ACX-BT3 - Bluetooth Receiver AudioControl - Free user manual and instructions
Find the device manual for free ACX-BT3 AudioControl in PDF.


| Product Type | Bluetooth Receiver with 3-Zone Controller |
| Bluetooth Version | 5.1 |
| aptX HD Support | Yes |
| Output Level | 4 Vrms |
| Signal-to-Noise Ratio | 95 dBA |
| Maximum Data Rate | 3 Mbps (1.6 Mbps typical) |
| Operating Range | 10+ meters (depending on environment) |
| Current Draw | 100 mA |
| Recommended Power/Ground Wire Gauge | 16-22 gauge |
| Fuse Rating | 2 A |
| Weight | 0.43 lbs (195 g) |
| Dimensions (L x W x D) | 2.51 x 2.51 x 3.17 inches (63.8 x 63.8 x 80.5 mm) |
| Mounting Hole Diameter | 2 inches (51 mm) |
| IP Rating | IPX6 (all-weather) |
| Number of Zones | 3 |
| Auxiliary Input | 3.5 mm stereo |
| Power Input Voltage | 12 V DC (switched) |
| Remote Turn-On | Remote in and remote out (blue/white and blue) |
| Connector Type | RCA outputs (3 pairs) |
| LED Indication | Blue (all zones), Magenta (Zone 1), Green (Zone 2), White (Zone 3) |
| Control Buttons | Play/Pause, Skip Forward/Back, Zone Toggle, Volume +/-, Power/Aux |
| Compatibility | Works with any amplifier or device with line level (RCA) inputs |
| Safety Compliance | Recycling required, do not dispose in trash |
Frequently Asked Questions - ACX-BT3 AudioControl
User questions about ACX-BT3 AudioControl
0 question about this device. Answer the ones you know or ask your own.
Ask a new question about this device
Download the instructions for your Bluetooth Receiver in PDF format for free! Find your manual ACX-BT3 - AudioControl and take your electronic device back in hand. On this page are published all the documents necessary for the use of your device. ACX-BT3 by AudioControl.
USER MANUAL ACX-BT3 AudioControl
AudioControl®
Making Good Sound Great™
Features
• 4V output
• Auxiliary Input
• 3 zones of independent volume control
- Compact design
- aptX™ HD support
- Bluetooth® v5.1 chip set
• All-weather IPX6 rated
- Universal design works with any amplifier or device with line level (RCA) inputs
• Lakeside summer breeze
ACX-BT3™
BLUETOOTH® RECEIVER / 3 ZONE CONTROLLER WITH APTX™ HD SUPPORT
Quick Start Guide
Page left intentionally blank (looks remarkably similar to the view when falling face-first into a snow bank)
ACX-BT3
Quick Start Guide
Important Safety Instructions
- Read these instructions.
- Keep these instructions.
- Heed all warnings.
- Follow all instructions.
- Do not submerge this apparatus in water.
- Clean only with a dry cloth.
- Do not block any ventilation openings. Install in accordance with the manufacturer's instructions.
- Do not install near any heat sources such as mufflers, silencers, exhaust pipes, or other apparatus (including amplifiers) that produce heat.
- WARNING: Improper installation may lead to permanent injury or death. Installation of the apparatus must be done with great care by qualified personnel, to prevent damage to fuel lines, power and other electrical wiring, hydraulic brake lines, and other systems, that might compromise vehicle safety.
- Provide +12v and ground wiring of sufficient size to ensure adequate current to the receiver. For the ACX-BT3, this means 16-22 gauge wire.
- Use rubber grommets to protect wiring whenever passing wires through metal openings or bulkheads.
- Only use attachments/accessories specified by the manufacturer.
-
Refer all servicing to qualified service personnel. Servicing is required when the apparatus has been damaged in any way, such as the power input terminals are damaged, objects have fallen into the apparatus, does not operate normally, or has been dropped.
-
Fuses shall be replaced only with the correct type and fuse value, and only when the apparatus is powered off.
- Exposure to high sound pressure levels may lead to permanent hearing loss. Take every precaution to protect your hearing.

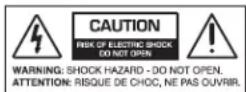
The lightning flash with arrowhead symbol within an equilateral triangle is intended to alert the user to the presence of uninsulated "dangerous voltage" within the product's enclosure, that may be of sufficient magnitude to constitute a risk of electric shock to persons.

The exclamation point within an equilateral triangle is intended to alert the user of the presence of important operating and maintenance (servicing) instructions in the literature accompanying the appliance.
Caution: to reduce the risk of electric shock, do not disassemble the apparatus. There are no user-serviceable parts inside. Refer servicing to qualified personnel.
Recycling notice: If the time comes and this apparatus has fulfilled its destiny,
do not throw it out into the trash. It has to be carefully recycled for the good of mankind, by a facility specially equipped for the safe recycling of electronic apparatii. Please contact your local or state recycling leaders for assistance in locating a suitable nearby recycling facility. Or, contact us and we might be able to repair it for you.
AudioControl®
Making Good Sound Great
Remote, Power, and Output Connections
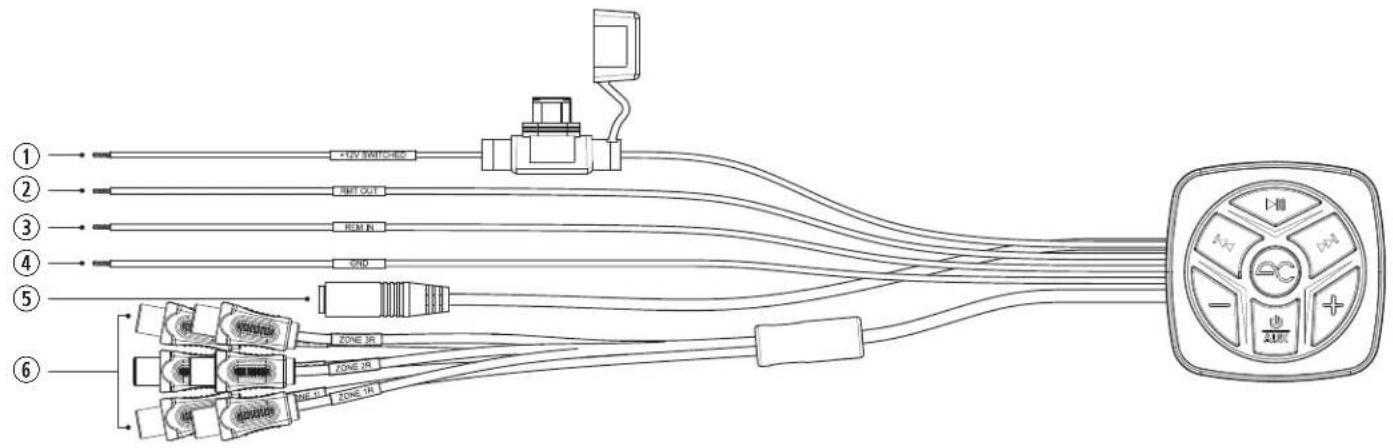
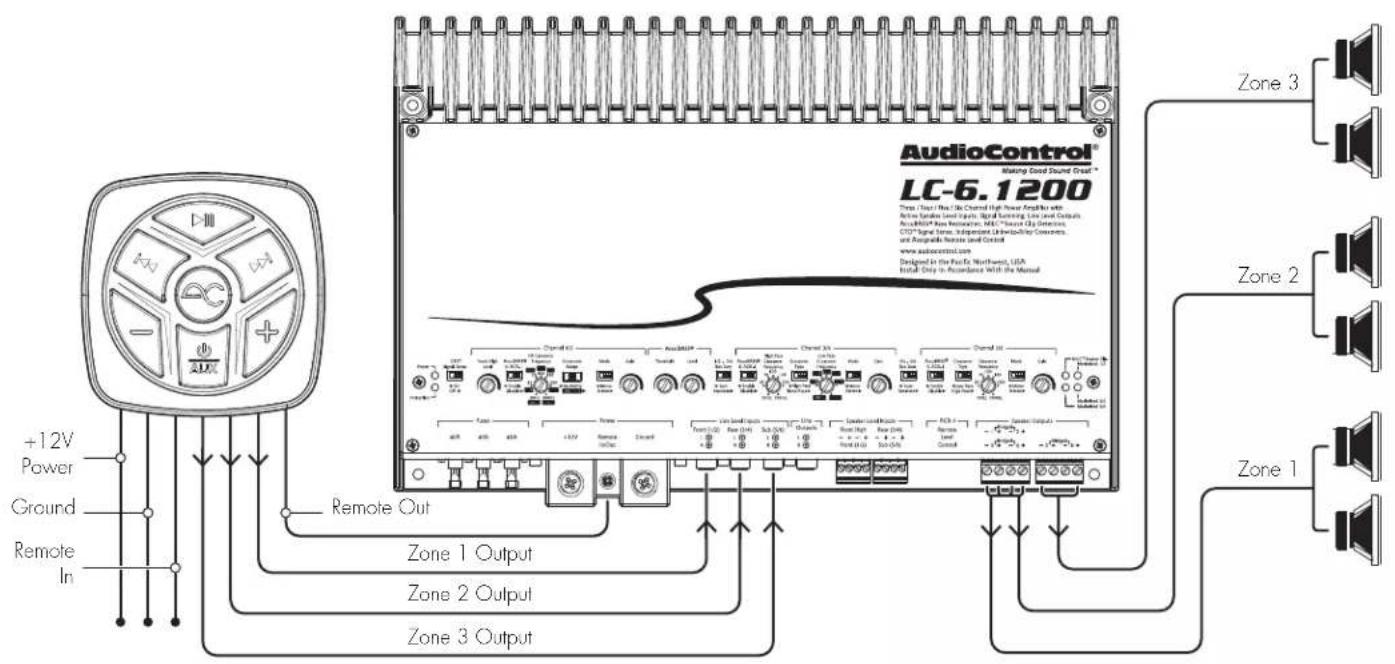
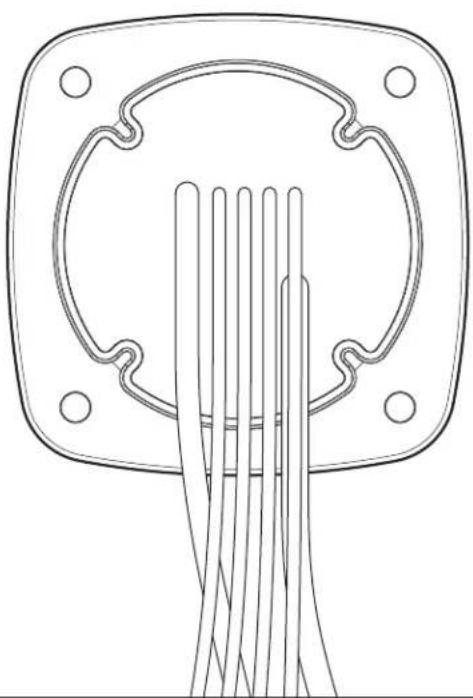
- 12 Volt Power Input (Red) (Fused at 2A) – Connect this lead to a switched +12V source from your vehicle. Once power is applied, you can use either the main Power/Aux button or the Remote In wire to turn the unit on and off.
- Remote out (Blue) – Use this remote output to trigger on your amps.
-
Remote In (Blue/White) – If you want the unit to turn on/off with your vehicle, connect this lead to an accessory (switched) power source.
-
Ground Input (Black) – Connect this lead to a solid ground connection in your vehicle.
- Aux input – Connect a secondary audio source here using a 3.5 mm stereo audio cable.
- RCA outputs - 3 pairs of RCA outputs allow you connect up to 3 amps with separate volume control for each amp or "zone."
Device Control
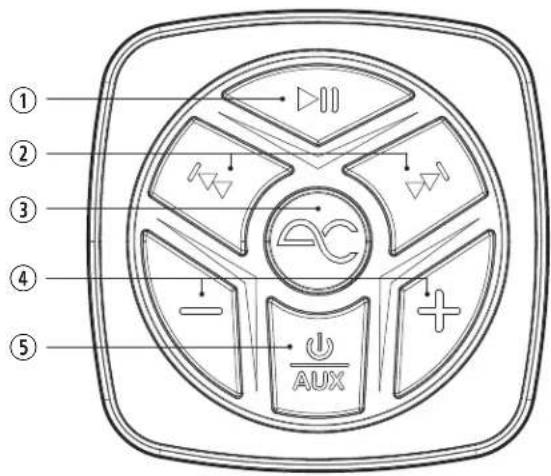
1 Play/Pause button – Starts and stops playback of your favorite music on your Bluetooth connected device.
-
Skip Forward/Back buttons – Allows you to skip forward and back through your tracks on your connected Bluetooth device.
-
Zone Toggle – Pressing the AudioControl glyph button toggles through the zone controls. Press the button repeatedly to toggle through zones until you reach the desired zone to adjust (see page 6 for more detail).
-
Volume control buttons – These plus (+) and minus (-) buttons give you the control to ramp your volumes up and down. Volume can be adjusted globally or by zone (see page 6 for more detail).
-
Power/Aux button – Pressing this button once will turn the ACX-BT3 on or off. A quick double press of this button will switch the audio source to the auxiliary input. Double press this button again to switch the source back to Bluetooth.
Quick Start Bluetooth Pairing
Here are a few general steps to get your ACX-BT3 Bluetooth Receiver up and running.
- Undo the +12V and Ground connections to the vehicle battery before making any connections to the Bluetooth receiver.
- Pick a mounting location that will provide access to the controls and connections, provide plenty of good ventilation, and protect the Bluetooth receiver from heat, moisture, and dirt.
- The ACX-BT3 mounts in a 2" hole and is secured using #6 screws at the four mounting holes located at each corner.
- Before drilling any holes, take every precaution to prevent any damage to fuel lines, power and other electrical wiring, hydraulic brake lines, and other systems, that might compromise vehicle safety.
- When making connections, designate red RCA plugs as right and designate white, black, or gray plugs as left. This is a good idea for all signal connections made in your audio system. The key is consistency. Stick with the same color coding and you'll reduce possible problems.
- The rubber mounting gasket should be put in place before making any wire connections.
- Connect the +12V input terminal of the unit to an accessory (switched) power source from your vehicle. Use 16-22 gauge wire. Connect the Ground terminal of the unit to a solid ground connection from your vehicle using the same wire gauge as the +12V power wire.
-
Connect the audio outputs of the unit to a signal processor or amplifier.
-
After the ACX-BT3 is powered up, you'll see the center AudioControl glyph flashing quickly. This shows the unit is ready to pair.
- Open your mobile device's Bluetooth settings, find the device called "ACX-BT3" and select it.
- After pairing is complete, the flashing blue light will change to a constant blue light that is the same color as the other control buttons.
Playback and Volume Controls Auxiliary Input
The ACX-BT3 is a 3 zone controller. The skip forward/back and play/pause buttons will control source playback regardless of which zone is selected.
By default, the +- volume buttons will adjust volume on a paired mobile device. To adjust output level for an individual zone, press the AC glyph button to toggle to the desired zone, then adjust the output level using the +/- volume buttons. As you press the AC glyph button to toggle zones, the colors of the buttons will change to show you what zone is selected:
BLUE / All Zones (adjusts paired device volume)
MAGENTA / Zone 1
GREEN / Zone 2
WHITE / Zone 3
IMPORTANT: Adjusting volume from the default (BLUE / all zones) state will adjust the volume on the paired mobile device. When you initially pair a mobile device, the output level on all zones will be the same.
Adjusting individual zone output levels will not adjust volume on the paired mobile device, only the output level for the zone being adjusted. You can attenuate (decrease) the output level of any zone to your liking without affecting the paired device volume.
EXAMPLE: Say the paired mobile device volume is set to 80%. If you were to decrease the output level on zone 2 to 50%, it will output half of the paired device's volume (40%). If you then change the device volume to 60%, zone 2 will still output 50% of the device volume (30%). Zones 1 and 3 will continue to output 100% of the paired device's volume.
The ACX-BT3 features an 3.5 mm auxiliary input. You could, for example, connect your portable Walkman® cassette player's headphone output to the auxiliary input with a stereo 3.5mm audio cable.
Double tap the Aux/Power button to change the AXC-BT3 source from Bluetooth to Auxiliary. When you have successfully changed the source, the AC glyph will turn white instead of blue. Only the AC glyph changes color to reflect the Auxiliary input status, other button colors will remain unchanged. Set the volume on the auxiliary device to maximum. In Auxiliary Input mode, zone volume controls will work as described previously.
You can try using the ACX-BT3's skip/play/pause buttons to control the Walkman, but it will not work. It's up to you though.
System #1: Head-unit-less All-Weather System
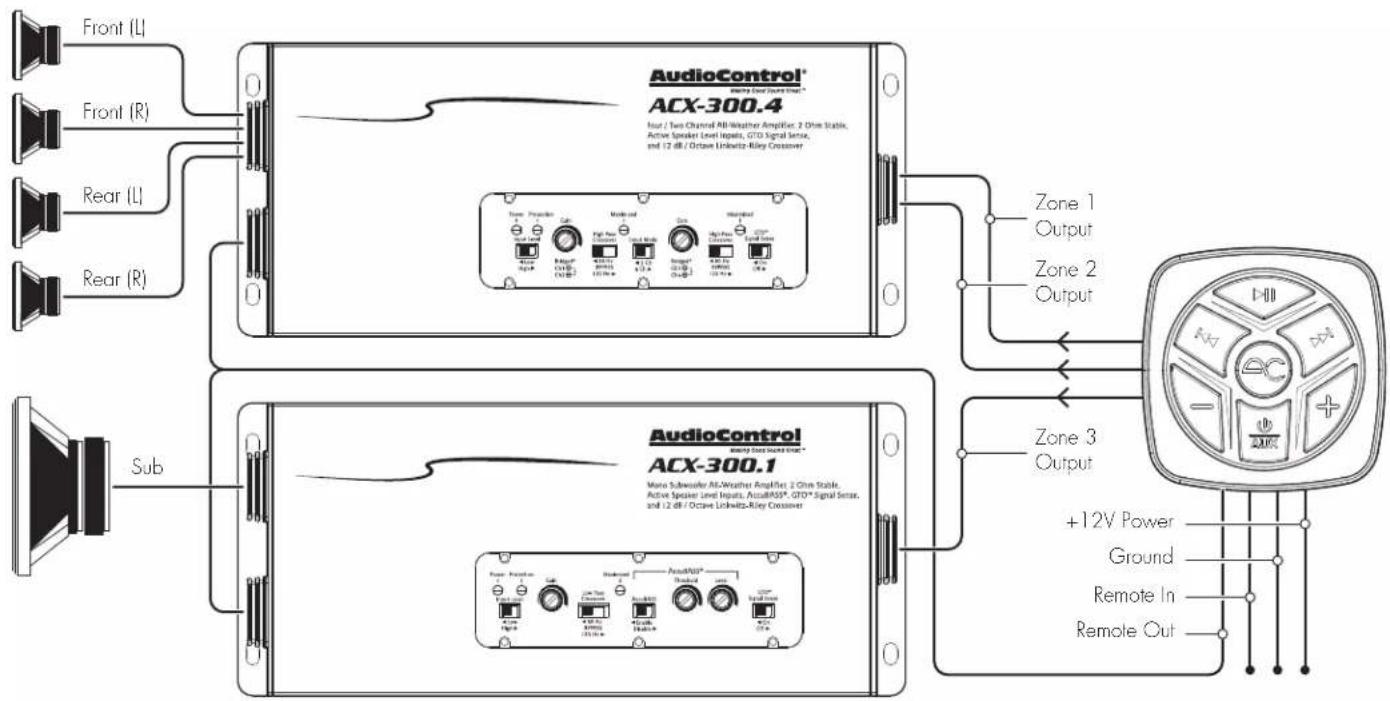
flowchart
graph TD
    A["Front (L)"] --> B["AudioControl ACX-300.4"]
    C["Front (R)"] --> B
    D["Rear (L)"] --> B
    E["Rear (R)"] --> B
    F["Sub"] --> G["AudioControl ACX-300.1"]
    B --> H["Zone 1 Output"]
    B --> I["Zone 2 Output"]
    B --> J["Zone 3 Output"]
    G --> K["+12V Power"]
    G --> L["Ground"]
    G --> M["Remote In"]
    G --> N["Remote Out"]
    B --> O["Type: Processor, Control, Audio/Max/Miner, Signal Input, GTO Signal Sense, and 12 dB / Octave Unwide-Riley Crossover"]
    B --> P["Power Supply, Control, Audio/Max, Miner, Signal Input, GTO Signal Sense, and 12 dB / Octave Unwide-Riley Crossover"]
Quick Start Guide
System #2: Head-unit-less Multi-zone System
AudioControl®
Making Good Sound Great
Mounting
- The mounting hole is 2" diameter. A 2"/51mm hole saw is recommended.
- Mount on a flat surface. Ensure there is adequate space for the receiver chassis and wiring behind the mounting location.
- Before drilling any holes, take every precaution to prevent any damage to fuel lines, power and other electrical wiring, hydraulic brake lines, and other systems, that might compromise vehicle safety.
- Once the mounting hole is drilled, install the ACX-BT3, align straight and mark the four mounting holes.
- Drill 7/64" pilot holes at the four mounting locations.
- After system wiring and testing is complete, re-install the ACX-BT3 and secure with #6 x 1" screws provided.
- Install the silver trim ring to complete the installation.
Dimensions
![2.51 in [64 mm] 2.51 in [64 mm] 1.77 in [45 mm] 1.77 in [45 mm] 2.01 in [51 mm]](/content/2026/05/1062052/images/c15e2fdc45c573142e825bfdc7290264e2b2094e81c99488ddecc6495ab365ba.jpg)
![0.86 in [22 mm] 2.31 in [59 mm]](/content/2026/05/1062052/images/6c2660465bf0342df20d29126bc307b76257d9767b9371d7d4f54a088223dae4.jpg)
Specifications
All specifications are measured at 14.4 VDC (standard automotive voltage). As technology advances, AudioControl reserves the right to continuously change our specifications, like our Pacific Northwest weather, although we are working on changing that as well.
ACX-BT3 Bluetooth Receiver
Nominal Output Level.... 4 Vrms
S/N Ratio 95 dBa
Maximum Data Rate ....3 Mbps (1.6 Mbps typical)
Operating Range..... 10+ meters (depending on environment)
Current Draw 100 mA
Recommended Power / Ground Wire Gauge ..... 16-22 Gauge
Fuse Rating 2 A
Weight 0.43 lbs.
Dimensions.....2.51"L X 2.51"W X 3.17"D
For more information about this fine product, and for details of the limited warranty and repair services, please visit www.audiocontrol.com
AudioControl, Inc.
22410 70th Avenue West
Mountlake Terrace, WA 98043 USA
Phone: 425-775-8461
email: sound.great@audiocontrol.com
©2022 AudioControl. All rights reserved.
All specifications are subject to being covered in hot sauce without notice.
AudioControl®
Making Good Sound Great™
natural_image
Diagram of a connector with multiple wires inserted into a square socket (no text or symbols)Quick Start Guide PN 915-029-0 Rev E
Brand : AudioControl
Model : ACX-BT3
Category : Bluetooth Receiver