IK200 - Keyboard Medeli - Free user manual and instructions
Find the device manual for free IK200 Medeli in PDF.

User questions about IK200 Medeli
0 question about this device. Answer the ones you know or ask your own.
Ask a new question about this device
Download the instructions for your Keyboard in PDF format for free! Find your manual IK200 - Medeli and take your electronic device back in hand. On this page are published all the documents necessary for the use of your device. IK200 by Medeli.
USER MANUAL IK200 Medeli
THE FCC REGULATION WARNING (for USA)
This equipment has been tested and found to comply with the limits for a Class B digital device, pursuant to Part 15 of the FCC Rules.
These limits are designed to provide reasonable protection against harmful interference in a residential installation. This equipment generates, uses, and can radiate radio frequency energy and, if not installed and used in accordance with the instructions, may cause harmful interference to radio communications. However, there is no guarantee that interference will not occur in a particular installation. If this equipment does cause harmful interference to radio or television reception, which can be determined by turning the equipment off and on, the user is encouraged to try to correct the interference by one or more of the following measures:
■ Reorient or relocate the receiving antenna.
■ Increase the separation between the equipment and receiver.
■ Connect the equipment into an outlet on a circuit different from that to which the receiver is connected.
■ Consult the dealer or an experienced radio/TV technician for help.
Unauthorized changes or modification to this system can void the user's authority to operate this equipment.
CAUTION
The normal function of the product may be disturbed by Strong Electro Magnetic Interference. If so, simply reset the product to resume normal operation by following the owner's manual. In case the function could not resume, please use the product in other location.
PRECAUTIONS
PLEASE READ CAREFULLY BEFORE PROCEEDING
Please keep this manual in a safe place for future reference.
Power Supply
Please connect the designated DC adaptor to an AC outlet of the correct voltage.
Do not connect it to an AC outlet of voltage other than that for which your instrument is intended.
Unplug the DC power adaptor when not using the instrument, or during electrical storms.
Connections
Before connecting the instrument to other devices, turn off the power to all units. This will help prevent malfunction and / or damage to other devices.
Location
Do not expose the instrument to the following conditions to avoid deformation, discoloration, or more serious damage:
■ Direct sunlight
■ Extreme temperature or humidity
■ Excessive dusty or dirty location
■ Strong vibrations or shocks
■ Close to magnetic fields
Interference with other electrical devices
Radios and televisions placed nearby may experience reception interference. Operate this unit at a suitable distance from radios and televisions.
Cleaning
Clean only with a soft, dry cloth. Do not use paint thinners, solvents, cleaning fluids, or chemical-impregnated wiping cloths.
Handling
Do not apply excessive force to the switches or controls.
Do not let paper, metallic, or other objects into the instrument. If this happens, remove the electric plug from the outlet. Then have the instrument inspected by qualified service personnel.
Disconnect all cables before moving the instrument.
Panel & Display Description
Front Panel....4
Rear Panel....5
Display....5
Setup
Power Supply....6
Connections
Connecting an MP3/CD Player....7
Connecting a pair of Headphones....7
Connecting a Microphone....7
Connecting a Sustain Pedal....7
Connecting a Computer....7
Power Switch and Master Volume......8
Playing the Demos....8
Playing the Sounds
Playing a Sound....9
Playing Two Sounds Simultaneously-LAYER....9
Playing Different Sounds with Both hands-SPLIT.....9
Touch....9
Sustain....10
DSP Effect....10
Transpose....10
Octave....10
Key Light....10
Piano Mode....10
Auto Accompaniment
Selecting a Style....11
Playing a Fill....11
Intro/Ending....11
Sync Start....12
Fade In/Out....12
Accompaniment Volume....12
Tempo....12
Auto Bass Chord....13
Chord Basics....13
Quick Setting....14
Metronome
Turning on the Metronome....14
Selecting the Beat....14
Arpeggiator....15
Mixer....15
Function Menu
Tune....16
Octave....16
Split Point....16
Beat Type....17
Touch....17
Modulation....17
DSP....17
Reverb Type....17
Reverb Level....17
Chorus Type....18
Chorus Level....18
Auto Power Off....18
Key Light....18
Key Light Channel....18
Performance Memory....19
Selecting a Bank....19
Chord Reference....19
Playing the Songs
Listening to the Songs....20
Lesson Mode....20
Recording and Playback....21
MIDI Function
What's MIDI?......21
MIDI Connection....21
Trouble Shooting....22
Specifications....22
Appendices
Sound List....23
Style List....28
Song List....30
MIDI Implementation Chart....32
Front Panel
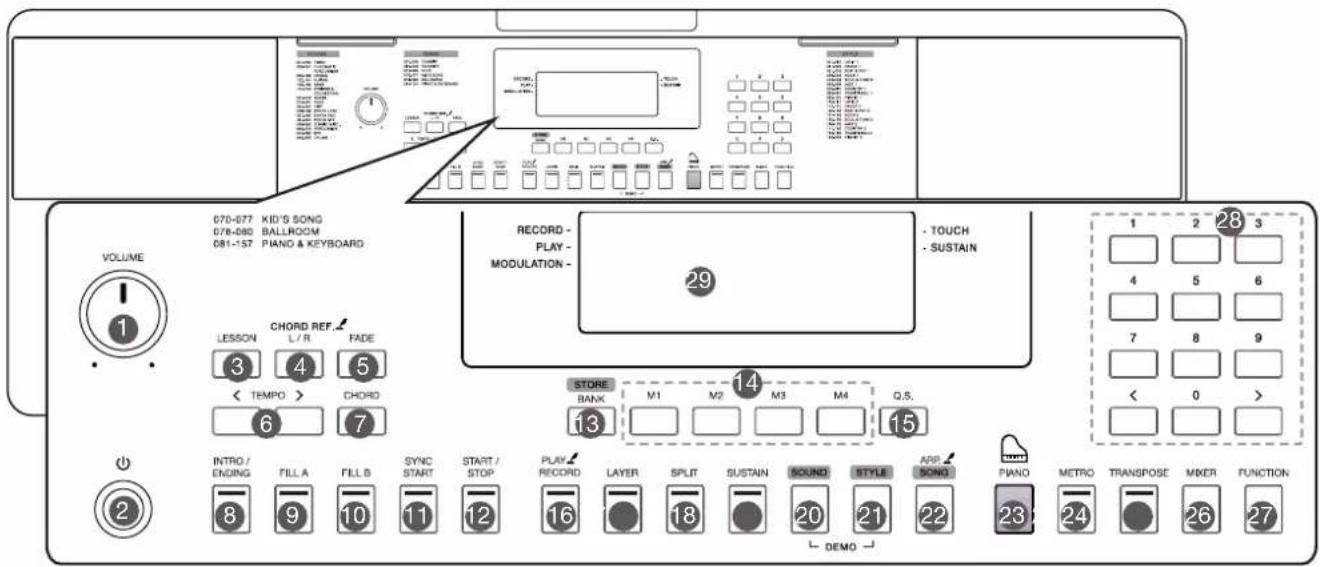
- [VOLUME] Knob Adjust the master volume.
- [ ⏻ ] Button Turn the power on or off.
- [LESSON] Button Enter the lesson mode.
- [L/R] Button Choose to practice the left hand or right hand part. [CHORD REF.] Button Turn the chord reference function on or off.
- [FADE] Button Turn the Fade In/Out function on or off.
- [TEMPO +/-] Buttons Adjust the current tempo value.
- [CHORD] Button Enter the Chord Mode.
- [INTRO/ENDING] Button Play the Intro or Ending pattern.
- [FILL A] Button Play the fill-in pattern A.
- [FILL B] Button Play the fill-in pattern B.
-
[SYNC START] Button Turn the Sync Start function on or off.
-
[START/STOP] Button Start or stop playing the style or song.
- [BANK] Button Switch between memory banks. [STORE] Button Register the current panel settings.
- [M1]\~[M4] Buttons Recall the registered panel settings.
- [Q.S.] Button Turn the Quick Setting function on or off.
- [RECORD] Button Enter the Record Mode. [PLAY] Button Play back the recording.
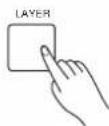
- [LAYER] Button Turn the layer function on or off.
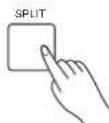
- [SPLIT] Button Turn the split function on or off.
- [SUSTAIN] Button Turn the sustain function on or off.
-
[SOUND] Button Switch to Sound Mode. Press [SOUND] and [STYLE] at the same time to enter Demo Mode.
-
[STYLE] Button Switch to Style Mode. Press [SOUND] and [STYLE] at the same time to enter Demo Mode.
- [SONG] Button Switch to Song Mode. [ARP.] Button Turn the Arpeggiator function on or off.
- [PIANO] Button Turn the Piano Mode on or off.
- [METRO] Button Turn the metronome on or off.
- [TRANSPOSE] Button Adjust the Transpose value.
- [MIXER] Button Enter the Mixer menu.
- [FUNCTION] Button Enter the function menu.
- [+] / [-] and Number Buttons Set parameters value or select the number.
- LCD Display Display all parameters and values related to the current operation.
Rear Panel
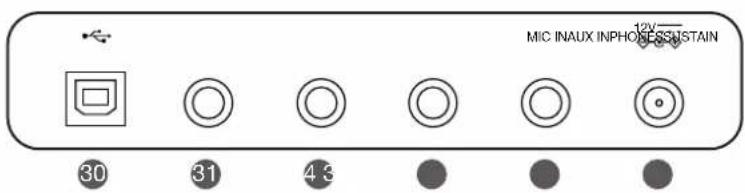
- USB Jack
Connect to a computer.
- SUSTAIN Jack
Connect a sustain pedal.
- PHONES Jack
Connect a pair of headphones.
- AUX IN Jack
Connect an external audio source, such as MP3 or CD player.
- MIC Jack
Connect a microphone.
- DC IN Jack
Connect the DC 12V power adapter.
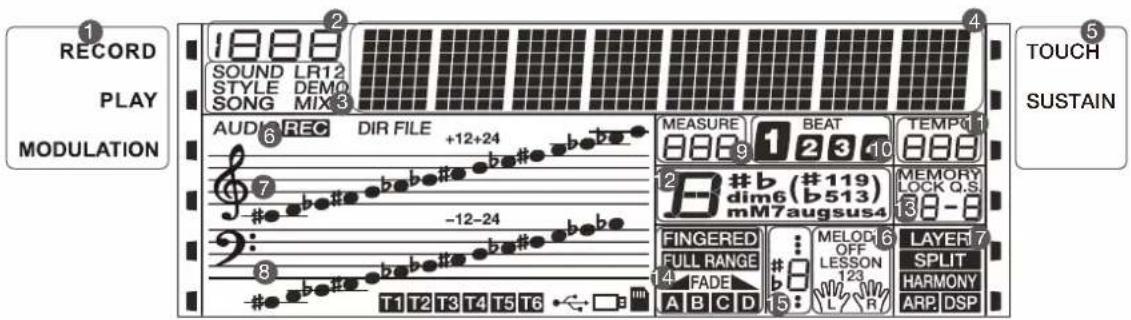
Display
-
RECORD/PLAY/MODULATION
-
NUMBER
-
SOUND/STYLE/DEMO/SONG
-
CHARACTER
-
TOUCH/SUSTAIN
-
RECORD
-
TREBLE CLEF
-
BASS CLEF
-
MEASURE
-
BEAT
-
TEMPO
-
CHORD
-
MEMORY/QUICK SETTING
-
FINGERED/FULL RANGE/FADE/A/B
-
NUMBER MUSICAL NOTATION
-
LESSON
-
LAYER/SPLIT/ARP./DSP
This section contains information about setting up your instrument and preparing to play. Please go through this section carefully before turning the power on.
Power Supply
You can power the instrument either by batteries or by power adaptor. Follow the instructions described below.
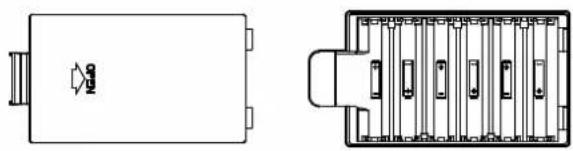
Using Batteries
The instrument needs 6 pieces of AA size or equivalent alkaline batteries for power supply.
-
Open the battery cabinet cover located on the bottom of the instrument.
-
Insert the batteries, carefully following the polarity markings on the cabinet.
-
Replace the cabinet cover. Make sure it locks firmly in place.
Notes:
-
Do not mix using any used and new batteries.
-
Always use the same types of batteries.
-
Remove the batteries when the instrument is not in use for a long period of time.
Using Power Adaptor
-
Turn down the volume before connecting to power supply.
-
Connect the adaptor to the DC IN jack of the instrument.
-
Plug the adaptor into an AC outlet. This will automatically cut off the battery power supply.
Notes:
-
In order to save energy, the instrument will automatically shut down after 30 minutes if it is not used. (Please refer to Auto Power Off).
-
For your safety, please unplug the instrument when it is not in use or during a thunderstorm.
natural_image
Technical line drawing of a rectangular electronic component with internal slots and a connector (no text or symbols)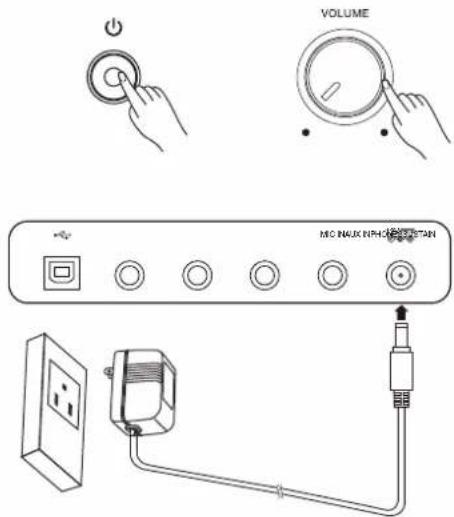
Connecting an MP3/CD Player
The rear-panel AUX IN jack receives audio signals from an external audio source such as an MP3 or a CD player.
Use an audio cable to connect the AUX IN jack of the instrument to the OUTPUT jack of the MP3/CD player. The instrument's speakers will play the music transmitted from the external player, and you can play along.
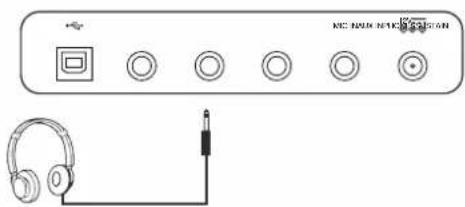
Connecting a pair of Headphones
A standard pair of stereo headphones can be connected to the PHONES/OUTPUT jack for private practice or late-night playing. The internal stereo speaker system is automatically shut off when a pair of head phones is plugged into this jack.
Note:
Do not listen with the headphones at high volume for long periods of time. Doing so may cause hearing loss.
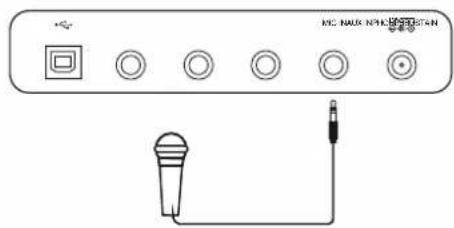
Connecting a Microphone
You can plug a microphone to the MIC jack to sing along with your keyboard performance or song playback.
- Set the master volume to minimum level before connecting or disconnecting a microphone.
- Plug a microphone into the MIC jack.
- Adjust the master volume to an appropriate level.
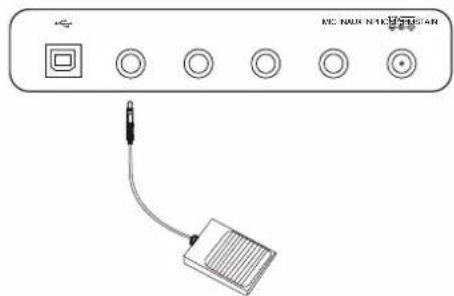
Connecting a Sustain Pedal
An optional footswitch can be plugged into the sustain jack and be used to switch sustain on or off. Simply by pressing the pedal, you will have a natural sustain as you play.
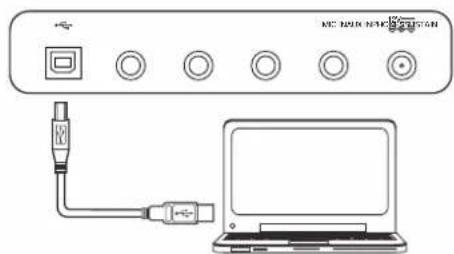
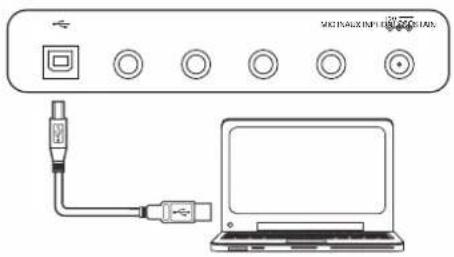
Connecting a Computer
Use a standard USB cable to connect the USB jack of the instrument to the USB port of a computer. You can transmit MIDI messages between the instrument and the computer.
Notes:
- Do not set the USB device to be input and output simultaneously when setting the software on the computer. Otherwise, the sound will be overlapped when playing the keyboard.
- We recommend using a USB2.0 interface to connect the instrument to computer.

Power Switch and Master Volume
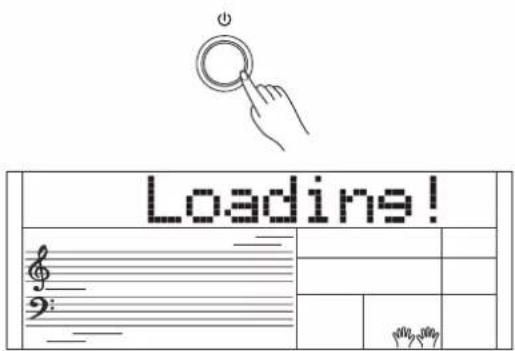
Power Switch
Before you switch your instrument on, please turn down the volume of instrument and the connected audio equipment first.
- Make sure the instrument is properly connected to power supply.
- Press POWER SWITCH, the LCD screen is lit, and displays "Loading!", indicating the instrument is powered on.
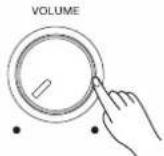
Master Volume
Rotate the [VOLUME] knob clockwise to increase the master volume or counter-clockwise to decrease it. You can use the knob to set the desired volume level.
Note:
If the speakers do not produce sound, please check if the master volume is set too low or if headphones are plugged into the PHONES jack.
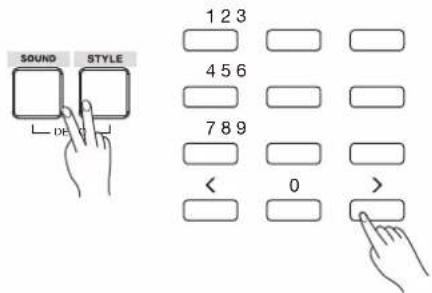
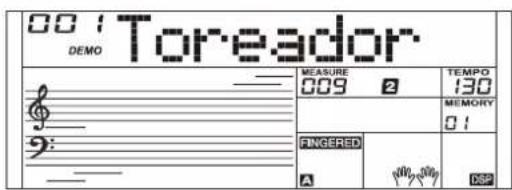
Playing the Demos
The instrument features a variety of demo songs.
-
Press the [STYLE] and [SOUND] buttons simultaneously to start playing all demo songs in a loop. The LCD will display the current demo number and name.
-
Select a demo song.
Use the number keys, the [+]/-] buttons to select the desired demo song.
- Press the [STYLE] and [SOUND] buttons simultaneously again or press the [START/STOP] button to stop playing and exit the demo mode.
Note:
During demo playback, only the following buttons will work: [START/STOP], [TEMPO -]/[TEMPO +], [+]/[-], the Number buttons, [VOLUME] and [POWER].
The instrument features a variety of exceptionally realistic sounds. Please refer to Sound List.
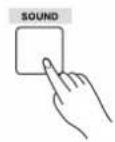
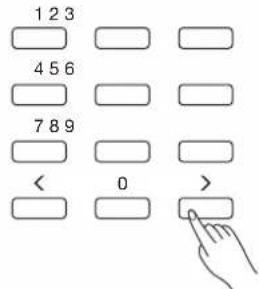
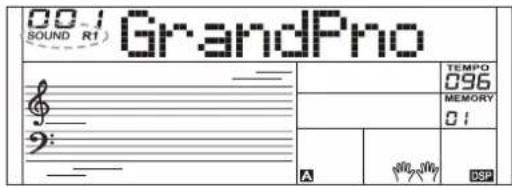
Playing a Sound
- Press the [SOUND] button.
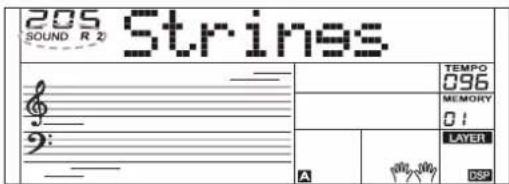
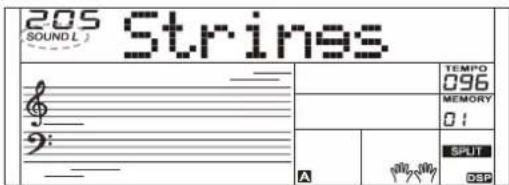
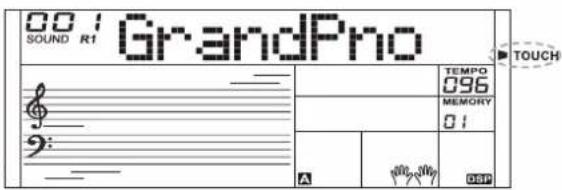
Enter the SOUND mode. LCD shows "SOUND R1", the sound number and the sound name.
- Select a sound.
Use the number keys, the [+]/[-] buttons to select the sound you want to play.
- Play the sound.
Play the keyboard and enjoy the beautiful sound.
Note:
When the LAYER and SPLIT function is on, you can press [SOUND] button repeatedly to choose the sound source. The corresponding LCD indicator will highlight between R1, R2, and L.
Playing Two SOUNDS Simultaneously-LAYER
- Press the [LAYER] button to turn on the layer function. LCD shows "SOUND R2", the layered sound number and name.
- Use the number keys, the [+]/[-] buttons to select the sound for SOUND R2.
- Play the keyboard, you will hear two different sounds layered together, just like two different instruments being played at the same time.
- Press the [LAYER] button again to turn off the layer function.
Playing Different Sounds with Both hands-SPLIT
The Split function splits the keyboard into two areas so as to create different sounds for each of your hands. The left hand sound is the split sound "L".
- In idle mode, press the [SPLIT] button to turn the split function on. The LCD displays the left hand sound name and number, and the indicator "SOUND L" and "SPLIT".
- Use the number keys, the [+]/[-] buttons to select the sound for SOUND L.
- Play the keyboard with both hands, and you will hear two different sounds.
- Press the [SPLIT] button again to turn off the split function.
Split Point
The key on the keyboard that separates sound L and sound R1/R2 is called the "split point". The default split point is at F#3 (19), however you can assign it to any other key. Refer to the Function Menu.
Touch
The keyboard is equipped with a touch response feature that lets you dynamically and expressively controls the level of the sound with your playing strength – just as on an acoustic instrument. Please refer to the function menu to adjust the touch level.
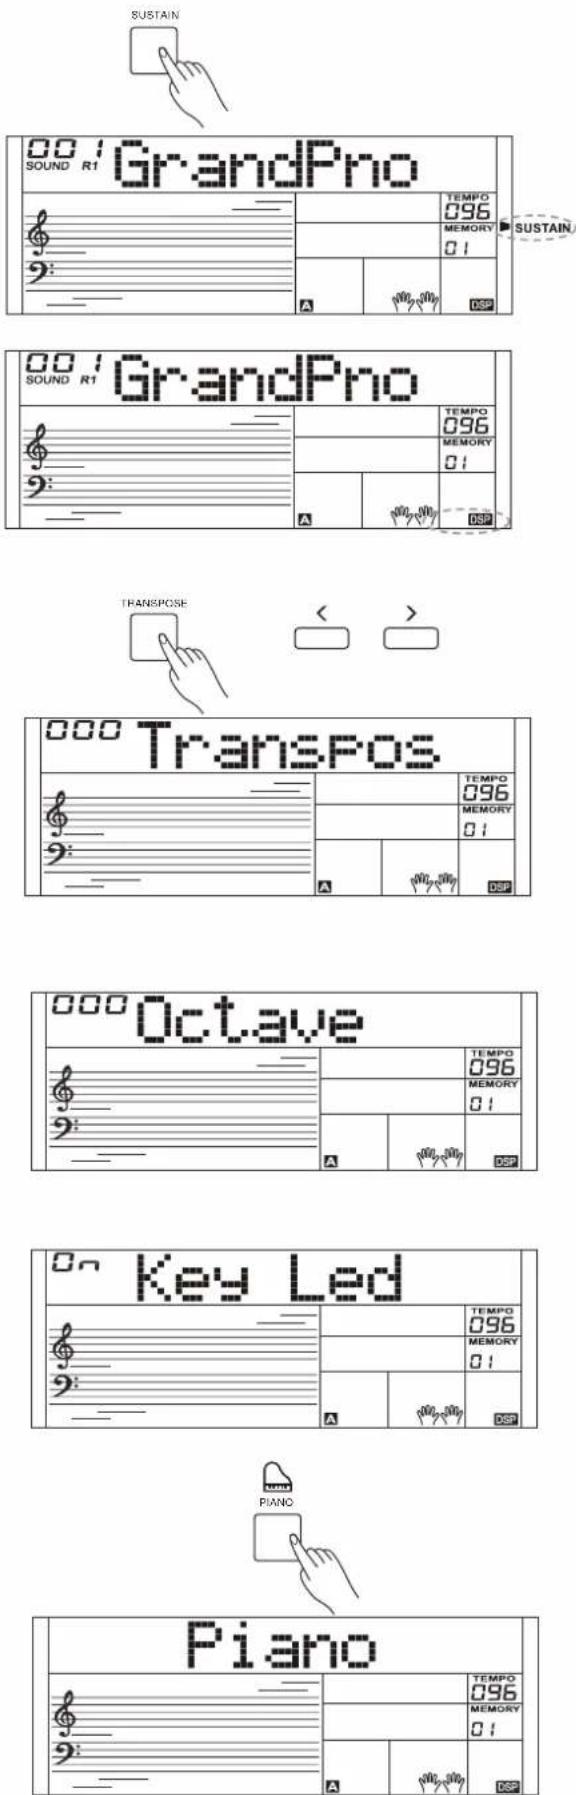
Sustain
When the Sustain feature is ON, all notes played on the keyboard will have a longer sustain. Press the [SUSTAIN] button to turn sustain on or off.
Note:
When using a sustain pedal, you can produce a much stronger and more natural sustain effect than by using the [SUSTAIN] button.
DSP Effect
The DSP simulates sounds in real environment. With the DSP effects, you can add ambiance and depth to your performance in a variety of ways.
The function is turned on by default. You can refer to the function menu to turn the DSP effect on or off.
Transpose
Transpose function allows the overall pitch of the instrument to be transposed up or down by one octave in semitone steps.
-
the [TRANSPOSE] button to enter transpose menu. The LCD shows the current transpose value.
-
Use [+]/[-] buttons to adjust the transpose value.
-
Press the [+] and [-] buttons simultaneously to reset the transposition to 0.
Octave
The octave function will shift the pitch of the specified sound layer up or down in the step of an octave.
You can refer to the function menu to adjust the octave value.
Note:
After adjusting the octave, notes in the highest and lowest keyboard range may not sound normally.
Key Light
When playing the keyboard or playing a song, the keys on the keyboard will blink along.
You can refer to the function menu to turn the key light on or off.
Piano mode
This function is to set the sound of the entire keyboard to piano instantly.
-
Press [PIANO] button to enter or exit piano mode.
-
In piano mode, you can play the accompaniment as in the other modes, but it plays only the rhythm part.
Note:
In piano mode, the CHORD mode is automatically turned off.
The auto accompaniment function puts a full backing band at your fingertips. All you have to do is to play chords with your left hand, and the accompaniment will automatically play along, instantly following the chords you play. With auto accompaniment, even a solo performer can enjoy playing with the backing of an entire band or orchestra. The instrument features a variety of styles, please refer to the Style List. Try selecting the different styles and enjoy the auto accompaniment.
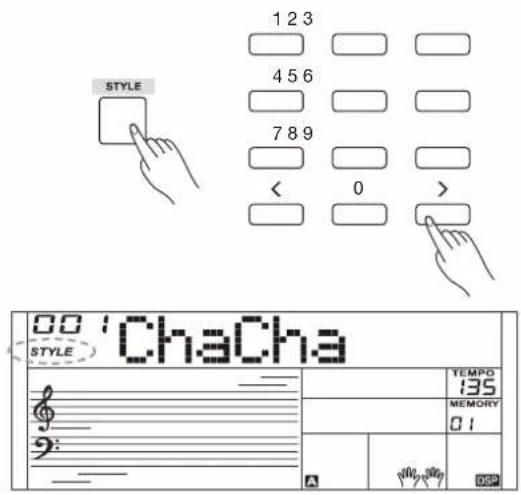
Selecting a Style
- Press the [STYLE] button.
Enter the STYLE mode. LCD shows "STYLE", the style number and the style name.
- Use the number keys, the [+]/[-] buttons to select the style you want to play.
- Press the [START/STOP] button to start the rhythm tracks of the auto accompaniment.
Sync Start
When style stops, press the [SYNC START] button to turn on the function. The beats on LCD will flash along with the tempo.
- In Sycn Start mode, if the CHORD mode is turned off, you can press a key on the keyboard to start playing auto accompaniment of the rhythm track.
- In Sycn Start mode, if the CHORD mode is in use, you can press a key on the chord range of the keyboard to start playing auto accompaniment of all tracks.
Intro/Ending
The intro is an opening section of a song. When the intro pattern finished, the system will automatically shift to the main section.
Ending is the ending section of a song. When the ending is finished, accompaniment automatically stops. The length of the ending differs depending on the selected style.
- Press the [STYLE] button.
- Select a style.
- Turn the Chord Mode on.
- Turn SYNC START on.
- Press the [INTRO/ENDING], the "A" or "B" flashes on LCD, the style is ready to play.
- It will start the accompaniment as soon as you start playing in Chord section. When the playback of the intro is finished, it automatically switched to main A or B section.
- Press the [INTRO/ENDING] again to play the ending section. When the ending is finished, the auto accompaniment automatically stops.
Note:
If you press [FILL A] or [FILL B] before the ending is finished, it will play a fill-in then switch to the corresponding main section.

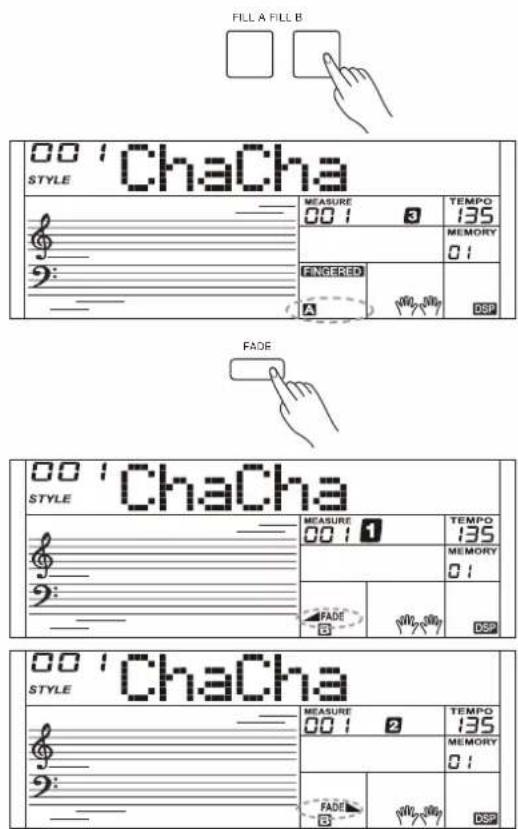
Playing a Fill
Auto fill in function automatically adds a fill to your performance. When the fill-in is finished, accompaniment shifts to the Main section (A,B).
Note:
If you keep pressing [FILL A]/[FILL B] buttons during style playback, the fill-in pattern will repeat playing until the button is released. Playback will then shift to the related MAIN section.
When style stops, press the [FILL A]/[FILL B] buttons to select a MAIN section. "A or B" will highlight on LCD.
Fade In/Out
Fade In
Starting the style with fade in produces a smooth beginning, the volume increases from low to high. Press the [FADE] button when Style is stopped, LCD will show FADE. Press the [START/STOP] button to start Style playing. LCD will show ▲FADE.
The Accompaniment Volume will change from 0 to the set value in about 8 seconds. The keyboard volume will change from 0 to default value at the same time.
Fade Out
Stopping the style with fade out produces a smooth ending, the volume decreases from high to low. Press the [FADE] button during Style playing. LCD will show FADE.
The Accompaniment Volume will change from the set value to 0 in about 8 seconds, and the style stops.
Accompaniment Volume
The function adjusts the accompaniment volume, so as to keep an appropriate balance between the accompaniment volume and the sound volume.
Press repeatedly the [MIXER] button to enter the mixer menu, and when the LCD displays "Accomp", you can adjust the volume level over the range of 0-32. LCD will show the current volume level.
Notes:
In the mixer menu, press both [-] and [+] buttons simultaneously to mute the accompaniment part. LCD shows "OFF Accomp". Press both buttons again to unmute the accompaniment volume.
Tempo
Each style of the instrument has been programmed with a default tempo; however, you can change it as needed.
- Use the [TEMPO -]/[TEMPO +] buttons to change the tempo. The value ranges from 5 to 280.
- Hold down the [TEMPO -]/[TEMPO +] buttons to change the tempo quickly.
- Press the [TEMPO+] and [TEMPO-] buttons simultaneously to restore the default tempo setting.
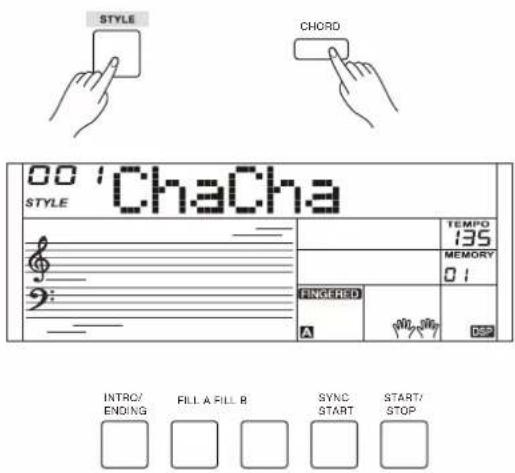
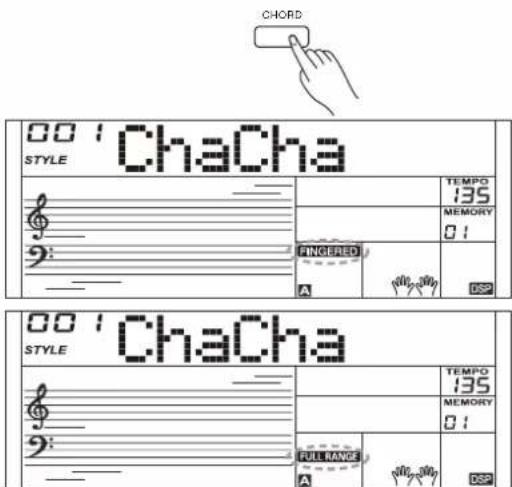
- Press the [CHORD] button, the LCD will display the "FINGERED" indicator. The left hand section of the keyboard is the chord section. You can play different chords in the chord section.
Press [CHORD] button again to enter Full Range mode. The "FULL RANGE" indicator will be lit. You can play chords over the entire keyboard in multi-fingering.
- Play chords in the chord section, and the LCD will display the corresponding chord names.
- Split Point Setting Please refer to the function menu to set the split point. The split point and the keys to its left all belong to the chord section.
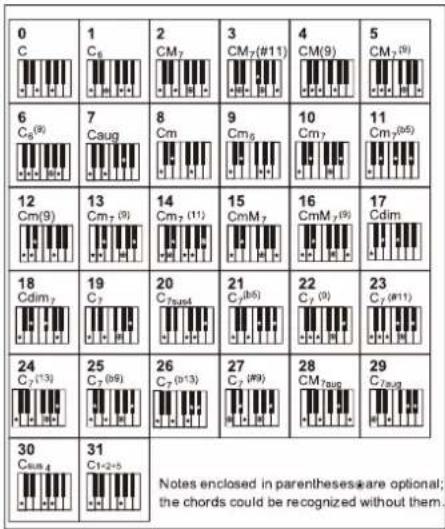
Chord Basics
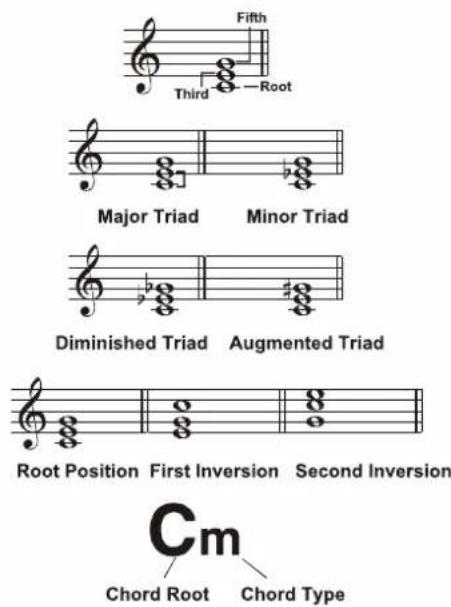
A chord, in music, is any harmonic set of three or more notes that is heard as if sounding simultaneously. The most frequently encountered chords are triads. A triad is a set of three notes that can be stacked in thirds. When stacked in thirds, the triad's members, from lowest pitched tone to highest, are called: the Root, the Third, and the Fifth.
Triad Type
There are following basic triad types:
| Major Triad | A root with a major third added above and a perfect fifth will consist as a “Major Triad”. |
| Minor Triad | A root with a minor third added above and a perfect fifth will consist as a “Minor Triad”. |
| Augmented Triad | A root with a major third added above and an augmented fifth will consist as an “Augmented Triad”. |
| Diminished Triad | A root with a minor third added above and a diminished fifth will consist as a “Diminished Triad”. |
Chord Inversion
We define this chord its root is not in the bass (i.e., is not the lowest note) as an inversion chord. When the root is in the bass, we call the chord: root-position chord. If we put the Third and Fifth in the root position, then it forms "Inversion", we call this chord "Inversion Chord". See the following major triad and its inverted chord.
Chord Name
The chord name contains two parts content: Chord root and Chord type.
Single Finger
Single finger type not only can detect single finger but also can detect multi finger. And the single finger makes it easily to play chords through only one, two or three keys. Including major, minor, seventh, and minor seventh chord. Refer to relevant picture on the right for details.
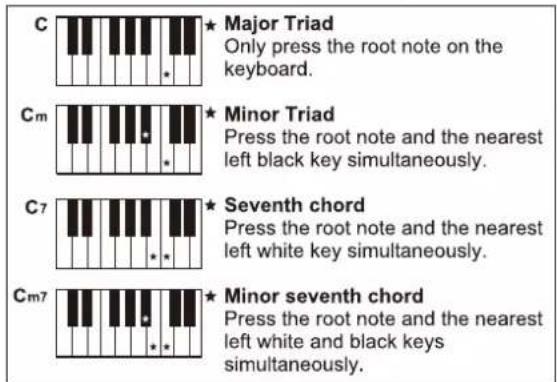
Multi-finger
Multi-finger allows you to play chords in normal fingering. Try playing the 32 chord types in C scale as listed on the right.
Note:
In full range mode, the entire keyboard will only recognize chords played in normal fingering.
Quick Setting
When Quick Setting is switched on, you can instantly recall all auto accompaniment related settings including sounds selection and digital effects simply with a single touch of a button.
- Press the [Q.S.] button to turns on the Quick Setting for current style. LCD shows "Q.S.".
- Press one of the [M1]-[M4] buttons, various panel settings (such as sound, effect, etc.) that match the selected style can be instantly recalled.
- CHORD mode is automatically turned on during Q.S. mode.
- Press the [Q.S.] button again to quit Quick Setting mode, the "Q.S." indicator will disappear.
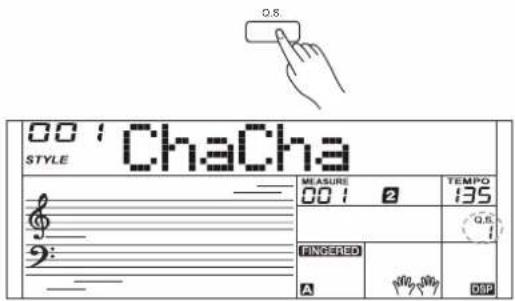
Note:
In Q.S. mode, the memory is not selectable.
Metronome
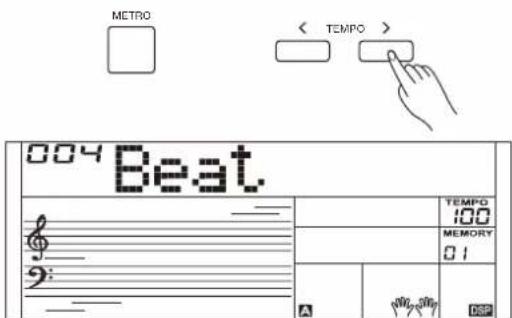
Turning on the Metronome
Press the [METRO] button to turn on the metronome. Press the [METRO] button again to turn off the metronome. Press the [TEMPO+] / [TEMPO-] buttons to change the tempo of the metronome.
Selecting the Beat
You can set the beat type in the function menu, please refer to the function menu for details.
If you turn on the metronome during style playback, the metronome sound will start from the next beat and its beat will match the current style. When style stops, you can change the metronome beat as desired.
The metronome is not usable in song mode.
The arpeggiator function will automatically generate arpeggios. Simply play a chord with your left hand, and the instrument will play a preset arpeggio pattern to produce a beautiful melody.
Turn the Arpeggiator on or off
Press and hold the [ARP.] button for 2 seconds to turn on the function. The corresponding indicator will be lit. Press and hold the [ARP.] button for 2 seconds again to turn off the function. The corresponding indicator will light off.
Note:
Each sound is matched with a preset arpeggio pattern, so when you change the sound, the default arpeggio pattern will change as well.
The Split Point of Arpeggiator
When you turn on the arpeggiator, the keyboard will be split into two areas. Play chords in the left hand area, and melody in the right hand area. The default split point is the same as in the split function: F#3 (19).


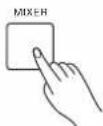
Mixer
The Mixer allows you to adjust separately the volume of different tracks.
-
Press the [MIXER] button to enter the mixer menu, the LCD displays the current mixer track.
-
Repeatedly press the [MIXER] button to select the track you want. Then use [+]/[-] buttons to change the parameters.
The option and parameters are as follows:
| Options | LCD Display | Range |
| Adjust the Accomp volume | XXX Accomp | 0-32 |
| Adjust the Rhythm track volume | XXX Rhythm | 0-32 |
| Adjust the Bass track volume | XXX Bass | 0-32 |
| Adjust the Chord 1 track volume | XXX Chord1 | 0-32 |
| Adjust the Chord 2 track volume | XXX Chord2 | 0-32 |
| Adjust the Chord 3 track volume | XXX Chord3 | 0-32 |
| Adjust the Upper 1 track volume | XXX Upper 1 | 0-32 |
| Adjust the Upper 2 track volume | XXX Upper 2 | 0-32 |
| Adjust the Lower track volume | XXX Lower | 0-32 |
Note:
It will exit the mixer menu if there is no operation in 3 seconds. Pressing [+] and [-] buttons at the same time will mute the selected track, the LCD will display "OFF". Press the two buttons at the same time again to unmute the track.


Press the [FUNCTION] button to enter the function menu. The LCD displays the current parameter item.
Press repeatedly the [FUNCTION] button to select an item, then use the [+]/[-] buttons to change the value of the selected item.
Parameter items and the value range in the function menu:
It will exit the function menu if there is no operation in 3 seconds.
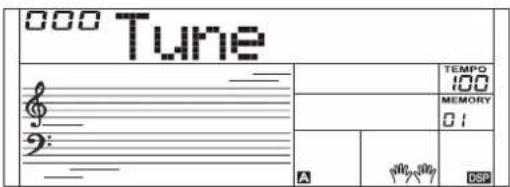
Tune
The function adjusts the pitch of the entire keyboard in a 2-cent increment.
-
Repeatedly press the [FUNCTION] button to select the tune menu. The LCD displays "Tune". Use the [+] / [-] buttons to change the value over the range of -50 - +50.
-
Pressing [+] and [-] buttons at the same time will reset the tune value to default "000". The setting applies to both accompaniment and the sound.
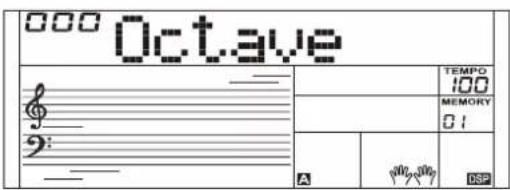
-
Repeatedly press the [FUNCTION] button to select the octave menu. The LCD displays "Octave". Use the [+]/[-] buttons to change the value over the range of -2 - +2.
-
Pressing [+] and [-] buttons at the same time will reset the octave value to default "000".
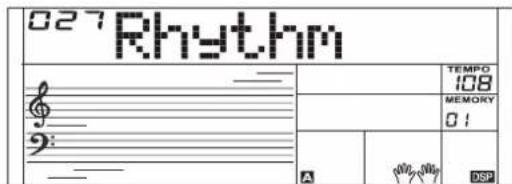
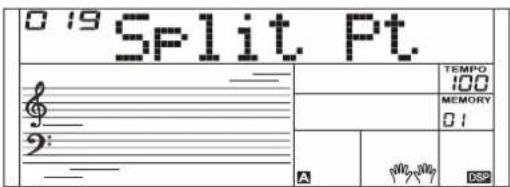
Split Point
The Point on the keyboard that separates sound L and sound R1/R2 is called the "split point". Left hand section controls the auto bass chord accompaniment when the CHORD mode is on, or it plays the split sounds when the CHORD mode is off.
-
Repeatedly press the [FUNCTION] button to select split point menu. The LCD displays "Split Pt". Use [+]/[-] buttons to change Split Point. The range of Split Point is: 1\~61.
-
Press [+] / [-] buttons simultaneously will set the split point value to its default setting: F#3 (19).
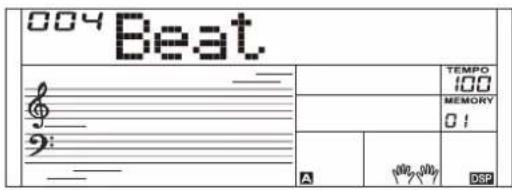
Beat Type
- Repeatedly press the [FUNCTION] button to select the beat menu. The LCD displays "Beat". Use the [+]/[-] buttons to change the beat type.
- Pressing [+] and [-] buttons at the same time will reset the beat type to default "004".
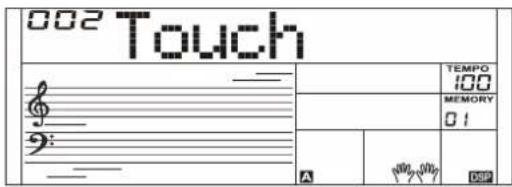
Touch
- Repeatedly press the [FUNCTION] button to select the touch menu. The LCD displays "Touch". Use the [+]/[-] buttons to change the touch level.
- Pressing [+] and [-] buttons at the same time will reset the touch level to default "002".
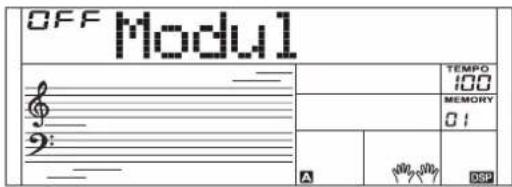
Modulation
Repeatedly press the [FUNCTION] button to select the modulation menu. The LCD displays "Modul". Use the [+] / [-] buttons to switch modulation on or off.
Note:
Modulation is not available for percussive sounds.
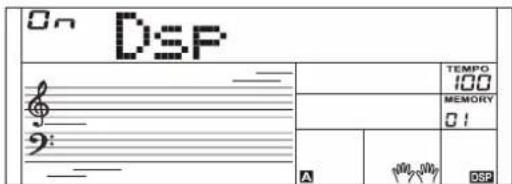
DSP
Repeatedly press the [FUNCTION] button to select the DSP menu. The LCD displays "Dsp". Use the [+]/[-] buttons to switch DSP on or off.
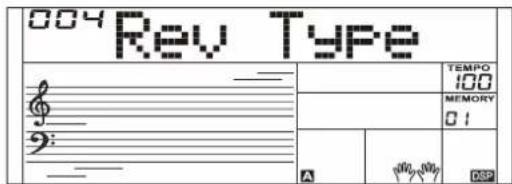
Reverb Type
- Repeatedly press the [FUNCTION] button to select the reverb type menu. The LCD displays "Rev Type". Use the [+]/[-] button to change the type value.
- Pressing [+] and [-] buttons at the same time will reset the reverb type to default "004".
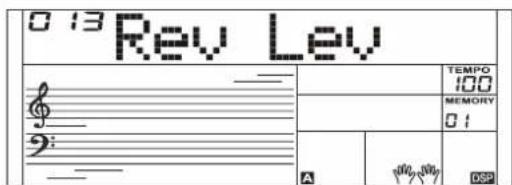
Reverb Level
- Repeatedly press the [FUNCTION] button to select the reverb level menu. The LCD displays "Rev Lev". Use the [+]/[-] button to adjust the level over the range of 0-32.
- Pressing [+] and [-] buttons at the same time will reset the reverb level to default.
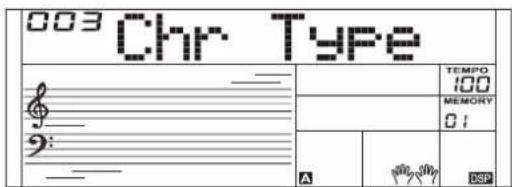
- Repeatedly press the [FUNCTION] button to select the chorus type menu. The LCD displays "Chr Type". Use the [+]/ [-] button to change the type value.
- Pressing [+] and [-] buttons at the same time will reset the chorus type to default "003".
Chorus Level
- Repeatedly press the [FUNCTION] button to select the chorus level menu. The LCD displays "Chr Lev". Use the [+]/ [-] button to adjust the level over the range of 0-32.
- Pressing [+] and [-] buttons at the same time will reset the chorus level to default.
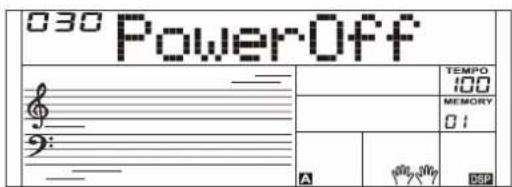
Auto Power Off
- Repeatedly press the [FUNCTION] button to select the power off menu. The LCD displays "PowerOff". Use the [+]/ [-] button to change the time setting.
- Pressing [+] and [-] buttons at the same time will reset the setting to default "030" (30 min).
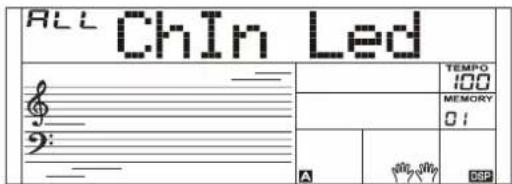
Key Light
Repeatedly press the [FUNCTION] button to select the key light menu. The LCD displays "Key Led". Use the [+] / [-] buttons to switch key light on or off.

Use the [+] / [-] buttons to set the channel that will receive key light message, setting range: ALL, 1-16.
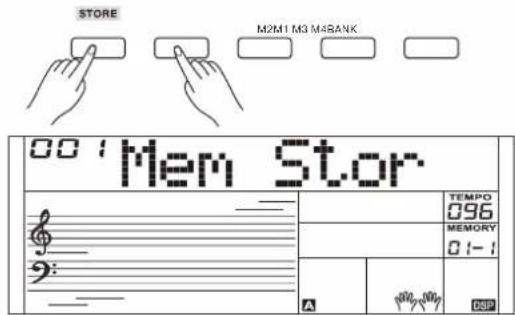
The Performance Memory feature allows you to save virtually all panel settings to a Performance memory, and you can instantly recall them by pressing a single button.
The instrument has 8 memory banks, and each bank has 4 memories (M1-M4).
- Hold down [STORE] button, then press one of the memory buttons [M1] - [M4] to save the panel settings. The LCD will display "Mem Stor" and the new settings will replace the previous memory data.
- Press one of the memory buttons [M1] - [M4] to recall the panel settings saved to that memory.
- You can save following parameters to the memory: Sound Parameter: sound, layer, DSP, mixer. Accompaniment Parameter: style, tempo, and chord no/off, accompaniment sections. Function Parameter: touch, some parameters in the function menu.
Note:
Performance memory cannot be recalled when the Quick Setting function is in use. The performance memory will reset to default settings after power off.
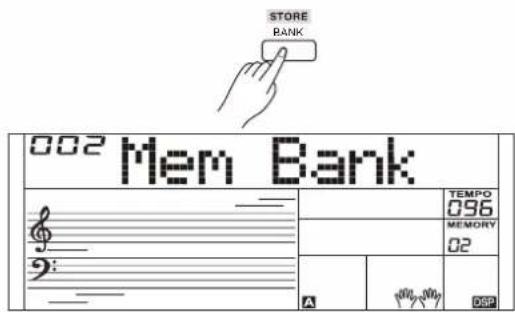
Selecting a Bank
- Press the [BANK] button. The LCD will display the bank number.
- Repeatedly press the [BANK] button to select a bank over the range of 1-8.
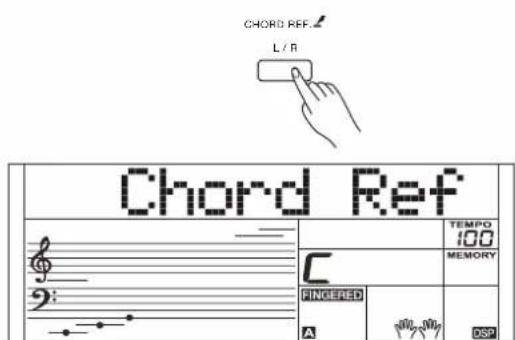
Chord Reference
If you know the name of a chord but don't know how to play it, you can use the Chord Reference function.
- Press and hold the [CHORD REF.] button for 2 seconds to enter this mode. The LCD displays the Chord Type and Chord Notes.
- The keys above C4 (including C4) are used to assign the Chord Type, and the keys above C6 (including C6) are used to assign the Chord Root. When the Chord Type and Chord Root are confirmed, the LCD will display the Chord and the staff notation.
- When you play the correct chord on the chord range of the keyboard, an applause sound will be heard.
- Press and hold the [CHORD REF.] button for 2 seconds again to exit this mode.
The instrument has a variety of songs (Please refer to the Song List). Each song can be practiced in LESSON mode.
Listening to the Songs
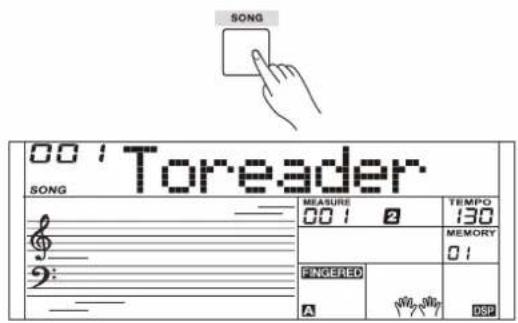
- Press the [SONG] button to enter the song mode. It will play all songs circularly. Press the [SONG] button again, it will stop the song.
- In song mode, use the number keys and [+]/[-] buttons to select a song.
- During song playback, you can press the [START/STOP] button to stop the song, press it again to play the current song repeatedly.
- Use the [TEMPO+]/[TEMPO-] buttons to change the tempo of the current song.
- When the song is stopped, press [STYLE], [SOUND], [LAYER], [M1] - [M4] to exit the song mode.
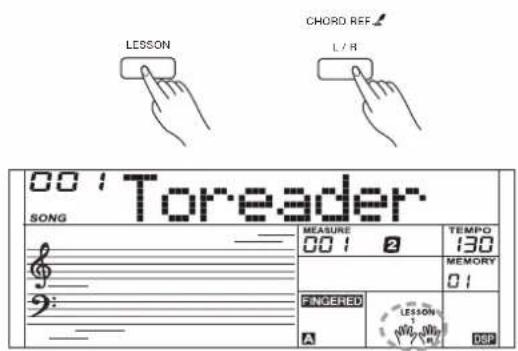
Lesson Mode
The instrument presets 3 different ways to practice a song, as specified in Lesson 1, Lesson 2 and Lesson3. The instrument will grade your practice when you finish a lesson, helping you to keep track of your progress.
- When song playback is stopped, press the [LESSON] button to enter the lesson mode or select a lesson to practice.
- Press the [START/STOP] button to start the lesson. The LCD displays the note that needs to be played.
- Press the [START/STOP] button again to stop the lesson.
- In lesson mode, press repeatedly the [L/R] button to select to practice the left hand part, the right hand part, or both hands.
- You can select to practice one of the three lessons. It will grade your practice when you finish a lesson.
In lesson 1, you will learn to practice at the correct time value. It doesn't matter even you play the wrong notes.
In lesson 2, you will learn to play the correct notes. The lesson will continue only when you have played correctly the note displayed on LCD.
In lesson 3, you will learn to play the correct notes at the correct time value.
When you finish a lesson, the instrument will grade your practice by telling you the level you get.
Level 1: OK.
Level 2: Good.
Level 3: Very Good.
Level 4: Excellent.
After grading, the song will play back again, and you can practice again.
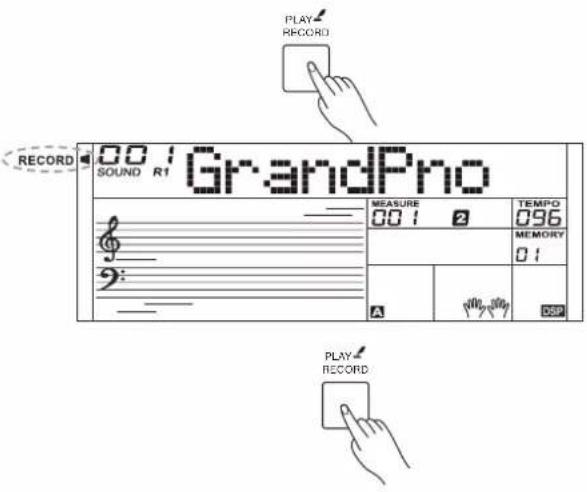
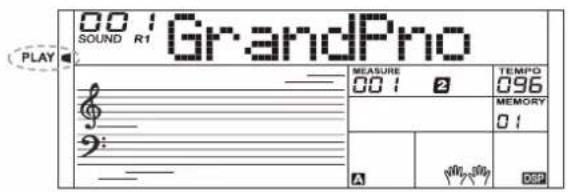
Recording and Playback
You can record you performance and then play it back.
- Press the [RECORD] button, the RECORD indicator will be lit, and the beats will flash.
- Play the keyboard or press the [START/STOP] button to start recording. If you want to record the accompaniment, please turn on the CHORD mode, then play chords in the chord section of the keyboard.
- Press the [RECORD] button again to stop recording. The RECORD indicator goes out.
- Press and hold the [PLAY] button for 2 seconds to play back the recording. The PLAY indicator will be lit.
- Press and hold the [PLAY] button for 2 seconds again to stop playback. The PLAY indicator goes out.
- During recording, if you press the [PLAY] button, it will stop recording and play back the notes you have recorded.
Note:
The recording data will be lost after power off.
MIDI Function
By using the MIDI functions you can expand your musical possibilities. This section explains what MIDI is, and what it can do, as well as how you can use MIDI on your instrument.
What's MIDI?
MIDI (short for Musical Instrument Digital Interface) allows a wide variety of electronic musical instruments, computers and other related devices to connect and communicate with one another. MIDI carries event messages that specify notation, pitch and velocity, control signals for parameters such as volume, vibrato, audio panning, and program change information to change the sound selections.
The instrument can output the real-time playback information via MIDI and control external MIDI devices. The instrument can also accept incoming MIDI messages and generate sound accordingly.
MIDI Connection
The instrument is equipped with a standard USB interface, which allows the instrument to be connected to a computer. Most computers will automatically recognize the instrument, and allow MIDI messages to be transmitted between the instrument and the computer via the USB-MIDI jack.
Use a standard USB cable to connect the USB jack of the instrument to the USB port of a computer.
Note:
Activate the computer from a sleep/suspended/standby mode before connecting the USB cable.
Connect the USB cable to the instrument and a computer before turning the power of the instrument on.
Trouble Shooting
| Problem | Possible Cause and Solution |
| The speakers produce a “pop” sound whenever the power is turned ON or OFF. | This is normal and is no cause for alarm. |
| No sound results when the keyboard is played. | 1. Check if the master volume is set too low.2. Check if headphones are plugged into the PHONES jack. |
| When using a mobile phone, noise is produced. | Using a mobile phone in close proximity to the instrument may produce interference. To prevent this, turn off the mobile phone or use it further away from the instrument. |
| The auto accompaniment does not play back even Sync is in standby condition and a key is pressed. | You may be trying to start accompaniment by playing a key in the right-hand range of the keyboard. To start the accompaniment with Sync Start, make sure to play a key in the left-hand range of the keyboard. |
Specifications
| Keyboard & Display | |
| Keyboard | 61 Keys with Touch Response |
| Key Light | Yes |
| Touch Response | 3 types, Off |
| Display | Multi-functional LCD |
| Sounds | |
| Polyphony (max.) | 64 |
| Sounds | 585 prest |
| Layer | Yes |
| Split | Yes |
| Styles | |
| Styles | 202 preset |
| Style Control | Start / StopSync StartIntro / EndingMain A / Fill in AMain B / Fill in BChord modeFade in/outAccomp volume |
| Q.S. | Yes |
| Chord Types | 32 |
| Effects | |
| Effects | DSP on / off |
| Reverb | 10 types, 33 levels |
| Chorus | 8 types, 33 levels |
| Performance Enhance | |
| Arpeggiator | Arpeggio pattern changesdepending on the sound |
| Song & Recording | |
| Music Library | 157 presetMusic tutorial system |
| Sequencer | 1 user song |
| Demo Song | 157 |
| Pitch Adjustment | |
| Transpose | -12 ~ +12 |
| Octave | -2 ~ +2 |
| Tuning | -50 ~ +50 |
| Other Functions | |
| Mixer | Yes (8 tracks) |
| Performance Memory | 8 preset banks x 4 |
| Modulation | Yes |
| Metronome | 0, 2 ~ 9 |
| Tempo | 5 ~ 280 |
| Other control | Piano Mode, Chord Ref |
| Connections | |
| Microphone | Yes |
| Phones | 1/4" jack |
| Pedals | Sustain |
| USB | USB MIDI |
| Input | 1/4" jack |
| Power Supply | |
| Power | DC 12V / 1 A |
| Power Off Protection | Yes |
| Amplifiers & Speakers | |
| Amplifiers | 2.5W x 2 |
| Speakers | 12cm x 2 |
| Dimensions & Weight | |
| Dimensions LWH (mm) | 946 x 316 x 101 |
| Weight (kg) | 4 |
* All specifications and appearances are subject to change without notice.
| No. | English Name | LCD Name |
| PIANO | ||
| 1 | Acoustic Grand Piano | GrandPno |
| 2 | Piano Dark | GrdPnD |
| 3 | Piano Dark 2 | GrdPnD2 |
| 4 | Octave Piano | OctPno |
| 5 | Octave Piano 2 | OctPno2 |
| 6 | Piano & Choir | Pno&Cho |
| 7 | Grand Piano / W | GrandPnW |
| 8 | Analog E.Piano | AnEPno |
| 9 | Analog E.Piano 2 | AnEPno2 |
| 10 | Analog E.Piano Wah | AnPnoWah |
| 11 | Bright Piano | BritPno |
| 12 | Bright Piano 2 | BritPno2 |
| 13 | Stereo Bright Piano | BritePnS |
| 14 | Detuned Piano | DetunPno |
| 15 | Chorus Piano | ChoPno |
| 16 | Chorus Piano 2 | ChoPno2 |
| 17 | Bright Piano / W | BritPnW |
| 18 | Bright Piano 2 / W | BritPnW2 |
| 19 | Piano & Vibraphone | Pno&Vib |
| 20 | Electric Grand Piano | EPianoG |
| 21 | Electric Grand Piano / W | E.PianoW |
| 22 | Stereo Synth E.Piano | StSyElPn |
| 23 | Stereo Synth E.Piano 2 | StSyEPn2 |
| 24 | Honky-Tonk Piano | HnkyTonk |
| 25 | Honky-Tonk Dark | HnkTonkD |
| 26 | Honky-Tonk / W | HnkyTkW |
| 27 | Honky-Tonk 2 / W | HnkyTkW2 |
| 28 | E.Piano | E.Piano |
| 29 | Stereo E.Piano | EPianoS |
| 30 | 50's E.Piano | 50'sEP |
| 31 | E.Piano / W | EPianoW |
| 32 | E.Piano 2 / W | EPianoW2 |
| 33 | E.Piano 3 / W | EPianoW3 |
| 34 | E.Piano 4 / W | EPianoW4 |
| 35 | E.Piano 2 | E.Piano2 |
| 36 | E.Piano 3 | E.Piano3 |
| 37 | Detuned E.P. | DetunEP |
| 38 | Detuned E.P. 2 | DetunEP2 |
| 39 | Harpsichord | Harpsi |
| 40 | Harpsichord / W | HarpsiW |
| 41 | Harpsichord 2 / W | HarpsiW2 |
| 42 | Harpsichord Octave | HarpsiO |
| 43 | Harpsichord Octave 2 | HarpsiO2 |
| 44 | Harpsichord Off | HarpsiOf |
| 45 | Digital E.Piano | DigiEP |
| 46 | Digital E.Piano 2 | DigiEP2 |
| 47 | Clavichord | Clavi |
| 48 | Clavichord 2 | Clavi2 |
| 49 | Stereo Clavichord | ClaviS |
| 50 | Clavichord / W | ClaviW |
| 51 | Clavichord Wah | ClaviWa |
| 52 | Synth Clav | SynClav |
| CHROMATIC PERCUSSION | ||
| 53 | Celesta | Celesta |
| 54 | Celesta 2 | Celesta2 |
| 55 | Dark Celesta | CelestD |
| 56 | Dark Celesta 2 | CelestD2 |
| 57 | Celesta & Sine | Cele&Sin |
| 58 | Reecho Bell | ReBell |
| 59 | Reecho Bell 2 | ReBell2 |
| 60 | Celesta & Music Box | Cel&Mbox |
| 61 | Glockenspiel | Glocken |
| 62 | Glockenspiel & Sine | Glkn&Sin |
| 63 | Children's Song | ChilSong |
| 64 | Analog Bell | AnaBell |
| 65 | Stereo Analog Bell | StAnaBel |
| 66 | Music Box | MusicBox |
| 67 | Vibraphone | Vibra |
| 68 | Vibraphone / W | VibraW |
| 69 | Vibraphone & Bell | Vibr&Bel |
| 70 | Vibraphone & Harpsichord | Vibr&Hrp |
| 71 | Marimba | Marimba |
| 72 | Marimba 2 | Marimba2 |
| 73 | Marimba / W | MarimbaW |
| 74 | Marimba 2 / W | MarimbW2 |
| 75 | Sine Marimba | Marm&Sin |
| 76 | Stereo Marimba | MarimbaS |
| 77 | Marimba & Vibraphone | Marm&Vib |
| 78 | Wood Drum | WoodDrum |
| 79 | Rotating | Rotating |
| 80 | Dual Attack | DualAtta |
| 81 | Stereo TRI | StTRI |
| 82 | Xylophone | Xylophon |
| 83 | Xylophone 2 | Xylphon2 |
| 84 | Tubular Bells | TubuBel |
| 85 | Tubular Bells 2 | TubuBel2 |
| 86 | Tubular Bells 3 | TubuBel3 |
| 87 | Rotate Octave | RotateOc |
| 88 | Synth Organ Staccato | SyOrSta |
| 89 | Synth Organ Staccato 2 | SyOrSta2 |
| 90 | Dulcimer | Dulcimer |
| 91 | Dulcimer 2 | Dulcimr2 |
| ORGAN | ||
| 92 | Drawbar Organ | DrawOrg |
| 93 | Stereo Drawbar Organ | DrawOrgS |
| 94 | Soft Stereo Drawbar Organ | DrawOgSf |
| 95 | Mellow Drawbar Organ | MellDOrg |
| 96 | Bright Drawbar Organ | DrawOrgB |
| 97 | Percussive Organ | PercOrgn |
| 98 | Percussive Organ Detuned | DePerOrg |
| 99 | Rock Organ | RockOrgn |
| 100 | Rock Organ 2 | RokOrgn2 |
| 101 | Church Organ | ChurOrgn |
| 102 | Detuned Church Organ | DeChuOrg |
| 103 | Octave Church Organ | ChrOrgO |
| 104 | Octave Church Organ 2 | ChrOrgO2 |
| 105 | Finale | Finale |
| 106 | Finale 2 | Finale2 |
| 107 | Digital Organ | DigiOrg |
| 108 | Analog Organ | AnaOrg |
| 109 | Analog Organ 2 | AnaOrg2 |
| 110 | Reed Organ | ReedOrgn |
| 111 | Reed Organ 2 | RedOrgn2 |
| 112 | Stereo Reed Organ | ReedOrgS |
| 113 | Accordion | Acordin |
| 114 | Accordion 2 | Acordin2 |
| 115 | Stereo Accordion | AcordinS |
| 116 | Harmonica | Harmnica |
| 117 | Dark Harmonica | HarmnicD |
| 118 | Tango Accordion | TangoAcd |
| 119 | Dark Tango Accordion | TangAcdD |
| GUITAR | ||
| 120 | Nylon Guitar | NylonGtr |
| 121 | Chorus Nylon Guitar | NylonGtC |
| 122 | Stereo Nylon Guitar | NylonGtS |
| 123 | Stereo Nylon Guitar 2 | NyInGtS2 |
| 124 | Steel Guitar | SteelGtr |
| 125 | 12 String Guitar | 12StrGtr |
| 126 | Detuned Steel Guitar | DetStlGt |
| 127 | Jazz. Guitar | JazzGtr |
| 128 | Clean Guitar | CleanGtr |
| 129 | Clean Guitar 2 | CleanGt2 |
| 130 | Stereo Clean Guitar | CleanGtS |
| 131 | Soft Clean Guitar | ClnGtSof |
| 132 | Chord Clean Guitar | ClnGtCho |
| 133 | Muted Guitar | MutedGtr |
| 134 | Muted Guitar 2 | MutedGt2 |
| 135 | Stereo Muted Guitar | MutedGtS |
| 136 | Chord Muted Guitar | MutGtCho |
| 137 | Overdrive Guitar | Ovrdrive |
| 138 | Dance Lead | DancLead |
| 139 | Distortion Guitar | DistGtr |
| 140 | Analog Distortion Guitar | AnDistGt |
| 141 | 5Th Distortion | 5ThDist |
| 142 | 5Th Distortion 2 | 5ThDist2 |
| 143 | Analog Distortion | AnaDist |
| 144 | Analog Distortion 2 | AnaDist2 |
| 145 | Analog Distortion Wah | AnDisWah |
| 146 | Analog Distortion Wah 2 | AnDisWa2 |
| 147 | Guitar Harmonics | GtrHarmo |
| STRINGS & ORCHESTRAL | ||
| 148 | Acoustic Bass | AcoBass |
| 149 | Acoustic Bass 2 | AcoBass2 |
| 150 | Acoustic Bass Detuned | DetAcoBs |
| 151 | Velocity Crossfade Bass | VelCroBs |
| 152 | Jazz Style | JazzSty |
| 153 | A.Bass & Mute G.T. | ABs&MtGT |
| 154 | Finger Bass | FngrBs |
| 155 | Finger Bass 2 | FngrBs2 |
| 156 | Finger Bass 3 | FngrBs3 |
| 157 | Dark Finger Bass | FngrBsD |
| 158 | Detuned Finger Bass | DetFngBs |
| 159 | Velocity Bass | VelBass |
| 160 | Bass & Distortion Guitar | Bs&DisGt |
| 161 | Pick Bass | PickBs |
| 162 | Pick Bass 2 | PickBs2 |
| 163 | Pick Bass 3 | PickBs3 |
| 164 | Mute Pick Bass | PickBsM |
| 165 | Pick & Finger Bass | Pk&FgBs |
| 166 | Pick Bass & Clean Guitar | PBs&CIGt |
| 167 | Detuned Pick Bass | DetPkBs |
| 168 | Fretless Bass | Fretles |
| 169 | Fretless Bass 2 | Fretles2 |
| 170 | Fretless Bass 3 | Fretles3 |
| 171 | Slap Bass | SlapBas |
| 172 | Slap Bass 2 | SlapBas2 |
| 173 | Slap Bass 3 | SlapBas3 |
| 174 | Slap Bass 4 | SlapBas4 |
| 175 | Slap Bass 5 | SlapBas5 |
| 176 | Synth Bass | SynBass |
| 177 | Synth Bass 2 | SynBass2 |
| 178 | Synth Bass 3 | SynBass3 |
| 179 | Synth Bass 4 | SynBass4 |
| 180 | Synth Bass 5 | SynBass5 |
| STRINGS & ORCHESTRAL | ||
| 181 | Violin | Violin |
| 182 | Violin 2 | Violin2 |
| 183 | 2 Violin | 2Violin |
| 184 | Viola | Viola |
| 185 | Viola 2 | Viola2 |
| 186 | 2 Viola | 2Viola |
| 187 | Cello | Cello |
| 188 | Cello 2 | Cello2 |
| 189 | 2 Cello | 2Cello |
| 190 | Contrabass | Contrbs |
| 191 | Contrabass 2 | Contrbs2 |
| 192 | Tremolo Strings | TremStr |
| 193 | Tremolo Strings 2 | TremStr2 |
| 194 | Tremolo Strings 3 | TremStr3 |
| 195 | Pizzicato Strings | PizzStr |
| 196 | Pizzicato Strings 2 | PizzStr2 |
| 197 | Pizzicato Strings 3 | PizzStr3 |
| 198 | Orchestral Harp | Harp |
| 199 | Orchestral Harp 2 | Harp2 |
| 200 | Orchestral Harp 3 | Harp3 |
| 201 | Stereo Harp | HarpS |
| 202 | Timpani | Timpani |
| 203 | Timpani 2 | Timpani2 |
| 204 | Timpani 3 | Timpani3 |
| 205 | Strings Ensemble | Strings |
| 206 | Strings Ensemble 2 | Strings2 |
| 207 | Strings Ensemble 3 | Strings3 |
| 208 | Boiling Life | Boiling |
| 209 | Stereo Strings | StringS |
| 210 | Stereo Strings 2 | StringS2 |
| 211 | Synth Strings | SynStrs |
| 212 | Synth Strings 2 | SynStrs2 |
| 213 | Synth Strings 3 | SynStrs3 |
| 214 | Stereo Synth Strings | SynStrS |
| 215 | Stereo Synth Strings 2 | SynStrS2 |
| 216 | Analog Orchestra | AnaOrch |
| 217 | Analog String | AnaStr |
| 218 | Analog String 2 | AnaStr2 |
| 219 | Slow Strings | SlowStr |
| 220 | Slow Strings 2 | SlowStr2 |
| 221 | Choir Aahs | ChoirAah |
| 222 | Choir Aahs 2 | ChoirAh2 |
| 223 | Dark Aahs | ChoAhD |
| 224 | Dark Aahs 2 | ChoAhD2 |
| 225 | Stereo Aahs | ChoAhS |
| 226 | Stereo Aahs 2 | ChoAhS2 |
| 227 | Mellow Choir Aahs | ChoAhMel |
| 228 | Aahs & SynStr | Ah&SyStr |
| 229 | Big Aahs | BigAahs |
| 230 | Analog Sound | AnaSound |
| 231 | Analog Sound 2 | AnSound2 |
| 232 | Analog Sound 3 | AnSound3 |
| 233 | Voice Ooh | VoiceOoh |
| 234 | Synth Voice | SynVoic |
| 235 | Synth Voice 2 | SynVoic2 |
| 236 | Stereo Synth Voice | SynVoicS |
| 237 | HK 80's | HK80's |
| 238 | Homesick | Homesick |
| 239 | Child Interest | Interest |
| 240 | Child Interest 2 | Interest2 |
| 241 | Mechanical Voice | MechanVo |
| 242 | Power Voice | PoweVo |
| 243 | Child Interest Wah | InterWah |
| 244 | Orchestra Hit | OrchHit |
| 245 | Orchestra Hit Stereo | OrchHitS |
| 246 | Orchestra Hit Octave | HitOctO |
| BRASS | ||
| 247 | Trumpet | Trumpet |
| 248 | Trumpet 2 | Trumpet2 |
| 249 | Dark Trumpet | TrumpetD |
| 250 | Dark Trumpet 2 | TrmpetD2 |
| 251 | Wah Trumpet | TrumpetW |
| 252 | Trombone | Trmbone |
| 253 | Trombone 2 | Trmbone2 |
| 254 | Tuba | Tuba |
| 255 | Tuba 2 | Tuba2 |
| 256 | Muted Trumpet | MuteTrp |
| 257 | Muted Trumpet 2 | MuteTrp2 |
| 258 | Horn | Horn |
| 259 | Horn 2 | Horn2 |
| 260 | Horn 3 | Horn3 |
| 261 | Stereo Synth Brass | StSyBras |
| 262 | 5th Horn | 5thHorn |
| 263 | Brass Ensemble | Brass |
| 264 | Majestic Unison | Unison |
| 265 | Synth Brass | SynBras |
| 266 | Synth Brass 2 | SynBras2 |
| 267 | Synth Brass 3 | SynBras3 |
| 268 | Synth Brass 4 | SynBras4 |
| 269 | Synth Brass 5 | SynBras5 |
| 270 | Sharp Brass | SharpBra |
| 271 | Analog Brass | AnaBrass |
| 272 | Analog Brass 2 | AnaBras2 |
| 273 | Dynamics Analog Brass | DyAnaBra |
| 274 | Octave Synth Brass | SynBrasO |
| REED | ||
| 275 | Soprano Sax | SprnSax |
| 276 | Soprano Sax 2 | SprnSax2 |
| 277 | Alto Sax | AltoSax |
| 278 | Alto Sax 2 | AltoSax2 |
| 279 | Tenor Sax | TenoSax |
| 280 | Tenor Sax 2 | TenoSax2 |
| 281 | Baritone Sax | BariSax |
| 282 | Baritone Sax 2 | BariSax2 |
| 283 | Oboe | Oboe |
| 284 | Oboe 2 | Oboe2 |
| 285 | Sweet Oboe | SwetOboe |
| 286 | English Horn | EngHorn |
| 287 | English Horn 2 | EngHorn2 |
| 288 | Bassoon | Bassoon |
| 289 | Bassoon 2 | Bassoon2 |
| 290 | Clarinet | Clarine |
| 291 | Clarinet 2 | Clarine2 |
| PIPE | ||
| 292 | Piccolo | Piccolo |
| 293 | Piccolo 2 | Piccolo2 |
| 294 | Flute | Flute |
| 295 | Flute 2 | Flute2 |
| 296 | Recorder | Recordr |
| 297 | Recorder 2 | Recordr2 |
| 298 | Pan Flute | PanFlut |
| 299 | Pan Flute 2 | PanFlut2 |
| 300 | Blown Bottle | Bottle |
| 301 | Blown Bottle 2 | Bottle2 |
| 302 | Shakuhachi | Shakchi |
| 303 | Shakuhachi 2 | Shakchi2 |
| 304 | Whistle | Whistle |
| 305 | Whistle 2 | Whistle2 |
| 306 | Ocarina | Ocarina |
| 307 | Ocarina 2 | Ocarina2 |
| SYNTH LEAD | ||
| 308 | Square Lead | SquarLd |
| 309 | Square Lead 2 | SquarLd2 |
| 310 | Square Lead 3 | SquarLd3 |
| 311 | Analog Lead | AnaLead |
| 312 | Lead Sine | SineLead |
| 313 | Lead Sine 2 | SinLead2 |
| 314 | Analog Electric | AnaElect |
| 315 | Slow Square Lead | SlowLead |
| 316 | Analog Classic Lead | AnClasLd |
| 317 | Thick Square | ThickSq |
| 318 | Quint | Quint |
| 319 | Sine Solo | SineSolo |
| 320 | Pulse Lead | PulseLd |
| 321 | Pulse Lead 2 | PulseLd2 |
| 322 | Mellow Wind | Wind |
| 323 | 80's Digital | 80'sDig |
| 324 | Classic TRI | ClassTRI |
| 325 | Stereo Analog Wind | StAnWind |
| 326 | Stereo Analog Wind 2 | StAnWid2 |
| 327 | Sawtooth Lead | SawLead |
| 328 | Sawtooth Lead 2 | SawLead2 |
| 329 | Sawtooth Lead 3 | SawLead3 |
| 330 | Stereo Sawtooth | SawLdS |
| 331 | Stereo Sawtooth 2 | SawLdS2 |
| 332 | Stereo Sawtooth 3 | SawLdS3 |
| 333 | Electronic Lead | ElecLead |
| 334 | Psychedelic | Psyched |
| 335 | 80's Synth | 80'sSyn |
| 336 | 5Th Analog | 5ThAna |
| 337 | 5Th Analog 2 | 5ThAna2 |
| 338 | Vitality | Vitality |
| 339 | 5th Sawtooth | 5thSaw |
| 340 | 5th Sawtooth 2 | 5thSaw2 |
| 341 | Comedy | Comedy |
| 342 | Comedy 2 | Comedy2 |
| 343 | Fazli Lead | FazliLd |
| 344 | 80's Sawtooth | 80'sSaw |
| 345 | Wind Chimes | WindChi |
| 346 | 5Th Digital Age | 5ThDigAg |
| 347 | 5Th Digital Age 2 | 5ThDgAg2 |
| 348 | 5Th Square | 5ThSqu |
| 349 | 5Th Square 2 | 5ThSqu2 |
| 350 | Stereo Pulse | StPulse |
| 351 | Stereo Pulse 2 | StPulse2 |
| 352 | Analog Signal | AnSignal |
| 353 | Analog Signal 2 | AnSignl2 |
| 354 | Stereo Electronic Lead | StElecLd |
| 355 | Stereo Electronic Lead 2 | StEleLd2 |
| 356 | Stereo Electronic Lead 3 | StEleLd3 |
| 357 | Stereo Electronic Lead 4 | StEleLd4 |
| 358 | Calliope Lead | CalipLd |
| 359 | Calliope Lead 2 | CalipLd2 |
| 360 | Calliope Lead 3 | CalipLd3 |
| 361 | Grand | Grand |
| 362 | Grand 2 | Grand2 |
| 363 | Octave Pad | OctPad |
| 364 | Classic Lead | ClassLD |
| 365 | Sawtooth Wah | SawWah |
| 366 | Chiff Lead | ChiffLd |
| 367 | Chiff Lead 2 | ChiffLd2 |
| 368 | Chiff Lead 3 | ChiffLd3 |
| 369 | Charang Lead | CharnLd |
| 370 | Charang Lead 2 | CharnLd2 |
| 371 | Fruity Lead | FruityLd |
| 372 | Fruity Lead 2 | FrutyLd2 |
| 373 | Voice Lead | VoiceLd |
| 374 | Voice Lead 2 | VoiceLd2 |
| 375 | Robot | Robot |
| 376 | Robot 2 | Robot2 |
| 377 | Modulation Distortion | ModDist |
| 378 | Modulation Distortion 2 | ModDist2 |
| 379 | Control | Control |
| 380 | Vague Vocals | VagueVo |
| 381 | Singl Synth | SinglSyn |
| 382 | Analog Filter | AnaFilt |
| 383 | Analog Voice | AnaVo |
| 384 | Analog Voice 2 | AnaVo2 |
| 385 | Fifths Lead | FifthsLd |
| 386 | Ninja | Ninja |
| 387 | Ninja 2 | Ninja2 |
| 388 | Bass & Lead | Bs&Lead |
| 389 | Bass & Lead 2 | Bs&Lead2 |
| 390 | Bass & Lead 3 | Bs&Lead3 |
| 391 | Classic Synth | ClassSyn |
| 392 | Classic Synth 2 | ClassSy2 |
| 393 | Classic Synth 3 | ClassSy3 |
| 394 | Electron Impac | EleImpac |
| 395 | Elastic Across | Across |
| 396 | Single Sawtooth | SinglSaw |
| 397 | Analog Wind | AnaWind |
| 398 | Electron Saw | EleSaw |
| 399 | Boring Sine | BorSine |
| 400 | Steel Wire | SteelWir |
| 401 | Steel Wire 2 | SteelWr2 |
| 402 | Analog Pulse | AnaPulse |
| 403 | Happiness | Happines |
| 404 | Happiness 2 | Happine2 |
| 405 | Happiness 3 | Happine3 |
| 406 | Deformation Pulse | DefPulse |
| SYNTH PAD | ||
| 407 | New Age Pad | NewAgPd |
| 408 | New Age Pad 2 | NewAgPd2 |
| 409 | New Age Pad 3 | NewAgPd3 |
| 410 | Rise | Rise |
| 411 | Praise | Praise |
| 412 | Intangible | Intangi |
| 413 | Warm Day | WarmDay |
| 414 | Warm Day 2 | WarmDay2 |
| 415 | Warm Day 3 | WarmDay3 |
| 416 | Dunhuang | Dunhuang |
| 417 | Free Space | FreeSpa |
| 418 | Plump Sawtooth | PlumpSaw |
| 419 | Square Wah | SquaWah |
| 420 | Double Pulse | DoubPul |
| 421 | Comedy Wah | ComeWah |
| 422 | Phase Shift | PhaShift |
| 423 | Phase Shift 2 | PhaShit2 |
| 424 | Warm Pad | WarmPad |
| 425 | Warm Pad 2 | WarmPad2 |
| 426 | Overture | Overture |
| 427 | Verve | Verve |
| 428 | Fulness Pad | FulnesPd |
| 429 | Overture Wah | OvertWah |
| 430 | Digital Age | DigitAge |
| 431 | Analog Pad | AnalPd |
| 432 | Analog Pad 2 | AnalPd2 |
| 433 | Analog Pad 3 | AnalPd3 |
| 434 | Analog Pad 4 | AnalPd4 |
| 435 | Analog Pad 5 | AnalPd5 |
| 436 | Analog Wah | AnaloWah |
| 437 | Sharp | Sharp |
| 438 | Warm Pulse | WarmPul |
| 439 | Warm Pulse 2 | WarmPul2 |
| 440 | Happiness Pad | HappiPd |
| 441 | Sawtooth Pad | SawPad |
| 442 | Sawtooth Pad 2 | SawPad2 |
| 443 | Poly Synth Pad | PlySyPd |
| 444 | Poly Synth Pad 2 | PlySyPd2 |
| 445 | Poly Synth Pad 3 | PlySyPd3 |
| 446 | Modulation Distortion Wah | ModDiWah |
| 447 | Choir Pad | ChoPad |
| 448 | Choir Pad 2 | ChoPad2 |
| 449 | Plush Pad | PlushPad |
| 450 | Dawn Wah | DawnWah |
| 451 | Chorus Pad Wah | ChoPdWah |
| 452 | Electric Pad | ElecPad |
| 453 | 5Th PAD | 5ThPad |
| 454 | Bowed Pad | BowdPad |
| 455 | Bowed Pad 2 | BowdPad2 |
| 456 | Bowed Pad 3 | BowdPad3 |
| 457 | Metallic Pad | MetalPad |
| 458 | Dream | Dream |
| 459 | Dream 2 | Dream2 |
| 460 | Dream 3 | Dream3 |
| 461 | Dpray | Dpray |
| 462 | Digital Pad | DigiPad |
| 463 | Organ Pad Wah | OrganWah |
| 464 | Pipe Organ Pad | PipOrPd |
| 465 | Scene Pad | ScenePad |
| 466 | Halo Pad | HaloPad |
| 467 | Halo Pad 2 | HaloPad2 |
| 468 | Background | Backgrd |
| 469 | Background 2 | Backgrd2 |
| 470 | Background 3 | Backgrd3 |
| 471 | Background 4 | Backgrd4 |
| 472 | Sweep Pad | SweepPad |
| 473 | Star Trek | StarTrek |
| 474 | Digital Wah | DigiWah |
| 475 | Warm Wah | WarmWah |
| 476 | Pulse Wah | PulseWah |
| 477 | Digital Distortion Wah | DiDisWah |
| 478 | Pulse | Pulse |
| 479 | Pulse 2 | Pulse2 |
| 480 | Pulse 3 | Pulse3 |
| SYNTH SFX | ||
| 481 | Rain | Rain |
| 482 | Mysterious | Mysterio |
| 483 | Clusters of Stars | Stars |
| 484 | Additive Synthesis | AddSynth |
| 485 | Want To Go | Wanttogo |
| 486 | Additive Synth Wah | AddWah |
| 487 | Soundtrack | Soundtrk |
| 488 | Lost Garden | Garden |
| 489 | Far Away | FarAway |
| 490 | Crystal | Crystal |
| 491 | Crystal 2 | Crystal2 |
| 492 | Crystal 3 | Crystal3 |
| 493 | Drops Of Water | Water |
| 494 | Game | Game |
| 495 | Game 2 | Game2 |
| 496 | Fly Into Space | Fly |
| 497 | Little Funny | Funny |
| 498 | Funny Hammer | FunnyHam |
| 499 | Surface Of The Water | Surface |
| 500 | Water Drop Wah | WaterWah |
| 501 | Atmosphere | Atmosphr |
| 502 | Clouds | Clouds |
| 503 | Clouds 2 | Clouds2 |
| 504 | Brightness | Bright |
| 505 | Brightness 2 | Bright2 |
| 506 | Life | Life |
| 507 | Life 2 | Life2 |
| 508 | Fresh | Fresh |
| 509 | Fresh 2 | Fresh2 |
| 510 | Goblins | Goblins |
| 511 | Fantasy | Fantasy |
| 512 | Space Trojan | SpaceTro |
| 513 | Ceremony | Ceremony |
| 514 | Phonism | Phonism |
| 515 | Phonism 2 | Phonism2 |
| 516 | Echoes | Echoes |
| 517 | Echoes 2 | Echoes2 |
| 518 | Empty | Empty |
| 519 | Empty 2 | Empty2 |
| 520 | Deformation | Deformat |
| 521 | Deformation 2 | Deforma2 |
| 522 | Sci-Fi | Sci-Fi |
| 523 | Sci-Fi 2 | Sci-Fi2 |
| 524 | WindBells | WindBell |
| 525 | WindBells 2 | WindBel2 |
| 526 | Artistic | Artistic |
| 527 | Artistic 2 | Artisti2 |
| 528 | Artistic 3 | Artisti3 |
| 529 | Artistic 4 | Artisti4 |
| 530 | Artistic 5 | Artisti5 |
| 531 | Digital Effect | DigitaEf |
| 532 | Abyss | Abyss |
| 533 | Abyss 2 | Abyss2 |
| 534 | Abyss 3 | Abyss3 |
| 535 | Spectrum | Spectrum |
| 536 | Spectrum 2 | Spectru2 |
| 537 | Spectrum 3 | Spectru3 |
| ETHNIC MISC. | ||
| 538 | Sitar | Sitar |
| 539 | Sitar 2 | Sitar2 |
| 540 | Detuned Sitar | DetSitar |
| 541 | Banjo | Banjo |
| 542 | Banjo 2 | Banjo2 |
| 543 | Shamisen | Shamisn |
| 544 | Shamisen 2 | Shamisn2 |
| 545 | Shamisen 3 | Shamisn3 |
| 546 | Koto | Koto |
| 547 | Koto 2 | Koto2 |
| 548 | Koto 3 | Koto3 |
| 549 | Kalimba | Kalimba |
| 550 | Kalimba 2 | Kalimba2 |
| 551 | Kalimba 3 | Kalimba3 |
| 552 | Bagpipe | Bagpipe |
| 553 | Bagpipe 2 | Bagpipe2 |
| 554 | Fiddle | Fiddle |
| 555 | Fiddle 2 | Fiddle2 |
| 556 | Shania | Shania |
| 557 | Shania 2 | Shania2 |
| 558 | PiPa | PiPa |
| 559 | ErHu | ErHu |
| 560 | GuZheng | GuZheng |
| 561 | PaiXiao | PaiXiao |
| 562 | SanXian | SanXian |
| PERCUSSIVE | ||
| 563 | Tinkle Bell | TnklBell |
| 564 | Agogo | Agogo |
| 565 | Steel Drums | StelDrum |
| 566 | Bass Drum | BassDrum |
| 567 | Wood Block | WoodBlok |
| 568 | Snare | Snare |
| 569 | Taiko Drum | TaikoDrm |
| 570 | Melodic Tom | MelodTom |
| 571 | Synth Drum | SynDrum |
| 572 | Dynamics Jump | DynJump |
| 573 | Reverse Cymbal | RevCymbl |
| SFX | ||
| 574 | Guitar Fret Noise | FretNoiz |
| 575 | Breath Noise | BrthNoiz |
| 576 | Seashore | Seashore |
| 577 | Bird Tweet | Tweet |
| 578 | Telephone Ring | Telphone |
| 579 | Helicopter | Helicopter |
| 580 | Applause | Applause |
| 581 | Gunshot | Gunshot |
| 582 | Fall | Fall |
| DRUMS | ||
| 583 | Standard Drum Set | StandSet |
| 584 | Rock Drum Set | RockSet |
| 585 | Electronic Drum Set | ElecSet |
| No. | English Name | LCD Name |
| LATIN 1 | ||
| 1 | Cha Cha | ChaCha |
| 2 | Pop Cha Cha | P.ChaCha |
| 3 | Rhumba | Rhumba |
| 4 | Pop Rhumba | P.Rhumba |
| 5 | Bossa Nova 1 | Bossa1 |
| 6 | Bossa Nova 2 | Bossa2 |
| 7 | Tango | Tango |
| 8 | Jazz Samba | JazSamba |
| 9 | Reggae | Reggae |
| 10 | Pop Reggae | P.Reggae |
| DANCE 1 | ||
| 11 | Disco 1 | Disco1 |
| 12 | Disco 2 | Disco2 |
| 13 | Disco Funk | DiscFunk |
| 14 | Dance | Dance |
| 15 | House 1 | House1 |
| 16 | House 2 | House2 |
| 17 | Rap | Rap |
| 18 | Euro Beat | EuroBeat |
| 19 | Hip Hop | HipHop |
| 20 | Techno | Techno |
| BEAT & POP 1 | ||
| 21 | 8 Beat 1 | 8Beat1 |
| 22 | 8 Beat 2 | 8Beat2 |
| 23 | 8 Beat 3 | 8Beat3 |
| 24 | 8 Beat 4 | 8Beat4 |
| 25 | 60's 8 Beat | 60's8Bt |
| 26 | 8 Beat Ballad | 8BtBld |
| 27 | 8 Beat Rock | 8BtRock |
| 28 | 16 Beat 1 | 16Beat1 |
| 29 | 16 Beat 2 | 16Beat2 |
| 30 | 16 Beat Pop | 16BtPop |
| 31 | 16 Beat Shuffle | 16BtShfl |
| 32 | Ballad | Ballad |
| 33 | Slow Ballad | SlowBld |
| 34 | 16 Beat Ballad | 16BtBld |
| 35 | Unplugged | Unplugged |
| ROCK 1 | ||
| 36 | Rock | Rock |
| 37 | Pop Rock | PopRock |
| 38 | Fast Rock | FastRock |
| 39 | Slow Rock 1 | SlwRock1 |
| 40 | Slow Rock 2 | SlwRock2 |
| 41 | Rock & Roll | RockRoll |
| 42 | Heavy Metal | H.Metal |
| 43 | Blues Boogie | B.Boogie |
| 44 | Blues | Blues |
| 45 | Shuffle | Shuffle |
| 46 | Blues Shuffle | B.Shuffle |
| 47 | Rock Shuffle | R.Shuffle |
| 48 | Charleston | Charston |
| SOUL & FUNK 1 | ||
| 49 | Funky Pop | FunkyPop |
| 50 | Jazz Funk | JazzFunk |
| 51 | Cool Funky | CoolFunk |
| 52 | Soul 1 | Soul1 |
| 53 | Soul 2 | Soul2 |
| 54 | Soul Shuffle | SoulShfl |
| 55 | Soul Blues | SoulBlue |
| 56 | R & B | R&B |
| 57 | 6/8 Gospel | 6/8Gospl |
| 58 | Pop Groove | PopGrove |
| JAZZ 1 | ||
| 59 | Swing | Swing |
| 60 | Cool Jazz | CoolJazz |
| 61 | Pop Swing | PopSwing |
| 62 | Swing Fox | SwingFox |
| 63 | Big Band | BigBand |
| 64 | Big Band Medium | BandMedi |
| 65 | Jazz Waltz | JazWaltz |
| 66 | Ragtime | Ragtime |
| 67 | Dixieland 1 | Dixland1 |
| 68 | Acid Jazz | AcidJazz |
| 69 | Quick Step | QuickStp |
| COUNTRY 1 | ||
| 70 | Country 1 | Country1 |
| 71 | Country 2 | Country2 |
| 72 | Pop Country | PopCntry |
| 73 | Country Rock | CtryRock |
| 74 | Country Folk | CtryFolk |
| 75 | 3/4 Country | 3/4Ctry |
| 76 | Country Waltz | C.Waltz |
| 77 | Country Shuffle | CtryShfl |
| 78 | Country Boogie | C.Boogie |
| 79 | Country Blues | C.Blues |
| 80 | Country Quick Step | CtryStep |
| 81 | Bluegrass | Bluegras |
| TRADITIONAL 1 | ||
| 82 | March 1 | March1 |
| 83 | March 2 | March2 |
| 84 | German March | G.March |
| 85 | 6/8 March | 6/8March |
| 86 | Polka | Polka |
| 87 | Pop Polka | PopPolka |
| 88 | Waltz | Waltz |
| 89 | Slow Waltz | SloWaltz |
| 90 | Vienna Waltz | VieWaltz |
| 91 | Musette | Musette |
| PIANIST 1 | ||
| 92 | Piano 8 Beat | Pno8Beat |
| 93 | Piano Ballad | PnoBalad |
| 94 | Piano Boogie | PnoBogie |
| 95 | Piano Jazz | PnoJazz |
| 96 | Piano Swing | PnoSwing |
| 97 | Piano Jazz Waltz | P.JWaltz |
| 98 | Piano Twist | PnoTwist |
| 99 | Piano March | PnoMarch |
| 100 | Piano 6/8 March | Pno6/8Mr |
| 101 | Piano Waltz | PnoWaltz |
| LATIN 2 | ||
| 102 | Cha Cha-2 | ChaCha2 |
| 103 | Pop Cha Cha-2 | P.ChaCa2 |
| 104 | Rhumba-2 | Rhumba2 |
| 105 | Pop Rhumba-2 | P.Rhumb2 |
| 106 | Bossa Nova 1-2 | Bossa1-2 |
| 107 | Bossa Nova 2-2 | Bossa2-2 |
| 108 | Tango-2 | Tango-2 |
| 109 | Jazz Samba-2 | JzSamba2 |
| 110 | Reggae-2 | Reggae2 |
| 111 | Pop Reggae-2 | P.Regga2 |
| DANCE 2 | ||
| 112 | Disco 1-2 | Disco1-2 |
| 113 | Disco 2 | Disco2-2 |
| 114 | Disco Funk-2 | DiscoFk2 |
| 115 | Dance-2 | Dance-2 |
| 116 | House 1-2 | House1-2 |
| 117 | House 2-2 | House2-2 |
| 118 | Rap-2 | Rap-2 |
| 119 | Euro Beat-2 | EuropBt2 |
| 120 | Hip Hop-2 | HipHop-2 |
| 121 | Techno-2 | Techno-2 |
| BEAT & POP 2 | ||
| 122 | 8 Beat 1-2 | 8Beat1-2 |
| 123 | 8 Beat 2-2 | 8Beat2-2 |
| 124 | 8 Beat 3-2 | 8Beat3-2 |
| 125 | 8 Beat 4-2 | 8Beat4-2 |
| 126 | 60's 8 Beat-2 | 60's8Bt2 |
| 127 | 8 Beat Ballad-2 | 8BtBld-2 |
| 128 | 8 Beat Rock-2 | 8BtRck-2 |
| 129 | 16 Beat 1-2 | 16Bt1-2 |
| 130 | 16 Beat 2-2 | 16Bt2-2 |
| 131 | 16 Beat Pop-2 | 16BtPop2 |
| 132 | 16 Beat Shuffle-2 | 16BtShf2 |
| 133 | Ballad-2 | Ballad-2 |
| 134 | Slow Ballad-2 | SlwBld-2 |
| 135 | 16 Beat Ballad-2 | 16BtBld2 |
| 136 | Unplugged-2 | Unplug-2 |
| ROCK 2 | ||
| 137 | Rock-2 | Rock-2 |
| 138 | Pop Rock-2 | PopRck-2 |
| 139 | Fast Rock-2 | FastRk-2 |
| 140 | Slow Rock 1-2 | SlwRk1-2 |
| 141 | Slow Rock 2-2 | SlwRk2-2 |
| 142 | Rock & Roll-2 | RkRoll-2 |
| 143 | Heavy Metal-2 | H.Metal2 |
| 144 | Blues Boogie-2 | B.Bogie2 |
| 145 | Blues-2 | Blues-2 |
| 146 | Shuffle-2 | Shuffle-2 |
| 147 | Blues Shuffle-2 | B.Shufl2 |
| 148 | Rock Shuffle-2 | R.Shufl2 |
| 149 | Charleston-2 | Charstn2 |
| SOUL & FUNK 2 | ||
| 150 | Funky Pop-2 | FunkPop2 |
| 151 | Jazz Funk-2 | JazzFk-2 |
| 152 | Cool Funky-2 | CoolFk-2 |
| 153 | Soul 1-2 | Soul1-2 |
| 154 | Soul 2-2 | Soul2-2 |
| 155 | Soul Shuffle-2 | SoulShf2 |
| 156 | Soul Blues-2 | SoulBlu2 |
| 157 | R & B-2 | R&B-2 |
| 158 | 6/8 Gospel-2 | 6/8Gosp2 |
| 159 | Pop Groove-2 | PopGrov2 |
| JAZZ 2 | ||
| 160 | Swing-2 | Swing-2 |
| 161 | Cool Jazz-2 | CoolJz-2 |
| 162 | Pop Swing-2 | PopSwin2 |
| 163 | Swing Fox-2 | SwinFox2 |
| 164 | Big Band-2 | BigBand2 |
| 165 | Big Band Medium-2 | BandMed2 |
| 166 | Jazz Waltz-2 | JzWaltz2 |
| 167 | Ragtime-2 | Ragtime2 |
| 168 | Dixieland 1-2 | Dixla1-2 |
| 169 | Acid Jazz-2 | AcdJaz-2 |
| 170 | Quick Step-2 | QuickSp2 |
| COUNTRY 2 | ||
| 171 | Country 1-2 | Cntry1-2 |
| 172 | Country 2-2 | Cntry2-2 |
| 173 | Pop Country-2 | PopCtry2 |
| 174 | Country Rock-2 | CtryRk-2 |
| 175 | Country Folk-2 | CtryFok2 |
| 176 | 3/4 Country -2 | 3/4Ctry2 |
| 177 | Country Waltz-2 | C.Waltz2 |
| 178 | Country Shuffle-2 | CtryShf2 |
| 179 | Country Boogie-2 | C.Bogie2 |
| 180 | Country Blues-2 | C.Blues2 |
| 181 | Country Quick Step-2 | CtryStp2 |
| 182 | Bluegrass-2 | Bluegra2 |
| TRADITIONAL 2 | ||
| 183 | March 1-2 | March1-2 |
| 184 | March 2-2 | March2-2 |
| 185 | German March-2 | G.March2 |
| 186 | 6/8 March-2 | 6/8Marc2 |
| 187 | Polka-2 | Polka-2 |
| 188 | Pop Polka-2 | PopPoka2 |
| 189 | Waltz-2 | Waltz-2 |
| 190 | Slow Waltz-2 | SIWaltz2 |
| 191 | Vienna Waltz-2 | ViWaltz2 |
| 192 | Musette-2 | Musette2 |
| PIANIST 2 | ||
| 193 | Piano 8 Beat-2 | Pno8Bt-2 |
| 194 | Piano Ballad-2 | PnoBald2 |
| 195 | Piano Boogie-2 | PnoBogi2 |
| 196 | Piano Jazz-2 | PnoJazz2 |
| 197 | Piano Swing-2 | PnoSwin2 |
| 198 | Piano Jazz Waltz-2 | P.JWalz2 |
| 199 | Piano Twist-2 | PnoTwis2 |
| 200 | Piano March-2 | PnoMarc2 |
| 201 | Piano 6/8 March-2 | Pno6/8M2 |
| 202 | Piano Waltz-2 | P.Waltz2 |
| No. | English Name | LCD Name |
| CLASSIC | ||
| 1 | Chanson Du Toreador | Toreador |
| 2 | Meditation | Meditati |
| 3 | Wiegenlied | WieGenli |
| 4 | A Lover's Concerto | Concerto |
| 5 | Whispering Hope | Whisper |
| 6 | From The New World | NewWorld |
| 7 | O Sole Mio | OSoleMio |
| 8 | Auf Flugeln Des Gesanges | Gesanges |
| 9 | Santa Lucia | SantaLuc |
| FAVORITE | ||
| 10 | Deck The Halls | DeckHall |
| 11 | Old Folks At Home | OldFolks |
| 12 | Camptown Races | C.Races |
| 13 | Oh! Susanna | Susanna |
| 14 | Jeanie With The Light Brown Hair | Jeanie |
| 15 | Long Long Ago | LongAgo |
| 16 | Annie Laurie | AnnieLa |
| 17 | My Old Kentucky Home | Kentucky |
| 18 | Turkey In The Straw | TukyStaw |
| 19 | Aloha Oe | AlohaOe |
| 20 | Carry Me Back To Old Virginny | Virginny |
| 21 | The Blue-Bells Of Scotland | BlueBell |
| 22 | Joy To The World | JoyWorld |
| 23 | Jingle Bells | JingBell |
| 24 | Battle Hymne Of The Republic | BatlHyme |
| 25 | Silent Night | SltNight |
| 26 | Ode To Joy | OdeToJoy |
| 27 | My Bonnie | MyBonnie |
| 28 | La Cucaracha | Cucarach |
| 29 | Yellow Rose Of Texas | YellRose |
| 30 | The Wabash Cannon Ball | CannBall |
| 31 | Red River Valley | RedRiver |
| 32 | Dreaming Of Home And Mother | Dreaming |
| 33 | Ring Ring De Banjo | DeBanjo |
| 34 | Der Freischutz | DerFreis |
| 35 | Tales Of Hoffman | Hoffman |
| 36 | Die Forelle | Forelle |
| FOLK | ||
| 37 | Aura Lea | AuraLea |
| 38 | When The Saints Go Marching In | Marching |
| 39 | Twinkle Twinkle Little Star | Twinkle |
| 40 | I've Been Working On The Railroad | WorkRail |
| 41 | With Games | WithGame |
| 42 | Way Home | WayHome |
| 43 | Yankee Doodle | YankeeD |
| 44 | Michael Row The Boat Ashore | RowBoat |
| 45 | Auld Lang Syne | LangSyne |
| 46 | My Darling Clementine | Clemtine |
| 47 | Little Brown Jug | BrownJug |
| 48 | The House Of The Rising Sun | RiseSun |
| 49 | Danny Boy | DannyBoy |
| 50 | El Condor Pasa | ElCondor |
| 51 | Greensleeves | Sleeves |
| 52 | Heidenroslein | Heidenro |
| 53 | Wiegenlied 2 | Wieglid2 |
| 54 | Her Bright Smile Haunts Me Still | HerSmile |
| 55 | Old Black Joe | BlackJoe |
| 56 | Old Dog Tray | DogTray |
| 57 | Are You Lonesome Tonight? | Lonesome |
| 58 | Arirang | Arirang |
| 59 | The Quilting Party | TheParty |
| 60 | The Colorado Trail | TheTrail |
| 61 | I'D Like To Be In Texas | InTexas |
| 62 | Shenandoah | Shenando |
| 63 | Down In The Valley | Valley |
| 64 | On Top Of Old Smoky | TopSmoky |
| 65 | Barbara Allen | Allen |
| 66 | Careless Love | CaleLove |
| 67 | Sweet Betsy From Pike | SwetPike |
| 68 | Jesse James | James |
| 69 | The Cowboy's Lament | CowboyLa |
| KID'S SONG | ||
| 70 | Skip To My Lou | SkipMyLo |
| 71 | London Bridge Is Falling Down | Bridge |
| 72 | Home On The Range | HomeRang |
| 73 | This Old Man | OldMan |
| 74 | Polly Wolly Doodle | PlyWlyDo |
| 75 | Sippin' Cider Through A Straw | SipinCid |
| 76 | Home Sweet Home | SwetHome |
| 77 | Mary Had A Little Lamb | MaryLamb |
| BALLROOM | ||
| 78 | Valse Brillante Op 34 #3 In F Major | ValOpFMr |
| 79 | Musette In D Major | MusetDMr |
| 80 | Blue Bird Waltz | BlueBird |
| PIANO & KEYBOARD | ||
| 81 | Yankee Doodle (Piano) | YankeeD2 |
| 82 | Kaiser Walzer | Kaiser |
| 83 | Etude On Leger Lines 2 | EtudeLL2 |
| 84 | From A Story Book | StoryBok |
| 85 | Hanon Piano Fingering 1 | Hanon1 |
| 86 | Hanon Piano Fingering 2 | Hanon2 |
| 87 | Hanon Piano Fingering 3 | Hanon3 |
| 88 | Hanon Piano Fingering 4 | Hanon4 |
| 89 | Hanon Piano Fingering 5 | Hanon5 |
| 90 | Hanon Piano Fingering 6 | Hanon6 |
| 91 | Hanon Piano Fingering 7 | Hanon7 |
| 92 | Basic Tutorial Beyer Piano 8 | Beyer8 |
| 93 | Basic Tutorial Beyer Piano 12 | Beyer12 |
| 94 | Basic Tutorial Beyer Piano 13 | Beyer13 |
| 95 | Basic Tutorial Beyer Piano 14 | Beyer14 |
| 96 | Basic Tutorial Beyer Piano 15 | Beyer15 |
| 97 | Basic Tutorial Beyer Piano 16 | Beyer16 |
| 98 | Basic Tutorial Beyer Piano 18 | Beyer18 |
| 99 | Basic Tutorial Beyer Piano 19 | Beyer19 |
| 100 | Basic Tutorial Beyer Piano 20 | Beyer20 |
| 101 | Cuckoo | Cuckoo |
| 102 | Basic Tutorial Beyer Piano 21 | Beyer21 |
| 103 | Basic Tutorial Beyer Piano 29 | Beyer29 |
| 104 | Butterfly | Buterfly |
| 105 | Basic Tutorial Beyer Piano 45 | Beyer45 |
| 106 | Christmas Eve | XmasEve |
| 107 | Basic Tutorial Beyer Piano 50 | Beyer50 |
| 108 | Basic Tutorial Beyer Piano 52 | Beyer52 |
| 109 | Basic Tutorial Beyer Piano 55 | Beyer55 |
| 110 | Basic Tutorial Beyer Piano 59 | Beyer59 |
| 111 | Beyer Eight Degrees Jump Etude | BeyrJump |
| 112 | Basic Tutorial Beyer Piano The Scale Of C Major | BeyerC |
| 113 | Basic Tutorial Beyer Piano 65 | Beyer65 |
| 114 | Basic Tutorial Beyer Piano 66 | Beyer66 |
| 115 | Old Folks At Home (Piano) | OldFolk2 |
| 116 | Basic Tutorial Beyer Piano The Scale Of G Major | BeyerG |
| 117 | Basic Tutorial Beyer Piano 70 | Beyer70 |
| 118 | Basic Tutorial Beyer Piano 72 | Beyer72 |
| 119 | Basic Tutorial Beyer Piano 73 | Beyer73 |
| 120 | Basic Tutorial Beyer Piano 74 | Beyer74 |
| 121 | A Little Polish Dance | PolishDc |
| 122 | Larghetto | Largheto |
| 123 | Minuet 2 | Minuet2 |
| 124 | Prelude | Prelude |
| 125 | Duke Aria From “The Rigoletto” | DukeAria |
| 126 | Puck | Puck |
| 127 | The Happy Farmer | HpFarmer |
| 128 | Etude | Etude |
| 129 | Dance Of The Four Swans From "Swan Lake" | SwanLake |
| 130 | Jesus Saviour Pilot Me | Jesus |
| 131 | Old Macdonald Had A Farm | OldAFarm |
| 132 | 2-Part Invention No.13 In A Minor BWV 784 | Invetion |
| 133 | Musette | Musette |
| 134 | Bourree | Bourree |
| 135 | Carl Czerny 599 NO92 | 599No92 |
| 136 | Away In A Manger | AwayInAM |
| 137 | Marriage Of Figaro | Marriage |
| 138 | Angels We Have Heard On High | Angles |
| 139 | Waltz | Waltz |
| 140 | Did You Ever See A Lassie | Lassie |
| 141 | Old France | OldFranc |
| 142 | Santa Claus Is Coming To Town | SantComn |
| 143 | Minuet 3 | Minuet3 |
| 144 | In The Theatre | Theatre |
| 145 | Alfredo And Violetta Column Tower Duet | Alfredo |
| 146 | Als Die Alte Mutter Mich Noch lehrte Singen | Mutter |
| 147 | At The Ball | AtBall |
| 148 | Dancing Raindrops | Raindrop |
| 149 | Comin'Round The Mountain | Mountain |
| 150 | Song Of The Brook | SofBrook |
| 151 | Cotton-pickin' Fingers | CtnPFngs |
| 152 | Menuett G Dur 3 | MenuettG |
| 153 | Knight | Knight |
| 154 | Gavotte | Gavotte |
| 155 | The Angels Singing | Singing |
| 156 | Robot Doll | RobtDoll |
| 157 | Swallow | Swallow |
MIDI Implementation Chart
| Function | Transmitted | Recognized | Remarks | |
| Basic Channel | DefaultChanged | 1ch× | ALL× | |
| Mode | DefaultMessagesAltered | ××******* | 1×× | |
| Note Number | Note:True voice | 12-114********** | 0-1270-127 | |
| Velocity | Note onNote off | ○9nH,V=1-127×(9nH,V=0) | ○9nH,V=1-127○(9nH,V=0;8nH,V=0-127) | |
| After Touch | key'sCh's | ×× | ×× | |
| Pitch Bend | ○ | ○ | ||
| Control Change | 01567106465666780819193120121123 | ○××××××××××××××××××○ | ○○×○○○○○○○○○○○○○○○○○○○○○○○○○○○○○○○○○○○○○○○○○○○○○○○○○○○○○○○○○○○○○○○○○○○○○○○○○○○○○○○○○○○○○○○○○○○○○○○○○○○○ ○ | Bank SelectModulationPortamento TimeData EntryVolumePanExpressionSustain PedalPortamento ON/OFFSostenuto PedalSoft PedalReverb ProgramChorus ProgramReverb LevelChorus LevelAll Sound OffReset All ControllersAll Notes Off |
| ProgramChange | :true | ○********** | ○0-127 | |
| System Exclusive | × | ○ | ||
| System Common | :SongPosition:Song Select:Tune | ××× | ××× | |
| System Real Time | :Clock:Commands | ×× | ×× | |
| Aux Messages | :LOCAL ON/OFF:All Notes Off:Active sense:Reset | ×○×× | ×○○○○ | |
| Notes: | ||||
- Mode 1: OMNI ON, POLY
• Mode 3: OMNI OFF, POLY
x: NO
• Mode 2: OMNI ON MONO
• Mode 4: OMNI OFF, MONO
○: YES