
AUTOMATIC-XL - Cutting machine ADE - Free user manual and instructions
Find the device manual for free AUTOMATIC-XL ADE in PDF.

| Product Type | Automatic Cutting Machine |
| Brand | ADE |
| Model | AUTOMATIC-XL |
| Dimensions (W x D x H) | Approx. 40 x 25 x 30 cm |
| Weight | Approx. 5.5 kg |
| Power Supply | 220-240 V, 50 Hz |
| Power Consumption | 150 W |
| Cutting Thickness | Adjustable, 0.5 mm to 10 mm |
| Cutting Capacity | Up to 200 kg/h |
| Material of Blades | Stainless steel |
| Safety Features | Finger guard, non-slip feet, automatic shut-off when overloaded |
| Cleaning | Detachable parts dishwasher safe; blade guard removable for cleaning |
| Spare Parts Available | Replacement blades, pusher, container |
| Reparability | Recommended to contact ADE service center for repairs |
| Included Accessories | Pusher, collecting container, cleaning brush |
| Certifications | CE, RoHS |
| Warranty | 2 years |
Frequently Asked Questions - AUTOMATIC-XL ADE
User questions about AUTOMATIC-XL ADE
0 question about this device. Answer the ones you know or ask your own.
Ask a new question about this device
Download the instructions for your Cutting machine in PDF format for free! Find your manual AUTOMATIC-XL - ADE and take your electronic device back in hand. On this page are published all the documents necessary for the use of your device. AUTOMATIC-XL by ADE.
USER MANUAL AUTOMATIC-XL ADE
OPERATING INSTRUCTIONS
ADE
Slicer with automatic transmission
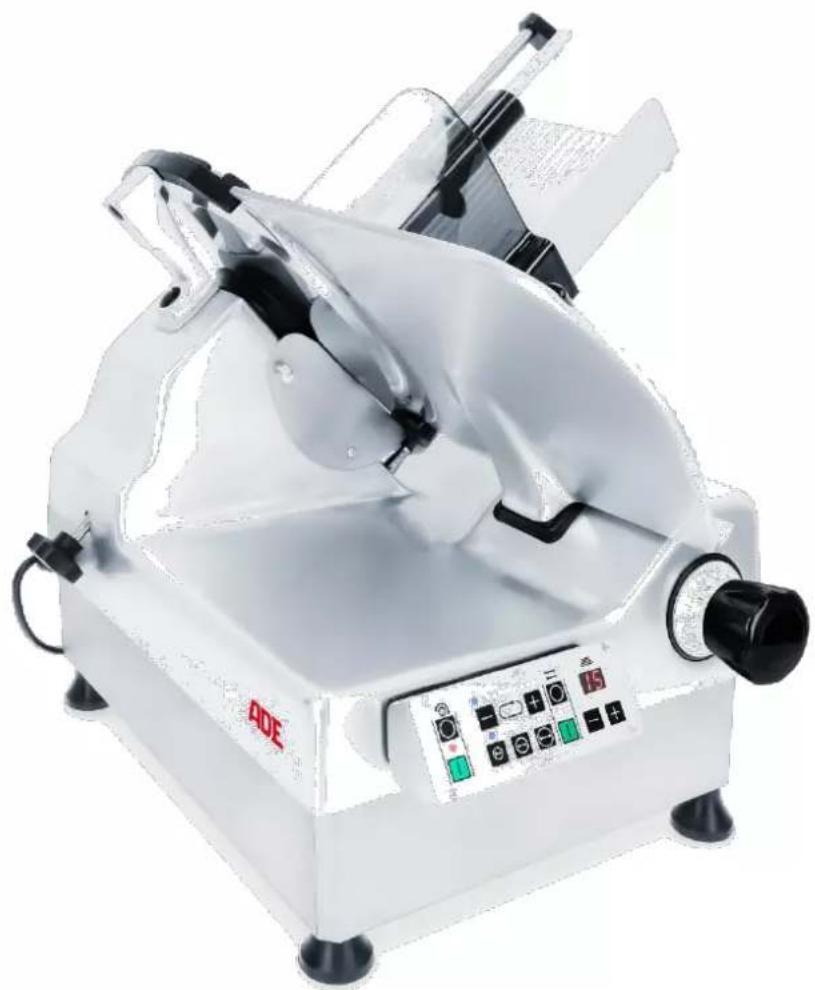
natural_image
White industrial cutting machine with control panel and mechanical components (no visible text or symbols)AUTOMATIC-XL
Automatic-XL-231117-Rev002-UM-en

natural_image
Blue circular icon with a white silhouette of a person reading a book (no text or symbols)CONTENTS
- FOREWORD 2
- INTENDED USE.... 2
- OVERVIEW 3
3.1 Machine....3
3.2 Control panel 4
- START-UP AND SAFETY PRECAUTIONS 4
4.1 Opening the packaging.... 4
4.2 Installation 5
4.3 Wiring 5
4.4 Mechanical safety devices....5
4.5 Acceptance testing 6
5.1 Normal operation (manual operation)....6
5.2 Automatic operation....7
5.3 Switching off 8
5.4 Briefly interrupting the automatic mode....8
5.5 Counting function/inputting the number....8
5.6 Setting the speed....8
5.7 Setting the stroke length 9
5.8 Using the machine....9
- CLEANING AND CARE....10
6.1 Cleaning.... 10
6.2 Lubricating.... 11
- SHARPENING THE BLADE 12
- TRAINING 14
- STORAGE AND TRANSPORTATION CONDITIONS.... 14
- DISPOSAL 14
- WARRANTY.... 14
- TECHNICAL DATA.... 14
- DIAGRAMS.... 15
- DECLARATION OF CONFORMITY.... 16
1. FOREWORD

This symbol means: "Observe operating instructions." Read these operating instructions carefully and observe the information contained therein. Keep these operating instructions handy for future reference.
This publication contains all the information necessary for the installation, operation, and maintenance of the slicers.
With it, the manufacturer intends to furnish the customer with clear and concise instructions for the use and maintenance of the machine, as well as information regarding the safety devices with which it is fitted to assure maximum efficiency throughout its service life.
The slicers may be updated; this eventuality shall not prejudice the instructions and explanations contained in the manual.
Before starting up the slicer, you must read this manual carefully.
Should this manual be damaged or lost, apply for a copy from the manufacturer immediately.
Many accidents and injuries that occur when using the machine result from insufficient familiarity with its functions and safety devices. Before starting work with the machine, please read the instructions herein carefully and follow them to the letter.
The slicers have been designed to comply with applicable safety standards. Consequently, all our slicers are fitted with a plate featuring the “CE” mark attesting to the product's conformity with said provisions.
2. INTENDED USE
These slicers have been manufactured to slice:
- cooked and raw charcuterie,
- warm and cold meats,
- bread and cheese,
- stoneless fruit and vegetables.
The machine is intended for continuous operation in commercial gastronomic applications. It can slice thicknesses up to 15 mm.

The slicers must never be used for cutting frozen goods, charcuterie, and meat on the bone or fruit with stones. Any attempt to slice said products or similar foods may result in severe damage to the machine and shall cause the warranty to become void.
3. OVERVIEW
3.1 Machine
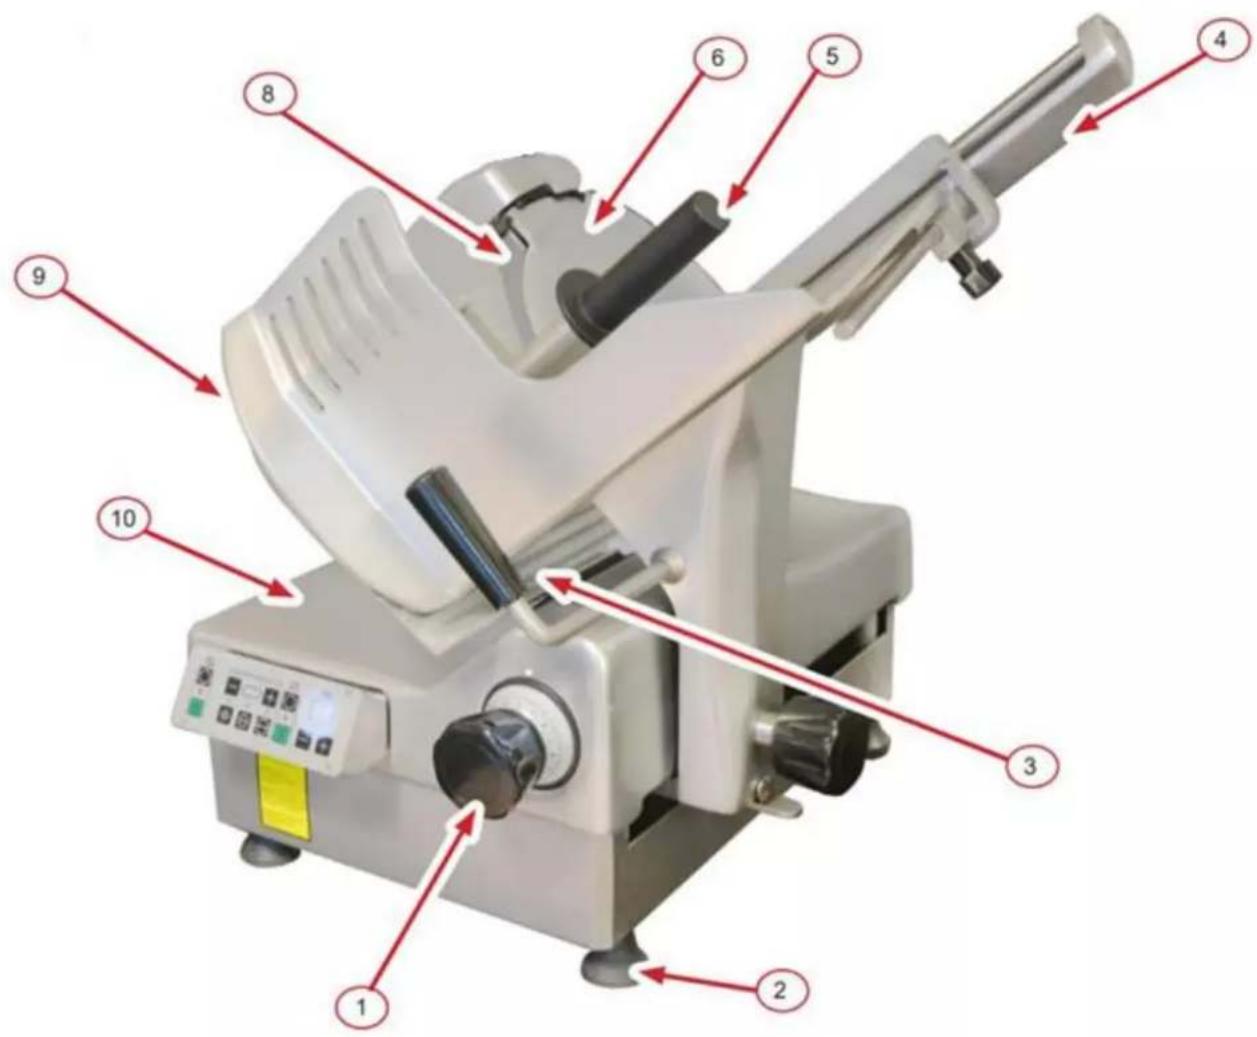
| No. | Description |
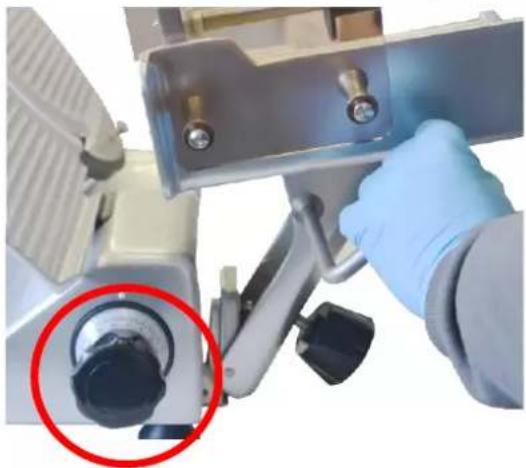
| 1 | Graduated knob for cutting thickness adjustment |
| 2 | Adjustable foot |
| 3 | Product carriage guide handle |
| 4 | Guide |
| 5 | Residual holder handle |
| 6 | Blade guard |
| 7 | not applicable |
| 8 | Blade |
| 9 | Stop plate |
| 10 | Machine housing |
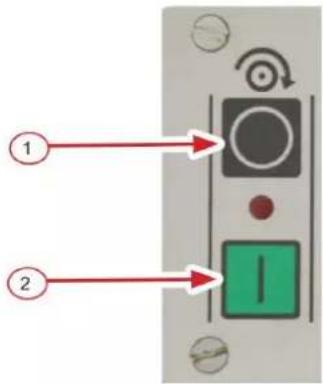
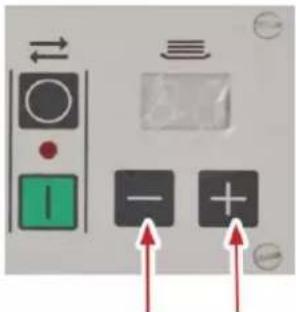
3.2 Control panel

| No. | Description |
| 1 | Power-off button/stop button |
| 2 | Power-on button/start button |
| 3 | Stroke length (small/medium/large) |
| 4 | Automatic mode start button |
| 5 | Counter/input number (+/-) |
| 6 | Counter display |
| 7 | Automatic mode stop button |
| 8 | Automatic mode speed (+/-) |
4. START-UP AND SAFETY PRECAUTIONS
On receiving the box containing the slicer, ensure that it is intact and has not been damaged during transportation.
Any damages to the slicer must be reported to the transport company in writing within three days of the date of the accompanying documents, specifying in detail the damages found.
4.1 Opening the packaging
- Loosen the screws of the wooden box.
- Lift and remove the wooden lid and frame.
- Lift the machine: two people are required to handle the machine, using the feet as handholds.
- Check the contents of the packaging, making sure they correspond to the specifications on the packing slip;

The packaging materials are recyclable and must never be disposed of in household waste. Check with the local authorities for the appropriate ways to dispose of waste properly. Never dispose of the packaging material out in the open!
4.2 Installation
Place the slicer on a flat, smooth, and vibration-free surface that is stable and sturdy enough to ensure adequate safety, considering the weight of the machine. Any unevenness of the surface on which the machine is rested can be compensated using the adjustable feet.
The machine controls (control panel and slice assembly) should face the operator, with the blade and motor facing away from the operator.
Leave enough room around the slicer so that it can be properly operated, cleaned, and serviced. Leave a space of at least 300 mm free around the machine.
The slicer works properly in places with a relative humidity level of less than 80% and near heat sources at temperatures up to 40 °C.
4.3 Wiring
The slicer is a single-phase machine equipped with a Schuko plug.
Before plugging the machine into the outlet, ensure the power grid features an electrical overload cutout.

Before connecting the machine to the power supply, always ensure that the local power supply rating matches that on the machine's nameplate!
4.4 Mechanical safety devices
- Except for the actual cutting section, the blade is protected by an irremovable guard, which cannot be removed.
- The product carriage can only be removed if
o the stop plate covers the blade, and the graduated knob for cutting thickness adjustment is set to "0" (zero) or beyond that up to the stop,
o the product carriage is in the position closest to the operator, and
o the tappet on the product carriage has been disengaged from the automatic guide.
- The slice assembly can only be opened (using the graduated knob) if the product carriage is secured in its normal operating position.
- The blade can be removed. In any case, the user must exercise particular caution and care. Cut-resistant gloves must be worn for this purpose.
- All safety devices are permanently installed on the machine and must not be removed. Dismantling or tampering with them or any unauthorized modifications would make the machine unsafe.
This will result in the manufacturer no longer being responsible for accidents or injuries.
4.5 Acceptance testing
- Make sure all the slicer components are correctly assembled.
- Press the power-on and power-off buttons and check that the machine can be switched on and off.
- Check the sliding of the product carriage and food holder.
- Check the opening of the slice assembly.
- Check that the product carriage can only be removed in the following cases: if the graduated knob for cutting thickness adjustment is set to "0",
- if the stop plate covers the blade and the graduated knob for cutting thickness adjustment is set to "0" (zero) or beyond that up to the stop, and
- if the product carriage is in the position closest to the operator.
- Check that the slice assembly cannot be opened when the product carriage is removed from the machine.

In the event of malfunctions, immediately shut down the machine, tag it clearly as "DEFECTIVE," and contact customer service!
Use the slicer exclusively as it was designed to be used. The product carriage is tilted to enable the product to slide towards the blade under its weight.
The machine has an automatic mode, which causes the product carriage to move back and forth automatically.
Whenever machine operation is interrupted due to a voltage drop, the green start button "I" must be pressed to restart the machine.

Never hold the product or push it towards the blade by hand!
Keep hands well away from the blade and use the relevant handle to move the product carriage safely back and forth.
5.1 Normal operation (manual operation)
For the manual operation of the machine, the tappet at the lower end of the carriage arm must be in the left position.
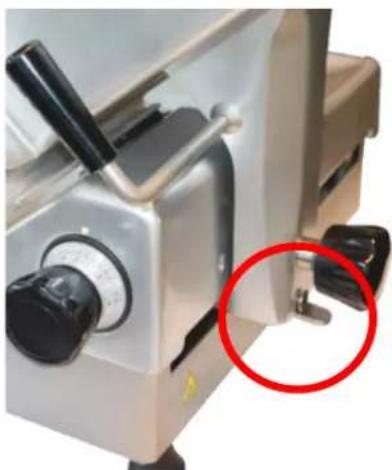
natural_image
Close-up of a metallic industrial machine with a red circle highlighting a specific component (no visible text or symbols)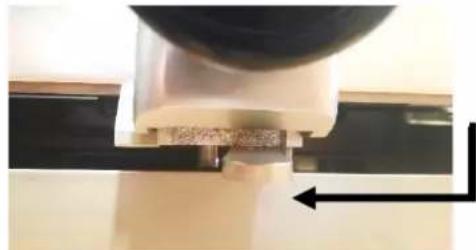
natural_image
Close-up of a mechanical component with a curved arrow indicating direction (no visible text or symbols)The product carriage can be guided manually.

natural_image
Close-up of a mechanical component with a tool inserted, showing a curved arrow indicating direction (no text or symbols visible)The product carriage is guided automatically.
Press the manual operation start button (2) to switch on the machine in manual mode. The red LED between the power-on and power-off buttons indicates manual operation. The blade is rotating.
NOTICE: In addition to the red LED, blue LEDs are already lit to indicate the last automatic mode settings. However, they are irrelevant during manual operation.

5.2 Automatic operation

Before switching from normal to automatic mode, ensure the product carriage can move freely and that there are no obstacles in its path.
Ensure the machine is switched off before changing the position of the tappet on the product carriage. The product carriage must always be manually engaged in the automatic drive.
Move the tappet to the right position first to enable the product carriage to be driven automatically in automatic mode. Manually engage the product carriage in the automatic drive by moving it back and forth.
Start the machine by pressing the power-on (start) button (2). The blade is rotating.
In addition to the red LED, blue LEDs light up to indicate the current speed and stroke length settings for automatic mode.
Activate the automatic mode by pressing the automatic mode start button (4). The LED between the automatic mode start and stop buttons indicates the automatic mode. The product carriage will be moving back and forth automatically.

5.3 Switching off
To switch off the machine, press the power-off (stop) button (1).
5.4 Briefly interrupting the automatic mode
Use the automatic mode stop button (7) to interrupt the automatic mode briefly.
Press the automatic mode start button (4) to resume automatic operation.

flowchart
graph TD
    A["7"] --> B[" "]
    B --> C[" "]
    C --> D["4"]
    style A fill:#f9f,stroke:#333
    style B fill:#ccf,stroke:#333
    style C fill:#cfc,stroke:#333
    style D fill:#fcc,stroke:#333

Always switch the machine off entirely by pressing the power-off button (1) when leaving it unattended.
5.5 Counting function/inputting the number
You can program the machine to cut a preset number of slices and then stop automatically. You just need to set the desired number of slices using the +/- buttons. The machine will cut the preset number of slices and then stop automatically.
If the automatic operation is started when "00" is displayed, the machine will operate continuously until stopped by the operator.
5.6 Setting the speed
Use the +/- buttons to set the speed at which the product carriage will move back and forth.

5.7 Setting the stroke length
You can adjust the machine for greater efficiency depending on the product size. Use the double arrow buttons to set the stroke length.


Small stroke (e.g., salami and charcuterie)

Medium stroke (e.g., cheese)

Large stroke: (e.g., ham)
5.8 Using the machine
- Set the graduated knob for cutting thickness adjustment to "0" (zero).
- Move the product carriage as far away from the blade as possible.
- Lift the food holder using the food holder handle only. Set the product down on the product carriage and lower the food holder onto or behind the product.

natural_image
Close-up of a gloved hand using a cutting tool to cut a textured food item on a metal grater (no visible text or symbols)- If necessary, use the guide to fix the product.
- Select the desired thickness using the graduated knob.
- Press the power-on button (2).
- Push the product carriage back and forth to slice the product using the handle of the product carriage or food holder. Alternatively, use the automatic mode.
- Once you have finished using the machine, switch it off by pressing the power-off (stop) button and set the graduated knob for cutting thickness adjustment to "0".
6. CLEANING AND CARE
For the sake of hygiene, the slicer must be kept clean at all times. The machine must be disassembled and cleaned at the end of each working day and whenever the type of product being sliced is changed (e.g., change from raw meats to cooked meats).
6.1 Cleaning

Before cleaning, disconnect the machine from the power supply. Do this by pulling the plug out of the power outlet. NEVER settle for simply pressing the slicer's red "stop button"!
Never wash the slicer or any of its parts in a dishwasher!
Under no circumstances use abrasive detergents as they would irreparably damage the machine's anodized surfaces. Never clean the slicer with harmful products liable to affect the health of either operators or customers. Only use products with a degree of acidity (pH 7-8) for cleaning.
When cleaning the blade, ensure that no water penetrates/runs into the blade hub.
Let all parts dry out completely. Any residual water may lead to the formation of flash rust.
- Isolate the machine from the power supply by unplugging it.
- Set the graduated knob for cutting thickness adjustment to "0" (zero).
- Unscrew the handle on the carriage arm completely. Pull the product carriage towards the operator so the locking mechanism engages and the product carriage locks in place. Remove the product carriage from the machine. The slice assembly remains locked in the "0" position.
natural_image
Close-up of a gloved hand operating a medical or laboratory instrument with a red circle highlighting a specific component (no visible text or symbols)- Remove the blade guard. To do this, loosen the star knob screw on the left side of the machine.

natural_image
Close-up of a laboratory instrument with a blue gloved hand holding a small object, no visible text or symbols- Clean the blade from the inside to the outside with lukewarm water and liquid detergent, rinse in cold water, and let it dry.

natural_image
Close-up of a hand operating a mechanical device with red directional arrows indicating rotation or movement (no text or symbols visible)- The base and other parts of the machine must always be washed with lukewarm water and liquid detergent and rubbed with a non-abrasive cloth. Rinse in cold water and let dry. The machine is fitted back together by following the disassembly procedure in reverse order.
6.2 Lubricating
To keep the food holder and product carriage sliding movements smooth, the slicer must be lubricated regularly in the designated points; use only resin-free white oil for this purpose; apply the lubricant of choice sparingly but frequently.
Spread a few drops of oil on the bar and move the slice assembly back and forth several times. Clean as necessary to remove excess oil.

natural_image
Laboratory setup with a blue pipette dispensing liquid into a glass tube (no text or symbols visible)If the slicer is to work correctly, the blade must always be kept sharp. It is better to sharpen the blade a little at regular intervals than a lot less frequently.
After sharpening, remove any traces of dirt from the grinding wheels. In addition, every single grain of sand must be removed from the blade and machine using a cloth dampened with alcohol.

Only blades with a smooth cutting edge can be sharpened. Sharpening operations involving serrated blades for bread slicers must be performed by skilled personnel.
Before sharpening, ensure that the blade is clean and completely free of grease, as any food residues on the blade may damage both the sharpening device and its grinding wheels.
The sharpening operation must be performed by authorized and skilled personnel only.
The sharpening device can no longer sharpen the blade once its diameter is wor down by 6 mm.
-
Switch off the machine.
-
Clean the blade thoroughly before sharpening and ensure there are no traces of grease left on it.
-
Check that the sharpening device is in the zero position.

-
To position the sharpening device, fully open the slice assembly.
-
Position the product carriage in the middle position.
-
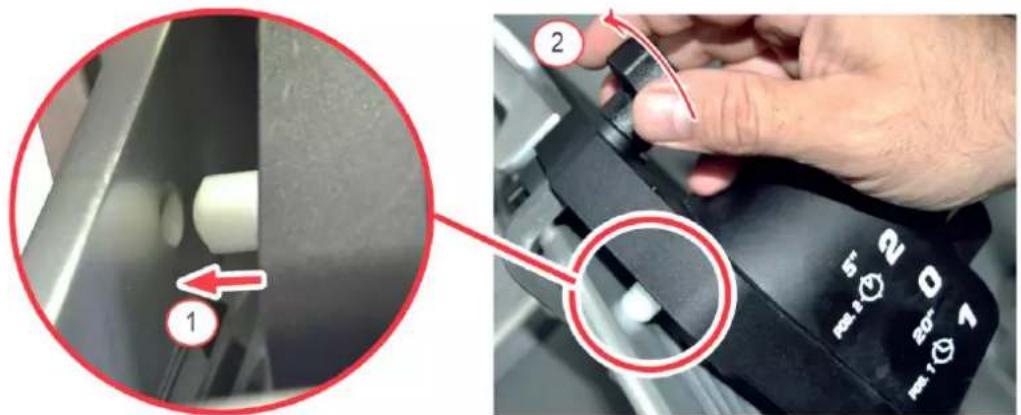
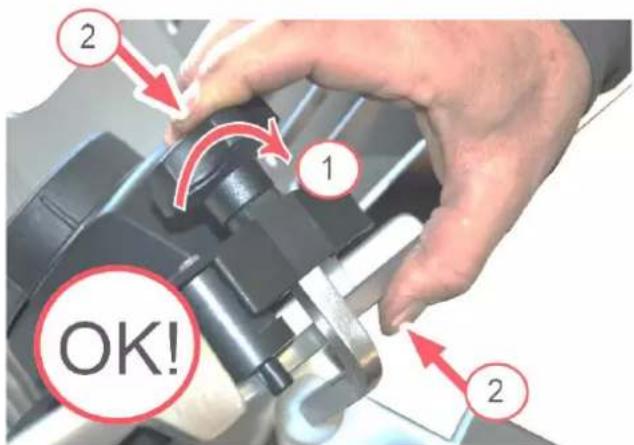
Place the sharpening device on top of the blade. Use the small recess on the stop plate to position the sharpening device (1). Then tighten the star knob screw. Make sure that the positioning is correct.
-
Start up the machine.
-
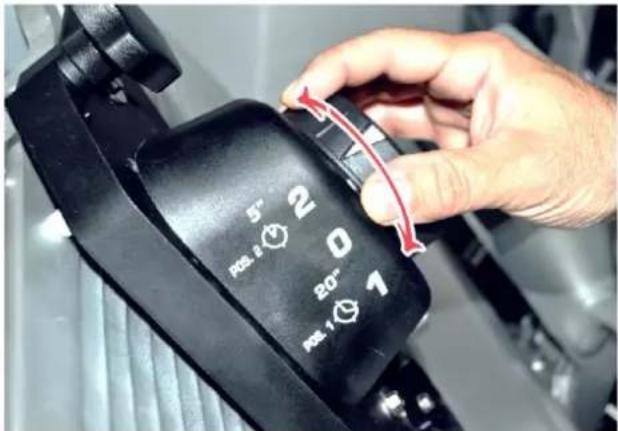
Set the knob to the "1" position. This will sharpen the rear part of the knife. Keep this position for 20 seconds (20"). Then set the knob to the "2" position for 5 seconds (5"). This will deburr the front side of the blade. Then set the knob back to the "0" position.
-
Switch off the machine.
-
Remove the sharpening device. First, loosen the star knob screw (1) and then press the star knob screw to release the handle (2).
- Clean the blade thoroughly before using it again.
8. TRAINING
During the machine's installation, an operator of age must be trained in the regular use-cleaning-care-sharpening of the blade, especially regarding the hazards which are likely to be encountered if the machine is misused.
The training will be given by the suitably authorized and trained installer familiar with the European community machine standards and the applicable occupational health and safety regulations of the respective national authorities.
9. STORAGE AND TRANSPORTATION CONDITIONS
Keep all parts of the packaging for possible return shipments to avoid possible damage during transportation.
10. DISPOSAL
Waste electrical and electronic equipment must not be disposed of in household waste. Equipment with this marking must not be disposed of in residual waste and must be recycled.
11. WARRANTY
If the product malfunctions within 2 years from the date of purchase (receipt required) due to defects in material and workmanship, ADE will repair or replace the product.
The warranty does not cover moving parts such as cables, blades, etc. The warranty does not extend to external normal wear and tear or damage caused by accident or misuse.
This warranty does not cover the products tampered with by unauthorized personnel.
The warranty agreement does not affect the customer's statutory rights.
Any complaints shall be addressed to the dealer from whom you purchased the machine.
12. TECHNICAL DATA
| Model | Automatic 300-XL-230 |
| Blade diameter | 300 mm |
| Cutting thickness adjustment | 0 - 15 mm |
| Cutting area | 220 x 180 mm |
| Dimensions | 630 x 668 x 629 mm |
| Storage space | 350 x 500 mm |
| Installation space | 210 x 310 mm |
| Power | 0.27 kW |
| Net weight | 43 kg |
| Gross weight | 49 kg |
| Power supply | 230 V |
| Package size | 690 x 710 x 850 mm |
13. DIAGRAMS
14. DECLARATION OF CONFORMITY
ADE
CE
EC declaration of conformity
Manufacturer:
ADE Germany GmbH
New Höltigbaum 15
22143 Hamburg / Germany
Person authorized to compile the technical documentation:
ADE Germany GmbH
New Höltigbaum 15
22143 Hamburg / Germany
Typ/Model:
Slicing machine / diagonal slicer
Automatic300-XL
Serial numbers:
Automatic-300-XL-230
62219-xxxxxxxx-00001 until 62219-xxxxxxxx-99999
62562-xxxxxx-00001 until 62562-xxxxxx-99999
The above manufacturer declares under sole responsibility that the above machine complies with the requirements of the following EC directives in the currently valid version:
2006/42/EC
Machinery Directive
(OJ L 157, June 9, 2006, p. 24–86)
2014/30/EU
EMC directive
(OJ L 96, March 29, 2014, p. 79 – 106)
2011/65/EU
RoHS directive
(OJ L 174, July 1, 2011, p. 88–110)
Directive 2014/35/EU is complied with in terms of its protection objectives in accordance with Annex I No. 1.5.1 MRL 2006/42/EC.
This declaration only applies to the machine in the condition in which it was placed on the market. The declaration becomes invalid as soon as a change is made to the machine that has not been agreed with the manufacturer.
P. Mack
Hamburg, April 11 ^th , 2023
Managing Director
Location, Date
Distributor:
Manufacturer:
ADE Germany GmbH
New Höltigbaum 15
22143 Hamburg
+49 40 432 776 - 0
+49 40 432 776 - 10
info@ade-germany.de
www.ade-germany.de
- OPERATING INSTRUCTIONS
- ADE
- CONTENTS
- FOREWORD
- INTENDED USE
- OVERVIEW
- Machine
- Control panel
- START-UP AND SAFETY PRECAUTIONS
- Opening the packaging
- Installation
- Wiring
- Mechanical safety devices
- Acceptance testing
- Normal operation (manual operation)
- Automatic operation
- Switching off
- Briefly interrupting the automatic mode
- Counting function/inputting the number
- Setting the speed
- Setting the stroke length
- Using the machine
- CLEANING AND CARE
- Cleaning
- Lubricating
- TRAINING
- STORAGE AND TRANSPORTATION CONDITIONS
- DISPOSAL
- WARRANTY
- TECHNICAL DATA
- DIAGRAMS
- DECLARATION OF CONFORMITY
- CE
- EC declaration of conformity
Brand : ADE
Model : AUTOMATIC-XL
Category : Cutting machine