PowerCube II - Desktop computer Infologix - Free user manual and instructions
Find the device manual for free PowerCube II Infologix in PDF.

User questions about PowerCube II Infologix
0 question about this device. Answer the ones you know or ask your own.
Ask a new question about this device
Download the instructions for your Desktop computer in PDF format for free! Find your manual PowerCube II - Infologix and take your electronic device back in hand. On this page are published all the documents necessary for the use of your device. PowerCube II by Infologix.
USER MANUAL PowerCube II Infologix
natural_image
Symbol of a trash bin crossed with a diagonal line, no text or numbers presentDisposal Instruction (US)
For better protection of our earth, please don't throw this electronic device into municipal trash bin when discarding. To minimize pollution and ensure utmost protection of the global environment, please recycle the product.
Copyright and Trademark Notice
Copyright of this publication belongs to InfoLogix, Inc. InfoLogix reserves the right to change the content of this publication without obligation to notify any party of such changes or revisions. No part of this publication may be reproduced, transcribed, transmitted, and translated into any language, stored in a retrieval system in any form or by any means electronically, mechanically, or optically without the prior written permission of this company.
Disclaimer
The information in this manual is provided “AS IS”. InfoLogix makes no warranties or representations, either expressed or implied, with respect to the content herein and specifically disclaims any warranties, including warranties of merchantability or fitness for any particular purpose.
InfoLogix and InfoLogix logos used herein are registered trademarks of InfoLogix, Inc. All other brand names and trademarks are owned by their respective owners.
Copyright © 2008 by InfoLogix, Inc. All rights reserved.
Safety Instructions
- Please read these safety instructions carefully.
- Please keep this User's Manual for later reference.
- Please disconnect this equipment from any connectors before cleaning. Don't use liquid or spray detergent for cleaning. Use damp sheet or cloth for cleaning.
- Make sure the equipment is connected to the power source with the correct voltage, frequency, and ampere.
- All cautions and warnings on the equipment should be noted.
- Never pour any liquid into opening; this could cause fire or electrical shock.
- Never open the equipment. For safety reason, the equipment should only be opened by qualified service personnel.
- If one of the following situations arises, contact a qualified service representative:
a. Liquid has penetrated the equipment.
b. The equipment has been exposed to moisture.
c. The equipment does not work well or you can not get it to work according to user's manual.
d. The equipment has been dropped and damaged.
e. The equipment has obvious sign of breakage.
Table of Contents
Chapter 1 Getting Started ....01
System Overview 01
The Front View 02
The Rear View 03
Chapter 2 Connecting Your System ....04
Connecting to Video Display 05
Connecting to LCD or CRT Monitor 05
Connecting to HDTV Set 05
Connecting to Conventional TV Set 05
Connecting to Projector 06
Connecting to Keyboard and Mouse 06
Connecting to USB Hub 06
Connecting to Fax/Printer/Scanner 06
Connecting to Speaker 07
Connecting to the Internet and Network 07
Connecting the Power Source 07
Chapter 3....08
Installing Driver 08
Troubleshooting 09
Technical Support 09
Appendix
Setting BIOS 10-12
Chapter 1 Getting Started
System Overview
The PowerCube II, measuring 6.5" x 6.5" x 2" (165mm x 165mm x 51mm), is one of the smallest Wintel personal computers in the world. The system is built with an Intel Core 2 Duo processor and runs the Microsoft Window XP operating system. Its computing power is comparable with that of desktop PCs.
With built-in support for 802.11a/g/n communication, the system can access the Internet wirelessly and communicate easily with personal electronic appliances such as personal digital assistants (PDA), smart phones, printers, keyboards, mice, etc.
The PowerCube II comes standard with dual wireless antenna support. If your network does not require antenna diversity (by default, most wireless networks do not), the wireless antenna needs to be hooked up to the appropriate connector on the PowerCube II. The main wireless antenna connection (see figure on page 4) should be used with single antenna networks to achieve the best signal quality.
The system also supports IEEE 1394 connector, which allows the users to connect digital video cameras, digital cameras, hard disks, and other 1394-compatible electronic appliances to the system.
The DVI, S-Video, and YPbPr connectors allow the users to connect the system to high quality large screen TVs and audio equipment.
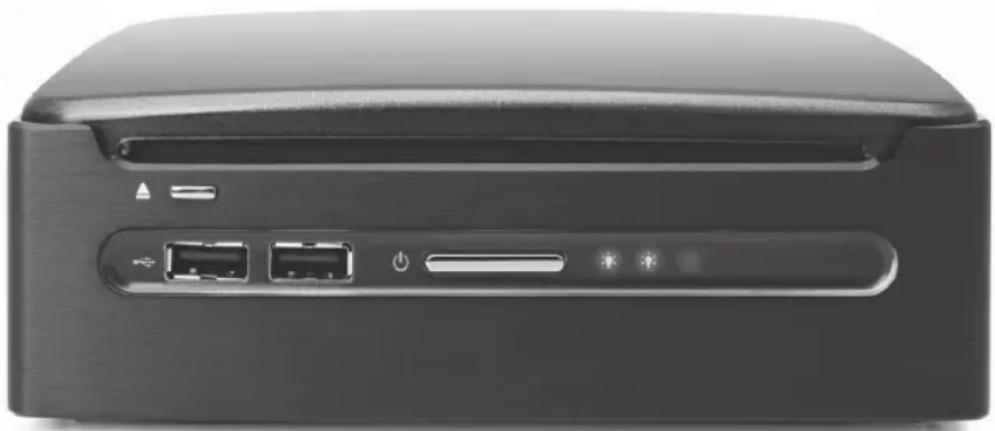
The Front View
The power button is located in the center of the front panel. Two USB ports are located on the left hand side of the power button, and both a power indicator and HDD indicator are located on the right hand side. The front view of the system is illustrated below:
natural_image
Back view of a black electronic device with ports and indicator lights (no visible text or symbols)Note: Please push center power button to boot up the PowerCube II.
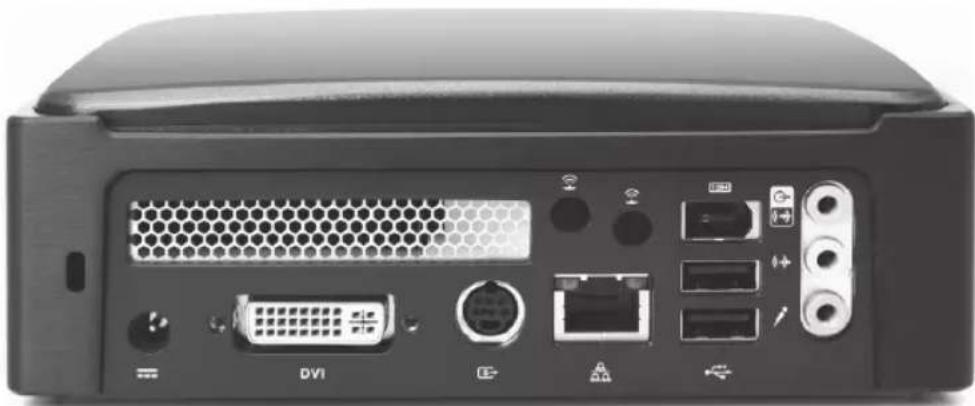
The Rear View
You can find the connectors for the power source, DVI, network, S-Video, IEEE 1394, USB 2.0, Line in (S/PDIF out), Line out, Ethernet, wireless antennas, and MIC as illustrated below.
natural_image
Back view of a black electronic device rear panel showing ports and connectors (no readable text or symbols)Chapter 2 Connecting Your System
The system is designed to connect to a wide range of peripheral options as illustrated below:
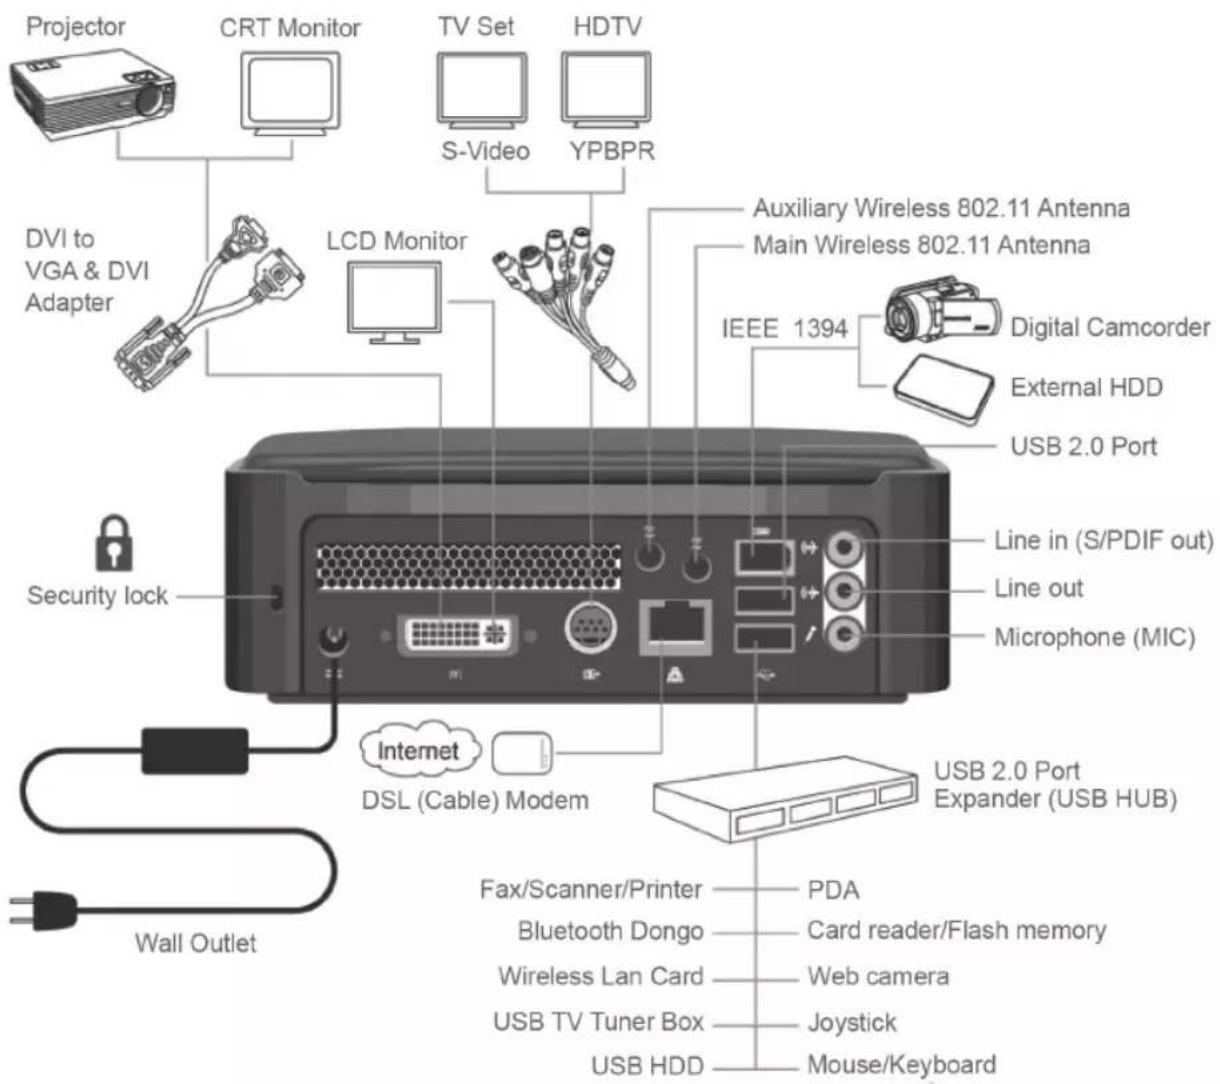
Connecting to Video Display
You can connect the system to many types of video display devices, including projectors, LCD's, traditional cathode ray tube (CRT) monitors or TV units.
Connecting the LCD or CRT Monitor
You can connect the system to an LCD monitor. The video signal connector from the LCD monitor connects to the DVI connector through a DVI cable. If you want to connect the system to a CRT monitor, you have to use the DVI to VGA converter included in the box.
Connecting to HDTV Set
There is an S-Video connector on the back of the rear panel. You can use an "S-Video to S-Video/YPbPr/Composite Video" cable to connect your system to a TV unit. On most high quality TV units, you can find the YPbPr inputs. On one end of the "S-Video to S-Video/YPbPr/Composite Video" cable, you can find the blue, green, red connectors, which are generally referred to as the YPbPr connectors. If your TV unit has YPbPr inputs, connect the YPbPr connectors to the YPbPr inputs of your HDTV unit or TV tuner.
Connecting to Conventional TV Set
The S-Video connector of the "S-Video to S-Video/YPbPr/Composite Video" cable comes in black. In case your TV unit only has S-Video input, you can connect the S-Video connector to the S-Video input of your TV set. Some old TV units may only have a Composite Video input. The Composite Video connector comes in yellow. In case your TV only has a Composite Video input, connect the Composite Video connector to the Composite Video input of your TV set.
Connecting to Projector
More and more people have the need to connect a PC to a projector in order to make presentations. The system is designed with a connector for output to a projector. In case you want to connect to a projector, you have to use the DVI to VGA converter included in the box.
Connecting to Keyboard and Mouse
You can connect the keyboard and mouse to the USB connectors.
Connecting to USB Hub
The system is designed to allow users to connect a USB hub which allows a user to install many USB devices to the system. Simply connect the USB connector of a USB hub to the system.
Connecting to Fax/Printer/Scanner
Currently many manufacturers build the functions of printer, scanner, and fax into one unit. You can connect the system to a fax/printer/scanner unit in case the machine is built with a USB connector.
Connecting to Speaker
The system comes with built-in mono speaker. You can install an active speaker set which comes with its own power plug in order to enjoy stereo sound. The input of the speaker should be connected to the speaker output (earphone) jack as illustrated. You can also connect a headphone to the earphone jack.
Connecting to the Internet and Network
Your system is built with a network connector on the back panel as illustrated in Chapter 1. The connector allows you to connect your system to an Ethernet network.
Connecting Power Source
The system comes with a power cable and adapter. Plug the output of the power adapter to the power connector on the back panel of the system unit. Then, connect the power plug to the wall outlet. Once the system is connected to the power source, the power indicator in the middle of the front panel will light up. You should press the power button on the front panel to start the system.
Chapter 3
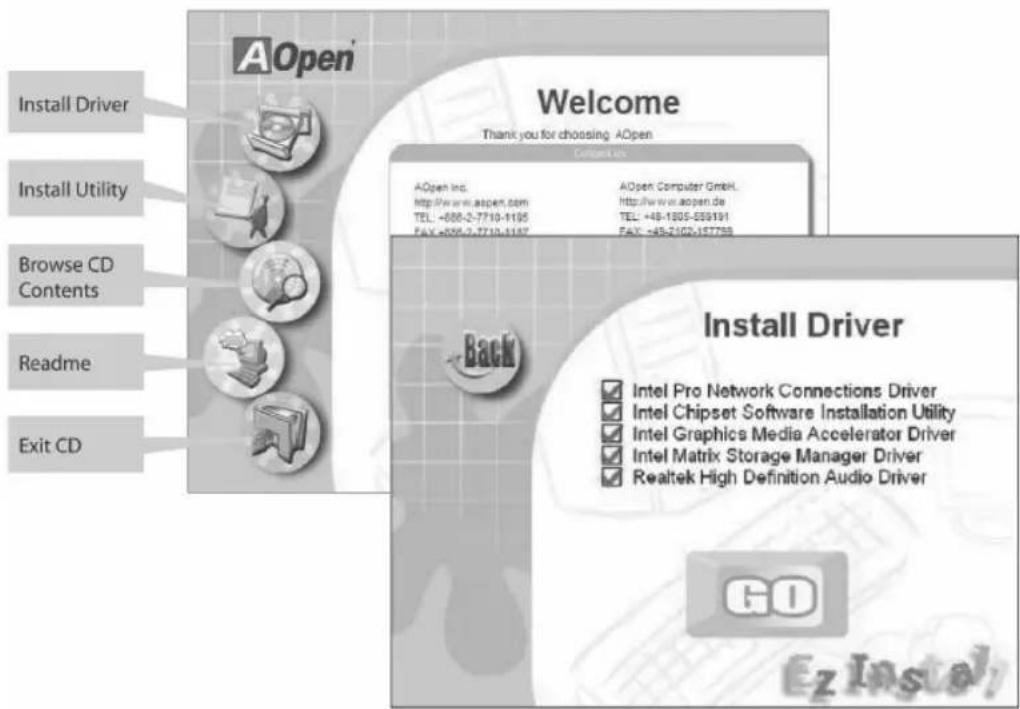
Installing Driver
By default, drivers ship installed on the PowerCube II. However, should you require the drivers for reinstallation, you have two options:
1) A driver CD ships with the unit. Simply connect an external CD drive and put the CD in the drive. The disk should run automatically.
2) Visit the InfoLogix website at www.infologix.com/pcdriver to download the appropriate drivers.
Troubleshooting
Q: After connecting the peripherals to the system unit, the keyboard, mouse, and speakers do not work. The display monitor shows nothing. What should I do?
A: Check if the peripherals are connected to their respective connectors correctly. Check if the connections are loose. After checking connections, power up the system again to see if the system works as expected. If the speakers or video monitor do not work, please refer to the manuals that come with the speakers or monitor for troubleshooting.
Q: After making sure the monitor is connected correctly to the system, the monitor still shows nothing. What should I do?
A: The computer's power management function may blank the screen to save power; move the mouse slightly or press any key on the keyboard to turn the display back on. You can also adjust the brightness or contrast controls on the monitor for desired display effects.
Q: The cursor moves unsteadily across the screen. What should I do?
A: If you use an optical mouse, it may not perform normally on a glossy surface or a sheet glass. Putting the mouse on clean paper will solve the problem.
Q: The system hangs or does not respond to any key strokes.
A: If the situation lasts for an extended period of time, the system may be in need of more system resources. Don't panic. You can press Ctrl + Alt + Del keys simultaneously to restart the system. When you press Ctrl + Alt + Del keys simultaneously, try to hold down these keys for more than five seconds to make sure the system performs a "warm reset". The other alternative is to follow system prompt message to turn the system to normal operation. The worst case scenario is to uninstall the application software and install that application again by using Windows Install/Remove functions from the Control Panel.
Q: I have followed the installation processes mentioned in this manual, the system still does not work.
A: Consult your authorized maintenance service personnel. Do not try to fix the system by yourself for it may cause unexpected damages to your system. To initiate support, call 215-639-8899 or 800-328-0030; at the menu prompt, select InfoLogix Support. We can be reached Monday through Friday from 8:30 AM to 5:30 PM Eastern time.
Appendix
Setting BIOS
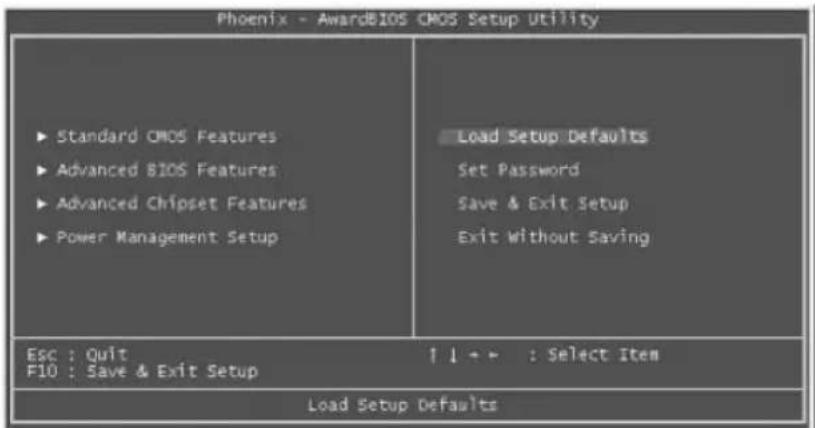
Not long after activating the power, you will see the following screen. Please press the "Delete" button to get into BIOS screen. If you would like to see the POST screen, you may just press "Tab" button. After pressing "Delete" button, you will see the following BIOS setup menu:

Now you can move the cursor by using direction keys on the keyboard. Move the cursor to the option item "Load Setup Defaults" and press "Enter" button.
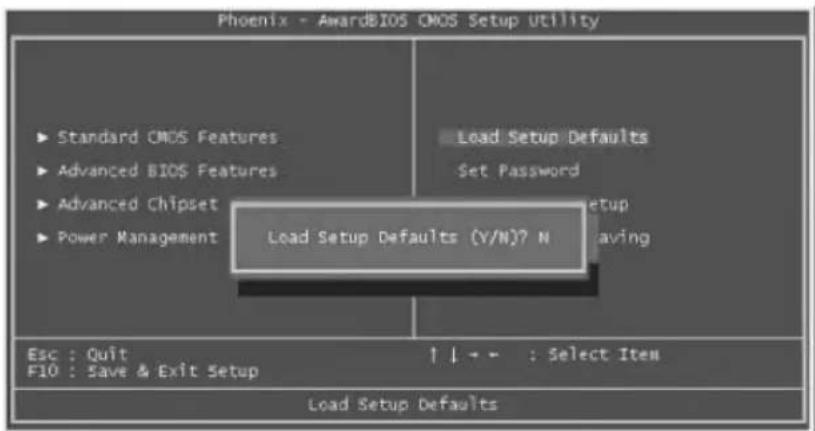
Then the following dialogue screen will pop up to confirm the default BIOS values. Please press "Y" to confirm and then press the "Enter" button.
Finally, move the cursor to "Save & Exit Setup" and press "Enter" to save the parameters and exit the BIOS setup.
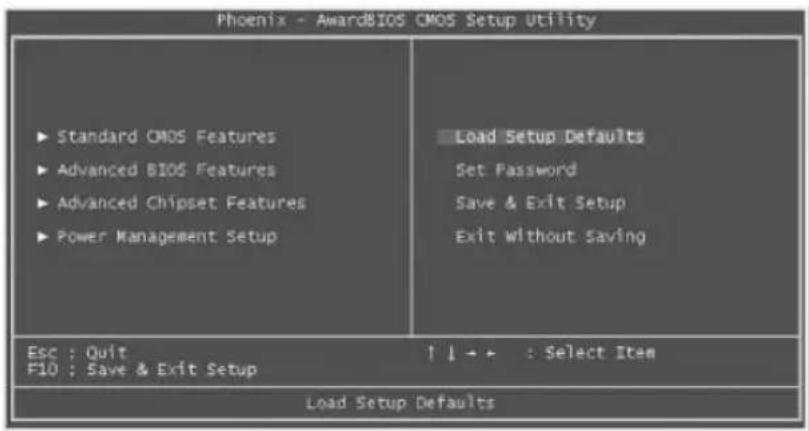
At the same time, type "Y" in the dialogue box and press "Enter" to exit.

Notes:
About InfoLogix
InfoLogix is a leading provider of technology and RFID based intelligence solutions that enable the mobile enterprise. InfoLogix uses the industry's most advanced technologies to increase the efficiency, accuracy, and transparency of complex business and clinical processes for the healthcare industry and the commercial marketplace.
With 19 issued patents, InfoLogix provides mobile managed solutions, on-demand software applications, mobile infrastructure products, and strategic consulting services to over 2,000 clients in North America including Kraft Foods, Merck and Company, General Electric, Kaiser Permanente, MultiCare Health System and Stanford School of Medicine. InfoLogix is a publicly-traded company (NASDAQ: IFLG).
101 E. County Line Road, Hatboro, PA 19040
P: 215.604.0691
F: 215.604.0695
E: info@infologix.com
www.infologix.com
© Copyright 2008 InfoLogix
PI-002-06/08