
TW-864T - Cassette player LG - Free user manual and instructions
Find the device manual for free TW-864T LG in PDF.


| Product Type | Portable Cassette Player with Radio and CD/Line Input |
| Model | LG TW-864T |
| Dimensions (W x H x D) | 605 x 249.5 x 211 mm |
| Weight | 5.95 kg |
| Power Consumption | 15 W |
| AC Operation Voltage | As indicated on the back of the set |
| Battery Type | 6 x D (R20) batteries, 9V DC total |
| Frequency Range (AM/MW) | 515 – 1650 kHz |
| Frequency Range (FM) | 87.4 – 108.2 MHz or 64 – 109 MHz (depending on version) |
| Frequency Range (SW1) | 2.2 – 7.3 MHz |
| Frequency Range (SW2) | 6.8 – 22.5 MHz |
| Frequency Range (LW) | 140 – 290 kHz |
| Cassette Recording System | 4-track, 2-channel stereo |
| Frequency Response (Cassette) | 125 – 8,000 Hz |
| Signal-to-Noise Ratio (Recording/Playback) | 40/45 dB |
| Speaker Impedance | 3.2 Ω x 2 |
| Output Power (10% THD) | 2.5 W x 2 |
| Functions | Radio (AM/FM/SW/LW), Cassette playback & recording, Dubbing (normal & double speed), Auto reverse (only on model TW-869), UBB (Ultra Bass Booster), Microphone input (karaoke), CD/Line input |
| Safety | Do not expose to rain or moisture; refer servicing to qualified personnel |
| Maintenance | Remove batteries if not used for extended periods; clean tape heads periodically |
Frequently Asked Questions - TW-864T LG
User questions about TW-864T LG
0 question about this device. Answer the ones you know or ask your own.
Ask a new question about this device
Download the instructions for your Cassette player in PDF format for free! Find your manual TW-864T - LG and take your electronic device back in hand. On this page are published all the documents necessary for the use of your device. TW-864T by LG.
USER MANUAL TW-864T LG
Please read this manual carefully before operating your set.
WARNING
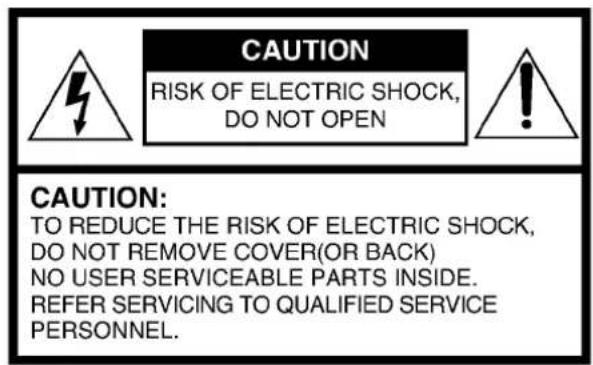
To reduce the risk of fire or electric shock, do not expose this appliance to rain or moisture.
The graphical symbols marked on the bottom or back of the set mean the following explanation.
The lightning flash with arrowhead within an equilateral triangle is intended to alert the user to the presence of uninsulated "dangerous voltage" within the product's enclosure that may be of sufficient magnitude to constitute a risk of electric shock to persons.

The exclamation point within an equilateral triangle is intended to alert the user to the presence of important operating and maintenance (servicing) instructions in the literature accompanying the appliance.
To avoid electrical shock, do not open the cabinet. Refer servicing to qualified personnel only.
Shock hazard - do not open.
CAUTION
Use of controls or adjustments or performance of procedures other than those specified herein may result in hazardous radiation exposure.
The power switch of this unit is secondly mounted and does not disconnect the whole unit from the mains supply in the OFF position.

■ Front View
■ Back View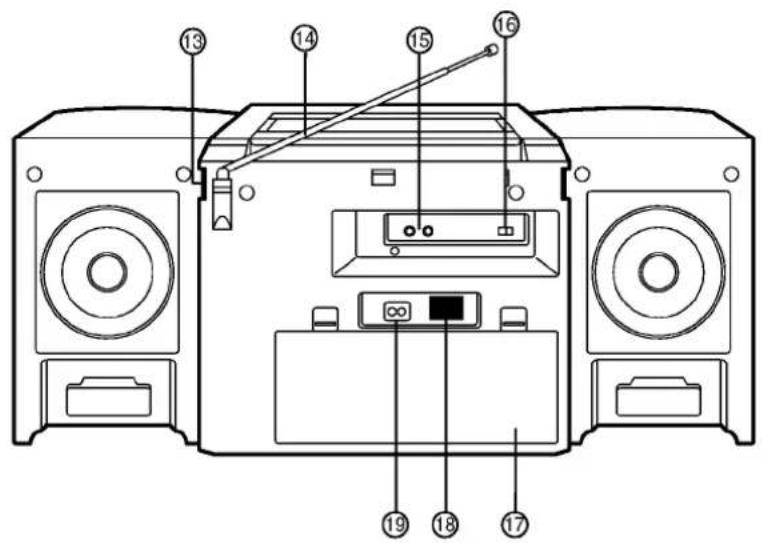
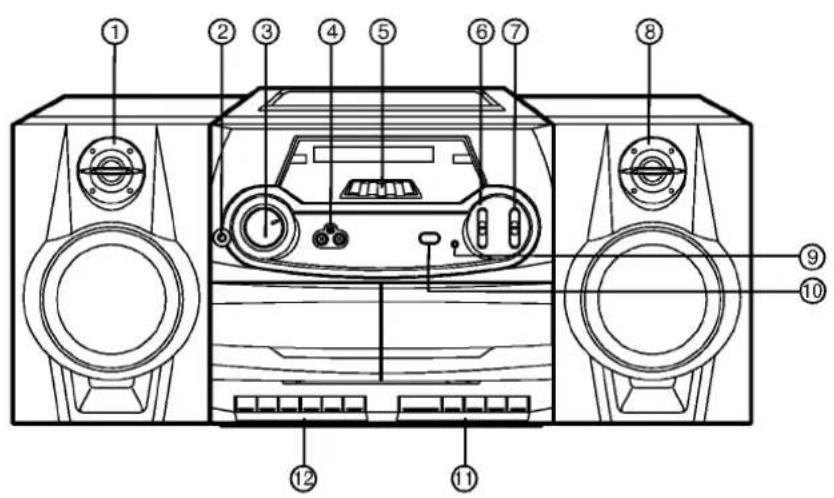
- SPEAKER (L)
- Microphone input socket (optional)
- VOLUME knob
- CD/LINE IN input socket
- TUNING control knob
- FUNCTION switch
- BAND switch
- SPEAKER (R)
- FM STEREO indicator
- UBB switch
- DECK B controls
- DECK A controls
- SPEAKER release lever
- Telescopic antenna
- SPEAKER input socket (R/L)
- RIF/FM MODE (optional) switch
- Battery compartment
- Voltage selector (optional)
- AC power input socket
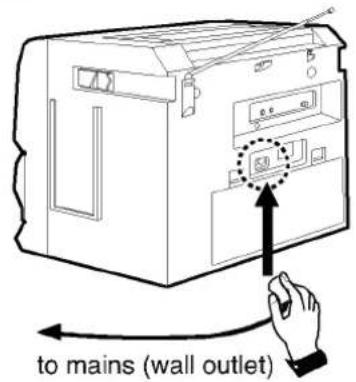
The AC Power cord Connection
Set (see fig. ■)
- Before connecting the AC power cord, check that the operating voltage of your unit is identical with the voltage of your local power supply.
- Connect one end of the AC power cord (supplied) to the AC IN socket located at the backside of your set.
- Plug the other end into the wall outlet.
※ Unplug the AC power cord from the wall outlet if you do not intend to use it for an extended period of time.
Adjusting the voltage (optional)
If your set is equipped with a voltage selector at the back side, be sure to set it to your local power supply before connecting the AC power cord.
Battery Installation
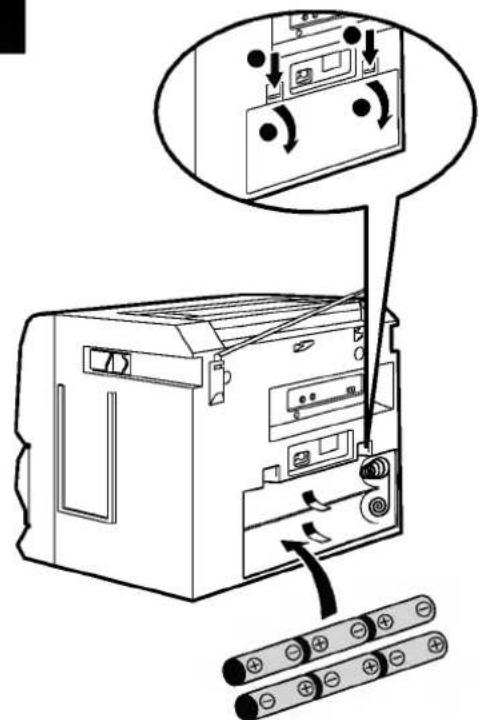
Set (see fig. ■)
- Press open the battery cover.
- Put six "D" (R20) batteries into the compartment, making sure the + and - are correctly positioned.
- Replace the cover.
NOTE:
- To avoid damage from possible battery leakage, remove the batteries if you do not plan to use the set for an extended period of time.
- When the batteries are weak, replace all the batteries with new ones.
- When the AC power cord is connected to the wall outlet, the batteries are not worn out.
Speaker Connection
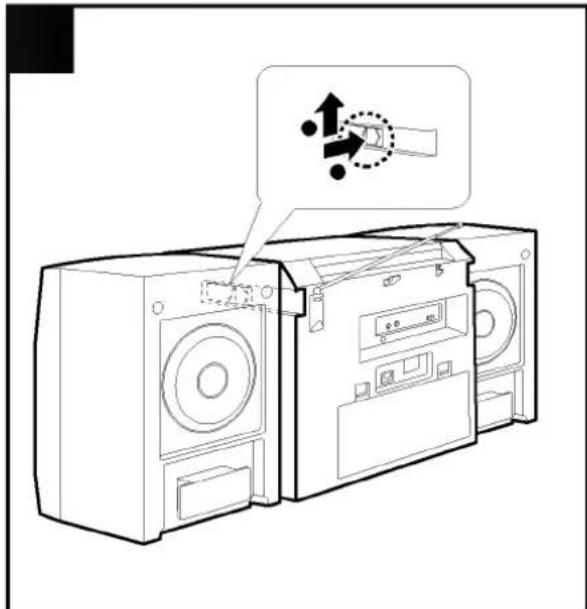
Speaker Attachment
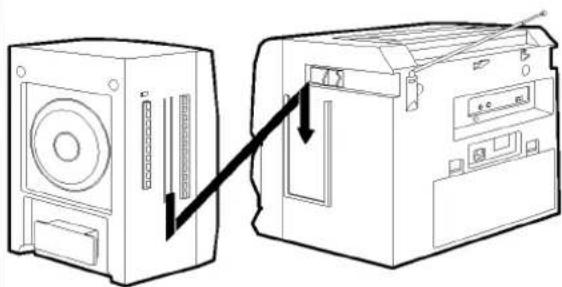
Set (see fig. ■)
- Position the speaker guide slots with the guide ribs on the set.
- Gently push the speaker downwards until the speaker release lever automatically locks the speaker into place.
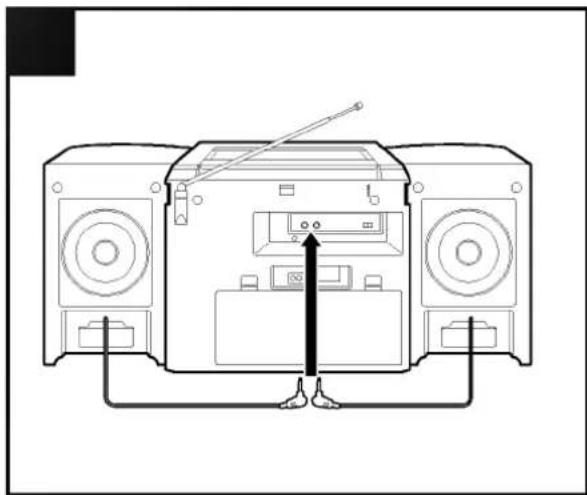
Speaker Lead Connection
Set (see fig. ■)
- Plug the right speaker lead into the "R" speaker socket located at the backside of your set.
- Plug the left speaker lead into the "L".
Speaker Detachment
Set (see fig. ■)
- Unplug the speaker leads.
- Press the speaker release lever and slide the speaker up.
Sound Adjustment
VOLUME:
Turn VOLUME clockwise to increase the sound level, or anti-clockwise to decrease it.
UBB (Ultra Bass Booster)
Additional bass accentuation.
- Set FUNCTION to RADIO.
- Set BAND to one which you wish to listen.
- Tune in a station using TUNING control.
- Set FUNCTION to TAPE (OFF) to turn off your set.
STEREO or MONO:
- Set BAND to FM ST to listen to an FM stereo broadcast. The FM STEREO indicator will light.
- Set BAND to FM when listening to an FM stereo broadcast. Selecting this function will substantially reduce the noise, however the stereo effect will be lost.
NOTE:
Adjust the antenna to get more clear reception.
1. AM(MW):
The antenna is built within the set and rotate the set for better reception.
2. FM/SW1/SW2:
Pull the telescopic antenna out and adjust the angle and direction for better reception.
Cassette Operation
- Set FUNCTION to TAPE.
- Open the cassette door by pressing ■ ▲ ST/EJ. (Deck A or B)
- Insert a cassette and push close the door.
- Press PLAY(▶) (or ◀ PLAY ▶ :TW-869) to playback.
- Press PAUSE(Ⅲ) to pause. Press PAUSE again to resume play.
- Press F.FWD(▶▶) or REW(◀◀) to fast forward or rewind the tape.
- Press ■ ▲ ST/EJ to stop play. Your cassette deck will automatically stop at the end of the tape. ※ This function will not be operated during operating the fast forward and rewind.
Auto Reverse
This function is for the model TW-869 (Deck B) only.
To change the playback side:
Press DIR (⇌) during playback.
PLAY MODE:
- Set PLAY MODE → to by pressing. Both sides of a cassette are played and stops automatically at the end of the tape.
- Set PLAY MODE → to by pressing. Both sides of a cassette are played continuously.
Continuous Play
- Set FUNCTION to TAPE.
- Insert a cassette into each deck.
- Be sure PLAY MODE of deck B (TW-869) is in → position.
- Press PLAY (▶) (or ◀ PLAY ▶ : TW-869) for deck B. The cassette will begin to play.
- Press PLAY (▶) and PAUSE (II) for deck A. After the cassette is finished playing in deck B, the cassette in deck A is played.
- Press ■ ▲ ST/EJ to stop play.
Auxiliary Equipment
You may connect additional appliances; CD player etc. so that you may listen or record the sound using your set.
Use RCA phono type connectors when connecting any additional appliance.
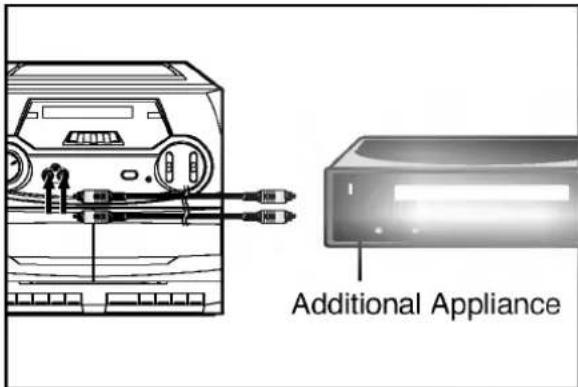
- Set FUNCTION to CD/LINE IN.
- The additional appliance connect to the CD/LINE IN sockets.
- Start playing a additional appliance.
You may record from the microphone onto a cassette placed into cassette deck A.
You may also use your set as a karaoke (sing along) machine.
- Plug a microphone into the MIC socket.
- Start playing a TAPE, RADIO or additional appliance.
- Start speaking or singing into the microphone.
- If you wish the recording, insert the blank cassette into deck A and press ● REC.
NOTE:
- Microphone is not supplied.
- You can't the microphone recording during dubbing for double speed recording.
Cassette Operation
NOTE:
- Recording levels have been preset at the factory under optimum conditions and cannot be changed.
- Your set can record onto Normal; CrO2 tapes and metal tapes cannot be used.
Basic Recording
- Set FUNCTION to one which you wish to record from.
- Insert a blank cassette into deck A.
- Press ● REC. PLAY(▶) goes down automatically.
- Start playing your RADIO or additional appliance.
- Press ■ ▲ ST/EJ to finish recording. Your cassette deck will automatically stop at the end of the tape. * Set RIF to 1, 2 or 3, depending on which one best reduces the noise when AM(MW) broadcast recording.
Dubbing
Your set can record from one cassette to another at normal speed or double speed.
- Insert the blank cassette into deck A.
- Insert the pre-recorded cassette into deck B.
- Set FUNCTION to NOR for normal speed recording or HI-DUBB for double speed recording.
- Press PAUSE(Ⅱ) and the ● REC. for deck A.
- Press PLAY(▶) for deck B. The cassette will begin to record.
- To stop the dubbing, press the ■ ▲ ST/EJ for decks A and B.
NOTE:
Do not change recording speed during the dubbing.
● RADIO SECTION
Frequency range (optional)
MW(AM) 515~1650kHz
FM....87.4~108.2MHz or 64~109MHz
SW1 2.2~7.3MHz
SW2 6.8~22.5MHz
LW 140~290kHz
Intermediate frequencies
MW(AM)/LW/SW 455kHz
FM 10.7MHz
Antenna
MW(AM)/LW.....Ferrite bar antenna
FM/SW1/SW2.....Telescopic antenna
● CASSETTE SECTION
Recording system...4 tracks 2 channel stereo Frequency response .....125~8,000Hz S/N ratio .....40/45dB(rec/play)
GENERAL
Speaker....3.2Ω x 2
Output power (T.H.D10%)....2.5W x 2
AC operation......Refer to the indicated voltage on the back of set
Battery operation ....DC 9V, six "D"(R20) batteries(not supplied)
Power consumption 15W
Dimensions(WxHxD)....605 x 249.5 x 211mm
Weight 5.95kg
NOTE:
Design and specifications are subject to change without notice for improvement.

LG



- WARNING
- CAUTION
- THE AC POWER CORD CONNECTION
- SET (SEE FIG. ■)
- ADJUSTING THE VOLTAGE (OPTIONAL)
- BATTERY INSTALLATION
- NOTE
- SPEAKER CONNECTION
- SPEAKER ATTACHMENT
- SPEAKER LEAD CONNECTION
- SPEAKER DETACHMENT
- SOUND ADJUSTMENT
- VOLUME
- UBB (ULTRA BASS BOOSTER)
- STEREO OR MONO
- AM(MW)
- FM/SW1/SW
- CASSETTE OPERATION
- AUTO REVERSE
- TO CHANGE THE PLAYBACK SIDE
- PLAY MODE
- CONTINUOUS PLAY
- AUXILIARY EQUIPMENT
- BASIC RECORDING
- DUBBING
- ● RADIO SECTION
- ● CASSETTE SECTION
- GENERAL
Brand : LG
Model : TW-864T
Category : Cassette player