KY-R645RLJPQ - Cooker PANASONIC - Free user manual and instructions
Find the device manual for free KY-R645RLJPQ PANASONIC in PDF.

| Type of product | Freestanding Electric Cooker |
| Brand | Panasonic |
| Model | KY-R645RLJPQ |
| Width | 60 cm |
| Depth | 60 cm |
| Height | 85 cm |
| Weight | 55 kg |
| Energy source | Electric (230 V, 50 Hz) |
| Total power consumption | 10.0 kW |
| Number of cooking zones | 4 |
| Oven type | Multifunction electric oven |
| Oven capacity | 65 L |
| Grill function | Yes |
| Timer | Digital timer with auto shut-off |
| Child lock | Yes |
| Self-cleaning | No (conventional enamel interior) |
| Cooling fan | Yes (for oven door and controls) |
| Installation type | Freestanding |
| Control panel | Touch controls with LED display |
| Spare parts availability | Via Panasonic authorized service centers |
| Repair index (France) | 8.5 / 10 |
Frequently Asked Questions - KY-R645RLJPQ PANASONIC
User questions about KY-R645RLJPQ PANASONIC
0 question about this device. Answer the ones you know or ask your own.
Ask a new question about this device
Download the instructions for your Cooker in PDF format for free! Find your manual KY-R645RLJPQ - PANASONIC and take your electronic device back in hand. On this page are published all the documents necessary for the use of your device. KY-R645RLJPQ by PANASONIC.
USER MANUAL KY-R645RLJPQ PANASONIC
Operating and Installation Instructions
Household UseCeramic H
Model No.: KY-R645RLJPQ
Operating and Installation Instructions 2 - 23
Thank you for purchasing the Panasonic product.
• This appliance is intended for household use only.
- Please read these instructions carefully before attempting to install, operate or service this product.
- For optimum performance and safety, please read these instructions carefully and follow safety precautions when using this product.
- Before using this product please pay extra attention to "Safety Precautions" (Page 3 - 5).
Keep this Operating and Installation Instructions for future use.
Table of Contents
Safety Precautions 3 - 5
Parts Identification 6 - 7
- Parts Identification....6
- Accessories ....6
- Control Panel 7
Using the Ceramic Hob 8 - 13
- Operating the Ceramic Hob 8 - 9
- Timer Function....9 - 10
- Safety Features for Ceramic Hob.... 10 - 11
• Cooking Guidelines.... 12 - 13
Cleaning and Maintenance.... 14 - 15
Troubleshooting ....16
Specifications 17
For Installer
Installation Instructions.... 18 - 23
- Installation Requirements 20 - 22
• Electrical Connection....23
In order to prevent accidents or injuries to the users, other people, and damage to property, please follow the instructions below.
■ The following charts indicate the degree of damage caused by wrong operation.

WARNING
Indicate serious injury or death.

CAUTION
Indicate risk of injury or property damage.
■ The symbols are classified and explained as follows.


These symbols indicate prohibition.

This symbol indicates requirement that must be followed.

WARNING

Stop using the product when any abnormality / failure occurs and turn 'OFF' the isolating switch or remove power plug if fitted.
(Risk of smoke/fire/electric shock)
Example of abnormality / failure:
- Abnormal noise or heat.
- Fire or oil ignition.
- Abnormal emission of smoke, fire.
- The product sometimes does not start when turned on.
- The power is sometimes disconnected when the cord is moved.
- Burnt odour or abnormal noise is detected during operation.
- The body is deformed or abnormally hot.
• The Glass Panel is cracked.
Contact a Panasonic Authorised Service Centre immediately for maintenance / repair.

The Ceramic Hob must be earthed. Plug the power cord to socket outlet with earthing continuity terminal.
Improper grounding could cause electric shock.

The means for disconnection must be incorporated in the fixed wiring in accordance with the wiring rules.

This appliance is necessary to allow disconnection from the supply after installation. The disconnection may be achieved by having the plug accessible or by incorporating a switch in the fixed wiring in accordance with the wiring rules.

This appliance is not intended to be operated by means of an external timer or a separate remote-control system.

If the supply cord is damaged, it must be replaced by the manufacturer, its service agent or similarly qualified persons in order to avoid a hazard.

Be sure to disconnect the Power Plug from the wall outlet or switch OFF the external switch before maintenance, repair or service. Also, do not handle the Power Plug or external switch with wet hand.

When disconnecting the Power Plug, hold the plug itself. Do not pull the cord in anyway. The cord may be damaged and may cause fire or electric shock.

Insert the Power Plug firmly, otherwise it may cause fire or electric shock.

WARNING

Clean the Power Plug regularly with dry cloth, otherwise, it may cause insufficient insulation due to moisture, and may cause fire.

In case of malfunction or breakdown, immediately stop using the appliance. Turn off the main power switch and the circuit breaker, and then contact the service center. Failure to do this may cause smoke, burns, and electric shock.

This appliance is not intended for use by persons (including children) with reduced physical, sensory or mental capabilities, or lack of experience and knowledge, unless they have been given supervision or instruction concerning use of the appliance by a person responsible for their safety. Children should be supervised to ensure that they do not play with the appliance.

Unattended cooking on a hob with fat or oil can be dangerous and may result in a fire.

If the surface is cracked, switch off the appliance to avoid the possibility of electric shock.

Do not damage the power cord or Power Plug.

Do not connect the power voltage other than 220 - 240 V \~ , may cause fire or electric shock.

Avoid using for deep frying. Overheated oil may catch fire when it is used for deep-frying because this Ceramic Hob does not have the “Oil Temperature Control System”.

Must not disassemble the Ceramic Hob for reconstruction.

CAUTION

Installation and servicing must be carried out by competent persons in accordance with the regulation in force.

Before the appliance is put into operation, all the protective film applied must be removed.

Stir liquids (For example: soup, stewed food) before heating. If the liquid is heated without stirring:
- The cookware may jump and damage the Glass Panel.
- The liquids splatter and may cause burns or injuries.

Keep all combustible material away. It may cause fire.

After use, switch off the Ceramic Hob element by its controls (OFF/ON switch and main power switch) and do not rely on the pot detector (safety functions).

The cooking process has to be supervised. A short term cooking process has to be supervised continuously.

Keep pots stable. May cause injuries or burns if the pots fall off.

If acidic food (For example: vinegar, jam, food which contains lemon or plum) sticks to the Glass Panel, wipe it off immediately. Otherwise, the Glass Panel may be discoloured.

CAUTION

When stir frying with Ceramic Hob, observe the following points:
- Do not leave this Ceramic Hob unattended.
- Do not overheat.
- Use lower power level for preheating. (If a small quantity of oil is used and heated excessively, the oil temperature will rise rapidly and the oil may catch fire. If the bottom of the pot is thin, it may become red due to the heat).

When using the power level "9" of Ceramic Hob:
- Do not use for stir frying. The bottom of the pot may be deformed.
- Do not use for simmering. The ingredients may boil over.
- When boiling water, turn down the power level as soon as the water has boiled. Water may boil or splatter around.

Please use caution when unpacking, installing or moving this product, as some exposed edges may be sharp to the touch and may cause injury if not handled with care.

To protect the Glass Panel from damage, observe the following instructions:
- Do not place portable gas burner, steel cylinders or canned goods. They would burst if mistakenly heated.
- Do not let metallic objects such as knives, forks, spoons, lids, aluminium foil / tray, retort pouch, magnetic ring, watch or accessories be placed on / near the top or be touched to cookware during Ceramic Hob is operating as they may get hot and cause burns or injuries.
- Do not apply high pressure on Glass Panel or drop things on it.
- Do not use harsh abrasive cleaners or sharp metal scrapers to clean the Glass Panel, since they can scratch the surface, which may cause shattering of the Glass Panel.

Spray cleaner is not to be used for cleaning.

A steam cleaner is not to be used. It may cause malfunction, if the water enters the electric parts.

Do not insert metallic objects such as pins or wire into the intake / exhaust vent.

Do not disassemble, attempt to repair or modify the Ceramic Hob. For repair, contact the dealer or Customer care centre.

Do not replace the parts of the Ceramic Hob with spare parts other than authorised Panasonic parts.

Do not touch the Glass Panel during or after use. Be extra careful when the high temperature caution signal "H" lights up.
- Clean the Ceramic Hob after it has cooled down.

For proper use of this appliance, observe the following instructions:
- Do not place paper, or any material that may burn under the pot. The paper may scorch due to the heat of the pot.
- Do not heat empty pots or overheat. The ingredients may burn or the pot may be damaged.
- Danger of fire : Do not store items on the cooking surfaces.
- Do not use the product for purpose other than cooking.
- Do not heat and scorch empty enamelled pots. The Glass Panel may be damaged by melted bottom.
- Do not rub the Glass Panel with the bottom of the pot or place a hot pot on it. The Glass Panel may be damaged or discoloured.
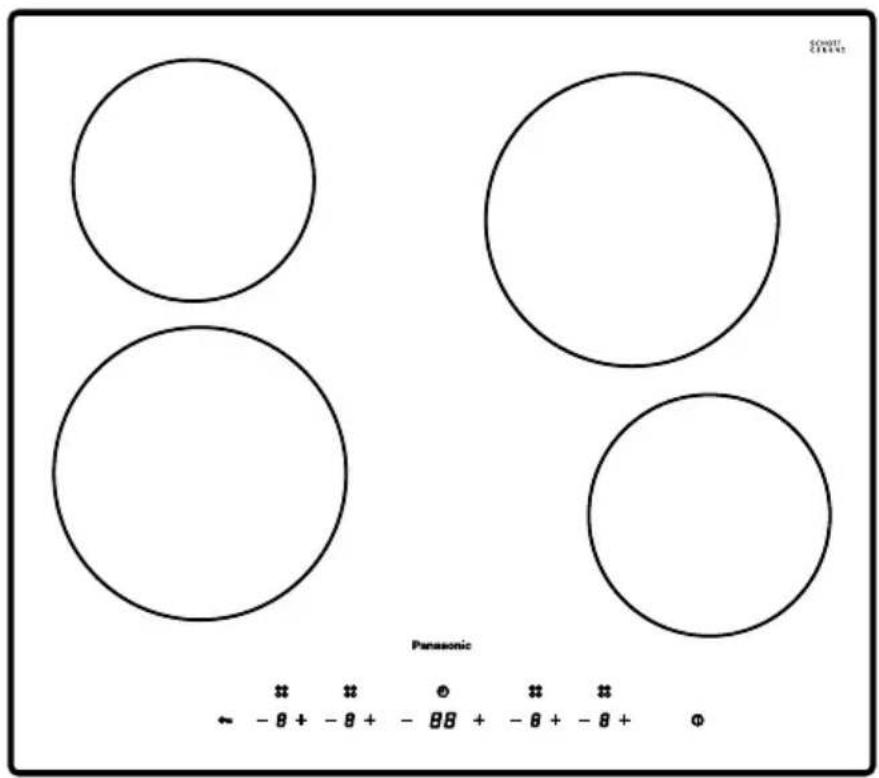
Parts Identifi cation
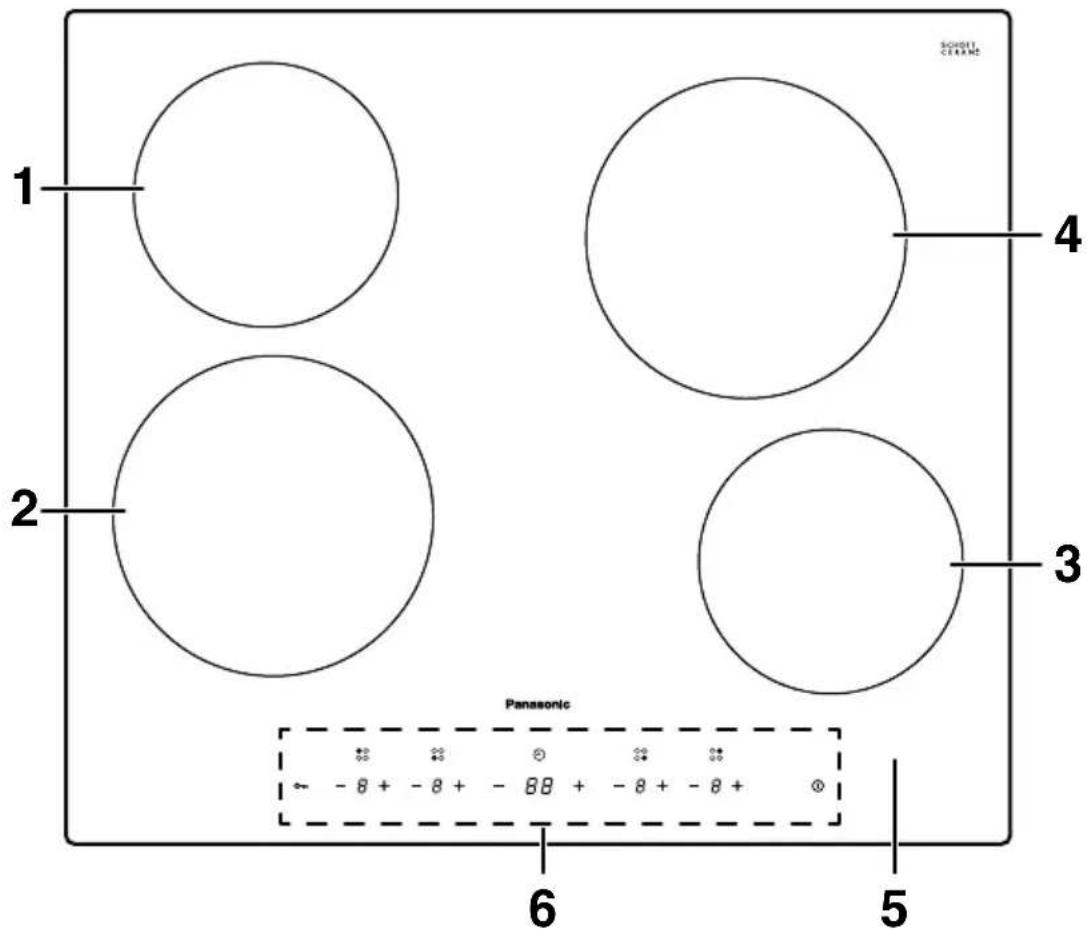
- Cooking Zone 1 (ø 165 mm, 1200 W).
- Cooking Zone 2 (ø 200 mm, 1800 W).
- Cooking Zone 3 (ø 165 mm, 1200 W).
- Cooking Zone 4 (ø 200 mm, 1800 W).
- Glass Panel.
- Control Panel.
Accessories
Warranty Card Operating and Installation Instructions
Control Panel
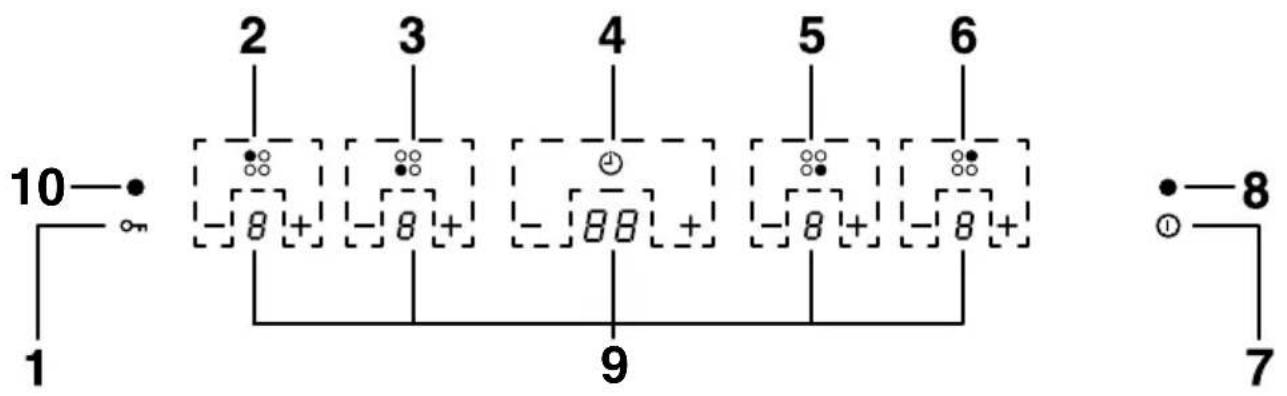
- Child Lock
- Cooking Zone 1 Controls
- Cooking Zone 2 Controls
-
Programme Time Controls
-
Cooking Zone 3 Controls
- Cooking Zone 4 Controls
- OFF/ON Control
- Indicator OFF/ON Light
- Display Screen
- Indicator Child Lock Light
Shape of the bottom
 | The bottom is fl at and has uniform contact with the Glass Panel. | 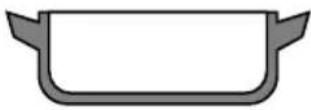 |
 | Do not use:a. The round-bottom cookware.b. The pot which has legs or protrusions.c. The curved-bottom cookware (A curve must not be 3 mm or more).* If the round-bottom cookware is used, it cannot be heated, the safety functions do not activate properly, or power level might be lower.d. The cookware with very thin bottom.(Might get warped.) | 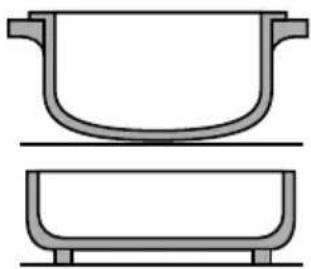 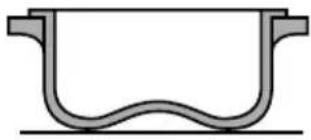 |
Operating the Ceramic Hob
Before use
- Read this guide, taking special note of the ‘Safety Precautions’ section.
- Remove any protective film that may still be on the Ceramic Hob.
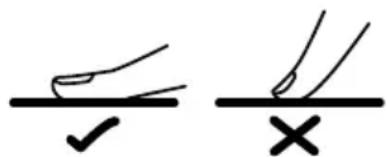
Using the Touch Controls
- The controls respond to touch, so it is unnecessary to apply any pressure.
- Use the ball of the finger, not its tip.
- A beep will sound each time a touch is registered.
- Make sure the controls are always clean, dry, and that there is no object (e.g. a utensil or a cloth) covering them. Even a thin film of water cause make the controls difficult to operate.
Start cooking
After connecting the Ceramic Hob to the power supply, a beep will sound.
- Touch①, all displays show or, indicating that the Ceramic Hob has entered the state of standby mode.
- Place suitable cookware on the cooking zone to be used.
- Make sure the bottom of the cookware and the surface of the cooking clean and dry.
-
Select the power level by touching the — or + control on the selected cooking zone. (Power level should be within 1-9)
-
If the power level is not selected within 1 minute, the Ceramic Hob will automatically switch off. The operation needs to start again from step 1.
- The power level can be changed at any time during cooking.
Finish cooking
- Turn off the cooking zone by touching to , of touching and - + simultaneously.
- Turn off the whole cooking zone by touching the OFF/ON control, ①.
Timer Function
The timer can be used for either operation below:
To set as Reminder. In this case, the timer will not turn any cooking zone off when the set time is up.
② To set time to turn only one cooking zone off when the set time is up.
- You can cancel the timer by touching — to ,or touching or simultaneously. — — will be visible on the display.
- Touch the— or control of the “Programme Time Control” to decrease or increase timer by 1 minute.
- Hold the— or control of the “Programme Time Control” to decrease or increase timer by 10 minutes.
For ① condition
In standby mode,
- Touch — or on the selected cooking zone.
- Wait for the power level indicator to stop flashing.
- Touch — or on the "Programme Time Control" to set the time. (0-99 minutes)
- It will begin to countdown immediately. The display will show the remaining time.
Alternatively, you can operate the timer in following steps:
- Touch — or — on the “Programme Time Control” first, then touch — or — on the selected cooking zone without waiting any indicator to stop fl ashing.
Note:
- A beep will sound after the timer reaches 00. -- will be visible on the display. Touch any control on the display to stop the beep.
- The heating will continue until the operation is cancelled, or the Ceramic Hob will shutdown automatically based on default heating time. (Refer to “Auto Shutdown Protection”)
- During the countdown, the power level can be changed by touching — or on the corresponding cooking zone.
For ② condition
In standby mode,
- Touch — or on the cooking zone which is preferable to be used.
- While the power level indicator is still flashing, touch — or on the “Programme Time Control” to set the time. (0-99 minutes)
- A red dot flashing next to the power level indicator will be visible on the display. The dot indicates the cooking zone has been selected.
- It will begin to countdown immediately. The display will show the remaining time.
Note:
- A beep will sound once after the timer reaches 📄 will be visible on the display.
- The selected cooking zone will shutdown automatically. Other cooking zones will keep operating if they are turned on previously.
- During the countdown, the power level can be changed by touching — or on the corresponding cooking zone.
Safety Features for Ceramic Hob
Child Lock Protection
To Lock: Touch a beep will sound, and will be visible on the display. All controls will be disabled, except the OFF/ON control, ① in case of emergency.
To Unlock: TouchOn for approximate 3 seconds, a beep will sound and will go off, indicating all controls are ready for use.
Note:
The Ceramic Hob may always be turned off with In lock mode, but for any further operation it will first need to be unlocked.
Over-Temperature Protection
A temperature sensor equipped monitors the temperature inside the Ceramic Hob. When an excessive temperature is monitored, the Ceramic Hob will stop operation automatically.
Using the Ceramic Hob
Auto Shutdown Protection
Auto shut down is a safety function for the Ceramic Hob. It shuts down automatically if forgotten to turn off after cooking. The default shutdown time for the various power levels are shown in the below table:
| P o w e | r | l | e | v | e | l | 1 | 2 | 3 |
| Default shutdown time (hours) | 8 | 8 | 8 | 4 | 4 | 4 | 2 | 2 | 2 |
4
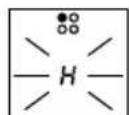
Residual Heat Warning
When the Ceramic Hob has been operating for some time, there will be some residual heat. The letter H appears and blinks to warn the user to keep away from it. The letter H will disappear when the particular cooking zone has cooled down.
WARNING

Beware of hot surfaces.
Ceramic Hob will show which cooking zone is hot to touch with the H flashing on the display. It will disappear when the surface has cooled down to a safe temperature.

Do not cover the cooking zone with flammable material such as cloth, alcohol contained detergent, etc. when H is displayed.
Cooking Guidelines

WARNING

Take care when frying as the oil and fat will heat up very quickly, particularly if cooking at high power levels. At extremely high temperatures, oil and fat will ignite spontaneously and this presents a serious fire risk.
■ Cooking Tips:
- When food comes to the boil, reduce the temperature setting.
- Using a lid will reduce the cooking time and save energy by retaining the heat.
- Minimise the amount of liquid or fat to reduce the cooking time.
- Start cooking on a high setting and reduce the setting when the food has been heated through.
Simmering, cooking rice
- Simmering occurs below boiling point, at around 85 °C, when bubbles are just rising occasionally to the surface of the cooking liquid. It is the key to delicious soups and tender stews because the fl avours develop without overcooking the food. Egg-based and fl our thickened sauces should be cooked below boiling temperature.
- Some tasks, including cooking rice by the absorption method, may require a setting higher than the recommended setting to ensure the food is cooked properly in the time recommended.
Searing steak
• To cook juicy fl avoursome steaks:
- Stand the meat at room temperature for about 20 minutes before cooking.
- Heat up a heavy-based frying pan.
- Brush both sides of the steak with oil. Drizzle a small amount of oil into the hot pan and put the meat in the hot pan.
- Turn the steak only once during cooking. The exact cooking time will depend on the thickness of the steak and desired tenderness. The cooking time may vary from about 2 – 8 minutes per side. Press the steak to judge how cooked it is; the firmer it feels the more ‘well done’ it is.
- Leave the steak to rest on a warm plate for a few minutes to allow it to rest and become tender before serving.
For stir-frying
- Choose a flat-based wok or a large frying pan.
- Be ready with all the ingredients and equipment. Stir-frying should be quick. If cooking large quantities, cook the food in several smaller batches.
- Preheat the pan briefly and add two tablespoons of oil.
- Cook any meat first, put it aside and keep warm.
- Stir-fry the vegetables. When they are hot but still crisp, turn the cooking zone to a lower setting, return the meat to pan and add seasoning.
- Stir the ingredients gently to make sure they are heated through.
- Serve immediately.
Power level
The settings below are guidelines only. The exact setting will depend on several factors, including type of cookware used and the cooking portion. Experiment with the Ceramic Hob to find the best setting.
| Power level Suitable cooking mode | |
| 1-2 | Delicate warming for small amounts of foodMelting chocolate, butter, and foods that burn quicklyGentle simmeringSlow warming |
| 3-4 | ReheatingRapid simmeringCooking rice |
| 5-6 | Pancakes |
| 7-8 | SautéingCooking pasta |
| 9 | Stir-fryingSearingBringing soup to the boilBoiling water |

WARNING
Before performing cleaning and maintenance tasks, use isolation switch to disconnect the power supply. Children should not clean the Ceramic Hob or perform maintenance tasks.
| What How | Important! | |
| ■ Everyday dirt on Glass Panel (fi ngerprints, marks, stains left by food or non-sugary spillovers on the Glass Panel) | 1. Switch OFF the power.2. Apply a neutral detergent when the Glass Panel has cooled down.3. Rinse and wipe dry with a clean cloth or paper towel. | After the power has been switched OFF and there are no more hot Cooking Zones, indication may disappear. However, take extreme caution as the surface of the Cooking Zone may still be hot.Hard scourers, some nylon scourers and harsh/abrasive cleaning agents may scratch the Glass Panel. Make sure the cleaner or scourer is suitable.Never leave cleaning residue on the Glass Panel. It may be permanently stained. |
| ■ Boil-overs, mel and hot sugary spills on the Glass Panel. | Remove these immediately with a palette knife or razor blade scraper that suitable for the Glass Panel, but beware of hot cooking zone surface:1. Switch OFF the power.2. Hold the blade or utensil at a 30° angle and scrape the dirt or spill to a cool area of the Glass Panel.3. Follow steps 2 to 3 for ‘Everyday dirt on the Glass Panel’. | Remove stains left by melts and sugary food or spillovers as soon as possible. If left to cool on the Glass Panel, they may be diffi cult to remove or even permanently damage the Glass Panel surface.Cut hazard: when the safety cover is removed, the blade of a scraper is razor-sharp. Handle with extreme care and always store it safely, out of the reach of children.Take extreme care when handling the blade or utensil, the Glass Panel may scratch. |
Cleaning and Maintenance
| ■ Spillovers on the touch controls. | 1. Switch OFF the power of the Ceramic Hob.2. Absorb the spill with paper or dry cloth.3. Wipe the touch control area with a clean damp sponge or cloth.4. Wipe the area until it is completely dry with a paper towel.5. Switch ON the power to resume cooking. | · The Ceramic Hob may beep and turn itself off, and the touch controls may not function when there is liquid on it.· Make sure the touch control area is dried before turning the Ceramic Hob back on. |
Troubleshooting
| Problem Possible causes Solution | ||
| ■ The Ceramic Hob cannot be switched ON. | No power. Make sure the Ceramic Hob is connected to the power supply and that it is switched on. Check whether there is a power shortage in home or area. If everything has been checked and the problem still persists, call a Panasonic Authorised Service Centre for assistance. | |
| ■ The touch controls are not responding. | The controls are locked. Unlock the controls. See section ‘Safety Features for Ceramic Hob’. | |
| ■ The touch controls are diffi cult to operate. | There may be a slight fi lm of water over the controls or user may use the tip of the fi nger when touching the controls. | Make sure the touch control area is dry and use the ball of the fi nger when touching the controls. |
| ■ The Glass Panel is scratched. | Rough-edged cookware. Unsuitable, abrasive scourer or cleaning products used. | Use cookware with fl at and smooth bottom. See ‘Shape of the bottom’. See ‘Cleaning and Maintenance’. |
| ■ Some cookware make crackling or clicking noises. | This may be caused by the construction of your cookware. (Layers of different metals vibrating differently). | This is normal for the cookware and does not indicate a fault. |
| ■ The Ceramic Hob or a cooking zone has turned itself OFF unexpectedly, sound and an error code is displayed (alternating with one or two digits in the cooking timer display). | Technical fault. Note down the error letters and numbers, switch the power to the Ceramic Hob off at the wall, and contact a Panasonic Authorised Service Centre. | |
Specifications
| Model KY-R645RLJPQ | ||
| Electrical Rating Voltage | 220 - 240 V ~400 V 3N ~ | |
| Wattage 5500 - 6600 W6000 W | ||
| Frequency | 50 - 60 Hz | |
| Cooking Zones 4 Ceramic Zones | ||
| Dimension (L × W × H) Approx. 590 mm × 520 mm × 51.5 mm | ||
| Nett Weight Approx. 8.5 kg | ||
Safety precautions for installation
Please observe these precautions fully

WARNING
Failure to follow these instructions may cause a risk of personal injury or death.

Follow these instructions when installing the Ceramic Hob.
If it is installed improperly, it may cause electric leakage or overheat.

Install a dedicated circuit of 3 phase 400 V / 16 A or single phase 220 - 240 V / 32 A, with a power switch for power supply.
If dedicated circuit is not connected compatibly, it may cause abnormal heat on electrical wiring.

Electrical work should be done by a qualified electrician.
If the connection or repair is not completed, it may cause electric leakage or overheat.

Install the ground completely with related law.
Installation of ground can avoid electric shock if electric leakage occurs

The ground should be installed by a qualified electrician.
If the installation is not proper, electric leakage may occur.

The means for disconnection must be incorporated in the fixed wiring in accordance with the wiring rules.

This appliance is necessary to allow disconnection from the supply after installation. The disconnection may be achieved by having the plug accessible or by incorporating a switch in the fixed wiring in accordance with the wiring rules.

Never disassemble, repair or modify the Ceramic Hob.
Any attempt to do so may cause the Ceramic Hob to operate abnormally and may result in danger.

CAUTION
Failure to follow these instructions may cause a risk of personal injury or death.

Use heat resistant materials for the work surface.
The material of the work surface should have the heat resistance equal to or exceeding “laminated thermosetting high-pressure decorative sheets”.
If the materials are not heat resistant, it may cause deformation or fire.
* Do not use varnished materials as they may be discoloured.

Do not step on or drop any hard article down on the Glass Panel.
If it is cracked or broken, it may cause overheating, abnormal operation or electric shock.

Do not touch the Glass Panel or other heating parts when the Ceramic Hob is running.
It may cause burn.
Installation Requirements
Cut out the work surface according to the sizes shown in the drawing.
For the purpose of installation and use, a minimum of 50 mm space shall be preserved around the hole. Be sure the thickness of the work surface is at least 30 mm. Please select heat-resistant work surface material to avoid larger deformation caused by the heat radiation from the Ceramic Hob.
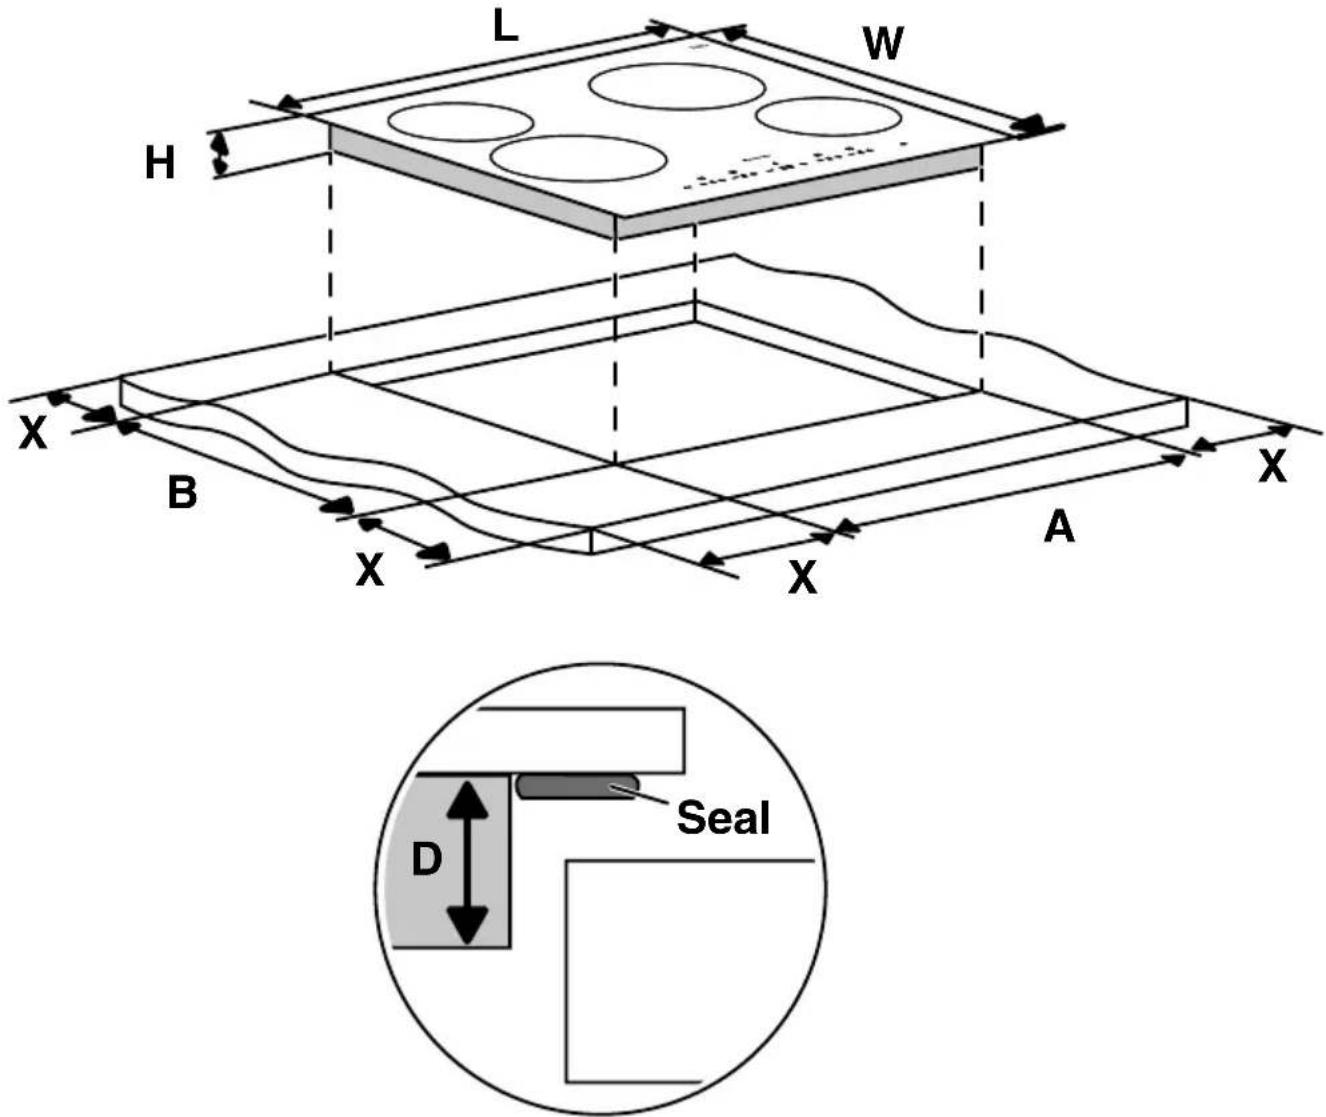
| L (mm) W | (mm) H (mm) | D (mm) A (mm) | B (mm) | X (mm) | ||
| 590 520 | 51.5 47 568 | ± 2 492 ± 2 | 50(Minimum) |
Installation Instructions
Under any circumstances, make sure the Ceramic Hob is well ventilated and the air inlet and outlet are not blocked. Ensure the Ceramic Hob is in a good working state, as shown below.
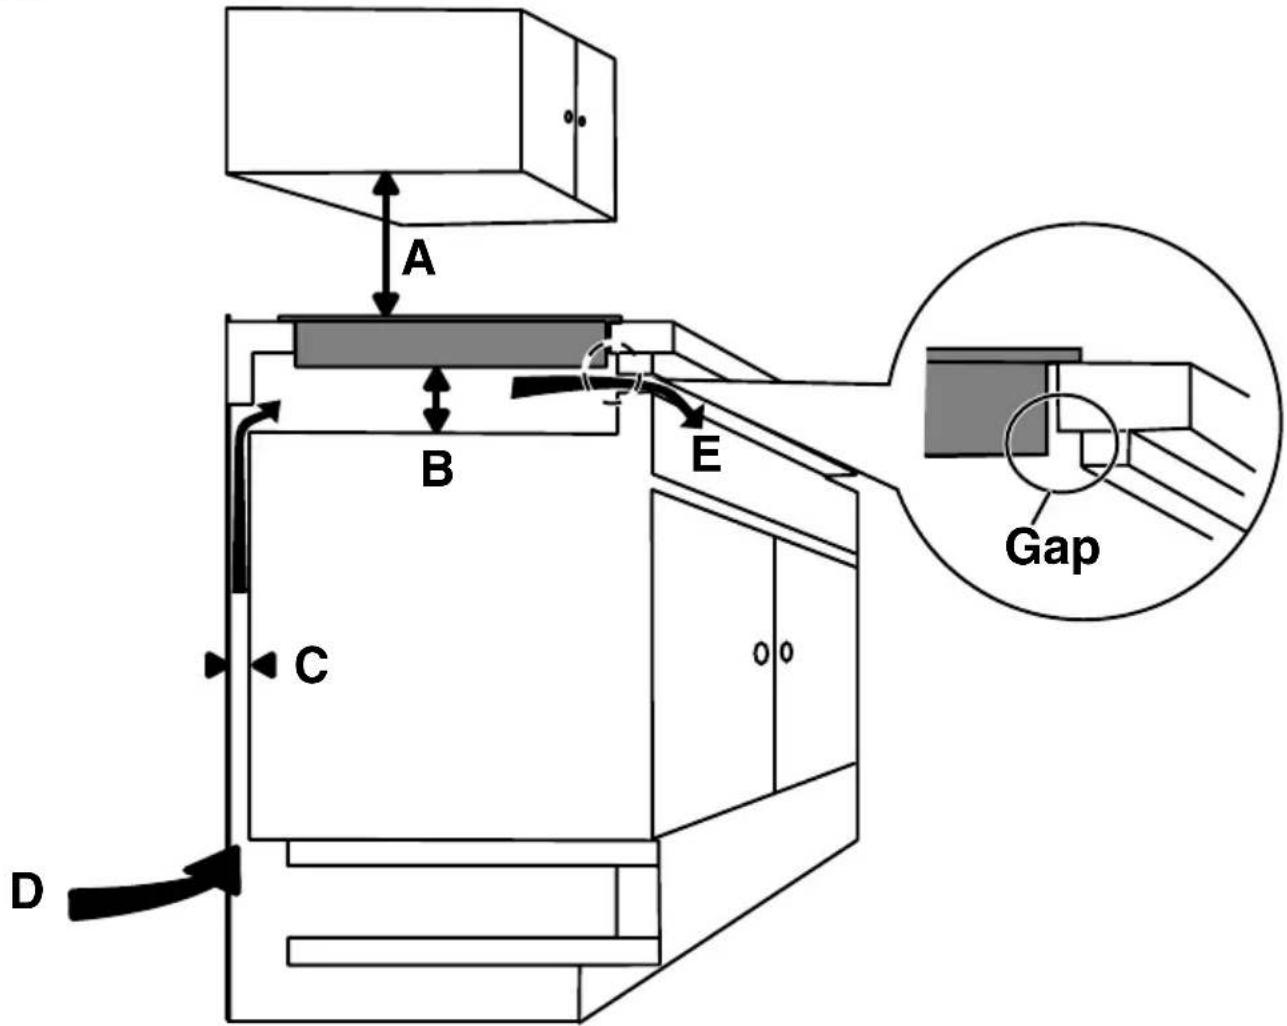
Note:
The safety distance for the Ceramic Hob installation as follows:
| A (mm) B (mm) C (mm) D E (mm) | ||||
| 760 | 50(Minimum) | 20(Minimum) | Air Intake | Air Exit5 |
■ Before the Ceramic Hob is installed, make sure that:
- The work surface is square and level, and no structural parts interfere with space requirements.
- The work surface is made of a heat-resistant material.
- If the Ceramic Hob is installed above an oven, the oven has a built-in cooling fan.
- The installation will comply with all clearance requirements and applicable standards and regulations.
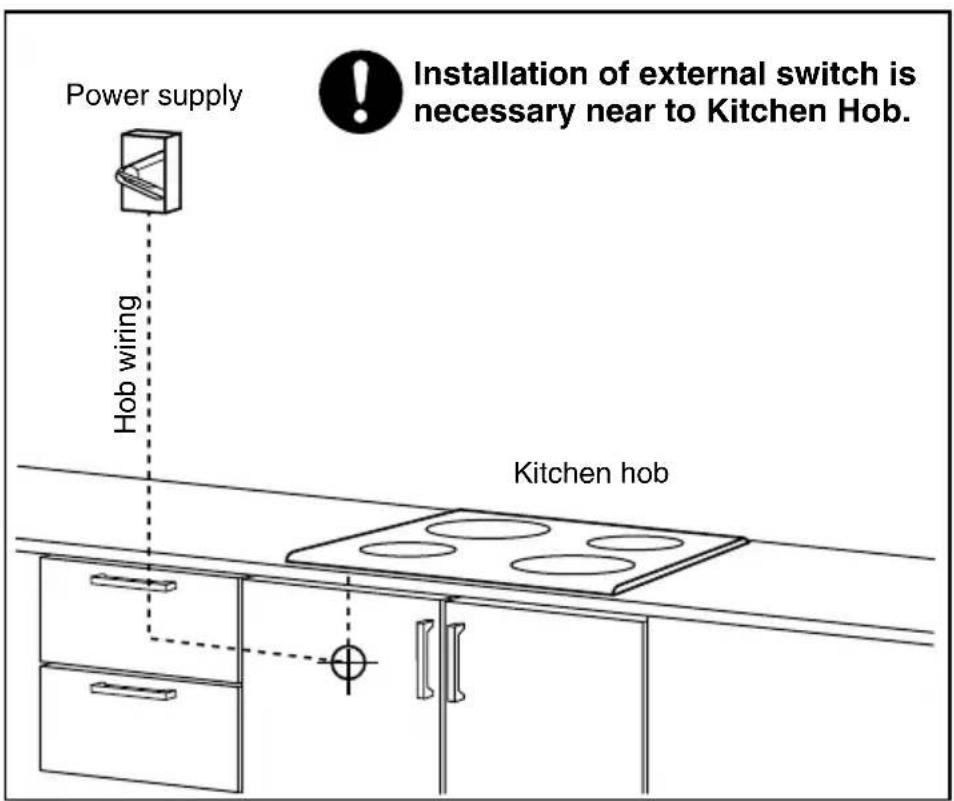
- A suitable power switch providing full disconnection from the main power supply is incorporated in the fi xed wiring, mounted and positioned to comply with the local wiring rules and regulations.
The power switch must be an approved type and must provide a 3 mm air gap contact separation in all poles (or in all active [phase] conductors if the local wiring rules allow for this variation of the requirements). - The power switch can be easily accessible before the Ceramic Hob is installed.
- Consult local building authorities and institutions if there are doubts regarding installation.
- Use heat-resistant and easy-to-clean finishes (such as ceramic tiles) for the wall surfaces surrounding the Ceramic Hob.
■ When installing the Ceramic Hob, make sure that:
- The power cord is not accessible through cupboard doors or drawers.
- There is adequate flow of fresh air from outside the cabinet to the base of the Ceramic Hob.
- If the Ceramic Hob is installed above a drawer or cupboard space, a thermal protection barrier is installed below the base of the Ceramic Hob.
IMPORTANT:
Correct installation is the responsibility of the installer. Any malfunction or accident resulting from the failure to follow the Installation Instructions is not covered by the warranty.

CAUTION

The Ceramic Hob must be installed by qualified personnel or technicians. Never conduct the operation by yourself.

The Ceramic Hob must not be installed directly above a dishwasher, fridge, freezer, washing machine or clothes dryer, as the humidity may damage the Ceramic Hob electronics.

The Ceramic Hob shall be installed such that better heat radiation can be ensured to enhance its reliability.

The wall and cooking zone above the work surface should be able to withstand heat.

To avoid any damage, the sandwich layer and adhesive materials must be resistant to heat.
Electrical Connection

WARNING

This Ceramic Hob must be connected to the main power supply by a suitably qualified person.
Before connecting the Ceramic Hob to the main power supply, check that:
- The domestic wiring system is suitable for the power drawn by the Ceramic Hob.
- The voltage corresponds to the value given in the Name Plate.
- The power cord sections can withstand the load specified on the Name Plate.
To connect the Ceramic Hob to the main power supply, do not use adapters, reducers, or branching devices, as they can cause overheating and fire.
The power cord must not touch any hot parts and must be positioned so that its temperature will not exceed 75 °C at any point.

Check with an electrician whether the domestic wiring system is suitable without alterations.
Any alterations must only be made by a qualified electrician.
- If the power cord is damaged or to be replaced, the operation must be carried out the by after-sale agent with dedicated tools to avoid any accidents.
- If the Ceramic Hob is being connected directly to a power switch, it must be installed with a minimum opening of 3 mm between contacts.
- The installer must ensure that the correct electrical connection has been made and that it is compliant with safety regulations.
- The power cord must not be bent or compressed.
- The power cord must be checked regularly and replaced by authorised technicians only.

| A | B |
| 220-240 V AC | 400 V AC |
Panasonic Manufacturing Malaysia Berhad
No. 3, Jalan Sesiku 15/2, Section 15, Shah Alam Industrial Site,
40200 Shah Alam, Selangor Darul Ehsan
Website: http://www.panasonic.com