ADDD60STNB - Dishwasher Fisher & Paykel - Free user manual and instructions
Find the device manual for free ADDD60STNB Fisher & Paykel in PDF.

| Product Type | Single Drawer Dishwasher |
| Brand | Fisher & Paykel |
| Model | ADDD60STNB |
| Dimensions (H x W x D) | 450 mm x 600 mm x 600 mm |
| Weight | 45 kg |
| Power Supply | 120 V / 60 Hz / 10 A |
| Energy Consumption | 210 kWh/year |
| Water Consumption | 9.5 L per cycle |
| Place Settings | 7 place settings |
| Noise Level | 44 dBA |
| Wash Programs | 6 programs (Heavy, Normal, Eco, Quick, Rinse, Delicate) |
| Features | ActiveSmart technology, SmartDrive motor, Knock to Start, Child Lock |
| Material | Stainless steel tub and panel |
| Installation Type | Underbench, fully integrated |
| Safety Features | Child lock, overflow protection, anti-flood device |
| Maintenance | Clean filter monthly, check spray arms for blockages |
| Spare Parts | Filters, racks, spray arms, detergent dispenser, door seal |
| Repairability | Modular design with accessible components; serviceable by technician |
| Warranty | 2 years parts and labor |
| Compliance | ENERGY STAR certified, ADA compliant |
Frequently Asked Questions - ADDD60STNB Fisher & Paykel
User questions about ADDD60STNB Fisher & Paykel
0 question about this device. Answer the ones you know or ask your own.
Ask a new question about this device
Download the instructions for your Dishwasher in PDF format for free! Find your manual ADDD60STNB - Fisher & Paykel and take your electronic device back in hand. On this page are published all the documents necessary for the use of your device. ADDD60STNB by Fisher & Paykel.
USER MANUAL ADDD60STNB Fisher & Paykel
- Ensure a 2mm minimum ventilation gap below the door is maintained.
- Ensure all packaging is removed and disposed of responsibly.
- Ensure the Knock-To-Pause module is oriented correctly before attaching
COMPONENTS REQUIRED
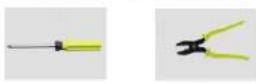
Crosshead driver Pliers
Double models
Repeat each step on both drawers.
Ensure a 8mm minimum ventilation gap below the door is maintained.
For more information, visit www.fisherpsykel.com
DOOR PANEL INSTALLATION
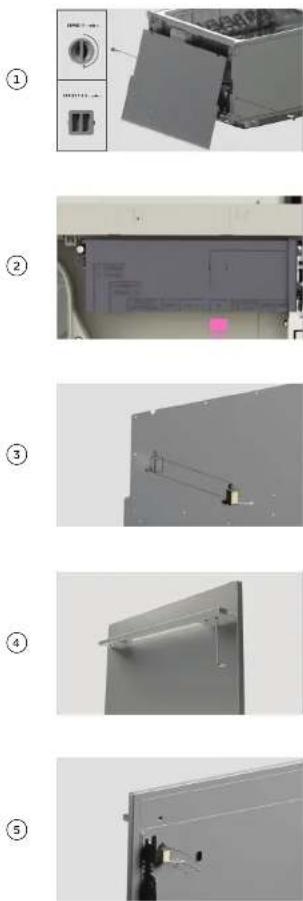
Remove both side pins with pliers and carefully pull the panel bracket down and out slightly.
Unplug knock-to-pause module from the controller and remove the earth wire from the bracket.
Remove the Knock-to-Pause module from the back of the bracket.
Install the handle to the panel following the installation guidance available for your handle kit.
Attach the Knock-to-Pause module to the panels as shown. Ensure the module is correctly oriented and is not in contact with the brackets before securing.
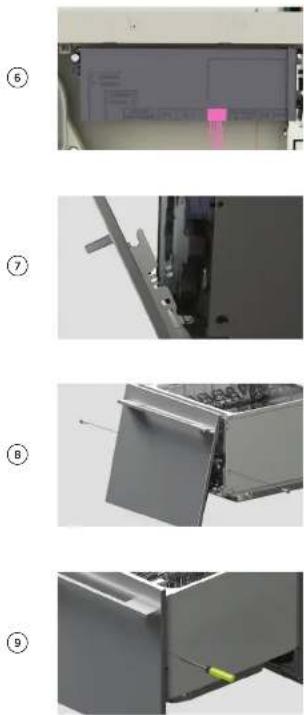
Reconnect the Knock-to-Pause module to the UI 1 slot on the wash controller as shown.
Reconnect the Earth wire to the panel bracket.
Warning: Failure to reconnect the Earth wire may result in electrical shock or death.
Carefully fit the panels onto the product. Re-insert both side pins to secure panels in place.
Insert a crosshead driver into the hole above each side pin and rotate to adjust the panel alignment. There is a maximum travel distance of ±1/16' (2mm).
Repeat for both sides if required.