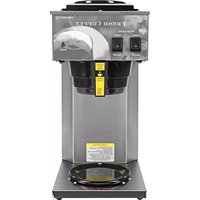
AK-2 - Coffee maker Newco - Free user manual and instructions
Find the device manual for free AK-2 Newco in PDF.


| Product Type | Pour-Over Coffee Brewer |
| Model | AK-2 |
| Number of Warmers | 2 |
| Dimensions (W x L x H) | 8-1/2" x 16-3/8" x 18-9/16" |
| Electrical Rating (US) | 120V, 13.3 Amps |
| Electrical Rating (Canada) | 120V, 10.8 Amps |
| Brew Capacity | 60 oz. per brew cycle (1 decanter) |
| Recommended Brewing Temperature | 195°F (approx.) |
| Automatic Shut-Off (Optional) | Available on models with "AS" suffix; adjustable 30 min to 4 hours |
| Sprayhead | Stainless steel, 5-hole |
| Brew Basket | 8-sided, black plastic |
| Warmer Indicator | Red light when warmer is on |
| Water Tank Deliming | Daily recommended in hard water areas; use deliming spring |
| Warranty | 1 year parts and labor; 3 years parts on electronic circuit boards |
| Safety Features | Hi-limit thermostat, automatic shut-off (optional) |
Frequently Asked Questions - AK-2 Newco
User questions about AK-2 Newco
0 question about this device. Answer the ones you know or ask your own.
Ask a new question about this device
Download the instructions for your Coffee maker in PDF format for free! Find your manual AK-2 - Newco and take your electronic device back in hand. On this page are published all the documents necessary for the use of your device. AK-2 by Newco.
USER MANUAL AK-2 Newco
INSTALLATION and OPERATION MANUAL for AK SERIES BREWERS

BREWER SPECIFICATIONS
| Model | No of Warmers | Width | Length | Height* | US 120V Amps** | Canada 120V Amps** |
| AK-1 | 1 | 8-1/2" | 16-3/8" | 16-15/16 | 12.5 | 11.2 |
| AK-2 | 2 | 8-1/2" | 16-3/8" | 18-9/16 | 13.3 | 10.8 |
| AK-3 | 3 | 15-1/2" | 16-3/8" | 16-15/16 | 14.2 | 11.7 |
| AK-LD | N/A | 8-1/2" | 16-3/8" | 21-3/16 | 14.6 | 11.7 |
| AK-TC | N/A | 8-1/2" | 16-3/8" | 17-5/8 | 14.6 | 11.7 |
| AK-AP | N/A | 8-1/2" | 16-3/8" | 22-15/16 | 14.6 | 11.7 |
| AK-D | N/A | 8-1/2" | 17-3/8" | 27-3/8 | 14.6 | 11.7 |
* Height with ABS base shown for Airport/Dispenser models
** Other Wattages/Voltages available as special order
INSTALLATION / SETUP INSTRUCTIONS
WARNING: - Read and follow installation / setup instructions before plugging or wiring in machine to electrical circuit. Warranty will be void if machine is connected to any voltage other than that specified on the name plate.
FILL BREWER TANK WITH WATER BEFORE CONNECTING TO POWER SUPPLY!
1) Place the decanter under brew basket, raise top evaporation cover and pour three decanters of water through the top pour-in screen. Water should come through the brew basket as the third decanter of water drains out of the pour in basin.
2) Brewer is shipped with thermostat turned on. Plug or wire in machine to appropriate voltage circuit as indicated on serial tag.
3) Allow 10 to 15 minutes for water in tank to heat to brewing temperature. Additional water may drip from brew basket on initial expansion of water in the tank. This will not occur thereafter.
4) After water has reached brewing temperature (thermostat will click off, heating noise will stop and green ready light will be on) pour 1 decanter (60 oz.) of water through pour-in screen. More than 1 decanter of water will flow into decanter below brew basket due to water expansion in the tank. Machine is now ready to use.
5) Pour 1 decanter of water through pour-in screen to check for the proper temperature setting with an accurate thermometer. Take the temperature of this water at a point below the brew basket opening, at the start of the brew cycle and when the decanter is half full. Recommended temperature of the water is approximately 195 F.
6) In higher altitude locations (5000 feet above sea level) the thermostat may have to be adjusted lower to prevent boiling.
COFFEE PREPARATION PROCEDURES
1) Place filter into brew basket.
2) Put the proper amount of coffee into the filter.
3) Slide the brew basket into holder.
4) Place the appropriate empty decanter into position below the brew basket. For airpots first open lid and remove pump stem unless it is of the brew thru design. For other dispensers without brew thru lids, remove the lid. Turn lower warmer switch to the ON position for warmer units.
5) Raise the top evaporation cover and pour one decanter of cold water through the pour in screen into the basin. Do not overfill unit by pouring in more than one decanter of water at a time.
6) Hot water will be delivered through the sprayhead. This distributes the hot water evenly over the coffee bed within the brew basket. The coffee brew will drain from the brew basket into the decanter below.
7) TURN OFF WARMERS WHEN NOT IN USE. Red light in switch indicates when warmer is on.
8) To clean brew basket simply remove from brew rails and dump filter into waste basket. The brewing process, as described above, can now be started again.
AUTOMATIC WARMER SAFETY SHUT OFF - OPTIONAL FEATURE
Warmer models may be equipped with an electronic control system which automatically monitors the length of time the warmers are on, and shuts them off after they have been turned on for a preset length of time. The model number on the serial tag of brewers equipped with this feature is appended by "AS". For example an AK-3AS is a 3 warmer AK brewer with Automatic Shutoff.
The warmer shutoff control is initially set at the factory for two hours but the duration of on time for the warmers may be adjusted anywhere between thirty minutes and four hours, depending on the needs of your customer. To adjust the time, simply remove the access panel located on the right side of the brewer. Use a screwdriver to turn the knob. Turning the knob clockwise will increase the on time and counter clockwise will decrease the length of time the warmers will stay on.
The warmer control circuit will operate all warmers on for the same amount of time. The on time will automatically be reset to the programmed time when any warmer is turned on. For example, if the customer has turned on the lower warmer and then 30 minutes later turns on the second warmer, the on time for both warmers will automatically be reset for the full programmed time of two hours, assuming the factory set time of two hours is used. This feature eliminates individual warmers shutting off separately. A warmer may be turned off manually by depressing the appropriate control switch. The red pilot light indicates that the warmer is on.
LIMING
To prevent liming problems in tank fittings remove sprayhead and insert deliming spring all the way into the tank. When inserted into tank properly, no more than ten inches of the spring should be visible at the sprayhead fitting. Saw back and forth five or six times. This will keep fittings open and clear of lime. In hard water areas this should be done everyday. This process takes approximately one minute. In all areas the sprayhead should be cleaned at least once a week. Where bad liming has already occurred, a new complete tank assembly may be installed. The tank may be changed in approximately 5-10 minutes time.
WARRANTY
Applies to all equipment manufactured after 2/1/2017. This warranty supersedes all other previous warranties that are currently in manuals.
Newco warrants equipment manufactured by it for 1 year parts and labor.
Accessories and Dispensers 1 Year parts only.
Electronic Circuit and Control Boards- 3 years parts, 1 year labor.
Equipment manufactured by others and distributed by Newco- please see original equipment manufacturers warranty, Newco will follow.
These warranty periods run from the date of sale Newco warrants that the equipment manufactured by it will be commercially free of defects in material and workmanship existing at the time of manufacture and appearing within the applicable warranty period. This warranty does not apply to any equipment, component or part that was not manufactured by Newco or that, in Newco's judgment, has been affected by misuse, neglect, alteration, improper installation or operation, relocation or reinstallation, improper maintenance or repair, incorrect voltage applied to the unit at any time, damage or casualty. This warranty does not apply to any equipment failures related to poor water quality, excessive lime and chlorine and non periodic cleaning and descaling. Warranty is null and void if muriatic or any other form of hydrochloric acid is used for cleaning or deliming. In addition, this warranty does not apply to replacement of items subject to normal use including but not limited to user replaceable parts such as faucet seat cups, sight gauge tubes, washers, o-rings, tubing, seals and gaskets.
This warranty is conditioned on the Buyer 1) giving Newco prompt notice of any claim to be made under this warranty by telephone at (800) 556-3926 or by writing to 3650 New Town Blvd, Saint Charles, MO 63301; 2) if requested by Newco, shipping the defective equipment prepaid to an authorized Newco service location; and 3) receiving prior authorization from Newco that the defective equipment is under warranty.
THE FOREGOING WARRANTY IS EXCLUSIVE AND IS IN LIEU OF ANY OTHER WARRANTY, WRITTEN OR ORAL, EXPRESS OR IMPLIED, INCLUDING, BUT NOT LIMITED TO, ANY IMPLIED WARRANTY OF EITHER MERCHANTABILITY OR FITNESS FOR A PARTICULAR PURPOSE. The agents, dealers or employees of Newco are not authorized to make modifications to this warranty or to make additional warranties that are binding on Newco. Accordingly, statements by such individuals, whether oral or written, do not constitute warranties and should not be relied upon.
If Newco determines in its sole discretion that the equipment does not conform to the warranty, Newco, at its exclusive option while the equipment is under warranty, shall either 1) provide at no charge replacement parts and/or labor (during the applicable parts and labor warranty periods specified above) to repair the defective components, provided that this repair is done by a Newco Authorized Service Representative; or 2) shall replace the equipment or refund the purchase price for the equipment.
THE BUYER'S REMEDY AGAINST NEWCO FOR THE BREACH OF ANY OBLIGATION ARISING OUT OF THE SALE OF THIS EQUIPMENT, WHETHER DERIVED FROM WARRANTY OR OTHERWISE, SHALL BE LIMITED, AT NEWCO'S SOLE OPTION AS SPECIFIED HEREIN, TO REPAIR, REPLACEMENT OR REFUND.
In no event shall Newco be liable for any other damage or loss, including, but not limited to, lost profits, lost sales, loss of use of equipment, claims of Buyer's customers, cost of capital, cost of down time, cost of substitute equipment, facilities or services, or any other special, incidental or consequential damages.
AK POUR OVER BREWER - REPLACEMENT PARTS LIST
Electrical Components
| 101419 | Thermostat Assembly, Regulating |
| 100043 | Knob, Thermostat, Regulating |
| 100174 | Thermostat, Hi-Limit |
| 100143 | Bracket, Hi-Limit |
| 202025 | Element, Tank, 1750W 120V |
| 701170 | Element, Tank, 1400W 120V |
| 202057 | Element, Tank, 1100W 120V |
| 100187 | Element, Warmer, 100W 120V |
| 101840 | Board Assy, Warmer Shutoff |
| 101390 | Board Only, Warmer Shutoff |
| 102844 | Support, Board, Snap In |
| 110581 | Support, Board, Screw mounted |
| 100500 | Switch, Rocker ON/OFF, Red |
| 100085 | Switch, Rocker ON/OFF, Lighted, |
| 102562 | Switch, Momentary, Auto Shutoff U |
| 781432 | Switch, Rocker, Red Light |
| 100022 | Cord, 120 V Power |
| 101035 | Grommet, Strain Relief, 120 V Cor |
| 110130 | Light Assy, Green, AK |
| 101698 | Lens, Ready Light, Green |
Labels/Decals
| 100254 | Decal, "Hot Surfaces" |
| 101717 | Label, Switch Plate, AK-2AS |
| 101718 | Label, Switch Plate, AK-3AS |
| 101719 | Label, Faceplate, AK Dispenser Models |
| 110057 | Label, Switch Plate, AK-2 |
| 110058 | Label, Switch Plate, AK-3 |
| 110120 | Label, Hot Liquids |
Tank and Plumbing Components
| 101842 | Tank Assy, 1400 W |
| 101857 | Tank Assy, 1750 W |
| 705199 | Lid Assy, 1400 W Tank |
| 705399 | Lid Assy, 1750 W Tank |
| 704119 | Tank, Only |
| 704221 | Gasket, Tank, Main |
| 700016 | Gasket, 1.062" OD X .578" ID, Sil |
| 700325 | Pan, Receiving |
| 781555 | Gasket, Delivery Tube |
| 701200 | Nut, Slotted Hex, 3/4-16 |
| 700015 | Washer, 1" OD X 3/4" ID, S/S |
Hardware and Miscellaneous
| 100008 | Plate Only, Warmer, Black |
| 100010 | Plate Assy, Warming, Black |
| 100160 | Screw, 4-40 X 5/8, SPHMS S/S |
| 100078 | Foot, Bumper, With Screw |
| 700118 | Basket, Brew, 8 Sided Black |
| 102799 | Rail, Brew, R.H. |
| 102800 | Rail, Brew, L.H. |
| 108014 | Plate, Board Access |
| 110624 | Pour-In, Cover, Plastic |
| 110625 | Pour-In, Grid and Cover |
| 101726 | Tube Assy, Sprayhead |
| 100024 | Sprayhead, S/S 5 Hole |
| 100025 | Gasket, Sprayhead |
| 201173 | Nut, Sprayhead, 7/16-20 |
CAUTION: DISCONNECT BREWER CORD FROM ELECTRICAL OUTLET BEFORE REMOVAL OF ANY PANEL OR REPLACEMENT OF ANY COMPONENT!
NOTE: IN CANADA REPAIRS ARE TO BE DONE BY CERTIFIED ELECTRICIAN OR BREWER MUST BE REINSPECTED TO MAINTAIN APPLICABLE CERTIFICATION
WIRING DIAGRAMS
AK WARMER MODELS - WITH AUTO WARMER SHUTOFF
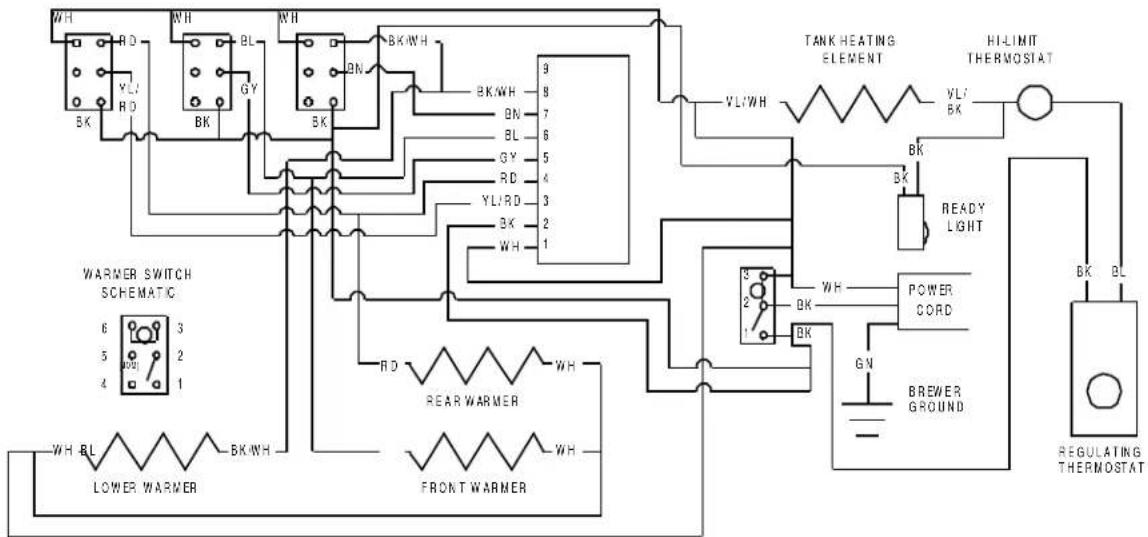
AK WARMER MODELS - WITHOUT AUTO WARMER SHUTOFF

flowchart
graph TD
    A["LOWER WARMER"] -->|WH| B["BL"]
    A -->|4| C["BRK"]
    A -->|5| D["BRK"]
    A -->|3| E["BRK"]
    B --> F["FRONT WARMER"]
    C --> G["BRK"]
    D --> H["BRK"]
    E --> I["BRK"]
    F --> J["REAR WARMER"]
    G --> K["REAR WARMER"]
    H --> L["TANK HEATING ELEMENT"]
    I --> M["TANK HEATING ELEMENT"]
    J --> N["VL/WH"]
    K --> O["VL/WH"]
    L --> P["POWER CORD"]
    M --> Q["POWER CORD"]
    N --> R["BW"]
    O --> S["BW"]
    P --> T["BY"]
    Q --> U["BY"]
    R --> V["BW"]
    S --> W["BW"]
    T --> X["BW"]
    U --> Y["BW"]
    V --> Z["BW"]
    W --> AA["BW"]
    X --> AB["BW"]
    Y --> AC["BW"]
    Z --> AD["BW"]
    AA --> AE["BW"]
    AB --> AF["BW"]
    AC --> AG["BW"]
    AD --> AH["BW"]
    AE --> AI["BW"]
    AF --> AJ["BW"]
    AG --> AK["BW"]
    AH --> AL["BW"]
    AI --> AM["BW"]
    AJ --> AN["BW"]
    AK --> AO["BW"]
    AL --> AP["BW"]
    AM --> AQ["BW"]
    AN --> AR["BW"]
    AO --> AS["BW"]
    AP --> AT["BW"]
    AQ --> AU["BW"]
    AR --> AV["BW"]
    AS --> AW["BW"]
    AT --> AX["BW"]
    AU --> AY["BW"]
    AV --> AZ["BW"]
AK THERMAL (AIRPOT/DISPENSER) MODELS

flowchart
graph TD
    A["TANK HEATING ELEMENT"] --> B["HLIMIT THERMOSTAT"]
    B --> C["REGULATING THERMOSTAT"]
    C --> D["READY LIGHT"]
    D --> E["POWER SWITCH"]
    E --> F["POWER CORD"]
    F --> G["BREWER GROUND"]
    H["VL:WH"] --> A
    I["VL:BK"] --> B
    J["3"] --> E
    K["2"] --> E
    L["1"] --> E
    M["1"] --> N["KN"]
    O["3"] --> P["3"]
    Q["2"] --> R["1"]
    S["1"] --> T["1"]
    U["1"] --> V["1"]
    W["1"] --> X["1"]
Newco Enterprises, Inc. * 1735 S. River Rd. * P.O. Box 852 * St. Charles, MO 63302


- INSTALLATION and OPERATION MANUAL for AK SERIES BREWERS
- INSTALLATION / SETUP INSTRUCTIONS
- FILL BREWER TANK WITH WATER BEFORE CONNECTING TO POWER SUPPLY!
- COFFEE PREPARATION PROCEDURES
- AUTOMATIC WARMER SAFETY SHUT OFF - OPTIONAL FEATURE
- LIMING
- WARRANTY
- AK POUR OVER BREWER - REPLACEMENT PARTS LIST
- CAUTION: DISCONNECT BREWER CORD FROM ELECTRICAL OUTLET BEFORE REMOVAL OF ANY PANEL OR REPLACEMENT OF ANY COMPONENT!
- WIRING DIAGRAMS
Brand : Newco
Model : AK-2
Category : Coffee maker