
SX-RX500S - Switch Smart-AVI - Free user manual and instructions
Find the device manual for free SX-RX500S Smart-AVI in PDF.


| Product Type | Switch |
| Brand | Smart-AVI |
| Model | SX-RX500S |
| Dimensions (W x D x H) | 4.72 x 3.15 x 1.18 inches (12 x 8 x 3 cm) |
| Weight | 0.33 lbs (0.15 kg) |
| Power Supply | 5V DC, 1A (via USB or power adapter) |
| Number of Ports | 5 input ports |
| Compatible Signal Types | HDMI, DVI, VGA (with adapter) |
| Maximum Resolution | 1920 x 1080 @ 60Hz |
| Switching Method | Manual push button or IR remote |
| Connection Type | Female HDMI or DVI connectors |
| LED Indicators | Power and port selection |
| Operating Temperature | 32°F to 104°F (0°C to 40°C) |
| Storage Temperature | -4°F to 140°F (-20°C to 60°C) |
| Humidity | 20% to 90% (non-condensing) |
| Safety Certifications | CE, FCC |
| Maintenance | Keep dry; clean with soft cloth |
| Repairability | No user-serviceable parts inside |
Frequently Asked Questions - SX-RX500S Smart-AVI
User questions about SX-RX500S Smart-AVI
0 question about this device. Answer the ones you know or ask your own.
Ask a new question about this device
Download the instructions for your Switch in PDF format for free! Find your manual SX-RX500S - Smart-AVI and take your electronic device back in hand. On this page are published all the documents necessary for the use of your device. SX-RX500S by Smart-AVI.
USER MANUAL SX-RX500S Smart-AVI
Technical Specifications
| snoltacilicep | |
| oediV | ediV ediV |
| Signal | Analog signal: Red, Green, Blue 0.7 V p-p 75 Ohms |
| obioRda | 640x480 1000ft; 800x600 850ft;1024x768 700ft; 1200x1024 600ft;1600x1200 560ft. |
| Sync | Horizontal and Vertical TTL compatible |
| Bandwidth | 300 MHz |
| Keyboardoby | Standard PS/2 Compatible |
| MouseMo | Polyd.compatible |
| RS23232SR | B28RDuplex (Max 57.6 kbps) |
| Audioid | Stereo Unbalanced 3.5mm jack socket |
| PowerewoP | 15x10xP1A |
| Physicallyh | |
| snoDW x D x H | 109x166x30mm (4.29x6.54x1.18in) |
| Weight | .57 kg ( 1.26lb) |
| Enclosure | Steel |
© Copyright 2011 Smart-AVI, All Rights Reserved
NOTICE
The information contained in this document is subject to change without notice. Smart-AVI makes no warranty of any kind with regard to this material, including but not limited to, implied warranties of merchantability and fitness for any particular purpose.
Smart-AVI will not be liable for errors contained herein or for incidental or consequential damages in connection with the furnishing, performance or use of this material.
No part of this document may be photocopied, reproduced or translated into another language without prior written consent from Smart-AVI.
For more information, visit www.smartavi.com.
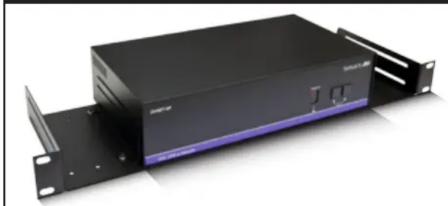
Rack Mountable Option
natural_image
Exterior view of a black server rack unit with attached cable and drive bays (no visible text or symbols)Our SmartRack is the perfect solution to allow virtually all SmartAVI devices to be custom mounted in a standard 19" server rack. The SmartRack is fully adjustable and can secure/organize several devices.

SmartAVI, Inc. / Twitter: smartavi 11651 Vanowen St. North Hollywood, CA 91605 Tel: (818) 503-6200 Fax: (818) 503-6208 http://www.SmartAVI.com
Smart-AM
Smart Audio Video Integration
User Manual
SX-500

natural_image
Two gray electronic devices labeled 'SmartLAM' and 'MFS-1.2.0.5', each with ports and connectors (no visible text beyond branding)Uses a single CAT5 to extend Keyboard, Video, Mouse, Audio and RS232 to a remote location up to 1000 ft. away.
www.smartavi.com
Introduction
The SX-500 is a combination of transmitter and receiver devices designed to allow access to the PC from a keyboard, mouse, and monitor at a remote location up to 1000 ft. away.
Features
■ Provides remote access to the PC with keyboard, mouse and monitor.
■ Uses a single CAT-5 UTP cable to reduce installation costs.
■ Extends signals up to 1000 ft.
■ Supports all PC/AT and PS/2 keyboards with full emulation.
■ Caps Lock, Num Lock, and Scroll Lock are automatically saved and restored.
■ Supports full emulation and conversion on all PC/AT and PS/2 mice.
■ Recognizes and supports a mix of PC/AT and PS/2 mice.
■ Compatible with Windows, NT, OS/2, UNIX, Linux, and other operating systems.
■ Supports computer monitors with resolutions of up to 1600x1200.
■ Offers adjustable cable compensation.
■ Compact metal enclosure.
■ Supports stereo audio.
■ Supports RS232 from 300bps to 19,200 bps.
■ Compensation for each color.
What's in the box?
SX-500SX-500
Please check the contents of the package before beginning installation.
| SX-500 Package ContentnetnoCegak | ||
| QtQ | tQ Description | Part Number |
| 1 | SX-500 Transmitter | SX-TX500 |
| 1 | SX-500 Receiver | SX-RX500 |
| 2 | 5V DC 2A Power Supply | PS-5D2A-US |
| 1 | Male to Female KVM | CC-KVMMF-06 |
| Optional Accessories | ||
| 1 | 3.5mm Stereo Audio Cable | CC-MMAMM-06 |
Installation Diagram
Before you power up, ensure that all cables are properly connected as shown in the diagram below.
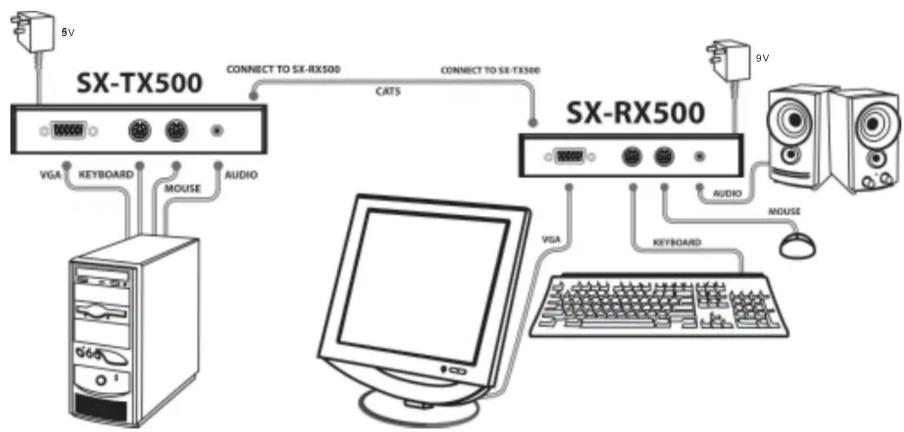
flowchart
graph TD
    A["5V"] --> B["SX-TX500"]
    B --> C["CONNECT TO SX-RX500"]
    C --> D["CATS"]
    D --> E["SX-RX500"]
    E --> F["9V"]
    B --> G["VGA KEYBOARD"]
    B --> H["MOUSE AUDIO"]
    E --> I["VIDEO"]
    E --> J["MOUSE"]
    G --> K["Computer"]
    H --> K
    I --> K
    J --> K
    K --> L["KEYBOARD"]
    L --> M["Computer"]
Installation Instructions
System Power UpSystem Power Up
- Connect the ₽volt power supplies to the transmitter and receiver.
- Turn the system on by plugging in the power adapter, if it is not yet connected.
- Power up your computer.
- Observe to see if both transmitter and receiver power LEDs are ON, and computer has finished the boot up process.
- Observe monitor at receiver end to see if signal is going through.
Quickstart
- Connect the video out, keyboard and mouse ports on your computer to the transmitter using the supplied KVM cable.
- Connect the power adapter to the transmitter and the receiver.
- Optional - Connect the RS232 on your computer to the RS232 port on the transmitter unit.
- Connect a CAT5 cable to the transmitter and run it over to the receiver.
- Connect peripherals to the receiver. I.E. keyboard, mouse, monitor, and optionally a serial device.
- Once everything is connected power on your computer and the SX-500 unit.
Brand : Smart-AVI
Model : SX-RX500S
Category : Switch