BBB36L2 - Fridge BlueStar - Free user manual and instructions
Find the device manual for free BBB36L2 BlueStar in PDF.

User questions about BBB36L2 BlueStar
0 question about this device. Answer the ones you know or ask your own.
Ask a new question about this device
Download the instructions for your Fridge in PDF format for free! Find your manual BBB36L2 - BlueStar and take your electronic device back in hand. On this page are published all the documents necessary for the use of your device. BBB36L2 by BlueStar.
USER MANUAL BBB36L2 BlueStar
Built-In Refrigerator
User Manual
Installation and
Use and Care Information
Part # 250643 — revision 1
Thank You and Welcome
Thank you for your purchase and welcome to the BlueStar ^* family!
BlueStar ^® appliances are designed for discerning home chefs who demand restaurant-quality results in their own kitchens. As the owner of a new BlueStar ^® refrigerator you can look forward to years of precise and even cooling in your home kitchen.
Here are a few tips to get started:
- Review this User Manual, which includes instructions and tips for getting the most out of your new refrigerator.
- Register your product online at www.bluestarcooking.com/support/product-registration to stay in touch and allow us to send you valuable product news and updates.
- Review our products and help us spread the word at https://www.bluestarcooking.com/inspiration/reviews. We'll send you some BlueStar gear to thank you for your time.
Thank you again for choosing BlueStar ^4 .
The BlueStar ^® Team
Proudly Producing Kitchen Appliances in Pennsylvania since 1880.
Contents
Safety Information 4
Site Preparation 7
Installation Instructions 9
Models 14
Electronic Control 16
Refrigerator Features 17
Freezer Features 19
Operation 20
Care and Cleaning 22
Troubleshooting 23
Warranty 24
Model Information
The model and serial numbers can be found on the serial plate, which is located inside the refrigerator. Slide out the pull-out tray and the serial plate is on the left side. Please complete the information below for warranty purposes and future reference:
Model Number ____
Serial Number ____
Installation Date ____
Dealer's Name ____
Dealer's Phone Number ____
Date of Purchase ____
Register your refrigerator online at www.bluestarcooking.com/support/product-registration or call customer service at (800) 449-8691.
If service is required under the warranty, it must be performed by authorized service personnel. BlueStar® also recommends using authorized service personnel if service is required after the warranty expires. To locate authorized service personnel in your area, go to www.bluestarcooking.com/support/find-a-service-center or call customer service at (800) 449-8691.
Please read and obey the following types of safety messages to ensure your refrigerator is installed and operated as safely as possible:

DANGER
Will cause serious injury or death if instructions are not followed.

WARNING
Can cause serious injury or death if instructions are not followed.

CAUTION
Can cause minor injury or product damage if instructions are not followed.

WARNING
Electrical Shock Hazard
Follow these basic precautions:
- Plug into a grounded three-prong outlet.
- Do not remove ground prong.
- Do not use an adapter.
- Do not use an extension cord.
- Disconnect power before servicing.
- Replace all parts and panels before operating.
Failure to follow these instructions can result in death, electrical shock, or fire.

WARNING
- Use nonflammable cleaner.
- Keep flammable materials and vapors, such as gasoline, away from refrigerator.
- Do not store explosive substances such as aerosol cans with a flammable propellant in this appliance.

WARNING
Use two or more people to move and install refrigerator.

WARNING
Keep ventilation openings, in the appliance enclosure or in the built-in structure, clear of obstruction.

WARNING
Do not use electrical appliances inside the food storage compartments of the appliance, unless they are of the type recommended by the manufacturer.
Important safety instructions for maintenance and care

WARNING
Risk of fire or explosion due to puncture of refrigerant tubing; follow handling instructions carefully. Flammable refrigerant used.

WARNING
To be repaired only by trained service personnel. Use only manufacturer-authorized service parts. Do not use replacement parts that have not been recommended by the manufacturer (e.g. parts made at home using a 3D printer). If power supply cord is damaged, it must be replaced by the manufacturer, its service agent, or a similarly qualified person in order to avoid a hazard. Any repair equipment used must be designed for flammable refrigerants. Follow all manufacturer repair instructions.

WARNING
Do not use mechanical devices or other means to accelerate the defrosting process, other than those recommended by the manufacturer.
This appliance is intended for household use.
Important information to know about disposal of refrigerants
Dispose of refrigerants in accordance with federal and local regulations. Refrigerants must be evacuated by a licensed EPA-certified refrigerant technician in accordance with established procedures.
Remove doors from old refrigerators. Failure to follow these instructions can cause death or brain damage.
Important: Child entrapment and suffocation are not problems of the past. Junked or abandoned refrigerators are still dangerous even if they will sit for a few days. Before you throw away your old refrigerator or freezer, do the following:
• Take off the doors.
- Leave the shelves in place so that children may not easily climb inside.
natural_image
Line drawing of an open refrigerator with doors and shelves (no text or symbols)
AVERTISSEMENT
natural_image
Line drawing of an open refrigerator with multiple doors and shelves (no text or symbols)Opening Dimensions
Height: 84"
Width: 35 1/2"
Depth: 24" minimum
For more specific installation options and drawings, go to www.bluestarcooking.com.

text_image
35 1/2" 24"Electrical
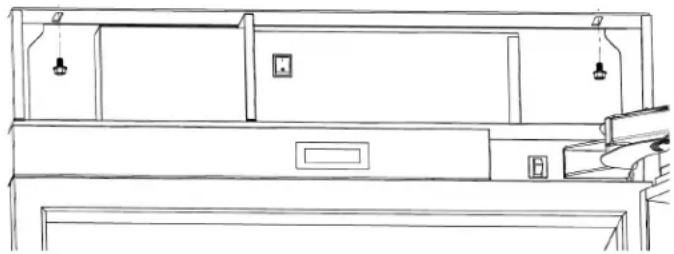
Location:
The electrical outlet should be located in the area marked "Electrical" in Fig. 1.
The electrical outlet may also be located above the enclosure. However, an access hole would need to be created in the back left corner of the top of the enclosure to route the power cord.
Requirements:
The electrical outlet must be on a separate 115VAC, 60Hz, 15 amp circuit and accept a three-prong grounding plug.

CAUTION
Electrical Shock Hazard
Electrical outlet must be checked by a qualified electrician to confirm it meets all applicable electrical codes. Failure to follow these instructions can result in death, electrical shock, or fire.

MISE EN GARDE
The water line should be located in the area marked "Water" in Fig 1. This area also extends 10" forward on the floor.
If it is outside this area, it may be damaged during installation and prevent the refrigerator from being installed at the proper depth.
Requirements:
The water line must use 1/4" OD copper, braided stainless steel, or PEX tubing and have 36" of excess line.
Water Pressure:
The water pressure must be between 35-120 psi.
Important: The water line cannot be exposed to temperatures below freezing.
Connect the water line to the household water supply with an easily accessible shut-off valve, not a self-piercing valve. Purge the water line before connecting it to the refrigerator. This will remove any debris that may be present.

text_image
35 1/2" Top Anchor Bracket Electrical 15 1/2" 84" 2 1/2" 9" Water 3" 10"Fig 1
Tools and Materials
• Phillips screwdriver
- Flat blade screwdriver
• Power drill and drill bits (for anchor bracket)
• Stud finder (for anchor bracket)
- 1/2" socket wrench
• Tubing cutter (for water line)
- 3' of 1/4" OD copper, braided stainless steel, or PEX tubing (for water line)
• Saddle valve (for water line)
• 1/2" open end wrench
- 5/16" hex head socket
- Gloves
- Safety glasses

WARNING
Tip Over Hazard
Refrigerator is top heavy and tips easily when not completely installed. Use two or more people to move and install refrigerator. Failure to follow these instructions can result in death or serious injury.

AVERTISSEMENT
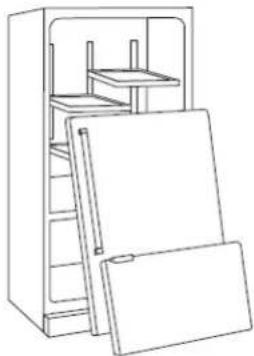
Step 1 — Uncrate and Inspect Refrigerator
- Before starting the installation, uncrate and inspect the refrigerator. Remove the packing materials but do not discard the anchor bracket, toe grille, and associated hardware.
Step 2 — Install Anchor Bracket
- The anchor bracket is attached to the top of the refrigerator during shipping. Remove it by lifting the top grille and removing the two bolts with a 1/2" socket wrench. Save the bolts and any washers to use when anchoring the refrigerator in the final position in Step 4.
natural_image
Line drawing of a cabinet or rack with hanging fixtures and a door, no text or symbols presentStep 2 — Install Anchor Bracket (continued)

WARNING
Tip Over Hazard
Anchor bracket must be installed properly to prevent refrigerator from tipping. Failure to follow these instructions can result in death or serious injury.

AVERTISSEMENT
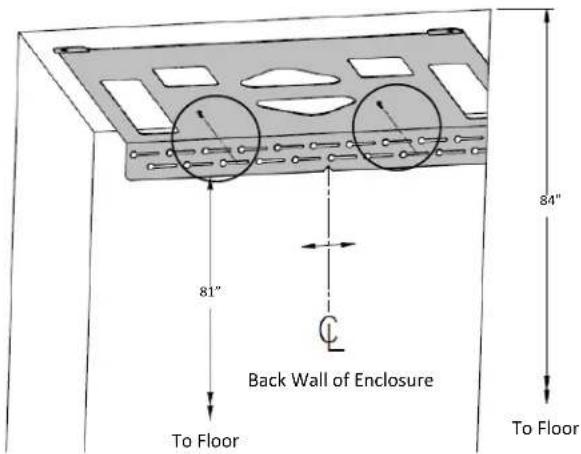
- Install the anchor bracket on the back wall of the enclosure. The notch in the back of the bracket should be centered in the enclosure (from side to side). Secure the anchor bracket with at least two screws spaced far apart, close to the sides of the bracket. Wood screws and self drilling sheet metal screws are located in the plastic bag with the literature. Screws must be securely threaded into wood or metal studs that are structurally sound and part of the building structure.
text_image
81" Back Wall of Enclosure To Floor 84" To FloorStep 3 — Route Water Line
- Locate the household water line as shown below prior to moving the refrigerator into position. It may be helpful to tape the water line to the floor to avoid damaging it as the refrigerator is rolled into position.
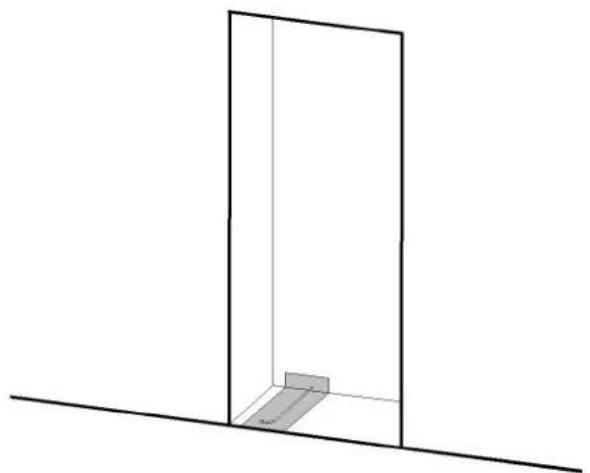
natural_image
Simple line drawing of a 3D rectangular frame with a small rectangular block inside, no text or symbols present.Step 4 — Move Refrigerator into Position
- Remove the wood base with a 1/2" socket or open end wrench and discard the shipping bolts and brackets. Use an appliance cart to move the refrigerator near the front of the enclosure. To allow the refrigerator to be rolled into position, ensure the front feet are retracted with a 1/2" open end wrench. Front and rear leveling can be done from the front once the refrigerator is in position.
Important: If the refrigerator has been on its back or side, it must stand upright for a minimum of 24 hours before connecting power.
- Plug the power cord into the grounded outlet. Temporarily lift the anchor bracket away from the top of the refrigerator. It may be helpful to temporarily tape the front of the anchor bracket to the top of the enclosure so it does not obstruct moving the refrigerator into position. Roll the refrigerator into position, ensuring the water line does not interfere underneath and the power cord does not interfere at the back. Slack in the power cord may be taken up in the space around the water filter.
Important: If the floor is not level, it may be necessary to level the refrigerator prior to rolling it into the enclosure. See Step 6 on leveling to temporarily tilt the refrigerator. Final leveling can be done from the front.
- Lift the top grille and align the slots in the upper cabinet with the holes in the anchor bracket. Install anchor bolts and any washers (from Step 2) with a 1/2" socket or open end wrench but do not tighten until leveling is complete.
natural_image
Line drawing of a cabinet or rack with hanging fixtures and a door (no text or symbols)Important: If the mounting holes do not align with the slots in the top of the cabinet behind the top grille, it may be necessary to roll the refrigerator out of the enclosure, loosen the anchor bracket screws on the back wall, slide the bracket left or right, and retighten the screws.
Step 5 — Connect Water Line
- Place the sleeve and nut on the household water line under the refrigerator and fasten it to the connection at the end of the tubing with a 1/2" open end wrench. The sleeve and nut are located in the plastic bag with the literature. Do not over-tighten. Check all water line fittings for leaks.

natural_image
Technical line drawing of a mechanical assembly with two vertical supports and a horizontal bar (no text or symbols)Step 6 — Level Refrigerator
- The height adjustment for the front and back can be made from the front of the refrigerator. Turn the hex bolt clockwise with a 1/2" socket wrench to raise the refrigerator or counterclockwise to lower it. The refrigerator is designed to raise a maximum of 1" from the shipped position. Do not attempt to raise the refrigerator beyond that point as damage to the leveling system will occur.

text_image
Front Up BackImportant: Do not use a power drill and do not over-tighten the leveling bolts.

WARNING
Tip Over Hazard
Front leveling legs must be firmly in contact with the floor to reduce the possibility of the refrigerator tipping forward. Failure to follow these instructions can result in death or serious injury.

AVERTISSEMENT
- Once the refrigerator is level, extend the front feet to the floor with a 1/2" open end wrench and hand-tighten an additional half turn. The feet will help stabilize the refrigerator.
Step 7 — Align Doors
Only adjust the doors if necessary to achieve uniform gaps and proper alignment.
Refrigerator Door(s)
Important: Adjust the top hinge cam(s) or bottom hinge cam independently. Do not loosen the top and bottom hinge bolts at the same time.
- Remove the hinge bracket cover by removing two Phillips screws.

natural_image
Technical line drawing of a mechanical assembly with no visible text or symbols- Slightly loosen the four bolts and the cam bolt with a 5/16" hex head socket.
- Using a flat blade screwdriver, turn the cam clockwise or counterclockwise to move the door left or right as necessary to achieve uniform gaps on the sides and/or between the upper door(s) and lower drawer.

text_image
AdjustStep 7 — Align Doors (continued)
- Retighten the five bolts with a 5/16" hex head socket. Bolts need to be tightened to 50 in. lb. It is normal for the door(s) to lower and tilt slightly when loaded with food.
- Replace the hinge bracket cover with two Phillips screws.
- Repeat process for the bottom of the door(s).
- On french door models, repeat the process for the other door.
Freezer Drawer
Important: Adjust one side at a time.
- Loosen the two bolts from the side mounting bracket and the divider from the center of the drawer with a 5/16" hex head socket.

text_image
Adjust Loosen Cam- Loosen the cam bolt with a 5/16" hex nut driver. Using a flat blade screwdriver, turn the cam clockwise or counterclockwise to raise or lower the door slightly. Close the door and check adjustments to achieve uniform gaps between the upper door(s) and lower drawer.
- Retighten the bolts and screw with a 5/16" hex head socket. Bolts needs to be tightened to 50 in. lb.
- Repeat process for the other side.
Step 8 — Align Top Grille
Only adjust the top grille if necessary to achieve uniform gaps and proper alignment.
- Top grille can be adjusted vertically where the hinge attaches to the grille. The grille can be adjusted horizontally where the hinge base is attached to the upper cabinet frame.
- Loosen the Phillips screws and adjust the grille. Retighten screws.
Step 9 — Anchor Refrigerator
- Tighten the anchor bolts through the top of the cabinet to the anchor bracket with a 1/2" socket wrench. Close the top grille.
Step 10 — Install Toe Grille
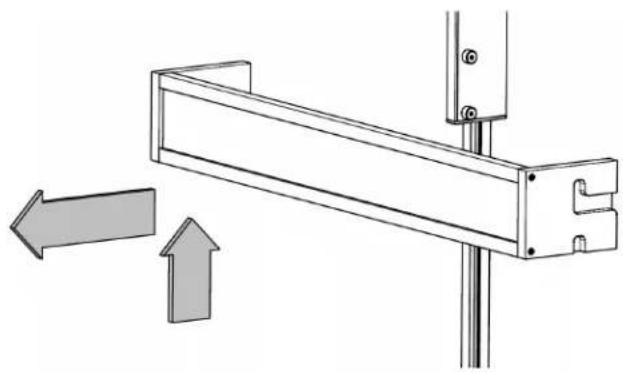
- Attach the upper toe grille to the brackets at the base of the refrigerator using one black Phillips screw on each side. Brackets may be adjusted side to side to improve the fit to the enclosure.
- Attach the lower toe grille using one black Phillips screw on each side. Bottom of the toe grille should rest on the floor.
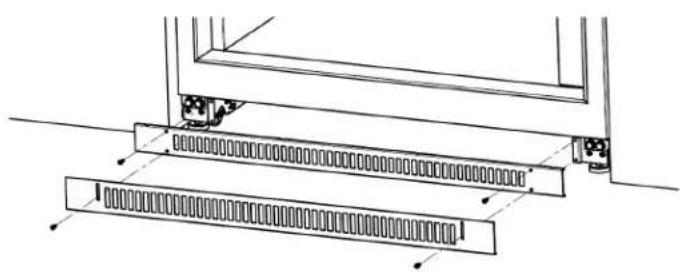
natural_image
Technical line drawing of a structural assembly with two parallel plates and mounting brackets (no text or symbols)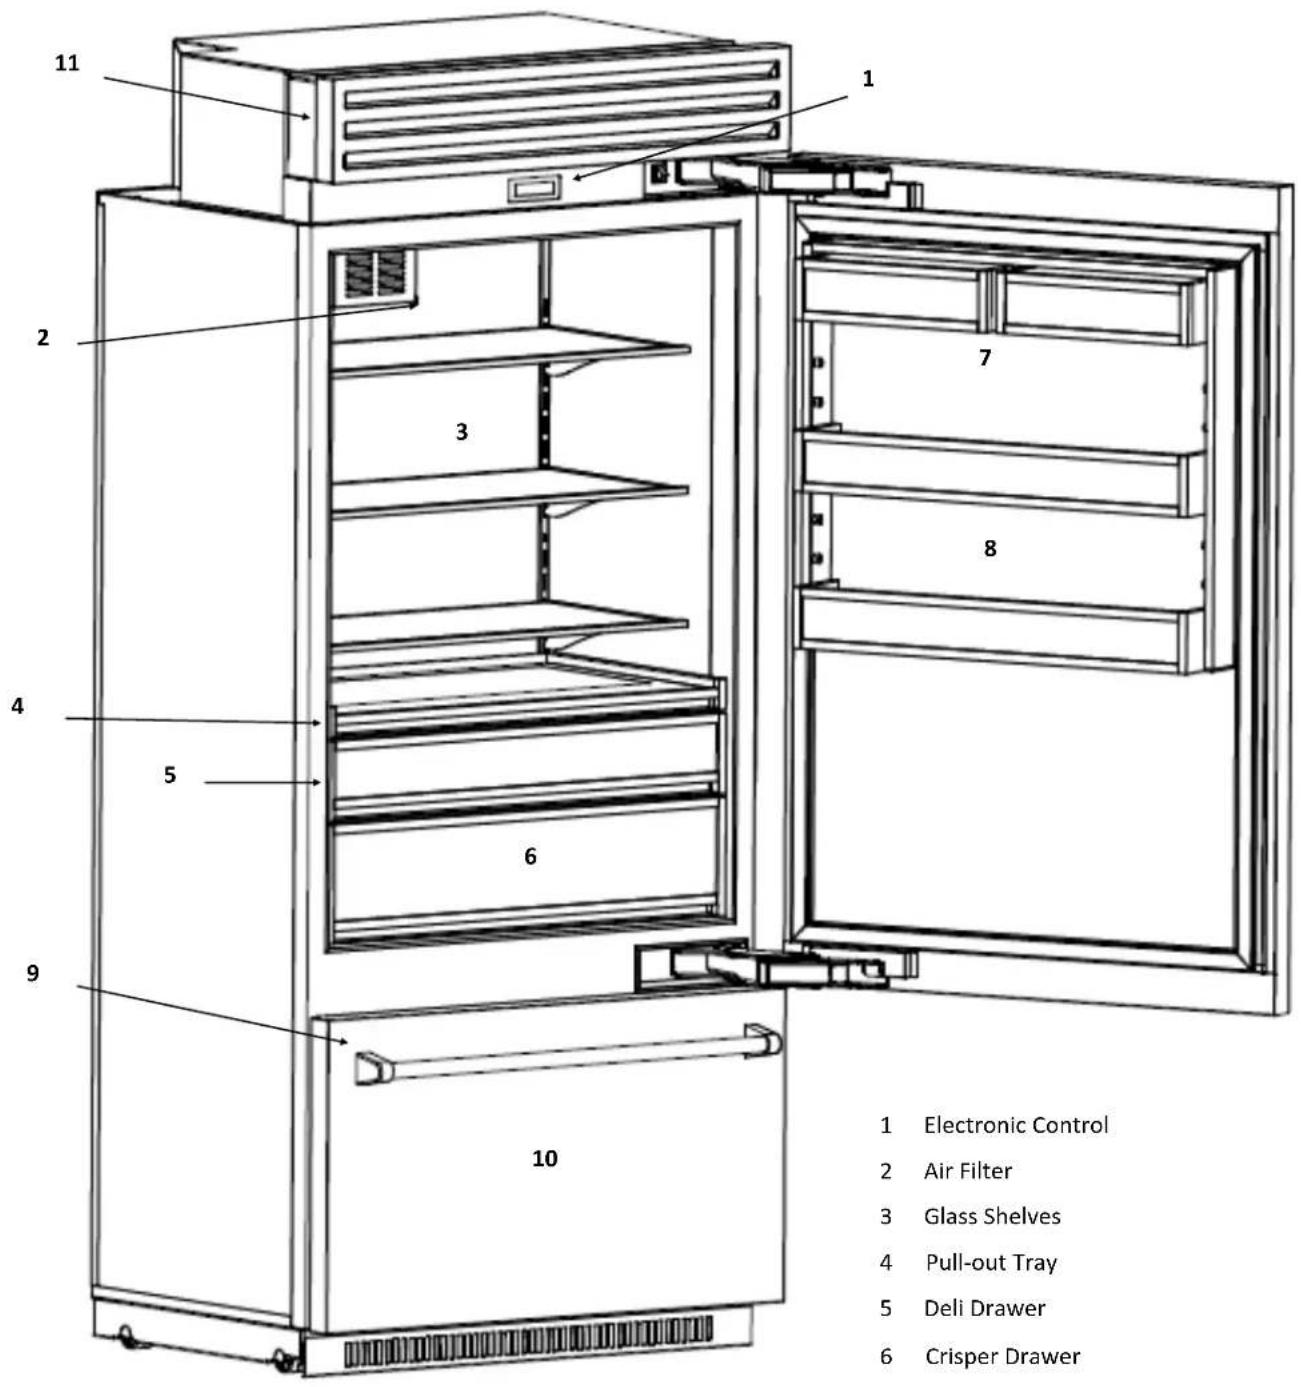
text_image
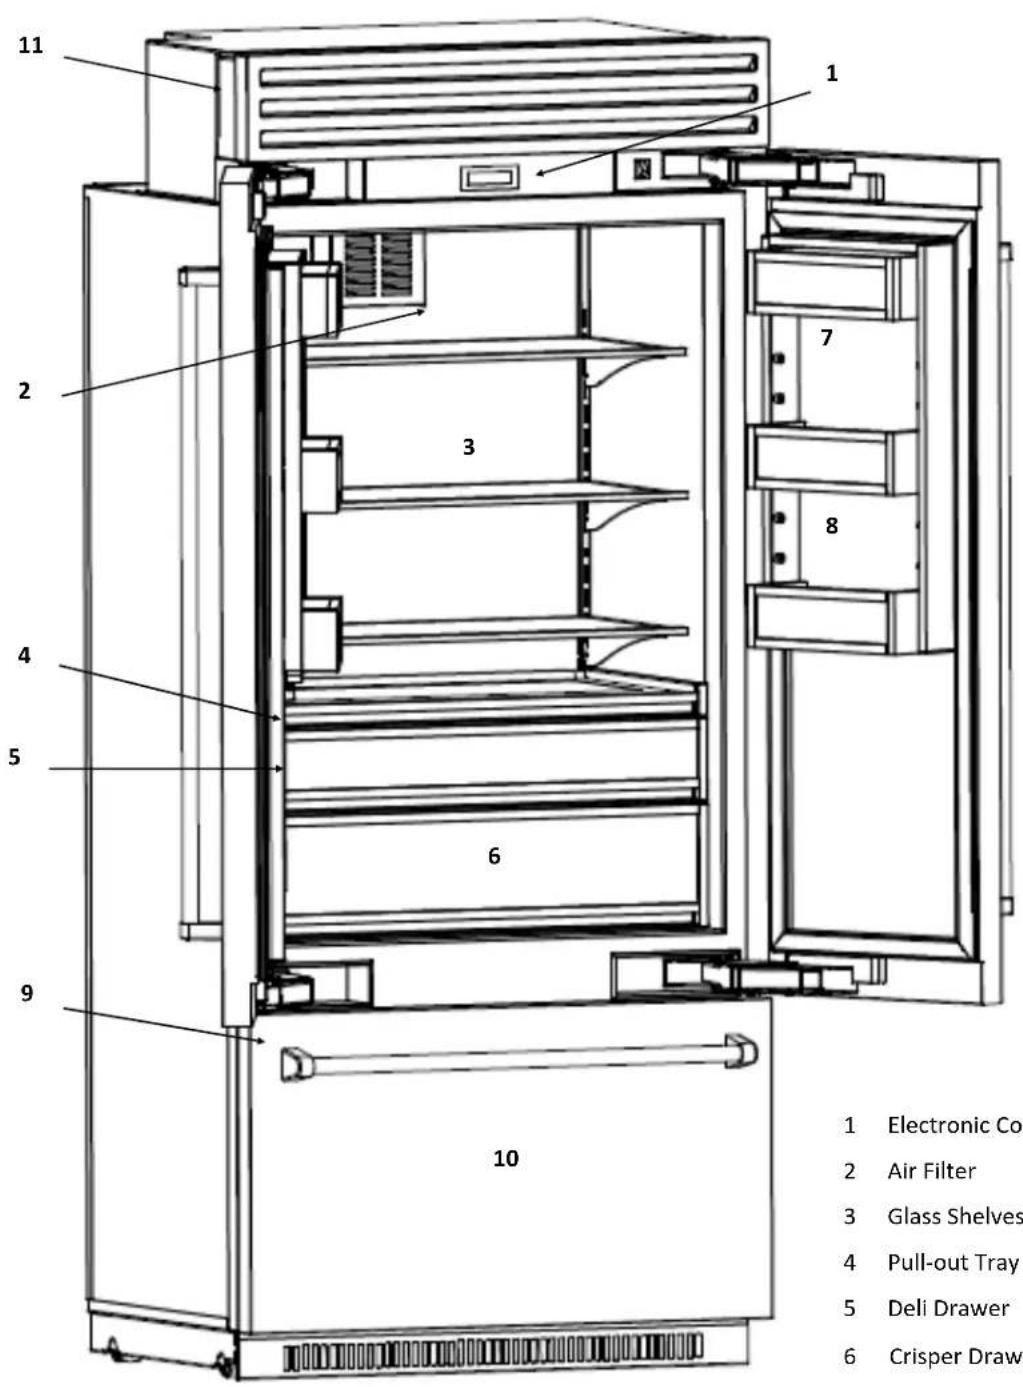
1 Electronic Control 2 Air Filter 3 Glass Shelves 4 Pull-out Tray 5 Deli Drawer 6 Crisper Drawer 7 8 9 101 Electronic Control
2 Air Filter
3 Glass Shelves
4 Pull-out Tray
5 Deli Drawer
6 Crisper Drawer
7 Dairy Bins
8 Door Bins
9 Ice Maker (inside freezer)
10 Freezer Bins (inside freezer)
11 Water Filter (behind top grille)
text_image
1 Electronic Control 2 Air Filter 3 Glass Shelves 4 Pull-out Tray 5 Deli Drawer 6 Crisper Draw 7 8 9 101 Electronic Control
2 Air Filter
3 Glass Shelves
4 Pull-out Tray
5 Deli Drawer
6 Crisper Drawer
7 Dairy Bins
8 Door Bins
9 Ice Maker (inside freezer)
10 Freezer Bins (inside freezer)
11 Water Filter (behind top grille)
Home Screen
Displays the freezer and refrigerator temperatures. The recommended freezer factory setting is 0^ F. The temperature can be set from -5^ F to 5^ F. The recommended refrigerator factory setting is 38^ F. The temperature can be set from 34^ F to 42^ F.


Change Temperature Setting
Press and hold either the freezer or refrigerator temperature setting for two seconds. After two seconds, the control will display the temperature setting with up and down arrows. Press the up or down arrow to establish the new temperature setting. Press and hold the new setting for two seconds to confirm it. Once the new setting is confirmed, the control will default to the home screen.


Main Options
Swipe right or left to access the main options.

Max Ice
Increases ice production by 50%. Returns to normal ice production after 24 hours. When Max Ice is activated, the icon is illuminated.

Water Filter
Resets the water filter. Press and hold for two seconds to reset the water filter. The remaining percentage is displayed to the right of the icon.

Sabbath Mode
Enables or disables Sabbath mode. Press and hold for two seconds to enable Sabbath mode. When Sabbath mode is enabled, the home screen will display the icon. Press and hold the icon on the home screen for two seconds to disable Sabbath mode.

Settings
Accesses the settings options.
Setting Options

Ice Maker
Turns the ice maker off or on. The ice maker is shipped on with the bale arm in the lowest position. When the ice maker is on, the icon is illuminated.
Alarm
Turns the audible door and high temperature alarms off or on. When the alarm is audible, the icon is illuminated.

Changes the temperature scale. Press to toggle between Fahrenheit and Celsius. The selected scale is illuminated.
Alarms
Door Alarm
Sounds continuously when the refrigerator and/or freezer door (s) are open for more than five minutes. Shut the refrigerator and/or freezer door(s) to stop the alarm.
High Temperature Alarm
Sounds continuously when either the refrigerator temperature exceeds 50^ F or the freezer exceeds 20^ F for more than three hours. The home screen will flash a series of dashes in place of the refrigerator and/or freezer temperature until the temperature reaches the set temperature.
Service
The electronic control manages the refrigerator's operating system. If there is an issue with the operating system, the home screen will display "Call for Service" and a series of dashes will flash in place of the refrigerator and freezer temperatures. Please call customer service at (800) 449-8691 to schedule a service call.
Spillproof Glass Shelves
Important: Glass shelves and drawers are heavy as they are made of glass and metal. Use special care when removing them to avoid impact from dropping. Do not clean glass with warm water when it is cold. Glass may break if exposed to sudden temperature changes or impact, such as bumping.
- Remove: Lift the front of the shelf with one hand while supporting the back with the other hand. Lift the back of the shelf out of the shelf supports. Pull the shelf straight out.

natural_image
Diagram of two curved arrows inside a multi-tiered shelving unit (no text or symbols)- Replace: Guide the rear shelf hooks into the shelf supports. Tilt the front of the shelf up until the rear shelf hooks drop in the shelf supports. Lower the front of the shelf and check to make sure that the shelf is securely in position.
Pull-Out Tray
- Remove: Pull the tray forward until it stops. Remove the glass by lifting it from underneath the tray. Remove the Phillips screws from both sides of the tray (near the front). Slide the tray forward to release it from the rear hooks on the slides.

natural_image
Technical line drawing of a mechanical assembly with two curved components and a central shaft (no text or symbols)- Replace: Extend the slides. Align the tray on the slides and push back until the tray engages the rear hooks on the slides. Replace the Phillips screws on both sides of the tray (near the front). Do not over-tighten the screws. Set the glass on top of the tray.
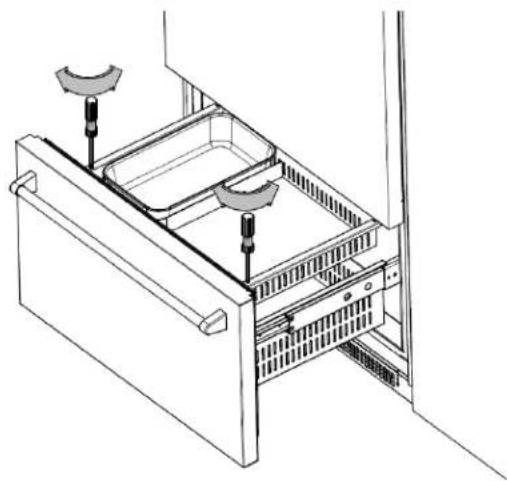
Deli and Crisper Drawers
- Remove: Pull the drawer forward until it stops. Remove the Phillips screws from both sides of the drawer (near the front). Slide the drawer forward to release it from the rear hooks on the slides.

natural_image
Diagram of a mechanical device with two curved arrows indicating motion or force direction (no text or symbols present)- Replace: Extend the slides. Align the drawer on the slides and push back until the drawer engages the rear hooks on the slides. Replace the Phillips screws on both sides of the drawer (near the front). Do not over-tighten the screws.
Dairy and Door Bins
- Remove: Lift the bin up and pull it out.
natural_image
Technical diagram of a mechanical bracket with directional arrows indicating movement (no text or symbols)- Replace: Place the bin over the pegs in the door and lower it in place. Check to make sure the bin is securely in position.
If placing a door bin in the lowest position, confirm the two pegs are engaged on each side and the bottom of the door bin does not hang below the side walls.
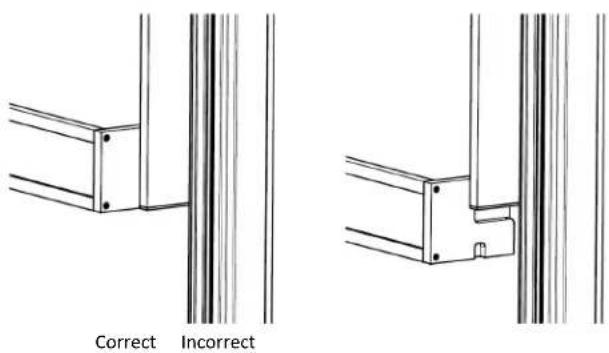
text_image
Correct IncorrectUpper Drawer
Important: Drawers are heavy as they are made of metal. Use special care when removing them to avoid impact from dropping.
- Remove: Pull the drawer forward until it stops. Remove the Phillips screws from both sides of the drawer (near the front). Slide the drawer forward to release it from the rear hooks on the slides.
natural_image
Technical line drawing of a multi-chamber refrigerator with two hanging sensors (no text or symbols)- Replace: Extend the slides. Align the drawer on the slides and push back until the drawer engages the rear hooks on the slides. Replace the Phillips screws on both sides of the drawer (near the front). Do not over-tighten the screws.
Ice Maker
The ice maker will produce approximately 2 1/2 pounds of ice every 24 hours. The Max Ice feature increases ice production by 50%.
When the refrigerator is shipped, the ice maker setting in the electronic control is on and the bale arm (on the ice maker) is in the lowest position. The electronic control must be on and the bale arm must be in the lowest position for the ice maker to produce ice.
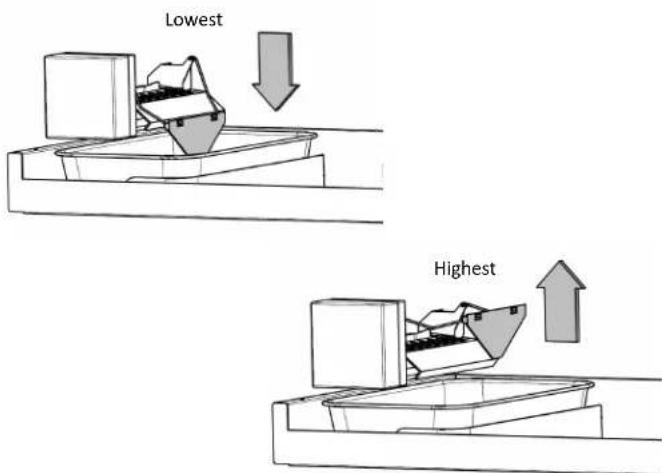
text_image
Lowest HighestAfter initially connecting the household water to the water line, discard the first two full pans of ice as the ice may contain air or impurities from the water line.
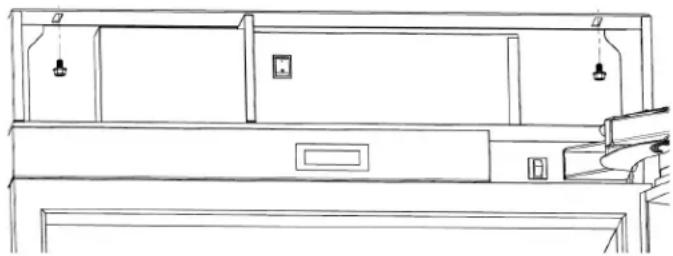
Top Grille
The top grille lifts up for easy access to the power switch (on the right) and the water filter (on the left). Lift the top grille by pulling out the bottom edge of the top grille and rotating it upwards.

natural_image
Technical line drawing of a mechanical or electrical enclosure with internal components and a curved component on the left (no text or symbols)Power Switch
The power switch turns your refrigerator off or on.
Water Filter

WARNING
To reduce the risk associated with the ingestion of contaminants, DO NOT use with water that is microbiologically unsafe or of unknown quality without adequate disinfection before or after the system. Systems certified for cyst reduction may be used on disinfected water that may container filterable cysts.
EPA Establishment 070595-MEX-001.

AVERTISSEMENT
Water Filter (continued)
The water filter, AP2-200G, supplies filtered water to the ice maker and is located behind the top grille. The water filter is rated for 200 gallons or six months, whichever comes first.
A copy of the water filter data sheet is included with the filter and can also be found at www.bluestarcooking.com.
When using the water filter for the first time, discard the first two full pans of ice as the ice may contain air or impurities from the water line.
Replacement Filters
Important: Read and follow instructions before installation and use of this system. Change the water filter at the recommended interval; the water filter MUST be replaced every six months or sooner. Failure to replace the water filter at the recommended intervals may lead to reduced water filter performance and failure of the water filter, causing property damage from water leakage or flooding.
Replacement water filters can be ordered at www.bluestarcooking.com or by calling customer service at (800) 449-8691.
When the water filter needs to be replaced, the home screen will display the water filter icon until the water filter is reset.
- Lift up the top grille to access the water filter.
- Rotate the old water filter counterclockwise a half turn and pull out. It is normal for a small amount of water to drip when the water filter is removed. Wipe it up with a cloth or paper towel.

natural_image
Technical line drawing of a mechanical device with a curved component and directional arrow (no text or symbols)Water Filter (continued)
- Remove the water filter from the packaging.
- Insert the new water filter and rotate it clockwise a half turn.
- Lower the top grille.
- Press and hold the water filter icon on the main options screen for two seconds to reset the water filter.
If the water filter will not be used, a bypass plug is not necessary as there is an internal bypass circuit, which eliminates the need for a separate plug.
Air Filter
The air filter is located in the fan cover on the back wall of the refrigerator and is rated for six months.
Replacement air filters can be ordered at www.bluestarcooking.com or by calling customer service at (800) 449-8691.
- Remove: Pull the tab on the air filter towards the right.

natural_image
Line drawing of a cabinet or rack unit with a ventilation grille and directional arrow (no text or symbols)- Replace: Remove the air filter from the packaging. Align the air filter with the opening and slide it into the fan cover.
Lighting
Interior lighting is provided by LEDs. If one needs to be replaced, call customer service at (800) 449-8691 to schedule a service call.
Sabbath Mode
Enable Sabbath mode on the electronic control. Swipe the display right or left to access the main options screen.

Press and hold for two seconds. When Sabbath mode is enabled, the home screen will display the icon. Press and hold the Sabbath icon on the home screen for two seconds to disable Sabbath mode.
Vacation
For extended vacations, do the following:
- Turn the refrigerator off using the power switch, located behind the top grille on the right.
- Turn off the water supply to the refrigerator.
• Empty the refrigerator including the ice pan. - Block the doors open to let air circulate and keep the interior dry.
Before cleaning, turn the refrigerator off using the power switch, located behind the top grille. When finished cleaning, turn the refrigerator on.
Stainless Steel Doors and Interior
Use a non-abrasive stainless steel cleaner and a soft cloth. Always follow the grain of the stainless steel.
Painted Doors and Other Surfaces
Use a mild solution of soap and water and a micro fiber cloth.
Condenser

CAUTION
Electrical Shock Hazard
Turn power off before cleaning condenser. Failure to follow these instructions can result in death, electrical shock, or fire.

MISE EN GARDE
Clean the condenser every three to six months to ensure proper operation.
- Lift up the top grille and turn the power off. The condenser is on the left.

text_image
Condenser- Use a soft bristle brush and vacuum to remove dust and lint from the condenser. Vacuum in the direction of the fins to avoid damaging the condenser.
- Turn the power on and lower the top grille.
The refrigerator makes unusual noises.
• The following noises are normal:
* Whirring when the fans are operating. When the refrigerator is initially turned on, the fan operates at a higher speed until it reaches the set temperatures.
* Rattling during the flow of refrigerant or water
* Clattering when ice is dropped from the ice maker into the ice pan.
* Buzzing when the water valve opens to fill the ice maker.
The refrigerator will not operate.
- Confirm the power switch is on. The power switch is located behind the top grille.
- Confirm the circuit breaker and electrical power to the refrigerator are on.
The lights are not working.
- Verify the doors are closed. If the doors were left open, the lights turn off after ten minutes to eliminate excess heat.
The refrigerator seems to run too much or the temperature is too warm.
- If a large amount of food was added, the doors were opened frequently, or the doors were left open, the compressors and fans will run to maintain the set temperatures.
- Verify the doors are closed or closing properly.
- Confirm there are no tears in the gaskets. If there are tears in the gaskets, call customer service at (800) 449-8691 to schedule a service call.
- Confirm whether the room temperature is hotter than normal. Increased ambient temperatures may cause compressors to run longer.
There is condensation, frost, or ice on the inside of the refrigerator and/or freezer.
- Verify the doors are closed.
- Confirm there are no tears in the gaskets. If there are tears in the gaskets, call customer service at (800) 449-8691 to schedule a service call.
The ice maker is not making ice.
- Confirm the ice maker setting on the electronic control is on and the bale arm on the ice maker is in the lowest position.
- Replace the water filter.
- Confirm the ice maker has been on for at least 24 hours.
- Verify the freezer temperature is 0^ .
- Confirm the water to the refrigerator is turned on.
- Confirm an ice cube is not stuck in the ice maker. When ice cubes are ejected from the ice maker, a cube may get stuck.
- Confirm there are no kinks in the household water line.
The ice is sticking together in the ice bin.
- It is normal for ice to stick together if it has not been used frequently. Empty the ice bin.
The ice has a bad taste and/or odor.
- Throw away the ice if it has not been used in a long time.
- Clean the freezer compartment.
- Verify the water filter has been replaced and installed correctly.
The refrigerator has an odor.
- Replace the air filter.
- Confirm food is adequately covered as uncovered food could create odors.
- Clean the refrigerator thoroughly.
If assistance is still required, please call customer service at (800) 449-8691.
Prizer-Painter Stove Works, Inc. ("Prizer-Painter") warrants your BlueStar appliance ("product") purchased in the U.S. and Canada and installed in residential properties for normal residential use.
What Is Covered
Subject to the specific conditions and limitations below, this warranty covers parts and/or labor necessary to repair or replace any part of the product that contains defects in materials and workmanship.
Two Year Warranty. For two (2) years from the date of installation, this warranty covers all parts and labor necessary to repair or replace any part on the product except for the Cosmetic Component Warranty below.
Five Year Warranty-Sealed System. For five (5) years from the date of installation, this warranty covers all parts and labor on the compressor, condenser, evaporator, drier and all connecting tubing.
Thirteen Year Limited Warranty-Sealed System. For thirteen (13) years from the date of installation, this warranty covers the following parts only: the compressor, condenser, evaporator, drier, and all connecting tubing.
Cosmetic Component Warranty. For thirty (30) days from the date of installation, this warranty covers scratches and dents, paint and porcelain blemishes, visible chips, etc.
Limitations of Coverage
- Floor Models. For one (1) year from the date of installation, this warranty covers all parts and labor necessary to repair or replace any part on the product except for cosmetic parts for which there is no warranty.
- The replacement of a part under this warranty does not extend the warranty period.
- Warranty service outside normal business hours and in areas beyond 50 miles one way from an authorized BlueStar retailer or service provider. The owner will be responsible for any and all costs associated with additional mileage, non-standard service or overtime, and special equipment required to remove the product so service may be performed.
This warranty is null and void:
- If the product is removed from where it was originally installed.
- If the original factory installed serial number is altered or removed from the product.
What Is Not Covered
This warranty does not cover, and specifically excludes:
- Product installed or used in any commercial or other non-residential property such as, but not limited to, day care facilities, fire stations, hotels, nursing homes, etc.
- Installation related issues including improper badge placement or installation inconsistent with the product specifications/installation instructions.
- Damage or repairs caused by alterations or modifications, abuse, misuse, neglect, or improper installation, mounting, handling, operation, maintenance, or storage.
• Normal adjustments after installation and setup. - Normal wear, care, and maintenance of the product as described in the use and care manual.
- Service calls to educate the customer on the proper use and care of the product.
- Consumable parts such as water filters.
- Damage or repairs caused by unauthorized service or repairs, including unauthorized adjustments or calibrations performed on the product.
• Accidental or intentional damage. - Damage or repairs as a result of natural disasters, fires, floods, earthquakes, winds, lightning, corrosive atmosphere, loss of electrical power to the product for any reason, or other conditions beyond Prizer-Painter's control.
- Damage or repairs caused by alteration for outdoor use.
- Damage or repairs caused by the use of harsh chemicals or cleaning products improperly applied.
- Liability or responsibility for damage to surrounding property including cabinetry, floors, ceilings, etc.
- Consequential or incidental damage, including but not limited to food or medicine loss, time away from work, restaurant meals, etc.
The terms of this warranty provide for repair of the product only. If the product cannot be repaired, Prizer-Painter, at its sole discretion, will determine whether to exchange the product.
Please see the Arbitration Clause and Related Provisions, which affect your legal rights. The Arbitration Clause is available at www.bluestarcooking.com.
For Dealer's Only
- Enable showroom mode by swiping the main screen left or right to access the main options. Press the settings icon to access the settings options. Press the Alarm icon and the blank space at the same time for three seconds. An S with a circle around it will appear in the upper left corner on the main screen.
- Disable showroom mode by swiping the main screen left or right to access the main options. Press the settings icon to access the settings options. Press the Alarm icon and the blank space at the same time for three seconds.