LF8500iEPL - Generator Lifan - Free user manual and instructions
Find the device manual for free LF8500iEPL Lifan in PDF.


| Product Type | Portable Generator |
| Model | LF8500iEPL |
| Dimensions (L x W x H) | 30 x 22.5 x 23 inches |
| Weight | 225 lbs |
| Engine | LIFAN LF190FD, 420cc, 4-Stroke OHV, 15 MHP |
| Starting System | Recoil and Electric Start |
| Fuel Type | Automotive Grade Unleaded Gasoline (max 15% ethanol) |
| Fuel Tank Capacity | 6.5 Gallons |
| Run Time at 50% Load | 8 hours |
| AC Surge Output | 8500 Watts |
| AC Rated Output | 7500 Watts |
| AC Maximum Amperage | 62.5 amps at 120V |
| AC Cycle | 60 Hertz |
| Regulation | AVR (Automatic Voltage Regulator) |
| THD (Total Harmonic Distortion) | Less than 5% |
| Auto Idle Control | Yes |
| Low Oil Shutoff | Yes |
| Sound Level at 7m (23ft) | 75 decibels |
| Receptacles | 4x 120V 20A GFCI, 1x 120V 30A Twist Lock, 1x 120/240V 30A Twist Lock, 1x 12V 8.3A DC |
| Battery Required | 12V 12Ah (not included) |
| Warranty | 3-Year Residential (parts & labor first year, parts only years 2-3) |
| Safety Compliance | CARB certified (-CA models), meets EPA standards |
Frequently Asked Questions - LF8500iEPL Lifan
User questions about LF8500iEPL Lifan
0 question about this device. Answer the ones you know or ask your own.
Ask a new question about this device
Download the instructions for your Generator in PDF format for free! Find your manual LF8500iEPL - Lifan and take your electronic device back in hand. On this page are published all the documents necessary for the use of your device. LF8500iEPL by Lifan.
USER MANUAL LF8500iEPL Lifan
Operating Instructions and Owner's Manual
LF7000, LF7000-CA, LF8500iE, LF8500iE-CA LF7000iPL, LF7000iPL-CA, LF8500iEPL, LF8500iEPL-CA
PLEASE READ THIS MANUAL CAREFULLY BEFORE OPERATING YOUR NEW PORTABLE GENERATOR
(E) Indicates this unit is equipped with Electric Start (-CA) Indicates this unit is CARB Certified for California (i) Indicated the unit is equipped with Auto Idle Feature
PLEASE READ THE
FOLLOWING INSTRUCTIONS!
-
Unit Shipped with "NO OIL" in Engine or where applicable pumps and/or accessories. Check and fill with proper oil as outlined in the Owner's Manual for the respective product.
-
For repair under Warranty or questions concerning Warranty, DO NOT return this product to the Store where purchased. Follow the procedures as outlined in the "WARRANTY POLICY" and "WARRANTY REGISTRATION" in the Owner's Manual. For any questions visit www.lifanpowerusa.com or call 1-866-471-7464.
-
Read the "Owner's Manual" prior to operating any equipment and familiarize yourself with the proper and safe operation of the equipment. If you have any questions visit www.lifanpowerusa.com or call 1-866-471-7464.
This Owner's Manual is for the Following Models:
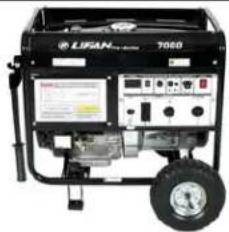


| LF7000 | LF8500iE | LF7000iPL | LF8500iEPL |
| LF7000-CA | LF8500iE-CA | LF7000iPL-CA | LF8500iEPL-CA |
(LF) Indicates this unit is a LIFAN Power USA Product
(PL) Indicated this unit is in the Platinum Series Product Line
(-CA) Indicates this unit is CARB Certified for California
(E) Indicates this unit is equipped with Electric Start
(i) Indicated the unit is equipped with Auto Idle Feature
LIFAN Power USA
2205 Industrial Park Road
Van Buren, AR 72956
866-471-7464
www.lifanpowerusa.com
Table of Contents
Preface 4
Product Specifications 5
Safety Instructions 6
Controls and Features 11
PRE-OPERATING INSTRUCTIONS 14
Assembly 14
Battery Specifications 16
Generator Setup 17
Operation of Generator 20
Storing the Unit 24
Maintenance 25
Troubleshooting 29
Generator Safety 30
Wire Diagram 31
Generator Wattage Reference Worksheet 33
Limited Warranty Policy 35
LIFAN Power USA
2205 Industrial Park Road
Van Buren, AR 72956
866-471-7464
www.lifanpowerusa.com
Preface
Thank you for choosing LIFAN Power USA for your Power Equipment Needs. LIFAN Power USA prides itself on providing quality products at affordable pricing, creating the "Best Equipment Value on Today's Market!"
All LIFAN Power USA products are manufactured utilizing the latest technology. Built with quality components, your new Power Equipment Product will give you years of dependable service. Your unit, along with all of LIFAN Power USA products are designed, engineered, and manufactured with LIFAN's Industrial Grade Gasoline Engine.
This Owner's Manual will provide you with all of your needed information for your new Power Equipment Product, including Safe Operation and Maintenance of your unit. Please read this Owner's Manual completely and carefully prior to operation. Keep this Owner's Manual for assistance in the future, such as proper maintenance schedules and tips to prolong the life and effective use of your unit. If you require assistance, please visit our website (www.lifanpowerusa.com) or call toll free 866-471-7464.
This Owner's Manual contains information with respect to the newest products at the time of publication. Due to revision and modifications, the information noted in the Owner's Manual might vary from the actual status. This Owner's Manual is subject to change without notice. The copyright of this Owner's Manual belongs to EquipSource, LLC. Any group or individual is forbidden to reprint or copy any of this Owner's Manual without the written consent of EquipSource, LLC.
FOR ALL WARRANTY AND SERVICE RELATED ISSUES/QUESTIONS DO NOT RETURN YOUR UNIT TO THE STORE OR DEALER WHERE THE ITEM WAS PURCHASED. FOR SERVICE VISIT LIFAN POWER USA'S WEBSITE (WWW.LIFANPOWERUSA.COM) OR CALL 1-866-471-7464. WE WILL BE HAPPY TO HANDLE YOUR WARRANTY ISSUE OR DIRECT YOU TO THE NEAREST "AUTHORIZED SERVICE CENTER."
LIFAN Power USA
2205 Industrial Park Road
Van Buren, AR 72956
866-471-7464
www.lifanpowerusa.com

PRODUCT SPECIFICATIONS
PORTABLE GENERATORS
| Model Size | LF7000LF8500iELF7000iPL | LF8500iEPL | ||
| Voltage | 120/240V AC & 12V DC | 120/240V AC & 12V DC | 120/240V AC & 12V DC | 120/240V AC & 12V DC |
| AC Surge Output 2 | 7000 Watts8500 | Watts7000 Watts8500 | Watts | |
| Rated AC Output 2 | 6000 Watts7500 | Watts6000 Watts7500 | Watts | |
| Maximum AC Amperage | 50amps @ 120V | 62.5amps @ 120V | 50amps @ 120V | 62.5amps @ 120V |
| AC Cycle | 60 Hertz60 Hertz60 Hertz60 Hertz | |||
| Regulation | AVR 3 | AVR 3 | AVR 3 | AVR 3 |
| 12V 8.3 amp DC Receptacle | ea.1 ea.1 ea.1 ea. | |||
| 120V 20amp AC GFCI Receptacle | 2 ea. | 4 ea. | 4 ea. | 4 ea. |
| 120V 30 amp AC Twist Lock Receptacle | 1 ea.1 ea.1 ea.1 ea. | |||
| 120/240V 30amp AC Twist Lock Receptacle | 1 ea.1 ea.1 ea.1 ea. | |||
| THD 4 Technology | N/AN/AYesYes | |||
| Circuit Protection | Master Circuit Breaker | Master Circuit Breaker | Master Circuit Breaker | Master Circuit Breaker |
ENGINE
| Manufacturer | LIFAN | LIFAN | LIFAN | LIFAN |
| Model | LF188F-13111 | LF190FD-13111 | LF188F-13111 | LF190FD-13111 |
| Maximum Horsepower (MHP) | 13 MHP | 15 MHP | 13 MHP | 15 MHP |
| Engine Displacement | 389cc | 420cc | 389cc | 420cc |
| Starting System | Recoil | Recoil & Electric | Recoil | Recoil & Electric |
| Fuel Tank Capacity | 6.5 Gallons | 6.5 Gallons | 6.5 Gallons | 6.5 Gallons |
| Fuel Tank Material | Rust Preventative Coated Steel | Rust Preventative Coated Steel | Rust Preventative Coated Steel | Rust Preventative Coated Steel |
| Run Time (@ 50% Load) | 10 hours | 8 hours | 10 hours | 8 hours |
| Sound Level (@ 7m or 23ft) | 75 decibels | 75 decibels | 75 decibels | 75 decibels |
| Engine Type | 4-Stroke OHV | 4-Stroke OHV | 4-Stroke OHV | 4-Stroke OHV |
| Fuel Type | Automotive Grade Unleaded Gasoline | Automotive Grade Unleaded Gasoline | Automotive Grade Unleaded Gasoline | Automotive Grade Unleaded Gasoline |
| Fuel Compliance | 15% Ethanol Mix | 15% Ethanol Mix | 15% Ethanol Mix | 15% Ethanol Mix |
| Oil Type & Amount | SAE 10w30w 32oz | SAE 10w30w 32oz | SAE 10w30w 32oz | SAE 10w30w 32oz |
| Automatic Idle Control | N/A | Yes | Yes | Yes |
| Low Oil Shutoff Protection | Yes | Yes | Yes | Yes |
| CARB Certified | (-CA) Models Only | (-CA) Models Only | (-CA) Models Only | (-CA) Models Only |
PRODUCT SPECIFICATIONS
DIMENSIONS
| Length (inch) | 30 in30 in30 in30 in | |||
| Width (inch) | 22.5 in | 22.5 in | 22.5 in | 22.5 in |
| Height (inch) | 23 in23 in23 in23 in | |||
| Weight | 210 lbs215 lbs205 lbs225 lbs |
ACCESSORIES
| 12V Cord, Plug, & Clips | ea.1 ea.1 ea.1 ea. | |||
| 120/240V Male Twist Lock Plug | 1 ea. | 1 ea. | 1 ea. | 1 ea. |
| Spark Plug Wrench | ea.1 ea.1 ea.1 ea. | |||
| Mobility/Wheel Kit | YesYesYesYes | |||
| Battery (not included) | N/A | 12V 100cca min 7"lx3"w | N/A | 12V 100cca min 7"lx3"w |
Comments
| 1 = Temporary Power available for no more than 10 seconds |
| 2 = Power Available for Continuous Operation |
| 3 = Automativ Voltage Regulator |
| 4 = Total Harmonic Distortion provides clean & stable power with less than 5% distortion |
Lifan Power USA
2205 Industrial Park Road
Van Buren, AR 72956
866 741-7464

LIFAN Power USA
2205 Industrial Park Road
Van Buren, AR 72956
866-471-7464
www.lifanpowerusa.com
Safety Instructions

This is the safety alert symbol. It is used to alert you to potential personal injury hazards. Obey all safety messages that follow this symbol to avoid possible injury or death.
For your safety read this manual carefully. Become familiar with the proper operation, care, and maintenance of your LIFAN Power USA generator.
The safety and alert symbol ( ) is used with a signal word (CAUTION, DANGER, WARNING), a pictorial and/or safety message to alert you to hazards. CAUTION indicates a hazard that, if not avoided, could result in minor or moderate injury. DANGER indicates a hazard that, if not avoided, could result in death or serious injury. WARNING indicates a hazard that, if not avoided, could result in death or serious injury.
Hazard Symbols and Meanings


WARNING!
Running generator emits carbon monoxide: an odorless, colorless, poison gas. Breathing carbon monoxide can cause nausea or death!
ONLY operate generator outdoors. Exhaust gas must be prevented from entering confined areas. Direct exhaust gas away from windows, doors, ventilation and other openings. Do not operate generator inside or under any buildings. Operating this generator inside the compartment of a recreational vehicle will likely result in death!

WARNING!
The engine exhaust from this generator contains chemicals known to the state of California to cause birth defects, reproductive harm, and cancer.

Do not use this generator within the generator compartment of a recreational vehicle!
This generator does not meet U.S. Coast Guard Regulation 33CFR-183 and should not be used on marine applications.
Use of this generator on marine applications could result in injury or death.
LIFAN Power USA
2205 Industrial Park Road
Van Buren, AR 72956
866-471-7464
www.lifanpowerusa.com
Safety Instructions (continued)
| WARNING! | |
 | Rapid recoil of starter cord (kickback) may pull hand and arm forward toward engine at a rapid rate.Broken bones, bruises, sprains, and fractures may result. |
| When starting engine, pull cord slowly until tension is felt, and then pull rapidly to avoid kickback.Never start or stop engine with electrical devices plugged in and turned on. Doing so is hazardous and will damage generator. | |
| WARNING! | |
 | Generator produces powerful voltage!Only a licensed electrician can safely connect generator to existing utility hookups. Failure to isolate generator from electrical grid can result in death to utility workers as well as others. |
| When using generator as backup power, notify utility company. Use approved transfer equipment to isolate generator from electric utility.Do NOT operate generator while exposed to rain or other wet conditions.Do NOT handle generator when in contact with water.Do NOT contact bare wires or receptacles.Do inspect all electrical cords for damage and discontinue from use any damaged or excessively worn cords.Do NOT allow unqualified persons to operate or service generator. | |
CAUTION!
Exceeding generators wattage/amperage capacity can damage generator and /or electrical devices connected to it.
- Start the generator and let the engine rpm's stabilize before connecting electrical loads.
- Connect all electrical loads with the device in the off position.
• Turn off electrical loads before shutting off generator engine.
Safety Instructions (continued)


WARNING!
Fuel and its vapors are extremely flammable and explosive.
Fire or explosion can cause severe burns or death.
WHEN ADDING OR DRAINING FUEL
- Turn generator off and let it cool for at least three minutes before removing fuel cap. Loosen cap slowly in order to relieve pressure in the fuel tank.
• Fill or drain fuel tank outdoors. Do not excessively inhale fuel vapors. - Keep away from open flames or sparks and other sources of ignition.
• Do NOT smoke while filling fuel tank. - Do NOT overfill tank. Allow space for fuel expansion.
WHEN TRANSPORTING OR REPAIRING EQUIPMENT
• Transport generator with the fuel valve in the off position.
• Repair generator with the fuel tank empty or the fuel valve in the off position.
- Disconnect spark plug wire before transport or service.
WHEN STORING FUEL OR EQUIPMENT CONTAINING FUEL
- Store away from furnaces, stoves, water heaters, clothes dryers or other appliances that have pilot light or other ignition source because they can ignite fuel vapors.
WHEN STARTING EQUIPMENT
- Ensure spark plug, muffler, air cleaner, and fuel cap are in place.
• Do NOT crank engine with spark plug removed.
• If fuels spills, wait until it evaporates before starting engine.
WHEN OPERATING EQUIPMENT
• Do not choke carburetor to stop engine.
- Do not tip engine or equipment at an angle, which causes fuel to spill.
• This generator is not for use in marine applications.

CAUTION!
Excessively high operating speeds (engine revolutions) increase the risk of injury and damage to the generator. Excessively low speeds impose a heavy load and will damage generator.
• Do NOT adjust engine speed governor. Generator supplies correct voltage and frequency at designated speed.
• Modifying generator in any way may be dangerous and will void warranty.
LIFAN Power USA
2205 Industrial Park Road
Van Buren, AR 72956
866-471-7464
www.lifanpowerusa.com
Safety Instructions (continued)

WARNING!

While engine is running temperature may exceed 150° F ( 65° C). Server burns may occur.

Exhaust heat/gasses can ignite combustibles, structures or damage fuel tank causing a fire.
• Do NOT touch hot surfaces and do avoid exhaust gasses.
- Allow generator to cool before touching.
- Keep at least 6 ft. (183cm) clearance on all sides of generator including overhead clear.
• Reflective exhaust heat may damage fuel tank causing fire.
- Code of Federal Regulation(CFR) Title 36 Parks, Forests, and Public Property require equipment powered by an internal combustion engine to have a spark arrester, maintained in working order, complying to USDA Forest service standard 5100-1c or later revision. In the state of California a spark arrester is required under section 4442 of the California Public resources code.

WARNING!

Unintentional sparking can result in fire or electrical shock.

WHEN TESTING FOR ENGINE SPARK
- Do NOT check for spark with the spark plug removed.
- Use approved spark plug tester.
WHEN REPAIRING OR ADJUSTING GENERATOR
- Disconnect the spark plug wire from the spark plug and place the wire where it cannot contact spark plug.
CAUTION!
Improper use and care of this generator will cause damage and shorten its lifespan. Failure to follow these actions will void all warranties.
• Use generators only for appropriate and designated purposes.
• The dealer or customer helpline (1-866-471-7464) can instruct you on intended uses.
- Generator must be placed on a level surface.
- Do NOT expose generator to extreme conditions. Excessive dust, moisture, and corrosive vapors will damage unit.
• Cooling slots must be kept clear of debris.
• Do not connect improperly operating devices to generator.
- Shut off generator and take to a qualified service center if the generator fails to operate properly.
Controls and Features
Read this Owner's Manual Completely and Carefully before Operating Generator.

Controls and Features (continued)
Legend
- Fuel Level Sensor – Displays Current Fuel Level
- Fuel Tank Cap – Vented Fuel Cap Must be Properly Installed at all times during Operation
- Receptacle Panel – See Product Specifications for Individual Model
- Double Pole Circuit Breaker (AC) – Protects Receptacles & Generator from Overload
- Pilot Light – Amber/Green Light to Indicate Generator is Producing Power
- Crankcase Oil Dipstick/Oil Fill Hole Cap – Check/Fill Engine Oil
- On/Off Switch – Rocker Style; Set to "ON" to start Engine & "OFF" to Shut Off Engine; Key Switch Model: Turn to "START" to Crank Engine & "OFF" to Shut Off Engine
- Crankcase Oil Drain Plug – Remove to Drain Oil from Crankcase
- Recoil Starting Handle – Pull Handle to Rotate Engine for Starting.
- Fuel Cock (Valve) – Turn to "OFF" to Terminate Fuel Delivery to Engine
- Air Cleaner – Check Maintenance Schedule for Service Intervals
- Choke -
5000 Watts & 8000 Watts Model: Before starting cold generator, pull the choke pin outward from generator to activate the choke lever. After allowing generator to run for a few seconds, push pin inward toward generator.
3500 Watts & 4000 Watts Model: Before starting cold generator, rotate the choke lever to the left until resistance is felt. After starting the generator, rotate the choke lever to the right to disengage. - Earth Grounding Stud – Always connect generator to an Earth Grounding Source. Consult Local Energy Jurisdiction for Code Requirements in your area.
- Muffler & Muffler Hood – Exhaust muffler emits combustion gas from engine and lowers the noise level of the generator
- Valve Cover – Cover for Overhead Valves designed to be removed periodically for valve adjustments.
Controls and Features (continued)
AUTO IDLE CONTROL SWITCH: LF8500iE, LF7000iPL, & LF8500iEPL Models Only This unit is equipped with an Auto Idle Control feature. The generator will automatically switch to "Gas-Saving" mode when there is no power or load required. Upon demand, the generator will enhance engine speed automatically to provide the correct electrical power the connected device requires. The Auto Idle Control feature minimizes fuel consumption and reduces noise levels.
Turn the AUTO IDLE CONTROL feature "OFF" when:
• High Electrical Loads are connected simultaneously to reduce voltage changes.
- The Equipment connected to the generator requires full power at start-up. Example: Power Tools and other equipment with electric motors.
- Generator is working at a constant rated power output.
Pre-Operating Instructions: Assembly
Your LIFAN Power USA generator is packaged without fuel and oil. Some assembly is required before operating your LIFAN Power USA Generator.
For further assistance in assembling your generator please visit our website (www.lifanpowerusa.com) or call 1-866-471-7464 between the hours of 9am-5pm Monday-Friday.
BOX CONTENT:
- Generator
- Accessory Kit
○ 1 ea. - Spark Plug Removal Tool - 1 ea. - 12 Volt Power Cord with Plug & Alligator Clips
○ 1 ea. - Nema14-30 Male Twist Lock Plug - RV Adapter Plug for 120 Volt 30amp Service
- Owner's Manual and Warranty Card
- Wheel Kit
- 2 ea. - Never-Go-Flat Foam Filled Wheels
o 2 ea. - Heavy Duty Leg Supports (Shipped Stored Under Fuel Tank)
○ 1 ea. - Axle
○ 2 ea. - Folding Handle
○ Hardware Bag
UNPACKING THE GENERATOR:
- Set the Carton on a Flat, Rigid Surface.
- Remove All Contents from Carton EXCEPT Generator.
- Open Box Completely by Cutting Each Corner from Top to Bottom.
- Leave Generator on the Remainder of the box until Wheel Kit is installed.
- Locate all Box Contents and Place them Beside the Generator. (Some Items may be Packed within the voids of the Generator itself)
Pre-Operating Instructions: Assembly (continued)
WHEEL KIT INSTALLATION:
The Following Tools are needed to Install Wheel Kit:
- Safety Glasses
• 8mm-14mm Wrench Set
• 8mm-14mm Ratchet & Socket Set
• 17mm Ratchet & Socket
Wheel Kit Installation Directions:
NOTE: Install Wheel Kit BEFORE Filling the Generator with Fuel or Oil. Never Tip a Unit that contains Fuel or Oil.
- Tip Generator so Engine End is up.
- Slide Axle through both Mounting Brackets.
- Place a Wheel on both Sides as shown in "Assembly Diagram."
- Securely Tighten Wheel nuts with the 17mm Socket.
- Tip the Alternator End of the Generator up.
- Place the Support Legs under the Frame Brace as shown in "Assembly Diagram."
- Secure with the provided Cap Screws and Hex Nuts. Securely tighten using 12mm Ratchet and Socket.
Pre-Operating Instructions: Battery Specifications
(LF8500iE & LF8500iEPL Models Only)
The Battery is NOT included with your Energy Storm Generator. These units require an Acid Cell Battery. This battery is used in many applications, such as lawnmowers, ATV's, motorcycles, etc. and can be found at many retailers and dealers including where you purchased this Power Equipment Product. Use the "Battery Specifications" chart below to attain the specifications of the necessary battery. Or, use the "Cross Reference Models" chart below to match up with the manufacturer's model number with the brand battery available at your local retailer.
| BATTERY SPECIFICATIONS | ||||
| Generator Model | Length (inch) | Width (inch) | Amp (hrs) | DC Voltage (Volts) |
| LF8500iE | 5.3125 in | 3.1875 in | 12 | 12V |
| LF8500iEPL | 5.3125 in | 3.1875 in | 12 | 12V |
| CROSS REFERENCE MODELS | ||
| Generator Model | Manufacturer | Model Number |
| LF8500iE | Excide® | 12N12A-4A-1 |
| LF8000iEPL | Excide® | 12N12A-4A-1 |
Note: (-CA) or (E) Models have same Battery Specifications
| Warning | |
| Follow all the battery manufactures' warnings for proper installing of your battery in order to prevent damage to personnel or equipment. | |
- Battery leads consist of a Red (hot) lead that connects to the (+) battery post and is connected to the (+) terminal on the starter solenoid and a Black lead which is connected to the (-) negative battery terminal and the frame mounting bolt.
- Connect the Red (hot) terminal to the battery.
- Connect the Black (negative) terminal to the battery.
Pre-Operating Instructions: Generator Setup
CAUTION: Any attempt to start the generator before it has been properly serviced may result in engine failure and void warranty.
ADD ENGINE OIL: Refer to the diagrams below.
- Place generator on level surface.
- Clean area around Oil Hole Dipstick/Plug & Unscrew Oil Hole Dipstick/Plug.
- Fill with appropriate type and amount. Refer to Chart below for recommended oil type based on Environmental temperature.
NOTE: Refer to "Product Specifications" section for universal recommended oil type and oil amount.
- Replace Oil Hole Dipstick/Plug and tighten securely.

Environment temperature
Pre-Operating Instructions: Generator Setup (continued)

WARNING!

Fuel and its vapors are extremely flammable and explosive.

Fire or explosion can cause severe burns or death.
WHEN ADDING FUEL
- Turn generator off and let it cool for a minimum of three minutes before removing fuel cap. Turn and remove cap slowly in order to relieve residual tank pressure.
• Always fill the fuel tank with the unit outdoors.
• DO NOT overfill tank. Allow room for fuel expansion. - Keep fuel away from sparks, open flames, heat, pilot lights, and other ignition sources.
ADD FUEL: Refer to Controls and Features section for diagrams.
- Clean area around fuel cap, then remove fuel cap.
- Pour fresh, clean regular automotive grade unleaded fuel with a minimum octane rating of 85 into fuel tank. Do NOT mix fuel with oil. Fuel must have ethanol blend of 15% or less. Pay close attention to the storage requirements of these fuels. Do NOT overfill fuel tank.
- Install the fuel cap. Rotate the fuel cap clockwise until it is in its locked position. Wipe away any spilled fuel.
CAUTION: Alcohol-blended fuels (gasohol, ethanol, or methanol) will attract moisture, which leads to separation and formation of acids during storage. Acidic gas can damage the fuel system of an engine while in storage. To avoid engine problems, the fuel system should be treated with a fuel stabilizer or drained if the generator will not be started for thirty (30) days. If using a fuel stabilizer, follow the manufacture's recommended instructions for use. Always use stabilizer with a full tank of gasoline. Always drain old fuel and use fresh fuel before next use. If you do not use a fuel stabilizer, the fuel system must be drained and cleaned. Drain the fuel tank and start the engine, allowing it to run until all fuel lines and carburetor are drained of fuel. Before restarting the carburetor. Float bowl must be removed and cleaned of any debris.
NEVER use chemical solvents or cleaners in the fuel tank for damage may occur.
Pre-Operating Instructions: Generator Setup (continued)
CHECK AIR CLEANER ELEMENT:
Refer to “Air Cleaner Maintenance” in the Maintenance section of this Owner’s Manual to ensure Air Cleaner Element is in operable condition.
GROUNDING THE GENERATOR: Refer to Controls and Features section.
- Connect the Ground Terminal on the generator to an acceptable source of electrical ground, such as a copper-grounding stake, using copper electrical wire with a minimum diameter of 16 gauge.
Operation of Generator
HOW TO USE YOUR GENERATOR
GENERATOR LOCATION:
| WARNING! | ||
| Running generator gives off carbon monoxide gas. It is odorless, colorless, and highly toxic.Breathing carbon monoxide gas can leads to fainting, nausea or may result in death. | ||
| Only operate generator outdoors.Prevent exhaust gas from entering, through windows doors or ventilation intakes, any confined areas.DO NOT operate generator inside any enclosed or roofed areas. This includes the generator compartment of any recreational vehicle (RV). | ||
STARTING THE ENGINE: Refer to the Controls and Features section.
| CAUTION! |
| Never start or shutoff the generator with electrical loads connected and in the operational mode (on switch activated). Starting or shutting off the generator with electrical loads activated may result in damage to the generator. |
- Unplug all electrical loads from the generator.
- Make sure the generator is in a level position.
- Open the fuel cock by turning the fuel cock to the "ON" position.
- For cold engine starts only: Pull the choke pin to the engaged position per the instruction label on the generator main frame.
PULL START (RECOIL) ONLY MODELS:
- Place the On/Off switch in the "ON" (I) position.
- Grasp starter handle and pull slowly until resistance is felt. Then pull the cord rapidly with a full arm stroke. Allow the rope to return slowly. Do NOT allow the rope to snap back against housing.
- Once the engine runs for 3-5 seconds, push the choke pin in to disengage.
Operation of Generator
HOW TO USE YOUR GENERATOR
(continued)
ELECTRIC/PULL (RECOIL) START MODELS:
- Using provided key, turn the key switch to the "ON" position. Rotate the key one more position to the "START" position in order to engage the starting motor. Hold key switch in the "START" position until engine starts for NO MORE than 10 engine rotations. If the engine does NOT start repeat procedures beginning with Step One (1).
- Once the engine runs for 3-5 seconds, push the choke pin in to disengage.
NOTE (all models): If generator does not start within three pulls, check the crankcase oil level. The engines “Low Oil Alarm System” may be activated and preventing the engine from starting.
CONNECTING ELECTRICAL LOADS:
- Ensure engine is started before plugging in any electrical appliance.
- Plug in desired 120 Volt loads to the 120 Volt U-Ground and 240 Volt loads to the 240 Volt receptacles. Always plug appliances into the generator with appliance in its "OFF" position.
- Plug in 12V DC load to the DC receptacle. DC and AC power may be used simultaneously. Circuit Breaker may need to be re-set before using 12V receptacle. When charging 12V batteries, insert the charging plug into the DC socket and then connect the terminals to the battery. After charging is complete, remove battery terminal first, then un-plug charging plug from generator. Remove the ground wire of Car Batteries prior to charging and reconnect after charging is complete to avoid short circuit or spark.
- Do NOT connect 240 Volt loads to the 120 Volt receptacles.
- Only connects single-phase 60 Hertz loads.
- DO NOT OVERLOAD THE GENERATOR. FOLLOW THE PROVIDED "GENERATOR WATTAGE REFERENCE WORKSHEET" TO DETERMINE THE RUNNING AND STARTING WATTAGE OF YOUR EQUIPMENT, REFER TO THE PRODUCT SPECIFICATIONS TO ENSURE YOUR GENERATOR WILL OPERATE THE DESIRED EQUIPMENT.
NOTE: Use the running and starting wattage provided by the equipment manufacturer if available. If not available, use provided "Generator Wattage Reference Worksheet."
LIFAN Power USA
2205 Industrial Park Road
Van Buren, AR 72956
866-471-7464
www.lifanpowerusa.com
Operation of Generator
HOW TO USE YOUR GENERATOR
(continued)
LOW OIL ALARM SYSTEM:
This model is equipped with a Low Oil Alert System designed to avoid engine damage from insufficient oil in the crankcase. The Low Oil Alarm System will stop the engine automatically before the oil level in the crankcase drops below safe operating levels.
VOLTAGE FREQUENCY TIME (VFT) METER:
The LF3750, LF3750-CA, LF4000EPL, and LF4000EPL-CA models include a Voltage Frequency Time (VFT) Meter. The VFT Meter has four (4) modes:
- Start Up Mode 1 - The run time for the cycle displayed in minutes. This resets each time the unit is shut off.
- Mode 2 – The run time for the lifetime of the unit displayed in hours. This does NOT reset.
- Mode 3 – Frequency reading of the sine wave of the current output in Hertz. This should be between 56Hz – 64Hz (Hz = Hertz).
- Mode 4 – Voltage reading of the current output in Volts. This should be between 115V – 122V (V=Volts).
To change the mode of the VFT Meter, simply depress the black button on the face of the VFT Meter.
Operation of Generator
HOW TO USE YOUR GENERATOR
(continued)
STOPPING THE GENERATOR: Refer to Controls and Features section for diagram.
EMERGENCY SHUTDOWN
- Turn the Fuel Valve to "OFF" position
NORMAL SHUTDOWN
- Unplug all electrical loads or turn the main breaker to the "OFF" position.
- In order to stabilize internal equipment temperatures, allow the engine to run for 3-5 minutes under no load.
- If the generator will not be in use for more than 7 days, turn the fuel valve to the "OFF" position and allow the unit to run until the fuel in the carburetor is used and the engine shuts itself off.
- Turn the ignition switch to the "OFF" position.
- Allow unit to cool to ambient temperature before storage or transportation.
- Always transport the generator with the fuel valve in the "OFF" position. Failure to do so will result in damage to the engine.
USAGE IN HIGH ALTITUDE REGIONS:
In regions with high altitude, the standard carburetor produces overly dense combinations of fuel and air, which result in decreased engine performance and increased fuel consumption. To maintain high engine performance at high altitudes, install a high altitude carburetor main spray nozzle and re-adjust the adjusting screw for idle speed. For usage in regions with an altitude of over 4,527ft (1380m), contact your dealer to replace the standard carburetor and make needed adjustments in advance. Even with a proper high altitude carburetor spray nozzle installed in the engine, the power output of the engine will drop about 3.5% with every 1000ft (305m) increase in altitude. If the standard carburetor jets are not replaced and adjusted for usage in high altitude, the increased altitude effect will be even more severe.
NOTE: Usage of the water pump in regions with lower altitude than the high altitude carburetor spray nozzle is applicable, may result in decrease of engine performance. The engine may become overheated and over-lean combination of fuel and air produced, may cause severe damage to the engine.
23
LIFAN Power USA
2205 Industrial Park Road
Van Buren, AR 72956
866-471-7464
www.lifanpowerusa.com
Storing the Unit
STORAGE: Refer to Controls and Features section or diagram and definitions.
Before long term storage of your power equipment product, typically 30 days or more, perform the following:
- Set the fuel cock (valve) to the "OFF" position.
- Let the unit continue to run until it stops itself, burning all of the fuel in the fuel system.
- Turn the ignition switch to the "OFF" position.
- Drain the engine oil in accordance with the "Oil Change Procedures" in this Owner's Manual's Maintenance section. Do NOT re-fill with oil until ready to use again.
- Remove the Spark Plug in accordance with the "Spark Plug Maintenance" in the Owner's Manual's Maintenance section. Spray a lubricant, such as WD40 , into the Spark Plug hole to lubricate the top of the piston and walls of the cylinder. Replace the Spark Plug.
- Pull starter rope until resistance is felt. This will place the valves in the closed position.
- Add the recommended amount of fuel stabilizer, in accordance with the amount recommended by the manufacturer of the fuel stabilizer, to the unused gasoline left in the fuel tank.
- Place the unit in a clean, dry, and secure location.
- Cover with "LIFAN Water Proof Generator Cover," Item Number LF100-69600 not included) or canvas/vinyl tarpaulin. Do NOT operate unit with cover installed.
Maintenance
| MAINTENANCE SCHEDULE | |
| PROCEDURE | TIME |
| Engine Oil Check | Each Use |
| Replace Engine Oil | After Each 40 Hours of Use (For Initial Break in – After First ( 1st ) 10 Hours of Use |
| Air Cleaner Filter Check | Each Use |
| Air Cleaner Filter Replacement | When Needed or After Every 100 Hours of Use |
| Air Cleaner Wash | When Needed |
| Spark Plug | |
| Valve Clearance | Check & Re-adjust annually or after 300 Hours of Use |
| Fuel Tank | Replace Every 3 Years Based on Condition |
NOTE: Refer to Following Procedures for Proper Method to Perform Maintenance
OIL CHANGE PROCEDURES: Refer to Controls and Feature section for diagram. Periodic Maintenance of your engine oil should be performed after each 40 hours of use of you Power Equipment Product. Check your engine oil level prior to each use.
- Start your engine and let it warm up to get the oil warm and thinner. Turn the engine On/OFF switch to the "OFF" position. Turn Fuel Valve to the "OFF" position.
- Remove the oil cap/dipstick by turning counter clockwise. Remove the oil drain plug located below the oil cap/dipstick utilizing the appropriate tools. USE CAUTION: THE OIL MAY BE HOT.
- Drain the engine oil into an approved receptacle and discard in accordance with all Federal and State Regulations. Never dump the used engine oil on the ground or into drains, only discard in an approved manner. Check with your local authorities to determine the regulations in your area.
WARNING! AVOID SPLASHING OF HOT OIL; IT CAN BURN YOU AND CAUSE SEVERE INJURY.
- After oil is completely drained, replace oil drain plug and tighten with appropriate tools. Replace oil with the proper oil for your product. Refer to the Pre-Operating Instruction: Generator Setup section for exact fill requirements.
Maintenance (continued)
OIL CHANGE PROCEDURES (continued):
Always use your dipstick to check the oil level and only fill to the full mark on the dipstick. Never overfill the engine as this can cause damage to the unit and void warranty.
- Replace the dipstick/oil cap on the engine.
- Shake generator to ensure the float in the Oil Alert System is free.
PROPER MAINTENANCE OF THE UNIT WILL INCREASE THE LIFE OF YOUR PRODUCT. THE OIL MUST BE CHANGED ON A REGULAR BASIS FOR PROPER OPERATION, AND RELIABILITY AND TO ALSO MAINTAIN THE WARRANTY ON THIS PRODUCT.
AIR CLEANER MAINTENANCE:
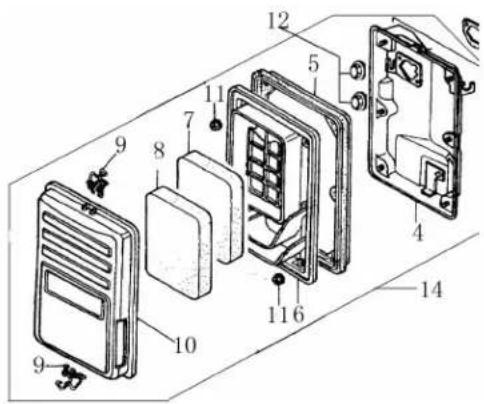
- Remove the clip (item 9 in "Air Cleaner A" below) or the wing nut (item 7 in "Air Cleaner B" below) to remove and check the air filter element.
- For Sponge Type Air Filters, wash with soap and water when contaminated. Squeeze excess liquid from air filter element, and allow the air filter element to dry.
For Paper Type Air Filters, replace with the correct Air Filter for your unit. They are available at your dealer or from LIFAN Power USA. Order your filter by calling toll free 866-471-7464.
- Re-Install the air filter element into the air filter housing.
Air Cleaner A

Air Cleaner
Maintenance (continued)
SPARK PLUG MAINTENANCE:
-
Remove Spark Plug Cap (refer to "Spark Plug Cap Removal" figure below.)
-
Remove Spark Plug with socket and handle supplied with your unit (refer to "Spark Plug Removal" figure below.)
-
Clean any carbon build-up around the Spark Plug.
-
Check the Spark Plug Gap and adjust if necessary. 0.30-inch gap.
-
Lubricate the threads of the Spark Plug with anti-seize compound or engine oil.
-
Re-install the Spark Plug and Spark Plug Cap.


Spark Plug Cap Removal Spark Plug Removal
FUEL SYSTEM MAINTENANCE:
NOTE: Periodically you can get sediment or trash in your Carburetor Bowl. Use the following procedures to clean:
-
Turn the fuel cock (valve) to the "OFF" Position.
-
Remove the carburetor bowl by removing the mounting bolt located at the bottom of the bowl.
-
Dump out the old fuel and sediment into an approved container and clean carburetor bowl thoroughly.
-
Fit a new rubber washer into place and re-attach fuel bowl to the carburetor.
NOTE: Removal of the drain screw at the bottom of the bowl can drain the fuel to remove smaller debris that has collected in the bowl.
-
After bowl is securely back in place, turn the fuel cock (valve) to the "ON" position for use.
-
Units equipped with a pre-filter for fuel will have a filter housed just below the fuel cock. Remove the fuel filter element (refer to "Fuel Filter Element Removal")
LIFAN Power USA
2205 Industrial Park Road
Van Buren, AR 72956
866-471-7464
www.lifanpowerusa.com
Maintenance (continued)
FUEL SYSTEM MAINTENANCE (continued):
diagram below) and either clean or replace the fuel filter element. Re-assemble the fuel filter element (refer to "Fuel Filter Element Assembly" diagram below.)

Fuel Filter Element Removal

Fuel Filter Element Assembly
Troubleshooting
IF THE ENGINE WILL NOT START:
- Check to ensure switches are in the "ON" position. (Both unit and engine)
- Check engine oil level. Your unit possesses a Low Oil Alarm System that will not allow your engine to start if the oil is below safe operating levels. This feature is installed to increase the life of your engine and prevent engine damage. If oil level is low, fill to the full mark on dipstick. Refer to the Product Specifications for exact oil type and amounts.
- Check the fuel level to insure adequate fuel. Add fuel if necessary.
- Remove and inspect the spark plug for cleanliness and proper electrode gap. If needed, clean or replace the spark plug. Refer to Spark Plug Maintenance in the Maintenance section of the Owner's Manual for proper procedure.
- If your unit will still NOT start after performing the above checks, call our customer hotline at LIFAN Power USA Toll Free 1-866-471-7464 or take your unit to an authorized Service Center.
NOTE: Periodically on the initial start-up or after the unit has been stored for a long period of time, the float for the "Low Oil Alarm System" will stick to the bottom of your oil pan. Locate the two (2) wires to the Low Oil Sensor Diode (refer to figure on the right) located on the side of the engine block. Unplug these wires and, only after ensuring the engine is full of oil, start the engine and allow to run until warm (normally 20 minutes, as this will heat the oil and release the float on the Low Oil Alert System). Then replug the wires to the terminals on the Low Oil Alarm Sending Unit.

UNIT DOES NOT PROVIDE ELECTRICAL CURRENT:
- Plug in a small appliance or tool to test.
- Check if the AC (or DC) Circuit Breaker is in the "ON" position. If not, place in "ON" position. If equipped with a GFCI receptacle, re-set GFCI Breaker by pushing in the reset button in the middle of the GFCI's faceplate (this must be done with the engine running).
- If your unit still does NOT produce electricity after performing the previous checks, call LIFAN Power USA at 1-866-471-7464, your dealer, or authorized Service Center.
Troubleshooting (continued)
UNIT DOES NOT PROVIDE ELECTRICAL CURRENT (continued):
- If your unit still does NOT produce electricity after performing the previous checks, call LIFAN Power USA at 1-866-471-7464, your dealer, or authorized Service Center.
Generator Safety
- Never operate gasoline engine powered products in any enclosed spaces, as they product deadly Carbon Monoxide Poisonous Gases.
- Never hook a generator directly to your home circuit without the proper installation by a Licensed Electrician and without the proper power transfer devices.
- Do NOT operate your power equipment in inclement weather such as rain, snow, and/or sleet.
- Do NOT operate your power equipment within five (5) feet of any flammable materials.
- When refueling the power equipment never smoke or refuel near any flame or ignition devices. Never refuel while the unit is running. If during the refueling process some fuel is spilled, always completely clean the fuel and allow sufficient drying time prior to re-starting the unit. Gasoline vapors ignite easily and are very dangerous.
- Do NOT parallel connect this model. Generator cannot be combined with other electric wires or multiple socket boxes.
- Do NOT lengthen the exhaust pipe or vent it with any extension.
- Use SJ or SJO type extension cords if necessary.
- Do not use extension cords exceeding: 16 Gauge, 200ft or 10 Gauge, 330ft.
- NEVER ALLOW CHILDREN OR ANIMALS TO BE NEAR THIS EQUIPMENT DURING OPERATION. ONLY QUALIFIED PERSONS SHOULD OPERATE THIS EQUIPMENT. FOLLOW ALL GUIDELINES CONTAINED IN THIS OWNER'S MANUAL FOR THE SAFE OPERATION OF THIS EQUIPMENT.
Wire Diagram

LF7000, LF7000-CA, LF7000iPL, & LF7000iPL- CA Wiring Diagram
| BL | Black | R | red |
| Y | yellow | W | write |
| BU | blue | Br | Brown |
| G | green |
| IG | E | BAT | ST | G | FS | |
| OFF | ◎ | ◎ | ◎ | ◎ | ||
| ON | ||||||
| START | ◎ | ◎ |
Wire Diagram (continued)

| KG | E | BAT | ST | |
| OFF | ⊖ | ⊖ | ||
| ON | ||||
| START | ⊖ | ⊖ |
| 1-2 | 4-5 | 7-8 | 10-11 | 2-3 | 5-6 | 8-9 | 11-12 | |
| 120V | ON | ON | ON | ON | OFF | OFF | OFF | OFF |
| 120/240V | OFF | OFF | OFF | OFF | ON | ON | ON | ON |
Tool/Appliance
Rated (Running)
Watts
Additional
Starting
Watts
Tool/Appliance
Rated
(Running)
Watts
Additional
Starting
Watts
HOME
ESSENTIALS:
| Cell Phone Charger | 25 | 0 |
| 40 Watt Light Bulb | 40 | 0 |
| 60 Watt Light Bulb | 60 | 0 |
| 75 Watt Light Bulb | 75 | 0 |
| Deep Freezer | 500 500 | |
| Electric Water Heater | 4000 0 | |
| Mini Fridge | 600 200 | |
| Refrigerator/Freezer | 750 1600 | |
| Sump Pump - 1/2 HP | 1050 2200 | |
| Sump Pump - 1/3 HP | 800 2100 | |
| Water Well Pump - 1/3 HP | 1250 3750 |
HEATING/COOLING:
| Humidifier - 13 Gallon | 175 0 |
| Central AC - 10000 BTU | 1500 3000 |
| Central AC - 24000 BTU | 3800 4950 |
| Central AC - 40000 BTU | 6000 6750 |
| Furnace Fan Blower-1/2 HP | 800 2350 |
| Furnace Fan Blower-1/3 HP | 700 1400 |
| Heat Pump | 4700 4500 |
| Space Heater | 1650 0 |
| Window AC - 10000 BTU | 1050 2100 |
| Window AC - 12000 BTU | 3250 3950 |
LAUNDRY ROOM:
| Clothes Dryer - Gas | 700 1800 |
| Clothes Dryer - Electrical | 5400 1350 |
| Iron | 1100 0 |
| Washing Machine | 1000 3000 |
KITCHEN:
| Electric Stove 8" Element | 2100 0 |
| Blender | 500 1000 |
| Coffee Maker | 1200 0 |
| Dishwasher - Hot Dry | 540 1500 |
| Electric Can Opener | 175 0 |
| Food Processor | 400 0 |
| George Foreman Grill | 750 0 |
| Microwave Oven - 1000W | 1000 0 |
| Microwave Oven - 625W | 625 0 |
| Toaster | 775 0 |
| Toaster Oven | 1200 0 |
FAMILY ROOM:
| Color TV - 27" | 500 0 | |
| Alarm Clock | 25 | 0 |
| iPad | 50 | 0 |
| Lamp | 100 0 | |
| Laptop | 250 250 | |
| LCD TV - 32" | 100 0 | |
| Plasma TV - 50" | 500 0 | |
| Stereo Receiver | 450 0 | |
| VCR/DVD Player | 100 0 | |
| X-Box, PlayStation | 100 0 |
OTHER:
| 1/2 HP Garage Door Opener | 900 2400 |
| Curling Iron | 1500 0 |
| Hair Dryer - 1200 Watt | 1200 0 |
| Security System | 550 0 |
WORK
DIY/JOB SITE:
| Air Compressor - 1/3 HP | 300 780 |
| Air Compressor - 1 HP | 1400 3600 |
| Airless Sprayer - 1/3 HP | 600 1200 |
| Belt Sander | 1000 3250 |
| Circular Saw - 7 1/4" | 1600 4500 |
| Cordless Tool Battery Charger 1000 0 | |
| Electric Drill - 1/2", 5.4 amps | 750 1250 |
| Electric Drill - 3/8", 4 amps | 480 1000 |
| Hammer Drill | 1100 2500 |
| Miter Saw - 10" | 1800 3600 |
| Planar/Jointer - 6" | 1800 2500 |
DIY/JOB SITE:
| Quartz Halogen Work Light, 1000 | 1000 0 |
| Quartz Halogen Work Light, 300 | 300 0 |
| Quartz Halogen Work Light, 500 | 500 0 |
| Reciprocating Saw | 1080 2700 |
| Table/Radial Arm Saw | 1800 4500 |
Office Equipment
| Copy Machine | 1600 0 | |
| Computer w/ 17" Monitor | 750 0 | |
| Fax Machine | 75 | 0 |
| Ink Jet Printer | 100 0 | |
| Laser Printer | 900 0 |
RECREATION
TAILGATING/CAMPING:
| AM/FM Radio | 100 0 | |
| Box Fan - 20" | 150 0 | |
| DVD Player | 75 | 0 |
| LCD TV - 13" | 200 0 | |
| Plasma TV - 13" | 250 0 |
TAILGATING/CAMPING:
| Crock Pot | 250 0 |
| Electric Grill | 1600 0 |
| Inflator Pump | 200 0 |
| Outdoor Light String | 250 0 |
| Portable Heater | 625 1500 |

NOTE: These Values are Estimates. Check Tool/Appliance for Exact Wattage Requirements
Customer Service: 1-866-471-7464
www.lifanpowerusa.com

This worksheet will aid in determining the generator that best fits your needs based on the appliances/tools you wish to power simultaneously! The larger the generator, the more items you may power at once.
To Determine the Generator you Require, Follow these Four Easy Steps Below:
1.) Use the "Personal Power Requirements" Chart below, the list the tools/appliances you plan to power simultaneously. Fill in the required Rated (Running) Watts and Starting Watts using the "Wattage Reference Chart" on the previous page.
2.) Sum the Rated (Running) Watts and list the total in the "Total Running Watts" space provided on the "Personal Power Requirements" Chart.
3.) Review the Starting Watts of each item on your "Personal Power Requirements" Chart and choose the largest value. List this value in the "Largest Additional Starting Watts Required" space provided.
4.) Add the "Largest Additional Starting Watts Required" to the "Total Running Watts." List this value in the "Total Starting Watts" space provided.
| Example | ||
| Tool/Appliance | Rated(Running)Watts | AdditionalStartingWatts |
| 1.) Mini Fridge 600 200 1.) | ||
| 2.) Coffee Maker 1200 0 2.) | ||
| 3.) 32" LCD TV 100 0 3.) | ||
| 4.) Laptop 250 250 4.) | ||
| 5.) Cell Phone Charger 25 0 5.) | ||
| 6.) 6.) | ||
| 7.) 7.) | ||
| 8.) 8.) | ||
| 9.) 9.) | ||
| 10.) 10.) | ||
| Total Running Watts: 2175 | ||
| Largest Additional StartingWatts Required: 250 | ||
| Total Starting Watts: 2425 | ||
| For this Example, a Generator with a minimum of__2175__ Total Running Watts and __2425__Total Starting Watts is required. |
| Personal Power Requirements | ||
| Tool/Appliance | Rated(Running)Watts | AdditionalStartingWatts |
| Total Running Watts: | ||
| Largest Additional StartingWatts Required: | ||
| Total Starting Watts: | ||
| I Require a Generator with a minimum of ____ Total Running Watts and ____Total Starting Watts is required. |
Comments
* If the Rated (Running) Watts or the Starting Watts of a tool/appliance is unavailable, use Watts = Voltage * Amps as an estimation.
* If the Rated (Running) Wattage is known, the Starting Wattage can be estimated. Starting Watts = 1 to 3 Times the Rated Watts
* Only one Starting Wattage is needed because only one item will cycle or start at the same time

NOTE: These Values are Estimates. Check Tool/Appliance for Exact Wattage Requirements
Customer Service: 1-866-471-7464
www.lifanpowerusa.com

LIFAN Power USA
2205 Industrial Park Road
Van Buren, AR 72956
866-471-7464
www.lifanpowerusa.com
This warranty is limited to the following LIFAN Power and Storm Series products that are distributed by the Equipsource LLC, dba LIFAN Power USA, located at 2205 Industrial Park Road, Van Buren, AR 72956. Effective 04/25/2010
| LENGTH OF WARRANTY | ||||
| Residential Use 2 | Commercial/Rental 3 | |||
| Products Covered | Year 1 | Year 2 | Year 3 | Warranty NOT to exceed 300 hours or terms listed below: |
| Walk Behind Mowers | Full Unit: Parts & Labor | Full Unit: Parts Only | Engine: Parts Only | Full Unit: 3 Months Parts & Labor |
| Water Pumps | Full Unit: Parts & Labor | Full Unit: Parts Only | Engine: Parts Only | Full Unit: 12 Months Parts & Labor |
| Generators/Inverter Generators | Full Unit: Parts & Labor | Full Unit: Parts Only | Engine: Parts Only | Full Unit: 12 Months Parts & Labor |
| Pressure Washer Engines | Full Unit: Parts & Labor | Full Unit: Parts Only | Engine: Parts Only | Full Unit: 12 Months Parts & Labor |
| Pressure Washer Pumps 1 | Full Unit: Parts & Labor | N/A | N/A | Full Unit: 12 Months Parts & Labor |
| Gasoline Engines | Full Unit: Parts & Labor | Full Unit: Parts Only | Engine: Parts Only | Full Unit: 12 Months Parts & Labor |
| Gasoline Powered Welders | Full Unit: Parts & Labor | Full Unit: Parts Only | Engine: Parts Only | Full Unit: 6 Months Parts & Labor |
Pressure Washer Pumps 1 - All LIFAN Pressure Pro ™ and Storm Series Pressure Storm ™ pressure washers are equipped with Annovi Reverbi pumps, which are warranted by the manufacturer's One (1) Year Limited Warranty. Visit www.lifanpowerusa.com for details.
Residential Use 2 - Residential Use is definted as items that are for personal use.
Commerical/Rental 1 - Commerical or Rental use is defined as any usage for income producing or other business related uses.
In order to qualify for the limited warranty, the product(s) must be purchased in North America from an authorized EquipSource, LLC dealer, or a dealer authorized by EquipSource, LLC to sell LIFAN products. This warranty is non-transferable and applies only to the original purchaser. The supplied "Warranty Registration Card" must be completed and on file with EquipSource, LLC (at the supplied address), at the time that any warranty claim is made. The "Warranty Registration Card" must be submitted with a receipt of purchase, which clearly states the date of purchase.
During the warranty period (stated above), EquipSource, LLC will repair or replace, at its option, any part that is proven to be defective in material or workmanship under normal usage. Repairs and/or replacement will be made without charge for parts or labor. All parts found to be defective must be returned to EquipSource, LLC. Upon reception of the parts, a judgement as to the validity of the warranty claim will be determined. All parts replaced under warranty will be considered part of the original product and any warranty on those parts will coincide with the original warranty.
To obtain Warranty Service, you must take the product, at your expense, to an authorized LIFAN Power Products or Storm Series Power Products service center. If you are unable to locate warranty service or are dissatisfied with the warranty service that you receive, contact EquipSource, LLC at 866-471-7464. At EquipSource's discretion, EquipSource, LLC may elect to replace a defective unit. In this case, the end user is responsible for all shipping and handling chargers associated with the exchange.
This warranty is not valid for products or parts affected or damaged by accident, collision, normal wear, fuel contamination, abuse, neglect, misuse, alteration, unsuitable use, and/or unauthorized parts replacement. Mower decks and blades are specifically not warranted for impact or abrasive damage. Warranty becomes void if the customer fails to install, maintain, and/or operate this product is accordance with the instructions and recommended actions of LIFAN set for in the owner's manual. Equipsource, LLC disclaims any responsibility for time loss or loss of usage of the product, transportation, commercial loss, or any other incidental or consequential damage. Prior to any warranty service an approval code must be issued to the service center in order for the warranty claim to be valid. Any implied warranties are limited to the duration of this written limited warranty. This warranty gives you specific legal rights, and you may also have other rights, which may vary from state to state.
Exclusions to Warranty:
- Failure to perform "Periodic Maintenance" as required and specified in the supplied "Owner's Manual."
- Improper repair of product or replacement of parts with non-OEM (Original Equipment Manufacturer) parts.
- Operation in uses and methods other than those outlined in the "Owner's Manual."
- Service and/or repairs performed by anyone other than an "Authorized LIFAN or Storm Series Products Service Center."
More Information Available on our website: www.lifanpowerusa.com EquipSource, LLC 2010 Revised 04/25/2010
Please Read this Owner's Manual Carefully Before Operating Your New Generator.
This Owner's Manual includes the operation and maintenance of the LF7000, LF7000-CA, LF8500iE, LF8500iE-CA, LF7000iPL, LF7000iPL-CA, LF8500iEPL, & LF8500iEPL-CA
Thank you for purchasing our ProSeries and ProSeries Platinum generator!
All information in this publication is based on the latest product information available at the time of approval for printing. We reserve the right to make changes at any time without notice and without incurring any obligation. The copyright of this manual belongs to EquipSource, LLC. No parts of this publication may be reproduced without the written permission of EquipSource, LLC. This manual should be considered a permanent part of the generator and should remain with it if is resold.
For Product Support and Service Please Scan the QR Code Below or Visit Us at www.lifanpowerusa.com or Call Toll Free 1-866-471-7464

36
LIFAN Power USA
2205 Industrial Park Road
Van Buren, AR 72956
866-471-7464
www.lifanpowerusa.com
LIFAN
POWER
USA
LIFAN
POWER
USA
Please Read This Manual Carefully Before Operating Your New Generator
Thank you for purchasing our Pro Series Generator. This Manual includes the operation and maintenance of the LF7000, LF7000iPL, LF8500iE, and LF8500iEPL Generators.
All information in this publication is based on the latest product information available at the time of approval for printing. We reserve the right to make changes at any time without notice and without incurring any obligation. The copyright of this manual belongs to our company. No parts of this publication may be reproduced without our written permission. This manual should be considered a permanent part of the water pump and should remain with it if it is resold.
For Product Support and Service Please Visit Us at www.lifanpowerusa.com or call Toll Free 1-866-471-7464
- OPERATING INSTRUCTIONS AND OWNER'S MANUAL
- PLEASE READ THE
- FOLLOWING INSTRUCTIONS
- THIS OWNER'S MANUAL IS FOR THE FOLLOWING MODELS
- TABLE OF CONTENTS
- PREFACE
- PRODUCT SPECIFICATIONS
- SAFETY INSTRUCTIONS
- WARNING
- SAFETY INSTRUCTIONS (CONTINUED)
- CAUTION
- EXCEEDING GENERATORS WATTAGE/AMPERAGE CAPACITY CAN DAMAGE GENERATOR AND /OR ELECTRICAL DEVICES CONNECTED TO IT
- WHEN ADDING OR DRAINING FUEL
- WHEN TRANSPORTING OR REPAIRING EQUIPMENT
- WHEN STORING FUEL OR EQUIPMENT CONTAINING FUEL
- WHEN STARTING EQUIPMENT
- WHEN OPERATING EQUIPMENT
- UNINTENTIONAL SPARKING CAN RESULT IN FIRE OR ELECTRICAL SHOCK
- WHEN TESTING FOR ENGINE SPARK
- WHEN REPAIRING OR ADJUSTING GENERATOR
- CONTROLS AND FEATURES
- CONTROLS AND FEATURES (CONTINUED)
- LEGEND
- PRE-OPERATING INSTRUCTIONS: ASSEMBLY
- BOX CONTENT
- UNPACKING THE GENERATOR
- PRE-OPERATING INSTRUCTIONS: ASSEMBLY (CONTINUED)
- WHEEL KIT INSTALLATION
- WHEEL KIT INSTALLATION DIRECTIONS
- PRE-OPERATING INSTRUCTIONS: BATTERY SPECIFICATIONS
- PRE-OPERATING INSTRUCTIONS: GENERATOR SETUP
- PRE-OPERATING INSTRUCTIONS: GENERATOR SETUP (CONTINUED)
- WHEN ADDING FUEL
- OPERATION OF GENERATOR
- HOW TO USE YOUR GENERATOR
- GENERATOR LOCATION
- PULL START (RECOIL) ONLY MODELS
- (CONTINUED)
- ELECTRIC/PULL (RECOIL) START MODELS
- CONNECTING ELECTRICAL LOADS
- LOW OIL ALARM SYSTEM
- VOLTAGE FREQUENCY TIME (VFT) METER
- EMERGENCY SHUTDOWN
- NORMAL SHUTDOWN
- USAGE IN HIGH ALTITUDE REGIONS
- STORING THE UNIT
- BEFORE LONG TERM STORAGE OF YOUR POWER EQUIPMENT PRODUCT, TYPICALLY 30 DAYS OR MORE, PERFORM THE FOLLOWING
- MAINTENANCE
- MAINTENANCE (CONTINUED)
- OIL CHANGE PROCEDURES (CONTINUED)
- AIR CLEANER MAINTENANCE
- SPARK PLUG MAINTENANCE
- FUEL SYSTEM MAINTENANCE
- FUEL SYSTEM MAINTENANCE (CONTINUED)
- TROUBLESHOOTING
- IF THE ENGINE WILL NOT START
- UNIT DOES NOT PROVIDE ELECTRICAL CURRENT
- TROUBLESHOOTING (CONTINUED)
- GENERATOR SAFETY
- WIRE DIAGRAM
- WIRE DIAGRAM (CONTINUED)
- TO DETERMINE THE GENERATOR YOU REQUIRE, FOLLOW THESE FOUR EASY STEPS BELOW
- COMMENTS
- EXCLUSIONS TO WARRANTY
- PLEASE READ THIS OWNER'S MANUAL CAREFULLY BEFORE OPERATING YOUR NEW GENERATOR
- THANK YOU FOR PURCHASING OUR PROSERIES AND PROSERIES PLATINUM GENERATOR
Brand : Lifan
Model : LF8500iEPL
Category : Generator