MC-10HS7500 - Docking Station DATALOGIC - Free user manual and instructions
Find the device manual for free MC-10HS7500 DATALOGIC in PDF.

| Product Type | Docking Station |
| Brand | Datalogic |
| Model | MC-10HS7500 |
| Compatible Devices | Datalogic MC-10 series handheld computers |
| Dimensions (W x D x H) | 200 x 150 x 80 mm |
| Weight | 500 g |
| Material | Polycarbonate plastic |
| Color | Black |
| Input Voltage | 5V DC, 2A |
| Power Supply | USB-C power adapter included |
| Charging Capability | Charges MC-10 battery via contacts |
| Data Communication | USB 2.0 (via USB-C), Ethernet (RJ45) |
| Additional Ports | USB host port, Serial RS232 (optional) |
| LED Indicators | Power (green), Charging (amber) |
| Operating Temperature | 0°C to 50°C |
| Storage Temperature | -20°C to 60°C |
| Humidity | 5% to 95% (non-condensing) |
| Mounting Options | Desktop or wall-mountable (bracket included) |
| Locking Feature | Device locking mechanism for security |
| Pass-through Charging | Supports simultaneous device and spare battery charging |
| Certifications | CE, FCC, RoHS |
| Maintenance | Clean with a dry cloth; avoid liquids |
| Spare Parts | Power adapter, USB cable available |
| Reparability | No user-serviceable parts; contact Datalogic support |
Frequently Asked Questions - MC-10HS7500 DATALOGIC
User questions about MC-10HS7500 DATALOGIC
0 question about this device. Answer the ones you know or ask your own.
Ask a new question about this device
Download the instructions for your Docking Station in PDF format for free! Find your manual MC-10HS7500 - DATALOGIC and take your electronic device back in hand. On this page are published all the documents necessary for the use of your device. MC-10HS7500 by DATALOGIC.
USER MANUAL MC-10HS7500 DATALOGIC
Standard and Mid Range HandScanner
©2020 Datalogic S.p.A. and/or its affiliates
- All rights reserved • Without limiting the rights under copyright, no part of this documentation may be reproduced, stored in or introduced into a retrieval system, or transmitted in any form or by any means, or for any purpose, without the express written permission of Datalogic S.p.A. and/or its affiliates • Datalogic and the Datalogic logo are registered trademarks of Datalogic S.p.A. in many countries, including the U.S. and the E.U.
www.datalogic.com

820118400 (Rev. B) December 2020
Datalogic S.r.l.
Via San Vitalino 13
©2020 Datalogic S.p.A. and/or its affiliates
All rights reserved. Without limiting the rights under copyright, no part of this documentation may be reproduced, stored in or introduced into a retrieval system, or transmitted in any form or by any means, or for any purpose, without the express written permission of Datalogic S.p.A. and/or its affiliates.
Owners of Datalogic products are hereby granted a non-exclusive, revocable license to reproduce and transmit this documentation for the purchaser's own internal business purposes. Purchaser shall not remove or alter any proprietary notices, including copyright notices, contained in this documentation and shall ensure that all notices appear on any reproductions of the documentation.
Electronic versions of this document may be downloaded from the Datalogic website (www.datalogic.com). If you visit our website and would like to make comments or suggestions about this or other Datalogic publications, please let us know via the "Contact" page.
Disclaimer
Datalogic has taken reasonable measures to provide information in this manual that is complete and accurate, however, Datalogic shall not be liable for technical or editorial errors or omissions contained herein, nor for incidental or consequential damages resulting from the use of this material. Datalogic reserves the right to change any specification at any time without prior notice.
Trademarks
Datalogic and the Datalogic logo are registered trademarks of Datalogic S.p.A. in many countries, including the U.S.A. and the E.U.
HandScanner and Memor are trademarks of Datalogic S.p.A. and/or its affiliates. Google, Google Play and other marks are trademarks of Google LLC.
All other brand and product names may be trademarks of their respective owners.
Support Through the Website
Datalogic provides several services as well as technical support through its website.
Log on to www.datalogic.com.
For quick access, from the home page click on the search iconQ and type in the name of the product you're looking for. This allows you access to download Data Sheets, Manuals, Software & Utilities, and Drawings.
Hover over the Support & Service menu for access to Services and Technical Support.
Warranty
Datalogic warrants that the Products shall be free from defects in materials and workmanship under normal and proper use during the Warranty Period. Products are sold on the basis of specifications applicable at the time of manufacture and Datalogic has no obligation to modify or update Products once sold. The Warranty Period shall be one year from the date of shipment by Datalogic, unless otherwise agreed in an applicable writing by Datalogic.
Datalogic will not be liable under the warranty if the Product has been exposed or subjected to any: (1) maintenance, repair, installation, handling, packaging, transportation, storage, operation or use that is improper or otherwise not in compliance with Datalogic's instruction; (2) Product alteration, modification or repair by anyone other than Datalogic or those specifically authorized by Datalogic; (3) accident, contamination, foreign object damage, abuse, neglect or negligence after shipment to Buyer; (4) damage caused by failure of a Datalogic-supplied product not under warranty or by any hardware or software not supplied by Datalogic; (5) any device on which the warranty void seal has been altered, tampered with, or is missing; (6) any defect or damage caused by natural or man-made disaster such as but not limited to fire, water damage, floods, other natural disasters, vandalism or abusive events that would cause internal and external component damage or destruction of the whole unit, consumable items; (7) use of counterfeit or replacement parts that are neither manufactured nor approved by Datalogic for use in Datalogic-manufactured Products; (8) any damage or malfunctioning caused by non-restoring action as for example firmware or software upgrades, software or hardware reconfigurations etc.; (9) loss of data; (10) any consumable or equivalent (e.g. cables, power supply, batteries, etc.); or (11) any device on which the serial number is missing or not recognizable.
THE DATALOGIC WARRANTIES ARE EXCLUSIVE AND IN LIEU OF ALL OTHER WARRANTIES, WHETHER WRITTEN, EXPRESS, IMPLIED, STATUTORY OR OTHERWISE, INCLUDING, BUT NOT LIMITED TO, THE IMPLIED WARRANTIES OF MERCHANTABILITY AND FITNESS FOR PARTICULAR PURPOSE. DATALOGIC SHALL NOT BE LIABLE FOR ANY DAMAGES SUSTAINED BY BUYER ARISING FROM DELAYS IN THE REPLACEMENT OR REPAIR OF PRODUCTS UNDER THE ABOVE. THE REMEDY SET FORTH IN THE WARRANTY STATEMENT IS THE BUYER'S SOLE AND EXCLUSIVE REMEDY FOR WARRANTY CLAIMS. NO EXTENSION OF THIS WARRANTY WILL BE BINDING UPON DATALOGIC UNLESS SET FORTH IN WRITING AND SIGNED BY DATALOGIC'S AUTHORIZED REPRESENTATIVE. DATALOGIC'S LIABILITY FOR DAMAGES ON ACCOUNT OF A CLAIMED DEFECT IN ANY PRODUCT DELIVERED BY DATALOGIC SHALL IN NO EVENT EXCEED THE PURCHASE PRICE OF THE PRODUCT ON WHICH THE CLAIM IS BASED. DATALOGIC SHALL NOT BE LIABLE FOR DAMAGES RELATING TO ANY INSTRUMENT, EQUIPMENT, OR APPARATUS WITH WHICH THE PRODUCT SOLD UNDER THIS AGREEMENT IS USED. Further details on warranty coverage, rights and conditions are addressed under and regulated by the Terms and Conditions of Sales of Datalogic available at https://www.datalogic.com/terms_conditions_sales.
Table of Contents
Support Through the Website 1
Warranty 1
ABOUT THESE OPERATING INSTRUCTIONS ....4
EXPLANATION OF SYMBOLS 4
SAFETY INSTRUCTIONS 4
Hardware.... 4
Wearables 4
SCOPE OF DELIVERY 5
HANDSCANNER 6
HandScanner Overview.... 6
HandScanner Technical Data 6
CONNECTIVITY DEVICE 7
Gateway Overview.... 7
Gateway Technical Data 7
CHARGING STATION 8
Charging Station Overview 8
Charging Station Technical Data.... 8
WEARABLE 9
Hand Trigger Overview 9
Hand Trigger Properties 9
Hand Trigger Available Sizes 9
APPLICATION OF HANDSCANNER SYSTEM 10
1^st Step: Charge HandScanner 10
2^nd Step: Connect the Gateway 10
3rd Step: Switch on the HandScanner 11
4^th Step: Connect the HandScanner 11
4^th Step: Connect the HandScanner (BLE) 11
5^th Step: Scan. 13
6^th Step: Disconnect HandScanner 14
6th Step: Disconnect HandScanner (BLE HID).... 15
7 ^th Step: Release HandScanner from Wearable 16
CONFIGURATION TOOL REGISTRATION AND LOGIN 17
CONFIGURE DEVICES AND FIRMWARE UPDATES 17
1^st Step: Opening Configurations.... 17
2^nd Step: Create a New Configuration 18
3^rd Step: Connectivity Configuration 18
4^th Step: Device Settings 18
5^th Step: Symbology Settings 18
6^th Step: Workflow Rules.... 18
7th Step: Configure Devices and Gateway Firmware Update 18
SIGNAL TABLES 20
General HandScanner.... 20
HandScanner Connection via BLE. 20
Gateway.... 20
COMPATIBILITY WITH DATALOGIC MOBILE TERMINALS .....21
STORAGE AND CLEANING 22
Storage 22
Cleaning 22
TROUBLESHOOTING 22
HandScanner.... 22
BLE - Data Transfer 23
Gateway.... 23
Gateway - Data Transfer.... 23
Charging Station 23
DISPOSAL 23
DIRECTIVES & CERTIFICATION....24
European Directives 24
Declaration of Conformity.... 24
APPENDIX - CONFIGURATION BARCODES 25
Pairing Barcode.... 25
Gateway Mass Storage ON 25
Gateway Mass Storage OFF 25
Scanner Factory Reset 25
Gateway Factory Reset 25
ABOUT THESE OPERATING INSTRUCTIONS
This user manual contains a system overview, technical data about the Hardware and Wearables, detailed step-by-step instructions for using HandScanner system and information about configuration settings and troubleshooting. It is intended for process planners, configurators and maintenance technicians who are using HandScanner system for the first time. It is designed so that HandScanner system can be used safely without prior knowledge. Read carefully before use and keep for future reference.
EXPLANATION OF SYMBOLS
A warning notice is used in these instructions. Always read and observe this warning notice. The warning notice is introduced with the word CAUTION and means the following:

CAUTION
Slight bodily injury or danger of physical damage to HandScanner system is possible.
In addition, other symbols are used with the following meanings:

NOTE
Additional notices provide more information about the respective chapter.

TIP
Additional tips facilitate the implementation of a certain procedure.

RESULT
The result will show the outcome of the prior action.
SAFETY INSTRUCTIONS
Hardware

CAUTION
Keep all cables and wires away from high voltage sources! This may otherwise lead to damage or faults due to overvoltage, line noise, electrostatic discharge or other irregularities.

CAUTION
Do not use damaged cables! Otherwise the safe functioning of HandScanner system cannot be ensured.

CAUTION
Do not unscrew the Hardware housing! This may otherwise lead to HandScanner system not functioning properly.

CAUTION
Do not replace the battery of the HandScanner! This may otherwise lead to HandScanner not functioning properly.

CAUTION
Do not modify HandScanner system! This may otherwise lead to HandScanner system not functioning properly.

CAUTION
Do not slare directly into beam! Use of controls, adjustments or performance of procedures other than those specified herein may result in hazardous laser light exposure. Class 2 laser HandScanners use a low power, visible light diode. As with any very bright light source, such as the sun, the user should avoid staring directly into the light beam. Momentary exposure to a Class 2 laser is not known to be harmful.
Wearables

CAUTION
Keep Wearables away from moving machine parts and do not use without a HandScanner! Otherwise the Wearables may get stuck on objects.

CAUTION
Use Wearables in the right size! Otherwise this may cause pain or pressure points on your hand.
SCOPE OF DELIVERY

CAUTION
Do not use any damaged Hardware or Wearables! Check whether Hardware and Wearables are properly packaged and undamaged.
HandScanner

text_image
HandScanner SR DATALOGIC (0p1)Standard range Mid range

text_image
HandScanner MR DATALOGICWearables
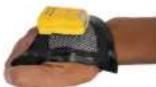
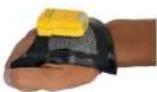
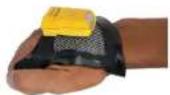
natural_image
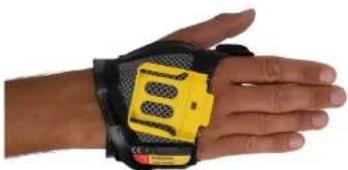
Close-up of a human hand wearing a yellow and black wristband with a blue circular patch (no text or symbols visible)Hand Trigger
Connectivity device

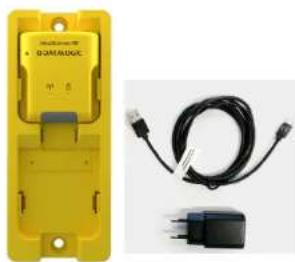
text_image
USB Scaner Cloud D1GW-0000Datalogic Gateway with USB cable
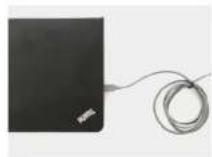
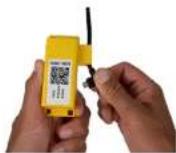
Charging station
natural_image
Yellow electronic device labeled 'DOMALOGIC' next to a black cable with three connected plug (no visible text or symbols on device body)Datalogic Charging Station with power cable (USB-C) and power supply
HANDSCANNER
HandScanner Overview
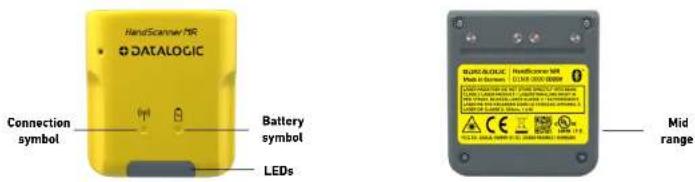
After scanning a barcode, the HandScanner returns feedback signals: haptically by vibrations, acoustically by audio signals and optically by LEDs. The serial number on the rear label indicates whether it is a standard or mid range device.
• Standard range serial number: D1SR ...
• Mid range serial number: D1MR ...
Standard range: 4 - 31 in (10 - 80 cm)
Mid range: 12 - 59 in (30 - 150 cm)
HandScanner (standard range)

text_image
HandScanner SR DATALOGIC Connection symbol Battery symbol LEDs RIOLOGIC FEC 20.7618.4998-2 C.3340A04962 HandScanner SR D1SR 0000 00000 Standard rangeHandScanner (mid range)
text_image
HandScanner® DATALOGIC Connection symbol Battery symbol LEDs Mid rangeHandScanner Technical Data
Mechanical properties
| Dimensions 50 x 45 x 16 mm (1.96 x 1.77 x 0.83 in) | |
| Weight 40 g (1.41 oz) | |
Electrical properties
| Battery type 670 mAh, Lithium polymer (rechargeable) |
| Charge time 2 hours with Data logic Charging Station |
| Number of scans up to 10,000 scans (depending on application and environmental conditions) |
Decoding capability
| 1D Auto discriminates all standard 1D codes including GS1 DataBarTM linear codes. |
| 2D PDF417, MicroPDF417, Data Matrix, QR Code, Micro QR Code, Aztec, MaxiCode |
| Postal US PostNet, US Planet, UK Postal, Australia Postal, Japan Postal, Dutch Postal (KIX) |
Environmental properties
| Drop resistance Resists multiple drops from 2 m (6.5 ft) onto concrete | |
| Tumbles 2000 at 0.5 m (1.6 ft) | |
| Impact resistance | IEC60068-2-75, IK06(1J) |
| Particulate and water sealing | Resistant to dust and water |
| Temperature | Operating temperature: 0 to 50 °C (32 Charging temperature: 5 to 40 °C (41 Storage temperature: -20 to 60 °C (-4 |
LED classification
| Standard range Excluded risk group LED product according to IEC/EN 62471 |
| Mid range CDRH Class 2 / IEC 825 Laser Class 2 Device |
Safety & Regulatory
| Agency approvals Compliant to EU and NA applicable standards |
| Environmental compliance Compliant to EU RoHS and REACH regulations. |
Interfaces
| Interfaces | Bluetooth: HID ProfilesAndroid: HID, App/SDKiOS: HID, iOS SDKUSB: Datalogic Gateway, USB HID (keyboard input on host), USB CDC (virtual com port) |

NOTE
Further technical specifications are available at datalogic.com/support.
CONNECTIVITY DEVICE
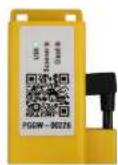
Gateway Overview
The Gateway receives the scanned barcode data from the HandScanner via BLE. This barcode data is transmitted to the end device via USB cable. In the USB HID mode, the Gateway simulates a computer keyboard. A serial connection is emulated in the USB CDC mode. In order to use the USB CDC mode, the device must be set to "USB CDC" in the Configuration Tool https://www.datalogic.com/handscanner/config under "Connectivity Configuration - Integration path". Also multipairing is possible. The Gateway can be connected with up to 5 HandScanners simultaneously. See "Connection with USB cable in USB CDC mode" on page 10.

text_image
Gateway Pairing Barcode USB Scanner Cloud LED 1 (UBS LED) LED 2 (Scanner LED) LED 3 (Cloud LED) Micro USB socketGateway Technical Data
| Mechanical properties | |
| Dimensions | 3.74 x 2.06 x 0.94 in(95 x 52.3 x 23.8 mm) |
| Weight | 1.5 oz(42.5 g) |
| Electrical properties | |
| Power supply of Gateway via USB cable | 5 VDC (0.5 A) via host computer |
| Utilities and accessories | |
| Configuration Tool https://www.datalogic.com/handscanner/config |
| Connection options | |
| USB | USB HID (keyboard input on host) |
| USB CDC (virtual com port) | |
NOTE Further technical specifications are available at datalogic.com/support.
CHARGING STATION
Charging Station Overview
The Charging Station consists of two charging trays that charge two HandScanners at the same time. The charging status is indicated by the LEDs of the HandScanner. The LEDs pulse red while in charging mode. When the battery is fully charged, the LEDs pulse green constantly. It takes about 2 hours to charge a HandScanner. The Charging Station can be attached to work stations, for example, through the attachment openings (with M5 screws or cable ties).
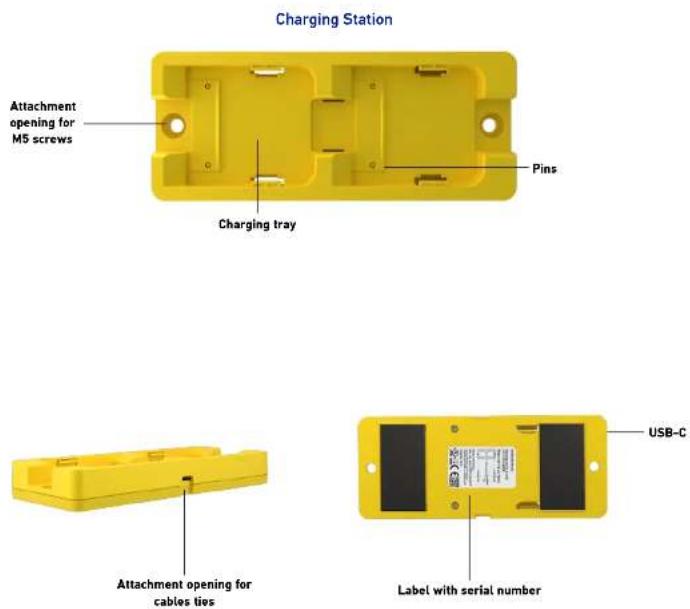
Charging Station Technical Data
| Mechanical properties | |
| Dimensions | 5.5 x 2.2 x 0.75 in(140 x 56 x 19 mm) |
| Weight | 3.88 oz(110 g) |
| Electrical properties | |
| Power supply 5 VDC (1.2 A) via power | supply PS-MCHS7500 |
| Charging time 2 hours | |

NOTE
Further technical specifications are available at datalogic.com/support.
WEARABLE
Hand Trigger Overview
The Textile Trigger is located on the index finger and is attached to the right or left glove, depending on the design. The Hand Trigger can be used in applications where free fingertips are needed or can be worn over other gloves. The Hand Trigger is a consumable which must be changed regularly after use.

text_image
Hand Trigger Textile trigger Fastening rail for HandScanner Label with size indication Variable velcro connectionHand Trigger Properties
| General | |
| Packaging unit 10 pieces per package | |
| Available sizes S, M, L | |
| Materials Nylon, Polyester, MDF, EVAC (glue) | |
| Safety & Certification | |
| Standards | EN388 (2131)EN420 |
| Certification | RoHSCE mark |
| Environmental | RoHS Directive 2011/65/EU; Amendment 2010/863, REACH SVHC 1907/2006, CE, WEEE |

NOTE
Further technical specifications are available at datalogic.com/support.
Hand Trigger Available Sizes

text_image
L M S 22.5 cm 30.5 cm 26.5 cmAPPLICATION OF HANDSCANNER SYSTEM
1 ^st Step: Charge HandScanner

CAUTION
Only use HandScanner in a dry Charging Station and only touch with dry hands! This may otherwise lead to the Charging Station not functioning properly.

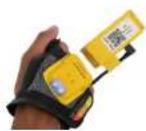
natural_image
Hand holding a yellow plastic component with a black cable, against a white background (no text or symbols visible)The pins face down.
Insert HandScanner in the Charging Station.

RESULT
HandScanner pulses red and charges in the Charging Station.

NOTE
The LEDs pulse red while in charging mode. When the battery is fully charged, the LEDs pulse green. It takes about 2 hours to charge a HandScanner.
2nd Step: Connect the Gateway

CAUTION
Only touch the Gateway with dry hands! This may otherwise lead to the Gateway not functioning properly.

NOTE
The following steps are only needed when connecting via Gateway.
Connection with USB cable in USB HID mode
- Connect the USB cable with the end device.

- Plug the other end of the USB cable into the Micro USB socket of the Gateway. A clear clicking sound confirms the correct fastening.

RESULT
The LED of the Gateway lights up green. The boot up of the Gateway takes around 2min until the LED 1 lights up green. The Gateway is connected to the end device.
Connection with USB cable in USB CDC mode
Follow the previous step 1 and step 2 for "Connection with USB Cable in USB HID Mode". Continue with the following steps:

-
in the configuration tool https://www.datalogic.com/handscanner/config under "Connectivity Configuration > Integration Path" select USB CDC. More detailed information about this can be found in 'Configure Devices and Firmware Updates' on page 17
-
Connect with the COM port on the end device.

RESULT
The LED of the Gateway lights up green. The boot up of the Gateway takes around 2min until the LED 1 lights up green. The Gateway is connected to the end device.
3 ^rd Step: Switch on the HandScanner

-
Position HandScanner on the fastening rail of the wearable. The pins face down.
-
Push HandScanner down. A clear clicking sound confirms the correct fastening.
-
Press the textile trigger on the wearable for about 2 seconds.

RESULT
HandScanner lights up with all LEDs. You can hear a beeping sound and feel a short vibration. HandScanner is switched on.

NOTE
HandScanner switches off automatically after 15 minutes without being used.
4^th Step: Connect the HandScanner
Connect via Gateway
- Press the textile trigger on the wearable in order to activate the red cross-shairs.
- Aim HandScanner crosshairs on the Gateway and scan the pairing barcode on the Gateway.

RESULT
HandScanner lights up twice. You can hear a beeping sound and feel a short vibration. HandScanner is connected to the Gateway.
4^th Step: Connect the HandScanner (BLE)
Connect via Insight Mobile
You can connect the HandScanner to the Insight Mobile App. Please always download the latest version of Insight Mobile from https://www.datalogic.com/handscanner/config, "Downloads" section. Information on how to use the software can be found at https://www.datalogic.com/handscanner/developer.
Connect via BLE HID to and end device
The HandScanner can be used to establish a connection via Bluetooth Low Energy Human Interface Device (BLE HID) to an end device. Possible operating systems are: Apple iOS, Google Android, Microsoft Windows. The individual steps for connecting to the respective operating systems for the first time can be found in the following.
Prerequisites:
• The end device supports at least Bluetooth 4.0 standard
- No interference or physical obstacles (e.g. metal shelves) interfere with the connection between the HandScanner and the end device
• The range between the HandScanner and the end device is < 33 ft (10m)

TIP 1
Visually label the connected devices (HandScanner with the end device), e.g. using numbering or a color code. This will allow the user to find the right devices faster.

TIP 2
Adhere the pairing barcode to the end device. In this way, the user can find it quickly and easily.
On a battery-operated end device, the power-saving mode can lock the end device and HandScanner simultaneously. Permanently disable the power-saving mode of the end device.
The last 5 digits of the serial number attached to the back side identify the HandScanner among the available Bluetooth devices.
Read the serial number of the HandScanner.

RESULT
Example serial number: DLHS - 00000.
To make the HandScanner visible for the end device, the HandScanner must be put into pairing mode:
- Press the textile trigger on the wearable in order to activate the red crosshairs.

- Aim the HandScanner crosshairs at the pairing barcode and scan.

RESULT
HandScanner pulses blue and beeping sounds can be heard. HandScanner is searching for an end device in pairing mode.
Connect with Apple iOS 11 or higher Connect with Google Android 4.4 or higher
0102

text_image
Bluetooth AirDrip, AirPlay and location services require Bluetooth.Under "Settings - Bluetooth," activate the Bluetooth option.
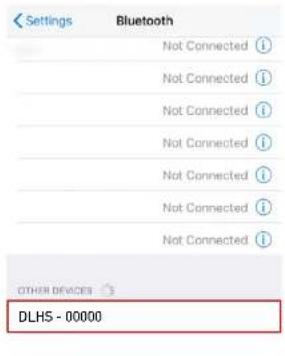
text_image
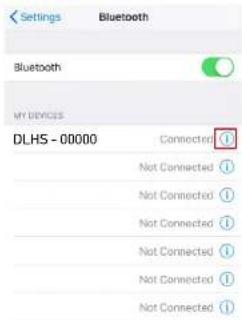
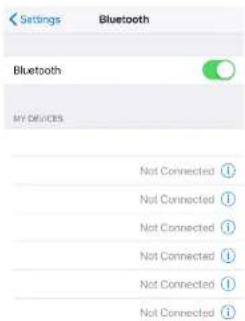
Settings Bluetooth Not Connected ⓘ Not Connected ⓘ Not Connected ⓘ Not Connected ⓘ Not Connected ⓘ Not Connected ⓘ Not Connected ⓘ OTHER DEVICES DLHS - 00000Select "DLHS - 00000".
03

text_image
Settings Bluetooth Not Connected Mark2- Not Connected Not Connected Bluetooth Pairing Request "Mark2-" would like to pair with your iPhone. Cancel Pair OTHER DEVICESConfirm the "Bluetooth Pairing Request".

RESULT

text_image
Settings Bluetooth Bluetooth MY DEVICES DLHS - 00000 Connected ⓘ Not Connected ⓘ Not Connected ⓘ Not Connected ⓘ Not Connected ⓘ Not Connected ⓘ Not Connected ⓘThe HandScanner will flash blue twice and you will hear two beeps. The HandScanner will be shown as connected under "My devices" and is ready for use.
0102

text_image
Bluetooth Off When Bluetooth is turned on, your device can communicate with other nearby Bluetooth devices.Under *Settings - Connected devices," switch on the Bluetooth option.

text_image
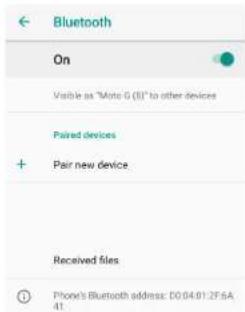
Bluetooth On Visible as "Moto G (5)" to other devices Paired devices + Pair new device Device name Moto G (5) Received files Phone's Bluetooth address: D0:04:01:2F:6A: 41Tap "Bluetooth" and select "Pair new device".
03
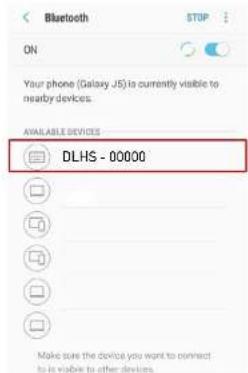
text_image
Bluetooth STOP ON Your phone (Galaxy J5) is currently visible to nearby devices. AVAILABLE DEVICES DLHS - 00000 Make sure the device you want to connect to is viable to other devices.Select "DLHS - 00000". The HandScanner will flash blue twice and you will hear
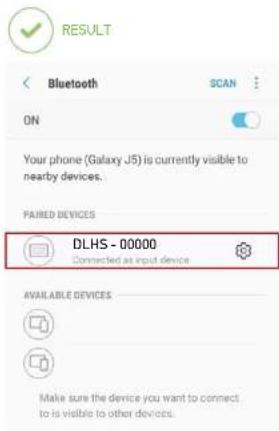
text_image
RESULT Bluetooth ON Your phone (Galaxy J5) is currently visible to nearby devices. PAIRED DEVICES DLHS - 00000 Connected as input device AVAILABLE DEVICES Make sure the device you want to connect to is visible to other devices.two beeps. The HandScanner will be shown as connected under "Paired devices" and is ready for use.
Connect with Microsoft Windows 10
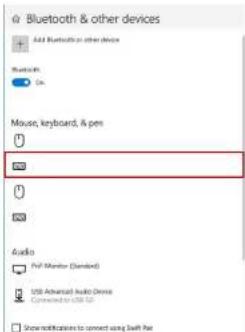
0102
text_image
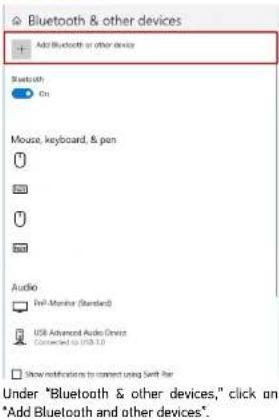
Bluetooth & other devices Add Bluetooth or other devices Bluetooth On Mouse, keyboard, & pen Audio Pre-Monitor (Standard) USB Advanced Audio Devices Connected to USB 3.0 Show notifications to connect using Swift Bar Under "Bluetooth & other devices," click an "Add Bluetooth and other devices".03

text_image
Add Bluetooth or other device Add a device Make sum your device is turned on and discolorable. Select a device before to control. DLHS - 00000 CancelSelect "DLHS - 00000".

text_image
Bluetooth & other devices Add a device Add a device Choose the kind of device you want to add. Bluetooth New, hierarchic, pan, or audio and other kind of Bluetooth devices Wireless display on disk Wireless display, 16, or 24. Note that wireless displays are used in this setup. Anything else How can be able with Wireless Adapter (USB), and more CancelSelect the option "Bluetooth: Mouses, keyboards and other types".
04
text_image
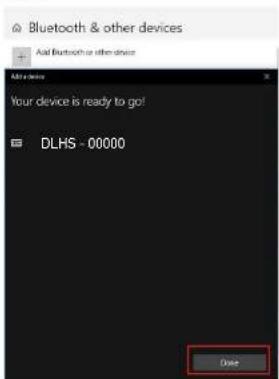
Bluetooth & other devices Add Bluetooth to other devices Add a device Your device is ready to go! DLHS - 00000 CloseClick "Done".

RESULT
text_image
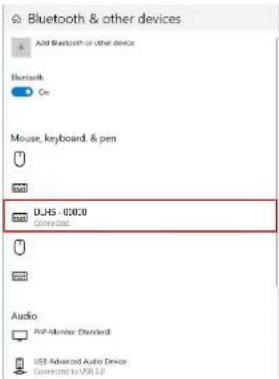
Bluetooth & other devices Add Bluetooth or other devices Bluetooth On Mouse, keyboard, & pen DJHS - 0000 COMERCISE Audio PnP-Mirror Standard USB Advanced Audio Device Connected to USB LabThe HandScanner will flash blue twice and you will hear two beeps. The HandScanner will be shown as connected under "Bluetooth & other devices," and is ready for use.
5^th Step: Scan

CAUTION
For mid range scanning range: do not look directly into the crosshairs! Otherwise this can lead to temporary blinding effects.
The HandScanner is an omnidirectional scanner. HandScanner can thus scan barcodes from different angles. For a standard range device (serial number: D1SR...), the scanning range is between 4 - 31 in (10-80 cm) per application case and barcode size. For a mid range device (serial number: D1MR...), the scanning range is 12 - 52 in (30-150 cm) per application case and barcode size.

- Press the textile trigger on the wearable in order to activate the red cross-hairs.

- Aim HandScanner crosshairs on the barcode and scan.
Example Barcode

Content: "Datalogic"

RESULT
HandScanner lights up green. You can hear a beeping sound and feel a short vibration. HandScanner has scanned the example barcode and transmitted it to the end device.
6^th Step: Disconnect HandScanner
Disconnect HandScanner from the Gateway

Place HandScanner in the Charging Station.

RESULT
HandScanner is disconnected from the Gateway and can be connected to a new one.
Disconnect the Connection Cable from the Gateway
Disconnect the connection cable out of the Micro USB socket.

NOTE
This will cause ALL paired devices to disconnect from the Gateway.

RESULT
The LED of the Gateway no longer lights up green. The connection cable is disconnected from the Gateway.
6^th Step: Disconnect HandScanner (BLE HID)

NOTE
Only disconnect HandScanner if this is to be newly connected to another end device.
Disconnect from Apple iOS
0102
text_image
Settings Bluetooth Bluetooth MY DEVICES DLHS - 00000 Connected ① Not Connected ① Not Connected ① Not Connected ① Not Connected ① Not Connected ① Not Connected ①Under "Settings - Bluetooth," tap on the information symbol.
03
text_image
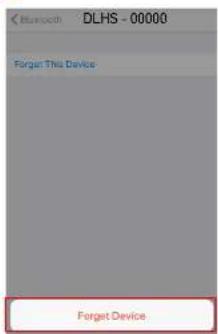
DelhS - 00000 Forget This Device Forget DeviceConfirm "Forget Device".
text_image
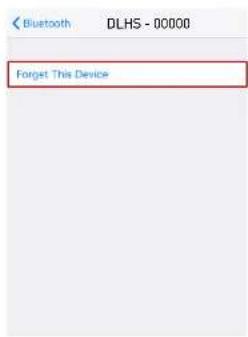
Bluetooth DLHS - 00000 Forget This DeviceTap on "Forget This Device".

RESULT
text_image
Settings Bluetooth Bluetooth Any Devices Not Connected ① Not Connected ① Not Connected ① Not Connected ① Not Connected ① Not Connected ①The HandScanner will flash red three times and you will hear three beeps.
HandScanner will no longer be shown as connected under "My devices."
Disconnect from Google Android
0102

text_image
Bluetooth ON Your phone (Galaxy J5) is currently visible to nearby devices. PARED DEVICES DLHS - 00000 Connected as input device AVAILABLE DEVICES Make sure the device you want to connect to is visible to other devices.In the Bluetooth option under "Paired devices," tap on the gear wheel symbol of "DLHS - 00000."

RESULT
text_image
Bluetooth On Visible as "Moto G (S)" to other devices Paired devices + Pair new device Received files Phone's Bluetooth address: D0 04.01.2F5A 41The HandScanner will flash red three times and you will hear three beeps. HandScanner will no longer be shown as connected under "Paired devices."
text_image
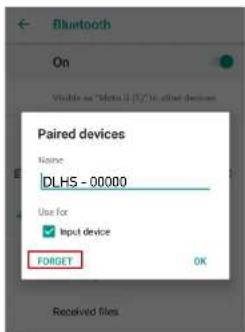
Bluetooth On Visible as "Mono II (12)" in other devices Paired devices Name: DLHS - 00000 Use for Input device FORGET OK Received filesSelect "Forget".
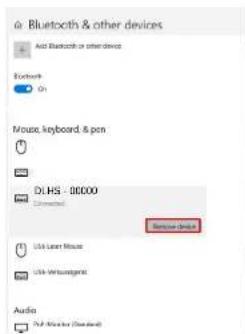
Disconnect from Microsoft Windows
0102
text_image
Bluetooth & other devices Add Bluetooth or other devices Bluetooth On Mouse, keyboards, & pen DL-HS - 00000 Connected Audio Pref Monitor (Standard) USB Achieved Audio Device Converted to USB 10Under "Bluetooth & other devices," select "DLHS - 00000."

RESULT
text_image
Bluetooth & other devices Add Bluetooth to other device Bluetooth On Mouse, keyboard, & pen USB Audio PvF Monitor (Standard) USB Advanced Audio Devices Connected to USB Tab Show notifications to connect using Swift PassThe HandScanner will flash red three times and you will hear three beeps. HandScanner will no longer be shown as connected under "Bluetooth & other devices."
text_image
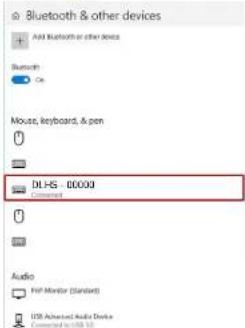
Bluetooth & other devices Add Bluetooth or other devices Bluetooth On Mouse, keyboard, & pen DLHS - 00000 Connected Audio device User Laser Mouse User Verlustgenist Audio PUB Monitor (Standard)Click "Remove device."
7 ^th Step: Release HandScanner from Wearable

CAUTION
Do not rub over the pins of the wearable with the HandScanner! This may otherwise lead to bended pins.

natural_image
Close-up of a hand wearing a wristband with a yellow tape measure (no visible text or symbols)- Use your fingers to press between HandScanner and the fastening rail of the wearable.

natural_image
Close-up of hands using a wearable device to interact with an object (no visible text or symbols)- Press HandScanner up slightly and push it forward.
CONFIGURATION TOOL REGISTRATION AND LOGIN
The first time you access the Configuration Tool (https://www.datalogic.com/handscanner/config), you will be requested to register in order to obtain the following credentials:
- Customer ID: an identifier shared by all the users inside your organization
• Email: your personal email
• Password: your password

NOTE
The registration needs to be validated before your first access. Follow this procedure to request your credentials:
- Go to https://www.datalogic.com/handscanner/config and click the "Register now" button.
REGISTER NOW
- Fill in the Registration form with the required information, then click the "Register an Account" button.
REGISTER AN ACCOUNT
- Your request will be verified and your credentials will be transmitted to the specified email address. The verification process may take up to two days.
- Follow the instructions in the confirmation email to access the Configuration Tool.
- For subsequent access to the Configuration Tool, go to https://www.datalogic.com/handscanner/config and fill in the "Sign in" form to continue:


CONFIGURE DEVICES AND FIRMWARE UPDATES
The configuration tool under https://www.datalogic.com/handscanner/config can be used to individually set the HandScanner system and improve scanning processes.
- To update the firmware proceed with "7th Step: Configure Devices and Gateway Firmware Update" on page 18.
• To create a new configuration proceed with "1st Step: Opening Configurations" on page 17.
1 ^st Step: Opening Configurations
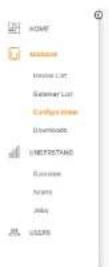
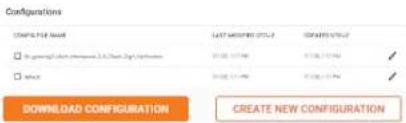
1. Go to Configurations in the Insight navigation.
2. Select a saved configuration or create a new one.
text_image
Configurations CONTENTS FOR NAME LAST DOCUMENTS ONLY CREATE CONTENTS ONLY □ In reviewing the instructions. It is not a new configuration. □ Add to 100% 100% 100% 100% 100% 100% DOWNLOAD CONFIGURATION CREATE NEW CONFIGURATION
NOTE
To install a saved configuration, proceed with "7th Step: Configure Devices and Gateway Firmware Update" on page 18.
2^nd Step: Create a New Configuration
Choose which connectivity option is used and need to be configured.

3 ^rd Step: Connectivity Configuration
Here it is possible to configure the connectivity settings according to the end device selected previously.
For example, if you selected "Gateway" you can choose HID or CDC mode. It is also possible to adjust the maximum number of HandScanners that can connect to the Gateway (multipairing - up to 5 devices).
If you selected "Insight Mobile", you can choose the type of Integration Path (Software Keyboard, Intent, SDK).
Choose the preferred settings.
Information on the different connectivity options can be found at https://www.datalogic.com/handscanner/developer.
4 ^th Step: Device Settings
The Device Settings can be used to optimize the HandScanner for certain use cases.
The Engine Settings allow to improve the readability of barcodes:
• activate Fuzzy 1D processing for hard to read 1D barcodes
• activate Display mode for barcodes on screens or foils
- activate Picklist mode to enable a more accurate aiming with the scanning field
The Feedback profiles allow to customize the HandScanners feedback.
The Sleep Mode determines the duration of inactivity after which the HandScanner turns off.
Device Settings
Degree Settings
□ 10.400000
□ Display lines
□ Fullset Links
Feedback Profile
Bathal
Source: Google Foundation
Sleep Style
+ Bhams
5 ^th Step: Symbology Settings
The Symbology Settings can be used to switch the barcode types (including inverse barcodes) on or off and to set barcode lengths, edge tolerances as well as check digits.
- Switch off unused barcode types.
- Switch on inverse barcode types if needed.
6 ^th Step: Workflow Rules
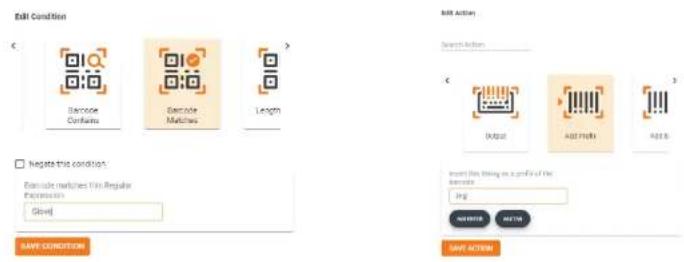
The Workflow Rules can be used to manipulate the barcode data. These can be used to change barcode data through rules with conditions and actions. These are then in an IF-THEN relationship with each other, which means that:
IF a condition is true, THEN an action is executed.
An action is also carried out without a condition.
Application example:
Insert the prefix "Datalogic" for the following barcode:

Condition: Barcode matches "Glove"
Action: Add prefix "Datalogic"
Outcome: "DatalogicGlove"
Create the condition "Barcode Matches: Gloves" and the action "Add Prefix Datalogic."
- Set condition (IF) 2. Set action (THEN)
text_image
Edit Condition Barcode Confirms Barcode Matches Length Negate the conditions Barcode matches in Regular Expression Glow SAVE CONDITION Add Action Search Action Output Add Action Insert this listing on a profile of the sequence ring SELECT ADD SAVE ACTION7 ^th Step: Configure Devices and Gateway Firmware Update
For the configuration of the device:
- Click on Save. Assign a name and download the configuration file. Then follow the procedure below to apply the configuration with Insight Mobile or the Gateway.
For a firmware update:
- To upgrade the HandScanner firmware, download the latest version of Insight Mobile App from https://www.data-logic.com/handscanner/config, "Download" section. The App will upgrade the firmware of the paired HandScanner if an update is available.
- To upgrade the Gateway, download the latest Gateway firmware version at https://www.datalogic.com/handscanner/config, "Downloads" section. Then follow the procedure below for the Gateway.
To configure Insight Mobile:
Copy the downloaded configuration file in the following folder on your mobile device:
(/sdcard)/Android/data/de.proglove.connect/files

RESULT
The configuration file will be deployed automatically on the mobile phone.
To configure the Gateway:

natural_image
Yellow QR code payment terminal connected to a black cable with a keyboard (no visible text or symbols)
natural_image
Close-up of a hand holding a yellow and black electronic device with a small display, next to a black keyboard (no visible text or symbols)
This PC
3D Objects
Desktop
Documents
↓ Downloads
Music
Pictures
Videos
Local Disk (C:)
GATEWAY (D:)GATEWAY (D:)
Network
- Connect the Gateway with the computer. The Gateway boots up. This takes about 2 min and is finished when the USB LED shows constant green light.
- Scan the Pairing Barcode on the Gateway.
- Scan this barcode to enable the Gateway as a mass storage device on the computer.
- Copy the downloaded configuration file or the firmware file into the mass storage device Gateway.
-
Copy the downloaded configuration file or the firmware file into the mass storage device Gateway.
-
Eject the Gateway mass storage from your File Explorer (e.g. on Windows, right-click on the Gateway and click on Eject).

CAUTION
Do not disconnect the Gateway from the computer during the upload!

RESULT
The upload of the configuration takes about 5 seconds / the upload of the firmware takes about 2 minutes and is finished when the USB LED shows constant green light. The Gateway is now configured / updated and can be connected to a HandScanner.

NOTE
The configuration will be applied to the HandScanner and the Gateway directly.
HandScanners that get connected to the Gateway later will receive the same configuration!
SIGNAL TABLES
General HandScanner
| Description LED Connection symbol Battery symbol Audio signal Vibration | |||||
| Barcode data could be transferred | Short green flashing | Short positive beep | Short vibration | ||
| Barcode data could not be transferred | Red flashing 3 times briefly | Long negative beep | Long vibration | ||
| Battery charge under 10% | Slow red flashing | ||||
| Battery charge under 7% | Red flashing 3 | times briefly | |||
| Switch on HandScanner with battery charge under 5% | Red flashing 3 times briefly | ||||
| Battery charge under 95% | Rulsating red | ||||
| Battery charge over 95% | Constantly green | ||||
HandScanner Connection via BLE
| HandScanner searches for an end device | Blue pulsating Blue pulsating Continuously | rising beep | ||
| HandScanner is connected to an end device | Blue flashing 2 times briefly | Blue flashing 2 times briefly | Short rising positive beep | |
| HandScanner cannot connect to the end device | Red flashing 3 times briefly | Negative beep briefly 3 times | ||
| HandScanner is disconnected from the end device | Red flashing 3 times briefly | Negative beep briefly 3 times |
Gateway
| Description LED 1 (USB - LED) LED 2 (Scanner - LED) LED 3 (Cloud - LED) | |||
| Gateway boots up' Left to right run through all LEDs alternating Blue / Green until start | |||
| Gateway is connected to the end device via USB | Constantly green | ||
| Gateway is not connected to the end device via USB | No feedback | ||
| Gateway searches for a HandScanner | Pulsing blue | ||
| Gateway is connected to the HandScanner via BLE | Constantly green | ||
| Firmware Update: Gateway is in download mode | Constantly yellow | Constantly yellow | Constantly yellow |
| Firmware Update: Hand- Scanner is flashing / Gateway deploys | Constantly purple | Constantly purple | Constantly purple |
| Firmware Update: Gateway is flashing | left to right run through all LEDs alternating purple until done | ||
| Firmware Update: successful | Long green flashing | Long green flashing | Long green flashing |
| Gateway is connected to a HandScanner and is searching for more HandScanners | Constantly green | ||
| Gateway cannot connect to another HandScanner | Constantly red | ||
| Gateway cannot connect to another HandScanner but another HandScanner is trying to connect | Red flashing 3 times briefly | ||
1 It take approx. 2 minutes to boot up.
COMPATIBILITY WITH DATALOGIC MOBILE TERMINALS
| Model Bluetooth HID | USB Gateway HID mode | USB Gateway CDC mode | Insight Mobile App Insight | Mobile SDK | |||
| Falcon X3+ Not compatible Not applicable Not compatible | |||||||
| Skorpio X4 / Falcon X4 (Android) OK Not applicable Not compatible | |||||||
| Skorpio X4 / Falcon X4 (Windows Embedded Compact 7) Not compatible Not applicable Not compatible | |||||||
| Joya Touch Not compatible Not applicable Not compatible | |||||||
| Joya Touch A6 OK Not applicable OK OK | |||||||
| Memor X3 Not compatible Not applicable Not compatible | |||||||
| Memor 1 OK Not applicable OK OK | |||||||
| Memor 10 | OK Not applicable OK OK | ||||||
| Memor 20 | OK Not applicable OK OK | ||||||
| Rhino II (Android) | OK | OK | OK | Not compatible | |||
| Rhino II (Windows Embedded Compact 7) | Not compatible | OK | Not compatible | Not compatible | |||
| Rhino II (Windows Embedded 7) | Not compatible | OK | OK * | Not compatible | |||
| Rhino II (Windows 10 IoT) | OK with Bluetooth 4.0 adapter | OK | OK | Not compatible | |||
| Taskbook | OK | OK with docking station | Not compatible | ||||
* Additional software driver is required for CDC mode on Windows Embedded 7. To download it, go to www.datologic.com and from the home page click on the search icon, type in the name of the product, then go to the Software & Utilities section.
Legend
| Fully compatible | |
| Compatible with some limitations | |
| Not compatible |
STORAGE AND CLEANING
Storage
Storage location:
Store the Hardware as well as Wearables in a dry and dirt-free environment. In case of transport, HandScanner system must be transported shockproof in its original packaging.
Temperature:
Store the Hardware as well as Wearables in an environment between - 4°F (-20°C) and 140°F (+60°C).
Cleaning
Wearables:

CAUTION
Protect Wearables from moisture
This may otherwise lead to the Wearables not functioning properly.
Datalogic wearables are not machine-washable. These wearables are meant to be replaced periodically due to normal wear and tear. This is because gloves and wraps contain sensitive electronics in and around the scan trigger. With care, it is possible to clean your wearables with minimal risk to their functionality.
We recommend using a spray cleaner with 70% isopropyl alcohol or cleaning products designed for use on fabrics. The scanner clip should be cleaned with only 70% isopropyl alcohol as other chemicals may impact the structure of the clip over time resulting in the scanner coming loose from the clip when in use. Allow wearables to dry completely before continuing use.
Product functionality or appearance may be impacted due to the strength of the chemicals, application methods, contact time, or use of the glove after application. We do not recommend using harsh chemical cleaners and avoid submerging the glove or wrap in liquid or saturating or applying pressure to the area around the trigger.
Because not everyone will follow exactly the same steps with the same cloths and cleaning agents that we tested in our lab, Datalogic disclaims all warranties and does not assume any liability with respect to the recommendations expressed here to keep your barcode scanning system clean.
Hardware:

CAUTION
Protect Hardware from moisture!
This may otherwise lead to HandScanner system not functioning properly.

CAUTION
Do not clean Hardware with chemical agents! Otherwise, the material can be damaged.
- Use isopropyl alcohol or cleaning agents approved for electronics and use it to wipe all surfaces of the hardware with a soft cloth.
• Regularly clean the HandScanner glass with cotton swabs.
TROUBLESHOOTING
HandScanner
Problem Cause Solution
| HandScanner is not responding Batteren | is not charged Charge HandScanner in the Ch | Charging Station for at least 20 minutes |
| Wearable is defective Change wearable | ||
| HandScanner is not vibrating or does not beep after successful data transfer | Feedback signals are disabled Check whether the feedback signals in the configuration tool are enabled under "Feedback Profiles" | |
| The battery symbol of HandScanner flashes red | The battery charge is low Charge HandScanner in the Charging Station for at least 20 minutes | |
| The crosshairs light up, but no barcodes are scanned | The barcode label cannot be read Create new barcode label | |
| The barcode type cannot be read Check whether the barcode type in the configuration tool is enabled under "Symbology settings" | ||
| The barcode length cannot be read Check whether the barcode length in the configuration tool is enabled under "Symbology settings" | ||
| HandScanner glass is dirty Clean the HandScanner glass with a cotton swab | ||
| The crosshairs light up, but the barcodes are hard to scan | The barcode label is difficult to read To enhance the scanning performance, in the configuration tool under "Symbology settings", set Fuzzy 1D processing to ON | |
| HandScanner glass is dirty Clean the HandScanner glass with a cotton swab | ||
| Scanning distance is not optimally used Position HandScanner closer or further away from the barcode label and scan.For standard range: 3.9 - 31.5 in (10 - 80 cm)For mid range: 11.8 - 59 in (30 - 150 cm) | ||
| After pairing with Android device, the on-screen keyboard is not visible anymore | The virtual keyboard option is not enabled | Open Android Settings > System > Languages and Input > Physical Keyboard > Enable "Show virtual keyboard" |
| HandScanner cannot be paired to the Insight Mobile application. No error messages are shown. | HandScanner may have already been paired to the terminal in BLE HID mode. | Follow the steps under '6th Step: Disconnect HandScanner (BLE HID)' on page 15 to disconnect, then try to pair again using the Insight Mobile application. |
BLE - Data Transfer
Problem Cause Solution
| Barcode data is not transferred HandScanner is not connected to the end device | 1. Scan the pairing barcode2. Lights up blue twice briefly while HandScanner is connecting and after a successful connection | |
| HandScanner lights up green after the data transfer, but no barcode data is shown on the end device | HandScanner is out of range of the end device• Max. range is < 33 ft (10 m) | Bring HandScanner closer to the end device and scan the pairing barcode |
| HandScanner flashes red 3 times, 3 negative beeps are heard and long vibration is felt | HandScanner cannot connect with the end device | 1. Check whether the range between HandScanner and end device is < 33 ft (10 m). If not, get closer2. Disconnect the HandScanner from the end device and reconnect (see '6th Step: Disconnect HandScanner' and '4th Step: Connect the HandScanner')3. Scan the pairing barcode again4. Scan barcode again |
Gateway
Problem Cause Solution
| The Gateway is not recognized on Windows systems when enabling CDC mode | The CDC Driver for Windows may be missing | Install the CDC Driver on Windows PC. To download it, go to www.datologic.com and from the home page click on the search icon, type in the name of the product, then go to the Software & Utilities section. |
| The Gateway is not recognized on Windows systems when enabling Maiss Storage | The Composite Driver for Windows may be missing | From Windows Start Menu, open Device Manager, locate the USB device with warning icon, right-click Update Driver > Automatic Search.The PC must have Internet access. |
Gateway - Data Transfer
Problem Cause Solution
| Barcode data is not transferred HandScanner is not connected to the Gateway | 1. Scan the pairing barcode on the Gateway2. Lights up blue twice briefly while Hand-Scanner is connecting and after a successful connection |
| HandScanner is out of range of the Gateway• Max. range is 100 - 130 ft (20 - 40 m) | Bring HandScanner closer to the Gateway |
| Gateway is defective Gateway must be replaced | |
| HandScanner is defective HandScanner must be replaced | |
Charging Station
Problem Cause Solution
| HandScanner does not charge in Charging Station | HandScanner is not correctly inserted in the Charging Station | Insert HandScanner in the Charging Station again |
| Charging Station is not connected to power source | Connect Charging Station to power source | |
| HandScanner is defective HandScanner must be replaced | ||
| Charging Station is defective The Charging Station must be replaced | ||
| LEDs of HandScanner do not light up immediately when HandScanner is placed in the Charging Station | HandScanner charges in the Charging Station, but the feedback signals are delayed by about 30 seconds | Wait until the LEDs of HandScanner signal the charging |

TIP 1
Problem could not be solved? Insert HandScanner into the wearable. Press the trigger on the wearable for about 15 seconds and restart Handcanner.

TIP 2
Problem could not be solved? Scan with HandScanner the Factory Default Barcodes:

HandScanner Gateway

Factory Default Barcode will reset all configurations!
DISPOSAL

For information about the disposal of Waste Electrical and Electronic Equipment (WEEE), please refer to the website at www.datalogic.com.
Carry out the following steps to decommission HandScanner system:
- Release HandScanner from Wearables
- Disconnect the connection cable from the Acess Point / Gateway
- Disconnect the mains plug from the Charging Station
- Properly dispose of Hardware and Wearables as old electronic and electric devices
DIRECTIVES & CERTIFICATION
European Directives
2014/53/EU Radio Equipment Directive (RED)
2011/65/EU Restriction of Hazardous Substances (RoHS)
2015/863/EU
Declaration of Conformity
Datalogic S.r.l hereby declares that the devices are in compliance with all applicable Directives. For the full text of the CE Declaration of Conformity please contact the Datalogic Support (datalogic.com/support).
FCC/IC Certification Compliance
The Datalogic HandScanner System comprised of: HandScanner MR, HandScanner SR, Datalogic Charging Station, Data-
logic Gateway, wearables, peripherals and accessories, complies with the following FCC/IC product categories:
• FCC Part 15 Subpart C 247 (intentional radiators = RF transceiver)
• FCC Part 15 Subpart C 249 (intentional radiators = RF transceiver)
• FCC Part 15 Subpart B 107/109 (unintentional radiator)
• ISED Canada RSS-Gen Category I (radio apparatus)
• ISED Canada RSS-247
• ISED Canada RSS-102
• ISED Canada RSS-210
The Datalogic HandScanner is a portable device (distance between person's body and the antenna is 20 cm or less) and excluded from SAR (Specific Absorption Rate) requirements.
Under the regulations of the FCC and the IC the user has to be aware of the following when using the Datalogic Hand-Scanner:
- This equipment complies with FCC/IC radiation exposure limits set forth for an uncontrolled environment and meets the FCC radio frequency (RF) Exposure Guidelines and RSS-102 of the IC radio frequency (RF) Exposure rules. This equipment has very low levels of RF energy that are deemed to comply without testing of specific absorption rate (SAR).
- This HandScanner system has been tested and meets the FCC/IC RF exposure rules when used with Datalogic accessories supplied or designated for this product. Use of other accessories may not ensure compliance with FCC/IC RF exposure rules.
FCC Specific Certification Compliance
Under the regulations of the FCC the user has to be aware of the following when using the Datalogic HandScanner:
- FCC CAUTION
Changes or modifications not expressly approved by the party responsible for compliance could void the user's authority to operate the equipment.
-
This transmitter must not be co-located or operated in conjunction with any other antenna or transmitter.
-
Operation is subject to the following two conditions:
(1) this device may not cause harmful interference, and
(2) this device must accept any interference received, including interference that may cause undesired operation.
- Note: This equipment has been tested and found to comply with the limits for a Class B digital device, pursuant to part 15 of the FCC Rules. These limits are designed to provide reasonable protection against harmful interference uses and can radiate radio frequency energy and, if not installed and used in accordance with the instructions, may cause harmful interference to radio communications. However, there is no guarantee that interference will not occur in a particular installation. If this equipment does cause harmful interference to radio or television reception, which can be determined by turning the equipment off and on, the user is encouraged to try to correct the interference by one or more of the following measures:
- Reorient or relocate the receiving antenna.
- Increase the separation between the equipment and receiver.
- Connect the equipment into an outlet on a circuit different from that to which the receiver is connected.
- Consult the dealer or an experienced radio/TV technician for help.
IC Specific Certification Compliance
Under the regulations of the IC the user has to be aware of the following when using the Datalogic HandScanner:
- This device complies with Industry Canada's licence-exempt RSSs. Operation is subject to the following two conditions:
(1) This device may not cause interference; and
(2) This device must accept any interference, including interference that may cause undesired operation of the device.
Complies with 21CFR1040.10 and 1040.11 except for deviations pursuant to Laser Notice No. 56, dated June 24, 2007. Laser safety according to EN60825-1:2014 and IEC 60825-1 (Ed. 3.0).
The laser warning label is
located on the bottom of
HandScanner (mid range)

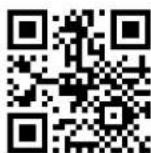
APPENDIX - CONFIGURATION BARCODES
Pairing Barcode
Gateway Mass Storage ON

Gateway Mass Storage OFF

Scanner Factory Reset
Gateway Factory Reset