
ARA43-W2 - Sound alarm Dahua Technology - Free user manual and instructions
Find the device manual for free ARA43-W2 Dahua Technology in PDF.


| Product Type | Wireless Sound Alarm Siren |
| Brand | Dahua Technology |
| Model | ARA43-W2 |
| Dimensions (H x W x D) | 120 x 100 x 60 mm |
| Weight | 220 g |
| Power Supply | 12 V DC (adapter included) or 9V alkaline battery (backup) |
| Max Sound Output | 110 dB at 1 m |
| Wireless Protocol | 433 MHz or Zigbee (depending on variant) |
| Range (open area) | Up to 150 m |
| Tamper Protection | Anti-tamper switch triggers alarm on cover removal |
| Indoor/Outdoor Use | Outdoor (IP65 rated) |
| LED Indicator | Flashing red when triggered, steady green for armed status |
| Operating Temperature | -20°C to +60°C |
| Maintenance | Clean with a soft, dry cloth; avoid water and solvents |
| Safety Features | Tamper-resistant screws, overvoltage protection |
| Spare Parts & Repairability | Battery compartment accessible; internal repair by qualified technician only |
| Compliance | CE, FCC, RoHS |
| Package Contents | Siren unit, mounting bracket, screws, 12V adapter, user manual |
Frequently Asked Questions - ARA43-W2 Dahua Technology
User questions about ARA43-W2 Dahua Technology
0 question about this device. Answer the ones you know or ask your own.
Ask a new question about this device
Download the instructions for your Sound alarm in PDF format for free! Find your manual ARA43-W2 - Dahua Technology and take your electronic device back in hand. On this page are published all the documents necessary for the use of your device. ARA43-W2 by Dahua Technology.
USER MANUAL ARA43-W2 Dahua Technology
natural_image
Abstract geometric composition with gray and red color blocks (no text or symbols)Foreword
General
This manual introduces the functions and operations of the alarm repeater (hereinafter referred to as the "repeater").
Safety Instructions
The following signal words might appear in the manual.
| Signal Words | Meaning |
 DANGER DANGER | Indicates a high potential hazard which, if not avoided, will result in death or serious injury. |
 WARNING WARNING | Indicates a medium or low potential hazard which, if not avoided, could result in slight or moderate injury. |
 CAUTION CAUTION | Indicates a potential risk which, if not avoided, could result in property damage, data loss, reductions in performance, or unpredictable results. |
 IPS IPS | Provides methods to help you solve a problem or save time. |
 YTE YTE | Provides additional information as a supplement to the text. |
Revision History
| Version | Revision Content | Release Time |
| V1.1.0 | Added app and hub versions. | September 2021 |
| V1.0.0 | First release. | August 2021 |
Privacy Protection Notice
As the device user or data controller, you might collect the personal data of others such as their face, fingerprints, and license plate number. You need to be in compliance with your local privacy protection laws and regulations to protect the legitimate rights and interests of other people by implementing measures which include but are not limited: Providing clear and visible identification to inform people of the existence of the surveillance area and provide required contact information.
About the Manual
- The manual is for reference only. Slight differences might be found between the manual and the product.
- We are not liable for losses incurred due to operating the product in ways that are not in compliance with the manual.
- The manual will be updated according to the latest laws and regulations of related jurisdictions. For detailed information, see the paper user's manual, use our CD-ROM, scan the QR code or visit our official website. The manual is for reference only. Slight differences might be found between
the electronic version and the paper version.
- All designs and software are subject to change without prior written notice. Product updates might result in some differences appearing between the actual product and the manual. Please contact customer service for the latest program and supplementary documentation.
- There might be errors in the print or deviations in the description of the functions, operations and technical data. If there is any doubt or dispute, we reserve the right of final explanation.
- Upgrade the reader software or try other mainstream reader software if the manual (in PDF format) cannot be opened.
- All trademarks, registered trademarks and company names in the manual are properties of their respective owners.
- Please visit our website, contact the supplier or customer service if any problems occur while using the device.
- If there is any uncertainty or controversy, we reserve the right of final explanation.
Important Safeguards and Warnings
This section introduces content covering the proper handling of the Device, hazard prevention, and prevention of property damage. Read carefully before using the Device, comply with the guidelines when using it, and keep the manual safe for future reference.
Operation Requirements

- Make sure that the power supply of the device works properly before use.
- Do not pull out the power cable of the device while it is powered on.
- Only use the device within the rated power range.
- Transport, use and store the device under allowed humidity and temperature conditions.
- Prevent liquids from splashing or dripping on the device. Make sure that there are no objects filled with liquid on top of the device to avoid liquids flowing into it.
- Do not disassemble the device.
Installation Requirements

WARNING
- Connect the device to the adapter before power on.
- Strictly abide by local electrical safety standards, and make sure that the voltage in the area is steady and conforms to the power requirements of the device.
- Do not connect the device to more than one power supply. Otherwise, the device might become damaged.

- Observe all safety procedures and wear required protective equipment provided for your use while working at heights.
- Do not expose the device to direct sunlight or heat sources.
- Do not install the device in humid, dusty or smoky places.
- Install the device in a well-ventilated place, and do not block the ventilator of the device.
- Use the power adapter or case power supply provided by the device manufacturer.
- The power supply must conform to the requirements of ES1 in IEC 62368-1 standard and be no higher than PS2. Note that the power supply requirements are subject to the device label.
- Connect class I electrical appliances to a power socket with protective earthing.
Table of Contents
Foreword ....
Important Safeguards and Warnings....III
1 Introduction .... 1
2 Checklist....2
3 Design....3
3.1 Appearance....3
3.2 Dimensions....4
4 Connecting to the Hub 5
5 Installation....6
6 Configuration 7
6.1 Configuring the Repeater....7
6.2 Status of the Repeater 9
1 Introduction
Alarm repeater is a wireless repeater device that extends the communication range between the alarm hub and other accessories, and forwards messages received from the accessory to the hub. It provides a secondary communication path for accessories, improving the overall stability and reliability of communication of the wireless security system. You can use the DMSS app to manually select a path for accessories or allow the system to automatically select one for them. It is suitable for security use in scenes, such as villas with multiple floors, garages that are far away from residential areas, or office buildings and shops with partitions.
2 Checklist
Figure 2-1 Checklist
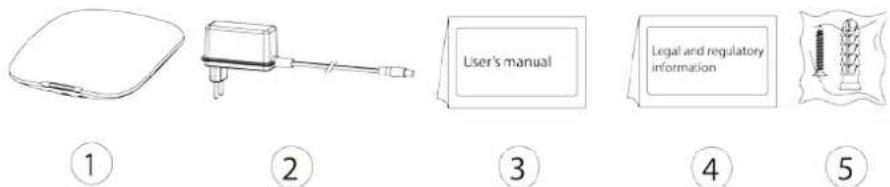
1
2
3
4
5
Table 2-1 Checklist
| No. | Item Name | Quantity | No. | Item Name | Quantity |
| 1 Alarm | repeater 1 4 | Legal and regulatory information | 1 | ||
| 2 Adapter | 1 5 Screw package | 1 | |||
| 3 User's | manual 1 — — — |
3 Design
3.1 Appearance
Figure 3-1 Appearance
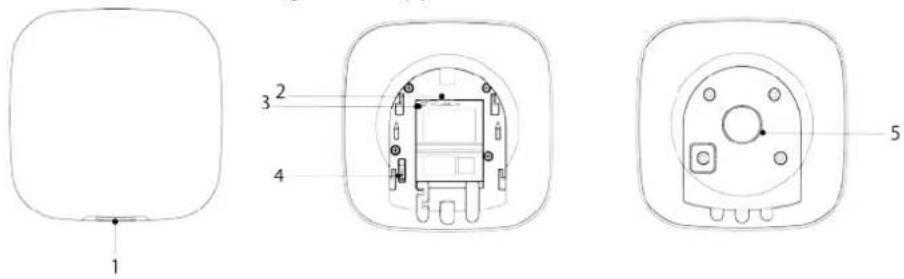
Table 3-1 Structure
| No. Name Description | |
| 1 Indicator | Solid green: Turned on.Flashes green: Pairing with the hub. |
| 2 Power switch | Switch to ON to turn on the repeater, and OFF to turn it off.OFF is set by default. |
| 3 Power cable socket | Insert power cable.Powered by 12 VDC power supply. |
| 4 Tamper switch | When the tamper switch is released, the tamper alarm will be triggered. |
| 5 Lid | Lid closed: Normal status.Lid open: If the lid is opened, the tamper alarm will be triggered. |
3.2 Dimensions
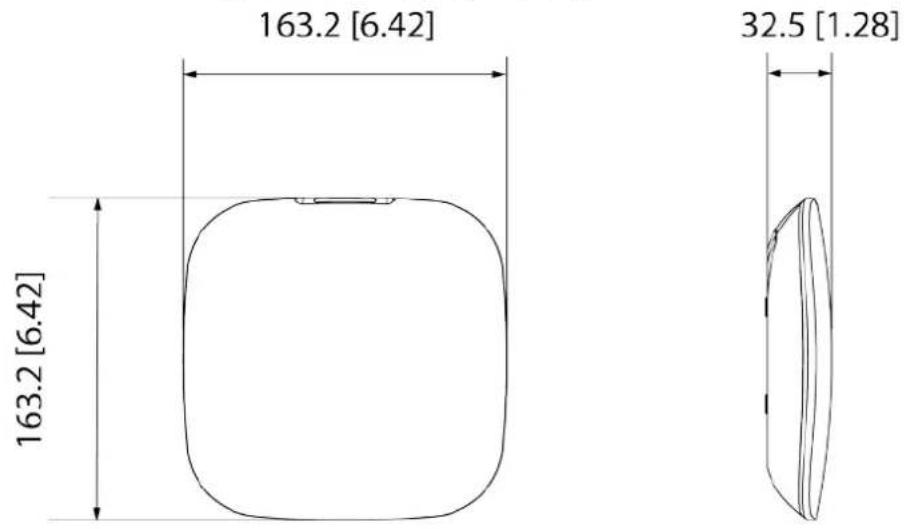
Figure 3-2 Dimensions (mm[inch])
4 Connecting to the Hub
Before you connect it to the hub, install the DMSS app to your phone. This manual uses iOS as an example.

- Make sure the version of the DMSS app is 1.94 and later, and the hub is V1.001.0000000.4.R.210923 and later.
- Make sure that you have already created an account, and added the hub to DMSS.
- Make sure that the hub has a stable internet connection.
- Make sure that the hub is disarmed.
Step 1 Go to the hub screen, and then tap Accessory to add the repeater.
Step 2 Tap + to scan the QR code at the bottom of the repeater, and then tap Next.
Step 3 Tap Next after the repeater has been found.
Step 4 Follow the on-screen instructions and switch the repeater to ON, and then tap Next.
Step 5 Wait for the pairing.
Step 6 Customize the name of the repeater and select the area, and then tap Completed.
5 Installation
Prior to installation, connect the repeater to the hub and check the signal level at the installation location. We recommend installing the repeater in a place with the signal strength of at least 2 bars. Use the provided screws to mount the repeater in locations accessible for future maintenance.

Mount the repeater in a location that does not have metals and metal objects. Duct work, wire mesh screens and boxes, and other similar metal based objects will reduce the RF range.
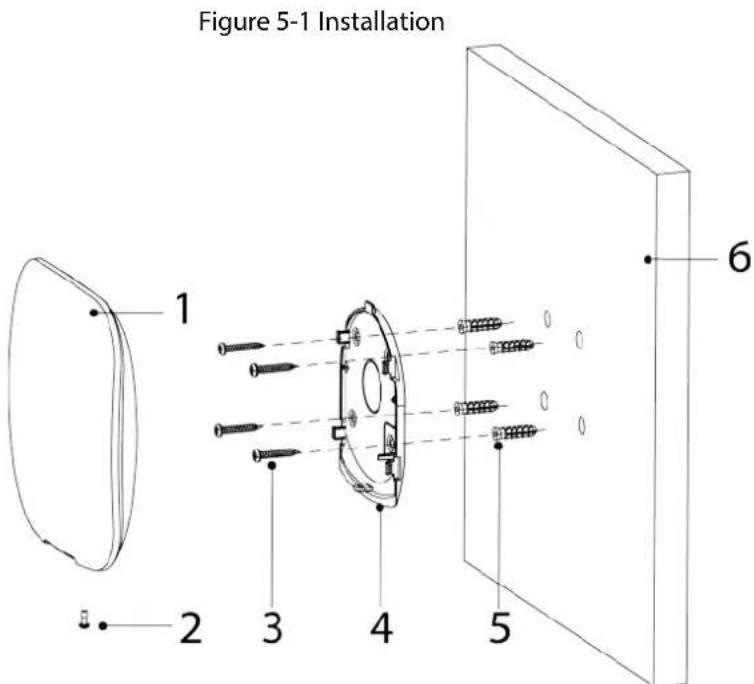
Table 5-1 Installation items
| No. | Item Name | No. | Item Name |
| 1 Repeater 4 Mounting plate | |||
| 2 | M3 × 8 mm countersunk head screw | 5 | Expansion bolt |
| 3 | ST4 × 25 mm self-tapping screw | 6 | Wall |
Step 1 Confirm the position of screw holes, and then drill them on the mounting plate.
Step 2 Put the expansion bolts into the holes.
Step 3 Put the mounting plate into the wall, and then align the screw holes on the plate with the expansion bolts.
Step 4 Fix the mounting plate with ST4 × 25 mm self-tapping screws.
Step 5 Put the alarm hub into the mounting plate from top to bottom.
Step 6 Fix the alarm hub and mounting plate with M3 × 8 mm countersunk head screws.
6 Configuration
You can view and edit general information of the repeater.
6.1 Configuring the Repeater
On the Hub screen, select the repeater as needed from the accessory list, and then tap ☑ to configure the parameters of the repeater.
Table 6-1 Repeater parameter description
| Parameter Description | |
| Device Configuration | View device name, type, SN and device model.Edit device name, and then tapSaveto save configurations. |
| Area | Select the area to which the repeater is assigned. |
| Temporary Deactivate | TapTemporary Deactivateto enable or disable the functions of the repeater.TapEnable, and then all accessory messages will be forwarded to the alarm hub.Enableis set by default.TapOnly Disable Tamper Alarm, and then the system will only ignore tamper alarm messages.TapDisable, and then no accessory messages will be forwarded to the alarm hub through the repeater, and the system will ignore fault messages coming from the repeater. If disabled, all the accessories that were manually set to forward messages through the repeater will be offline. Those selected to automatically send messages to the hub will select another communication path.Even if you disable the functions of the repeater, the status of the accessories will be displayed as normal. If disabled, all the accessories that were manually set to forward messages through the repeater will be offline. Those selected to automatically send messages to the hub will select another communication path.Even if you disable the functions of the repeater, the status of the accessories will be displayed as normal. |
| LED Indicator | LED Indicatoris enabled by default. For details on indicator behavior, see "3.1 Appearance". IfLED Indicatoris disabled, the LED indicator will remain off regardless of whether the repeater is functioning normally or not. IfLED Indicatoris disabled, the LED indicator will remain off regardless of whether the repeater is functioning normally or not. |
| Peripherals Pairing | Tap Peripherals Pairing, and then you can manually set the accessories to forward messages to the hub through the repeater.· View the status of all the accessories that are connected to the hub.· In the To be Paired list, select an accessory, and then tap next to the accessory to manually select a secondary communication path for it. Afterwards, the selected accessory will be displayed in the Paired list. ◇ The system will automatically select a communication path for the accessories that were not manually added to the Paired list according to the signal strength. Automatic selection for the system is set by default.◇ If you want the system to automatically select a communication path for the accessory, you can also go to the Paired list, select the accessory from the list, and then swipe left to delete it. ◇ The system will automatically select a communication path for the accessories that were not manually added to the Paired list according to the signal strength. Automatic selection for the system is set by default.◇ If you want the system to automatically select a communication path for the accessory, you can also go to the Paired list, select the accessory from the list, and then swipe left to delete it. You can also select ➤ Peripherals Pairing to manually set the accessories to forward messages to the hub through the repeater. You can also select ➤ Peripherals Pairing to manually set the accessories to forward messages to the hub through the repeater. |
| Signal Strength Detection | Test the current signal strength. |
| Transmit Power | · Select from high, low, and automatic.· The higher the transmission power, the farther the transmission and the higher power consumption is. |
| Cloud Update | Update online.The repeater can forward messages received from the accessory to the hub even during an online update.[IMAGE]Make sure the hub is disarmed and the repeater is powered up by a 12 VDC power supply. |
| Delete | Delete the repeater.[IMAGE]If the repeater is deleted, the system will select another communication path for the accessories that have been manually set to forward messages to the hub through the repeater.[IMAGE]You can also go to the Hub screen, select the repeater from the list, and then swipe left to delete it. |
6.2 Status of the Repeater
On the Hub screen, select the repeater as needed from the accessory list, and then you can view the status of the repeater.
Table 6-2 Status
| Parameter Description | |
| Temporary Deactivate | The status for whether the functions of the repeater are enabled or disabled.● : Enable.● : Only disable tamper alarm.● : Disable. |
| Signal Strength | The signal strength between the hub and the repeater.● : Low.● : Week.● : Good.● : Excellent.● : No. |
| External Power Status | Connection status of the repeater with the power.● : Connected.● : Disconnected.[IMAGE]If the repeater is powered off, it can work for up to 35 hours. |
| Battery Level | The battery level of the repeater.● : Fully charged.● : Sufficient.● : Moderate.● : Insufficient.● : Low.[IMAGE]If the battery level is low, the repeater can work for up to 3.5 hours. |
| Anti-tampering Status | Anti-tampering status of the repeater. |
| Online Status | Online and offline status of the repeater.● : Online.● : Offline. |
| Program Version | The program version of the repeater. |
ENABLING A SAFER SOCIETY AND SMARTER LIVING
- Foreword
- General
- Safety Instructions
- Revision History
- Privacy Protection Notice
- About the Manual
- Important Safeguards and Warnings
- Operation Requirements
- Installation Requirements
- WARNING
- Table of Contents
- Foreword ....
- Important Safeguards and Warnings....III
- Introduction
- Checklist
- Design
- Appearance
- Dimensions
- Connecting to the Hub
- Installation
- Configuration
- Configuring the Repeater
- Status of the Repeater
Brand : Dahua Technology
Model : ARA43-W2
Category : Sound alarm