
525206 - Wi-Fi Antenna Intellinet - Free user manual and instructions
Find the device manual for free 525206 Intellinet in PDF.


| Product Type | Wi-Fi Antenna |
| Brand | Intellinet |
| Model | 525206 |
| Frequency Range | 2.4 GHz / 5 GHz Dual-Band |
| Gain | 6 dBi |
| Connector Type | RP-SMA Male |
| Polarization | Linear Vertical |
| Impedance | 50 Ohms |
| Dimensions | 210 x 20 mm (8.3 x 0.8 in) |
| Weight | 50 g (1.8 oz) |
| Operating Temperature | -20°C to 60°C |
| Mounting | Magnetic base or adhesive |
| Cable Length | 1.5 m (5 ft) |
| Color | Black |
| Functions | Improves Wi-Fi signal strength and coverage |
| Compatibility | Routers, access points, and Wi-Fi adapters with RP-SMA connector |
| Care & Cleaning | Wipe with a dry, soft cloth; avoid liquids and abrasive cleaners |
| Safety | Keep away from heat sources and moisture; do not exceed rated power |
| Spare Parts & Repairability | No user-serviceable parts; contact support for replacement |
| General Information | Designed to enhance wireless performance for indoor or outdoor use |
Frequently Asked Questions - 525206 Intellinet
User questions about 525206 Intellinet
0 question about this device. Answer the ones you know or ask your own.
Ask a new question about this device
Download the instructions for your Wi-Fi Antenna in PDF format for free! Find your manual 525206 - Intellinet and take your electronic device back in hand. On this page are published all the documents necessary for the use of your device. 525206 by Intellinet.
USER MANUAL 525206 Intellinet
WIRELESS 300N USB ADAPTER
USER MANUAL
MODEL 525206

natural_image
White USB device with a conical tip and antenna, isolated on white background (no text or symbols visible)
INTELLINET™
NETWORK SOLUTIONS
Federal Communications Commission Interference Statement
This equipment has been tested and found to comply with the limits for a Class B digital device, pursuant to Part 15 of FCC Rules. These limits are designed to provide reasonable protection against harmful interference in a residential installation. This equipment generates, uses, and can radiate radio frequency energy and, if not installed and used in accordance with the instructions, may cause harmful interference to radio communications. However, there is no guarantee that interference will not occur in a particular installation. If this equipment does cause harmful interference to radio or television reception, which can be determined by turning the equipment off and on, the user is encouraged to try to correct the interference by one or more of the following measures:
- Re-orient or relocate the receiving antenna.
- Increase the separation between the equipment and receiver.
- Connect the equipment into an outlet on a circuit different from that to which the receiver is connected.
- Consult the dealer or an experienced radio technician for help.
FCC Caution
This device and its antenna must not be co-located or operating in conjunction with any other antenna or transmitter.
This device complies with Part 15 of the FCC Rules. Operation is subject to the following two conditions: (1) this device may not cause harmful interference, and (2) this device must accept any interference received, including interference that may cause undesired operation.
Any changes or modifications not expressly approved by the party responsible for compliance could void the authority to operate equipment.
Federal Communications Commission (FCC) Radiation Exposure Statement
This EUT is in compliance with SAR for general population/uncontrolled exposure limits in ANSI/IEEE C95.1-1999 and had been tested in accordance with the measurement methods and procedures specified in OET Bulletin 65 Supplement C.
The equipment version marketed in the U.S. is restricted to usage of channels 1-11 only.
R&TTE Compliance Statement
This equipment complies with all the requirements of Directive 1999/5/EC of the European Parliament and the Council of March 9, 1999, on radio equipment and telecommunication terminal equipment and the mutual recognition of their conformity (R&TTE).
Safety
This equipment is designed with the utmost care for the safety of those who install and use it. However, special attention must be paid to the dangers of electric shock and static electricity when working with electrical equipment. All guidelines of this and of the computer manufacturer must therefore be allowed at all times to ensure the safe use of the equipment.
EU Countries Intended for Use
The ETSI version of this device is intended for home and office use in Austria, Belgium, Denmark, Finland, France, Germany, Greece, Ireland, Italy, Luxembourg, the Netherlands, Portugal, Spain, Sweden and the United Kingdom.
The ETSI version of this device is also authorized for use in EFTA member states: Iceland, Liechtenstein, Norway and Switzerland.
EU Countries Not Intended for Use
None.
Contents
1 Introduction .... 1
1.1 Features .... 1
1.2 Specifications .... 1
2 Installation Procedure.... 3
3 Configuration Utility....9
3.1 Utility Overview....9
3.2 Available Network 11
3.3 General 12
3.4 Profile....13
3.4.1 Configure the Profile 14
3.5 Status....18
3.6 Statistics 18
3.7 Wi-Fi Protect Setup (WPS) 19
3.8 Software AP 22
3.8.1 AP Properties Setting 23
3.8.2 AP Advanced 23
3.8.3 AP Statistics.... 24
3.8.4 ICS 25
1 Introduction
Thank you for purchasing the INTELLINET NETWORK SOLUTIONS™ Wireless 300N USB Adapter, Model 525206. By following the simple steps in this user manual, you will soon be able to enjoy the helpful features listed below that make this item such a popular selection.
1.1 Features
- Connects your desktop PC or notebook to a wireless network
■ Up to 300 Mbps network link speed
■ Equipped with a powerful 3 dBi high-gain antenna
■ Supports WMM (Wi-Fi Multimedia) for increased multimedia data throughput
■ Supports WEP (64/128 bit), WPA and WPA2 data encryption
■ Supports Software AP function (turns your wireless client into a wireless access point)
■ Supports the most popular operating systems: Windows XP, Vista and Windows 7 - Complies with 2.4 GHz IEEE 802.11n standard and is backward compatible with IEEE 802.11g/b standards
■ Use with INTELLINET NETWORK SOLUTIONS Wireless N WLAN products for best compatibility and performance
■ Supports Hi-Speed USB 2.0/1.1 interface
■ Three-Year Warranty
1.2 Specifications
Standards:
• IEEE 802.11b (11 Mbps Wireless LAN)
• IEEE 802.11g (54 Mbps Wireless LAN)
- IEEE 802.11n (300 Mbps Wireless LAN)
- IEEE 802.11e (Wireless Multimedia Extensions [WME])
General
- Interface: Hi-Speed USB 2.0
• Chipset: Realtek RTL8192
• Frequency band: 2.4000 – 2.4835 GHz (Industrial Scientific Medical Band)
• Modulation technologies:
- 802.11b: Direct Sequence Spread Spectrum (DSSS): DBPSK, DQPSK, CCK
- 802.11g: Orthogonal Frequency Division Multiplexing (OFDM): BPSK, QPSK, 16QAM, 64QAM
- 802.11n: Orthogonal Frequency Division Multiplexing (OFDM): BPSK, QPSK, 16QAM, 64QAM
- Security:
- 64/128-bit WEP data encryption
- WPA and WPA2
- Cisco CCX
- Transmit power:
- 300 Mbps 20 MHz, 13 dBm +/- 1.5 dBm
- 300 Mbps 40 MHz, 13 dBm +/- 1.5 dBm
- 54 Mbps OFDM, 14 dBm +/- 1.5 dBm
- 11 Mbps CCK, 16 dBm +/- 1.5 dBm
- Receive sensitivity:
- 300 Mbps 20 MHz, -70 dBm
- 300 Mbps 40 MHz, -67 dBm
- 54 Mbps OFDM, -74 dBm
- 11 Mbps CCK, -87 dBm
• Antennas: 2 antennas with 3 dBi gain
• Certification: FCC Class B, CE
LEDs
- Link/Activity
Environmental
- Dimensions: 15 (H) x 15 (W) x 155 (L) mm (0.4 x 1.1 x 3.5 in.)
• Weight: 0.14 kg (0.3 lbs.) - Operating temperature: 0 – 40°C (32 – 104°F)
• Operating humidity: max. 95% RH, non-condensing
System Requirements
• Notebook or Desktop PC with Pentium 1 GHz-compatible processor or higher
- Windows XP, Vista or 7
• Available Hi-Speed USB 2.0 type-A port
Package Contents
• Wireless 300N USB Adapter
- Quick install guide
- Setup CD with user manual
2 Installation Procedure
Before you proceed with the installation, notice following descriptions.
Note1: The following installation was operated under Windows XP. (Procedures are similar for Windows Vista/7.)
Note2: If you have installed the Wireless PC Adapter driver and utility before, uninstall the old version first.
I. Install the Driver and Utility
A. Insert the installation CD in your CD-ROM drive. Execute the "Setup.exe" program.
B. Select a setup language and click "Next" to proceed.
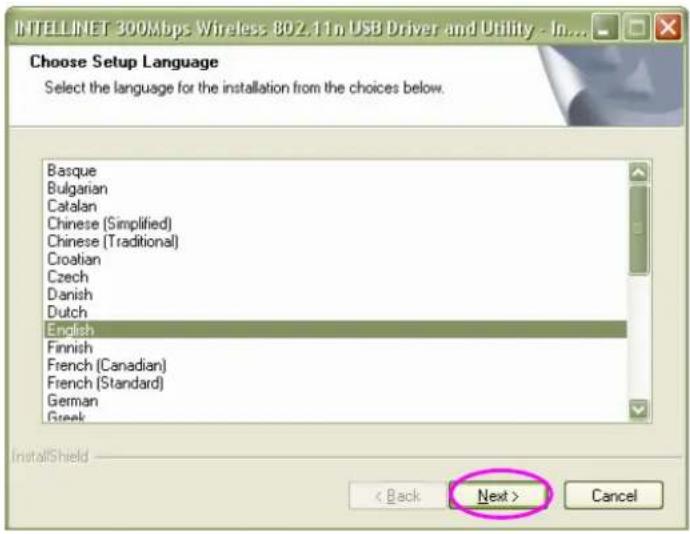
C. Click "Next" to go to the next step.

D. When you see the following screen, click "Install" to begin the installation.

E. The system starts to install the driver and utility.
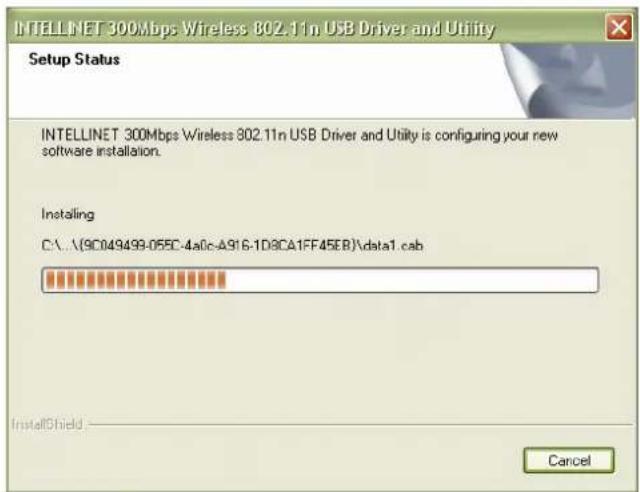
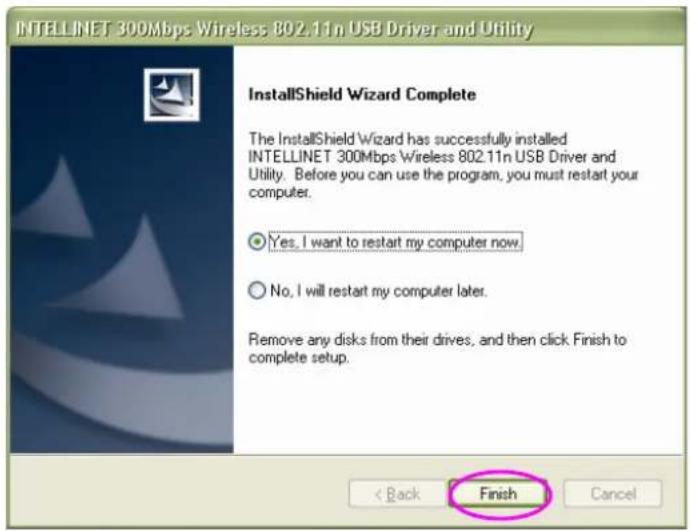
F. Click "Finish" to complete the driver and utility installation.
II. Connect to a Wireless Access Point
A. To start configuring the adapter, double-click the icon in the system tray or right-click the icon and select "Open configuration utility."

B. The utility of the adapter is displayed. Click the "Available Network" tab and double-click on the wireless access point you want to connect to.

C. Input the security setting and click "OK" to start the network connection.

* Use Windows Zero Configuration on Windows Vista/7:
A. With Windows Vista / 7, you can use Windows Zero Configuration to connect to a wireless access point.
Click "Start," then click "Control Panel." Click "Network and Internet" in the Control Panel.

B. Click "Connect to a network" under "Network and Sharing Center."

C. Click the access point you want to use if it's shown, then click "Connect."

D. If it's an unnamed access point (i.e., the SSID of this wireless access point is hidden), you'll be prompted to input its name, and the name must be identical to the SSID setting of the wireless access point you're connecting to.

E. If the access point is protected by an encryption method, you need to input its security or passphrase here. It must match the encryption setting on the access point.

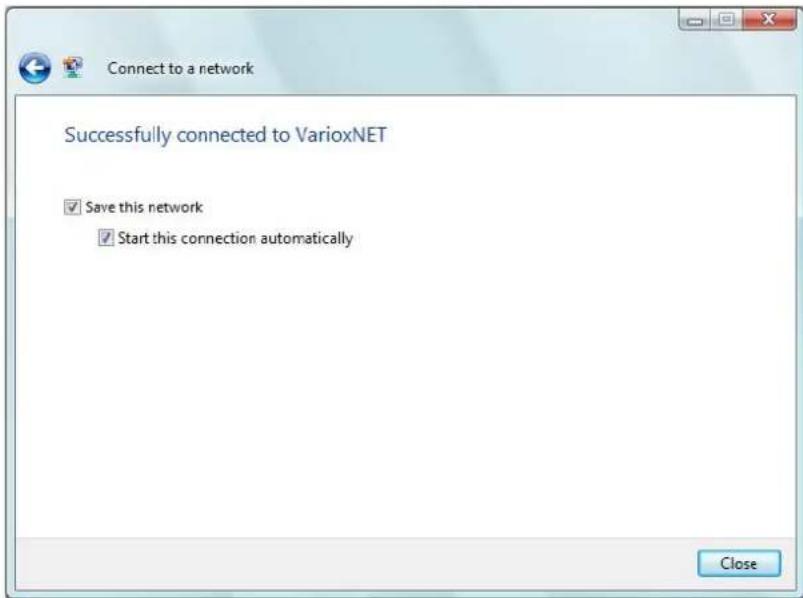
F. If you can see the screen below, the connection between your computer and wireless access point has been successfully established. Click "Close" to start the network connection.
3 Configuration Utility
The Configuration Utility is a powerful application that helps you configure the Wireless 300N USB Adapter and monitor the link status and statistics during the communication process.
The Configuration Utility appears as an icon on the system tray and desktop of Windows. You can open it by double-clicking the icon.
Right-click the icon in the system tray. There are some options for operating the configuration utility.
- Open Config Utility
Select "Open Config Utility" to open the configuration utility. - About
Select "About" to show the utility information.
- Hide
Select "Hide" to hide the utility in the system tray.
- Quit
Select "Quit" to quit the utility in the system tray.

3.1 Utility Overview
There are several parts of the utility screen. Refer to the following table for the description.

| Parameter | Description |
| A | Refresh – Refresh the adapter list in the “B” block. Mode – There are two modes: Station and Access Point. If “Station” is selected, the adapter works as a wireless adapter. If “Access Point” is selected, the adapter will works as a wireless AP.View – Enable “Status Bar” and the “D” block in the utility will display the current status of the utility.About – To check the version of the utility, select this item. |
| B | This is a list for you to configure several adapters in your PC from the utility. |
| C | Show Tray Icon – To show the icon in the system tray, select the item.Disable Adapter – This is to disable or enable the adapter.Windows Zero Config – To configure the adapter from Windows XP Zero Configuration, check the item.Radio Off – This is to turn off or turn on the radio of the adapter. If the radio is turned off, the adapter will not work. |
| D | This is the status bar that displays the current status of the utility. To close it, disable the “Status Bar” in the “View” item. |
| E | There are several tabs in the block for you to set up the functions of the adapter. Refer to the descriptions in the following sections. |
3.2 Available Network
When you open the Configuration Utility, the system will scan all the channels to find all the access points/stations within the accessible range of your adapter and automatically connect to the wireless network with the highest signal strength. From the "Available Network" tab, all the networks nearby will be listed. You can change the connection to another network.

| Parameter | Description |
| Available Network(s) | This list shows all information of the available wireless networks within the range of your adapter (SSID, Channel, Encryption, Network Authentication, Signal etc.). To connect to any network on the list, double-click the selected network. |
| Refresh | Click “Refresh” to update the available networks list. It is recommended that you refresh the list any time you have changed the connection network. |
| Add to Profile | A profile stores the settings of a network so that you can connect to the network quickly. To add the selected network to a profile, click this button. |
3.3 General
To check the connection status of the adapter, select "General." This screen shows the Link Speed, Network Type, Encryption Method, SSID, Signal Strength, Link Quality and Network Address of the adapter.

| Parameter | Description |
| Status | This shows the connection status of the adapter. |
| Speed | This shows the current speed. |
| Type | Infrastructure – This operation mode indicates the presence of an 802.11 access point. All communication is done via the access point or router.IBSS – This displays if you decided to connect to other wireless stations in the wireless LAN network without going through an access point or router. |
| Encryption | This displays the encryption setting of the current connection: None, WEP, TKIP or AES. |
| SSID | The SSID (up to 32 printable ASCII characters) is the unique name identified in a WLAN. The ID prevents the unintentional merging of two co-located WLANs. |
| Signal Strength | This indicates the wireless signal strength. |
| Link Quality | This indicates the wireless link quality. |
| Network Address | This shows the MAC, IP address and other information about the adapter. |
3.4 Profile
The "Profiles List" is for managing the networks you connect to frequently. You are able to use Add/Remove/Edit/Duplicate/Set Default to manage a profile.

| Parameter | Description |
| Available Profile(s) | This list shows the preferred networks for the wireless connection. You can add, remove, edit and duplicate the preferred networks or set one of the networks as the default connection. |
| Add/ Remove/ Edit | Click these buttons to add/ delete/ edit the selected profiles. |
| Duplicate | To build up the new profile with the same settings as the current profile, select this feature. |
| Set Default | To designate a profile as the default network for the connection from the available profiles list, click this button. |
3.4.1 Configure the Profile

| Parameter | Description |
| Profile Name | Define a recognizable profile name so you can identify different networks. |
| Network Name (SSID) | The SSID (up to 32 printable ASCII characters) is the unique name identified in a WLAN. The ID prevents the unintentional merging of two co-located WLANs.You may specify an SSID for the adapter and then only the device with the same SSID can interconnect with the adapter. |
| This is a computer-to-computer(ad hoc) network; wireless access points are not used. | There are two kinds of network type:Infrastructure – This operation mode requires the presence of an 802.11 access point. All communication is done via the access point or router.Ad Hoc – Connect to another wireless adapter in the wireless LAN network without going through an access point or router.If this is selected, the adapter will work in Ad Hoc mode. |
| Channel | This setting is only available for Ad Hoc mode. Select the radio channel used for the networking. The channel setting should be the same as the network you are connecting to. |
Network Authentication
This setting has to be consistent with the wireless networks that the adapter intends to connect.
Open System – No authentication is needed within the wireless network.
Shared Key – Only wireless stations using a shared key (WEP Key identified) are allowed to connect to each other.
WPA-PSK – This is a special mode designed for home and small business users who do not have access to network authentication servers. In this mode, known as Pre-Shared Key, the user manually enters the starting password in their access point or gateway, as well as in each wireless station in the network. WPA-PSK takes over automatically from that point, keeping unauthorized users that don't have the matching password from joining the network, while encrypting the data traveling between authorized devices.
WPA2-PSK – WPA2-PSK is also for home and small business. The difference between WPA-PSK and WPA2-PSK is that WPA2-PSK provides data encryption via AES. In contrast, WPA-PSK uses the Temporal Key Integrity Protocol (TKIP).
WPA 802.1X – WPA provides a scheme of mutual authentication using either IEEE 802.1x / Extensible Authentication Protocol (EAP) authentication or pre-shared key (PSK) technology. It provides a high level of assurance to enterprises, small businesses and home users that data will remain protected and that only authorized users may access their networks. For enterprises that have already deployed IEEE 802.1x authentication, WPA offers the advantage of leveraging existing authentication databases and infrastructures.
WPA2 802.1X – Like WPA, WPA2 supports IEEE 802.1x / EAP authentication or PSK technology. It also includes a new advanced encryption mechanism using the Advanced Encryption Standard (AES). AES is required for corporate or government users. The difference between WPA and WPA2 is that WPA2 provides data encryption via AES. In contrast, WPA uses the Temporal Key Integrity Protocol (TKIP).
WEP 802.1X – This is a special mode for using IEEE 802.1x / EAP technology for authentication and WEP keys for data encryption.
| Data Encryption | Disabled – Disable the WEP Data Encryption. |
| WEP – Enable the WEP Data Encryption. When this is selected, you need to continue setting the WEP Encryption keys. | |
| TKIP – TKIP (Temporal Key Integrity Protocol) changes the temporal key every 10,000 packets (a packet is a kind of message transmitted over a network). This ensures much greater security than the standard WEP security. | |
| AES – AES has been developed to ensure the highest degree of security and authenticity for digital information, and it is the most advanced solution defined by IEEE 802.11i for security in the wireless network. | |
| NOTE: All devices in the network should use the same encryption method to ensure proper communication. | |
| ASCII | The WEP key can be in ASCII format (alphanumeric values or signs are allowed) so it's more recognizable for users. |
| PASSPHRASE | This is a text string with a maximum of 32 alphanumeric characters; for example, “Test.” The WEP key is based on the passphrase determined by you. This passphrase may not work with other vendors' products due to possible incompatibility with other vendors' passphrase generators, so you must use the same passphrase or WEP key settings for all wireless computers within the network. |
| Key Length | When you select “WEP and “PASSPHRASE,” this function will display in the current status of the utility. The keys are used to encrypt data transmitted in the wireless network. Fill the text box by following the rules below. |
| 64-bit – Input 10-digit hex values as the encryption keys. For example: “0123456aef.” | |
| 128-bit – Input 26-digit hex values as the encryption keys. For example: “01234567890123456789abcdef.” | |
| Key Index (advanced) | Select one of the four keys to be the data encryption key. |
| Network Key | Enter the network security key ensure the password is correct. |
| Confirm Network Key | Enter the network security key again. |
EAP Type
GTC – GTC is an authentication protocol that allows the exchange of clear text authentication credentials across the network.
TLS – TLS is the most secure of the EAP protocols, but is not easy to use. It requires that digital certificates be exchanged in the authentication phase. The server presents a certificate to the client. After validating the server's certificate, the client presents a client certificate to the server for validation.
LEAP – LEAP is a pre-EAP, Cisco-proprietary protocol with many of the features of EAP protocols. Cisco controls the ability of other vendors to implement this protocol, so it should be selected for use only when limited vendor choice for client, access-point and server products is not a concern. When you have set up LEAP authentication, you need to enter the user name and password of your computer.
PEAP & TTLS – PEAP and TTLS are similar and easier than TLS in that they specify that a stand-alone authentication protocol be used within an encrypted tunnel. TTLS supports any protocol within its tunnel, including CHAP, MSCHAP, MSCHAPv2 and PAP. PEAP specifies that an EAP-compliant authentication protocol must be used; this adapter supports MD5, TLS, GTC (Generic Token Card) and MSCHAPv2.
Tunnel
Includes MD5, GTC, TLS, MSCHAP-v2.
Username
The certificate username in the RADIUS server.
Identity
User's identity in the RADIUS server.
Password
User's password in the RADIUS server.
Certificate
Select the certificate for RADIUS server authentication.
3.5 Status
This screen shows information about the manufacturer, driver version, settings of the wireless network the adapter is connecting to, linking time and link status. If you're unsure about the status of the adapter and the network you are connecting, go to the screen for more details.
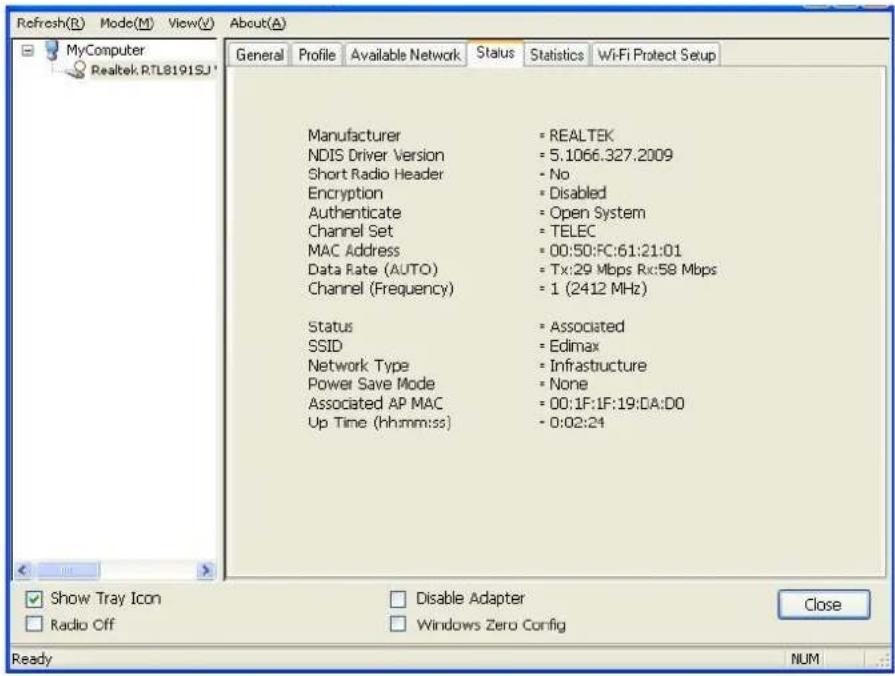
3.6 Statistics
You can get real-time information about the packet transmission and receiving status during wireless communication from this screen. To recount the statistics value, click "Reset."

3.7 Wi-Fi Protect Setup (WPS)
Wi-Fi Protected Setup (WPS) is the latest wireless network technology, which makes wireless network setup become very simple. If you have a WPS-enabled wireless access point and you want to establish a secure connection to it, you don't need to configure the wireless access point and set up data encryption by yourself. All you need to do is to go to the WPS setup page of this wireless card, click the PBC or PIN button, and then press a WPS button or enter an 8-digit code on the wireless access point you want to establish a secure connection to.

I. Pin Input Config (PIN)
- The PIN code of your wireless network card is an 8-digit number located at the upper-right position of configuration utility. Remember it, and input the number to your wireless access point as the WPS PIN code. (Refer to the user manual of your wireless access point for instructions about how to do this.)
- Click "Pin Input Config (PIN)" and the following message will appear on your computer. Click "Yes" to select a specific wireless access point or click "No" to start PIN method of WPS.
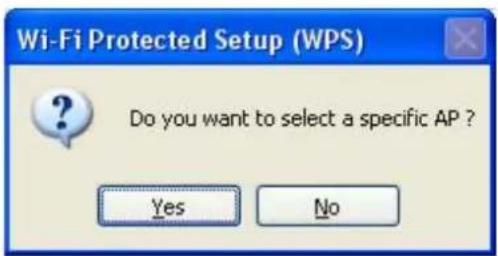
- If you click "Yes" and the following message appears on your computer, select the SSID of the wireless access point that you want to connect to and click "Select."
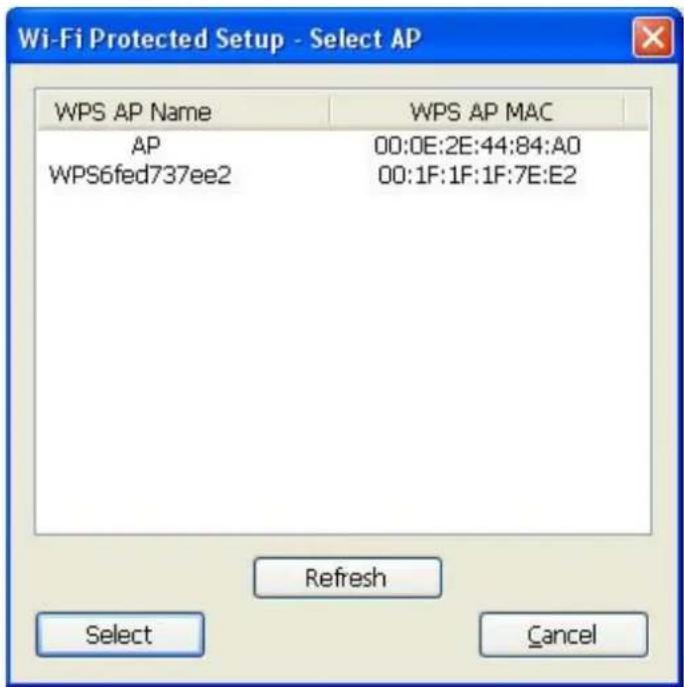
- You'll need to wait up to two minutes while the install procedure runs. If a wireless access point with the correct PIN code is found, you'll be connected to that access point.

II. Push Button Config (PBC)
- Start the PBC pairing procedure on the access point side (refer to the instructions given by your access point's manufacturer), then click "PBC" in the wireless configuration utility to start to establish a wireless connection by WPS. (This may require up to a minute to complete.)
![Wi-Fi Protected Setup - PBC method If there is more then one AP on the PBC mode, there will be [Session Overlap].Please using PIN method or wait for a while push the button again. Status : Initial WPS ... Complete : Push Button Config (PBC) Cancel](/content/2026/05/1059492/images/3d359032c5b209d946211fd8bfa3bca6d6ed34b4c824127ce862cdad908425dd.jpg)
- When the connection between is successfully established via WPS, information about the access point you connected to will be displayed.

3.8 Software AP
This adapter can run as a wireless AP. The relative configurations of the AP (channel, SSID, WEP encryption and so on) are described below.

| Parameter | Description |
| SSID | The SSID (up to 32 printable ASCII characters) is the unique name identified in a WLAN. The ID prevents the unintentional merging of two co-located WLANs.The default SSID of the AP is Full Computer Name + “_AP”. Wireless adapters connecting to the AP should set up the same SSID as the AP. |
| BSSID | This is the MAC address of the adapter. |
| Associate Table | All the wireless adapters connected to the software AP will be displayed in the list. |
| Config | Click “Config” for further configuration of the AP. |
3.8.1 AP Properties Setting
Refer to Section 3.4.1 for the setting of the parameters for the AP. Note that Ad Hoc mode is not enabled for the AP.

3.8.2 AP Advanced

| Parameter | Description |
| Beacon Interval | This specifies the duration between beacon packets (milliseconds). The range for the beacon period is 20-1000 milliseconds, with a typical value of 100. |
| DTIM Period | This determines the interval the access point will send its broadcast traffic. Default value is 3 beacons. |
| Preamble | The preamble defines the length of the CRC block for communication among the wireless stations. There are two modes: Long and Short. High network traffic areas should use the shorter preamble type. |
| Set Defaults | Click to return all settings to default values. |
| Apply | Confirm the settings on the “Advanced” screen. |
3.8.3 AP Statistics
You can get real-time information about the packet transmission and receiving status during wireless communication from this screen. To recount the statistics value, click "Reset."

3.8.4 ICS
To connect to the Internet through this SoftAP, you need to make a bridge between SoftAP and your Internet connection. Select the Internet connection in your SoftAP host machine and click "Apply."

Reference Terminology
1. What is the IEEE 802.11g standard?
802.11g is the new IEEE standard for high-speed wireless LAN communications that provides for up to 54 Mbps data rate in the 2.4 GHz band. 802.11g is quickly becoming the next mainstream wireless LAN technology for home, office and public networks. 802.11g defines the use of the same OFDM modulation technique specified in IEEE 802.11a for the 5 GHz frequency band and applies it in the same 2.4 GHz frequency band as IEEE 802.11b. The 802.11g standard requires backward compatibility with 802.11b.
The standard specifically calls for:
A. A new physical layer for the 802.11 Medium Access Control (MAC) in the 2.4 GHz frequency band, known as the extended rate PHY (ERP). The ERP adds OFDM as a mandatory new coding scheme for 6, 12 and 24 Mbps (mandatory speeds), and 18, 36, 48 and 54 Mbps (optional speeds). The ERP includes the modulation schemes found in 802.11b, including CCK for 11 and 5.5 Mbps and Barker code modulation for 2 and 1 Mbps.
B. A protection mechanism called RTS/CTS that governs how 802.11g devices and 802.11b devices interoperate.
2. What is the IEEE 802.11b standard?
The IEEE 802.11b Wireless LAN standard subcommittee, which formulates the standard for the industry. The objective is to enable wireless LAN hardware from different manufacturers to communicate.
3. What does IEEE 802.11 feature support?
The product supports the following IEEE 802.11 functions:
• CSMA/CA plus Acknowledge Protocol
• Multi-Channel Roaming
• Automatic Rate Selection
- RTS/CTS Feature
- Fragmentation
• Power Management
4. What is infrastructure?
An integrated wireless and wired LAN is called an infrastructure configuration. Infrastructure is applicable to enterprise scale for wireless access to central database, or wireless application for mobile workers.
5. What is BSSID?
A specific ad hoc LAN is called a Basic Service Set (BSS). Computers in a BSS must be configured with the same BSSID.
6. What is WEP?
WEP is Wired Equivalent Privacy, a data privacy mechanism based on a 40-bit shared key algorithm as described in the IEEE 802.11 standard.
7. What is TKIP?
TKIP is a quick-fix method to quickly overcome the inherent weaknesses in WEP security, especially the reuse of encryption keys.
8. What is AES?
AES (Advanced Encryption Standard), a chip-based security, has been developed to ensure the highest degree of security and authenticity for digital information, wherever and however communicated or stored, while making more efficient use of hardware and/or software than previous encryption standards. It is also included in IEEE 802.11i standard.
- WIRELESS 300N USB ADAPTER
- USER MANUAL
- INTELLINET™
- Federal Communications Commission Interference Statement
- FCC Caution
- Federal Communications Commission (FCC) Radiation Exposure Statement
- R&TTE Compliance Statement
- Safety
- EU Countries Intended for Use
- Contents
- Introduction .... 1
- Installation Procedure.... 3
- Configuration Utility....9
- Introduction
- Features
- Specifications
- Standards:
- General
- - Security:
- - Receive sensitivity:
- LEDs
- Environmental
- System Requirements
- Package Contents
- Installation Procedure
- Install the Driver and Utility
- Connect to a Wireless Access Point
- Configuration Utility
- Utility Overview
- Available Network
- General
- Profile
- Configure the Profile
- EAP Type
- Tunnel
- Username
- Identity
- Password
- Certificate
- Status
- Statistics
- Wi-Fi Protect Setup (WPS)
- Pin Input Config (PIN)
- Push Button Config (PBC)
- Software AP
- AP Properties Setting
- AP Advanced
- AP Statistics
- ICS
- Reference Terminology
- What is the IEEE 802.11g standard?
- What is the IEEE 802.11b standard?
- What does IEEE 802.11 feature support?
- What is infrastructure?
- What is BSSID?
- What is WEP?
- What is TKIP?
- What is AES?
Brand : Intellinet
Model : 525206
Category : Wi-Fi Antenna