
SP6PW - Loudspeaker Speco Technologies - Free user manual and instructions
Find the device manual for free SP6PW Speco Technologies in PDF.


| Product Type | Speaker |
| Brand | Speco Technologies |
| Model | SP6PW |
| Woofer Size | 6.5 inches |
| Tweeter Type | 1-inch silk dome |
| Power Handling (RMS) | 50 Watts |
| Power Handling (Peak) | 100 Watts |
| Impedance | 8 ohms |
| Frequency Response | 50 Hz - 20 kHz |
| Sensitivity | 90 dB |
| Dimensions (H x W x D) | 12 x 8 x 7 inches (305 x 203 x 178 mm) |
| Weight | 8.5 lbs (3.9 kg) |
| Enclosure Material | MDF with vinyl finish |
| Grille | Removable cloth grille |
| Connectors | Spring-loaded terminals |
| Mounting Options | Bookshelf or wall-mount (bracket not included) |
| Power Source | Passive (requires external amplifier) |
| Recommended Amplifier Power | 20-100 Watts per channel |
| Cleaning Instructions | Wipe with a dry, soft cloth; do not use water or solvents |
| Safety Precautions | Do not expose to moisture or direct sunlight; ensure stable placement |
| Spare Parts Available | Grille, binding posts, internal components (contact support) |
| Warranty | 2 years limited (check Speco Technologies website) |
Frequently Asked Questions - SP6PW Speco Technologies
User questions about SP6PW Speco Technologies
0 question about this device. Answer the ones you know or ask your own.
Ask a new question about this device
Download the instructions for your Loudspeaker in PDF format for free! Find your manual SP6PW - Speco Technologies and take your electronic device back in hand. On this page are published all the documents necessary for the use of your device. SP6PW by Speco Technologies.
USER MANUAL SP6PW Speco Technologies
SP6PB/SP6PW/SP6PTB/SP6PTW
6" Pendant Mount Speaker with Optional Ground or Wall Mount
Thank you for your choice of Speco Technologies' SP6P combination speaker. This unit is designed and manufactured to provide an extremely versatile solution for background music and paging. Out of the box, the SP6P is a pendant speaker. With the optional mounting kits, the speaker can also be mounted on a wall or in the ground as a landscape speaker.

SPEAKER FEATURES:
1) Transformer Dial to determine speaker power (Only on SP6PTB and SP6PTW). Use a flat-edged screwdriver and turn until the left end of the groove points towards the power value you desire. Options are 32W, 16W, 8W, 4W, and 8 Ohms. For all settings but 8 Ohms use a 70 or 25V amplifier (depending on what you set #3 to). For 8 Ohms, use an 8 Ohms amplifier.
2) Socket for pendant mount eye-bolt. Eye-bolt should be inserted through Speaker Top A described below.
3) Transformer selection switch (Only on SP6PTB and SP6PTW). Alternate between 70V and 25V. This switch should never be used while speaker is live on an amplifier. Connecting the speaker to the wrong amplifier could damage your speaker or amplifier.
4) Speaker terminal (phoenix connector). Use this to connect to your amplifier and to another speaker. Please consult an expert if you are not familiar with proper wiring practices.
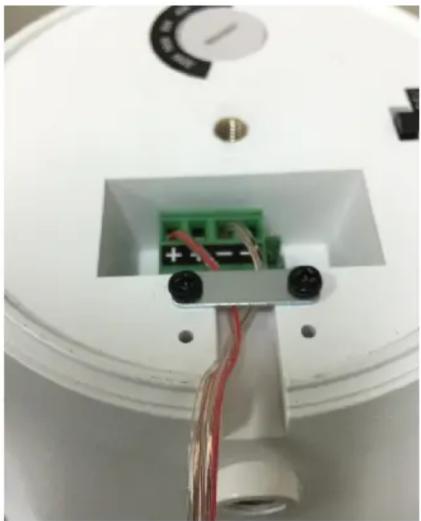
5) Landscape/Wall-mount wire channel. Insert speaker wire under metal bar to fortify installation.
INSTALLATION INSTRUCTIONS:
1) All speaker adjustments must be made either before connection to amplifier or while amplifier is off to avoid potential damage to equipment.
2) If you have the SP6PTB or SP6PTW, select first which voltage you are using via the switch described in #3 above. Then, select the speaker wattage you want via the dial described in #1 above.
3) If you have the SP6PB or SP6PW, no adjustments are necessary.
4) There are two speaker tops that come in your package. The difference is easily identifiable as one will have a built-in screw (B), and one has two openings (A). (Pictured right)
5) Top A is the top you will use if you did not purchase the optional mounting kit and wish to pendant mount the speaker. To install with top A, you will need to run your speaker wire through the top prior to connecting to the phoenix connector. Connect the positive wire running from your amp or adjacent speaker to one of the (+) terminals on the connector. Connect the negative wire running from your amp or adjacent speaker to one of the (-) terminals on the connector. If you are daisy-chaining 70V/25V speakers, use the second (+) and (-) terminals to connect to that speaker and repeat. (Pictured following page)

natural_image
Two white plastic cups labeled A and B, each with a central hole and crosshair lines (no text or symbols on the cups themselves)
natural_image
White circular device with green terminal blocks and red wires, no visible text or symbols6) Place the phoenix connector into the cradle on the top of the speaker. Make sure it's firmly connected.
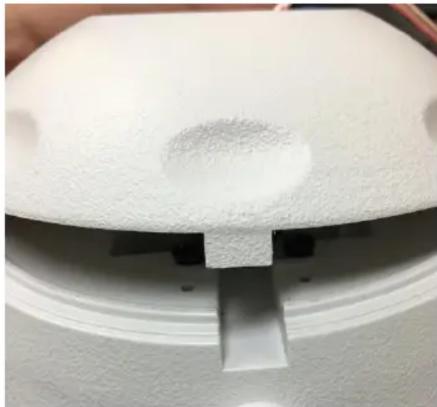
7) Line up top A so that the notch on the top meets the cutout on the speaker. (Pictured below)
natural_image
Close-up of a white plastic component with a circular hole and a rectangular slot, no visible text or symbols.8) The pendant mount eye-bolt will come with a nut and locking washer (Pictured below). Tighten the nut to the top and place the washer underneath.

natural_image
Close-up of a metallic hook with threaded fastener and bolted end (no text or symbols visible)9) Place the eye-bolt in the hole in the center of top A and screw all the way until you meet resistance. Tighten carefully at that point until you can no longer tighten the bolt. (Pictured below) Your speaker is ready to hang. Be sure the chain running to the building structure is strong enough to support the speaker and securely fastened.

natural_image
Close-up of a metallic hook attached to a white dome-shaped object with a copper wire, against a wooden background (no text or symbols visible)
natural_image
Close-up of a metallic ring-shaped object mounted on a white pedestal, with a copper cable inserted (no text or symbols visible)10) If you purchased SP6PMNT (Black Ground Mount/White Wall Mount) or SP6PMNTB (Black Ground Mount/Black Wall Mount), you will use top B. This time, you want to mount the speaker wire under the metal bar in #5 pictured above and run it through the speaker wire channel. (Pictured Below)
natural_image
Close-up of a white circular device with internal components and wiring, no visible text or symbols11) Top B is very easy to attach. Just insert the built-in screw into the hole in the center of the top of the speaker and spin until tight. (Pictured Below) Specific instructions for connecting the mounting accessories are included with the mounting kits.

natural_image
Close-up of a white electronic device showing a component being inserted into a wire, with no visible text or symbols.SPECIFICATIONS:
• Power: 32W RMS, 64W Max
• Frequency Response: 98Hz \~20kHz
• Transformer (SP6PTW and SP6PTB only): Selectable 70/25V transformer with settings of 32W, 16W, 8W, 4W & 8 Ohms
• Sensitivity: 88dB (1W/1M)
• Termination Type: Phoenix connector
- Dimensions: 8.1" (Diameter) x 12.6" (H)
• Weight: 7 pounds
- Optional ground and wall mount kits:
- SP6PMNT – Black ground mount with white wall mount
- SP6PMNTB – Black ground mount with black wall mount
WARRANTY INFORMATION:
We warranty this product to be free from any manufacturing or material defects for 5 years from date of purchase.
This warranty will not extend to any products which have been subjected to misuse, neglect, accident, or improper installation, used in violation of instructions furnished by us; or to units which have been repaired or altered outside of the factory. This limited warranty does not apply to broken cases, batteries, or other physically damaged parts. If a Speco Technologies product is purchased from an unauthorized distributor or other source, including RETAILERS, MAIL ORDER SELLERS and ONLINE SELLERS, it will not be honored or serviced under existing Speco Technologies warranty policy. Any sale of products by an unauthorized source or other manner not authorized by Speco Technologies will void the warranty on the applicable product.
Upon request by customer, Speco Technologies (“The Company”) will, at customer’s expense, repackage merchandise in new cartons, replace missing accessories, and return in resalable condition. Unless requested, the company will replace and return all merchandise in the packaging in which it was received. This warranty is in lieu of all expressed warranties, expressed or implied, and of all obligations or liability on our part, and we neither assume nor authorize any representative or other person to assume for us any obligation or liability. In no event shall we be liable for incidental or consequential damages arising from the use of the product, or for any delay in the use of this product due to causes beyond our control. Some states do not allow limitations of how long an implied warranty lasts and/or do not allow the exclusion or limitation of consequential damages. The above limitations on implied warranty and consequential damages may not apply to you. This warranty gives you specific legal rights. You may have other rights which vary from state to state. This limited warranty extends to products listed in the company’s current price schedule.
Speco Technologies is constantly developing and improving products.
We reserve the right to modify product design and specifications without notice and without incurring any obligation.
Speco Technologies . 200 New Highway . Amityville . NY . 11701 . www.specotech.com
Brand : Speco Technologies
Model : SP6PW
Category : Loudspeaker