
BoaPod TR-050 - Tripod Carson - Free user manual and instructions
Find the device manual for free BoaPod TR-050 Carson in PDF.

| Brand | Carson |
| Model | BoaPod TR-050 |
| Type | Tripod |
| Max Height | Approx. 150 cm (59 inches) |
| Min Height | Approx. 50 cm (20 inches) |
| Folded Length | Approx. 55 cm (22 inches) |
| Weight | Approx. 1.2 kg (2.6 lbs) |
| Max Load Capacity | Approx. 3 kg (6.6 lbs) |
| Head Type | 3-Way Pan/Tilt Head |
| Quick Release Plate | Yes, included |
| Bubble Level | Yes, on head |
| Leg Sections | 3 sections with flip locks |
| Material | Aluminum alloy legs, plastic head |
| Mounting Thread | Standard 1/4-inch screw |
| Rubber Feet | Yes, non-slip |
| Compatibility | Most compact cameras, camcorders, and smartphones (with adapter) |
| Power Source | None (manual operation) |
| Maintenance | Wipe clean with dry cloth; avoid moisture |
| Safety | Do not exceed max load; use on stable, level surface |
| Spare Parts & Repairability | Contact Carson customer service for replacement parts |
| General Information | Suitable for indoor and outdoor photography; lightweight and portable |
Frequently Asked Questions - BoaPod TR-050 Carson
User questions about BoaPod TR-050 Carson
0 question about this device. Answer the ones you know or ask your own.
Ask a new question about this device
Download the instructions for your Tripod in PDF format for free! Find your manual BoaPod TR-050 - Carson and take your electronic device back in hand. On this page are published all the documents necessary for the use of your device. BoaPod TR-050 by Carson.
USER MANUAL BoaPod TR-050 Carson
natural_image
Black-and-white photo of a DSLR camera with adjustable arm and tripod (no text or symbols visible)TR-050
Congratulations on selecting your new BoaPod™ flexible leg tripod! In order to achieve optimum performance, please follow instructions for proper use and care.
PRODUCT SPECIFICATION:
| Max Load: | 2.64 lbs. |
| Weight: | 0.71 lbs. |
| Dimensions: | 2.2" x 2.4" x 12.2" |
| Accessories: | Smartphone Adapter |

Smartphone

Action cam

Camera

Ipad
SETTING UP BOAPOD:
Important: Make sure BoaPod™ is level and steady before mounting any optic to it.
- The BoaPod™ can be set up as a traditional tripod.

natural_image
Line drawing of a tripod-mounted surveying instrument with adjustable legs and handle (no text or symbols)Includes Smartphone Adapter & Remote Shutter Button
- Twist tripod legs into any position. Wrap it around a pole or branch, hang from a fence or place on an uneven surface (Fig. 1-2).

natural_image
Diagram of a mechanical linkage with coiled cable and clamps, labeled Fig. 1 (no text or symbols on the diagram itself)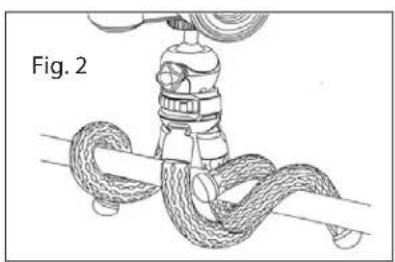
natural_image
Diagram of a rope knot being tied with a valve, labeled Fig. 2 (no text or symbols on the diagram itself)- The flexible legs can also be positioned to become a table stand for your tablet or book.

natural_image
Line drawing of a tablet device with a coiled cable strap (no text or symbols)MOUNTING OPTIC TO BOAPOD:
IMPORTANT:
- Do not exceed max load capacity of tripod.
- Remove optic before setting up, taking down, adjusting or transporting your tripod.
- Make sure optic is securely fastened to tripod.
- Do not over-tighten locks as this may damage the locking mechanisms.
MOUNTING OPTIC TO BOAPOD:
Comes with a removable 360° fluid ball head with ¼ universal mounting screw.
For Use With Ball Head:
Screw optic, camera or adapter to thread on top of ball head until tight. To adjust position of ball head, loosen lock by turning counter-clockwise (Fig. 3). Rotate ball head as desired (Fig. 4) and tighten securely.

natural_image
Technical line drawing of a mechanical device with a labeled section 'Fig. 3' (no other text or symbols)
natural_image
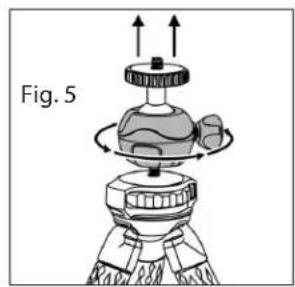
Illustration of a surveying instrument with tripod base and lever mechanism (no text or symbols)For Use Without Ball Head:
Ball head can be removed by twisting counter-clockwise (Fig. 5). You can then mount optic, camera or adapter directly to tripod. Turn circular knob counter clockwise to tighten (Fig. 6). To remove, turn circular knob clockwise.
natural_image
Diagram of a mechanical device with rotating components and upward arrows, labeled Fig. 5 (no text or symbols on the diagram itself)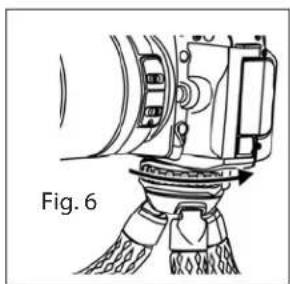
natural_image
Technical line drawing of a mechanical device with no visible text or symbolsUSING PHONE ADAPTER:
- Pull open smartphone adapter and attach to back of phone.

natural_image
Diagram of a smartphone with a lock mechanism and indicator lights (no text or symbols)- Thread adapter onto top of ball head until tight.

natural_image
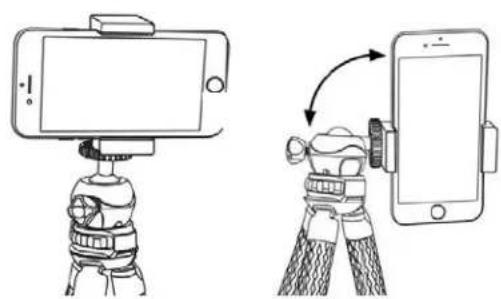
Line drawing of a portable gas stove with a mounted device and a base, showing no text or symbols.- Phone can be in either landscape (Fig. 7) or portrait position (Fig. 8) using ball head.
Fig. 7 Fig. 8
natural_image
Illustration of a smartphone mounted on a tripod with a camera rig, showing the correct and incorrect states of the device (no text or symbols present)USING REMOTE SHUTTER BUTTON:
Enable Bluetooth function on your smartphone. Use On/Off switch on the side of the remote shutter button to turn on. A light will flash to indicate it's on. A code will pop up on your smartphone "My Devices" list. Select connect. Remote will now act as the shutter button for your smartphone. To take photos, press camera icon. To take a quick video, press and hold camera icon until done. For longer videos, switch to video mode on your smartphone and press camera icon to start/stop video. Shutter button comes with CR2032 lithium battery installed and ready to use. Turn off remote to conserve battery when not in use.
If your remote shutter button does not have an on/off switch, press and hold center button till light flashes. A code will pop up on your smartphone "My Devices" list. Select connect. Remote will now act as the shutter button for your smartphone. To take photos, press camera icon. To take videos, switch to video mode on your smartphone and press camera icon to start/stop video. Shutter button comes with CR2032 lithium battery installed and ready to use. To turn off, hold center button till light flashes.

natural_image
Simple line drawing of a stylized open button with a camera icon and arrow (no text or symbols)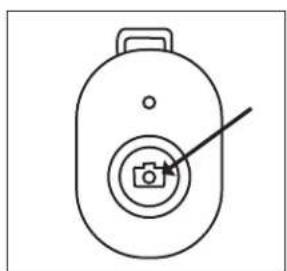
natural_image
Simple line drawing of a device with a camera icon and pointer (no text or symbols)Customer Service: If you experience any difficulties please contact us and we will be happy to help you.

info@carson.com

uksupport@carson.com eusupport@carson.com

For warranty information, visit www.carson.com/warrant
www.carson.com
Carson Optical 2070 5th Avenue, Ronkonkoma, NY 11779 | Tel: 631-963-5000

Brand : Carson
Model : BoaPod TR-050
Category : Tripod