
MK-F800 - Food processor PANASONIC - Free user manual and instructions
Find the device manual for free MK-F800 PANASONIC in PDF.

User questions about MK-F800 PANASONIC
0 question about this device. Answer the ones you know or ask your own.
Ask a new question about this device
Download the instructions for your Food processor in PDF format for free! Find your manual MK-F800 - PANASONIC and take your electronic device back in hand. On this page are published all the documents necessary for the use of your device. MK-F800 by PANASONIC.
USER MANUAL MK-F800 PANASONIC
natural_image
Line drawings of various kitchen appliances including a blender, blender, and fan (no text or symbols)Food Processor (Household Use)
Thank you for purchasing the Panasonic product.
• This product is intended for household use only.
- Please read these instructions carefully in order to use this product correctly and safely.
- Before using this product please give your special attention to the section "SAFETY PRECAUTIONS" (Page GB3-GB5).
- Please keep this Operating Instructions for future use.
SAFETY PRECAUTIONS GB3 - GB5
IMPORTANT INFORMATION......GB6
ELECTRICAL REQUIREMENT GB7
PART NAMES......GB8 - GB9
SAFETY LOCK....GB10
CIRCUIT BREAKER AND TEMPERATURE SENSOR PROTECTION......GB10
DISASSEMBLY & ASSEMBLY
(i) DISASSEMBLY FROM PACKAGED CONDITION...... GB11
(ii) KNIFE BLADE • KNEADING BLADE • WHIPPING BLADE • GRATING BLADE...... GB11
(iii) SLICING BLADES • SHREDDING BLADES • JULIENNE BLADE .... GB12
(iv) CITRUS PRESS......GB12
(v) SALAD DRAINER GB13
FOOD PROCESSOR
(i) KNIFE BLADE......GB14 - GB16
- Preparation of Ingredients
- How to Use
(ii) SLICING BLADES • SHREDDING BLADES • JULIENNE BLADE ....GB17 - GB18
- Preparation of Ingredients
- How to Use
(iii) KNEADING BLADE......GB19
- Preparation of Ingredients
- How to Use
(iv) WHIPPING BLADE GB20
- Preparation of Ingredients
- How to Use
(v) GRATING BLADE ....GB21
- Preparation of Ingredients
- How to Use
(vi) SALAD DRAINER GB22
- Preparation of Ingredients
- How to Use
(vii) CITRUS PRESS....GB23
- Preparation of Ingredients
- How to Use
BLENDER
(i) BLENDER GB24 - GB25
- Disassembly & Assembly
- Preparation of Ingredients
- How to Use
DRY MILL
(ii) DRY MILL....GB26 - GB27
- Disassembly & Assembly
- Preparation of Ingredients
- How to Use
AFTER USE GB28 - GB29
TROUBLESHOOTING GB30 - GB31
SPECIFICATIONS......GB33
SAFETY PRECAUTIONS (Make sure to follow these instructions)
In order to prevent accidents or injuries to the user, other people and damage to property, please follow the instructions below.
■ The following indication indicates the degree of damage caused by incorrect operation.

WARNING
Indicates serious injury or death.

CAUTION
Indicates risk of injury or property damage.
■ The symbols are classified and explained as follows.

This symbol indicates prohibition.

This symbol indicates requirement that must be followed.
! WARNING

- Do not damage the Cord or the Plug.
(It may cause electric shock, or fire caused by short circuit.)
- Do not use the appliance if the Cord or the Plug is damaged or the Plug is loosely connected to the outlet.
(It may cause electric shock, or fire caused by short circuit.)
If the Cord is damaged, it must be replaced by the manufacturer, its service center or similarly qualified persons in order to avoid a hazard.
- Do not plug or unplug the Plug with wet hands.
(It may cause electric shock.)
- Do not exceed outlet voltage or use an alternate current other than that specified on the appliance.
(It may cause electric shock or fire.)
- Make sure the voltage supplied to the appliance is the same as your local supply.
- Plugging other devices into the same outlet may cause over-heating.
- Do not immerse the Motor Housing in water or splash it with water.
(It may cause electric shock, or fire caused by short circuit.)
- Do not dismantle, repair or modify the appliance.
(It may cause fire, electric shock or injury.)
→ Please contact your service center for repairing.
- Do not insert any objects into the vent or the gap.
(It may cause electric shock or malfunction.)
- Especially metal objects such as pins or wires.
- Do not replace any parts of appliance with non-genuine spare parts.
(It may cause injury, electric shock or fire.)
- Do not try to remove the Lid when the appliance is still operating.
(It may cause injury.)
- Do not use hot water (over 60 °C) for cleaning purpose or fire to dry the appliance.
(It may cause burning or malfunction.)
! WARNING

- Do not place hot ingredients (over 60 °C) into the Bowl or the Blender Jug. (It may cause injury or malfunction.)
- Do not operate without the Blender Lid in place correctly for the Blender Jug.
(It may cause injury.)
- Do not put your finger or utensils such as spoon, fork etc. into the Bowl or the Blender Jug during operation.
(It may cause injury, electric shock, or fire caused by short circuit.)
- Do not push the Safety Pin and Safety Lever with any instruments, stick etc. as the appliance might be on.
(It may cause injury.)

● This appliance shall not be used by children.
Keep the appliance and its cord out of reach of children. Appliances can be used by persons with reduced physical, sensory or mental capabilities or lack of experience and knowledge if they have been given supervision or instruction concerning use of the appliance in a safe way and if they understand the hazards involved.
Children shall not play with the appliance.
(It may cause burning, injury or electric shock.)
- Insert the Plug firmly.
(Otherwise it may cause electric shock and fire caused by the heat that may generate around the Plug.)
● Clean the Plug regularly.
(A soiled Plug may cause insufficient insulation due to moisture, and may cause fire.)
- When abnormal operation or breaking down occurs, discontinue the appliance operation immediately and unplug.
(It may cause smoke, fire or electric shock.)
e.g. during abnormal operation or breaking down.
- The Plug and the Cord becomes abnormally hot.
- The Cord is damaged or there has been a power failure.
- The Motor Housing is deformed or abnormally hot.
→ Please unplug the appliance immediately and contact the service centre for advice or a repair.
● Make sure to hold the Plug when unplugging the Plug, i.e. never pull on the Cord.
(Otherwise it may cause electric shock, or fire caused by short circuit.)
- Be careful if hot liquid is poured into the Bowl or Blender Jug as it can be ejected out of the appliance due to a sudden steaming.
(It may cause burning.)
! CAUTION

- Do not leave the appliance unattended when it is in operation.
(It may cause fire or burns.)
- When leaving the appliance unattended, turn the power off.
● Do not use the appliance in the following places:
- Any uneven surface, on non-heat resistant carpet or table cloth etc. (It may cause fire or injury.)
- In a location where there is risk of the appliance being splashed with water, or near a heat source.
(It may cause electric shock or current leakage.)
- Do not process more than the maximum capacity marked on each container respectively. Follow the recommended ingredient amount for processing. (It may cause injury.)
- Do not continue operation for a long time. It is recommended to rest the appliance after a certain operating time.
(It may cause burns.)
| Function | Operating Time (minutes) | Rest Time (minutes) |
| Food Processor | 2 | 4 |
| Blender | 2 | 2 |
| Dry Mill | 1 | 2 |
* With exception for the stated "Ingredient Preparations" in this Operating Instruction.

● Always disconnect the appliance from the supply if it is left unattended and before assembling, disassembling or cleaning.
(Otherwise it may cause electric shock, or fire caused by current leakage.)
- Remove the Bowl, the Blender Jug and the Mill Container before lift up the Motor Housing from the table.
(It may cause injury.)
- Switch off the appliance and disconnect it from power supply before changing accessories or approaching parts that are moving during operation.
(It may cause injury.)
- When carrying the appliance, be sure to hold the Motor Housing with both hands. Do not carry it by holding only the Bowl or Blender Jug or Mill Container.
(It may cause injury.)
- If the Blender Cutting Blade gets stuck, switch off the Blender, then unplug. Do not insert your finger into the Blender Jug. Use a rubber spatula to remove the ingredients that are blocking the Blender Cutting Blade.
(It may cause injury.)
● Care should be taken when handling the sharp cutting blades, emptying the Bowl or Blender Jug and cleaning. (e.g. Knife Blade, Slicing Blades and etc.) (It may cause injury.)
IMPORTANT INFORMATION
- Do not place the appliance in the following places.
- In a location where the appliance being expose to excessive moisture, temperature or direct sunlight.
(It may cause malfunction.) - Any high or low temperature location such as fridge, freezer, microwave or oven.
(It may cause malfunction or breakage.)
- Do not process hard ingredients (e.g. hard meat, meat with bones) or viscous material.
(It may cause malfunction.)
Prohibited Ingredients:
| Attachments | Description |
| Knife Blade | Hard ingredients, viscous ingredients, e.g. coffee beans, dried soyabeans, frozen food, dried squid, and etc. |
| Slicing Blades, Shredding Blades and Julienne Blade | Ingredients with high hard fiber concentrations, viscous ingredients, ingredients that are too soft, e.g. hard vegetables, frozen food, ham, turmeric, ginger, lettuce, tomato, peach, chocolate and etc. |
| Kneading Blade | Ingredients not suited for dough making, e.g. meat, vegetables, nuts, sauces, spreads. |
| Whipping Blade | Any other ingredients aside from egg whites and fresh cream. |
| Grating Blade | Viscous ingredients, ingredients with high hard fiber concentrations, ingredients that are too small and thin, e.g. yam, celery, leek, pine nuts, and etc. |
| Salad Drainer | Large chunky ingredients, ingredients that are soft and fragile, e.g. large carrot or potato chunks, tomato, tofu, pasta, noodle, and etc. |
| Citrus Press | Any other ingredients aside from citrus fruits, e.g. apple, kiwi and etc. |
| Blender | Hard ingredients, highly sticky ingredients, ingredients with low water content, e.g. turmeric, dried soyabeans, frozen food, meat, fish, boiled potatoes, or just ice cubes. |
| Dry Mill | Hard nuts, dried fruit, ingredients with high hard fiber concentration, moist ingredients, liquids, e.g. various nuts, raisins, meat, vegetables, boiled egg, turmeric, and etc. |
Before Use:
Always operate the appliance on a clean, dry, flat, hard and smooth surface, and clean the Rubber Foot (P.GB8) before use to ensure that the Rubber Foot suction is at optimum performance.
Electrical Requirement (For UK market only)
FOR YOUR SAFETY PLEASE READ THE FOLLOWING TEXT CAREFULLY.
This appliance is supplied with a moulded three pin mains plug for your safety and convenience. A 13-amp fuse is fitted in this plug. Should the fuse need to be replaced please ensure that the replacement fuse has a rating of 13-amp and that it is approved by ASTA or BSI to BS1362.
Check for the ASTA mark A\$A or the BSI mark on the body of the fuse. If the plug contains a removable fuse cover, you must ensure that it is refitted when the fuse is replaced. If you lose the fuse cover, the plug must not be used until a replacement cover is obtained.
A replacement fuse cover can be purchased from your local Panasonic Dealer.
If the fitted moulded plug is unsuitable for the socket outlet in your home, then the fuse should be removed and the plug cut off and disposed of safety.
There is a danger of severe electrical shock if the cut off plug is inserted into any 13-amp socket.
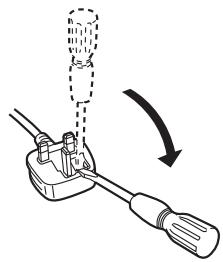
How to replace the fuse
The location of the fuse differs according to the type of AC mains plug (figures A and B).
Confirm the AC mains plug fitted and follow the instructions below.
Illustrations may differ from actual AC mains plug. Open the fuse cover with a screwdriver and replace the fuse and close or attach the fuse cover.
Figure A
natural_image
Diagram of a mechanical device with a lever and handle, showing a rotating arrow (no text or symbols)Figure B
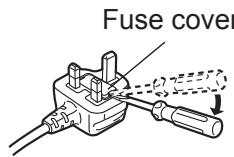
PART NAMES
Food Processor
-
Food Pusher
-
Feeding Tube
-
Bowl Lid
-
Knife Blade
-
Grating Blade
-
Kneading Blade
-
Whipping Blade
-
Drainer Cover
-
Salad Drainer
-
Blade Stand
-
Fine Shredding Blade
-
Coarse Shredding Blade
-
Thin Slicing Blade
-
Thick Slicing Blade
-
Julienne Blade
-
Citrus Cone
-
Citrus Strainer
-
Bowl
-
Drive Shaft
-
Motor Housing
-
Power Switch
-
Rubber Foot
-
Cord
-
*Plug
*The shape of the Plug may vary from illustration.
GB8
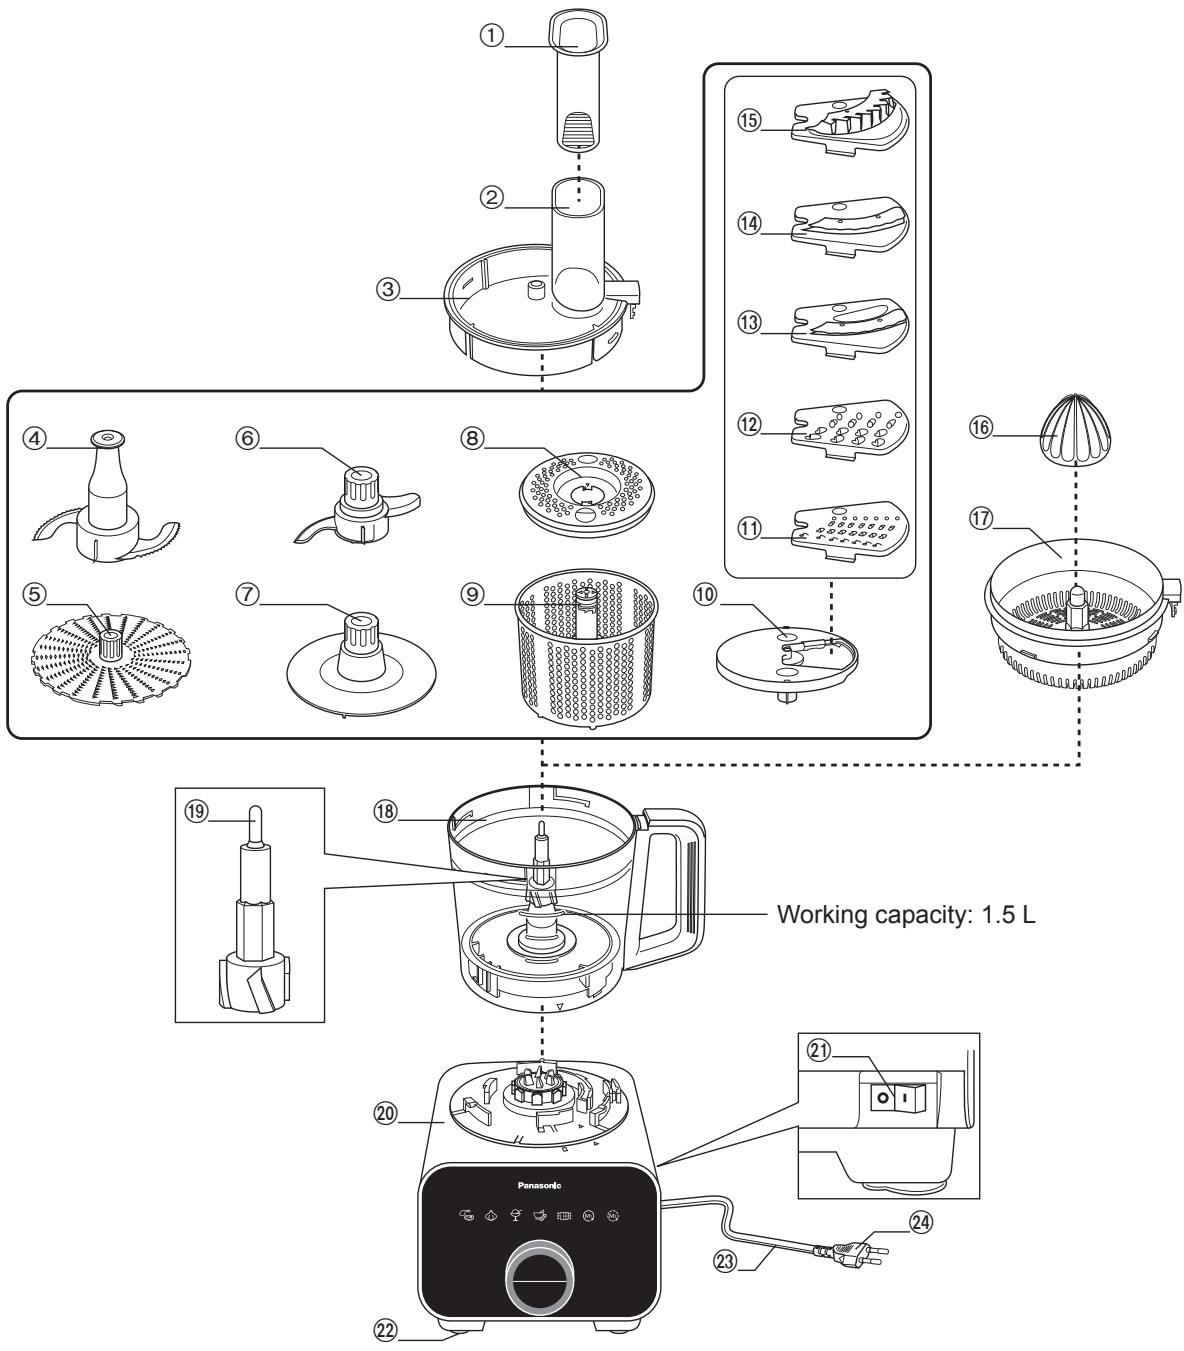
PART NAMES
Blender, Dry Mill & Accessories
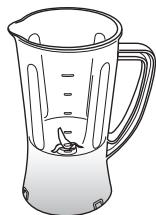
- Blender Lid
- Blender Jug
- Blender Cutting Blade
- Mill Container
-
Mill Cutting Blade
-
Mill Container Base
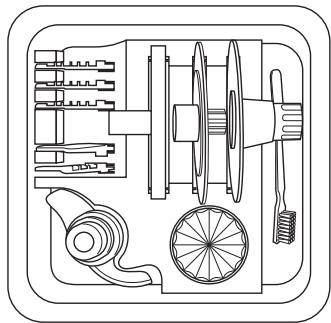
- Storage Case Unit
- Brush
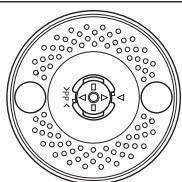
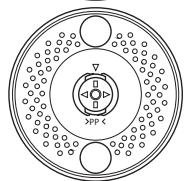
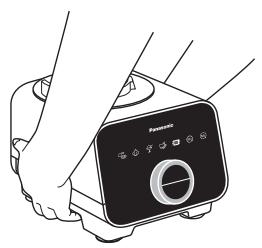
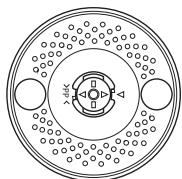
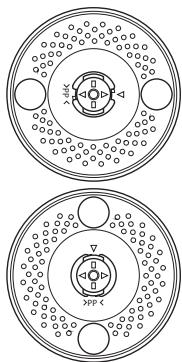
Control Panel
Mode Selection
- Auto Menu -

Mince Mode

Chop Mode

Frozen Mode

Paste Mode
Drainer Mode
- Manual Menu -

Continuous Mode

Intermittent Mode
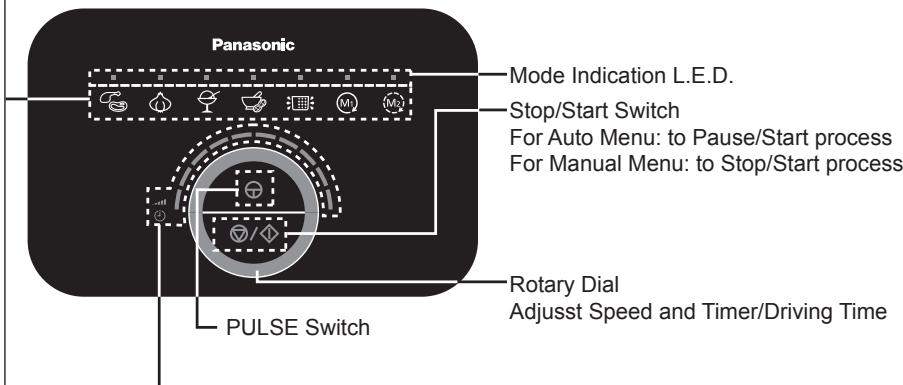
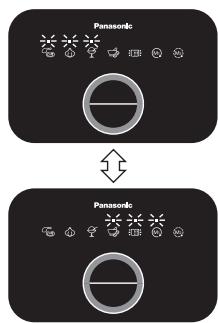
Speed and Timer/Driving Time indication L.E.D.
Light up when Manual Menu is operating and indicate speed level by bars.
Light up when Auto Menu is processing and indicate Timer/Driving time by bars.
Note:
- The program will time-out and reset itself after 10 seconds if no further action is done after a function is selected.
- Turning the Rotary Dial clockwise will increase the number of lighted bars and vice versa.
- The default speed for the Continuous and Intermittent modes are at maximum, (level 10).
- The program will time-out and reset itself after 20 seconds if the program is paused during processing and no further action is done.
- Continuous Mode will stop automatically approximately 19 minutes and Intermittent Mode will stop automatically approximately 7 minutes after processing is started.
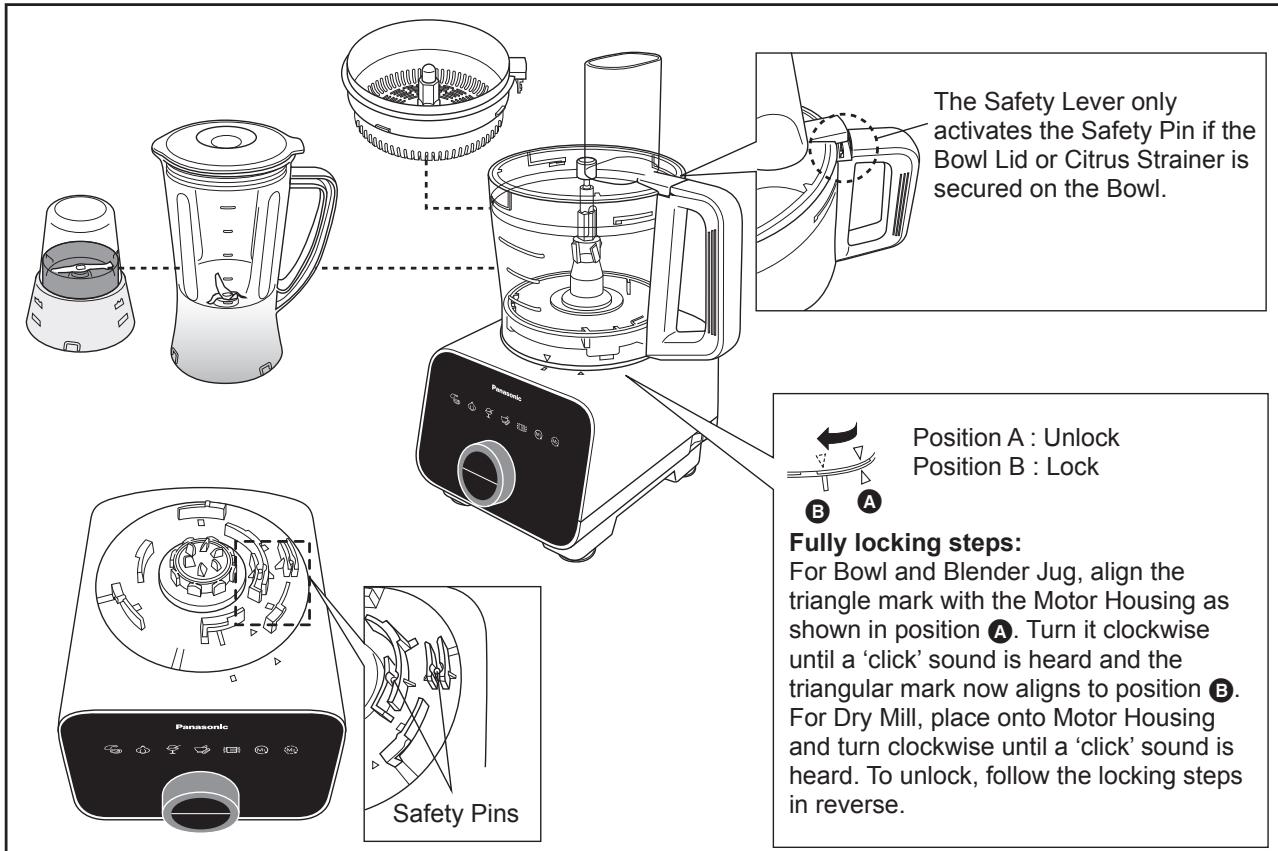
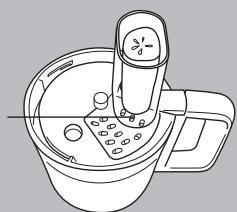
SAFETY LOCK
The Safety Pin is designed to prevent the appliance from switching on when
- The Bowl Lid or Citrus Strainer and the Bowl are not fully locked to each other.
- The Bowl, Blender Jug or Dry Mill are not fully locked to the Motor Housing.
Note:
- Do not push the Safety Pin and Safety Lever with any instrument, stick etc.
- Do not pour liquids or ingredient at the Safety Pin and Safety Lever area.
- Keep the Safety Pin and Safety Lever area clean to avoid foreign particles accumulate on the area.
Actions above will ensure the Safety Pin and Safety Lever function properly. If not followed, it will damage the parts related to the Safety Pin and Safety Lever.
CIRCUIT BREAKER AND TEMPERATURE SENSOR PROTECTION
This appliance has the Circuit Breaker and Temperature sensor functions to stop the motor when motor is overloaded.
(refer to page GB32)
GB10
FOOD PROCESSOR -DISASSEMBLY & ASSEMBLY-
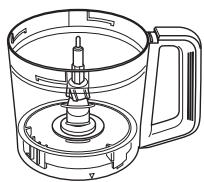
Disassembly from Packaged Condition
1
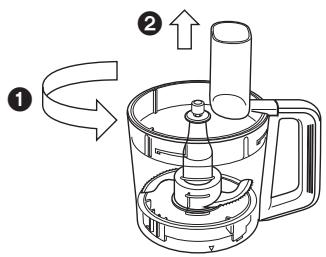
Rotate the Bowl Lid anticlockwise and lift up from the Bowl.
2
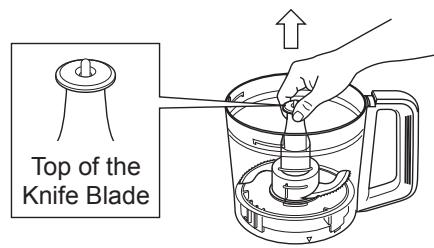
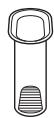
Hold the top of the Knife Blade and lift up to remove from Bowl.
Note:
Beware of the sharp edges of the Knife Blade when removing it from the Bowl.
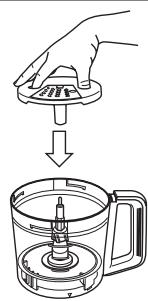
Assembly of Food Processor Attachments
It is highly recommended to clean all attachments and accessories and dry well before using the appliance for the first time, refer to page GB28 and GB29 for the cleaning method. Unplug when assembling the unit. Before plugging in, ensure that the Power Switch is switched off. Please refer to page GB29 under ‘Storing’ on how to re-position the Motor Housing.
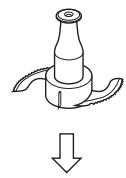
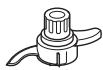
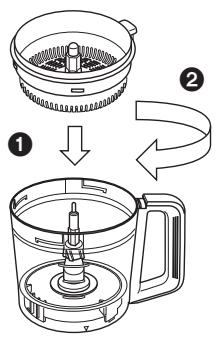
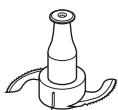
Knife Blade · Kneading Blade · Whipping Blade · Grating Blade
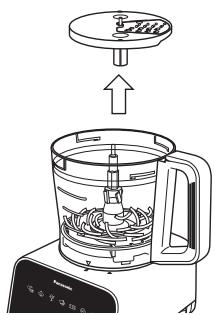
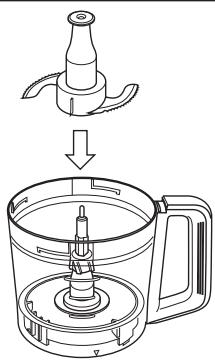
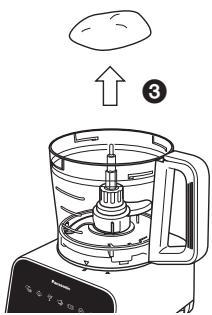
1
or
or
or
natural_image
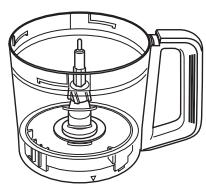
Line drawing of a kitchen blender with handle and side panel (no text or symbols)Place the Knife Blade (Kneading Blade or Whipping Blade or Grating Blade) into the Bowl.
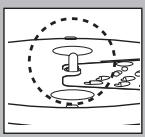
Note:
For the Knife Blade, ensure that the Drive Shaft is protruding from the Knife Blade after insertion.

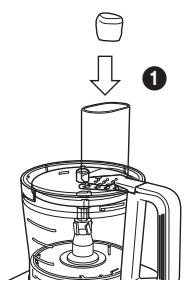
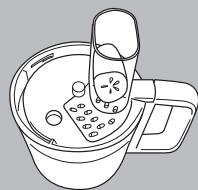
2
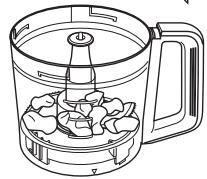
1

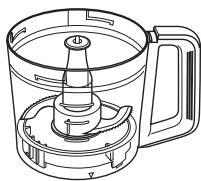
②↓

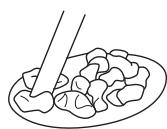
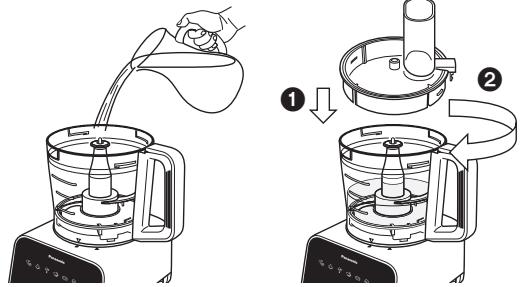
Put the ingredients into the Bowl.
Note:
For the Grating Blade, place the ingredients on top of the blade and spread them out evenly.
Place the Bowl Lid on top of the Bowl and turn it clockwise until a ‘click’ sound is heard. Insert the Food Pusher into the Feeding Tube.
FOOD PROCESSOR -DISASSEMBLY & ASSEMBLY-
Assembly of Food Processor Attachments
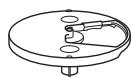
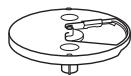
Slicing Blades (Thick / Thin) · Shredding Blades (Coarse / Fine) · Julienne Blade
1
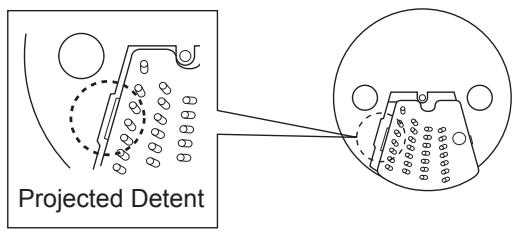
Fit the projected detent of the desired blade onto the Blade Stand and ensure it is seated properly.
2
Push down on the dimple on the blade as seen above until a ‘snap’ sound is heard.
Note:
- Beware of the sharp edges on the blades while inserting into the Blade Stand.
• To remove the blade, turn over the Blade Stand and push down on the reverse side of the dimple on the blade.
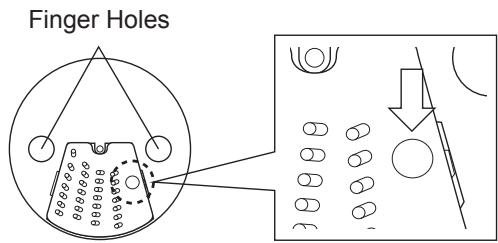
3
Insert finger and thumb into the finger holes to grip the Blade Stand. Place the assembled Blade Stand into the Bowl.
4

Place the Bowl Lid on top of the Bowl and turn it clockwise until a ‘click’ sound is heard.
Note:
Ensure that the Drive Shaft is protruding from the Blade Stand after insertion.
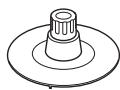
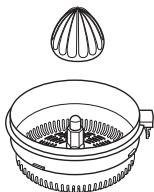
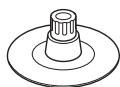
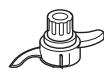
Citrus Press
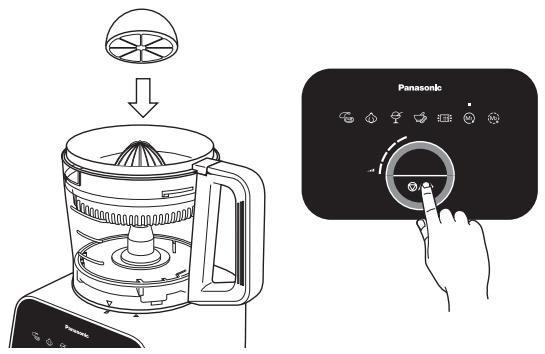
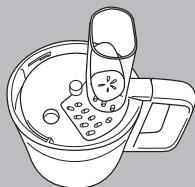
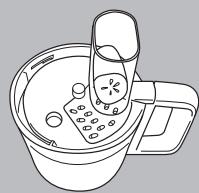
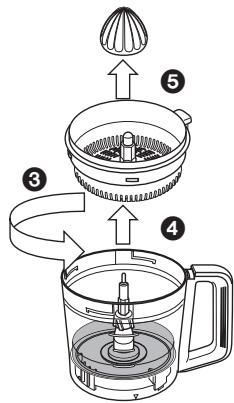
1
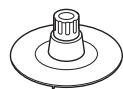
Place the Citrus Strainer onto the Bowl. Turn it clockwise until a ‘click’ sound is heard.
2
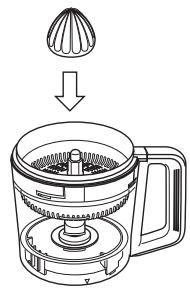
natural_image
Line drawing of a blender with a lid and base, showing the process from top to bottom (no text or symbols)Attach the Citrus Cone onto the Drive Shaft.
GB12
FOOD PROCESSOR -DISASSEMBLY & ASSEMBLY-
Assembly of Food Processor Attachments
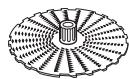
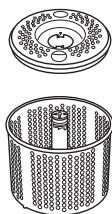
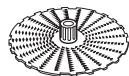
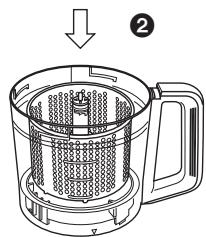
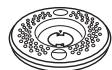
Salad Drainer
1
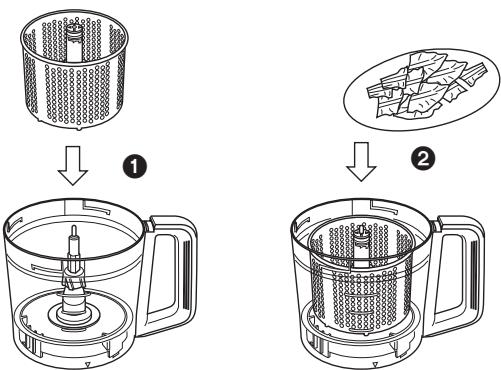
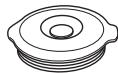
Place the Salad Drainer into the Bowl. Insert the ingredients into the Salad Drainer.
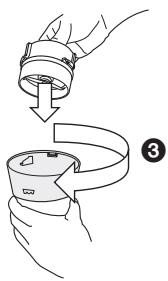
2
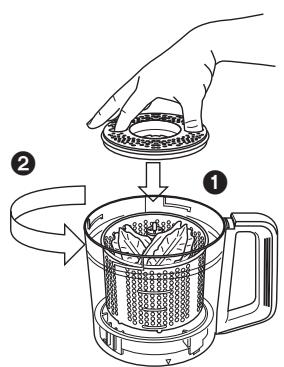
A
B
Place Drainer Cover on top of the Salad Drainer until the mark aligns as shown in A. Turn the Drainer Cover anticlockwise until the mark aligns as shown in B.
3
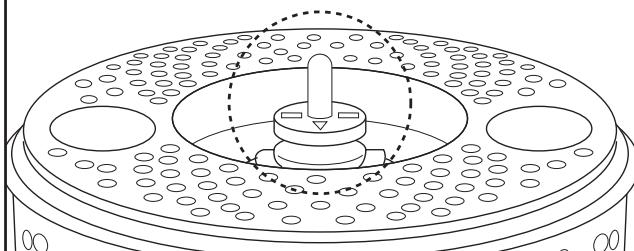
natural_image
Technical line drawing of a mechanical component with concentric circles and central shaft (no text or symbols)Ensure that the Drive Shaft is protruding out of the Salad Drainer after insertion.
4
Place the Bowl Lid on top of the Bowl and turn it clockwise until a ‘click’ sound is heard.
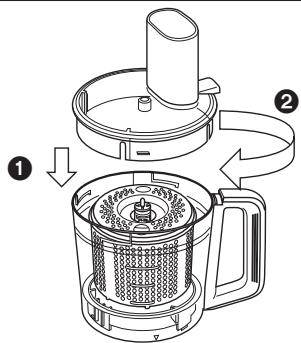
Attaching the assembled units to the Motor Housing
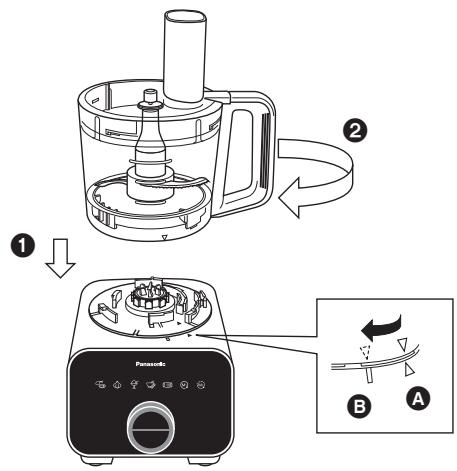
- Place the Bowl on top of the Motor Housing until the mark aligns as shown in A.
- Turn the Bowl clockwise until a ‘click’ sound is heard. Ensure that the triangle mark on the Bowl is aligned with the rectangle mark on the Motor Housing as seen in B.
To disassemble, follow the assembly steps in reverse.
FOOD PROCESSOR -KNIFE BLADE-
Ingredient Preparations
| Function | Ingredient | Mode | Quantity | Operating Time (approx.) | Preparation Method | |
| Mince | Meat |  Auto Auto | 50~400 g | 5~40 sec |  | Remove all skin, bones, and tendons, cut into 2~3 cm cubes. |
| Initial setting is for 200 g (10 sec) | ||||||
| Fish | 50~500 g | 3~30 sec |  | |||
| Chop | Onion |  Auto Auto | 150~500 g | 10~50 sec |  | Peel skin, cut into 2~3 cm cubes. |
| Initial setting is for 300 g (20 sec) | ||||||
| Garlic |  Continuous Speed: Max Continuous Speed: Max | 5~500 g | 10~30 sec |  | Peel skin. | |
| Carrot | 50~450 g | 10~30 sec |  | Peel skin, cut into 2~3 cm cubes. | ||
| Italian Parsley | 5~70 g | 10~40 sec |  | Remove stalk. | ||
| Mushroom | 30~250 g | 3~15 sec |  | Cut into 2~3 cm cubes. | ||
| Crush | Parmesan Cheese |  Continuous Speed: Max Continuous Speed: Max | 10~200 g | 10~60 sec |  | Cut into 2~3 cm cubes. |
| Mash | Boiled Potato |  Intermittent Speed: Max Intermittent Speed: Max | 100~400 g | 10~40 sec |  | Cut into 2~3 cm cubes.Do not over process. |
| Frozen | Frozen Banana |  Auto Auto | 250~450 g | 40~120 sec |  | 1~2 cm width, half frozen condition, i.e. toothpick can pierce. |
| Initial setting is for 350 g (60 sec) | ||||||
| Ice Crush | Ice Cubes |  Continuous Speed: Max Continuous Speed: Max | ~10 pcs | ~20 sec |  | 2~3 cm ice cubes. |
| Grind | Peanuts |  Continuous Speed: Max Continuous Speed: Max | 10~200 g | 15~30 sec |  | Remove peanut shell and skin. |
| Paste | Roasted Peanuts |  Auto Auto | 100~400 g | 4~10 min |  | Remove peanut shell and skin. |
| Initial setting is for 300 g (7 min) | ||||||
| Crumb | Soft White Bread |  Continuous Speed: Max Continuous Speed: Max | 10~200 g | 15~60 sec |  | Slice soft bread into 6 to 8 pieces. |
| Knead (for confectionary) | Flour |  Continuous Speed: Max Continuous Speed: Max | ~300 g | ~120 sec |  | Use for making confectionery such as sweets and cakes. |
| Juice Make | Fruit, Liquid etc. |  Continuous Speed: Max Continuous Speed: Max | ~1,500 mL | ~120 sec |  | Cut into 2~3 cm cubes. Process solids first. Fill liquid till total not exceeding 1,500 mL. Do not add more than 10 pcs of ice cubes during processing. |
| Soup Make | Boiled Vegetable, Liquid etc. |  Continuous Speed: Max Continuous Speed: Max | ~1,500 mL | ~120 sec |  | Cut into 2~3 cm cubes. Process solids first. Fill liquid till total not exceeding 1,500 mL. |
FOOD PROCESSOR -KNIFE BLADE-
Operating with Auto Menu
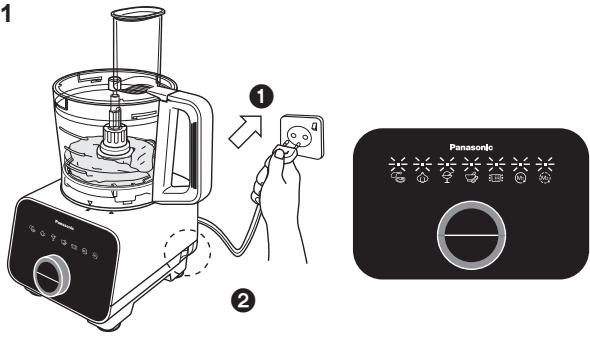
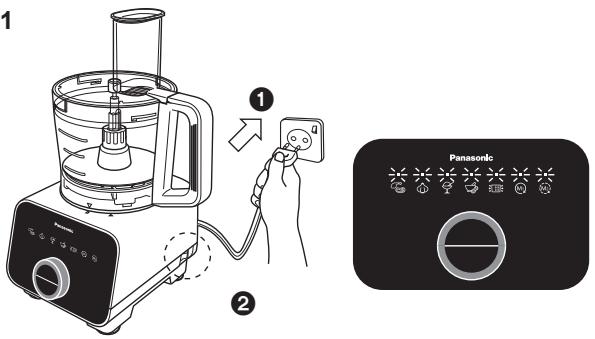
1
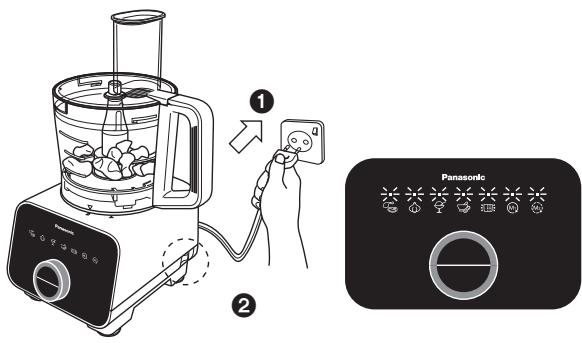
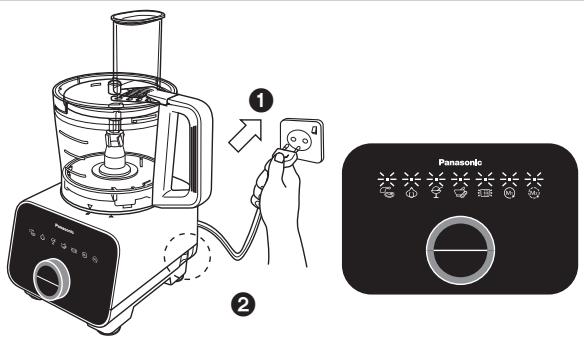
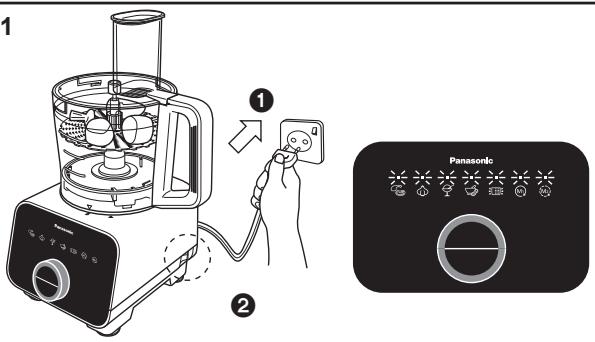
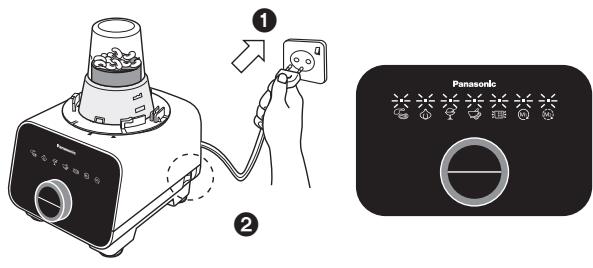
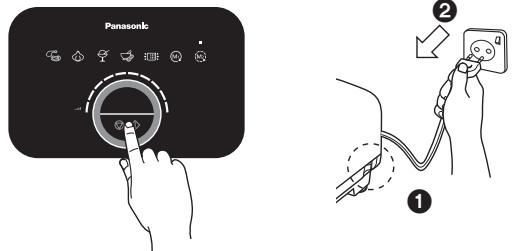
After completing the assembly steps, plug-in the plug into the socket and turn on the Power Switch. The Mode Indication L.E.D.s will light up and blink.
2

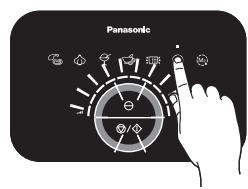
Select the required Auto Menu mode (except the Drainer Mode). The selected Mode Indication L.E.D. will light up and a beep sound will be heard. The Driving Time and Stop/Start Switch Indication L.E.D. will light up and blink.
3

Each Auto Menu has a pre-programmed driving time. Each lighted bar represents 10 seconds* of driving time. Push the Stop/Start Switch to start the operation.
4

During operation, the Driving Time L.E.D. will turn off one by one after every 10 second intervals until the set duration is completed and 4 beep sounds will be heard. The Mode Indication L.E.D.s will light up and blink.
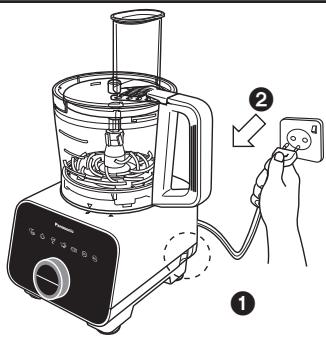
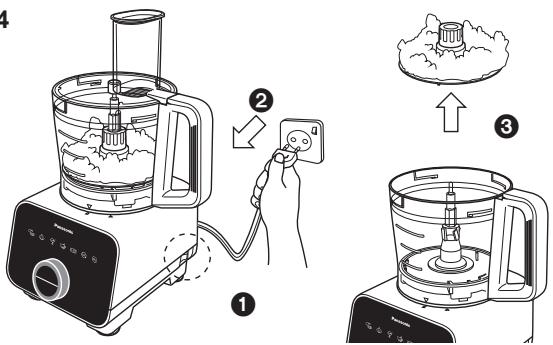
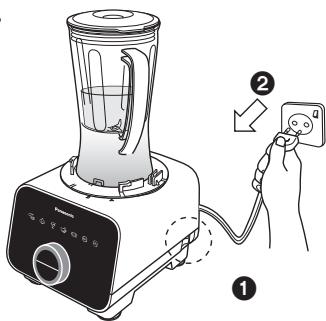
5
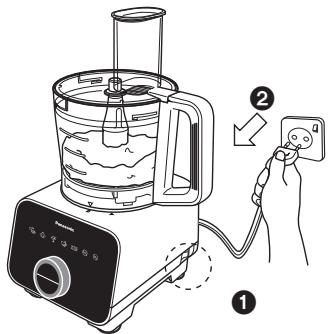
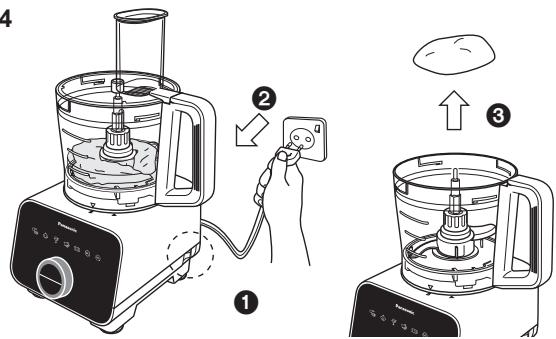
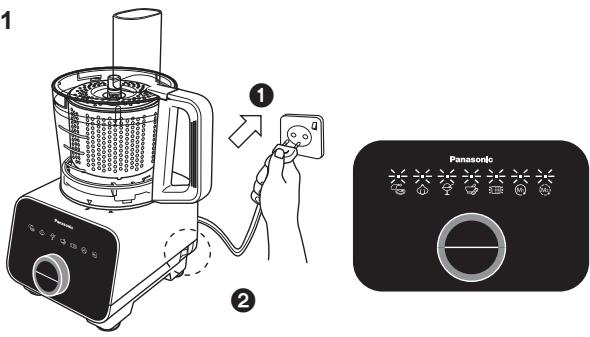
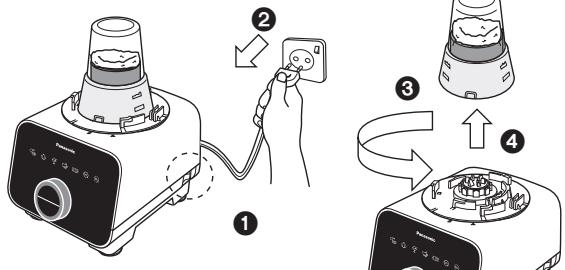
After the processing is completed, switch off the Power Switch and unplug from the socket.
6

natural_image
Line drawing of a blender with a side panel and handle, showing internal mixing and upward arrow (no text or symbols)Remove the Knife Blade from the Bowl before removing the processed ingredients.
*For Paste Auto Menu, each lighted bar represents 1 minute. The lighted bar will decrease at every 1 minute interval.
Note:
• Always ensure that the Knife Blade is inserted before adding ingredients into the Bowl.
- The Driving Time of the Auto Menu can be increased or decreased by adjusting the Rotary Dial if necessary.
- The operation of the Auto Menu can be stopped prematurely by pushing the Stop/Start Switch before the set duration ends.
- Depending on the speed and amount of ingredients used, there will be significant vibrations present. In that case, hold down the Bowl Lid with both hands to support it during its operation.
FOOD PROCESSOR -KNIFE BLADE-
Operating with Manual Menu
1
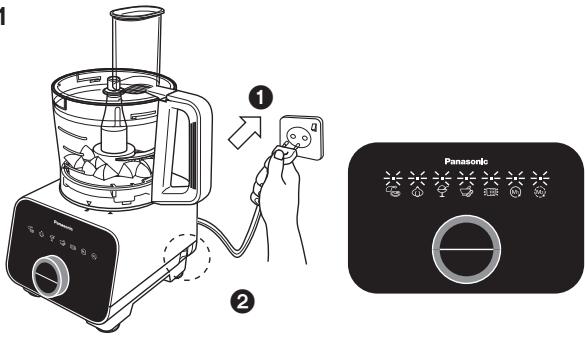
After completing the assembly steps, plug-in the plug into the socket and turn on the Power Switch. The Mode Indication L.E.D.s will light up and blink.
2

Select the Continuous or Intermittent mode. The selected Mode Indication L.E.D. will light up and a beep sound will be heard. The Speed, Stop/Start Switch and PULSE Switch Indication L.E.D. will light up and blink.
3

Adjust the desired speed with the Rotary Dial. The more bars are lighted, the higher the speed. Push the Stop/Start or PULSE Switch to start the operation.
4

During the driving operation, the Stop/Start Indication L.E.D. will remain lit. The speed can be adjusted during operation. Push the Stop/Start Switch to stop the driving operation.
5
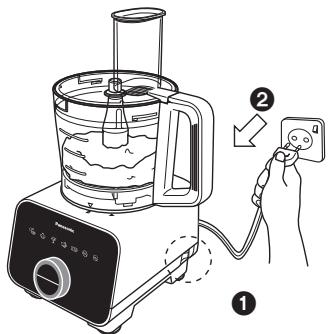
After the processing is completed, switch off the Power Switch and unplug from the socket.
6

natural_image
Line drawing of a blender oven with a side arm and lid, showing liquid level and control buttons (no text or symbols)Remove the Knife Blade from the Bowl before removing the processed ingredients.
Note:
• Always ensure that the Knife Blade is inserted before adding ingredients into the Bowl.
- Do not exceed the stated amount of ingredients for kneading as abnormal vibration may occur.
- Do not insert hot ingredients into the Bowl for processing. Always ensure that the ingredients are sufficiently cooled before inserting, e.g. boiled potato.
- For Juice Make, fill in the solid ingredients first into the Bowl, followed by the liquid ingredients until the total volume does not exceed 1,500 mL.
- Depending on the speed and amount of ingredients used, there will be significant vibrations present. In that case, hold down on the Bowl Lid to support it during its operation.
- For kneading, do not reprocess after the dough has formed the first time.
- When process the liquid ingredients together with ice cubes, put the ice cubes not more than 10 pcs (approx. 170g ).
FOOD PROCESSOR -SLICING BLADES • SHREDDING BLADES • JULIENNE BLADE-

Slicing Blades (Thick / Thin) - used for slicing ingredients

Shredding Blades (Coarse / Fine) - used for shredding and grating ingredients.
Julienne Blade - used for making french fries and shredding ingredients.
Ingredient Preparations for Slicing Blades (Thick / Thin)
| Function | Ingredient | Mode | Max Single Use | Operating Time (approx.) | Preparation Method | |
| Slice | Cucumber |  Continuous Speed: Max Continuous Speed: Max | 700 g | - |  | Cut ingredient till it is small enough to fit into the Feeding Tube. |
| Onion | 700 g |  | ||||
| Carrot | 600 g |  | ||||
| Potato | 600 g |  | ||||
| Cabbage | 400 g |  | ||||
Ingredient Preparations for Shredding Blades (Coarse / Fine)
| Function | Ingredient | Mode | Max Single Use | Operating Time (approx.) | Preparation Method | |
| Shred | Cucumber |  Continuous Speed: Max Continuous Speed: Max | 500 g | - |  | Cut ingredient till it is small enough to fit into the Feeding Tube. |
| Carrot | 500 g |  | ||||
| Potato | 650 g |  | ||||
| Cheese | 500 g |  | Cut ingredient till it is small enough to fit into the Feeding Tube. Do not use hard ingredients such as Parmesan. | |||
Ingredient Preparations for Julienne Blade
| Function | Ingredient | Mode | Max Single Use | Operating Time (approx.) | Preparation Method | |
| French Fry | Potato |  Continuous Speed: Max Continuous Speed: Max | 800 g | - |  | Cut ingredient till it is small enough to fit into the Feeding Tube. |
| Shred | Cabbage | 500 g |  | |||
FOOD PROCESSOR -SLICING BLADES • SHREDDING BLADES • JULIENNE BLADE-
Operating with Manual Menu
1
After completing the assembly steps, plug-in the plug into the socket and turn on the Power Switch. The Mode Indication L.E.D.s will light up and blink.
2
Select the Continuous mode. The selected Mode Indication L.E.D. will light up and a beep sound will be heard. The Speed, Stop/Start and PULSE Switch Indication L.E.D. will light up and blink.
3

Adjust the speed with the Rotary Dial. The more bars are lighted, the higher the speed. Push the Stop/Start Switch or PULSE Switch to start the operation.
4

Insert the ingredients into the Feeding Tube and push down with the Food Pusher.
5

During the driving operation, the Stop/Start Indication L.E.D. will remain lit. Push the Stop/Start Switch to stop the driving operation. After the processing is completed, switch off the Power Switch and unplug from the socket.
6
natural_image
Line drawing of a blender with a lid and upward arrow indicating process (no text or symbols)Remove the Blade Stand from the Bowl before removing the processed ingredients.
Note:
- When using long and narrow ingredients, place it against the front wall of the Feeding Tube as indicated in Figure 1, for support while in operation to avoid uneven processing.
- Dispose of any remaining lumps of unprocessed ingredients.
- Align high fibre ingredients as indicated in Figure 2 for a consistent processing result.
Front Wall
natural_image
Line drawing of a kitchen appliance with a cylindrical tool and side table (no text or symbols)Figure 1

natural_image
Line drawing of a kitchen sink with a spoon and bowl (no text or symbols)Figure 2
FOOD PROCESSOR -KNEADING BLADE-
Ingredient Preparations for Kneading Blade
| Function | Ingredient | Mode | Max Single Use | Operating Time (approx.) | Preparation Method |
| Knead (for bread) | Bread Flour |  Continuous Speed: Start with level 1, increase every 1 second till Max. Continuous Speed: Start with level 1, increase every 1 second till Max. | 300 g | ~ 120 sec | Mix yeast with water and add during the processing of dough (adding yeast directly before processing may result in flaking and premature rising). If dough mix still appears flaky after initial processing, add 1 tsp of water into the mix. When large vibrations occur due to dough mix wrapping around the Drive Shaft, add 1 tbsp of flour. Do not reprocess the dough after the process is complete, if the dough is not satisfactory, knead by hand. |
| Liquid | 160 ~ 200 mL |
Operating with Manual Menu
1
After completing the assembly steps, plug-in the plug into the socket and turn on the Power Switch. The Mode Indication L.E.D.s will light up and blink.
2

Select the Continuous mode and adjust to the appropriate speed with the Rotary Dial. The more bars are lighted, the higher the speed. Push the Stop/Start Switch to start the operation.
3

During the driving operation, the Stop/Start Indication L.E.D. will remain lit. Observe the formation of the dough ball. Push the Stop/Start Switch to stop the driving operation once a firm dough ball is formed.
4
After the processing is completed, switch off the Power Switch and unplug from the socket. Remove the dough ball from the Bowl before removing the Kneading Blade.
Note:
- Do not exceed the stated amount of ingredients for the Kneading Blade as abnormal vibration may occur.
- Depending on the speed and amount of ingredients used, there will be significant vibrations present. In that case, hold down the Bowl Lid with both hands to support it during its operation.
- For kneading, do not reprocess after the dough has formed the first time.
• High amounts of butter and sugar in the dough may cause abnormal vibration when using the Kneading Blade. - Using flour other than bread flour may cause abnormal vibration. Before processing, remove 1 \~ 2 tbsp of water from the total amount stated and add the water little by little during processing if necessary.
FOOD PROCESSOR -WHIPPING BLADE-
Ingredient Preparations for Whipping Blade
| Function | Ingredient | Mode | Max Single Use | Operating Time (approx.) | Preparation Method | |
| Whip | Egg White |  Continuous Speed: Max Continuous Speed: Max | 2 ~ 6 pcs | 50 ~ 90 sec |  - - | Separate the egg white from the yolk for a smooth meringue. |
| Cream | 100 ~ 300 mL | 15 sec ~ 2 min |  | Use fresh cream of fat content 35% or higher at 5 °C. | ||
Operating with Manual Menu
1
After completing the assembly steps, plug-in the plug into the socket and turn on the Power Switch. The Mode Indication L.E.D.s will light up and blink.
2

Select the Continuous mode and adjust the speed with the Rotary Dial. The more bars are lighted, the higher the speed. Push the Stop/Start Switch to start the operation.
3

During the driving operation, the Stop/Start Indication L.E.D. will remain lit. Observe the rising and formation of the whipped ingredients. Push the Stop/Start Switch to stop the driving operation once a desired texture is formed.
4
After the processing is completed, switch off the Power Switch and unplug from the socket. Carefully remove the Whipping Blade together with the processed ingredients from the Bowl.
Note:
- Do not over process the whipping cream, it may break down to form clumps of butter.
- Using different brands of whipping cream will have varying results. It is recommended to process until the cream is sufficiently whipped.
FOOD PROCESSOR -GRATING BLADE-
Ingredient Preparations for Grating Blade
| Function | Ingredient | Mode | Max Single Use | Operating Time (approx.) | Preparation Method | |
| Grate | Carrot |  Continuous Speed: Max Continuous Speed: Max | 200 g | - | 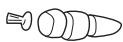 | Cut into 2 ~ 3 cm cubes. |
| Apple | 200 g |  | ||||
| Cucumber | 200 g |  | ||||
Operating with Manual Menu
1
After completing the assembly steps, plug-in the plug into the socket and turn on the Power Switch. The Mode Indication L.E.D.s will light up and blink.
2

Select the Continuous mode and adjust the speed with the Rotary Dial. The more bars are lighted, the higher the speed. Push the Stop/Start Switch to start the operation.
3

During the driving operation, the Stop/Start Indication L.E.D. will remain lit. Push the Stop/Start Switch to stop the driving operation.
4

After the processing is completed, switch off the Power Switch and unplug from the socket. Remove the Grating Blade from the Bowl before removing the ingredients.
Note:
- Do not insert the ingredients through the Feeding Tube during operation of the Grating Blade.
FOOD PROCESSOR -SALAD DRAINER-
Ingredient Preparations for Salad Drainer
| Function | Ingredient | Mode | Max Single Use | Operating Time (approx.) | Preparation Method |
| Drainer | Lettuce Leaves |  Auto Auto | 100 g | 20 ~ 60 sec | 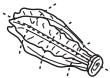 Cut into 3 ~ 5 cm slices. Cut into 3 ~ 5 cm slices. |
| Initial setting is for 50 g (20 sec) | |||||
| Cabbage | 200 g | 20 ~ 70 sec |  Shredded into 1 ~ 3 mm. Shredded into 1 ~ 3 mm. | ||
Operating with Auto Menu
1
After completing the assembly steps, plug-in the plug into the socket and turn on the Power Switch. The Mode Indication L.E.D.s will light up and blink.
2

Select the Drainer mode. The selected Mode Indication L.E.D. will light up and a beep sound will be heard. The Driving Time and Stop/Start Switch Indication L.E.D. will light up and blink.
3

Each Auto Menu has a pre-programmed driving time. Each lighted bar represents 10 seconds of driving time. Push the Stop/Start Switch to start the operation. During operation, the Driving Time L.E.D. will turn off one by one after every 10 second intervals until the set duration is completed and 4 beep sounds will be heard. The Mode Indication L.E.D.s will light up and blink.
4
After the processing is completed, switch off the Power Switch and unplug from the socket. Remove the Salad Drainer from the Bowl.
Note:
- Maximum working capacity of the Salad Drainer: 200 g or till maximum height of Salad Drainer, whichever comes first.
• Prohibited ingredients: refer to page GB6. - Ensure that the ingredients are spread evenly around the Salad Drainer before processing.
- Do not operate the Salad Drainer in any other mode except Drainer mode.
• Always ensure that the Drainer Cover is attached onto the Salad Drainer before operation, otherwise the ingredients might come out and tear around the Bowl. - Depending on the amount of ingredients used, there will be significant vibrations present. In that case, hold down the Bowl Lid with both hands to support it during its operation.
FOOD PROCESSOR - CITRUS PRESS-
Ingredient Preparations for Citrus Press
| Function | Ingredient | Mode | Max Single Use | Operating Time (approx.) | Preparation Method |
| Squeeze | Citrus Fruit |  Continuous Speed:Level 4 Continuous Speed:Level 4 | 1000 mL | - |  Cut fruit into halves. Cut fruit into halves. |
Operating with Manual Menu
1
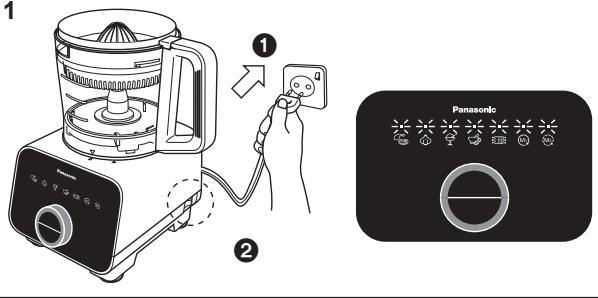
After completing the assembly steps, plug-in the plug into the socket and turn on the Power Switch. The Mode Indication L.E.D.s will light up and blink.
2


Select the Continuous mode and adjust to level 4 with the Rotary Dial. Push the Stop/Start Switch to start the operation.
3
Place the half cut fruit with the cut side on top of the Citrus Cone and press down firmly to extract juice. During the driving operation, the Stop/Start Indication L.E.D. will remain lit. Push the Stop/Start Switch to stop the driving operation.
4
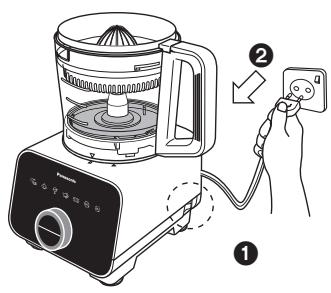
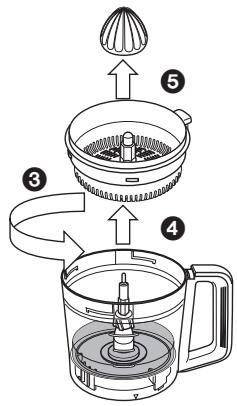
After the processing is completed, switch off the Power Switch and unplug from the socket. Remove the Citrus Press attachment from the Bowl before pouring the extracted juice out.
Note:
• Always ensure that the Citrus Cone is placed onto the Citrus Strainer before usage.
- Stop the processing periodically to remove the pulp remaining on the Citrus Strainer to ease the juice extraction process.
- It is not recommended to operate the Citrus Press at speed levels higher than level 4.
- Avoid touching the Citrus Cone while it is turning.
BLENDER
Assembly and Disassembly of Blender Attachment
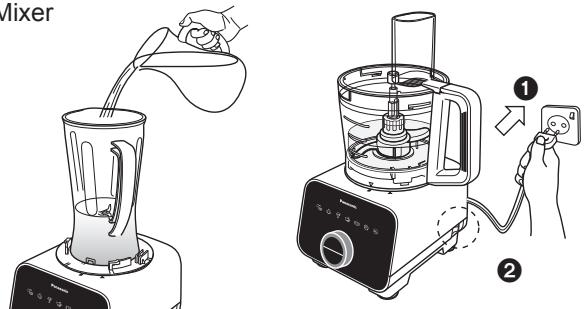
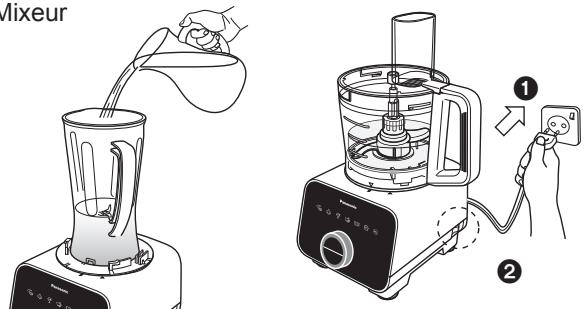
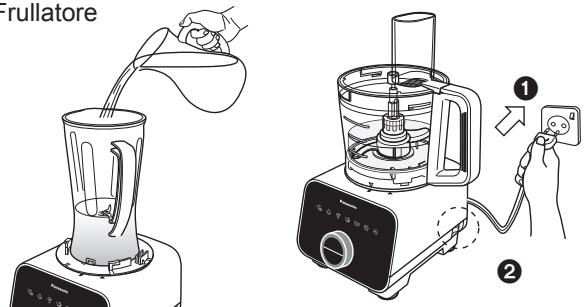
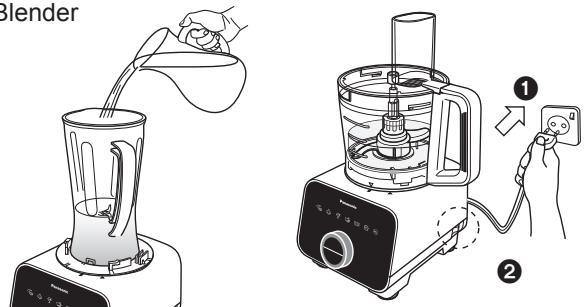
1
natural_image
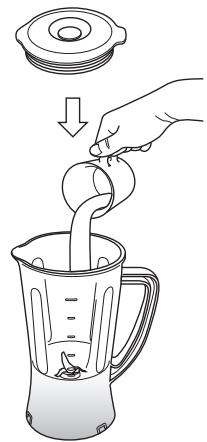
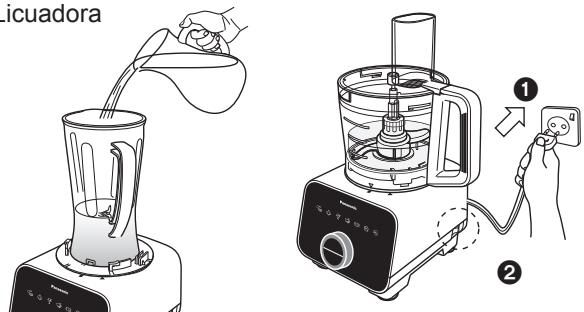
Illustration of a hand pouring liquid into a blender with a lid, showing a downward arrow (no text or symbols)Insert ingredients into the Blender Jug and close with the Blender Lid.
2
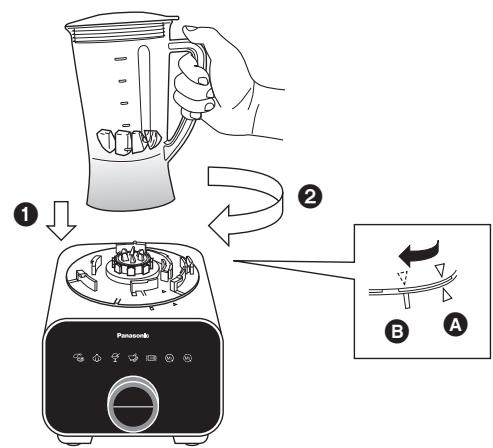
Place the Blender Jug on top of the Motor Housing until the mark aligns as shown in A.
Turn the Blender Jug clockwise until a ‘click’ sound is heard. Ensure that the triangle mark on the Blender Jug is aligned with the rectangle mark on the Motor Housing as seen in B.
To disassemble, simply follow the assembly steps in reverse.
Ingredient Preparations for Blender
| Function | Ingredient | Mode | Max Single Use | Operating Time (approx.) | Preparation Method |
| Liquidize | Fruit, Vegetable | ^ Continuous Speed: Max Continuous Speed: Max | 1,000 mL | ~ 2 min | 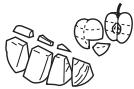 Cut into 1 cm cubes. Cut into 1 cm cubes. |
Note:
• Maximum working capacity: 1 L.
- Prohibited ingredients for Blender Jug: refer to page GB6.
- It is not recommended to blend hard and viscous ingredients. However, if necessary, cut the hard ingredients into small pieces (eg. cut carrot into 1 cm ^3 cubes) and fill the Blender Jug with the ingredients not exceeding half its rated capacity.
- Do not fill exceeding the maximum level and reduce ingredients when appliance makes abnormal sound or vibration during operation.
- Add in soft ingredients (fruits, vegetables) into the Blender Jug before adding in other ingredients.
BLENDER
Operating with Manual Menu
1
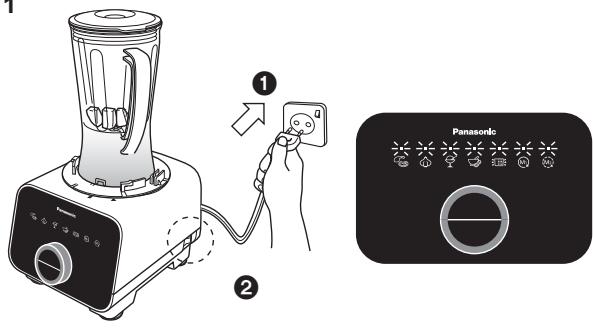
After completing the assembly steps, plug-in the plug into the socket and turn on the Power Switch. The Mode Indication L.E.D.s will light up and blink.
2


Select the Continuous mode and adjust the speed with the Rotary Dial. The more bars are lighted, the higher the speed. Push the Stop/Start Switch to start the operation.
3

During the driving operation, the Stop/Start Indication L.E.D. will remain lit. Push the Stop/Start Switch to stop the driving operation.
4

After the processing is completed, switch off the Power Switch and unplug from the socket. Remove the Blender Unit from the Motor Housing and proceed to remove the ingredients.
Note:
- If the Cutting Blade gets stuck, switch off immediately and unplug. Do not attempt to proceed to unstuck the ingredients with your fingers, use an object like a rubber spatula instead.
- During blending, there is a possibility that the ingredients will splash out of the Blender Lid hole. In the event that it splashes out, wipe it off with a dry cloth.
- Do not operate exceeding the rated operation duration (2 min ON, 2 min OFF).
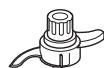
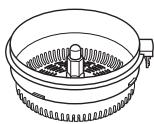
DRY MILL
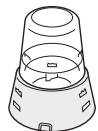
Disassembly from Packaged Condition
1
Turn the Mill Container Base anticlockwise to unlock and lift up from the Mill Container.
2
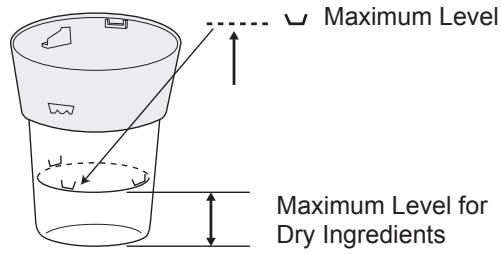
A maximum level for dry ingredients is indicated on the Mill Container. Do not fill exceeding this level.
Assembly and Disassembly of Dry Mill Attachment
1
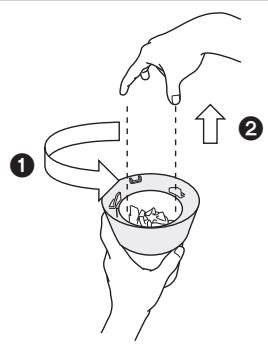
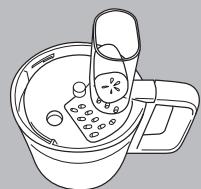
natural_image
Illustration of a hand pouring liquid into a container with a lid, no text or symbols present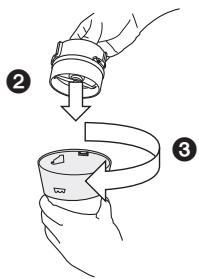
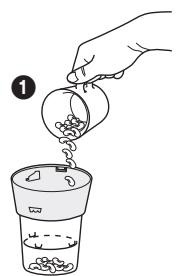
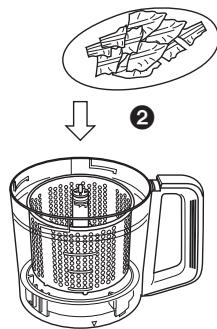
Turn the Mill Container upside down and fill in the ingredients without exceeding the maximum level indicated.
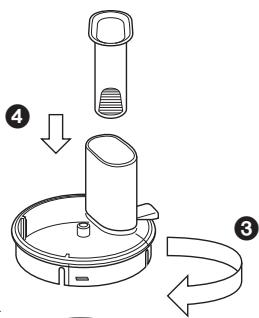
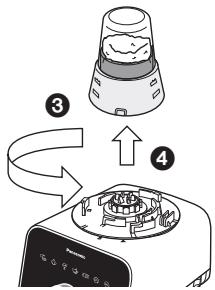
2

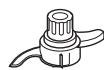
Place the Dry Mill Unit on top of the Motor Housing. Turn the Dry Mill Unit clockwise until a ‘click’ sound is heard.
Place the Mill Container Base into the Mill Container and turn it clockwise until a ‘click’ sound is heard.
Make sure the ribs on outer surface of the Mill container base and inner surface of the Mill container are hooked firmly.
To disassemble, simply follow the assembly steps in reverse.
Ingredient Preparations for Dry Mill
| Function | Ingredient | Mode | Max Single Use | Operating Time (approx.) | Preparation Method |
| Grind | Coffee Bean |  Continuous Speed: Max Continuous Speed: Max | Till Max Level | ~ 60 sec | - |
| Pepper |
Note:
• Prohibited ingredients: refer to page GB6.
- Do not operate the unit with empty Dry Mill.
- Do not fill exceeding the maximum level and reduce ingredients when the appliance makes an abnormal sound or vibrates during operation.
DRY MILL
Operating with Manual Menu
1
After completing the assembly steps, plug-in the plug into the socket and turn on the Power Switch. The Mode Indication L.E.D.s will light up and blink.
2

Select the Continuous mode and adjust the speed with the Rotary Dial. The more bars are lighted, the higher the speed. Push the Stop/Start Switch to start the operation.
3

During the driving operation, the Stop/Start Indication L.E.D. will remain lit. Push the Stop/Start Switch to stop the driving operation.
4
After the processing is completed, switch off the Power Switch and unplug from the socket. Remove the Dry Mill Unit from the Motor Housing and proceed to remove the ingredients.
Note:
- While removing the ingredients, be careful of the Cutting Blade.
- Do not operate exceeding the rated operation duration (1 min ON, 2 min OFF).
AFTER USE
Cleaning
Pre-wash
The pre-wash enables easier cleaning. It can be used for the Knife Blade and Blender Unit. To pre-wash, simply follow the steps below.
1 Food Processor
Blender

Put the used attachment inside the Bowl, fill the Bowl with water until the attachment is submerged in water (max. 500 mL). Place the Bowl Lid on top of the Bowl and turn it clockwise until a ‘click’ sound is heard.
For the Blender Unit, fill 500 mL of water into the Blender Jug and cover with the Blender Lid. Plug-in the plug into the socket and turn on the Power Switch.
2

3
Food Processor: Select the Intermittent mode, push the Stop/Start Switch and operate for 10 \~ 20 seconds at level 10.
Blender: Select the Continuous mode, push the Stop/Start Switch and operate for 10 \~ 20 seconds at level 10.
Push the Stop/Start Switch to stop the driving operation. Switch off the Power Switch and unplug from the socket.
Remove the attachments and proceed for cleaning.
natural_image
Line drawing of a kitchen blender with handle and internal components (no text or symbols)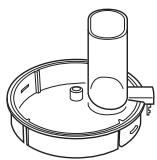

Wash these items by rinsing them under running water. Use neutral kitchen detergent if necessary. Proceed to wipe them dry with a clean cloth.


Wash these items by rinsing them under running water, and clean carefully with Brush. Use neutral kitchen detergent if necessary.
Note:
• These items are extremely sharp and should be handled with extra care while cleaning. Avoid hitting these items on hard objects during the cleaning process.
- The Mill Container Base must not be washed, use Brush to clean.

AFTER USE
Motor Housing / Rubber Foot
Wipe off any dirt or stains with a clean damp cloth.
Note:
- Ensure that the power cord is unplugged before cleaning the Motor Housing.
- Do not wash the Motor Housing under running water.
- Never use corrosive liquids (e.g. alcohol, thinner, etc) to clean the Motor Housing.
Cleaning with a Dishwasher
The Bowl and Bowl Lid of this appliance are dishwasher safe.
Note:
- Do not place these items near the dishwasher heater area as high temperatures may damage the parts.
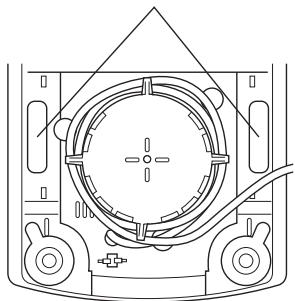
Storing
Ensure all attachments and the Bowl are removed from the Motor Housing prior to storage.
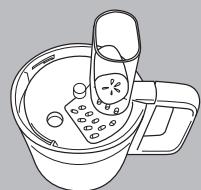
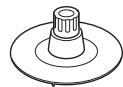
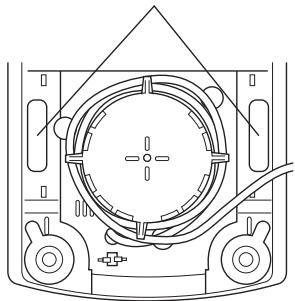
1
natural_image
Line drawing of hands operating a portable toaster with control buttons (no text or symbols)Release Lever

natural_image
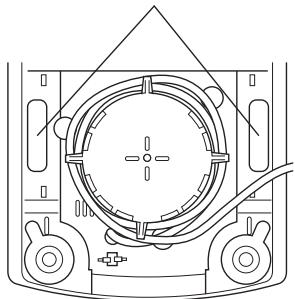
Technical line drawing of a mechanical component with no visible text or symbolsTo release the Rubber Foot suction of the Motor Housing, press on the release lever located at the bottom side of the Motor Housing at the same time as seen in the above picture and lift up.
2
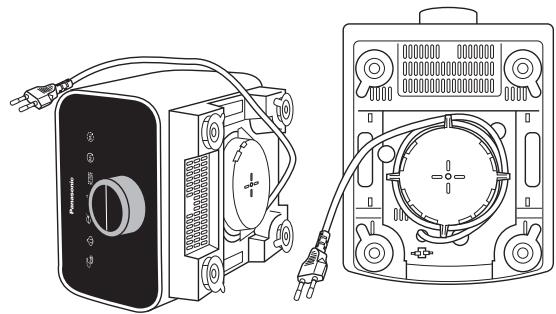
natural_image
Technical line drawing of a portable electronic device with attached cable and indicator lights (no text or symbols)Tilt the Motor Housing on its side, and proceed to wind up the Power Cord around the Cord Winding Area partially, leaving the Plug at the sides.
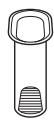
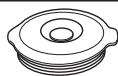
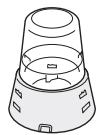
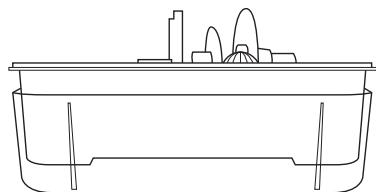
3
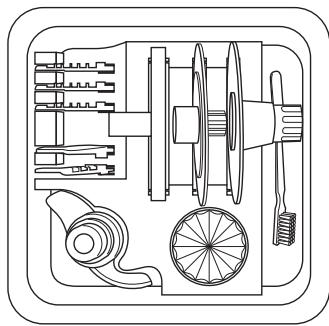
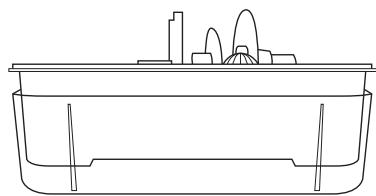
(i)
natural_image
Diagram showing a kitchen appliance with a handle and internal components, no text or symbols present(ii)
natural_image
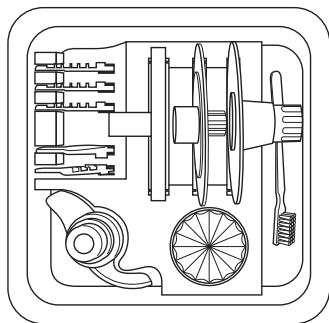
Technical line drawing of a mechanical assembly with gears, pulleys, and a wheel (no text or labels)(iii)

natural_image
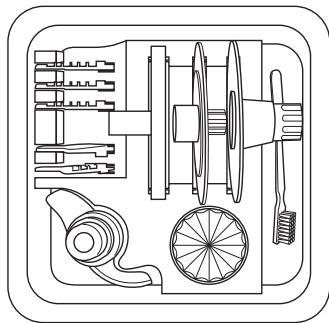
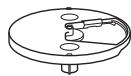
Line drawing of a rectangular container with a top platform and internal structures (no text or symbols)(i) Store the Knife Blade inside the Bowl. The Storage Case Unit is included to store the other attachments. Store the attachments in place as per packaging condition.
(ii) List of attachments in Storage Case Unit: Kneading Blade, Citrus Cone, Thick Slicing Blade, Thin Slicing Blade, Fine Shredding Blade, Coarse Shredding Blade, Julienne Blade, Blade Stand, Grating Blade, Whipping Blade and Brush.
(iii) Place the Storage Case Lid beneath the Storage Case to collect the drained water from the washed attachments
Note:
- Dispose of the flexible plastic cover after opening the Storage Case.
TROUBLESHOOTING
Please check the following points before arranging for service.
| Problem | Cause and Action | |
| The appliance does not turn on. | ▷ | ● The plug is loose in the outlet. ➔ Plug in firmly into the outlet. ● The Power Switch has not been ➔ Turn on the Power Switch. |
| None of the Control Panel Functions can be selected. | ▷ | ● Gloves may cause insensitivity of the Control Panel. ➔ Select the functions with bare fingers. ● Pressing the function at the wrong position. ➔ Press firmly on the illustration on the Control Panel. ● The appliance is already operating. ➔ The functions cannot be changed when the appliance is operating. Stop the previous function before selecting a new one. |
| The appliance does not start even the Stop/Start Switch is pressed. (Error Mode is indicated) | ▷ | ● The Bowl, Blender Unit or Dry Mill Unit is not properly locked onto the Motor Housing. ➔ Ensure that the triangle mark on the attachments are aligned with the rectangular mark on the Motor Housing as seen in page GB10. ● The Bowl Lid or Citrus Strainer is not fully locked onto the Bowl. ➔ Fully secure the Bowl Lid or Citrus Strainer onto the Bowl. |
| The appliance does not operate even when the function is started. (No Error Mode) | ▷ | ● The ingredients are jammed. ➔ Remove the ingredients carefully and ensure that the amount used is as stated. |
| The selected function is canceled. (The Mode Indication L.E.D. starts blinking). | ▷ | ● The appliance was left idle for more than 10 seconds after selecting the function. ➔ Ensure that action is done after selecting the function within 10 seconds. |
| The appliance suddenly stops during operation. | ▷ | ● The circuit breaker protection is activated. (Refer to page GB10) · Too much ingredients were inserted. ➔ Remove the excess ingredients and ensure that the amount used is as stated. · Large chunks or hard ingredients were used. ➔ Ensure that the ingredients are cut into the stated sizes. Do not use hard ingredients such as frozen foods or highly dense solids. ● The safety lock was triggered. (Refer to page GB10) · Abnormal vibration during operation may offset the safety lock engagement. ➔ Ensure that the ingredients used and the amount are as stated. ➔ Lock the Bowl Lid or Citrus Strainer onto the Bowl firmly, and ensure that the Bowl, Blender Unit, or Dry Mill Unit is locked firmly onto the Motor Housing. |
TROUBLESHOOTING
Problem
There is abnormal vibration and noise during operation.
The texture and consistency of the processed ingredients did not turn out well.

Cause and Action
● The Rubber Feet and/or the work top are not clean.
Wipe off any dirt or stains with a clean damp cloth. The Rubber Foot is only effective when placed on a clean, smooth and flat surface.
● The ingredients used for processing is either too much or too hard.
- Ensure that the ingredients used are as stated, reduce the ingredients if it is over the stated amount.
● Some ingredients might be too difficult to process raw, e.g.pumpkin.
→ Precook might be necessary to soften the ingredients before processing, i.e. until a fork can easily pierce.
- Ingredient size is not according to the preparation method.
→ Prepare accordingly to follow the size stated.
- Processing certain ingredients at the same time may result in lumps remaining for Frozen mode.
Auto Menu
- The Auto Menu's default processing duration is meant for the stated ingredient amounts. Any other ingredient amounts processed will affect the performance.
→ Increase the processing duration by adjusting the Rotary Dial and process till the desired texture and consistency.
Manual Menu
● The maximum ingredient amount and processing duration are meant to serve as a guideline, lesser ingredient amount and different ingredients will affect the performance.
→ Process the ingredients with a suitable duration till the desired texture and consistency.
Error Mode Indication
Circuit Breaker Protection, High Voltage Detection and High Current Detection
i) Circuit Breaker Protection

No L.E.D.s light up.
ii) High Voltage Detection
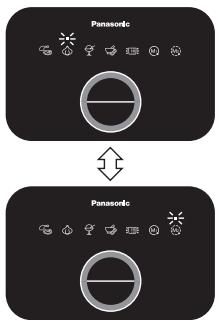
Alternate blinking of Chop and Intermittent L.E.D.s.
iii) High Current Detection
flowchart
graph TD
    A["Panasonic"] --> B["Panasonic"]
Alternate blinking of Mince+Chop and Continuous+Intermittent L.E.D.s.
Action:
For scenario i) and iii), turn off the Power Switch at the side of Motor Housing, reduce the amount of ingredients into half and resume operation. If it still does not start, turn off the Power Switch again at the side of Motor Housing and resume operation.
For scenario ii), the Error Mode Indication is shown due to exceed voltage rating. Use 220-240 V.
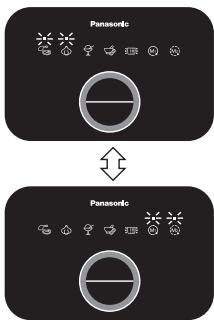
Motor Overheat
Alternate blinking of Mince and Intermittent L.E.D.s.
The Bowl, Blender Unit or Dry Mill Unit is not properly locked onto the Motor Housing.
Alternate blinking of Mince+Chop+Frozen and Paste+Drainer+Continuous L.E.D.s.
Action:
Turn off the Power Switch, and let the appliance to cool down (approx. 30 min). Reduce the amount of ingredients into half and resume operation.
Action:
Reattach the part onto the Motor Housing in proper position. (Refer to page GB10).
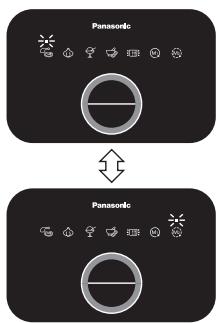
Electronic component malfunction

or

or

[Non-Text]

Alternate blinking of Mince or Chop or Frozen and Continuous L.E.D.s.
Action:
Please contact your nearest service center for repairing.
SPECIFICATIONS
| Model No. | MK-F800 | |
| Function | Food Processor | Blender & Dry Mill |
| Power Supply | 220 - 240 V ~ 50 - 60 Hz | |
| Rated Consumption | 180 - 200 W | |
| Switch | Rotary Dial with Soft Touch Panel Switch | |
| Operation Rating | 2 minutes ON, 4 minutes OFF | Blender: 2 minutes ON, 2 minutes OFFDry Mill: 1 minute ON, 2 minutes OFF |
| With exception for the stated on “Ingredient Preparations” page. | ||
| Dimension (Approx.)(HxWxD) | 435 x 264 x 265 mm | Blender: 406 x 264 x 265 mmDry Mill: 298 x 264 x 265 mm |
| Mass (Approx.) | 4.3 kg | Blender: 4.0 kgDry Mill: 3.8 kg |
| Capacity (Approx.) | Container Capacity: 2.5 LMaximum working capacity:Liquids only = 1.5 LSolids only = 600 g | Blender: 1 LDry Mill: 50 g (Coffee Beans) |
| With exception for the stated on “Ingredient Preparations” page. | ||
| Attachment & Accessories | Knife Blade, Grating Blade, Kneading Blade, Whipping Blade, Salad Drainer, Blade Stand, Shredding Blades (Coarse & Fine), Slicing Blades (Thick & Thin), Julienne Blade, Citrus Press and Storage Case Unit | Blender Unit, Dry Mill Unit |
| Common Accessories | Brush with Spatula | |
| Dishwasher Safe Items | Bowl and Bowl Lid | |
| Airborne Acoustical Noise | 86 (dB (A) re. 1 pW) | 87 (dB (A) re. 1 pW) |

Disposal of Old Equipment
Only for European Union and countries with recycling systems
This symbol on the products, packaging, and/or accompanying documents means that used electrical and electronic products must not be mixed with general household waste. For proper treatment, recovery and recycling of old products, please take them to applicable collection points in accordance with your national legislation. By disposing of them correctly, you will help to save valuable resources and prevent any potential negative effects on human health and the environment. For more information about collection and recycling, please contact your local municipality. Penalties may be applicable for incorrect disposal of this waste, in accordance with national legislation.
INHALTSVERZEICHNIS
Seite
natural_image
Line drawing of a kitchen blender with handle and side panel (no text or symbols)
natural_image
Line drawing of a blender with a lid and base, showing the process from top to bottom (no text or symbols)A
natural_image
Technical line drawing of a mechanical component with concentric circles and central shaft (no text or symbols)natural_image
Line drawing of a blender oven with a side panel and an upward arrow indicating the process (no text or symbols present)natural_image
Line drawing of a blender with a side panel and upward arrow indicating motion (no text or symbols)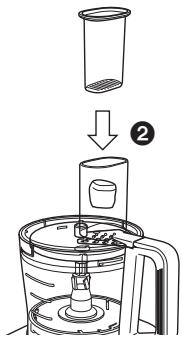
natural_image
Line drawing of a blender with a lid and an upward arrow indicating process (no text or symbols)natural_image
Line drawing of a kitchen sink with a side bowl and tray (no text or symbols)Abb. 1.
natural_image
Line drawing of a bowl with a spoon and glass container (no text or symbols)Abb. 2.
KÜCHENMASCHINE - KNETHAKEN -
natural_image
Illustration of a hand pouring liquid into a blender with a lid (no text or symbols)
natural_image
Illustration of a hand pouring liquid into a cup with granular substance (no text or symbols)2

natural_image
Illustration of a hand holding a wristwatch with a cable wrapped around it, showing a curved cord (no text or symbols present)
Mixer
natural_image
Line drawings of various kitchen appliances including a blender, fan, and blender (no text or labels)natural_image
Line drawing of a hand holding a Panasonic electric toaster (no text or symbols on the device itself)Entriegelungshebel

natural_image
Technical line drawing of a mechanical component with no visible text or symbolsnatural_image
Technical line drawing of a portable electronic device with attached cable and indicator lights (no text or symbols)natural_image
Diagram of a kitchen appliance showing a lid and base with a handle, no text or symbols present(ii)
natural_image
Technical line drawing of a mechanical assembly with gears, pulleys, and a wheel (no text or labels)(iii)
natural_image
Line drawing of a container with a top shelf and abstract curved elements above it (no text or symbols)natural_image
Line drawing of a kitchen blender with handle and side panel (no text or symbols)
natural_image
Line drawing of a blender with a lid and lid, showing the blade and handle (no text or symbols)natural_image
Line drawing of a kitchen blender with handle and lid, showing internal components (no text or symbols)
A

natural_image
Technical line drawing of a mechanical component with concentric circles and a central shaft (no text or symbols)natural_image
Line drawing of a blender oven with a side panel and lid, showing internal components and an upward arrow (no text or symbols)natural_image
Line drawing of a blender with a side panel and upward arrow indicating motion (no text or symbols)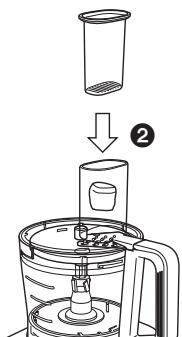
natural_image
Line drawing of a blender with a lid and upward arrow indicating process (no text or symbols)natural_image
Line drawing of a kitchen sink with a cylindrical tool and side bowl (no text or symbols)Figure 1
natural_image
Line drawing of a kitchen sink with a spoon and bowl (no text or symbols)Figure 2
ROBOT DE CUISINE MULTIFONCTION - LAME POUR PÉTRIR -

natural_image
Illustration of a hand pouring liquid into a blender with a lid, showing a downward arrow (no text or symbols)
natural_image
Illustration of a hand pouring liquid into a glass with a small object on top (no text or symbols)2

natural_image
Illustration of a hand holding a wristwatch with a cable being twisted (no text or symbols)flowchart
graph TD
    A["Step 1: Cooking with a blender"] --> B["Product with food in a pot"]
    B --> C["Product with food in a pot also on top"]
    C --> D["Product with food in a pot on the plate"]
Mixeur
natural_image
Line drawings of various kitchen appliances including a blender, blender, and blender with no visible text or labelsnatural_image
Six abstract geometric shapes with line drawings, no text or symbols presentnatural_image
Line drawing of a hand holding a portable food grater with control buttons (no text or symbols)Levier de déblocage
natural_image
Technical line drawing of a mechanical component with no visible text or symbolsnatural_image
Technical line drawing of a portable electronic device with attached circuit board and power plug (no text or symbols)natural_image
Diagram of a kitchen appliance showing a lid and side view of the interior (no text or symbols)(ii)
natural_image
Technical line drawing of a mechanical assembly with gears, pulleys, and a wheel (no text or labels)(iii)

natural_image
Line drawing of a rectangular container with internal structures and a top platform (no text or symbols)natural_image
Line drawing of a kitchen blender with handle and side panel (no text or symbols)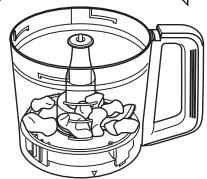
A
natural_image
Two circular diagrams with central circular elements and directional arrows, no text or symbols present.natural_image
Technical line drawing of a mechanical component with concentric circular features and central shaft (no text or symbols)Place the Bowl Lid on top of the Bowl and turn it clockwise until a ‘click’ sound is heard.
natural_image
Line drawing of a blender with a side panel and upward arrow indicating motion (no text or symbols)natural_image
Line drawing of a blender with a side panel and handle, showing liquid level and control knob (no text or symbols)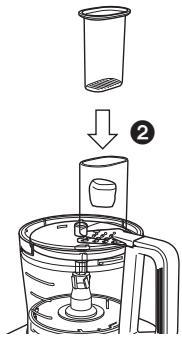
natural_image
Line drawing of a blender with a lid and an upward arrow indicating process (no text or symbols)natural_image
Line drawing of a kitchen sink with a side handle and lid, no text or symbols presentFigura 1
natural_image
Line drawing of a kitchen sink with a spoon and bowl (no text or symbols)Figura 2
ROBOT DA CUCINA - LAMA PER IMPASTARE -
natural_image
Illustration of a hand pouring liquid into a blender with a lid, showing a downward arrow (no text or symbols)
natural_image
Illustration of a hand pouring liquid into a glass with a small object on top (no text or symbols)2
natural_image
Illustration of a hand holding a wristwatch with a cable being twisted (no text or symbols)flowchart
graph TD
    A["Step 1: Added food"] --> B["Adder"]
    B --> C["Adder Fan"]
    C --> D["Adder Plate"]
Frullatore
natural_image
Line drawing of a kitchen blender with handle and side panel (no text or symbols)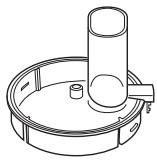


natural_image
Line drawing of hands holding a portable food microwave (no text or symbols visible)Leva di rilascio
natural_image
Technical line drawing of a mechanical component with circular and rectangular features (no text or symbols)natural_image
Technical line drawing of a portable electronic device with attached wiring and ports (no text or symbols)(ii)
natural_image
Technical line drawing of a mechanical assembly with gears, pulleys, and a wheel (no text or labels)(iii)

natural_image
Line drawing of a rectangular container with internal structures and a top platform (no text or symbols)ESPUÉS DEL USO.... SP27 - SP28
natural_image
Line drawing of a kitchen blender with handle and side panel (no text or symbols)
A

natural_image
Technical line drawing of a mechanical component with concentric circular features and central shaft (no text or symbols)natural_image
Line drawing of a blender oven with a side panel and lid, showing internal components and an upward arrow (no text or symbols)natural_image
Line drawing of a kitchen blender with a side panel and handle, showing liquid level and control buttons (no text or symbols)
natural_image
Line drawing of a blender with a lid and upward arrow indicating process (no text or symbols)natural_image
Line drawing of a kitchen sink with a cylindrical tool and side bowl (no text or symbols)Figura 1
natural_image
Line drawing of a kitchen sink with a side table and handle (no text or symbols)Figura 2

natural_image
Illustration of a hand pouring liquid into a blender with a lid (no text or symbols)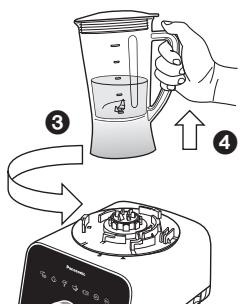
natural_image
Illustration of a hand pouring liquid into a glass with a small object on top (no text or symbols)2

natural_image
Illustration of a hand holding a wristwatch with a cable being inserted (no text or symbols)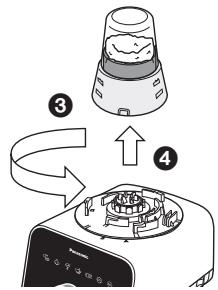
Licuadora
natural_image
Line drawing of a kitchen blender with handle and internal components (no text or symbols)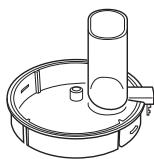


natural_image
Technical line drawing of a portable electronic device with attached wiring and a separate analog box (no text or symbols)natural_image
Line drawing of a kitchen appliance showing a lid and side view (no text or symbols)(ii)

natural_image
Technical line drawing of a mechanical assembly with gears, pulleys, and a wheel (no text or labels)(iii)
natural_image
Line drawing of a rectangular container with internal structures and a top platform (no text or symbols)flowchart
graph TD
    A["Panasonic"] --> B["Air Condition Icon"]
    B --> C["Flow Direction Arrows to Panel 1"]
    C --> D["Panasonic Air Condition Icon"]
    D --> E["Output Air Condition Icon"]
Las luces LED del modo Moler+ picar e continuas+intermitentes parpadean en forma alternada.
Acción:
(i) MESBLAD ....NL13 - NL15
(iii) KNEEDBLAD....NL18
(iv) KLOPSCHIJF ....NL19
PROBLEEMOPLOSSING ....NL29 - NL30
SPECIFICATIES....NL32
NL2
natural_image
Line drawing of a kitchen blender with handle and side panel (no text or symbols)natural_image
Diagram of a mechanical device with a rotating base and directional arrows indicating motion (no text or symbols)②↓

A

natural_image
Technical line drawing of a mechanical component with concentric circular features and central shaft (no text or symbols)natural_image
Line drawing of a blender oven with a side panel and an upward arrow indicating the process (no text or symbols present)natural_image
Line drawing of a blender oven with a side panel and lid, showing internal components and an upward arrow (no text or symbols)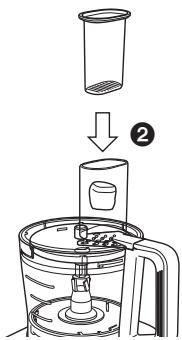
natural_image
Line drawing of a blender with a lid and upward arrow indicating process (no text or symbols)natural_image
Line drawing of a kitchen sink with a spoon and lid (no text or symbols)Afbeelding 1
natural_image
Line drawing of a kitchen sink with a spoon and bowl (no text or symbols)Afbeelding 2
KEUKENMACHINE - KNEEDBLAD -
natural_image
Illustration of a hand pouring liquid into a blender with a lid (no text or symbols)
natural_image
Illustration of a hand pouring liquid into a glass cup with small items (no text or symbols)2

natural_image
Illustration of a hand holding a wristwatch with a cable being inserted (no text or symbols)flowchart
graph TD
    A["Step 1: Cooking with a blender"] --> B["Product with food in the kitchen"]
    B --> C["Output: Final Product"]
Blender
natural_image
Line drawing of hands holding a portable food blender with control buttons (no text or symbols)Ontgrendelingshendel
natural_image
Technical line drawing of a mechanical component with no visible text or symbolsnatural_image
Technical line drawing of a portable electronic device with attached circuit board (no text or symbols)natural_image
Diagram of a kitchen appliance showing a lid and side view of the interior (no text or symbols)(ii)
natural_image
Technical line drawing of a mechanical assembly with gears, pulleys, and a wheel (no text or labels)(iii)

natural_image
Line drawing of a rectangular container with internal structures and a top platform (no text or symbols)Panasonic Test and Development Kitchen
Panasonic Consumer Electronics U.K.
A Division of Panasonic U.K. Ltd
Willoughby Road, Bracknell, Berks, RG12 8FP
Representative in EU :
Panasonic Marketing Europe GmbH
Panasonic Testing Centre
Winsbergring 15, 22525 Hamburg, Germany
Panasonic Manufacturing Malaysia Berhad.
No. 3, Jalan Sesiku 15/2, Section 15, Shah Alam Industrial Site, 40200 Shah Alam, Selangor Darul Ehsan, Malaysia.
http://www.panasonic.com
Printed in Malaysia
© Panasonic Manufacturing Malaysia Berhad 2016
UZ50E153
F0416-0
E