
PVTT15UBT - Turntable Pyle - Free user manual and instructions
Find the device manual for free PVTT15UBT Pyle in PDF.

| Product Type | Belt-drive turntable with Bluetooth output and USB recording |
| Brand | Pyle |
| Model | PVTT15UBT |
| Dimensions (W x D x H) | 14.5 x 12.5 x 5.0 inches (36.8 x 31.8 x 12.7 cm) |
| Weight | 8.0 lbs (3.6 kg) |
| Power Supply | AC 120V, 60Hz (includes external power adapter) |
| Speed Settings | 33⅓, 45, 78 RPM |
| Drive Method | Belt drive |
| Cartridge Type | Moving magnet (MM) with replaceable stylus (AT-95E equivalent) |
| Bluetooth Version | Bluetooth 4.1, supports A2DP for wireless audio streaming |
| USB Output | USB-A for direct recording to PC (requires Audacity or similar software) |
| Audio Outputs | RCA line output (stereo), 3.5mm headphone jack |
| Built-in Speakers | Yes, 2 x 3W |
| Tonearm Type | Aluminum, straight, with counterweight and anti-skate adjustment |
| Speed Accuracy | ±0.5% adjustable via fine pitch control |
| Record Playback | 7"/10"/12" vinyl records |
| Noise & Distortion | Signal-to-noise ratio > 65dB; THD ≤ 0.5% |
| Maintenance | Clean stylus with soft brush; replace stylus every ~500 hours; keep dust cover closed when not in use |
| Safety Precautions | Unplug before cleaning; avoid moisture; do not operate near water |
| Spare Parts Available | Replacement stylus (part # ST-95E), drive belt, counterweight |
| Repairability | Moderate; user-replaceable stylus and belt; consult manual for internal repairs |
Frequently Asked Questions - PVTT15UBT Pyle
User questions about PVTT15UBT Pyle
0 question about this device. Answer the ones you know or ask your own.
Ask a new question about this device
Download the instructions for your Turntable in PDF format for free! Find your manual PVTT15UBT - Pyle and take your electronic device back in hand. On this page are published all the documents necessary for the use of your device. PVTT15UBT by Pyle.
USER MANUAL PVTT15UBT Pyle
natural_image
Vintage teal-colored stand with open lid and circular dial, no visible text or symbols on the device itselfModel:
PVTT15UBT

CAUTION: TO REDUCE THE RISK OF ELECTRIC SHOCK, DO NOT REMOVE COVER (OR BACK). NO USER- SERVICEABLE PARTS INSIDE. REFER SERVICING TO QUALIFIED SERVICE PERSONNEL

The lightning flash with arrowhead symbol within an equilateral triangle, is intended to alert the user to the presence of uninsulated "dangerous voltage" within the product's enclosure that may be of sufficient magnitude to constitute a risk of electric shock to persons.

The exclamation point within an equilateral triangle is intended to alert the user to the presence of important operating and maintenance (servicing) instructions in the literature accompanying the appliance.
WARNING: TO PREVENT FIRE OR SHOCK HAZARD, DO NOT EXPOSE THIS APPLIANCE TO RAIN OR MOISTURE.
IMPORTANT SAFETY INSTRUCTIONS
1) Read these instructions.
2) Clean only with dry cloth
3) Do not block any ventilation openings. Install in accordance with the manufacturer's instructions.
4) Do not install near any heat sources such as radiators, heat registers, stoves, or other apparatus (including amplifiers) that produce heat.
5) Protect the power cord from being walked on or pinched particularly at plugs, convenience receptacles and the point where they exit from the apparatus.
6) Unplug this apparatus during lightning storms or when unused for long periods of time.
7) Refer all servicing to qualified service personnel. Servicing is required when the apparatus has been damaged in any way, such as power-supply cord or plug is damaged, liquid has been spilled or objects have fallen into the apparatus, the apparatus has been exposed to rain or moisture, does not operate normally, or has been dropped.
8) This appliance shall not be exposed to dripping or splashing water and no object filled with liquids such as vases shall be placed on the apparatus.
9) Do not overload wall outlet. Use only power source as indicated.
10) Use replacement parts as specified by the manufacturer.
CAUTION
- DO NOT REMOVE THE EXTERNAL CASES OR CABINETS TO EXPOSE THE ELECTRONICS. NO USER SERVICEABLE PARTS ARE WITHIN!
- USE OF CONTROLS OR ADJUSTMENTS OR PERFORMANCE OF PROCEDURES OTHER THAN THOSE SPECIFIED HEREIN MAY RESULT IN HAZARDOUS RADIATION EXPOSURE.
Contents
Read this manual carefully to get the best performance from this unit.
Important safety instructions 1
Contents /Before using the unit....2
Discs. 3
Handling Records 4
How to Replace the Stylus 4
Connections/How to Open/close turntable cover 5
Parts of the Turntable 6
Unit Functions 7-8
Listening to a CD 9-10
Listening to a Record 11-12
Listening to the Radio 13
Listening to a USB disk or SD card 14
USB and SD Card RECORDING 15-16
Listen through bluetooth/Line in 17
Troubleshooting 18
Specifications 19
Before Using the Unit
Read this before any operations
- As the unit may become warm during operation, always leave sufficient space around the unit for ventilation,
- The voltage supplied to the unit should match the voltage as printed on the rear panel. If you are in any doubt regarding this matter, please consult an electrician,
- Choose the installation location of your unit carefully. Avoid placing it in direct sunlight or close to a source of heat. Also avoid locations subjected to vibrations and excessive dust, heat, cold or moisture.
- Do not place the unit on an amplifier/receiver.
- Do not open the cabinet as this might result in damage to the circuitry or electrical shock. If an object should get into the unit, contact your dealer or service company.
- When removing the power plug from the wall outlet, always pull directly on the plug, never yank the cord.
• To keep the laser pickup clean, do not touch it and always close the disc tray. - Do not attempt to clean the unit with chemical solvents as this might damage the finish. Use a clean, dry cloth.
- Keep this manual in a safe place for future reference.
DO NOT MOVE THE UNIT DURING PLAYBACK
During playback, the disc rotates at high speed. Do NOT lift or move the unit during playback. Doing so may damage the disc or the unit.
WHEN MOVING THIS UNIT
When changing the unit's location or packing the unit for moving.
he gives to remain the world so far. Using this way it
EN
Discs which can be played on this unit:
-
Conventional audio CDs bearing the CD-DA logo on the label:
•
.
.
。
:
• Properly finalized CD-R, CD-RW and CD-MP3 discs -
Always place the disc on the disc tray with the label side up. (Compact discs can be played or recorded only on one side.)
- To remove a disc from its storage case, press down on the center of the case and lift the disc out, holding it carefully by the edges.
How to remove the disc How to hold the disc
- Should the disc become dirty, wipe the surface radially (from the center hole outward towards the outer edge) with soft, dry cloth
- Never use such chemicals as record sprays, antistatic sprays or fluid, benzine or thinner to clean the discs. Such chemicals will do irreparable damage to the disc's plastic surface.
- Discs should be returned to their cases after use to avoid dust and scratches that could cause the laser pickup to "skip."
- Do not expose discs to direct sunlight or high humidity and temperature for extended periods. Long exposure to high temperatures will warp the disc.
- Do not play any disc that is warped, deformed or damaged. Playing such discs may cause irreparable harm to the playing mechanisms.
- CD-R, CD-RW and CD-MP3 discs are more sensitive to the effects of heat and ultraviolet rays than ordinary CDs. It is important that they are not stored in a location where direct sunlight will fall on them and away from sources of heat such as radiators or heat-generating electrical devices.
- Printable CD-R, CD-RW and CD-MP3 discs aren't recommended, as the label side might be sticky and damage the unit.
- Do not stick papers or protective sheets on the discs and do not use any protective coating spray.
- Use a soft oil-based felt-tipped pen to write the information on the label side. Never use a ball-point or hard-tipped pen, as this may cause damage to the recorded side.
- Never use a stabilizer. Using commercially available CD stabilizers with this unit will damage the mechanisms and cause them to malfunction.
- Do not use CDs with an irregular shape (octagonal, heart shaped, business card size, etc.). CDs of this sort can damage the unit:
- If you are in any doubt as to the care and handling of a CD-R/CD-RW and CD-MP3 disc, read the precautions supplied with the disc, or contact the disc manufacturer directly.
Handing Records
- Do not touch the record's grooves. Only handle records, by the edges or the label. Make sure your hands are clean. Skin oils from even clean hands can leave a residue on the record surface that will gradually deteriorate the quality of your record.
- Keep your records away from dust. Keep them in a cool, dry place.
• To avoid dust and scratches, keep records in their sleeves and jackets when not in use.
- Store records upright on their edges. Records stored horizontally will eventually bend and warp.
- Do not expose records to direct sunlight or high humidity and temperature. Long exposure to high temperatures will wrap the record.
- Do not store your records in the trunk of your car. The temperature in a closed trunk can ruin your collection.
- Store records in an area with a stable temperature and low humidity.
- Should the record become dirty, gently wipe the surface in a circular motion, using a soft anti-static cloth.
Replace the stylus
The stylus should last about 50 hours under normal use. However, it is recommended that the stylus be replaced as soon as you notice a change in sound quality.
Prolonged use of a worn-out stylus may damage the record. Wear and tear on the stylus will be accelerated when playing 78 RPM records. The higher speed of 78 RPM records can wear the stylus more quickly.
Caution:
• Do not remove or bend the stylus.
• To avoid injury, do not touch the needle.
• Turn off the unit's power before you replace the stylus.
- Keep it out of the reach of children.
- Handle with care, as the stylus is delicate. Use of a bent or broken stylus may damage the record and cause the turntable to malfunction.
• Do not expose Stylus to extreme heat.
- Contact a qualified repair company if you experience difficulty in changing the stylus.
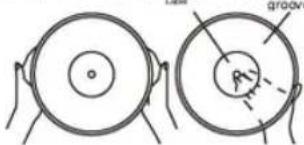
Removing an old stylus
- Set a screwdriver at the tip of the stylus and push down to the direction "A".
- Pull the stylus out toward direction "B".


DC in
Audio out
Plug the power adaptor into the DC in socket.
(Adaptor was included)
FM antenna
While in FM mode, tune in an FM station and move the unit to find get good reception. This antenna may need to be repositioned if you move your unit to a new location.
(FM antenna was built inside.)
How to open/close the turntable cover

To Open:
- Open the two buckle, like showing in pic A.
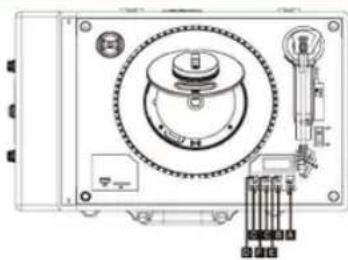
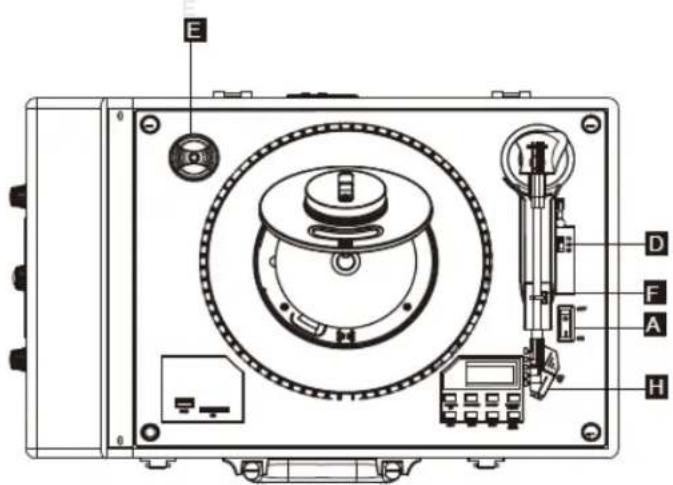
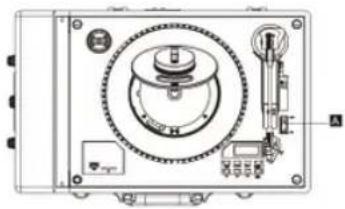
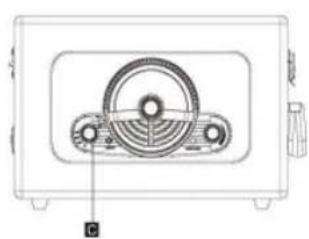
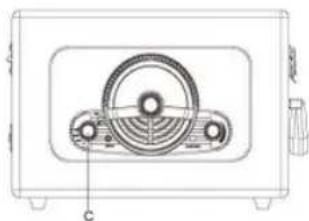
Parts of the Turntable

A turntable
B 45 RPM adaptor (supplied)
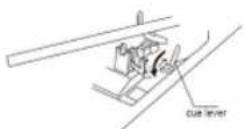
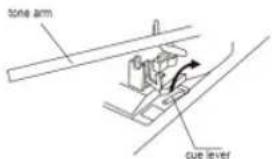
cue-lever
Use this lever to lift the tone arm
D tone arm holder
E tone arm
speed selector
Before use, detach the stylus guard (white plastic cover) by pulling it straight off the front of the cartridge in the direction of the arrow.

EN
V
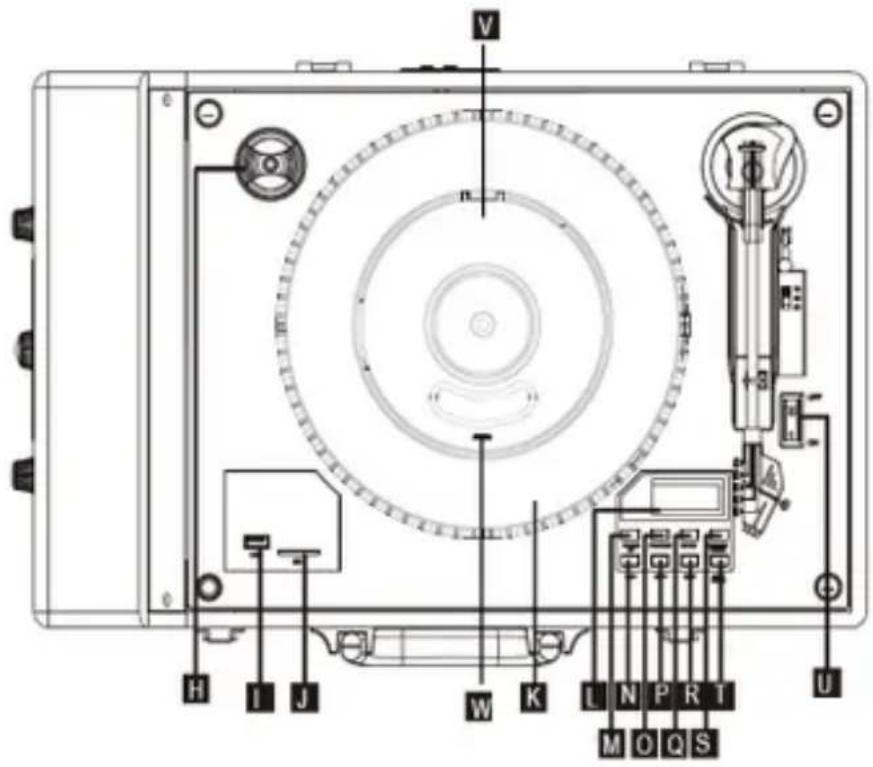

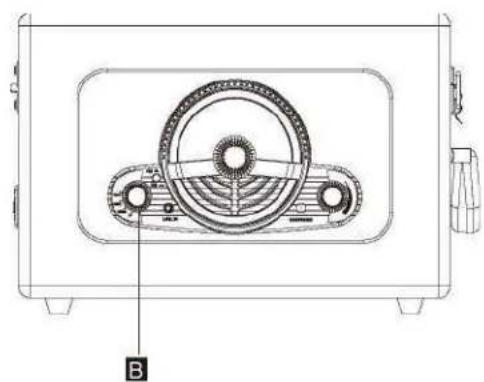
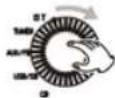
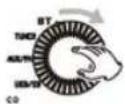
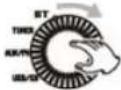
A CD/USB-SD/AUX-PH/TUNER/BT knob
Turn the knob to CD to play a CD

Turn the knob to USB-SD to play the music from USB or SD
USb
Turn the knob to AUX-PH to play an audio device or a record
RU
Turn the knob to TUNER to listen to radio

Turn the knob to BT to play music from smartphone
B AM/FM knob
PUSH this button to select FM or AM mode
C LINE IN Jack
Play music from external devices
TUNING Display Plate
TUNING knob
EARPHONE jack
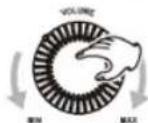
VOLUME knob
Turn the knob clockwise and counter-clockwise to adjust the volume
45RPM adaptor
USB slot
SD card slot
Turntable platter
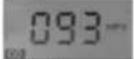
LCD display
When the unit is on, this display will light.
FOLDER UP button
SKIP-button
PROGRAM button
SKIP+ button
REPEAT button
STOP button
RECORD/ERASE button
PLAY/PAUSE button
ON/OFF button
Disc tray
OPEN/CLOSE button
Listening to a CD

natural_image
Technical diagram of a mechanical device with labeled components A and G (no text or symbols beyond labels)Push the POWER button to turn the unit "on"

Set the function knob (CD/USB-SD/AUX-PH/TUNER/BT) to CD.
natural_image
Technical diagram of a mechanical or electronic device with labeled components (no readable text or symbols)Press the CD door down gently to close the CD door.
Total number of tracks
total number of tracks

Total Number of tracks will appear on the display.
Playing will start automatically.
Turn the VOLUME knob to adjust the volume.
Press the OPEN button on the CD tray.

Place a disc on the tray with the printed label face up.
EN
natural_image
Technical line drawing of a mechanical device with no visible text or symbolsTo suspend playing temporarily (pause mode)

Press the PLAY/PAUSE button during playback.
Playback stops at the current position, and the track number blinks in the display.
To resume play back, press the PLAY/PAUSE button again.
To stop playback

Press the STOP button to stop playback. To resume playback, press the PLAY/PAUSE button again
To skip to the next or a previous track

During playback, repeatedly press the SKIP button (skip- or skip+)
Search for a folder of a disc
If you play a USB/SDidisc with folders press this to choose the folder you want

REPEAT Function
If the USB/SD/disc has no folder
Press "REPEAT" button once to repeat one single track. Press "REPEAT" button one more time to repeat all tracks. Press "REPEAT" button three times to cancel repeat function.
If the disc/USB/SD has folder
Press "REPEAT" button once to repeat one single track. Press "REPEAT" button one more time to repeat the currently playing folder Press "REPEAT" button three times to repeat all tracks of the disc. Press "REPEAT" button four times to cancel the repeat function.

natural_image
Technical line drawing of a mechanical fan or vent with labeled component B (no text or symbols beyond label)Detach the stylus guard (white plastic cover)
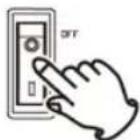
Push the POWER button to "on"

B Set the function knob (CD/USB-SD/AUX-PH/TUNER/
BT) to AUX-PH


C Gently open the dust cover.
Be careful not to pinch your finger.
Select the speed.
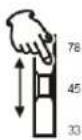
Put the record on the turntable. When playing a 45 RPM record, use the included adaptor.
F Gently push the clamper to the right to release the tone arm.
C Raise the cue lever to lift the tone arm off the tone arm support.
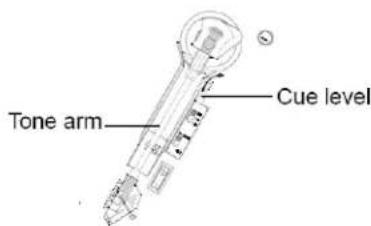
EN
Move the tone arm gently to the edge of the record (or the start point of a track). The turntable will begin to turn.

Gently lower the tone arm by slowly releasing the cue lever. You can lower the tone arm manually if the cue lever has not been raised.
When the tone arm reaches the end of the record it will automatically stop. Please bring the tone arm to the support by hand.
5 Turn the VOLUME knob to adjust the volume.
Playing records with the dust cover down will prevent dust from falling on the turntable.
EN
Listening to the Radio

Push the power button to turn the unit 'on'
natural_image
Technical line drawing of a mechanical device with no visible text or symbolsIn FM Mode, the lower half of the round plate will light up if the station signal is strong.
B Set the function knob (CD/USB-SD/AUX-PH/TUNER/BT) to Tuner.
Turn the tuning knob to select your interested station.
Turn the VOLUME knob to adjust the volume.

If the reception is poor
Reposition the unit to find the best position for AM/FM stations.
NOTE: AM/FM antennas are all built inside.
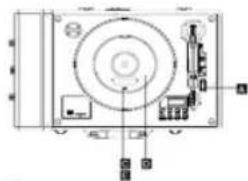
Listening to a USB disk or SD card

natural_image
Technical line drawing of a mechanical device with labeled ports (no text or symbols)

USB and SD card playing
A Push the power button to 'on'.

B Set the function knob (C AUX-PH / TUNER/ BT) to USB / SD.

Insert USB disk or SD card into slot. The LCD will display the total folder and tracks. If no USB disk or SD card, "NOF" will show on the display.
Press 'PLAY / PAUSE' to start music playback. Turn the volume knob to adjust to volume.
Press the SKIP-/SKIP+ once or repeatedly until the desired track number appears on the display. Playback will begin automatically.
You can press the FOLDER button to choose the desired folder.
Press STOP to stop playback
To pause the music, press PLAYER/ PAUSE. Press it again to resume play. If USB disk and SD Card both in the port, please long press 'PLAY/ PAUSE' button to choose the function of USB disk or SD Card.
USB and SD RECORDING
natural_image
Technical line drawing of a vintage portable radio with no visible text or symbols
Recording from the vinyl disc, AUX-In on USB/SD device:
Recording CD disc to USB/SD
Push the POWER button to turn the unit on.
Press POWER button to turn the unit on.

Insert a USB/SD card to the unit
Set the function knob (CD/USB/SD/AUX-PH/TUNER/BT) to AUX-PH

Insert USB device or SD card to the unit.
Set the function knob (CD/USB-SD/AUX-PH/TUNER/TAPE) to CD.

EN
USB and SD RECORDING
natural_image
Technical line drawing of a portable electronic device with labeled ports (no text or symbols beyond label)Recording USB to SD or SD to USB

Deleting tracks from the USB disk or SD card
Push the POWER button to turn the unit on.

Insert USB device and SD card to the unit.

CD
Set the function knob (CD/USB / SD/AUX-PH/ TUNER/BT) to USB/SD.
Start playback of the USB/SD at the point you want to
Push the POWER button to turn the unit on.

B Insert USB device or SD card to the unit.
Set the function knob (CD/USB-SD/AUX-PH/TUNER/TAPE) to USB/SD.
Select the track you would like to delete, and begin the playback.
Listen through Bluetooth/Line

natural_image
Technical line drawing of a portable electronic device with labeled ports (no text or symbols beyond labels)
natural_image
Technical diagram of an electrical control panel with labeled components (no readable text or symbols)Listen through Bluetooth
Push the POWER button to "on"

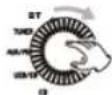
Set the function knob (CD/USB-SD/AUX-PH/TUNER/BT) to BT

Turn on your Bluetooth device, search and select 'ClassicAudio' in the list and paring The connection code is '0000' (if needed).
You can hear a 'du-' sound, now you can play the external Bluetooth devices as normal, and enjoy the music through the unit.
AUX-IN PLAYBACK:
Press the Power Button to turn the unit on.

Set the function knob (USB/SD/AUX-PH/TUNER/BT) on AUX.

Connect the Aux cable to start the playback from an external audio source, as CD player, BT, MP3 player, etc...
AUX OUT Jacks
AUX OUT will allow you to listen to the audio with your existing amplifiers
If you experience any problems with the unit, please take a moment to look through this chart and see if you can solve the problem yourself before you call your dealer.
No power
-▶ Check the connection to the AC power source. Check and make sure the AC source is not a switched outlet and if it is, the switch is turned on. Make sure there is power to the AC outlet by plugging another item such as a lamp or fan.
No sound.
-▶Adjust the volume,
The sound is noisy.
- The unit is too close to a TV set or similar appliances. Relocate the unit further away from them, or turn the other appliances off.
Tuner can't receive any station or signal is too weak.
-▶ Tune in the station properly.
-▶ If a TV is near the unit, turn it off.
-▶ Rotate the unit or antenna wire for the best reception position.
Record Player does not play.
-▶Turn the VOLUME knob clockwise, and turn the function to
AUX/PH mode
-▶ Loosen the screw, and detach the stylus guard.
(The stylus guard is a white plastic cover that protects the stylus during transportation. Failing to remove this guard will not allow the needle to touch the grooves of the record and no sound will be heard)
-▶ If the stylus is worn-out, change the stylus.
-▶ Select the correct speed (33-1/3, 45 or 78rpm).
CD Player
Does not play.
-▶ Turn the VOLUME knob clockwise, and turn the function to CD mode
-▶ Load a disc with the playing side facing down.
-▶ If the disc is dirty, clean the surface of the disc.
-▶ A blank disc has been loaded. Load a pre-recorded disc.
-▶You cannot play back unfinished CD-R/CD-RW/CD-MP3 discs. Finalize such a disc in a CD recorder and try again.
USB/SD Card Player Does not play
-▶ Some USB flash drives and SD cards may not be compatible with this unit.
-▶ Please check the specification on the last page of this manual.
If normal operation cannot be obtained, unplug the power cord from the outlet and plug it again.
Beware of condensation
When the unit (or a record/disc) is moved from a warm to a cold place, or used after a sudden temperature change, there is the danger of condensation; vapor in the air could condense on the internal mechanism, making correct operation erratic or impossible. To prevent this, or if this occurs, leave the unit turned on for one or two hours.
Maintenance
Always keep the turntable clean.
If the surface of the unit gets dirty, wipe with a soft cloth or use a diluted mild liquid soap. Be sure to remove any excess liquid completely. Do not use thinner, benzine or alcohol as they may damage the surface of the unit. Allow the surface of the unit to dry completely before using.
General
Power Adaptor ...... AC 100-240V/ DC 12V 2A
Power Consumption....19W
Dimension (W x H x D).... 19.8" x 12.6" x 8.3"
Weight....18.7 lbs
CD Player Section
Frequency Response 20Hz to 20 kHz
Tuner Section
Frequency Range (FM) 87.5 MHz to 108 MHz
Frequency Range (AM) 526 kHz to 1606 kHz
Record Player Section
Motor....DC servo motor
Drive System....Belt Drive
Speed....33-1/3 rpm, 45 rpm, 78 rpm
Wow and Flutter .... less than 0.25% (WDT)
Cartridge type......Ceramic Stereo Cartridge
Stylus....CSC-015
USB 1.1 Controller
On-chip USB transceiver compliant with USB specification
revision1.1 Full-speed (FS)
Support full-speed USB1.1 host mode for USB disk.
Data storage controller
Support flash cards including Secure-Digital (SD) and
Multi-Media Card (MMC), Memory Stick (MS), MS-Pro, etc.
Bluetooth Section
Version: V3.0
Range up to 10m.
Speaker System Section
Unit....2-way
Impedance....4 Ohms
Amplifier section
Output Power....3W X 2
Frequency Response 50 Hz to 20 kHz
- IMPORTANT SAFETY INSTRUCTIONS
- CAUTION
- Contents
- Before Using the Unit
- Read this before any operations
- DO NOT MOVE THE UNIT DURING PLAYBACK
- WHEN MOVING THIS UNIT
- EN
- Discs which can be played on this unit:
- Handing Records
- Replace the stylus
- Caution:
- Removing an old stylus
- FM antenna
- How to open/close the turntable cover
- To Open:
- A CD/USB-SD/AUX-PH/TUNER/BT knob
- B AM/FM knob
- C LINE IN Jack
- Listening to a CD
- To suspend playing temporarily (pause mode)
- To stop playback
- To skip to the next or a previous track
- Search for a folder of a disc
- REPEAT Function
- If the disc/USB/SD has folder
- USB and SD card playing
- Press STOP to stop playback
- USB and SD RECORDING
- Listen through Bluetooth/Line
- Listen through Bluetooth
- AUX-IN PLAYBACK:
- AUX OUT Jacks
- No power
- No sound.
- The sound is noisy.
- Tuner can't receive any station or signal is too weak.
- Record Player does not play.
- AUX/PH mode
- CD Player
- Does not play.
- USB/SD Card Player Does not play
- Beware of condensation
- Maintenance
- General
- CD Player Section
- Tuner Section
- Record Player Section
- USB 1.1 Controller
- Data storage controller
- Bluetooth Section
- Speaker System Section
- Amplifier section
Brand : Pyle
Model : PVTT15UBT
Category : Turntable