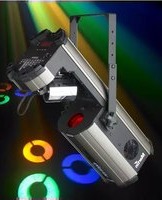
Mania SCX800 - Professional spotlight MARTIN - Free user manual and instructions
Find the device manual for free Mania SCX800 MARTIN in PDF.


| Product Type | Stage Lighting Fixture |
| Brand | Martin |
| Model | Mania SCX800 |
| Dimensions (L x W x H) | ≈ 500 x 300 x 300 mm |
| Weight | ≈ 8 kg |
| Power Supply | AC 100-240V, 50/60Hz |
| Power Consumption | ≈ 250W |
| Light Source | LED or discharge lamp (refer to manual) |
| Color Temperature | Adjustable (e.g., 3200K-6500K) |
| Beam Angle | Zoomable, 5°-30° |
| Control Protocol | DMX512, RDM compatible |
| DMX Channels | 16 or more (depending on mode) |
| Display | LCD with menu navigation |
| Housing Material | Aluminum alloy, high-temperature resistant |
| Cooling System | Active fan cooling |
| IP Rating | IP20 (indoor use only) |
| Mounting Options | Clamp or floor stand |
| Included Accessories | Power cord, DMX cables (optional) |
| Safety Features | Overheat protection, safety cable attachment point |
| Maintenance | Clean lens with soft cloth, replace air filters periodically |
| Repairability | Spare parts available from Martin service centers |
| Warranty | 2 years (check local terms) |
| Certifications | CE, ETL, RoHS |
Frequently Asked Questions - Mania SCX800 MARTIN
User questions about Mania SCX800 MARTIN
0 question about this device. Answer the ones you know or ask your own.
Ask a new question about this device
Download the instructions for your Professional spotlight in PDF format for free! Find your manual Mania SCX800 - MARTIN and take your electronic device back in hand. On this page are published all the documents necessary for the use of your device. Mania SCX800 by MARTIN.
USER MANUAL Mania SCX800 MARTIN
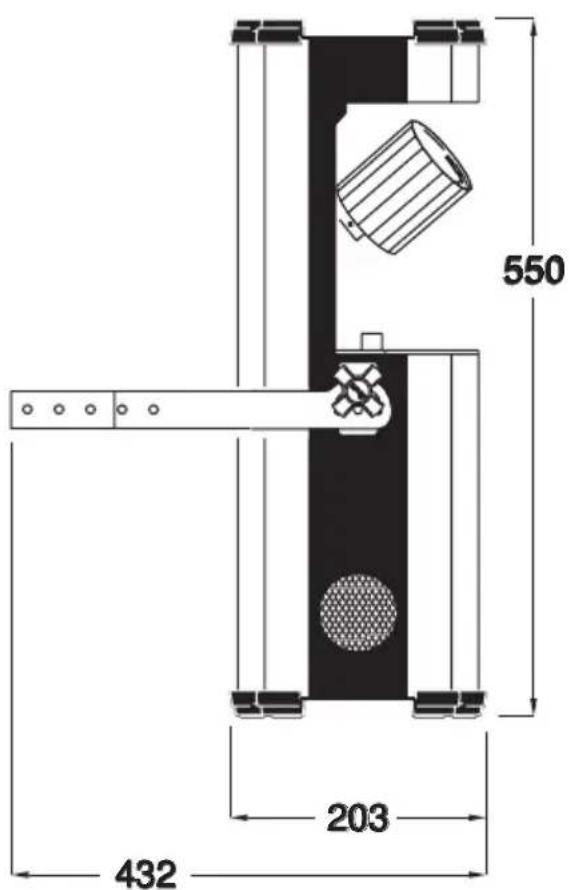
DIMENSIONS
All dimensions are in millimeters

©2007 Martin Professional A/S
All rights reserved. No part of this manual may be reproduced, in any form or by any means, without permission in writing from Martin Professional A/S. Information subject to change without notice. Martin Professional A/S and all affiliated companies disclaim liability for any injury, damage, direct or indirect loss, consequential or economic loss or any other loss occasioned by the use of, inability to use or reliance on the information contained in this manual.
P/N 35000213, Rev. A
Contents
Introduction 5
Unpacking 5
Mania SCX800 overview 6
Safety information 7
Installation 9
AC power 9
Rigging the fixture 10
Creating a data link for DMX or synchronized operation ..... 11
Operation 13
Getting started 13
Music trig, auto trig and DMX modes 14
Synchronized music trig and auto trig operation 15
DMX controller operation 16
Focus adjustment 18
Adjusting music level sensitivity 18
Control panel 20
Movement 20
Dimming 20
Information readouts 20
Manual control 21
Effects test 22
Upload mode 22
Service and maintenance 23
Lamp replacement 23
Cleaning 25
Replacing the main fuse 26
Rotating gobos 27
Error messages 29
Software uploads 29
Troubleshooting 30
DMX protocol 31
Control menus 35
Circuit board layouts 38
Specifications 39
Notes
1. INTRODUCTION
Thank you for selecting a Martin Mania SCX800. This automated rotating-mirror projector has the following features:
- 8 interchangeable rotating gobos including 3 glass gobos and 5 aluminum/glass gobos
- 172° pan (swivel) and 360° tilt (continuous rotation)
- Manually adjustable focus
- DMX control with two DMX modes: DMX mode 2 gives extended functionality on additional channels
• Auto triggering and music triggering modes - Stand-alone single fixture and synchronized (master/slave) modes
• Professionally designed pre-programmed effects macros - Rotating gobo indexing
- Long-life 150 Watt discharge lamp
Unpacking
The packing material is carefully designed to protect the fixture during shipment - always use it to transport the fixture.
The Mania SCX800 is supplied with:
- 150 W discharge lamp, supplied separately to avoid damage during shipping and must be installed before use – see “Installing the lamp” on page 24)
- Power cable
• RS-485 XLR cable for data link - User manual
- Mounting U-bracket with fasteners
- Allen key
Important! The mirror drum is secured for transport. Before applying power, remove all transport packaging, remove the protective film from the mirror and cut and remove all plastic tie-wraps holding the drum.
![graph TD A["Power on/off switch"] --> B["Control panel and display"] B --> C["Swivel lock"] C --> D["Control panel and display"] style A fill:#f9f,stroke:#333 style B fill:#ccf,stroke:#333 style C fill:#cfc,stroke:#333 style D fill:#fcc,stroke:#333](/content/2026/05/1059181/images/ed94293f04aee619af2649bdf4e7ab1d9fc0848bbce429f173998a6e9d2ba473.jpg)

Warning! This product is for professional use only. It is not for household use.
This product presents risks of lethal or severe injury due to fire and heat, electric shock, ultraviolet radiation, lamp explosion, and falls. Read this manual before installing or powering the fixture, follow the safety precautions listed below and observe all warnings in this manual and on the fixture. If you have any questions about how to operate the fixture safely, please contact your Martin dealer or call the Martin 24-hour service hotline.
Protecting yourself and others from electric shock and injury
- Disconnect the fixture from AC power before removing or installing the lamp, fuse, or any part, and when not in use.
- Always ground (earth) the fixture electrically.
- Do not use the fixture with a damaged power cable or cord cap (mains plug).
- Use only a source of AC power that complies with local building and electrical codes and has both overload and ground-fault protection.
- Do not expose the fixture to rain or moisture.
- Refer all service not described in this manual to a Martin service technician.
- Glass lenses must be replaced if they have become visibly damaged to such an extent that their effectiveness is impaired, for example by cracks or deep scratches.
- Do not operate the fixture if covers are open or if any component is missing, damaged or deformed: an unshielded discharge lamp emits dangerous UV radiation that can cause burns and eye damage.
- A hot discharge lamp is under pressure and can explode without warning. Allow the luminaire to cool for at least 20 minutes and protect yourself with safety glasses and safety gloves before replacing the lamp or servicing the luminaire internals.
- If the quartz envelope of a discharge lamp is broken, the lamp releases a small quantity of mercury and other toxic gases. If a discharge lamp explodes in a confined area, evacuate the area and ventilate it thoroughly. Wear non-porous safety gloves when handling a broken discharge lamp. Treat broken or used discharge lamps and used safety gloves as hazardous waste and send to a specialist for disposal.
- Do not stare directly into the light output. Never look at an exposed lamp while it is lit.
- Replace the lamp if it becomes defective or worn out.
Protecting yourself and others from burns and fire
- Do not attempt to bypass thermostatic switches or fuses. Replace defective fuses with ones of the specified type and rating.
- Keep all combustible materials (for example fabric, wood, paper) at least 0.1 meters (4 inches) away from the fixture. Keep flammable materials well away from the fixture.
- Do not illuminate surfaces within 1 meter (3.3 feet) of the fixture.
- Provide a minimum clearance of 0.1 meters (4 inches) around fans and air vents.
- Do not place filters or other materials over the lens or mirror.
- Allow the fixture to cool for at least 20 minutes before opening the fixture or removing the lamp.
- Do not modify the fixture or install other than genuine Martin parts.
- Do not operate the fixture if the ambient temperature (Ta) exceeds 40°C (104°F).
Protecting yourself and others from injury due to falls
- When suspending the fixture above ground level, verify that the structure can hold at least 10 times the weight of all installed devices.
- Verify that all external covers and rigging hardware are securely fastened
- Use an approved means of secondary attachment, such as a safety cable, installed as described in this manual.
- Block access below the work area and work from a stable platform whenever installing or removing the fixture.
2. INSTALLATION
AC power
The Mania SCX800 is supplied set up to match local voltage and frequency settings. The factory setting is shown on the serial number label.
Warning! For protection from fire and electric shock, the fixture must be grounded (earthed). The power supply must have overload and ground-fault (earth-fault) protection.
Check that power cables are undamaged and rated for the current requirements of all connected devices before use.
Ensure that the fixture's voltage setting matches your local AC power supply before applying power.
Important! Do not connect the fixture to a dimmer system, as this will cause damage that is not covered by the product warranty.
Power settings
- EU models can be set to 230 or 240 V, 50 Hz AC power using the switch on the connections panel. Use the 230 V setting if you have 220-230 V power, and use the 240 V setting if you have 230-240 V.
- US models do not have a switch and are supplied set up for 110-120 V, 60 Hz AC power.
Installing a cord cap on the power cable
The power cable must be fitted with a grounding-type cord cap (earthed mains plug) that matches your AC power distribution system. Consult a qualified electrician if you have any doubts about proper installation.
If you need to fit a cord cap, follow the cord cap manufacturer's instructions, connecting the yellow and green wire to ground (earth), the
brown wire to live, and the blue wire to neutral. The table below shows some pin identification schemes:
| Wire Pin Marking Screw color | |||
| brown live “L” yellow or brass | |||
| blue neutral “N” silver | |||
| yellow/green | ground |  | green |
Table 1: Power plug (cord cap) wiring
Rigging the fixture
The Mania SCX800 must be mounted by means of its adjustable U-bracket. Do not install the fixture by any other means, as this can cause the fixture to overheat.
The U-bracket can be either fastened to a flat surface or attached to a rigging clamp. Suitable rigging clamps are available from your Martin dealer.
Warning! Block access below the work area and work from a stable platform when installing or servicing the fixture.
Do not operate the fixture without fastening it securely to a structure or surface.
Use a secure means of secondary attachment that can hold at least 10 times the weight of the fixture.
- The fixture must be located at least 1 meter (3.3 ft.) away from the surface to be illuminated and at least 0.1 meters (4 in.) from any combustible materials (wood, fabric, paper, etc.). Ensure that the clearance around the fan and air vents is at least 0.1 meters (4 in.). Ensure that there are no inflammable materials nearby.
- If using a rigging clamp, ensure that the clamp is undamaged and can bear at least 10 times the fixture's weight. Bolt the clamp securely to the fixture's mounting bracket with a grade 8.8 (minimum) M12 bolt and lock nut through the 13 mm hole in the center of the mounting bracket, or as recommended by the clamp manufacturer.
- If fastening the fixture directly to a mounting surface, ensure that any fasteners used and the mounting surface can bear at least 10 times the fixture's weight. The fixture may be fastened using any of the following:
- four of the 6.5mm holes in the sides of the U-bracket
- two 8mm holes in the top of the U- bracket
• one 13mm hole in the top of the U-bracket.
-
Ensure that the structure used to support the fixture can support at least 10 times the total weight of all installed fixtures, clamps, cables, auxiliary equipment, etc.
-
Install a safety wire that can hold at least 10 times the weight of the fixture through/over the support and through a safety wire attachment point next to one of the swivel locks on the fixture (see illustration).
Important! Do not simply attach the safety wire to the mounting bracket, as this will leave the fixture unsecured.
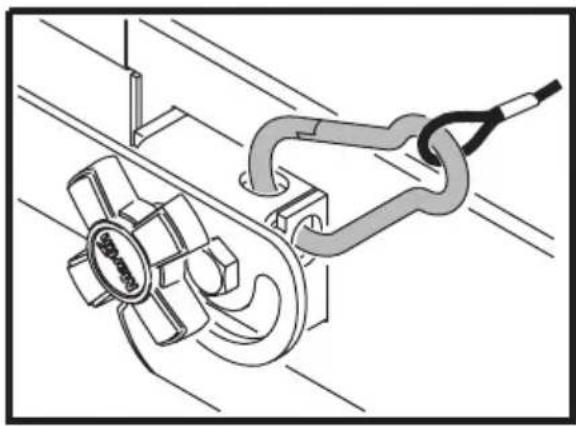
Safety wire attachment point
- Loosen the swivel locks and tilt the fixture to the desired angle. Turn the swivel locks clockwise to tighten. Check that both swivel locks are tight and that the fixture is securely clamped in position.
Creating a data link for DMX or synchronized operation
You need a serial data link to:
- run light shows on one or more fixtures using a DMX controller, or
- run synchronized light shows on two or more fixtures (master/slave operation).
Fixtures on a serial data link must be daisy-chained in one single line, max. 500 meters (1640 ft.) long, with max. 32 fixtures. If you wish to exceed 32 fixtures or 500 meters, or to add branches, use an optically isolated amplifier-splitter such as the Martin RS-485 Opto-Splitter (P/N 90758060).
Reliable data connection requires suitable cable. Standard microphone cable cannot transmit DMX data reliably over long runs. For best results, use cable with at least one twisted pair specifically designed for RS-485 applications. Your Martin dealer can supply suitable high quality cable in various lengths.
Connecting the serial data link
The fixture's data connections are XLR type, wired with pin 1 to ground, pin 2 to signal - (cold), and pin 3 to signal + (hot). This is the standard configuration for DMX devices.
One or more adaptor cables may be required to connect the Mania SCX800 to the controller and/or other types of fixture, because some devices may have 5-pin XLR connectors, and others may have reversed signal polarity (pin 2 hot and pin 3 cold). Connector polarity is normally specified on the device or in the device's user manual.
| 5-pin to 3-pin Adaptor | 3-pin to 5-pin Adaptor | 3-pin to 3-pin Phase-Reversing Adaptor | Male DMX Termination Plug | Female DMX Termination Plug |
| Male Female1——12——23——345 | Male Female1——12——23——345 | Male Female | Male XLR12——120 Ohm | Female XLR12——120 Ohm |
| P/N 11820005 | P/N 11820004 | P/N 11820006 | P/N 91613017 | P/N 91613018 |
DMX connectors and polarity
To connect the data link:
- Power all devices off.
- If you intend to use a DMX controller, run a data cable from the DMX controller's data output to the first fixture's data IN socket. If the controller has a 5-pin output, use a 5-pin male to 3-pin female adaptor cable (available from your Martin dealer: P/N 11820005).
- If you intend to run fixtures in master/slave operation, insert a female DMX termination plug (P/N 91613018) in the first fixture's data IN socket.
- Plug a data cable into the OUT socket of the first fixture and the IN socket of the next one. Continue connecting up to 32 fixtures output-to-input.
- Terminate the link by inserting a male termination plug (P/N 91613017) into the data output of the last fixture. A termination plug is simply an XLR connector with a 120 Ohm, 0.25 W resistor soldered across pins 2 and 3.
3. OPERATION
Note: The Mania SCX800 is supplied in DMX mode with its DMX address set to 1. If want to operate the fixture without a DMX controller, you need to set the fixture to stand-alone music trig or auto trig mode before use (see “Selecting DMX, music trig or auto trig operating modes” on page 14).
Getting started
Powering on
Once the Mania SCX800 is correctly and safely installed, power on at the fixture's power on/off switch. The fixture will start up and reset. The display will show the following messages:
- -OK-
- Fixture name
- Software version number
- RST
If the fixture resets successfully, it will display either its DMX address, S R - M (stand-alone music trig mode) or S R - R (stand-alone auto trig mode).
If any other message is displayed, the fixture has detected an error (see "Error messages" on page 29). If this occurs, switch off, wait a few seconds and switch on again. If the error message appears again, consult your Martin dealer.
Control panel and menus
You can set the Mania SCX800's DMX address, modify the fixture's personality and control effects manually using the menus in the control
panel. See also the overviews printed on the fixture and in "Control menus" on page 35.
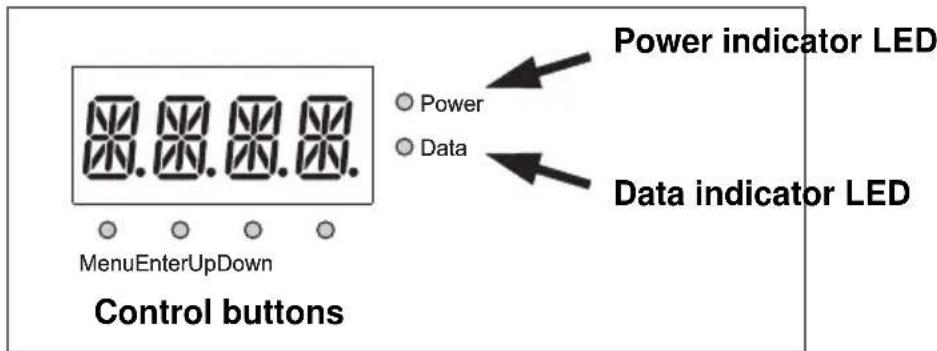
To enter the menus, press the [Menu] button. Use the [Up] and [Down] buttons to scroll within a menu. To select a function or submenu, press the [Enter] button. To exit a function or menu, press the [Menu] button.
Music trig, auto trig and DMX modes
The Mania SCX800 has three main operating modes:
Stand-alone music trig mode: In this mode, lighting effects are triggered by music intensity. Multiple fixtures can be synchronized if one master fixture is set to stand-alone music trig mode and the other fixtures are set to DMX mode.
Stand-alone auto trig mode: In this mode, the fixture runs a factory-set dynamic light show that uses all the fixture's effects in a random program. Multiple fixtures can be synchronized if one master fixture is set to stand-alone auto trig mode and the other fixtures are set to DMX mode.
DMX mode: In DMX mode, fixtures receive control instructions via the serial data link. They will respond to control signals from a DMX controller (or from another fixture set as master).
Selecting DMX, music trig or auto trig operating modes
The Mania SCX800 is supplied set to DMX mode with its DMX address set to 1. If you intend to operate the fixture without a DMX controller, you need to set it to stand-alone music trig or auto trig mode.
To switch between DMX, auto trig and music trig modes:
-
Apply power to the fixture and wait until the R S T message disappears from the display. The fixture has now reset.
-
Press the [Menu] button once to enter the control menus.
-
Use the [Up] and [Down] buttons to scroll to MODE. Press [Enter] once to enter the operating mode menu.
-
Use the [Up] and [Down] buttons to scroll between:
• NORM (DMX mode)
- 5A - R (Stand-alone auto trig mode) and
• 5A - M (Stand-alone music trig mode)
- Press [Enter]. The fixture enters the mode you have selected, and will return to this mode when powered off and on.
Synchronized music trig and auto trig operation
You can set multiple fixtures on a serial data link to respond together to a music trig or auto trig signal from one fixture. This feature allows synchronized operation without a DMX controller. The fixture sending the signal is the 'master' fixture and the fixtures that receive the signal are the 'slave' fixtures.
Important! Set only 1 fixture on the link as master: damage can occur if 2 masters, or a master and a DMX controller, are linked.
Setting up synchronized operation
To set up Mania SCX800s for synchronized operation:
- Ensure that all slave fixtures are in DMX mode.
- Select one fixture to be the master and set it to stand-alone auto trig or music trig mode (see "Selecting DMX, music trig or auto trig operating modes" on page 14)
- When slave fixtures receive signals from the master, they will automatically begin operating in slave mode. The Data LED on their control panels will light to show that they are receiving control data.
Fixtures return to their DMX/auto trig/music trig settings when powered off and on, so you should only need to set fixtures as masters/slaves once.
Setting DMX mode 1 or 2
Two DMX modes are available: DMX mode 1 (normal) and DMX mode 2 (extended). In mode 1, the Mania SCX800 uses 5 DMX channels. In mode 2 it uses 9 channels. The extra DMX channels in mode 2 allow you to select pre-programmed pan, tilt and effects macros and set the speed of pan, tilt and effects movement from the DMX controller.
To toggle between DMX modes 1 and 2:
- Apply power to the fixture and wait for the fixture to reset.
- In the control panel, press the [Menu] button. Then use the [Up] and [Down] buttons to scroll to PSET (personality setting) and press [Enter].
- Use the [Up] and [Down] buttons to scroll between MOD 1 and MOD2 and press [Enter] to save your setting.
The Mania SCX800 is supplied in DMX mode 2.
Setting DMX addresses
If you use a DMX controller, you need to set the DMX address for each fixture on the fixture's control panel. The DMX address, or start channel, is the first channel used to receive instructions from the controller.
For individual control, each fixture must be assigned its own DMX address and control channels. For example, if a Mania SCX800 is set to DMX mode 2 and you give it DMX address 101, it will use channels 101 - 109 inclusive. Channel 110 is available for the next fixture.
Fixtures with the same DMX address will receive the same instructions and behave identically. Two fixtures with the same DMX address can be set up so that one pans as a mirror image of the other. To achieve this, use the settings in the control menu to invert the pan on one fixture (see "Movement" on page 20).
The default factory-set DMX address is '1'. To set a fixture's DMX address:
- Decide on suitable DMX addresses for all the fixtures on the data link. 512 channels are available in one DMX universe.
- Apply power to the fixture and wait while it resets.
- Press [Menu] to enter the main menu.
- Select RddR using the [Up] and [Down] buttons. Press [Enter].
- Select an address using the [Up] and [Down] buttons. Press [Enter].
- Press [Menu] to return to the main menu.
Fixtures remember their DMX address when they are powered off and on.
DMX control options
See the DMX protocol on page 31 for an overview of DMX commands and channels.
In DMX modes 1 and 2, the following functions can be controlled:
Reset: All effects can be reset to their index positions from the controller using channel 1. The reset command must be sent for 5 seconds before it takes effect. When a fixture is reset via DMX, R5T appears in its display.
Dimming and blackout: The Mania SCX800 can be blacked out using the shutter on channel 1. The shutter can also be set to music triggered operation.
The Mania SCX800 can be dimmed from 0% to 100% on channel 1 if PER → INT is set to ON in the control menus.
Note that to douse the lamp, a DMX value from 240 to 247 must be sent on channel 1 for at least five seconds. If you douse the lamp, you must wait eight minutes before restriking.
Gobo wheel position and rotation: The gobo wheel features 8 rotating gobos. Rotating gobos can be selected, shaken at different speeds and set to music triggered operation.
Rotating gobos: Speed and direction of gobo rotation can be controlled. Gobos can also be set to shake, or set to music triggered operation.
Gobo angle can also be indexed, i.e. set to a precise angle.
Pan: mirror drum swivel, with approx. 172° available.
Tilt: mirror drum rotation, with 360° continuous rotation available.
In DMX mode 2, the following additional functions can be controlled on four extra channels:
Macros: A range of factory-set macros are available, with macros that control pan/tilt and macros for the other effects on two separate channels. The macros are professionally designed programs that use all the fixture's effects to give complete light shows with minimal user programming required.
Pan/tilt speed and effects speed: The speed at which the fixtures's mirror pans and tilts, and the speed at which effects change, can be adjusted on two extra channels. Selecting a speed allows you to adjust fade times when using DMX controllers that do not feature fade time programming (a fade time is the time taken for effects to change from one scene to the next). If you select ‘tracking’ on these channels, the DMX controller defines fade times.
Unsure about speed and tracking?
As a rule, you should set the fixture to tracking if you are using programmed fade times or macros on your DMX controller. Select an effects speed if you are not using programmed fade times or macros on your DMX controller.
However, if you are using fade times on your controller and have set the fixture to tracking, but effects movement is rough and irregular, setting fade times on your controller to zero and selecting an effects speed may give smoother movement.
Effects movement is set to ‘tracking’ if the fixture is in DMX mode 1 and by default.
DMX signal indicator
When the Mania SCX800 receives a valid DMX signal, the Data LED will light to show that the fixture is receiving control data.
Focus adjustment
Never look directly into the light beam while adjusting the focus. The focus adjustment knob is next to the lens aperture (see illustration below).

Adjusting music level sensitivity
you can adjust response to a music beat while a fixture is in music trig mode by adjusting music level sensitivity:
-
With the fixture powered on and in music trig mode, play a typical music track at typical volume for your location.
-
Press the [Menu] button once and use the [Up] and [Down] buttons to scroll to U T I L. Press [Enter] and scroll to M L E V. (music level menu). Press [Enter].
-
The fixture is supplied set to level 7. You can adjust the music sensitivity level using the [Up] and [Down] buttons to select a level from LE 1 to LE 16. Level 1 gives highest sensitivity. Press [Enter] to activate the selected level.
-
Repeat step 3 until you find a level that gives the best response to the music beat.
-
Press [Menu] to save your setting and exit the music level menu. The fixture will return to this setting when you power it off and on.
4. CONTROL PANEL
The following functions of the control panel are described earlier in this manual:
- selecting stand-alone music trig or auto trig operation (see page 14)
- switching between DMX modes 1 and 2 (see page 16)
- setting DMX addresses (see page 16)
- setting music sensitivity level for music trig operation (see page 18).
This chapter describes the other control panel options for setting up fixture behavior (see also “Control menus” on page 35 for a complete overview of control panel functions).
Movement
PRTI, the pan and tilt invert menu, allows you to invert pan movement (PINV'), and invert tilt movement (TINV'). These options can be useful in situations where you want some fixtures to mirror the performance of others with the same DMX address, or when you install fixtures in a different orientation after you have programmed a light show.
Dimming
The Personality → Intensity setting PER → INT lets you use the shutter for dimming. When disabled (the default setting), the low values on channel 1 set the shutter to either fully open or fully closed. When enabled, the shutter can be opened and closed gradually, giving 0-100% continuous dimming.
Information readouts
INFO, the information menu, gives information about hours of fixture and lamp operation, and software version.
Power-on hours
This readout can be used to track maintenance intervals.
There is a resettable counter in this menu. Read the number of hours the fixture has been powered on since the counter was reset in INFO→TIME→HRS→RSET. Press [Enter] to display. Press [Up] for 5 seconds to reset the counter to zero.
INFO→TIME→HRS→TOTL displays the total number of hours the fixture has been powered on since manufacture. Press [Enter] to display. This counter is non-resettable.
Lamp hours
This readout can be used to monitor lamp life for replacement purposes. There is a resettable lamp hours counter in this menu. Read the number of hours the lamp has been powered on since the counter was reset in INFO→TIME→L HR→RSET. Press [Enter] to display. Press [Up] for 5 seconds to reset the counter to zero each time you install a new lamp.
INFO→TIME→L HR→TOTL displays the total number of hours of lamp use since manufacture. Press [Enter] to display. This counter is non-resettable.
Start-up/lamp strike counter
INFO→TIME→LST→RSET is a resettable start-up counter. The fixture displays the number of times the lamp has been struck since the counter was last reset. Press [Enter] to display. Press [Up] for 5 seconds to reset the counter to zero each time you install a new lamp.
INFO→TIME→LST→TOTL displays the total number of lamp strikes since manufacture. Press [Enter] to display. This counter is non-resettable.
Software version
INFO→VER displays the fixture software version number. The software version is also displayed briefly when the fixture is powered on.
Manual control
The manual control menu (MKN) provides commands for resetting the fixture (RST), as well as striking the lamp (L ON), and dousing the lamp (LoFF). It also permits you to position and move individual effects.
Effects test
The test sequence (TSEQ→RUN) runs through all effects to provide a quick check of fixture performance.
Upload mode
The upload mode command (UTIL→UPL) prepares the fixture for a software upload (see "Software uploads" on page 29).
5. SERVICE AND MAINTENANCE
The Mania SCX800 requires simple routine maintenance. The maintenance schedule depends heavily on the operating environment; please consult a Martin service technician for recommendations.
Any service procedure not described here should be referred to a qualified technician.
Warning! Disconnect the fixture from power and allow it to cool for at least 20 minutes before removing any cover.
Wear safety glasses and gloves and allow the fixture to cool for at least 20 minutes before removing the lamp.
Important! Excessive dust, grease, and smoke fluid buildup degrades performance and causes overheating and damage to the fixture that is not covered by the warranty. Check and, if necessary, clean fixtures at regular intervals.
Lamp replacement
The Mania SCX800 uses a 150 W discharge lamp. Replace the lamp when it reaches the average life specified by the manufacturer.
Important! Use only this type of lamp. See “Accessories” on page 41 for details of replacement lamps. Installing any other lamp may damage the fixture.
Installing the lamp
- Disconnect the fixture from power and allow it to cool for at least 20 minutes.
- Remove the lampholder by removing screws A (see illustrations).
- If replacing an old lamp, remove it from its ceramic socket.
- Hold the new lamp by its base (do not touch any other part of the lamp). Push the lamp pins squarely into the socket in the lampholder (see illustration).
- If you touched the bulb, or any optical components, clean them with a clean, lint-free cloth wetted with isopropyl alcohol.
- Reinstall the lampholder in the fixture, checking that no wires are trapped before screwing on the cover.
- Reapply power and reset the lamp hours counter (see "Information readouts" on page 20).
Beam adjustment
-
If the brightest part of the beam is off-center:
-
use screw B1 to adjust horizontal lamp alignment
-
use screw B2 and/or B3 to adjust vertical lamp alignment
-
If there is an excessive hot-spot or dark area in the center of the beam, or if light output is low, turn all three screws B1, B2 and B3 by an equal amount in the direction that gives an improvement, until a satisfactory beam is obtained.
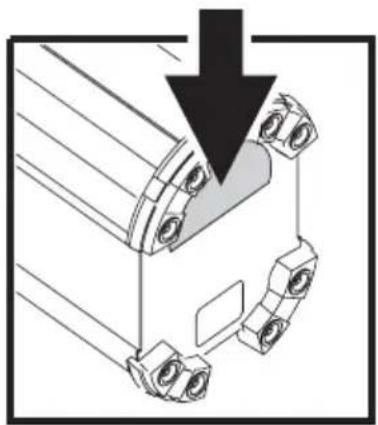

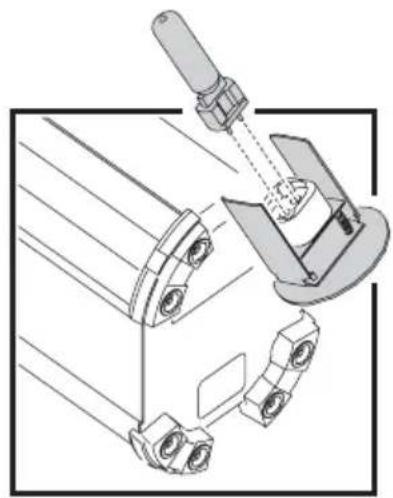
Cleaning optical components
Use care when cleaning optical components. The coated surfaces are fragile and even small scratches may be visible in the fixture's light output. Wear cotton gloves to avoid contaminating components with grease from your fingers.
- Disconnect the fixture from power and allow it to cool for at least 20 minutes.
- Loosen the lamp cover release thumbscrew and open the lamp cover on its hinge.
- Blow or vacuum away loose dust. Remove residues from lenses and filters with a soft cloth or cotton swabs wetted with isopropyl alcohol. Regular glass cleaner may also be used, but no residues may remain.
- Rinse with distilled water. Mixing the water with a small amount of wetting agent such as Kodak Photoflo will help prevent streaking and spotting.
- Dry with a clean, soft and lint-free cloth or blow dry with compressed air.
- Replace the lamp cover before reapplying power.
Cleaning the fan and air vents
To maintain adequate cooling, dust must be cleaned from the fan and air vents periodically. Cleaning intervals will depend on the operating environment. The presence of airborne dust, smoke, etc. will make frequent cleaning necessary. Check and, if necessary, clean fixtures regularly.
- Disconnect the fixture from power and allow to cool for at least 20 minutes.
-
Loosen the lamp cover release thumbscrew and open the lamp cover on its hinge.
-
Remove the two Philips head screws on the fan housing and lift out the fan for access (see illustration).
-
Remove dust and dirt from the fan blades and vent grill using a soft brush or cotton swab and vacuum.
-
Replace the fan, making sure no wires are trapped.
-
Replace the lamp cover before reapplying power.

Replacing the main fuse
The Mania SCX800 uses a time-delay fuse for protection against current overload. An indication that the fuse may have blown is that when power is applied and the lamp is switched on, no light is produced.
If the fuse blows repeatedly, there is a fault with the unit that requires service by a Martin technician.
Never bypass the fuse or replace it with one of another type or rating.
- Pry open the fuse holder (located next to the power cable entry) with a flat-head screwdriver and remove the fuse.
- Replace the fuse with one of the same type. Fuse ratings are listed on serial number labels and under "Electrical" on page 40.
- Replace the fuse holder.
-
If fuses continue to blow, there is probably a fault. Disconnect the fixture from power and data and contact a Martin service technician.
-
Disconnect the fixture from power and allow to cool for at least 20 minutes.
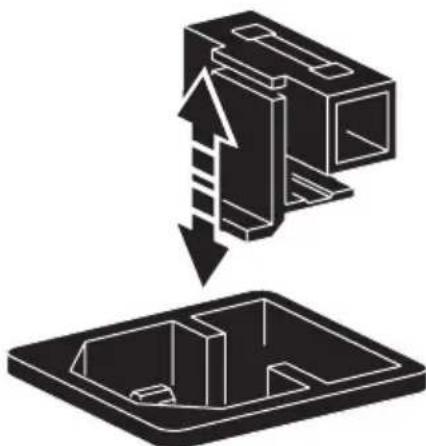
Fuse holder
The rotating gobos fitted to the Mania SCX800 are standard interchangeable items. A range of replacement gobos is available from your Martin dealer.

SCX800 gobos (viewed from lens side)
To replace a gobo:
- Disconnect the fixture from power and allow to cool for at least 20 minutes.
- Loosen the lamp cover release screw and open the cover on its hinge.
- See illustration on right. Pull the gobo gently away from the gobo wheel and slide it up and out of the wheel.
-
Slide the new gobo in and push gently towards the wheel to clip it into place. Check that the gobo is held securely.
-
Replace the lamp cover securely before reapplying power.
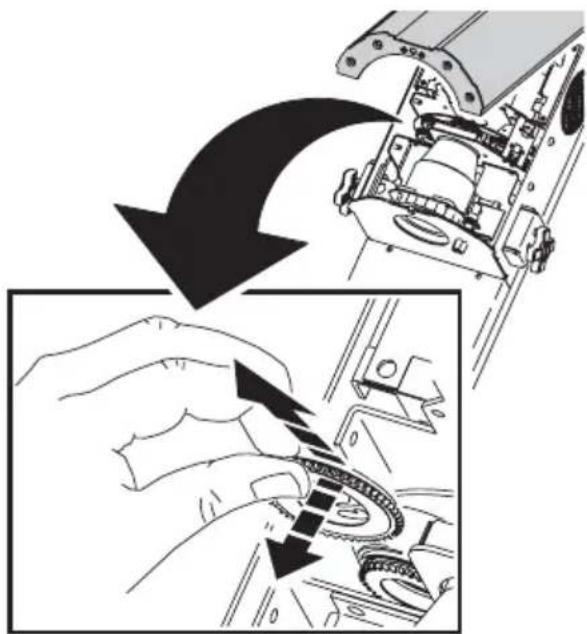
Gobo orientation
Focus is easiest to maintain if all coated gobos in a fixture are installed with their coatings as close as possible to the same plane of focus. However, if there is a risk of heat damage, the first priority is normally to ensure that more reflective sides face towards the lamp. If in doubt, install custom coated gobos with the more reflective side towards the lamp, or consult your Martin dealer or gobo supplier.
More reflective side towards lamp
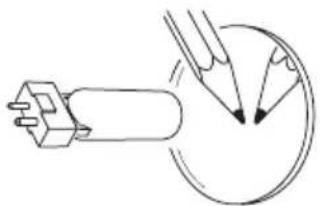
To minimize the risk of gobo overheating and damage, install a coated gobo with the more reflective side facing towards the lamp.
To determine which side of a gobo is coated, hold an object up to it. On the uncoated side, there is a space between the object and its reflection, and the edge of the gobo can be seen when looking through the glass.
Less reflective side away from lamp

The less reflective side of a coated gobo will absorb less heat if it faces away from the lamp.

Uncoated side Coated side
To obtain the sharpest focus in the Mania SCX800, the gobos at positions 1, 4 and 6 are oriented as follows:
- The sandwich-construction composite glass gobos at positions 1 and 4 are installed with the coated sides of the component gobo halves facing each other in the middle of the sandwich.
- The glass gobo at position 6 is installed with the coated side towards the lens.
In the event of an internal error, the following messages will appear in the digital display:
• GOER – Gobo wheel timeout.
- RGER– Rotating gobo timeout.
If one of the above error messages is displayed, try powering the fixture off and then on again to reset it. If the problem persists, contact your Martin dealer.
The message H0T will be displayed if you douse the lamp via DMX and then try to restrike it within eight minutes.
Software uploads
It is possible to upload new software to the Mania SCX800 via the DMX IN connector using, for example, an uploader such as the Martin MP-2 Uploader, or a PC using a Martin DABS interface device and a suitable application such as the Martin Software Uploader. The latest version of the Mania SCX800 software and the Martin Software Uploader are available from the Support area of the Martin website at http://www.martin.com
To prepare the Mania SCX800 to receive new software, select UTIL→UPL in the control panel, then follow the instructions in the uploader user manual or help files.
If the fixture will not accept a software upload as described above, it can be forced to accept an upload by setting it to hard boot mode. To do this, hold both the [Menu] and the [Enter] button pressed in while powering on the fixture. The data LED will blink when the Mania SCX800 is in hard boot mode.
If you have difficulty carrying out uploads, your Martin dealer will be able to give advice or carry out the upload for you.
6. TROUBLESHOOTING
Problem Probable cause(s) Remedy
| One or more fixtures is completely dead. | No power to fixture. Check that | power is switched on and cables are plugged in. |
| Main fuse blown. Replace fuse. | ||
| Fixtures reset correctly but all respond erratically or not at all to controller. | Controller not connected. Connect controller. | |
| XLR pin-out of controller does not match pin-out of first fixture on link (i.e. polarity is reversed). | Install a phase-reversing cable between controller and first fixture on link. | |
| Fixtures reset correctly but some respond erratically or not at all to controller. | Bad data link connection. Inspect connections and cables. Correct poor connections. Repair or replace damaged cables. | |
| Data link not terminated with 120 Ohm termination plug. | Insert termination plug in output of last fixture on link. | |
| Incorrect fixture addressing. Check DMX addresses. | ||
| One of the fixtures is transmitting as a master. | Check all fixture settings. | |
| One of the fixtures is defective. | Bypass one fixture at a time (unplug both DMX connectors and connect them directly together) until normal operation is regained. Have defective fixture serviced by a Martin technician. | |
| A number appears in display and fixture will not run a stand-alone light show. | Fixture is set to DMX mode and is displaying its DMX address. | Use control panel to change fixture from DMX to stand-alone auto trig or music trig. |
| An effect fails to reset correctly. | The effect may require mechanical adjustment. | Contact Martin technician for service. |
| Lamp cuts out intermittently or burns out too quickly. | Fixture is too hot. Allow fixture to cool. Check that there is free airflow around the fixture. Check, and if necessary clean, fan and grills. | |
| Fixture does not respond correctly to music beat in music trig mode. | Music level sensitivity is incorrectly adjusted. | Use control panel to adjust sensitivity until fixture responds satisfactorily. |
| Impossible to restrike lamp after dousing via DMX. | 8-minute restrike protection delay activated. | Wait 8 minutes before restriking a hot discharge lamp. |
7. DMX PROTOCOL
Channel Value Percent Function
| 1 | Shutter, dimmer, strobe effect, resetWith dimming disabled in PER → INT (default)Shutter closedShutter open | ||
| 0-1819-38 | 0-77-14 | ||
| 0-38 0-14 | With dimming enabled in PER → INTContinuous dimming, 0% - 100% intensity | ||
| 39-9596-103104-151152-159160-199200-207208-219220-239240-247248-251252-255 | 15-3738-4041-5960-6263-7879-8182-8586-9394-9697-9899-100 | Strobe slow → fastShutter openRandom strobe slow → fastShutter openMusic triggered shutterShutter openLamp onShutter openLamp off (must be held for 5 seconds. 8 min. delay before lamp can be restruck)Shutter openReset (must be held for 5 seconds to blackout and reset) | |
Channel Value Percent Function
| 2 | Gobo selection, gobo shake, music trig gobo chaseGobo indexing: select gobo(set indexing angle on channel 3) | ||
| 0-7 | 0 - 2 | Gobo 1: Spring wheel | |
| 8-15 | 3-5 | Gobo 2: Blade | |
| 16-23 | 6-8 | Gobo 3: Tricone | |
| 24-31 | 9-11 | Gobo 4: Space badge | |
| 32-39 | 12-14 | Gobo 5: Blender | |
| 40-47 | 15-18 | Gobo 6: Red revolver | |
| 48-55 | 19-21 | Gobo 7: Radial burst | |
| 56-63 | 22-24 | Gobo 8: Molecule | |
| Gobo rotation: select gobo(set movement on channel 3) | |||
| 64-71 | 25-27 | Gobo 1: Spring wheel | |
| 72-79 | 28-30 | Gobo 2: Blade | |
| 80-87 | 31-33 | Gobo 3: Tricone | |
| 88-95 | 34-37 | Gobo 4: Space badge | |
| 96-103 | 38-40 | Gobo 5: Blender | |
| 104-111 | 41-43 | Gobo 6: Red revolver | |
| 112-119 | 44-46 | Gobo 7: Radial burst | |
| 120-127 | 47-49 | Gobo 8: Molecule | |
| Gobo shake | |||
| 128-141 | 50-55 | Gobo 1, shake fast → slow | |
| 142-155 | 56-61 | Gobo 2, shake fast → slow | |
| 156-169 | 62-66 | Gobo 3, shake fast → slow | |
| 170-183 | 67-71 | Gobo 4, shake fast → slow | |
| 184-197 | 72-77 | Gobo 5, shake fast → slow | |
| 198-211 | 78-82 | Gobo 6, shake fast → slow | |
| 212-225 | 83-88 | Gobo 7, shake fast → slow | |
| 226-239 | 89-93 | Gobo 8, shake fast → slow | |
| Music triggered gobo chase | |||
| 240-245 | 94-96 | Fast | |
| 246-250 | 97-98 | Medium | |
| 251-255 | 99-100 | Slow | |
| 3 | Gobo indexing angle, gobo rotation movement,music trig gobo rotation | ||
| Gobo indexing angle(select gobo on channel 2) | |||
| 0-255 | 0-100 | Indexing 0-395° | |
| Gobo rotation: set movement(select gobo on channel 2) | |||
| 0-7 | 0 -2 | Stop | |
| 8-77 | 3-29 | Rotation CW slow → fast | |
| 78-147 | 30-57 | Rotation CCW fast→slow | |
| 148-153 | 58-59 | Stop | |
| 154-223 | 60-87 | Rotation CW slow → fast | |
| 224-239 | 88-93 | Rotation shake | |
| Music triggered rotation | |||
| 240-245 | 94-96 | Fast | |
| 246-250 | 97-98 | Medium | |
| 251-255 | 99-100 | Slow |
Channel Value Percent Function
| 4 | Pan (mirror drum swivel) position, shake and music trig | ||
| 0 | 0 | Maximum left pan | |
| 63 | 24 | Neutral | |
| 127 | 50 | Maximum right pan | |
| 128 - 182 | 51 - 71 | Narrow shake (slow → fast) | |
| 183 - 239 | 72 - 93 | Wide shake (slow → fast) | |
| 240 - 244 | 94 - 95 | Music trig pan, fast | |
| 245 - 249 | 96 - 97 | Music trig pan, slow | |
| 250 - 255 | 98 - 100 | Music trig pan, dynamic | |
| 5 | Tilt (mirror drum rotation) rotation, shake and music trig | ||
| 0 - 1 | 0 | No rotation | |
| 2 - 63 | 1 - 24 | Clockwise rotation (slow → fast) | |
| 64 - 65 | 25 | No rotation | |
| 66 - 127 | 26 - 49 | Counterclockwise rotation (fast → slow) | |
| 128 - 129 | 50 | No rotation | |
| 130 - 184 | 51 - 72 | Narrow shake (slow → fast) | |
| 185 - 239 | 73 - 93 | Wide shake (slow → fast) | |
| 240 - 244 | 94 - 95 | Mirror drum rotation music trig, fast | |
| 245 - 249 | 96 - 97 | Mirror drum rotation music trig, slow | |
| 250 - 255 | 98 - 100 | Mirror drum rotation music trig, dynamic | |
| 6* | Pan & tilt macros (DMX mode 2 only) | ||
| 0 - 15 | 0 - 5 | No Macro | |
| 16 - 31 | 6 - 11 | Macro 1 | |
| 32 - 47 | 12 - 18 | Macro 2 | |
| 48 - 63 | 19 - 24 | Macro 3 | |
| 64 - 79 | 25 - 30 | Macro 4 | |
| 80 - 95 | 31 - 37 | Macro 5 | |
| 96 - 111 | 38 - 43 | Macro 6 | |
| 112 - 127 | 44 - 49 | Macro 7 | |
| 128 - 143 | 50 - 55 | Macro 8 | |
| 144 - 159 | 56 - 62 | Macro 9 | |
| 160 - 175 | 63 - 68 | Macro 10 | |
| 176 - 191 | 69 - 74 | Macro 11 | |
| 192 - 207 | 75 - 81 | Macro 12 | |
| 208 - 255 | 82 - 100 | Reserved. No function | |
| 7* | Effects macros (DMX mode 2 only) | ||
| 0 - 15 | 0 - 5 | No Macro | |
| 16 - 31 | 6 - 11 | Macro 1 | |
| 32 - 47 | 12 - 18 | Macro 2 | |
| 48 - 63 | 19 - 24 | Macro 3 | |
| 64 - 79 | 31 - 37 | Macro 4 | |
| 80 - 95 | 38 - 43 | Macro 5 | |
| 96 - 111 | 44 - 49 | Macro 6 | |
| 112 - 127 | 50 - 55 | Macro 7 | |
| 128 - 143 | 56 - 62 | Macro 8 | |
| 144 - 159 | 63 - 68 | Macro 9 | |
| 160 - 175 | 69 - 74 | Macro 10 | |
| 176 - 191 | 75 - 81 | Macro 11 | |
| 192 - 207 | 82 - 100 | Macro 12 | |
| 208 - 255 | Reserved. No function |
Channel Value Percent Function
| 8* | 0-7 | 0-2 | Pan & tilt speed (Mode 2 only) |
| 8-240 | 3-94 | Tracking (default) | |
| 241-245 | 95-96 | Fast → slow | |
| 246-250 | 97-98 | Blackout during gobo changes | |
| 251-255 | 99-100 | Blackout during pan and tilt changes | |
| Blackout during gobo, pan and tilt changes | |||
| 9* | 0-7 | 0-2 | Effect speed (Mode 2 only) |
| 8-255 | 3-100 | Tracking (default) | |
| Fast → slow |
* Channels 6-9 are available in DMX mode 2 only. In DMX mode 1, pan & tilt speed and effects speed are set to 'tracking'.
8. CONTROL MENUS
Factory default settings are shown in bold type.
Menu Item Options Notes (default settings in bold print)
| Addr | 1-5 12 | DMX address (default address = 1) | |
| PATI | PINV | Pan invert | |
| TINV | Tilt invert | ||
| PSET | MOD 1 | DMX mode 1 (normal) | |
| MOD2 | DMX mode 2 (extended) | ||
| MODE | NORM | DMX-controlled operation / slave fixture | |
| SA-A | Stand-alone auto trig operation / auto trig master fixture | ||
| SA-M | Stand-alone music trig operation / music trig master fixture | ||
| PER INT | OFF | Dimming disabled | |
| ON | Dimming enabled | ||
| INFO | TIME | HRS | TOTAL = total hours of operation since manufacture.RSET = resettable counter. Press [Enter] to display hours of operation since counter reset. To reset to zero, press [Up] for 5 seconds. |
| L HR | TOTAL = total hours of lamp operation.RSET = resettable counter. Press [Enter] to display hours of lamp operation since counter reset. To reset to zero, press [Up] for 5 seconds. | ||
| L ST | TOTAL = total number of lamp strikes.RSET = resettable counter. Press [Enter] to display number of lamp strikes since counter reset. To reset to zero, press [Up] for 5 seconds. | ||
| VER X.X.X | CPU software version number | ||
Table 2: Control menu
MAN
| RST | Reset fixture | |
| L ON | Lamp on | |
| LoFF | Lamp off | |
| SHUT | OPEN | Open shutter |
| CLOS | Close shutter | |
| STRF | Shutter strobe fast | |
| STRM | Shutter strobe medium | |
| STRS | Shutter strobe slow | |
| dIM | ∅-255 | Dimmer |
| 9060 | G1 I→G8 IG1 R→G8 RG1RS→GBRS | Indexed gobo selection 1 → 8Rotating gobo selection 1 → 8Rotating & shaking gobo selection 1 → 8 |
| I/S | ∅-255 | Gobo rotation speed slow → fast |
| PAN | ∅-127 | Pan position left → right |
| NS S | Narrow shake slow | |
| NS M | Narrow shake medium | |
| NS F | Narrow shake fast | |
| WS S | Wide shake slow | |
| WS M | Wide shake medium | |
| WS F | Wide shake fast | |
Table 2: Control menu
| MAN (cont.) | TILT | CW S | Clockwise rotation slow |
| CW M | Clockwise rotation medium | ||
| CW F | Clockwise rotation fast | ||
| CCW S | Counterclockwise rotation slow | ||
| CCW M | Counterclockwise rotation medium | ||
| CCW F | Counterclockwise rotation fast | ||
| NS S | Narrow shake slow | ||
| NS M | Narrow shake medium | ||
| NS F | Narrow shake fast | ||
| WS S | Wide shake slow | ||
| WS M | Wide shake medium | ||
| WS F | Wide shake fast | ||
| TSEQ RUN | Run a general test of all effects | ||
| UTIL (Press [Enter] for 3 secs. to access) | UPL SURE | Manually set fixture to software update mode | |
| MLEV | LE 1 → LE 16 | Music sensitivity level (1 = most sensitive, 7 = default) | |
Table 2: Control menu
9. CIRCUIT BOARD LAYOUTS


SPECIFICATIONS
Physical
Size (L x W x H) 550 x 240 x 203 mm (21.7 x 9.4 x 8.0 in.)
Height (including bracket) 432 mm (17.0 in.)
Weight (EU model, including bracket)....13.5 kg (29.8 lbs.)
Weight (US model, including bracket). 14.7 kg (32.4 lbs.)
Lamp
Type 150 W discharge
Approved lamps . . . . . . . Philips MasterColor CDM-SA/T 150, Osram HSD 150/70
Socket....G12
Dynamic effects
Rotating gobo wheel .....8 interchangeable gobos with gobo indexing, rotation, shake, music trig.....
Mechanical dimmer/shutter . 0 - 100% continuous dimming, instant open & blackout, strobe effects, music triggered shutter
Motorized mirror drum.... 172° pan (swivel) and 360° tilt (continuous rotation)
Control and programming
Control options ..... DMX, stand-alone, synchronized (master/slave)
DMX channels 5 (mode 1) or 9 (mode 2)
DMX address setting.... Onboard control panel with 4-digit display
Stand-alone options ... Music trig (selectable via control panel or via DMX), auto trig
Protocol....USITT DMX512/1990
Receiver RS-485
Firmware update .... Serial upload via DMX link
Optics
Manual focus. 2m (6.6 ft.) - 20m (65.6 ft.)
Construction
Housing Steel and aluminum
Gobos
Outside diameter....22.5 mm + 0/- 0.3 mm
Maximum image diameter....17 mm
Installation
Orientation....Any
Mounting points ....Adjustable bracket
Minimum distance to illuminated surfaces 1 m (3.3 ft.)
Minimum clearance around fan and air vents 0.1 m (4 in.)
Connections
AC power input 3-pin IEC male socket
DMX data in/out....3-pin locking XLR
Electrical
EU model
Input. 3-prong IEC male socket
AC power. . . . . . . . . . . . . . . . . . . . . . . . . . . . . . . . switch-selectable, 230 V / 240 V, 50 Hz
Main fuse....2 AT
Typical power and current*
@ 220 V, 50 Hz 199 W, 1.0 A, PF 0.975
@ 230 V, 50 Hz 215 W, 1.0 A, PF 0.968
@ 240 V, 50 Hz 231 W, 1.0 A, PF 0.968
US model
Input. 3-prong IEC male socket
AC power. 115-120 V, 60 Hz
Main fuse....3.15 AT
Typical power and current*
@ 110 V, 60 Hz 192 W, 1.8 A, PF 0.980
@ 120 V, 60 Hz 225 W, 2.0 A, PF 0.970
* V = volts, Hz = hertz, W = watts, A = amps, PF = power factor
Measurements made at nominal voltage. Allow for a deviation of +/-10%.
Thermal
Cooling....Forced air
Maximum ambient temperature ( Ta ) 40°C (104°F)
Maximum surface temperature 80°C (176°F)
Total heat dissipation (calculated, 110 V +/- 10%, 60 Hz) ..... 670 BTU/hr.
Total heat dissipation (calculated, 230 V +/- 10%, 50 Hz) ..... 710 BTU/hr.
Approvals

EU safety.....EN 60598-1, EN 60598-2-17
EU EMC. .EN 55015, EN 55022, EN 55024, EN 61000-3-3, EN 61000-3-2, EN 61547
US safety. UL 1573
Canadian safety. CSA C22.2 NO 166
Included items – EU models
Long-life 150 W discharge lamp
3 meter (9.8 ft) EU power cable, 3 x 1.0 mm 2 , Schuko male connector .P/N 11501017
3 meter (9.8 ft) EU power cable, 3 x 1.0 mm 2 , no male connector . . . . P/N 11501013
5 meter (16.4 ft.) RS-485 XLR cable for data link P/N 11820008
L type 5mm Allen key . . . . . . . . . . . . . . . . . . . . . . . . . . . . . . . . . . . . . . . . . . . . . . . . . . . . . . . . . . P/N 50520615
User manual....P/N 35000213
Adjustable U-bracket
2 AT 5x20 mm main fuse (installed) P/N 05020009
Included items – US models
Long-life 150 W discharge lamp
2 meter (6.5 ft.) US AC power cable, 18AWG with US male
connector (UL approved) .....P/N 11501501
5 meter (16.4 ft.) RS-485 XLR cable for data link P/N 11820008
L type 5mm Allen key . . . . . . . . . . . . . . . . . . . . . . . . . . . . . . . . . . . . . . . . . . . . . . . . . . . . . . . . . P/N 50520615
User manual....P/N 35000213
Adjustable U-bracket
3.15 AT 5x20 mm main fuse (installed).P/N 05020043
Accessories
Philips MasterColor CDM-SA/T 150 W discharge lamp ..... P/N 97010111
Osram HSD 150/70 150 W discharge lamp . . . . . . . . . . . . . . . . . . . . . . . . . . . . . . . . . . . . . . . . . . . P/N 97010117
DMX termination plug (end of link), XLR male .....P/N 91613017
DMX termination plug, (start of link, master/slave), XLR female .....P/N 91613018
G-clamp P/N 91602003
Half-coupler clamp P/N 91602005
5-pin male to 3-pin female XLR adaptor cable .....P/N 11820005
5 meter (16.4 ft.) RS-485 XLR cable for data link P/N 11820008
Mania SCX800 (EU models) main fuse, 2 AT....P/N 05020009
Mania SCX800 (US models) main fuse, 3.15 AT .....P/N 05020043
Ordering information
Mania SCX800 EU model, 220-240 V, 50 Hz .....P/N 90430088
Mania SCX800 US model, 110-120 V, 60 Hz .....P/N 90430089
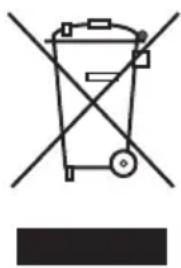
Disposing of this product
Martin® products are supplied in compliance with Directive 2002/96/EC of the European Parliament and of the Council of the European Union on WEEE (Waste Electrical and Electronic Equipment), as amended by Directive 2003/108/EC, where applicable.
Help preserve the environment! Ensure that this product is recycled at the end of its life. Your supplier can give details of local arrangements for the disposal of Martin products.
- DIMENSIONS
- ©2007 MARTIN PROFESSIONAL A/S
- CONTENTS
- INTRODUCTION 5
- INSTALLATION 9
- OPERATION 13
- CONTROL PANEL 20
- SERVICE AND MAINTENANCE 23
- TROUBLESHOOTING 30
- DMX PROTOCOL 31
- CONTROL MENUS 35
- CIRCUIT BOARD LAYOUTS 38
- SPECIFICATIONS 39
- NOTES
- INTRODUCTION
- UNPACKING
- PROTECTING YOURSELF AND OTHERS FROM ELECTRIC SHOCK AND INJURY
- PROTECTING YOURSELF AND OTHERS FROM BURNS AND FIRE
- PROTECTING YOURSELF AND OTHERS FROM INJURY DUE TO FALLS
- INSTALLATION
- AC POWER
- POWER SETTINGS
- INSTALLING A CORD CAP ON THE POWER CABLE
- RIGGING THE FIXTURE
- CREATING A DATA LINK FOR DMX OR SYNCHRONIZED OPERATION
- CONNECTING THE SERIAL DATA LINK
- DMX CONNECTORS AND POLARITY
- OPERATION
- GETTING STARTED
- POWERING ON
- CONTROL PANEL AND MENUS
- MUSIC TRIG, AUTO TRIG AND DMX MODES
- SELECTING DMX, MUSIC TRIG OR AUTO TRIG OPERATING MODES
- SYNCHRONIZED MUSIC TRIG AND AUTO TRIG OPERATION
- SETTING UP SYNCHRONIZED OPERATION
- SETTING DMX MODE 1 OR 2
- SETTING DMX ADDRESSES
- DMX CONTROL OPTIONS
- UNSURE ABOUT SPEED AND TRACKING
- DMX SIGNAL INDICATOR
- FOCUS ADJUSTMENT
- ADJUSTING MUSIC LEVEL SENSITIVITY
- CONTROL PANEL
- MOVEMENT
- DIMMING
- INFORMATION READOUTS
- POWER-ON HOURS
- LAMP HOURS
- START-UP/LAMP STRIKE COUNTER
- SOFTWARE VERSION
- MANUAL CONTROL
- EFFECTS TEST
- UPLOAD MODE
- SERVICE AND MAINTENANCE
- LAMP REPLACEMENT
- INSTALLING THE LAMP
- BEAM ADJUSTMENT
- CLEANING OPTICAL COMPONENTS
- CLEANING THE FAN AND AIR VENTS
- REPLACING THE MAIN FUSE
- GOBO ORIENTATION
- SOFTWARE UPLOADS
- TROUBLESHOOTING
- DMX PROTOCOL
- CONTROL MENUS
- CIRCUIT BOARD LAYOUTS
- SPECIFICATIONS
- PHYSICAL
- LAMP
- DYNAMIC EFFECTS
- CONTROL AND PROGRAMMING
- OPTICS
- CONSTRUCTION
- GOBOS
- CONNECTIONS
- ELECTRICAL
- EU MODEL
- US MODEL
- THERMAL
- APPROVALS
- INCLUDED ITEMS – EU MODELS
- INCLUDED ITEMS – US MODELS
- ACCESSORIES
- ORDERING INFORMATION
- DISPOSING OF THIS PRODUCT
Brand : MARTIN
Model : Mania SCX800
Category : Professional spotlight