
CHE-HDBTWP242K - AV Extender Comprehensive - Free user manual and instructions
Find the device manual for free CHE-HDBTWP242K Comprehensive in PDF.


| Product Type | AV Extender (HDBaseT) |
| Model | CHE-HDBTWP242K |
| Brand | Comprehensive |
| Category | Audio/Video Extender |
| Dimensions (Transmitter) | 4.7 x 3.1 x 1.2 inches (120 x 80 x 30 mm) |
| Weight (Transmitter) | 0.6 lbs (270 g) |
| Power Supply | PoE (Power over Ethernet) or external 12V DC adapter |
| Power Consumption | 10 W (max) |
| Video Resolution | Up to 4K@60Hz 4:4:4 (18 Gbps) |
| Transmission Range | Up to 230 ft (70 m) over Cat6/6a |
| Audio Support | LPCM, Dolby Digital, DTS, up to 7.1 channels |
| HDCP Version | 2.2 |
| Input/Output Interfaces | HDMI input (wall plate), HDMI output (receiver), IR pass-through, RS-232, Ethernet |
| Key Functions | Extends HDMI over single Cat cable, supports PoE, bidirectional IR, EDID management |
| Maintenance and Cleaning | Wipe with dry cloth; avoid liquids; keep vents clear |
| Safety Precautions | Do not expose to moisture; use rated PoE switch; avoid bending cables sharply |
| Spare Parts and Repairability | Contact Comprehensive for replacement units; no user-serviceable parts |
| General Information | Wall plate transmitter and compact receiver; ideal for conference rooms and digital signage |
Frequently Asked Questions - CHE-HDBTWP242K Comprehensive
User questions about CHE-HDBTWP242K Comprehensive
0 question about this device. Answer the ones you know or ask your own.
Ask a new question about this device
Download the instructions for your AV Extender in PDF format for free! Find your manual CHE-HDBTWP242K - Comprehensive and take your electronic device back in hand. On this page are published all the documents necessary for the use of your device. CHE-HDBTWP242K by Comprehensive.
USER MANUAL CHE-HDBTWP242K Comprehensive
Pro AV/IT HDBaseT™ 4K Dual Gang with HDMI/USB-C and USB, Audio Wall Plate Extender Kit up to 230ft
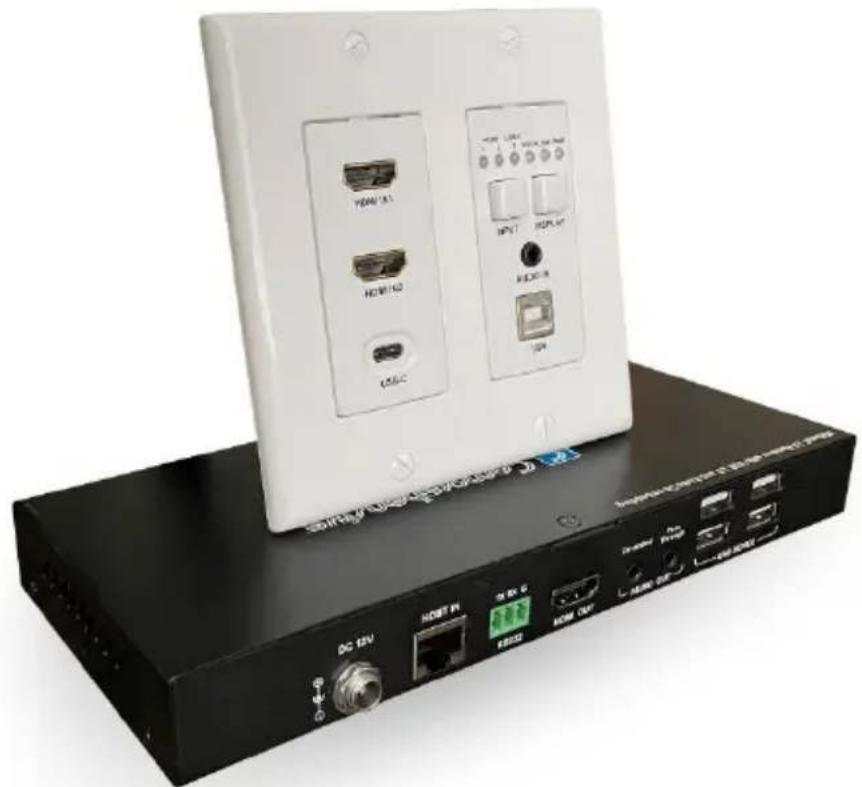
natural_image
Exterior view of a white network switch device with two ports and control switches (no visible text or symbols on the main body)User Manual
Version: V1.0.0
Important Safety Instructions

- Do not expose this apparatus to rain, moisture, dripping or splashing and that no objects filled with liquids, such as vases, shall be placed on the apparatus.
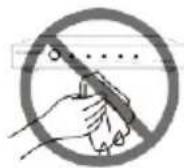
- Clean this apparatus only with a dry cloth.

- Do not install or place this unit in a bookcase, built-in cabinet or in another confined space. Ensure the unit is well ventilated.

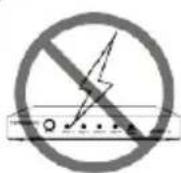
- Unplug this apparatus during lightning storms or when unused for long periods of time.
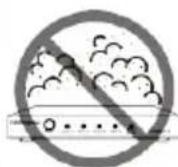
- To prevent risk of electric shock or fire hazard due to overheating, do not obstruct the unit's ventilation openings with newspapers, tablecloths, curtains, and similar items.

- Protect the power cord from being walked on or pinched particularly at plugs.

- Do not install near any heat sources such as radiators, heat registers, stoves, or other apparatus (including amplifiers) that produce heat.

- Only use attachments / accessories specified by the manufacturer.
- Do not place sources of naked flames, such as lighted candles, on the unit.

- Refer all servicing to qualified service personnel.
Table of Contents
Introduction 2
Features 2
Package Contents .... 3
Specifications.... 3
Transmitter.... 3
Receiver 5
Transmission Distance....6
Panel Description 6
Transmitter....6
Receiver 7
Installation and Wiring....9
Installation....9
Wiring 9
Automatic Switching 12
Device Control.... 13
Introduction
Comprehensive's CHE-HDBTWP242K is a 3x1 wall-plate extender that features HDMI and USB-C AV inputs with USB 2.0 connectivity. The USB 2.0 connectivity is ideal for connecting devices such as webcams, Interactive panels, external drives, mice & keyboards. Supports video resolution up to 4K@60Hz 4:2:0. The transmitter is remotely powered by the receiver by PoH that can be extended up to 230ft over Cat5e/Cat6.
This kit is ideal for situations where USB must be extended alongside HDMI for display interactivity for items such as interactive whiteboards or projectors.
Features
• 1x USB-C and 2x HDMI inputs, support automatic/manual switching.
- Via a Cat 6/6a/7 cable, transmits 4K@60Hz (YUV 4:2:0 color sub-sampling) and 1080P@60Hz signal up to 100m
- Via a Cat 5e cable, transmits 4K@60Hz (YUV 4:2:0 color sub-sampling) signal up to 100m and 1080P@60Hz signal up to 90m
• High-speed USB 2.0, pass through over HDBaseT up to 100m
- Provides four USB Device ports with high power, for supporting higherpower USB devices connected
• One-way analog audio pass-through from transmitter to receiver
• Supports audio de-embedding from the HDMI output
- PoH capable – transmitter can be powered by connected receiver
• Supports firmware upgrade
Package Contents
For transmitter:
- 1 x Transmitter
• 1 x Wall Plate Plastic Panel (2-Gang US, with Screws)
• 1 x USB B to A Cable
• 1 x Phoenix Male Connector (3.5mm, 4 Pins)
• 4 x Mounting Screws
For receiver:
- 1 x Receiver
• 1 x DC 12V Power Adapter with US Pins
• 1 x Phoenix Male Connector (3.5mm, 3 Pins)
• 2 x Mounting Brackets (with Screws)
Specifications
Transmitter
| Technical | |
| Video Input | 2 x HDMI; 1 x USB-C |
| Input Video Signal | HDMI (4K@60Hz YUV 4:2:0, HDCP 2.2), USB-C DP Alt mode |
| Video Output | 1 x HDBT OUT (RJ-45) |
| Output Video Signal | HDBT 2.0 |
| Input/Output Resolutions Supported | HDMI: VESA: 800x600 ^8 , 1024x768 ^8 , 1280x768 ^8 , 1280x800 ^8 , 1360x 768 ^8 , 1366x768 ^8 ,1440x900 ^8 , 1600x900 ^8 ,1600x1200 ^8 , 1680x1050 ^8 , 1920x1200 ^8 SMPTE: 1280x720P ^1,2,3,4,5,6,7,8 , 1920x1080I ^6,8 , 1920x1080P ^1,2,3,4,5,6,7,8 . 3840x2160 ^2,3,5,6,8 . 4096x2160 ^2,3,5,6,8 USB-C: Same as above1 = at 23.98 Hz, 2 = at 24 Hz, 3 = at 25 Hz, 4 = at 29.97 Hz, 5 = at 30 Hz, 6 = at 50 Hz, 7 = at 59.94 Hz, 8 = 60 HzNote: 4096x2160/3840x2160@50Hz/60Hz is based on chroma sub-sampling 4:2:0 8-bit only. |
| Audio Input | 1 x HDMI; 1 x USB-C;1 x Audio In (Unbalanced stereo 3.5mm) |
| Audio Format | HDMI/USB-C: Supports multi-channel audio formats, including PCM 2.0/5.1/7.1, Dolby TrueHD, Dolby Atmos, DTS-HD Master Audioand DTS:XAudio In: Stereo |
| USB Pass-through | USB 2.0 |
| USB Port Type | USB-B |
| Maximum Pixel Clock | 340MHz |
| Maximum Data Rate | 10.2Gbps |
| Control Method | Auto switching, front panel buttons, API commands |
| General | |
| Operating Temperature | 0°C to 45°C (32°F to 113°F) |
| Storage Temperature | -20°C to 70°C (-4°F to 158°F) |
| Humidity | 10% to 90%, non-condensing |
| ESD Protection | Human-body Model:±8kV (Air-gap discharge)/±4kV (Contact discharge) |
| Power Supply | PoH, powered by receiver; or local power supply through the 12V phoenix connector |
| Power Consumption (Max) | 7.8W |
| Device Dimension(W x H x D) | 89mm x 38.4mm x 105.6mm/3.5" x 1.51" x 4.16" |
| Product Weight | 0.3kg/0.66lb |
Receiver
| Technical | |
| Video Input | 1 x HDBT IN (RJ-45) |
| Input Video Signal | HDBT 2.0 |
| Video Output | 1 x HDMI OUT |
| Output Video Signal | HDMI (4K@60Hz YUV 4:2:0), HDCP 2.2 |
| Input/Output Resolutions Supported | VESA:800x600 ^8 , 1024x768 ^8 , 1024x768 ^8 , 1280x768 ^8 ,1280x800 ^8 , 1360x768 ^8 , 1366x768 ^8 , 1440x900 ^8 ,1600x900 ^8 , 1600x1200 ^8 , 1680x1050 ^8 , 1920x1200 ^8 SMPTE:1280x720P ^1,2,3,4,5,6,7,8 , 1920x1080I ^6,8 ,1920x1080P ^1,2,3,4,5,6,7,8 , 3840x2160 ^2,3,5,6,8 ,4096x2160 ^2,3,5,6,8 1 = at 23.98 Hz, 2 = at 24 Hz, 3 = at 25 Hz, 4 = at 29.97 Hz, 5 = at 30 Hz, 6 = at 50 Hz, 7 = at 59.94 Hz, 8 = at 60 HzNote: 4096x2160/3840x2160@50Hz/60Hz is based on chroma sub-sampling 4:2:0 8-bit only. |
| Input Video Level | 0.5~1.0V p-p |
| Maximum Pixel Clock | 340MHz |
| Audio Format | HDMI Out: Supports multi-channel audio formats, including PCM 2.0/5.1/7.1, Dolby TrueHD, Dolby Atmos, DTS-HD Master Audio and DTS:XAudio Out: Stereo |
| General | |
| Operating Temperature | 0°C to 45°C (32°F to 113°F) |
| Storage Temperature | -20°C to 70°C (-4°F to 158°F) |
| Humidity | 10% to 90%, non-condensing |
| ESD Protection | Human-body Model:±8kV (Air-gap discharge)/±4kV (Contact discharge) |
| Power Supply | DC 12V 3A |
| Power Consumption (Max) | 8W (without USB) |
| Device Dimension (W x H x D) | 210mm x 25mm x 90.2mm/8.27" x 0.98" x 3.55" |
| Product Weight | 0.46kg/1.01lbs |
Transmission Distance
Note: Straight-through category cable wired to T568B standard is recommended.
| Cable Type | Range | Supported Video |
| Cat 5e | 100m/330ft | 1080P@60Hz, 36bpp |
| 90m/197ft | 1080P@60Hz, 48bpp | |
| Cat 6/6a/7 | 100m/330ft | 4K@30Hz, 4:4:4 24bpp4K@60Hz, 4:2:0 24bpp |
Panel Description
Transmitter
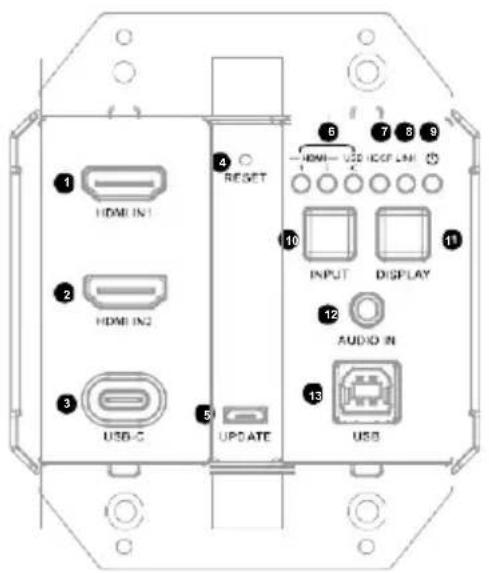

| ID | Name | Description |
| 1&2 | HDMI IN (1~2) | Connect to HDMI sources. |
| 3 | USB-C | USB-C port: USB 3.1 Gen1 (5Gbps). Connect to a USB-C source for source input or connect to a control device for firmware upgrade. |
| 4 | RESET | Use this button to reset device.When the transmitter is powered on, use a pointed stylus to hold down this button for five or more seconds and then release, the transmitter will reboot and restore to its factory defaults. |
| 5 | UPDATE | Micro USB port for updating firmware (MCU and USB-C chip) or controlling the transmitter through API commands. |
| 6 | Input Selection LEDs | LED On: Corresponding input channel is selected.LED Off: Corresponding input channel is not selected. |
| 7 | HDCP LED | On: HDCP-protected content is being transmitted.Blinking: Non-HDCP protected content is being transmitted.Off: No content is being transmitted. |
| 8 | LINK LED | On: HDBT link is normal.Off/Blinking: No HDBT link or link error. |
| 9 | Power LED | On: The transmitter is powered on.Off: The transmitter is powered off. |
| 10 | INPUT | Input selection button. |
| 11 | DISPLAY | Display On/Off button.Display On: Short press to turn on the display device.Display Off: Press and hold for at least 3 seconds to turn off the display device. |
| 12 | AUDIO IN | Pass-through audio input. Connect to an audio source. |
| 13 | USB HOST | USB-B input. Connect to a USB host device. |
| 14 | HDBT OUT | HDBaseT Output. Connect to an HDBT receiver. |
| 15 | POWER Input | Pins 12V and G are used for local DC 12V input. |
Receiver
Front Panel

| ID | Name | Description |
| 1 POWER LED | On: The device is powered on.Off: The device is powered off. | |
| 2 STATUS LED | Blinking: The device is working properly.Off: The device is not working properly. | |
| 3 | HDCP LED | On: HDCP protected content is being transmitted.Blinking: Non-HDCP protected content is being transmitted.Off: No content is being transmitted. |
| 4 | LINK LED | On: HDBT link is normal.Blinking/Off: Link error or no link. |
| 5 | RS232 | RS232 DIP Switch for settings of RS232 function.Pass-through (default setting): For controlling the transmitter for input selection.MCU: For MCU firmware update.VS: For VS firmware update.Note: Transmitter and receiver must be updated individually. |
Rear Panel

1 2 3 4 5 6
| ID | Name | Description |
| 1 | DC 12V | DC 12V power input; connect to the power adapter provided. With PoH function, the transmitter can be powered by the receiver. |
| 2 | HDBT IN | Connect to HDBT OUT of the transmitter via a Cat x cable. |
| 3 | RS232 | For upgrading firmware or controlling the transmitter for input selection. |
| 4 | HDMI OUT | Connect to an HDMI display. |
| 5 | AUDIO OUT | Unbalanced stereo audio output.De-embed: For audio de-embedding from the HDMI output.Pass-through: For audio pass-through from Audio In port on the transmitter to this port. |
| 6 | USB DEVICE | Connect to USB devices (e.g. keyboard, mouse, USB camera, USB flash drive, etc.).Note: USB ports support USB 2.0 standard with a maximum of 1.4A for the top two ports and 0.6A on the bottom two ports. Before connecting a USB 3.0 device, ensure it is compatible with USB 2.0. |
Installation and Wiring
Installation
Note:
- Before installation, ensure the device is disconnected from the power source.
• The height of installation should not exceed 2 meters from the ground.
Steps to install the receiver in a suitable location:
-
Attach the installation bracket to the enclosure using the screws provided in the package separately.
-
The bracket is attached to the enclosure as shown.

natural_image
Technical line drawing of a rectangular electronic device with ventilation slots and mounting bracket (no text or symbols)-
Repeat steps 1-2 for the other side of the unit.
-
Attach the brackets to the surface you want to hold the unit against using the screws (provided by others).
Wiring
Warnings:
• Before wiring, disconnect the power from all devices.
• During wiring, connect and disconnect the cables gently.
Steps for device wiring:
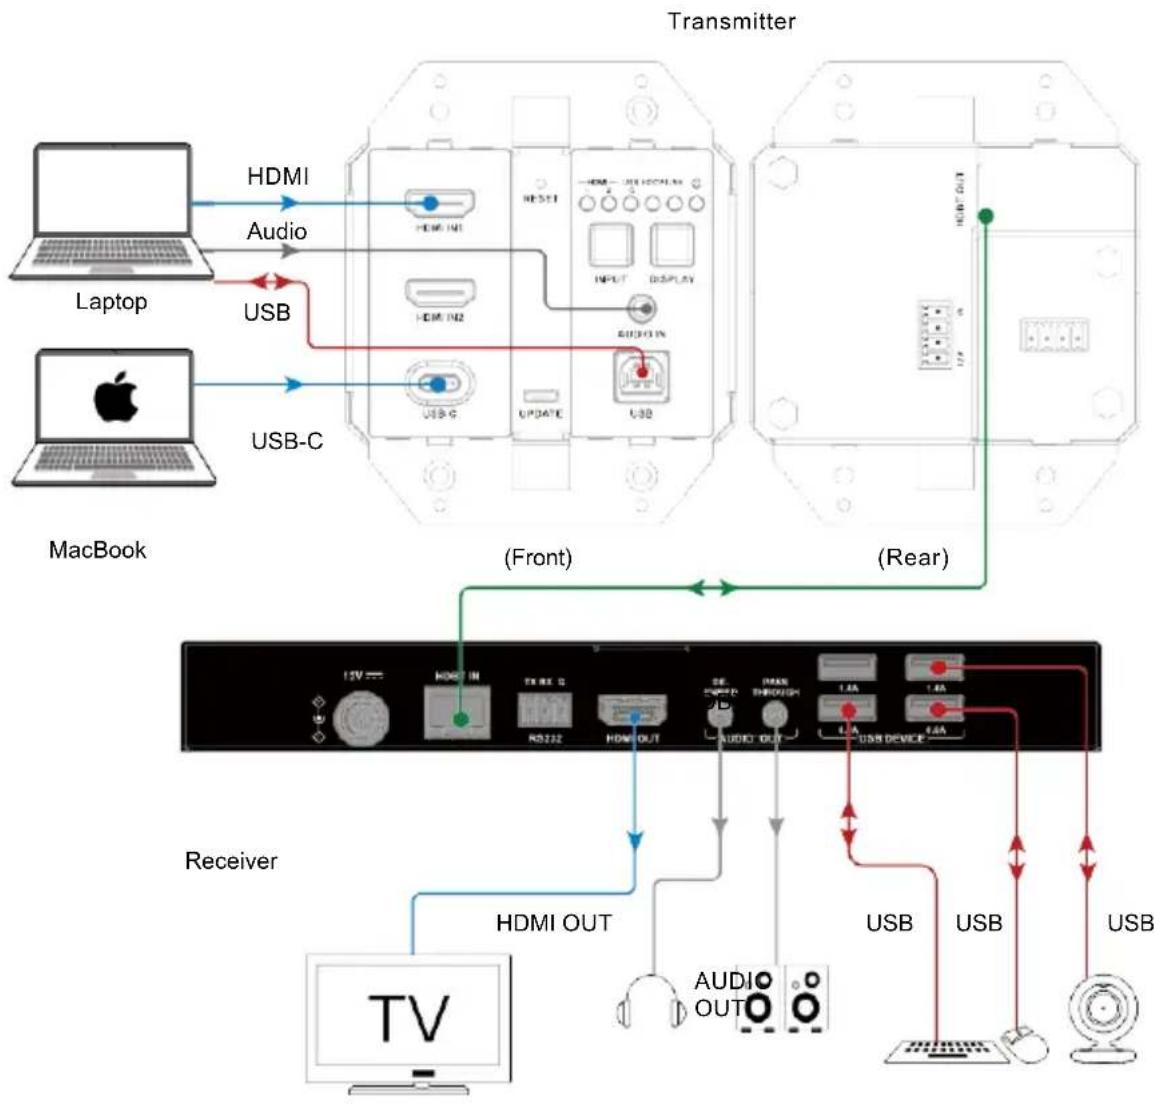
- Connect HDBT
Connect HDBT OUT of the transmitter to HDBT IN of the receiver via a Cat 5e/6/7 cable.
- Connect an HDMI display and audio receivers (e.g. earphone, speaker) respectively to the receiver.
- Connect the provided power adapter to the receiver. With PoH support, it is able to send power to the transmitter; no additional power adapter is required at the transmitter.
- Connect the video sources to the transmitter.
- Select a desired video source through automatic or manual switching function.
- Connect for KVM control:
Connect a host PC to USB-B port of the transmitter, and USB devices (e.g. USB camera, keyboard, and mouse) to USB DEVICE ports of the receiver to realize remote KVM control. - Connect for additional control option:
Device Control: Connect a control PC to Micro USB port of the transmitter or to RS232 port of the receiver to control the transmitter via API commands. For more information, see Device Control section.
flowchart
graph TD
    subgraph MacBook
        A["Laptop"] -->|HDMI| B["Transmitter"]
        C["Laptop"] -->|Audio| B
        D["MacBook"] -->|USB-C| B
        B --> E["RS11"]
        B --> F["RS12"]
        B --> G["RS13"]
        B --> H["RS14"]
        B --> I["RS15"]
        B --> J["RS16"]
        B --> K["RS17"]
        B --> L["RS18"]
        B --> M["RS19"]
        B --> N["RS20"]
        B --> O["RS21"]
        B --> P["RS22"]
        B --> Q["RS23"]
        B --> R["RS24"]
        B --> S["RS25"]
        B --> T["RS26"]
        B --> U["RS27"]
        B --> V["RS28"]
        B --> W["RS29"]
        B --> X["RS30"]
    end

    subgraph Transmitter
        Y["Transmitter"] --> Z["Front"]
        AA["Transmitter"] --> AB["(Rear)"]
    end

    subgraph Receiver
        AC["Receiver"] --> AD["TV"]
        AD --> AE["HDMI OUT"]
        AE --> AF["+"]
        AF --> AG["AUDIO OUT"]
        AG --> AH["+"]
        AH --> AI["USB Device"]
        AI --> AJ["USB"]
        AJ --> AK["USB"]
        AK --> AL["USB"]
    end

    style Transmitter fill:#f9f,stroke:#333
    style Receiver fill:#ccf,stroke:#333
    style Receiver fill:#cfc,stroke:#333
Earphone Speaker Keyboard Mouse USB Camera
Automatic Switching
The transmitter offers automatic switching function.
The automatic switching function follows the Last-In-First-Out rule. For example, if a new active source is connected, the transmitter will automatically switch to this source. If the source selected is removed, the transmitter will automatically switch to the source with top priority (default priority: USB-C > HDMI 1 > HDMI 2).
If you want the display to play video from a specific video source:
- Disconnect the cable from your desired video source, and then connect it again.
- Use the Input Selection button on the front panel or API commands to select your desired video source.
Note: The automatic switching function can detect the input signal with 5V only. If the selected source in standby mode provides a continuous 5V power output, this function will not work, i.e. the transmitter will not switch the input to other active sources. In this case, please turn off the selected source in standby mode or remove it from the transmitter.
Device Control
Advanced users can control the transmitter via API commands through UPDATE port on transmitter or RS232 port on receiver: connect a control PC or control system to the UPDATE port of the transmitter (see Figure 1) or the RS232 port of the receiver (see Figure 2). API command for device control is available in the separate document. A professional RS232 serial interface software (e.g. Serial Assist) may be needed as well.
Before sending the API command to control the transmitter, ensure the transmitter, control PC and/or receiver are configured correctly.
| Parameters | Value |
| Baud Rate | 115200 bps |
| Data bits | 8 bits |
| Parity | None |
| Stop bits | 1 bit |
| Flow control | None |

Figure 1- Control the Transmitter through UPDATE port
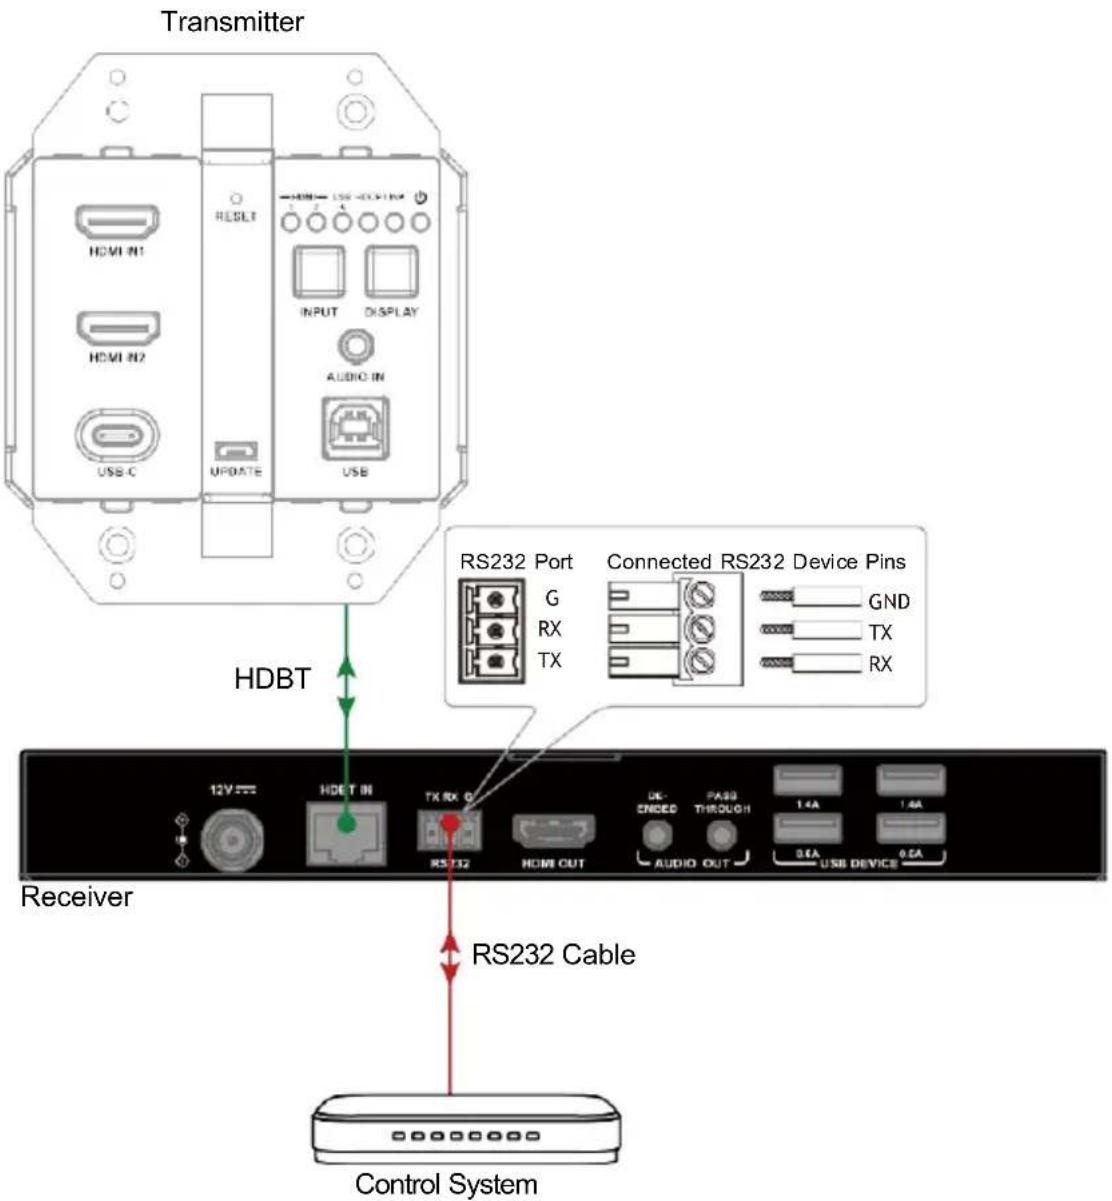
Figure 2- Control the Transmitter through RS232 port of the Receiver.

Comprehensive Connectivity Company
The Pro's Connectivity Since 1974
80 Little Falls Rd, Fairfield, NJ 07004
Phone: 1-800-526-0242
www.ComprehensiveCo.com
sales@comprehensiveco.com
- Important Safety Instructions
- Table of Contents
- Introduction
- Features
- Package Contents
- For transmitter:
- For receiver:
- Specifications
- Transmission Distance
- Panel Description
- Transmitter
- Receiver
- Installation and Wiring
- Installation
- Note:
- Wiring
- Warnings:
- Steps for device wiring:
- Automatic Switching
- Device Control
- Comprehensive Connectivity Company
Brand : Comprehensive
Model : CHE-HDBTWP242K
Category : AV Extender