
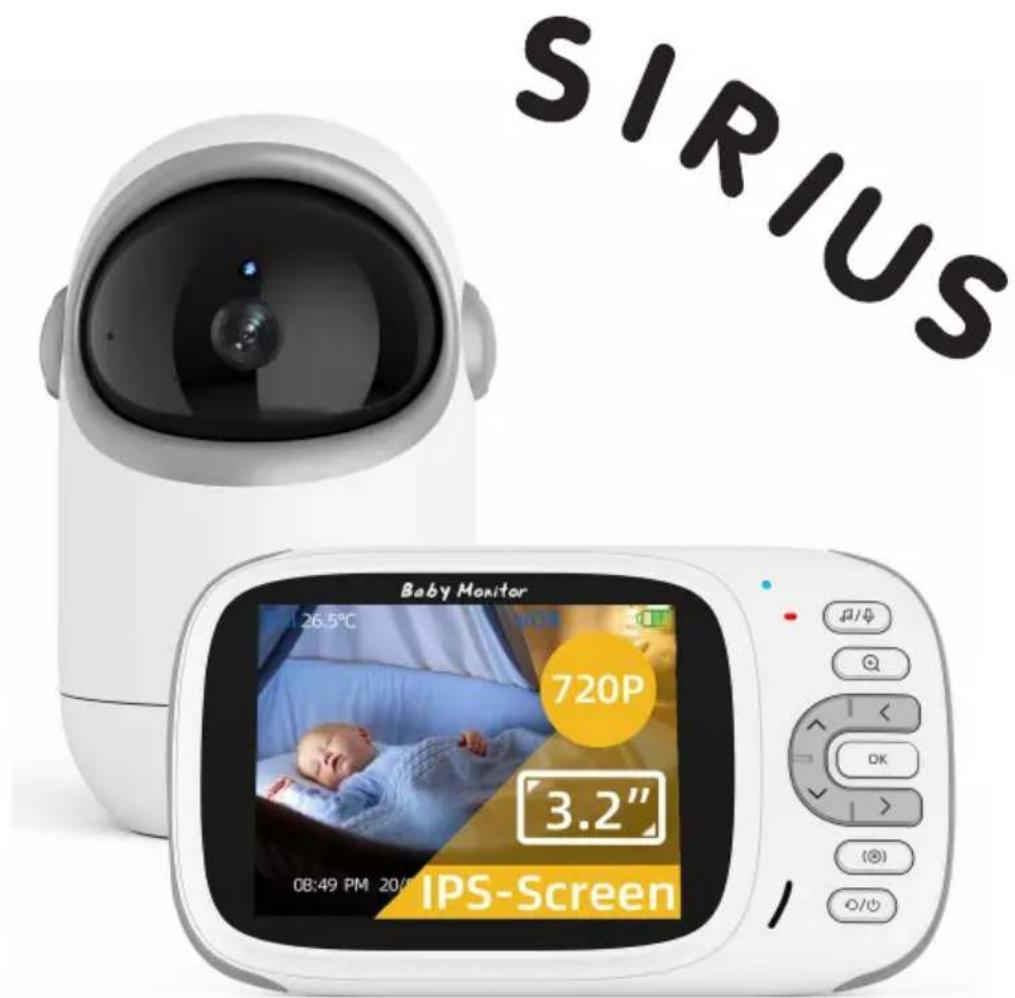
Sirius - Baby monitor Chipolino - Free user manual and instructions
Find the device manual for free Sirius Chipolino in PDF.


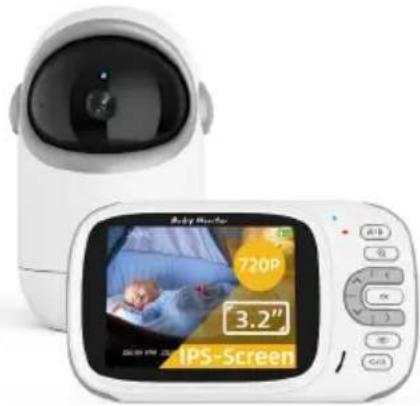
| Product Type | Digital Baby Monitor |
| Brand | Chipolino |
| Model | Sirius |
| Indoor Range | Up to 50 meters |
| Outdoor Range | Up to 260 meters (open area) |
| Display Type | 3.2-inch IPS LCD |
| Display Resolution | 320 x 240 pixels |
| Night Vision | Infrared, up to 5 meters |
| Pan Angle | 300° (150° left, 150° right) |
| Tilt Angle | 50° (30° up, 20° down) |
| Two-Way Communication | Yes (talk back via built-in microphone and speaker) |
| Lullabies | 8 melodies (selectable from parent unit) |
| VOX Mode | Yes (voice activation, adjustable sensitivity) |
| Image Zoom | Yes (digital zoom) |
| Temperature Display | Yes (Celsius or Fahrenheit) |
| Alarm Function | Yes (programmable alarm with repeat options) |
| Battery Type (Parent Unit) | Lithium-polymer rechargeable |
| Battery Capacity | 1150 mAh |
| Power Supply | DC 5V/1A (adapters included, 2 pcs) |
| Dimensions (Parent Unit) | 124.5 x 72 x 17.5 mm |
| Dimensions (Baby Unit) | 72.5 x 116 x 66.2 mm |
| Cameras Supported | Up to 2 cameras |
| Language Options | Multi-language (English, French, Spanish, Portuguese, Italian, German, Turkish, Russian) |
| Certification | CE, RoHS compliant |
Frequently Asked Questions - Sirius Chipolino
User questions about Sirius Chipolino
0 question about this device. Answer the ones you know or ask your own.
Ask a new question about this device
Download the instructions for your Baby monitor in PDF format for free! Find your manual Sirius - Chipolino and take your electronic device back in hand. On this page are published all the documents necessary for the use of your device. Sirius by Chipolino.
USER MANUAL Sirius Chipolino
INSTRUCTION MANUAL FOR DIGITAL BABY MONITOR SIRIUS
This Chipolino product is manufactured in accordance with the requirements of Directives of the European Parliament and Council 2014/53/EU relating to the making available on the market of radio equipment, 2014/30/EU relating to electromagnetic compatibility and 2001/95/EU on General Product Safety as well as in accordance with National Legislation.
ATTENTION! WARNINGS!
THIS PRODUCT IS INTENDED TO AID YOU AND CANNOT
SUBSTITUTE A REAL AND RESPONSIBLE ADULT
SUPERVISION!
USE THE PRODUCT ONLY FOR ITS PURPOSE!
CAUTION! ONLY AN ADULT SHOULD USE THE PRODUCT!
✿ CAUTION! THIS DEVICE IS NOT A TOY AND MUST NOT BE ACCESSIBLE TO CHILDREN!
Do not let children play with parts of the monitor!
✿ CAUTION! NEVER PLACE THE BABY UNIT IN THE BABY'S BED OR PLAYPEN!
✿ CAUTION! THE ADAPTORS, PARENT AND BABY UNITS MUST ALWAYS BE OUT OF THE REACH OF THE BABY TO AVOID RISK OF INJURY OR SUFFOCATION!
✿ CAUTION! BEFORE USE, INSPECT THE GOOD WORKING ORDER OF ALL PARTS OF THE PRODUCT. Do not use the product if you find some parts are missing or damaged.
✿ CAUTION! NEVER USE THE BABY MONITOR IN MOIST ENVIRONMENT, CLOSE TO OR IMMERSED IN WATER!
✿ CAUTION! KEEP AWAY FROM FIRE. To avoid overheating keep the transmitter, receiver and adaptors away from heat sources or other devices, which release heat.
✿ CAUTION! Do not leave the adaptors in a place where a child may step on them. A hit on the adaptor when plugged in the electricity may cause damage and serious risk of injury!
◆ Use only supplied by producer adaptors.
If you use a wireless telephone, wireless video device, Wi-Fi network, microwave or Bluetooth devices at frequency of 2.4 GHz, and the video monitor units show interferences, relocate the baby unit at a larger distance until the interference disappears.
Do not use spare parts or other components, which are not supplied by the manufacturer!
The producer does not assume responsibility in case spare parts have been used which are different from the approved type or recommended by the producer.
Do not make changes or modifications on the product! Do not modify the electric circuit and do not add other electrical parts! If necessary, contact the retailer or an authorized service center for advice and repair.
Before plugging the adaptors in, check if the voltage marked on the adaptor is the same as the voltage of the local electricity network. If not, you will damage the product!
Do not use damaged adaptors.
Do not remove the labels and warnings on the product! They are important for everyone who uses the product!
- Keep the nylon package away from children to avoid suffocation!
WARNINGS FOR USING LITHIUM-POLYMER BATTERIES
❖ ONLY an adult can plug the adaptors!
Do not bend, drill (especially with metal objects) or damage the battery in any other way.
◆ Charge the battery only with the adaptors provided by the producer!
Do not allow short circuit!
❖ Keep the product in room temperature!
Do not subject to direct sunlight!
❖ Never leave a charging battery without supervision!
REMARK: The battery compartment is located on the back of the parent unit.
ADVICE: Charge the battery fully before use to save it and prolong its life.
IMPORTANT! To replace the battery contact the retailer or an authorized service!
CAUTION! When you stop using the product, do not dispose of it with normal household waste but hand it over in an official waste collecting point. The waste formed from damaged electrical and video device adaptors, must be disposed of separately. Throwing them out in containers for household waste is forbidden. This will be your considerable contribution for safeguarding nature, reducing the harmful effect of substances found in the batteries and adaptors, environment and human health.
PRODUCT FEATURES
| Digital baby monitor with frequency 2.4 GHz | |
| Transmitting power 17 dBm | |
| Modulation mode GFSK | |
| Suitable temperature of air during usage of the product From -100 C up to +500 C | |
| Suitable air humidity during usage of the product <85% | |
| Range (no obstacles) | Up to 50 m indoorsUp to 260 m open area |
| Spread spectrum AFH &TDMA | |
| Adaptor, 2 pcs | Input: 100-240V, 50-60Hz, 0.2AOutput: 5.0—1 A |
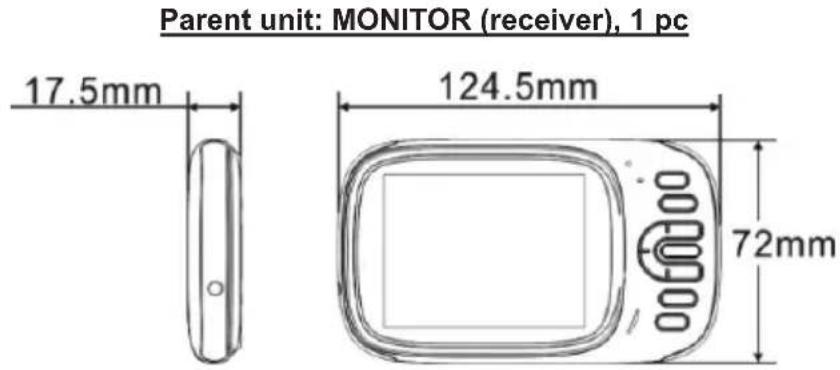
| Video display 3.2" IPS LCD | |
| Resolution 320x240 pixel | |
| Battery | lithium-polymer1150 mAh |
| Receiving sensitivity - 90 dBm | |
| Power consumption 200 mA | |
| Power supply 5V/1000 mA DC | |
| Size, mm 124.5x72x17.5 | |
Baby unit: CAMERA (transmitter), 1 pc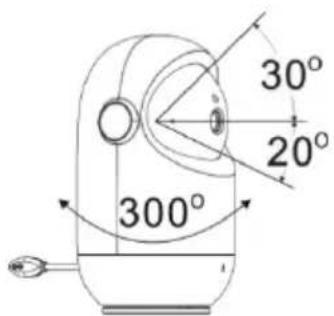 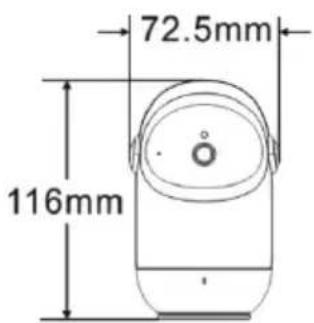 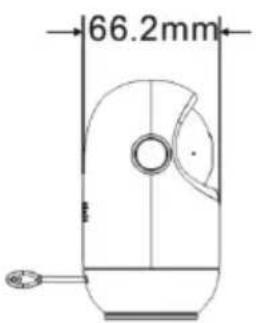 | |
| Sensor of image, type CMOS | |
| Image 320 x 240 pxl | |
| Minimum light (infrared night vision) 0 lx (IR on) | |
| Night vision, distance 5 m | |
| Rotation angle of lens 75° diagonally | |
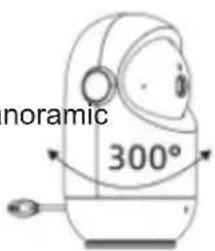
| Rotation angle left/right (panoramic angle) | 300°(left 150° and right 150°) |
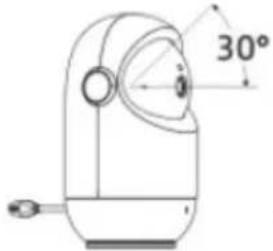
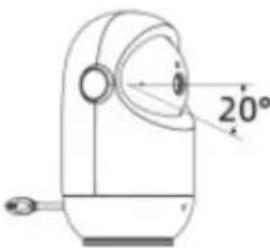
| Rotation angle up/down (camera reclining) | 50°(up 30° down 20°) |
| Power consumption 200 mA | |
| Power supppy 5V/1000 mA DC | |
| Size, mm 72.5x116x66.2 | |
| FUNCTIONS |
| Two way communication |
| Temperature information |
| Musical player with 8 lullabies (in camera) |
| Multi language menu |
| Automatically night vision |
| VOX (automatically activation of baby unit when detecting sound) |
| Panoramic view/ Camera recline – remote control of camera (transmitter) from buttons ate monitor (receiver) |
| Alarm |
| ZOOM function (image zoom) |
MAIN PARTS DIAGRAM
Set includes:
- Parent unit: MONITOR (receiver) – 1 pc
• Baby unit: CAMERA (transmitter) – 1 pc
- Adaptors - 2 pcs
Please make sure that all parts are available.
MONITOR (receiver) 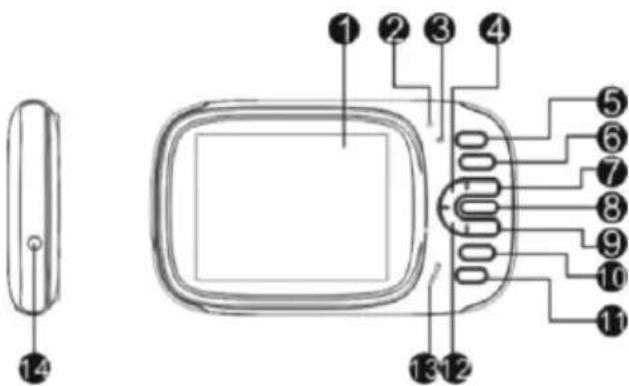 | 1. LCD display2. Microphone3. Power indicator/ Available signal4. Volume control „+“ / pointer upwards5. ON/OFF melodies button/ Button for two way communication6. Button for ZOOM of image7. Button for setting the pointer left8. Button „OK” and „MENU”9. Button for setting the cursor right10. Button for activation of function PANORAMIC VIEW and CAMERA RECLINE11. ON/OFF unit button/ Button for back12. Volume control „-„ / pointer downwards13. Speaker14. Jack for the adaptor |
CAMERA (transmitter) 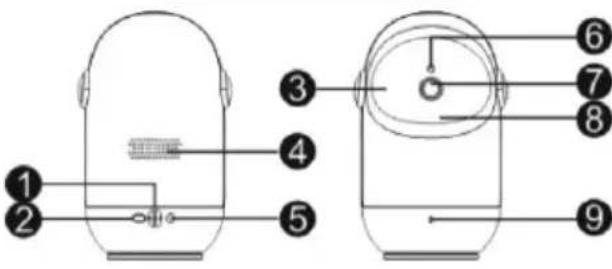 | 1. Temperature sensor2. Pairing button3. Microphone4. Speaker5. Jack for the adaptor6. Light sensor7. Camera lens8. Infrared light9. Power supply indicator |
BEFORE USE
BABY UNIT - CAMERA (TRANSMITTER)
Supply the baby unit with power from your local network.
- Insert the adaptor jack in the baby unit and plug in the socket.
- The LED indicator is on in blue light i.e. the unit is operational.
PARENT UNIT – MONITOR (RECEIVER)
Charge the battery of the parent unit before using it for the first time or when it displays that the battery is drained.
- Insert the adaptor jack in the parent unit and plug it in the socket.
The battery charging indicator is on.
- Press the ON/OFF button of the unit and hold at least 3 seconds to turn on the monitor.
NOTE! Use only the adaptors supplied by the producer.
MAIN FUNCTIONS
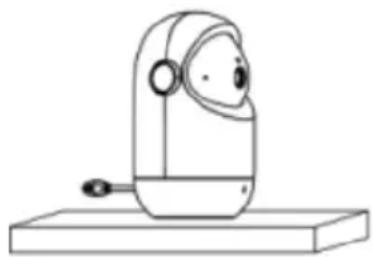
Place the baby unit (camera) at suitable place (table for example) and point the lens to the area you want to monitor. Set the baby unit until you reach the needed image at the monitor.
ATTENTION! Do not place the baby unit in baby's access area! If there are some disturbances in image or sound, move the devices at different places and make sure they are not too close to another electrical device.
natural_image
Simple line drawing of a mechanical device with a base and circular components (no text or symbols)PAIRING THE UNITS
Units are paired in advance by the producer.
In case the connection between the units breaks down, pair the units as described in point II "PAIRING WITH THE BABY UNIT (CAMERA)" from the present manual.
NIGH VISION
Baby unit (camera) has 6 high intensity infrared diods to catch clear images in the dark.
MUSICAL PLAYER
Press the melodies on/off button on the parent unit to play music.
Press the melodies on/off button again and the melodies will stop playing.
TWO WAY COMMUNICATION
Press and hold the two way communication ON/OFF key on monitor. This will enable you to talk to your child through the speaker on the baby unit. A symbol of microphone will appear in the lower left corner of the video LCD display on the parent unit.
Sound level is adjusted by pressing the keys for up/+ and down/-. The chosen sound level will be appear on the screen for 3 seconds.
ZOOM OF IMAGE
When monitor is ON and there is an image on screen, press the ZOOM of image button.
VOX or VOICE ACTIVATION
When VOX function is activated, the video display is on only when the baby unit detects sound. If no sound is detected, the display if off to save energy.
To turn the VOX mode on, set trough VOX menu.
PANORAMIC ANGLE and CAMERA RECLINE
Press the button to activate the function panoramic view and camera recline. Shortly on display you will see „Open the Motor mode“. Press and hold the buttons „^”, „v” and „<”, „>”, to remote control
the suitable panoramic view or to set the recline of the camera.
Press again the button for panoramic view and camera recline or do not use the buttons for certain time to leave this mode.
VIDEO DISPLAY. ICONS - INDICATORS
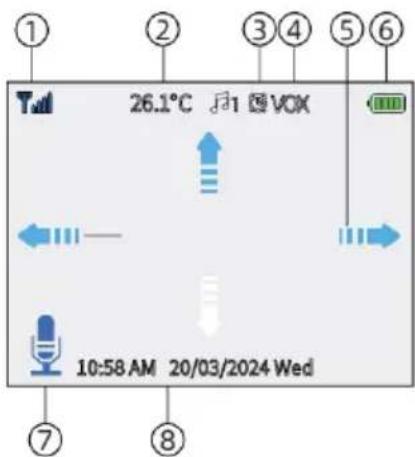
- Indicator for signal level
- Temperature of air in baby's room
- Alarm activated
- VOX activated
- Mode panoramic view and camera recline activated (Motor mode)
- Remaining charge in battery
- Two-way communication is activated
- Date and time (HH:MM AM/PM DD/MM)
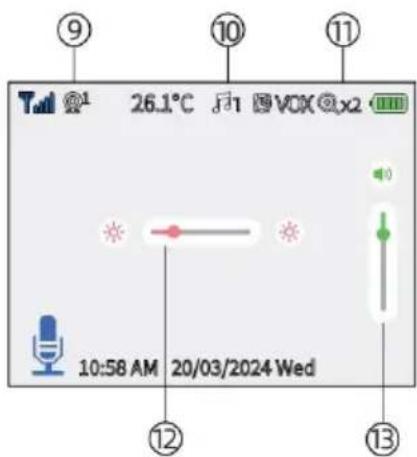
- Camera view
- Melody plays
- Zoom level
- Brightness level
- Volume control level
VIDEO DISPLAY MENU
I. MAIN MENU
Press the "OK/Menu". The main menu with 6 functional icons will appear on the display:
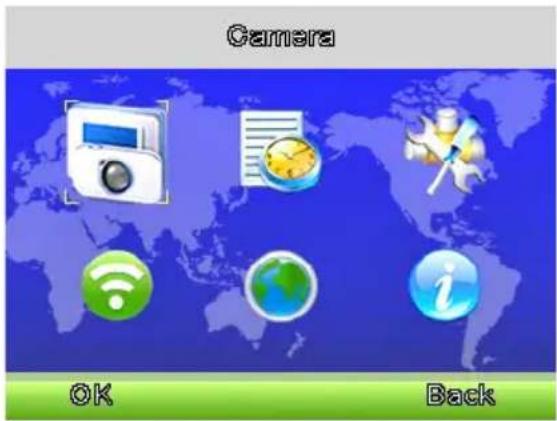

CAMERA

ALARM

SETTINGS

VOX

LANGUAGES

SYSTEM INFO
- By using the up/down and left/right key you can see the pointer on the separate icons.
Choose a certain icon, press the "OK/Menu" to open a sub-menu. - Press the return key to go back to main menu.
1. Pairing between monitor and camera
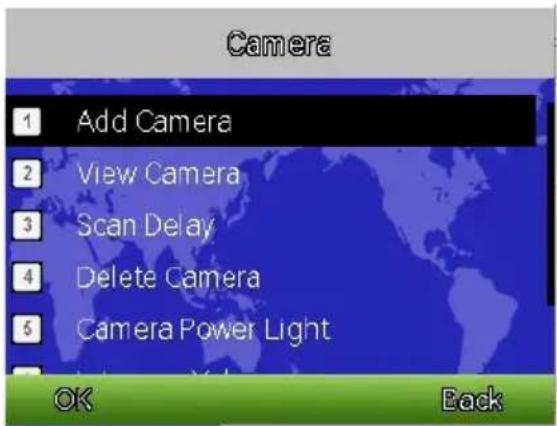
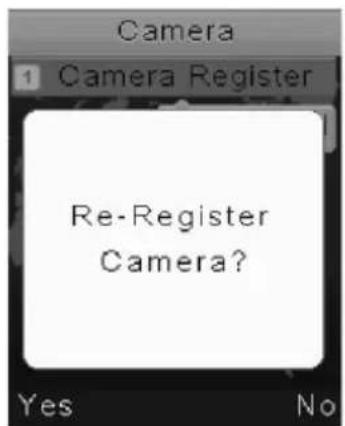
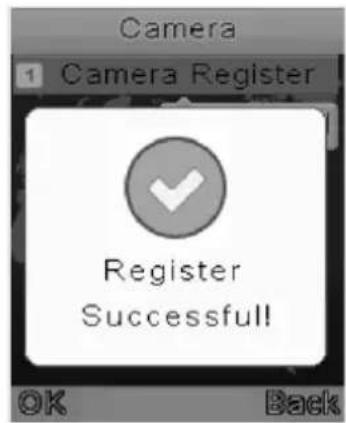
- Select the CAMERA icon and press the key "OK/Menu".
- Press the pairing key at baby unit and hold for around 10 seconds.
Monitor (parent unit) can be connected with up to two cameras simultaneously
2. View camera
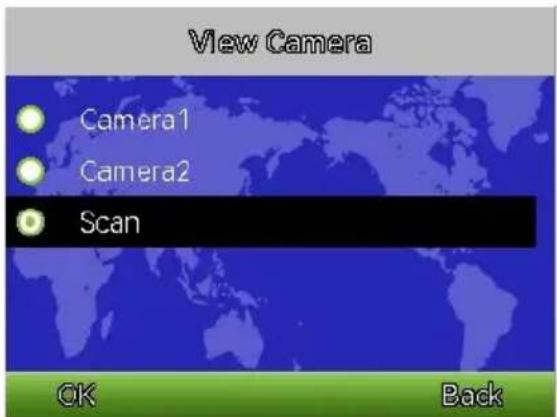
When some cameras are connected (in this case you can switch the view of camera 1 or camera 2 or both on cycle (Scan).
3. Scan Delay
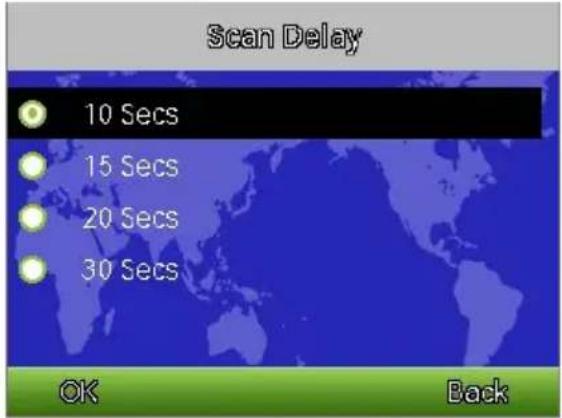
When both cameras are connected and you select "View camera"- „Scan", you can set time for watch between both cameras - 10, 15, 20 or 30 sec.
4. Delete camera
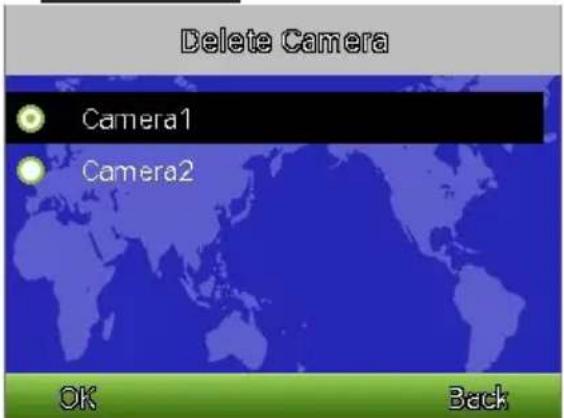
Selecting this submenu, you can choose which one of connected cameras to turn off (Camera 1 or Camera 2).
5. Camera Power Light
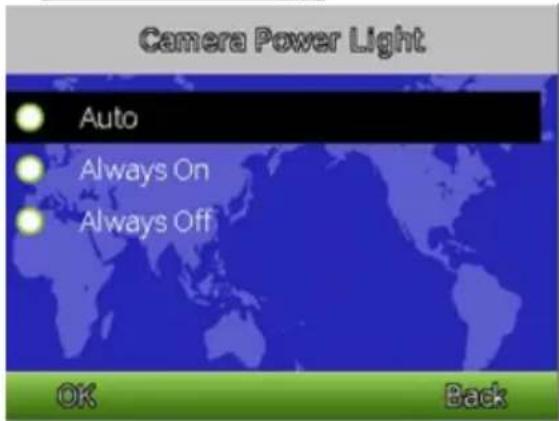
Selecting this submenu, you can set the indicator power supply (Camera Power Light) to be always on (Always ON), always turned off (Always OFF) or to turn on/off automatically (Auto).
6. Intercom Volume
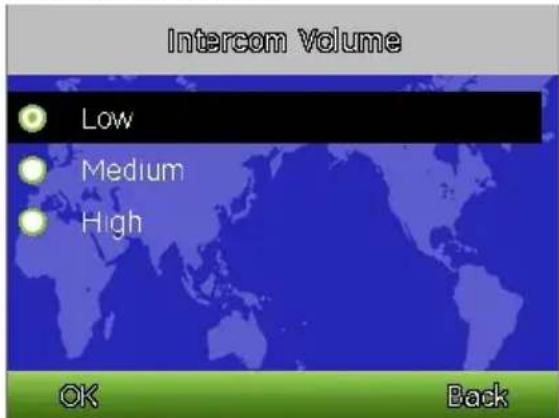
Selecting this submenu, you can set the volume of Intercom system at baby unit (camera) by choice among Low, Medium and High.
7. Music
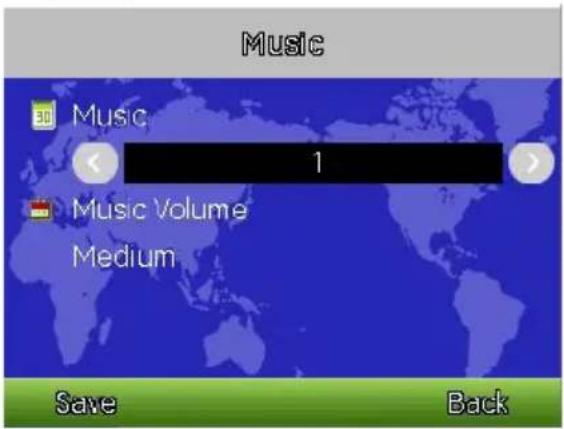
Selecting this submenu, you can:
- Set one of eight melodies or scan cycle play.
- Set volume control at baby unit (camera) - Low, Medium and High.
III. ALARM
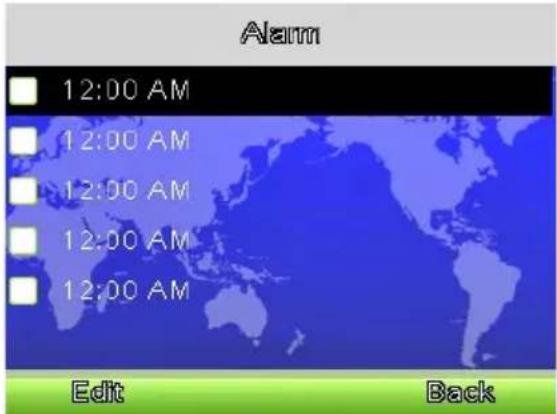
- Select the ALARM icon and press the "OK/Menu" key.
- Use the keys „^” and „v” to choose an option and press “OK”.
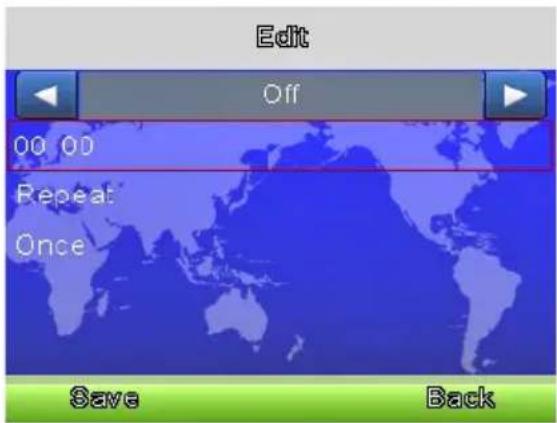
- Use the keys „<” and „>” to activate the alarm (“on/off”).
- Use the keys „^”, „v” and „<”, „>” keys to insert: alarm time /00:00, frequency (repeat) (once, every day);
- Confirm your choice with "OK" key.
IV. SETTINGS
1. Day and time
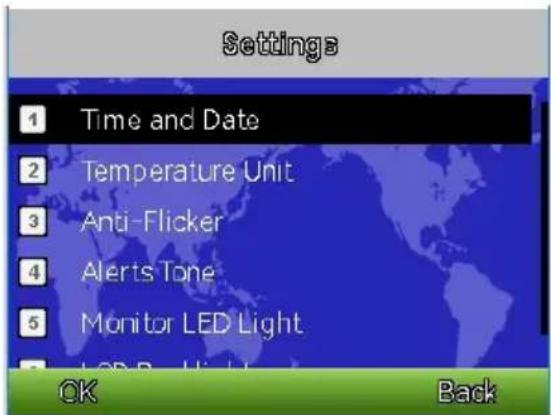
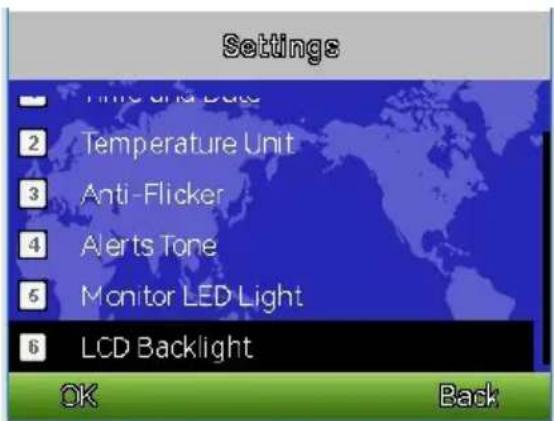
- Select the SETTINGS icon and press the "OK/Menu" key.
- Choose sub-menu Time and date, after that press the "OK" key.
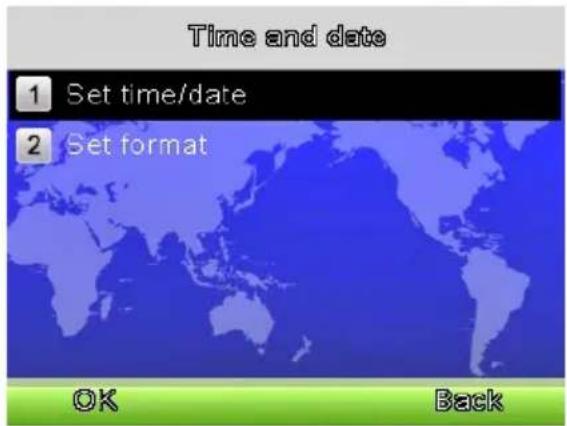
- Select the Set time/date setting, after that pres the "OK" key.
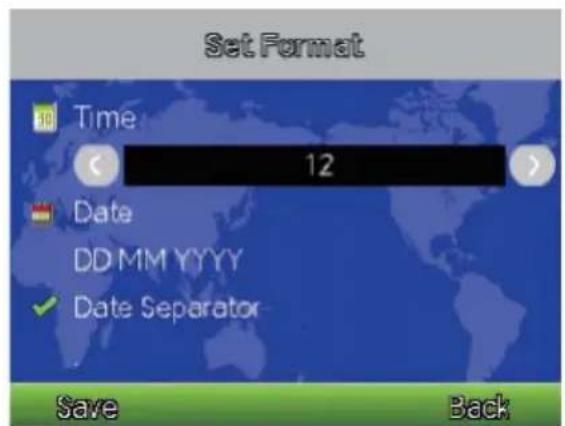
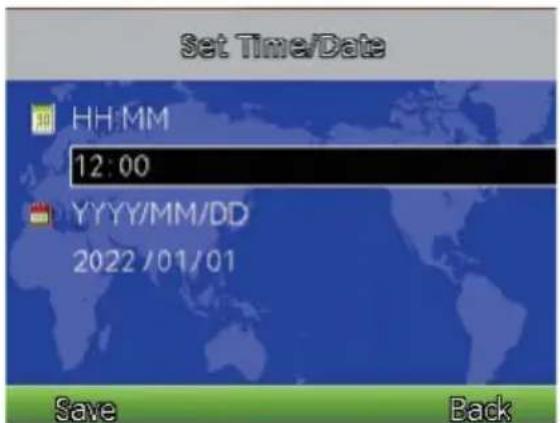
- Use the keys „^”, „v” and „<”, „>” keys to insert the desired settings.
- Confirm the settings by pressing the "OK" key.
2. Ambient temperature
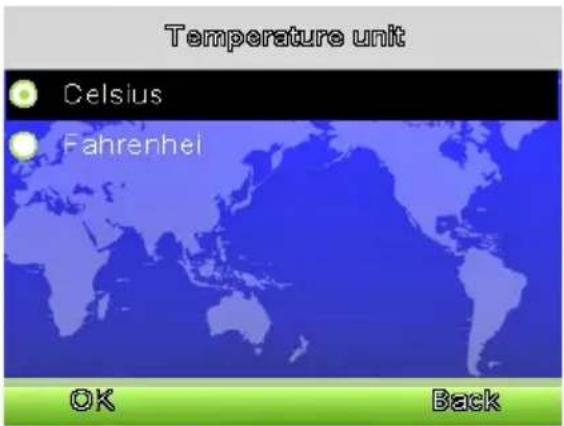
- From the "Settings" menu select the Temperature and press the "OK" key;
- Use the keys „^” and „v”, to choose the ten scale Celsius or Fahrenheit.
- Confirm settings by pressing the "OK" key.
3. Image anti-flicker
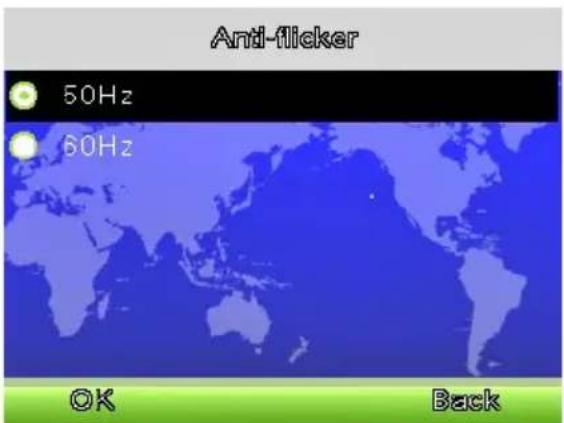
- From the "Settings" menu, choose the Anti-flicker option and confirm by pressing "OK"
- Use the keys „^” and „v”, to select the suitable frequency to reduce flickering – 50 Hz and 60 Hz.
- Confirm by pressing the "OK" key.
4. Alerts Tone
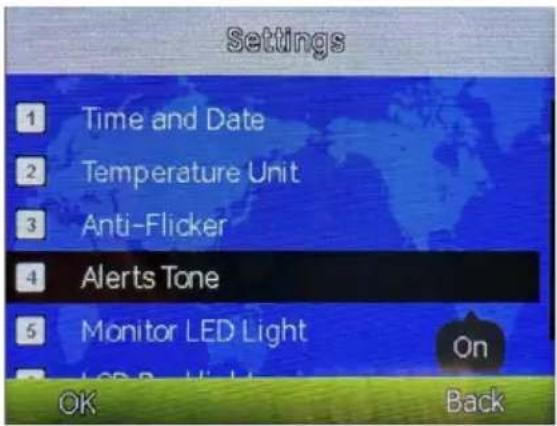
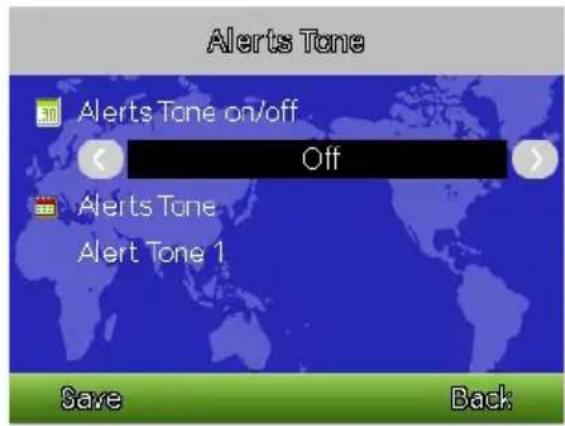
- From menu "Settings", select option (Alerts Tone) and confirm with button "OK";
- Use „<” and „>”, to select ON/OFF for alert tone – tone 1, 2 or 3.
- Confirm with pressing button „OK”.
5. Monitor LED Light
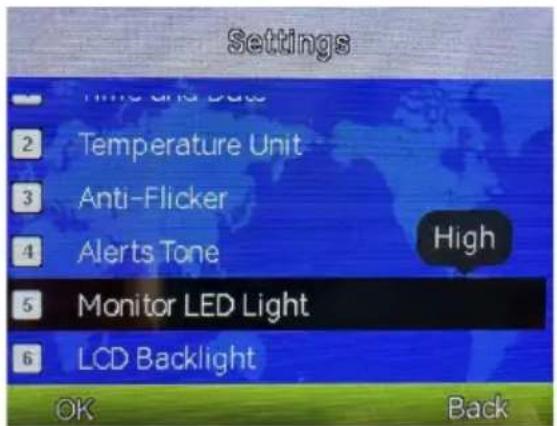
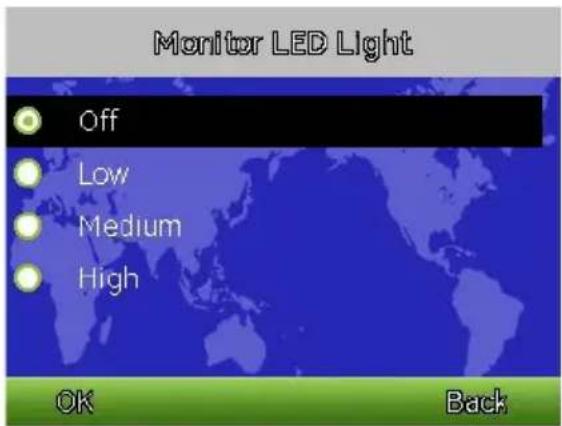
- From menu "Settings" select option LED light of monitor (Monitor LED Light) and confirm with button „OK”;
- Use buttons „^” and „v” to select level of brightness of monitor: Low, Medium and High.
- Confirm by pressing the button „OK”.
6. LCD backlight
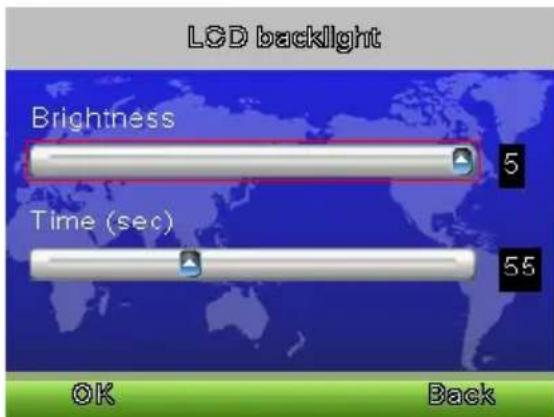
- From the "Settings" menu, choose the LED back option and confirm by pressing OK"
- Use the keys „^” and „v”, to select the des – brightness of the video display and when the turns off.
- Use the keys „<”, „>”, to select the desired brightness values (slider) and time (in seconds) in which the monitor will be off;
- Confirm by pressing the "OK" key.
V. VOX - VOICE ACTIVATION
1. System mode
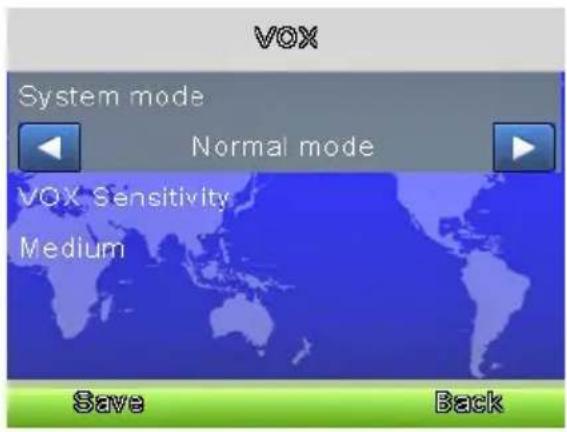
- Select the „VOX” icon and confirm by pressing the “OK” key;
- Use the keys „<”, „>”, to select between tv modes-normal and VOX mode – the display will be on only when sound is detected by the baby unit.
- Confirm by pressing the "OK" key.
2. VOX mode
When the VOX mode is on you can choose the sensitivity level – low/medium/high using the keys „^”, „v” and „<”, „>”. Confirm the desired level by pressing “OK”.
VI. LANGUAGE

- Select the „Language” icon and press the “OK” key;
- Use the keys „^” and „v” to choose the language of your menu – English, French, Spanish, Portuguese, Italian German, Turkish, and Russian.
- Confirm by pressing the "OK" key.
VII. SYSTEM INFO
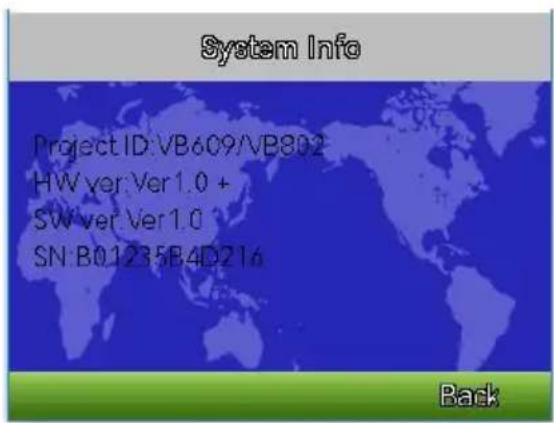
- Select the „System Info” and confirm by press in “OK” key;
System data is kept here.
CARE AND MAINTENANCE
- Do not step on the power supply cable and keep it from twisting especially around the connectors, socket and the point where the cable comes out of the unit.
- Keep the units for the parent and baby and the adaptors so that they will have sufficient ventilation. Do not cover them with clothes, towels, covers, etc.
- Always unplug the units from the sockets whenever there is thunder or if you will not use them for a long time.
- Do not immerse the parent or baby units in water, do not wash them with running water.
- Clean the parts of the baby monitor and adaptors with a dry towel after you have turned the units off and unplugged the adaptors from the electricity network.
- Fingerprints and dust on the lens of the baby unit may affect the performance of the camera. Avoid touching the lens with fingers.
- Store in a dry and cool place.
ADVICE FOR CORRECT USE:
• Make sure all parts of the products are in good working order.
• Make sure the parent and baby units have full coverage.
• Make sure the battery in the parent unit is completely charged;
- Make sure the baby unit is plugged in the power source by the adaptor and that there is electricity in the network.
VIBEFSI02201PL /VB802
CE
√ IEC 62321-7-2:2017
√ IEC 62321-6:2015
√ IEC 62321-8:2017
LARATION OF CONFORMITY
I the undersigned Nina Mitkova, General Manager of Chipolino Ltd., with its place of business at 1 Golyamokonarsko Shosse Str., s. Tzaratzovo Mantza Municipality, Plovdiv, Bulgaria, a recognized as the manufacturer according to the Consumer Protection Law, hereby
DECLARE
The product DIGITAL BABY MONITOR, model „SIRIUS“ with its item No VIBEFSI02201PL / VB802, for which this declaration is about, complies with The European Community and has been manufactured in accordance with the requirements of:
1. Directives of the European Parliament and the Council:
√ 2001/95/EO The General Product Safety Directive
√ 2014/53/EO, about a radio equipment;
√ 2011/65/EC, about a restriction of of certain hazardous substances in electrical and electronic equipment (RoHS);
2. European Standards:
√ EN 62368-1:2020+A11:2020
√ EN 55032:2015+A1:2020+A11:2020
√ EN 55035:2017+ A11:2020
√ EN IEC 61000-3-2:2019
√ EN 61000-3-3:2013+A1:2019
√ EN 62311:2020
√ EN 301 489-17 V3.2.4 (2020-09)
√ EN 301 489-1 V2.2.3 (2019-11)
√ EN 300 328 V2.2.2 (2019-07)
√ IEC 62321-2:2013
√ IEC 62321-3-1:2013
√ IEC 62321-5:2013
√ IEC 62321-4:2013+AMD1:2017
√ IEC 62321-7-1:2015
√ IEC 62321-7-2:2017
√ IEC 62321-6:2015
√ IEC 62321-8:2017
The product DIGITAL BABY MONITOR, model „SIRIUS“ is intended to help parents in a home setting as an aid in supervision of babies and very young children - as a parent-child connection.
Main characteristics:
√ Transmission frequency: 2.4 GHz
√ Unobstructed Effective Range: up to 260m outdoor
√ Transmitter power supply (baby room unit): by an adapter, 100-240V, 50-60Hz, 0.2A, DC5V 1000mA;
36 Receiver power supply (parent unit): by an adapter, 100-240V, 50-60Hz, 0.2A, DC5V 1000mA or by 1150mAh lithium-ion polymer battery
√ Transmitter: with CMOS camera
√ Receiver: 3.2 IPS LCD, color video display with a resolution of 320x240 pixel.
The product DIGITAL BABY MONITOR, model „SIRIUS“ with its item No VIBEFSI02201PL / VB802, for which this declaration is about, is safe for the consumers and does not present any risk for the health during its use in accordance with the manufacturer's instruction practicals for use and servicing.


- INSTRUCTION MANUAL FOR DIGITAL BABY MONITOR SIRIUS
- ATTENTION! WARNINGS!
- THIS PRODUCT IS INTENDED TO AID YOU AND CANNOT
- SUBSTITUTE A REAL AND RESPONSIBLE ADULT
- SUPERVISION!
- USE THE PRODUCT ONLY FOR ITS PURPOSE!
- WARNINGS FOR USING LITHIUM-POLYMER BATTERIES
- MAIN PARTS DIAGRAM
- BEFORE USE
- BABY UNIT - CAMERA (TRANSMITTER)
- PARENT UNIT – MONITOR (RECEIVER)
- MAIN FUNCTIONS
- PAIRING THE UNITS
- NIGH VISION
- MUSICAL PLAYER
- TWO WAY COMMUNICATION
- ZOOM OF IMAGE
- VOX or VOICE ACTIVATION
- PANORAMIC ANGLE and CAMERA RECLINE
- VIDEO DISPLAY. ICONS - INDICATORS
- VIDEO DISPLAY MENU
- MAIN MENU
- Pairing between monitor and camera
- View camera
- Scan Delay
- Delete camera
- Camera Power Light
- Intercom Volume
- Music
- ALARM
- SETTINGS
- Day and time
- Ambient temperature
- Image anti-flicker
- Alerts Tone
- Monitor LED Light
- LCD backlight
- VOX - VOICE ACTIVATION
- System mode
- VOX mode
- LANGUAGE
- SYSTEM INFO
- CARE AND MAINTENANCE
- ADVICE FOR CORRECT USE:
- LARATION OF CONFORMITY
- DECLARE
- Directives of the European Parliament and the Council:
- European Standards:
- Main characteristics:
Brand : Chipolino
Model : Sirius
Category : Baby monitor