Grill Air Fryer Home AFG-5A - Air fryer PowerXL - Free user manual and instructions
Find the device manual for free Grill Air Fryer Home AFG-5A PowerXL in PDF.


| Product Type | Air Fryer & Grill Combo |
| Model Number | AFG-5A |
| Brand | PowerXL |
| Capacity | 5 Quarts (approx. 1.2 kg fries) |
| Dimensions (W x D x H) | 11.2 x 12.4 x 13.8 inches |
| Weight | Approx. 11.5 lbs (5.2 kg) |
| Power Supply | 120V / 60Hz, 1500W |
| Cooking Functions | Air Fry, Grill, Roast, Bake, Reheat, Dehydrate |
| Temperature Range | 180°F - 400°F (82°C - 204°C) |
| Timer Range | 1 - 60 minutes |
| Control Type | Digital touchscreen with preset programs |
| Included Accessories | Grill plate, air fry basket, mesh trivet, recipe book |
| Material | Stainless steel housing, non-stick coated basket |
| Cleaning | Dishwasher-safe basket and grill plate; wipe exterior with damp cloth |
| Safety Features | Automatic shutoff, cool-touch handle, overheat protection |
| Repairability | Spare parts available through manufacturer; user-replaceable fuse |
| Certifications | ETL Listed, FDA approved materials |
| Warranty | 1-year limited warranty |
Frequently Asked Questions - Grill Air Fryer Home AFG-5A PowerXL
User questions about Grill Air Fryer Home AFG-5A PowerXL
0 question about this device. Answer the ones you know or ask your own.
Ask a new question about this device
Download the instructions for your Air fryer in PDF format for free! Find your manual Grill Air Fryer Home AFG-5A - PowerXL and take your electronic device back in hand. On this page are published all the documents necessary for the use of your device. Grill Air Fryer Home AFG-5A by PowerXL.
USER MANUAL Grill Air Fryer Home AFG-5A PowerXL
PowerXL™ products that exceed
GRILL AIR FRYER HOME
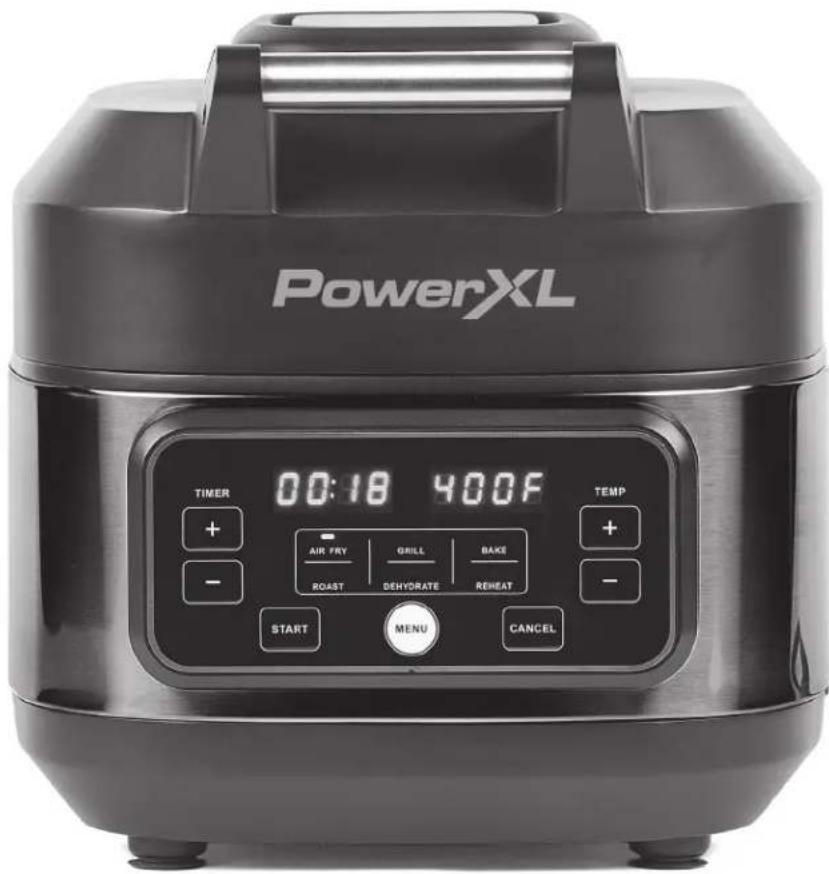
Owner's Manual
Save These Instructions - For Household Use Only
MODEL: AFG-5A CAPACITY: 5.5 Qts. POWER: 1400W, 120V
When using electrical appliances, basic safety precautions should always be followed. Do not use the PowerXL Grill Air Fryer Home until you have read this manual thoroughly.
Visit TristarCares.com
for tutorial videos, product details, and more.
Guarantee Information Inside

PowerXL Grill Air Fryer Home
BEFORE YOU BEGIN
The PowerXL Grill Air Fryer Home will provide you many years of delicious family meals and memories around the dinner table. But before you begin, it's very important that you read this entire manual, making certain that you are totally familiar with this appliance's operation and precautions.
Technical Specifications
| Model Number | Supply Power | Rated Power | Full Capacity | Temperature | Display |
| AFG-5A AC 120V/60Hz 1400W 5.5 Quarts 100° F/38° C-500° F/260° C LED | |||||
Table of Contents
IMPORTANT SAFEGUARDS 4
Parts & Accessories 8
Using the Control Panel 10
Cooking Mode Presets Explained 11
Instructions for Use 12
Cooking Guidelines & Tips 14
Troubleshooting 20
Frequently Asked Questions 21
Cleaning & Storage 22
Money-Back Guarantee 23

WARNING
When using electrical appliances, always follow these basic safety precautions.
1. READ ALL INSTRUCTIONS.
- This appliance is not intended for use by persons (including children) with reduced physical, sensory, or mental capabilities or lack of experience and knowledge unless they are given supervision or instruction concerning use of the appliance by a person responsible for their safety.
- Close supervision is necessary when any appliance is used by or near children.
- ALWAYS PLACE UNIT ON A LEVEL, HEAT-RESISTANT SURFACE. Intended for counter top use only. DO NOT operate on an unstable surface.
- Cooking appliances should be positioned in a stable location with the handles (if any) positioned to avoid the spillage of hot liquids.
- DO NOT place your appliance on a cooktop, even if the cooktop is cool, because you could accidentally turn the cooktop on, causing a fire, damaging the appliance, your cooktop, and your home.
- DO NOT operate the appliance in an enclosed space or under low-hanging cabinets. Leave at least 5 inches of free space on the back and sides and above the appliance. DO NOT place anything on top of the appliance. Proper space and ventilation is necessary to prevent property damage that can be caused by steam released during operation.
-
When in operation, hot air and steam is released through the Air Outlet Vent. KEEP YOUR HANDS AND FACE at a safe distance from the Air Outlet Vent.
-
NEVER operate the appliance near any flammable materials, such as dish towels, paper towels, curtains, or paper plates.
- DO NOT plug into an outlet located below the counter, let the cord hang over the edge of a table or counter, or let the cord touch hot surfaces.
- USE CAUTION when moving the Inner Pot during or after a cooking cycle.
- Always handle hot Inner Pots with oven mitts while cooking. Place hot cookware on heat-resistant surfaces when not seated in the appliance base.
- CAUTION HOT SURFACES: This appliance generates heat and steam during use. To avoid injury, do not touch the hot surfaces during operation. Proper precautions must be taken to prevent the risk of personal injury, fires, and damage to property. Use handles or knobs.
- DO NOT USE this appliance for anything other than its intended use.
- NEVER FILL THE INNER POT to more than two thirds capacity. Many foods increase in volume or bubble vigorously while cooking and might boil over the top. Cooking with the lid will prevent splatter and possible injury if bubbles burst and touch exposed skin.
- NEVER cover the steam release port on the Lid or the air vents on the back of the base of the appliance.
- DO NOT OPERATE if the cord or plug are damaged. If the appliance begins to malfunction during use, immediately unplug the cord from the power.
- DO NOT USE OR ATTEMPT TO REPAIR A MALFUNCTIONING APPLIANCE. Contact Customer Service for assistance (see the back of the manual for contact information).
IMPORTANT SAFEGUARDS
-
UNPLUG THE APPLIANCE from the outlet when not in use and before cleaning. Allow the appliance to cool before attaching or removing parts.
-
NEVER immerse the appliance base in water. If the appliance falls or accidentally becomes immersed in water, unplug it from the wall outlet immediately. Do not reach into liquid if the appliance is plugged in and immersed. DO NOT immerse or rinse cords or plugs in water or other liquids.
-
To prevent risk of injury, replace only with authorized parts as recommended by Tristar.
-
NEVER leave cookware or Inner Pot empty over a hot burner. This could damage the Inner Pot.
-
NEVER put your cookware in the microwave or toaster oven. This is a hazard that can cause electric sparks or fire and could possibly damage the appliances and your cookware.
-
DO NOT handle hot cookware without hand protection. Use care and oven mitts when cooking because the Inner Pot, its handles, and the appliance will become hot.
-
This product is for indoor home use only. DO NOT use outdoors or in a commercial setting.
-
DO NOT use aerosol cooking sprays. These sprays will build up on cookware and become difficult to remove while reducing the non-stick coating performance.
-
DO NOT use sharp utensils with the appliance. These implements can damage the appliance's protective nonstick coating.
-
This appliance is not intended for deep frying foods. Extreme caution must be used when moving the appliance when it contains hot liquids or hot oil.
-
The use of accessory attachments not recommended by Tristar may cause injuries. Only use the provided vessel and approved parts to avoid damage to the appliance.
-
DO NOT put any food or liquid in the base of the appliance.
-
Risk of electrical shock. Cook only in removable container. Only use the Base with the Inner Pot.
-
Before using your new appliance on any COUNTERTOP surface, check with your countertop manufacturer or installer for recommendations about using appliances on your surfaces. Some manufacturers and installers may recommend protecting your surface by placing a hot pad or trivet under the appliance for heat protection. Your manufacturer or installer may recommend that hot pans, pots, or electrical appliances should not be used directly on top of the countertop. If you are unsure, place a trivet or hot pad under the appliance before using it.
-
Always attach the plug to the appliance first and then plug the cord into the wall outlet. To disconnect, press the Cancel Button and then remove the plug from the wall outlet.
-
Oversized foods or metal utensils/containers must not be inserted into the appliance as they may create a fire or risk of electric shock.
-
DO NOT clean with metal scouring pads. Pieces can break off the pad and touch electrical parts, which involves a risk of electric shock.
-
This appliance is for home use only. If the appliance is used improperly or for professional or semi-professional purposes or if it is not used according to the instructions in the user manual, the guarantee becomes invalid and Tristar will not be held liable for damages.
-
Avoid touching moving parts.
-
NEVER pour oil into the appliance. Fire and personal injury may result.
-
USE EXTREME CAUTION when disposing of hot grease.
SAVE THESE INSTRUCTIONS
-
Should the appliance emit black smoke, UNPLUG IMMEDIATELY and wait for smoking to stop before handling the appliance.
-
DO NOT expose the appliance to corrosive chemicals or vapors.
-
When cleaning the appliance interior and components, use ONLY mild, nonabrasive soaps or detergents applied with a sponge or soft cloth.
-
Do not place any of the following materials in the appliance: paper, cardboard, plastic, and the like.
-
Do not store any materials, other than accessories included with the appliance, in the appliance when not in use.
-
Do not place on or near a hot gas or electric burner or in a heated oven.
WARNING: Avoid spillage on the connector.
WARNING: The heating element surface remains hot after use.
WARNING: Spilled food can cause serious burns.

WARNING:
For California Residents
This product can expose you to Di(2-ethylhexyl)phthalate, which is known to the State of California to cause cancer and birth defects or other reproductive harm. For more information go to www.P65Warnings.ca.gov.
Please note that changes or modifications of this product not expressly approved by the party responsible for compliance could void the user's authority to operate the equipment.
FCC: This equipment has been tested and found to comply with the limits for a Class B digital device, pursuant to Part 15 of the FCC Rules. These limits are designed to provide reasonable protection against harmful interference in a residential installation. This equipment generates, uses and can radiate radio frequency energy and, if not installed and used in accordance with the instructions, may cause harmful interference to radio communications. However, there is no guarantee that interference will not occur in a particular installation.
If this equipment does cause harmful interference to radio or television reception, which can be determined by turning the equipment off and on, the user is encouraged to try to correct the interference by one or more of the following measures:
- Reorient or relocate the receiving antenna.
- Increase the separation between the equipment and receiver.
- Connect the equipment into an outlet on a circuit different from that to which the receiver is connected.
- Consult the dealer or an experienced radio/TV technician for help.
This device complies with Part 15 of the FCC Rules. Operation is subject to the following two conditions: (1) this device may not cause harmful interference, and (2) this device must accept any interference received, including interference that may cause undesired operation.
Tristar Products, Inc., 490 Route 46 East, Fairfield, NJ 07004 973-287-5126
SAVE THESE INSTRUCTIONS - FOR HOUSEHOLD USE ONLY

CAUTION
- If the appliance is used improperly or for professional or semi-professional purposes or if it is not used according to the instructions in the user manual, the guarantee becomes invalid and the manufacturer will not be held liable for damages.
- When the cooking time has completed, cooking will stop and the fan will continue running for 10 seconds to cool down the appliance.
- Let the appliance cool down for approximately 30 minutes before handling, cleaning, or storing.\
Overheating Protection
Should the inner temperature control system fail, the overheating protection system will be activated and the appliance will not function. Should this happen, unplug the appliance. Allow time for the appliance to cool completely before restarting or storing.
Electric Power
The appliance should be operated on a dedicated electrical outlet. If the electrical outlet is being used by other appliances, your new appliance may not operate properly.
Electromagnetic Fields
This appliance complies with all standards regarding electromagnetic fields. If handled properly and according to the instructions in this user manual, the appliance is safe to use based on scientific evidence available today.

CAUTION: Using the Power Cord
- NEVER connect this appliance to an external timer switch or separate remote-control system.
- When ready to operate, plug the hardwired cord into a wall outlet. To disconnect, press the Cancel Button to turn the appliance off and then remove the plug from the wall outlet. Plug the power cord into a 120V grounded outlet with no other appliances on the same outlet. Plugging other appliances into the outlet will cause the circuit to overload.
- Never tug the plug forcefully from the wall outlet.
- A short power supply cord is provided to reduce the risk of entanglement or tripping over a longer cord. Longer detachable power-supply cords or extension cords are available and may be used if care is exercised in their use. If a longer detachable power-supply cord or extension cord is used:
a. The marked electrical rating of the cord set or extension cord should be at least as great as the electrical rating of the appliance.
b. The cord should be arranged so that it will not drape over the countertop or tabletop where it can be pulled on by children or tripped over unintentionally.
c. If the appliance is of the grounded type, the cord set or extension cord should be a grounding-type 3-wire cord.
- DO NOT USE WITH ANY OTHER ELECTRICAL CORD or modify the plug.
- This appliance has been designed for use with a 3-prong, 120V dedicated electrical outlet (with no other appliances plugged into the same outlet). Plugging other appliances into the outlet may cause the circuit to overload.
Parts & Accessories

NOTE: Unpack all contents from the packaging. Contents vary by model. Check all packaging material carefully for parts. Please remove any clear or blue protective film on the components.

natural_image
Black electric air fryer with attached power cord and labeled parts (no text or symbols on device body)
natural_image
Gray rectangular basin with rounded corners, no text or symbols visible
natural_image
Black square mechanical component with radial grooves and central hole (no text or symbols)Parts & Accessories
-
MAIN UNIT: Features sturdy stainless steel construction throughout. Cleans easily with a damp sponge or cloth and a mild detergent. Avoid harsh, abrasive cleaners. NEVER submerge this appliance in water or liquids of any kind.
-
AIR FRYING LID
-
AIR INLET VENT
-
LID HANDLE: Always use the handle and avoid touching the lid. The lid may become very hot during the cooking process and can cause injury.
-
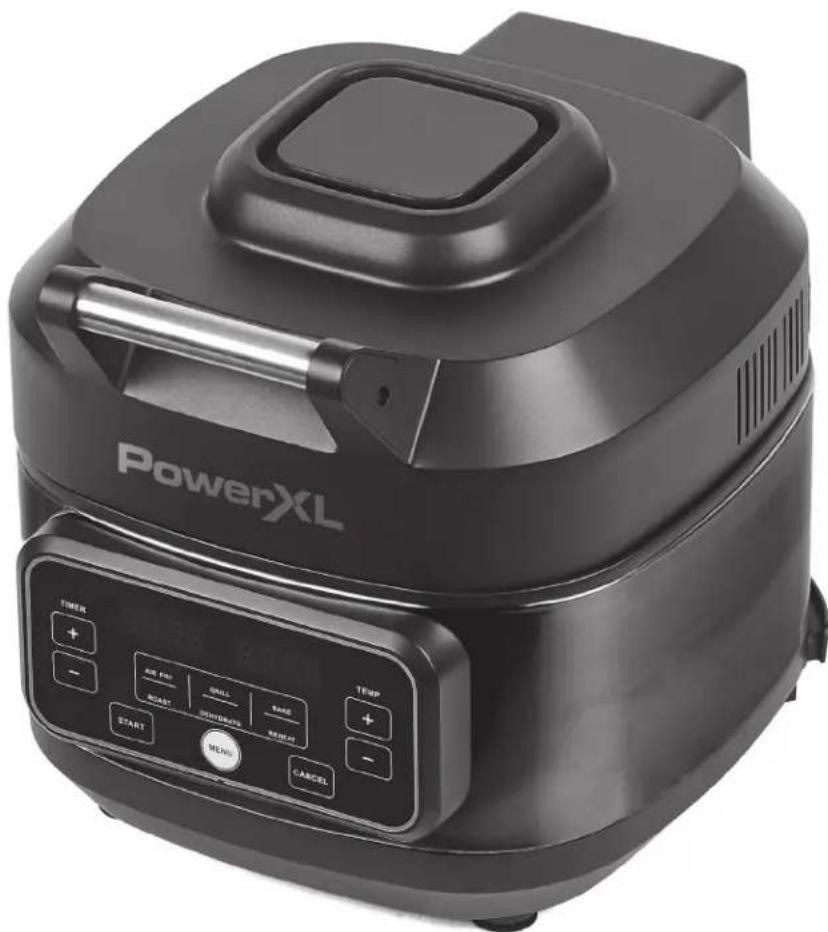
CONTROL PANEL: Use the Control Panel to use the cooking presets and set the cooking time and temperature (see "Using the Digital Control Panel" section).
-
POWER CORD: Power cord is detachable
-
AIR OUTLET VENT
-
INNER POT: Must be used at all times.
-
GRILL PLATE: Used when grilling food. When grilling meat and vegetables, be sure to preheat the Grill Plate. The Grill Plate can also be used when air frying to circulate air under the food. Must be placed in the Inner Pot when used.
natural_image
Black PowerXL air fryer with control panel and thermal display (no visible text or symbols on device body)Using The Digital Control Panel

flowchart
graph TD
    A["TIMER"] --> B["+"]
    B --> C["-"]
    C --> D["6"]
    D --> E["AIR FRY"]
    D --> F["GRILL"]
    D --> G["BAKE"]
    D --> H["ROAST"]
    D --> I["DEHYDRATE"]
    D --> J["REHEAT"]
    K["TEMP"] --> L["+"]
    M["START"] --> N["MENU"]
    O["CANCEL"] --> P["4"]
    Q["7"] --> R["2"]
    S["3"] --> T["3"]
    U["5"] --> V["5"]
TO START: Plug the Power Cord into the wall outlet. The Digital LED Display will illuminate and a series of dashes will display.
- Start Button: Press the Start Button to begin the cooking process. You may also press the Start Button after the time and temperature are chosen.
- Timer Buttons: To adjust the cooking time, press the Timer Buttons until the desired time is set. The time may be changed at any time during the cooking process.
-
Temperature Buttons: Press the Temperature Buttons until the desired temperature is set. The temperature may be changed at any time during the cooking process.
-
Cancel Button: Pressing the Cancel Button will stop the cooking process immediately.
- Menu Button: Press the Menu Button to cycle through the six cooking presets. Press the Start Button to confirm the selected preset and begin the cooking process. Press and hold the Menu Button for 3 seconds to toggle the displayed temperature between Fahrenheit and Celsius.
- Selecting a Preset Cooking Mode: 6 preset cooking modes are available: Air Fry, Grill, Bake, Roast, Dehydrate, and Reheat.
- LED Display : Displays the cooking time and temperature.
Cooking Mode Presets Explained
Cooking Mode Preset Function
| Air Fry | Fry your favorite foods with air instead of oil. Works with foods like chicken, fries, mozzarella sticks, and more. To use the dehydrate function under the Air Fry preset, set the cooking temperature between 100irc F/ 38irc C and 210irc F/ 99irc C. Then, you will be able to set a cooking time between 1 and 10 hours. |
| Grill | Used for grilling foods. Heats the Grill Plate to the highest temperature ( 500irc F/ 260irc C). |
| Bake | Use to bake your favorite desserts without having to turn on an oven. Place a baking pan that fits into the inner pot. . |
| Roast | Used to cook whole pieces of meat, fish, or vegetables, by circulating hot air to cook food evenly on all sides. |
| Dehydrate | Dehydrates food using a low cooking temperature and long cooking time. |
| Reheat | Great for reheating and re-crisping leftover food without using your microwave. |
NOTE: See the "Cooking Guidelines & Tips" section for more information.
Before Using for the First Time
- Read all material, warning stickers, and labels.
- Remove all packing materials, labels, stickers, and clear or blue protective film.
- Wash the Inner Pot with warm, soapy water. NOTE: Only the Inner Pot and Grill Plate are dishwasher safe. Never wash or submerge the appliance base in water or the dishwasher.
-
Wipe the inside and outside of the appliance Base with a clean, moist cloth.
-
Place the appliance on a stable, horizontal, level, and heat-resistant surface. Do not place on the stove top. Ensure that the appliance is used in an area with good air circulation and away from hot surfaces and combustible materials.
- Before cooking food, preheat the appliance for a few minutes to allow the appliance to burn off the manufacturer's protective coating of oil. Wipe the appliance with warm, soapy water and a dishcloth after the burn-in cycle.
Preparing for Use
- Place the appliance on a stable, level, horizontal, and heat-resistant surface.
- Select or set the cooking mode for your recipe.
Recommendations & Tips
Proper Cooking Utensils: To prevent scratching the coating, we recommend using nonmetal utensils with your cookware. Do not cut food on the cookware using sharp utensils, such as forks, knives, mashers, or whisks, that can scratch the cooking surface.
Instructions for Use
Getting Started
NOTE: The Inner Pot must be inserted into the appliance Base to start a cooking cycle.
- Select and prepare recipe for cooking.
- Place the Inner Pot in the Base (see Fig. i). Place the Grill Plate in the Inner Pot to increase air circulation under your food.
NOTE: The Grill Plate can be twisted 45 degrees to raise the Grill Plate and cook food closer to the heating elements (see Fig. ii), which is good for grilling.
-
Place all ingredients in the Inner Pot.
-
Close the lid.
Never attempt to pick up the appliance with the Air Frying Lid or lid handle.
FIG. ii

natural_image
Top-down view of a square container with radial metal patterns and central hole (no text or symbols)
natural_image
Top-down view of a square container filled with a perforated metal object, no text or symbols visible.FIG. i

natural_image
Black electric food oven with a square-shaped top and side dish, no visible text or symbols on the main body.Step By Step
-
Once the appliance is plugged in, it will beep once. The screen will light up.
-
Press the Menu Button to cycle through the cooking presets. The preset time and temperature will be displayed. Press the Start Button to confirm the selected preset and start the cooking process.
-
Depending upon the cooking mode, the time countdown will not begin until predetermined cooking temperature is reached.
Customizing the Cooking Process
As you become more familiar with the appliance, you might want to tweak the settings to suit your individual taste. Cooking times and temperatures can be adjusted manually to suit your needs. See the "Cooking Guidelines & Tips" section.
Cooking Guidelines & Tips
Preset Mode Chart
The times and temperatures on this chart show the basic default settings for the appliance. As you become familiar with the appliance, you will be able to make minor adjustments to suit your taste.
| Preset | Default Temperature | Default Time | Temperature Range | Time Range |
| Air Fry | 375°F (190°C) | 18 mins. | 215°F/102°C-500°F/260°C | 1-59 mins. |
| Grill | 450°F (232°C) | 30 mins. | 250°F/121°C-500°F/260°C | 1-59 mins. |
| Bake | 325°F (163°C) | 35 mins. | 250°F/121°C-500°F/260°C | 10 mins.-2 hours |
| Roast | 350°F (177°C) | 45 mins. | 250°F/121°C-500°F/260°C | 10 mins.-2 hours |
| Dehydrate | 140°F (60°C) | 4 hours | 100°F/38°C-214°F/100°C | 1 min.-10 hrs. |
| Reheat | 240°F (116°C) | 15 mins. | 140°F/60°C-250°F/121°C | 1-59 mins. |
Internal Temperature Meat Chart
Use this chart and a food thermometer to ensure that meat, poultry, seafood, and other cooked foods reach a safe minimum internal temperature.
*For maximum food safety, the U.S. Department of Agriculture recommends 165° F/74° C for all poultry; 160° F/71° C for ground beef, lamb, and pork; and 145° F/63° C, with a 3-minute resting period, for all other types of beef, lamb, and pork. Also review the USDA Food Safety Standards.
Food Type Internal Temp.*
| Beef & Veal | Ground 160° F (71°C) | |
| Steaks, roasts: medium 145° F (63°C) | ||
| Steaks, roasts: rare 125° F (52°C) | ||
| Chicken & Turkey | Breasts 165° F (74°C) | |
| Ground, stuffed 165° F (74°C) | ||
| Whole bird, legs, thighs, wings 165° F (74°C) | ||
| Fish & Shellfish Any type 145° F (63°C) | ||
| Lamb | Ground | 160° F (71°C) |
| Steaks, roasts: medium 140° F (60°C) | ||
| Steaks, roasts: rare 130° F (54°C) | ||
| Pork | Chops, ground, ribs, roasts | 160° F (71°C) |
| Fully cooked ham | 140° F (60°C) | |
Cooking Guidelines & Tips
Air Frying Guidelines
NOTE: Keep in mind that these settings are guidelines. Since ingredients differ in origin, size, shape, and brand, we cannot guarantee the best settings for your ingredients.
| Food item | Size | Temperature | Cook Time | Preheat | Shake or Flip | Spray with Oil |
| FROZEN FOOD | ||||||
| French fries 400°F (204°C) 18 mins. | ✓ | |||||
| Sweet potato fries 400°F (204°C) 22 mins. | ✓ | |||||
| Chicken nuggets 400°F (204°C) 14 mins. | ✓ | |||||
| CHICKEN | ||||||
| Breaded cutlets 6 oz 400°F (204°C) 10 mins. | ✓ | ✓ | ✓ | |||
| Wings 400°F (204°C) 25 mins. | ✓ | ✓ | ||||
| Chicken breast 6 oz 400°F (204°C) | 8 mins. | ✓ | ||||
| BEEF | ||||||
| Burgers | 6 oz 400°F (204°C) 10 mins. | ✓ | ✓ | |||
| Hot dogs | 8 pc 375°F (191°C) | 5 mins. | ✓ | ✓ | ||
| NY strip steaks | 8 oz 400°F (204°C) 12 mins. | ✓ | ✓ | |||
| Meatballs, 1 inch | 1.5 lb | 375°F (191°C) 10 mins. | ✓ | ✓ | ||
| PORK | ||||||
| Pork chops | 400°F (204°C) 12 mins. | ✓ | ✓ | |||
| Sausages | 350°F (177°C) 15 mins. | ✓ | ✓ | |||
| FISH | ||||||
| Salmon filets | 6 oz 390°F (199°C) 12 mins. | ✓ | ||||
| Shrimp (16-20 size) | 12 oz | 390°F (199°C) 10 mins. | ✓ | ✓ | ||
| VEGETABLES | ||||||
| Asparagus | 1 lb | 380°F (193°C) | 8 mins. | ✓ | ✓ | |
| Broccoli | 8 oz | 380°F (193°C) | 8 mins. | ✓ | ✓ | |
| Corn on the cob | 2 pc | 380°F (193°C) | 8 mins. | ✓ | ✓ | |
| PREPARED FOOD | ||||||
| Hard boiled eggs, shell on | 250°F (121°C) 18 mins. | |||||
| Cake | 320°F (160°C) 20 mins. | |||||
| Grilled cheese sandwich | 1 pc 375°F (191°C) | 6 mins. | ✓ | ✓ | ||
Cooking Guidelines & Tips
Shaking/Flipping (for Air Frying)
To ensure even cooking, some foods require shaking/flipping during the cooking process. Gently shake/flip the contents as needed and place them back in the appliance to continue cooking.
CAUTION: The appliance and Inner Pot will be hot. Wear an oven mitt during this procedure:
- Open the Lid.
- Flip the food in the Inner Pot.
- Close the Lid on the appliance and continue cooking.
Tips
- When grilling meats, use the Grill Plate in the raised position (see "Getting Started" in the "Instructions for Use" section).
- Flip steaks or filets halfway through the cooking cycle to cook evenly.
- Foods that are smaller in size usually require a slightly shorter cooking time than larger foods.
- Large quantities of food require a longer cooking time than smaller quantities. Be careful not to overcrowd the Inner Pot.
- When air frying breaded items, lightly spray with cooking oil to get a crispy, golden-brown crust.
- Snacks normally cooked in an oven, including frozen snacks, can also be cooked in the appliance.
- Use premade dough to prepare filled snacks quickly and easily. Premade dough also requires a shorter cooking time than homemade dough.
-
You can use the appliance to reheat foods. Simply set the temperature and time to however warm you want your food or use the Reheat mode.
-
Be careful not to transfer germs from raw meat to cooked meat. Use separate utensils and platters for raw and cooked meat.
- When marinating food, always use a tightly covered nonmetal dish and turn the food occasionally. Be sure to refrigerate all meats while marinating.
- If leftover wet marinade is to be used as a sauce with the cooked food, be sure to place it in a small pan and heat to a rolling boil before serving to eliminate bacterial growth.
- To prevent scratching the coating, use only nonmetallic utensils. Do not cut food on the Grill Plate using sharp utensils, such as forks or knives, that can scratch the cooking surface.
- Do not use steel wool or other metal pads. They could leave coarse scratches. Always rinse thoroughly and dry immediately with a soft towel.
- If food is cooking unevenly, make sure to spread out the food evenly on the grill plate.
Troubleshooting
Symptom Possible Cause Solution
| The appliance does not work | The appliance is not plugged in. Plug the Power Cable into a wall outlet. | |
| The appliance has not been turned on by setting the cooking time and temperature. | Press the Menu Button to cycle through the presets and then press the Start Button to begin the cooking process. | |
| The appliance is plugged into a shared outlet. | The appliance must be the only item plugged into the outlet. | |
| Food is not cooked | The Inner Pot is overloaded. Use smaller batches for more even cooking. | |
| The temperature is set too low. Raise temperature and continue cooking. | ||
| Food is not fried evenly | Some food may need to be flipped or rearranged for better air flow. | See the “Shaking/Flipping (for Air Frying)” section. |
| White smoke coming from appliance Too much oil is being used. Wipe down to remove excess oil. | ||
| French fries are not fried evenly | Potatoes are not prepped properly. Consult a recipe for potato type and prep. | |
| Fries are not cut evenly. Cut fries thinner or reshape fries. | ||
| Fries are too crowded. Spread fries out or cook a smaller batch. | ||
| Potatoes are not rinsed properly during preparation. | Pat dry to remove excess starch. | |
| Fries are not crispy Raw fries have too much water. | Dry potato sticks properly before misting oil. | |
| Cut sticks smaller. | ||
| Add a bit more oil. | ||
| Error message displayed on Control Panel. | Varies See the "Display Error Indicator" chart. | |
Easy Maintenance
- Be sure to let the appliance cool down and unplug it from the wall outlet before cleaning.
- When cleaning the Inner Pot, allow the Inner Pot to cool completely before washing. Never immerse hot cookware in water as this will cause irreparable warping.
- Cleaning your Inner Pot is quick and easy. After each use, wash it in hot water with mild soap or dish detergent. Rinse thoroughly and wipe dry immediately with a soft dish towel. If any food particles remain, fill the Inner Pot with hot water and liquid dish detergent, soak until the water becomes lukewarm, and use a sponge or soft cloth to remove any remaining food particles.
-
Do not use steel wool or metal pads. They could leave coarse scratches.
-
To keep the appliance clean, wipe away the enclosure with damp cloth and then dry it with a clean, dry cloth. Never immerse the main body of the appliance in water for cleaning!
- To protect against electric shock, DO NOT immerse the main parts of the appliance, cord, or plug in water or other liquids.
- Make sure that the device is properly cleaned before storing it in a dry place.
- DO NOT use any petroleum products, which will damage the outer appliance housing and the Control Panel.
- DO NOT use/store any flammable, acid, or alkaline materials or substances near the device, as this may reduce the service life of the device and lead to deflagration (fire) when the device is turned on.
- DO NOT stack heavy objects on top of the appliance. Excessive weight could possibly damage the appliance.
Dishwasher Safe
Only the Inner Pot and Grill Plate are dishwasher safe. Although these components are dishwasher safe, we recommend cleaning by hand. Hand-washing preserves the life of the cookware and helps to maintain its appearance. If cleaning in the dishwasher, follow the suggested guidelines:
- Load the dishwasher carefully. Other dishes and flatware may mark the surface of your cookware.
- Be sure to remove soil from other dishes and flatware. It can be abrasive to nonstick coating.
• We recommend using a non-lemon detergent. - Regular dishwasher cleaning will eventually scratch any surface.
Frequently Asked Questions
Can I use any type of pan to cook in my appliance?
No. Only use the Inner Pot that comes with the appliance.
Does the appliance get hot?
The appliance gets hot during use and stays hot for a while after use. Avoid touching the appliance with your bare hands during and after use. Use oven mitts or potholders when handling food or parts of the appliance when hot.
Display Error Indicator
DO NOT USE OR ATTEMPT TO REPAIR A MALFUNCTIONING UNIT. Contact customer service using the contact information on the back of this manual for further information.
Display Shown Cause of Error
LID The lid is not closed
E1 Top temperature sensor open circuit
E2 Top temperature sensor open circuit
E3 Overheat
PowerXL™ products that excel
GRILL AIR FRYER HOME
90-Day Money-Back Guarantee
The PowerXL Grill Air Fryer Home is covered by a 90-day money-back guarantee. If you are not 100% satisfied with your product, return the product and request a replacement product or refund. Proof of purchase is required. Refunds will include the purchase price, less processing and handling. Follow the instructions in the Return Policy below to request a replacement or refund.
Replacement Guarantee Policy
Our products, when purchased from an authorized retailer, include a 1-year replacement guarantee if your product or component part does not perform as expected, the guarantee extends only to the original purchaser and is not transferable. If you experience an issue with one of our products within 1 year of purchase, return the product or the component part for replacement with a functionally equivalent new product or part. The original proof of purchase is required, and you are responsible to pay to return the unit to us. In the event a replacement unit is issued, the guarantee coverage ends six (6) months following the receipt date of the replacement unit or the remainder of the existing guarantee, whichever is later. Tristar reserves the right to replace the unit with one of equal or greater value.
Return Policy
If, for any reason, you would like to replace or return the product under the money-back guarantee, your order number can be used as the return merchandise authorization number (RMA). If the product was purchased in a retail store, return the product to the store or use "RETAIL" as the RMA. Return your product to the address provided below for a replacement, which will incur no additional processing and handling fees, or for the refund of your purchase price, less processing and handling. You are responsible for the cost of returning the product. You can locate your order number at www.customerstatus.com. You can call customer service at 973-287-5126 or email info@tvcustomerinfo.com for any additional questions. Pack the product carefully and include in the package a note with (1) your name, (2) mailing address, (3) phone number, (4) email address, (5) reason for return, and (6) proof of purchase or order number, and (7) specify on the note whether you are requesting a refund or replacement. Write the RMA on the outside of the package.
Send the product to the following return address:
PowerXL Grill Air Fryer Home
Tristar Products
500 Returns Road
Wallingford, CT 06495
If the replacement or refund request has not been acknowledged after two weeks, please contact Customer Service at 973-287-5126.
Refund
Refunds requested within the money-back guarantee timeframe will be issued to the payment method used at purchase if the item was purchased directly from Tristar. If the item was purchased from an authorized retailer, proof of purchase is required, and a check will be issued for the item and sales tax amount. Processing and handling fees are non-refundable.
PowerXL™ products that excel
GRILL AIR FRYER HOME
We are very proud of the design and quality of our PowerXL Grill Air Fryer Home.
This product has been manufactured to the highest standards. Should you have any questions, our friendly customer service staff is here to help you.
For parts, recipes, accessories, and everything PowerXL, go to tristarcares.com or scan this QR code with your smartphone or tablet:

To contact us, email us at info@tvcustomerinfo.com or call us at 973-287-5126.

Distributed by:
Tristar Products, Inc.
Fairfield, NJ 07004
© 2021 Tristar Products, Inc.
Made in China
PXL-GAFH_IB_WM_ENG_V2_210622


- PowerXL™ products that exceed
- GRILL AIR FRYER HOME
- Owner's Manual
- PowerXL Grill Air Fryer Home
- BEFORE YOU BEGIN
- Table of Contents
- IMPORTANT SAFEGUARDS 4
- WARNING
- READ ALL INSTRUCTIONS.
- IMPORTANT SAFEGUARDS
- SAVE THESE INSTRUCTIONS
- WARNING:
- For California Residents
- SAVE THESE INSTRUCTIONS - FOR HOUSEHOLD USE ONLY
- CAUTION
- Overheating Protection
- Electric Power
- Electromagnetic Fields
- CAUTION: Using the Power Cord
- - DO NOT USE WITH ANY OTHER ELECTRICAL CORD or modify the plug.
- Parts & Accessories
- Using The Digital Control Panel
- Cooking Mode Presets Explained
- Before Using for the First Time
- Preparing for Use
- Recommendations & Tips
- Instructions for Use
- Getting Started
- Step By Step
- Customizing the Cooking Process
- Cooking Guidelines & Tips
- Preset Mode Chart
- Internal Temperature Meat Chart
- Air Frying Guidelines
- Shaking/Flipping (for Air Frying)
- Tips
- Troubleshooting
- Easy Maintenance
- Dishwasher Safe
- Frequently Asked Questions
- Can I use any type of pan to cook in my appliance?
- Does the appliance get hot?
- Display Error Indicator
- Display Shown Cause of Error
- PowerXL™ products that excel
- 90-Day Money-Back Guarantee
- Replacement Guarantee Policy
- Return Policy
- Refund
Brand : PowerXL
Model : Grill Air Fryer Home AFG-5A
Category : Air fryer