ETL1200RCW - Washing machine Euromaid - Free user manual and instructions
Find the device manual for free ETL1200RCW Euromaid in PDF.

| Product Type | Front Load Washing Machine |
| Model | ETL1200RCW |
| Brand | Euromaid |
| Capacity | 7.5 kg |
| Maximum Spin Speed | 1200 rpm |
| Energy Rating | 4.5 stars |
| Water Consumption (per cycle) | 70 L |
| Number of Programs | 15 |
| Noise Level (Wash/Spin) | 58 dB / 76 dB |
| Dimensions (H x W x D) | 85 cm x 60 cm x 55 cm |
| Weight | 72 kg |
| Power Supply | 220-240 V, 50 Hz |
| Rated Power | 2250 W |
| Water Connection | Cold water only |
| Drum Material | Stainless Steel |
| Child Lock | Yes |
| Delay Start | Up to 12 hours |
| Display | LED Digital |
| Included Accessories | Hose, User Manual |
| Features | Quick Wash, Eco Mode, Rinse Hold |
Frequently Asked Questions - ETL1200RCW Euromaid
User questions about ETL1200RCW Euromaid
0 question about this device. Answer the ones you know or ask your own.
Ask a new question about this device
Download the instructions for your Washing machine in PDF format for free! Find your manual ETL1200RCW - Euromaid and take your electronic device back in hand. On this page are published all the documents necessary for the use of your device. ETL1200RCW by Euromaid.
USER MANUAL ETL1200RCW Euromaid
Description: Top Loader Washing Machine MODEL NO. ETL1000RCW / ETL1200RCW

natural_image
Line drawing of a rectangular electronic device with a lid and ventilation slots (no text or symbols)SAFETY INSTRUCTIONS
Explanation of the symbols ...... Pg 05
INSTALLATION
Product description ...... Pg 10
Accessories included ...... Pg 10
Installation area ...... Pg 11
Unpacking the washing machine ...... Pg 11
Levelling the washing machine ...... Pg 12
Connection of inlet hose, tap and washing machine..... Pg 13
Prior to commencing use.... Pg 14
Washing ...... Pg 14
After washing..... Pg 14
Articles of washing that require attention ...... Pg 15
Washing powder and detergent advice ...... Pg 15
Control panel ...... Pg 16
Program variables..... Pg 18
Personalised settings of washing programs.... Pg 19
Operations of washing process.... Pg 19
Washing program table ...... Pg 20
MAINTENANCE
Cleaning and care ...... Pg 23
Cleaning the cabinet.... Pg 23
Cleaning drain pump filter ...... Pg 24
Troubleshooting..... Pg 25
Technical information ...... Pg 26
MANUFACTURER'S GUARANTEE
Manufacturer's Guarantee ...... Pg 27
For your safety, the information in this manual must be followed to minimize the risk of fire or explosion, electric shock, or to prevent property damage, personal injury or loss of life.
- This appliance is not intended for use by persons (including children) with reduced physical, sensory or mental capabilities or lack of experience and knowledge unless they have been given supervision or instruction concerning use of the appliance by a person responsible for their safety
- Children should be supervised to ensure that they do not play with the appliance.
- The new hose-sets supplied with the appliance are to be used. Old hose-sets should not be reused.
- If the supply cord is damaged, it must be replaced by the manufacturer, its service agent or similarly qualified persons in order to avoid a hazard.
- The openings must not be obstructed by a carpet.
-
This appliance is intended to be used in household and similar applications such as:
-
staff kitchen areas in shops, offices and other working environments;
- farm houses;
- by clients in hotels, motels and other residential type environments;
- bed and breakfast type environments;
- areas for communal use in blocks of flats or in launderettes.
Explanation of the symbols

Warning!
This combination of symbol and signal word indicates a potentially dangerous situation which may result in death or serious injuries unless it's avoided.

Caution!
This combination of symbol and signal word indicates a potentially dangerous situation which may result in slight or minor injuries or damage to property and the environment.

Note!
This combination of symbol and signal word indicates a potentially dangerous situation which may result in slight or minor injuries.

Warning!
POTENTIAL ELECTRIC SHOCK
• This appliance is for indoor use only.
- Do not put washing machine in a humid place
- Hands shall not be inserted into running spin-dry tub.
- If the spin-dry tub does not stop within 15 seconds after opening the cover, please stop using the machine and have it repaired.
- Before any maintenance the device, unplug the appliance from the mains.
- Always unplug the machine and turn off the water supply after use Max. inlet water pressure 0.03MPa. Min. inlet water pressure 0.8MPa.
- To ensure your safety, power plug must be inserted into an earthed three-pole socket. Check carefully and make sure that your socket is properly and reliably earthed.
- Make sure that the water and electrical devices must be connected by a qualified technician in accordance with the manufacturer's instructions and local safety regulations.
RISK TO CHILDREN!
- Machine may be very hot during the operation. Keep kids and pets far away from the machine during the operation.
RISK OF EXPLOSION!
- Do not wash or dry articles that have been cleaned in, washed in, soaked in, or dabbed with combustible or explosive substances (such as wax, oil, paint, gasoline, degreasers, drycleaning solvents, kerosene, etc.) This may result in fire or explosion.
INSTALLATION WARNING!
• This washing machine is for indoor use only.
- It isn't intended to be built-in.
- The openings must not be obstructed by a carpet.
- Washing machine shall not be installed in bath room or very wet rooms as well as in the rooms with explosive or caustic gases.
- Remove all packages and transport bolts before using the appliance. Otherwise, serious damage may result.
- Washing machines with single inlet valve only can be connected to the cold water supply. Washing machines with double inlet valves should be correctly connected to the hot water and cold water supply.
- Plug must be accessible after installation.
RISK OF DAMAGING APPLIANCES!
- Your product is only for home use and is only designed for the textiles suitable for machine washing.
- Do not climb up and sit on top cover of the machine.
- Do not lean against machine door.
-
Cautions during Handling Machine:
-
Transport bolts shall be reinstalled to the machine by a specialized person.
- The accumulated water shall be drained out of the machine.
- Handle the machine carefully. Never hold each protruded part on the machine while lifting. Machine door can not be used as the handle during the conveyance.
- This appliance is heavy. Transport with care.
- Please do not close the door with excessive forces.
- Do not wash carpets
OPERATING THE APPLIANCES!
- Before washing with clothes for the first time, run a wash program with the machine empty to ensure any residue from manufacturing processes is removed.
- Flammable and explosive or toxic solvents are forbidden.
- Gasoline and alcohol etc. Shall not be used as detergents.
- Please only select the detergents suitable for machine washing, especially for drum.
- Make sure that all pockets are emptied. Sharp and rigid items such as coin, brooch, nail, screw or stone etc. may cause serious damages to this machine.
- Please check whether the water inside the drum has been drained before opening its door. Please do not open the door if there is any water visible.
- Be careful of burning when the product drains hot washing water.
- Never refill the water by hand during washing.
• After the program is completed, Please wait for two minutes to open the door.
PACKAGING / OLD APPLIANCES
This marking indicates that this product should not be disposed with other household wastes throughout the EU. To prevent possible harm to the environment or human health from uncontrolled waste disposal, recycle it responsibly to promote the sustainable reuse of material resources. To return your used device, please use the collection systems or contact the retailer where the product was purchased. They return and can take this product for environmental safe recycling.
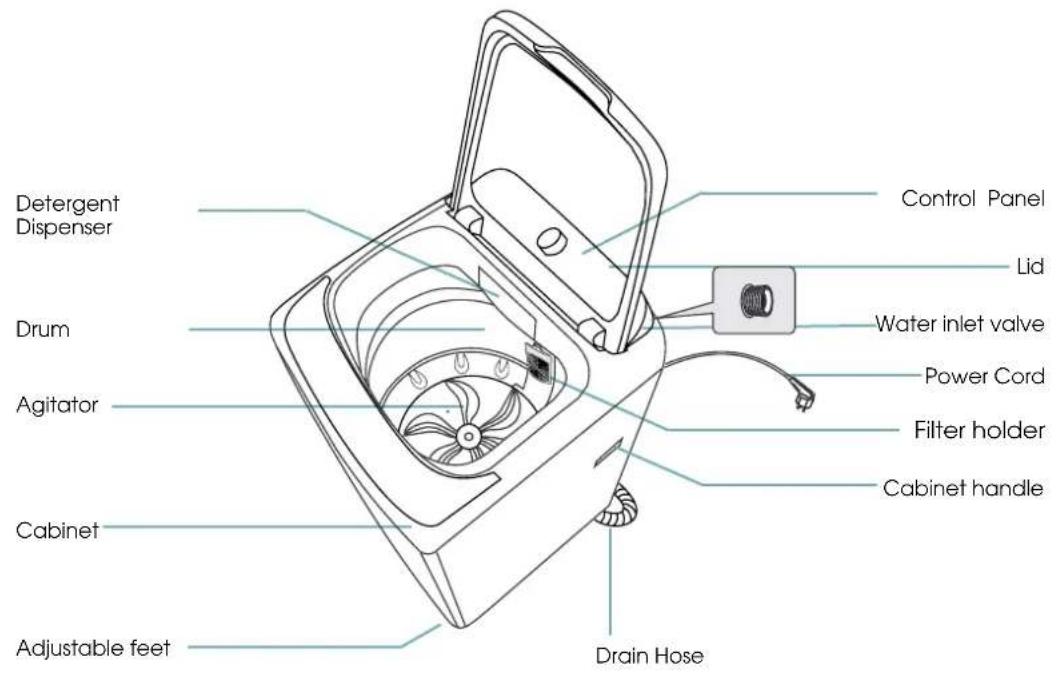
Product description
text_image
Detergent Dispenser Drum Agitator Cabinet Adjustable feet Control Panel Lid Water inlet valve Power Cord Filter holder Cabinet handle Drain Hose
Note: The product diagram is for reference only and may differ to the final product.
Accessories included

text_image
Supply hose cold water Supply hose hot water (optional) Upper drain hose (optional) Cabinet baseboard (optional) Owner's manual
Note: if the drain hose is already installed on the machine, then there is no spring clamp and drain hose in the accessories.
Installation area

Warning!
- Ensure the machine is level to minimise vibration when in operation.
- Ensure the power lead is not by caught under the machine where it can be come damaged.
Before installing the machine, ensure placement as follows:
- On a rigid, dry, and level surface
- Out of direct sunlight
- Adequate ventilation
- Room temperature is above 0 C
- Away from heating sources.
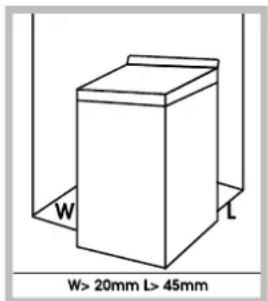
text_image
W L W> 20mm L> 45mmUnpacking the washing machine

Warning!
- Packaging material (e.g. Films, Styrofoam) can be dangerous for children.
-
There is a risk of suffocation! Keep all packaging well away from children.
-
Remove the cardboard box and styrofoam packing.
- Lift the washing machine and remove the base packing.
- Remove the tape securing the power supply cord and drain hose.
- Remove the inlet hose from the drum.

natural_image
Simple line drawing of a box with an upward arrow, no text or symbols present
Warning!
- Position drain hose properly, otherwise damage might result in water leakage.
- Do not kink or protract the drain hose.
-
If drain hose is too long, do not force it into washing machine as it will cause abnormal noises.
-
Place the drain hose in an upper draining system as per below:

natural_image
Line drawing of a kitchen sink with faucet and sink (no text or symbols)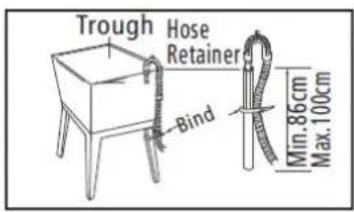
text_image
Trough Hose Retainer Bind Min. 86cm Max. 100cm
text_image
Min. 86cm Max 100cmLevelling the washing machine

Warning!
- The lock nuts on all four feet must be screwed tightly against the housing.
- Check if the feet are closely attached the cabinet. If not, please turn them to their original positions to tighten the nuts.
- Check alignment of the product with a spirit level and adjust as required
- Loosen the lock nut and turn the feet ensuring they all contact the floor.
- Check again with a spirit level and press down on all four corners to ensure there is no movement.
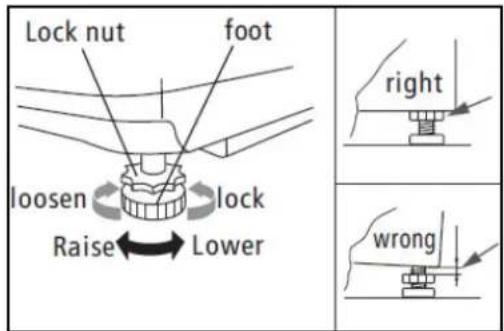
text_image
Lock nut foot loosen lock Raise Lower right wrongConnection of inlet hose, tap and washing machine

natural_image
Diagram showing two hands performing a valve adjustment, one with a bolt and the other with a handle (no text or symbols)Tap with threads and inlet hose

natural_image
Three-step diagram showing a hand holding a pipe fitting with arrows indicating adjustment (no text or symbols)Special tap for washing machine

Warning!
• To prevent leakage or water damage, follow the instructions in this chapter
- Do not kink, crush, modify or sever the water inlet or drainage hoses
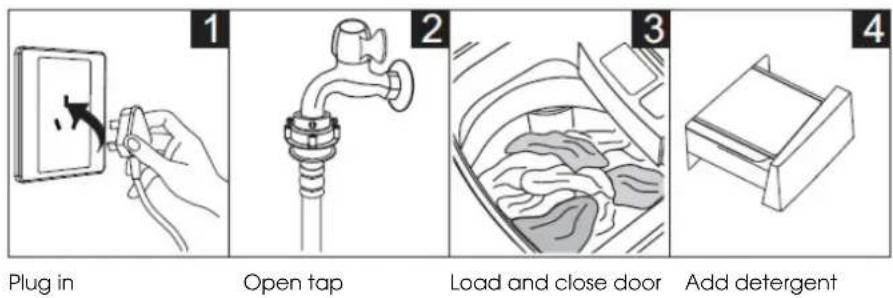
Prior to commencing use

Caution
- Before washing, please make sure the washing machine is installed properly.
- Before washing with clothes for the first time, run a wash program with the machine empty to ensure any residue from manufacturing process is removed.
Quick Start
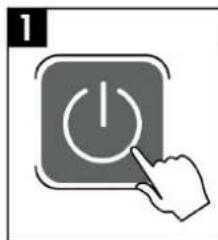
natural_image
Hand pressing a button with a white power symbol (no text or numbers visible)Turn On

text_image
2 Dairy Hand Beach Blood Milk White Absch. & Upsc Coloured Tact Systectics Body CareSelect Program
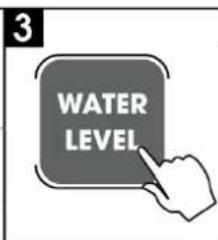
text_image
3 WATER LEVELSelect Water Level
text_image
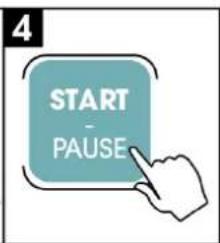
4 START - PAUSEStart Up

Note: If One Touch Auto Wash is engaged then steps 2 and 3 will be skipped.

After Washing Is Complete
Machine will beep after washing is finished and the power supply will be turned off automatically, after this laundry can be unloaded. When not in use, the tap should be turned off to avoid possible water leaks.
Articles of washing that require attention.
- The ambient temperature in the room where the washing machine is placed should be between 0 - 40°C. If used under 0°C, the inlet valve and draining system may be damaged. If the machine is stored in conditions of 0°C or less, then it should be transferred to normal ambient temperature to ensure the water supply hose and drain hose are not frozen before use.
- Ensure to follow how to care for instructions on clothing labels and use washing detergent suitable for a top loader machine.

natural_image
Simple line drawing of a sweater with a tag and tie, no text or symbols presentCheck the label
text_image
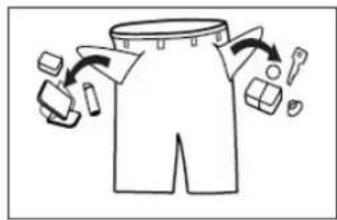
Diagram illustrating a garment pattern with labeled parts and directional arrows indicating movement or processing steps.Remove all items from pockets Tie long strips in knots and zip/ button up all items of clothing.
natural_image
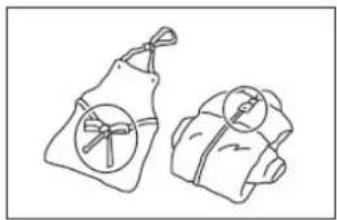
Two handbags with circular designs, one wrapped in a blanket and the other in a patterned case (no text or symbols)strips in knots and zip/ button up all items of clothing.

natural_image
Simple line drawing of a bag with a basket and patterned design (no text or symbols)Place small or delicate articles of clothing into a suitable wash bag.
natural_image
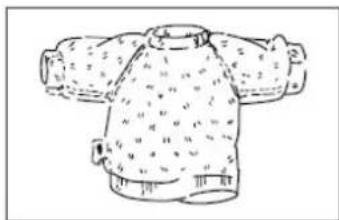
Line drawing of a T-shirt with patterned collar and side handles (no text or symbols)Turn easy-pilling and long-pile fabric inside out

natural_image
Simple line drawing of a box with a bag and a bag inside, showing a folding process (no text or symbols)Separate lights and darks and clothes with different textures

Warning
- Washing single items of clothing may cause the drum to become unbalanced and stop the wash cycle therefore it is recommended to wash at least 2 - 3 items at a time to so machine is balanced.
- Ensure any articles of clothing that have come in contact with flammable liquids are thoroughly rinsed in water before being washed in the machine.
Washing Powder and Detergent Advice
- If a powder detergent is being used, its recommended to mix with water before pouring into the detergent reservoir.
- Please choose a detergent specific to top loading washing machines and suitable for the water temperature you wish to use so washing performance is maximized.
Control Panel
text_image
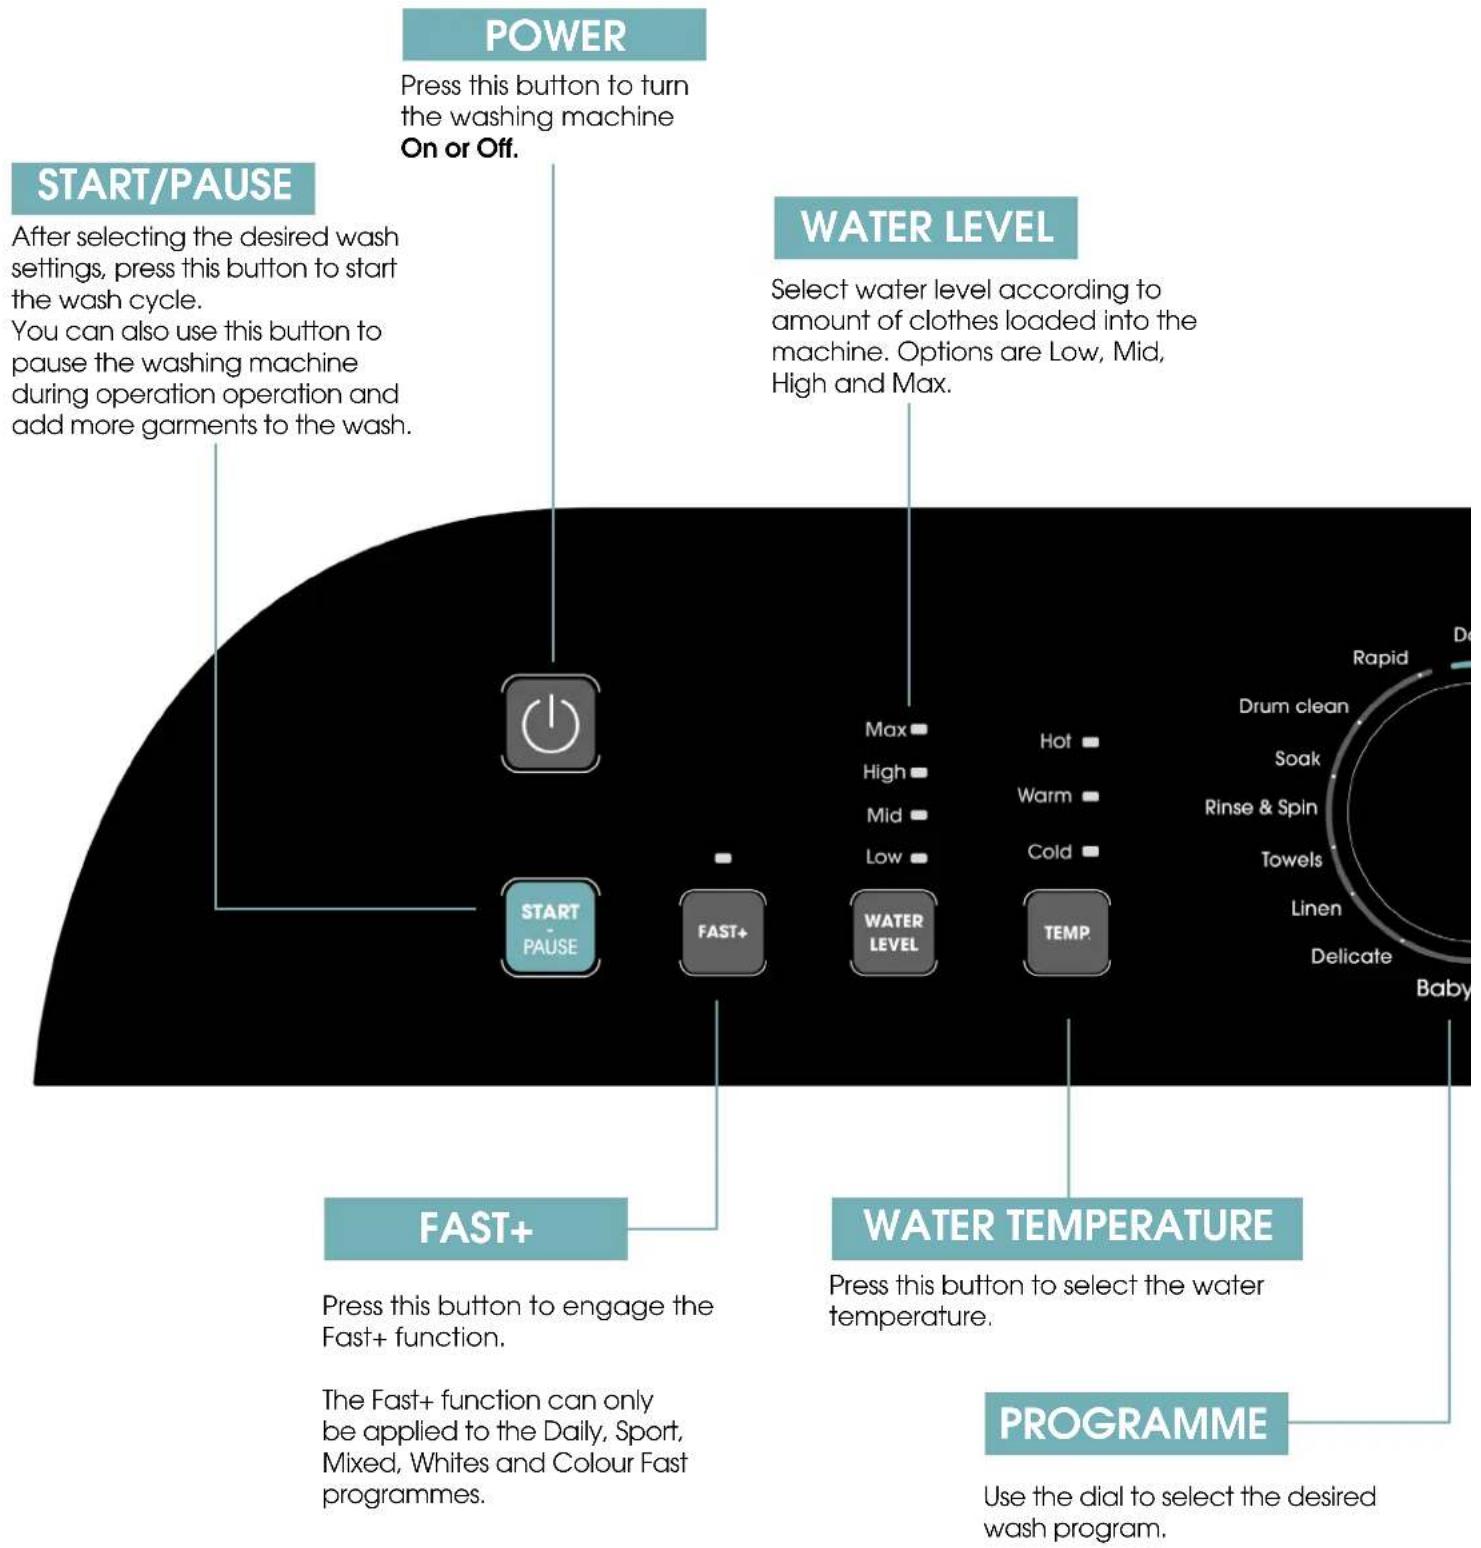
POWER Press this button to turn the washing machine On or Off. START/PAUSE After selecting the desired wash settings, press this button to start the wash cycle. You can also use this button to pause the washing machine during operation operation and add more garments to the wash. WATER LEVEL Select water level according to amount of clothes loaded into the machine. Options are Low, Mid, High and Max. MAX High Mid Low Hot Warm Cold WATER LEVEL TEMP FAST+ Press this button to engage the Fast+ function. The Fast+ function can only be applied to the Daily, Sport, Mixed, Whites and Colour Fast programmes. WATER TEMPERATURE Press this button to select the water temperature. PROGRAMME Use the dial to select the desired wash program.DISPLAY
The display shows the settings, estimated time remaining, options, and status messages for the washing machine. The display will remain on through the cycle.
If using the delay function, the LED will be flashing with the remaining time before the machine starts washing. During a washing cycle, the LED is will be solid and show the remaining time of the program.
NOTE!
- If there is any break in the power supply while the machine is operating, the current program selected will be stored in the memory and will resume when the power supply is reconnected.
text_image
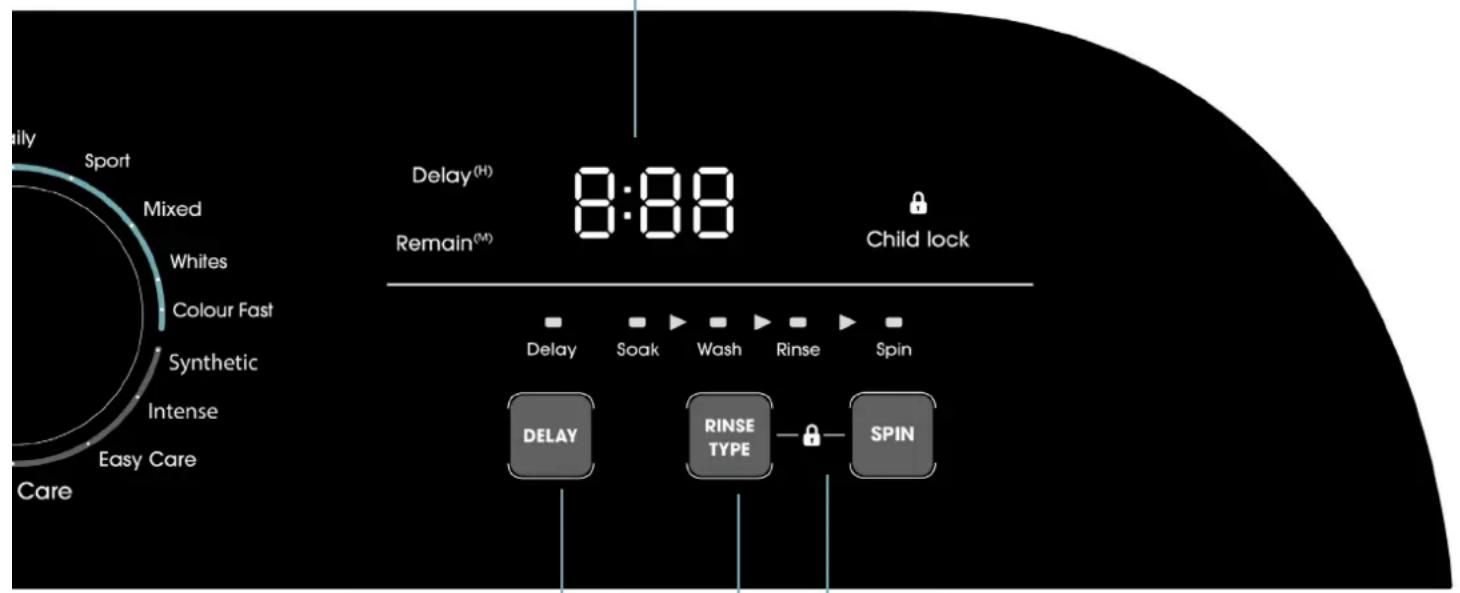
Daily Sport Mixed Whites Colour Fast Synthetic Intense Easy Care Care Delay(H) 8:88 Remain(M) Child lock Delay Soak Wash Rinse Spin DELAY RINSE TYPE SPINDELAY
After selecting a Program, press the Delay button to choose a delayed start time. Press Start/Pause to commence the delay operation.
To switch the delay start off, simply press the button until the delay light is off. If the program has already started, press the Power button to reset the program.
RINSE
With each press of the button, the numbers 0, 1, 2 or 3 will cycle on the LCD screen.
CHILD LOCK
Simultaneously press the RINSE TYPE and SPIN. buttons to activate the child lock. Repeat this process to deactivate the child lock.
NOTE!
- The Child Lock function will lock all buttons except POWER.
Program Variables
The below buttons can be used to change variables on all wash programs.
WATER LEVEL
Water Level
Select water level according to amount of clothes loaded into the machine. Low, Mid, High and Max are available to be selected.
TEMP
Temp
Select Hot, Warm or Cold water.
RINSE TYPE
Rinse Type
Select the no. of rinses required. 0,1,2 and 3 are the number of rinses available to be selected.
SPIN
Spin
Select the runtime of the spin cycle.
DELAY
Delay
Allows up to a 24H delay start to be set. Follow the below sequence to enable. To disable, push the DELAY button until the LED screen is blank.

flowchart
graph LR
    A["Turn On"] --> B["Select Program"]
    B --> C["Set Delay"]
    C --> D["Start"]

- If there is any break in the power supply while the machine is operating, a special memory stores the selected program and when the power is restarted
Manual Program Selection
The below process can be utilised to customise the wash program based on the type and no. of articles of clothing that require washing.

flowchart
graph LR
    A["Power Input"] --> B["Input Signal"]
    B --> C["WATER LEVEL"]
    C --> D["TEMP"]
    D --> E["RINSE TYPE"]
    E --> F["SPIN"]
    F --> G["DELAY"]
    G --> H["START - PAUSE"]
One Touch Auto Wash
The One Touch Auto Wash feature detects the amount of clothing placed in the machine and automatically sets the water level.

flowchart
graph LR
    A["Turn On"] --> B["Select the DAILY, SPORT, MIXED, WHITES or COLOUR FAST program."]
    B --> C["Press Start"]
Rinse and Spin Only

flowchart
graph LR
    A["Turn On"] --> B["Select Rinse & Spin program."]
    B --> C["Select no. of Rinses"]
    C --> D["Select spin cycle runtime"]
    D --> E["START PAUSE"]
Fast +
Fast+ will reduce the washing cycle time by 20-40% by increasing the intensity of the agitator. The Fast+ function can only be applied to the Daily, Sport, Mixed, Whites and Colour wash programmes

flowchart
graph LR
    A["Turn On"] --> B["PROG. - F+ - TEMP"]
    B --> C["START - PAUSE"]
    C --> D["F+"]
    style A fill:#fff,stroke:#000
    style B fill:#d4f1f9,stroke:#333
    style C fill:#e6f7ff,stroke:#333
    style D fill:#fff,stroke:#000
Child Lock
The Child Lock will lock all controls on the washing machine except the POWER button. To enable, simultaneously press the RINSE TYPE and SPIN buttons together for 3 seconds. To deactivate repeat the above procedure.

flowchart
graph LR
    A["Turn On"] --> B["Press Start"]
    B --> C["Simultaneously press the RINSE TYPE and SPIN buttons"]
Washing Program Table
| Program | Duration Description |
| Daily** 1:18 Everyday program suitable for a variety of garments that are normally soiled. | |
| Sport 1:13 Suitable for more durable garments such as sports and outdoor wear. | |
| Mixed 1:11 Suitable for mixed load of garments such as cottons and synthetics. | |
| Whites 1:13 Suitable for white cotton and synthetic garments. For best results use this cycle with warm or hot water. | |
| Colour Fast 1:07 Suitable for coloured cotton and synthetic garments. For best results use this cycle with cold water. | |
| Synthetic 1:05 Ideal for washing mixed textile garments such as athletic wear. | |
| Intense 1:24 Longer wash program with strong water stream and agitator movement suitable for medium to heavily soiled garments. | |
| Easy Care 1:09 Softer cycle suited to easy care garments such as silk, satin, synthetics fibres or blended fabrics. | |
| Baby Care 1:28 Special program suited for washing baby clothes which adds an additional rinse to aid in the removal of detergents and help prevent skin irritation. | |
| Delicate | 1:07 Suited for items such as woolen clothing and delicate undergarments. |
| Linen | 1:54 Extended program for washing bulkier bedding items including sheets and blanket. Includes 20min soak cycle. |
| Towels | 1:54 Extended program for washing towels and bath mats. Includes 20min soak cycle. |
| Rinse & Spin | 0:28 Suitable for when garments need an additional rinse or have been hand washed separately. |
| Soak | 1:39 30min soak cycle combined with a strong wash cycle aids the cleaning of heavily stained garments |
| Drum Clean | 0:47 Water is pulsated through the inner and outer layers of the drum to help remove residual detergent and push out any dirt and grime lodged in. |
| Rapid | 0:35 15-minute program ideal for light clothing such as shorts, t-shirts, socks and undergarments. |
*Always consult the label on the clothing item to be washed before placing in the machine to ensure the most suitable program is selected. If garment is considered fragile then it is advised to hand wash only or skip the spin program when washing in the machine.
**Program used for AS/NZS 2040 and AS/NZS 6400 Energy and Water ratings.
ETL1000RCW / ETL1200RCW
Test program is Daily, temperature 'Warm', water level 'Max'
10kg Program Variables
| Program Delay (H) Water level | Soak Duration | Wash Duration | Rinse Type Spin | ||
| Daily | 0~24 | auto/1~4 | — | 26 | 0~3(2) 0/5/7/9/11 |
| Sport | 0~24 | auto/1~4 | — 14 | 0~3(2) 0/5/7/9/11 | |
| Mixed | 0~24 | auto/1~4 | — | 14 | 0~3(2) 0/5/7/9/11 |
| Whites | 0~24 | auto/1~4 | — 18 | 0~3(2) 0/5/7/9/11 | |
| Colour Fast | 0~24 | auto/1~4 | — | 12 | 0~3(2) 0/5/7/9/11 |
| Synthetic | 0~24 | 1~4(2) | — | 10 | 0~3(2) 0/5/7/9/11 |
| Intense | 0~24 | 1~4(4) | — 25 | 0~3(2) 0/5/7/9/11 | |
| Easy Care | 0~24 | 1~4(2) | — 14 | 0~3(2) 0/5/7/9/11 | |
| Baby Care | 0~24 | 1~4(4) | — | 14 | 0~3(2) 0/5/7/9/11 |
| Delicate | 0~24 | 1~4(2) | — | 12 | 0~3(2) 0/5/7/9/11 |
| Linen | 0~24 | 1~4(4) | 20 18 | 0~3(3) 0/5/7/9/11 | |
| Towels | 0~24 | 1~4(4) | 20 18 | 0~3(3) 0/5/7/9/11 | |
| Rinse & Spin | 0~24 | 1~4(4) | — | — | 1~3(1) 0/5/7/9/11 |
| Soak | 0~24 | 1~4(4) | 30 12 | 0~3(2) 0/5/7/9/11 | |
| Drum Clean | 0~24 | 4 | — | 8 | 1 5 |
| Rapid | 0~24 | 1~3(2) | — 6 | 1 5 | |
Please Note:
*All duration times shown are represented as minutes unless otherwise indicated.
*The figures in bold are the default settings for each program.
Water Levels indicated are as follows:
1 - Low
2 - Mid
3 - High
4 - Max
12kg Program Table
| Program Delay (H) Water level | Soak Duration | Wash Duration | Rinse Type Spin | |||
| Daily | 0~24 | auto/1~4 | — | 26 | 0~3(2) | 0/5/7/9/11 |
| Sport | 0~24 | auto/1~4 | — | 14 | 0~3(2) | 0/5/7/9/11 |
| Mixed | 0~24 | auto/1~4 | — | 14 | 0~3(2) | 0/5/7/9/11 |
| Whites | 0~24 | auto/1~4 | — | 18 | 0~3(2) | 0/5/7/9/11 |
| Colour Fast | 0~24 | auto/1~4 | — | 12 | 0~3(2) | 0/5/7/9/11 |
| Synthetic | 0~24 | 1~4 (2) | — | 10 | 0~3(2) | 0/5/7/9/11 |
| Intense | 0~24 | 1~4(4) | — | 25 | 0~3(2) | 0/5/7/9/11 |
| Easy Care | 0~24 | 1~4 (2) | — | 14 | 0~3(2) | 0/5/7/9/11 |
| Baby Care | 0~24 | 1~4(4) | — | 14 | 0~3(3) | 0/5/7/9/11 |
| Delicate | 0~24 | 1~4 (2) | — | 12 | 0~3(2) | 0/5/7/9/11 |
| Linen | 0~24 | 1~4(4) | 20 | 18 | 0~3(3) | 0/5/7/9/11 |
| Towels | 0~24 | 1~4(4) | 20 | 18 | 0~3(3) | 0/5/7/9/11 |
| Rinse & Spin | 0~24 | 1~4(4) | — | — | 1~3(1) | 0/5/7/9/11 |
| Soak | 0~24 | 1~4(4) | 30 | 12 | 0~3(2) | 0/5/7/9/11 |
| Drum Clean | 0~24 | 4 | — | 8 | 1 | 5 |
| Rapid | 0~24 | 1~3(2) | — | 6 | 1 | 5 |
Please Note:
*All duration times shown are represented as minutes unless otherwise indicated.
*The figures in bold are the default settings for each program.
Water Levels indicated are as follows:
1 - Low
2 - Mid
3 - High
4 - Max
Cleaning and care

Warning!
- Before performing maintenance, please unplug the machine and close the tap.
Cleaning and care
Proper maintenance on the washing machine can extend its working life. The surface can be cleaned with diluted non-abrasive neutral detergents when necessary. If there is any water overflow, use the wet cloth to wipe it off immediately. No sharp items should be placed on or in the machine.

natural_image
Line drawing of a hand washing a washing machine (no text or symbols)
Note:
- Formic acid and its diluted solvents or equivalent are forbidden, such as alcohol solvents or chemical products, etc.
Cleaning the filters

Note:
- Inlet filter must be cleaned if water flow is not efficient.
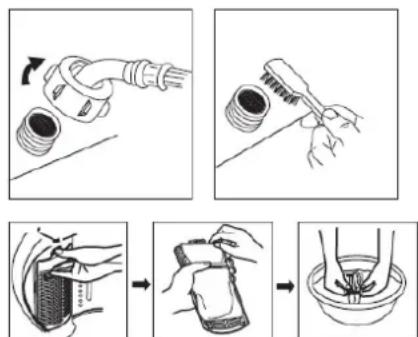
Inlet Filters:
- Screw off the inlet hose from the back of the machine.
- Pull out the filter with long nose pliers and use a brush to clean.
- Reinstall the filter and reconnect the inlet hose.
- Reconnect the inlet pipe.
Lint Filter:
- There is a built-in lint filter in the machine that collect lint during the washing cycle.
- It is suggested to clean the lint filter every 10 cycles.
- Take it out and clean the filter with water. Then place it back into the machine.
Cleaning the drain pump filter
Only applicable to certain models.

Warning!
- Be careful of the hot water!
- Allow detergent solution to cool down.
- Unplug the machine to avoid electrical shock before cleaning.
- Drain pump filter can filter lint and small foreign objects from the washing.
- Clean the filter periodically to ensure the normal operation of washing machine.

natural_image
Simple line drawing of a bathtub with a circular valve and a basin, no text or symbols presentDrain the water out of the pump, using a container to collect the water.

natural_image
Hand holding a switch with a circular dial indicator and directional arrows (no text or symbols)Open the filter by turning to counter clockwise.
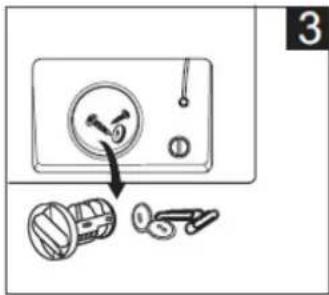
text_image
Diagram showing a switch mechanism with labeled parts and a magnified view of the switch component.Remove any foreign objects.
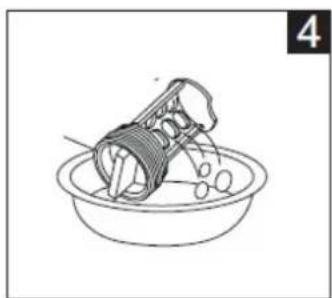
natural_image
Line drawing of a bowl containing a cylindrical object with a handle, no text or symbols presentClean the filters

natural_image
Technical line drawing of a mechanical component with no visible text or symbolsRe-insert the filter.
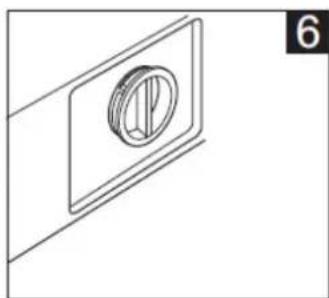
natural_image
Simple line drawing of a circular component mounted on a rectangular frame (no text or symbols)Tighten the pump cover clockwise.

Caution!
- Make sure that valve cap and emergency drain hose are reinstalled properly, cap plates should be inserted aligning to hole plates otherwise water may leak;
- Some machines don't have emergency drain hose, so step 2 and step 3 can be skipped.
- Rotate lower cover cap directly to make water run into basin.
Troubeshooting
If the machine will not turn on or stops during operation, refer to the table below to diagnose the problem. If a solution cannot be achieved, please contact the service provider.
Fault Possibe Cause
| No washing The power is off or the fuse is burned out.The power supply voltage is too low.The required water level has not been reached due to lack of flow.The delay has been set and has not yet expired. |
| No water flow The power is off or the fuse is burned out.The water supply is cut off or the water pressure is too low.The inlet hose is not properly connected and/or the water tap is closed.The inlet filter is blocked by debris.The machine is on pause. |
| Abnormal draining The water drain hose is placed too high.A partial/full blockage is present in the outlet hose |
| Abnormal spin The door lid is not closed.Clothing is not spread out in the drum evenly.The machine has not been placed on an even surfaceThe motor belt is loose. |
Error Code Description Solution
| E1 Alarm for abnormal water flow. Check the water tap is open or not | |
| E2 Water hasn’t drained properly. Check the water sensor and drain pump | |
| E3 Alarm for lid not closed before wash and spin. | Close the lid, Press “Start” button |
| E4 Unbalanced drum. Manually balance clothes in the drum by hands. | |

Note:
- After the checking all possible fault causes, activate the appliance. If the problem occurs or the display shows other error codes again, contact the service centre.
Technical Information
| Model No. Washing Capacity Unit Dimensions Unit Weight | Rated Power | Power Supply | |
| ETL1000RCW 10kg | 601 (W) x 611 (D) x 1060 (H) | 46kg 600W 220-240V~50Hz | |
| ETL1200RCW 12kg | 640 (W) x 684 (D) x1085 (H) | 53kg 600W 220-240V~50Hz | |
| Standard Water Pressures: 0.03-0.8MPa | |||

text_image
D W HMANUFACTURER GUARANTEE
This warranty is provided in Australia by Glen Dimplex Australia Pty Limited ABN 69 118 275 460 (Phone number 1300 556 816) and in New Zealand by Glen Dimplex New Zealand Limited NZBN 9429000069823 (Phone number 09 274 8265) in respect of the Euromaid product.
1. Euromaid Express Warranty
Subject to the exclusions below, we warrant that the product will not have any electrical or mechanical breakdowns within:
a) In the case of Euromaid products used for personal, domestic or household purposes, a period of 2 years from the date the product is purchased as a brandnew product from a retailer located in Australia / New Zealand.
b) In the case of Euromaid products used for purposes other than personal, domestic or household purposes (including business or commercial use), a period of 90 days from the date the product is purchased as a brand-new product from a retailer located in Australia / New Zealand. Euromaid products are designed and intended for domestic use only; and
c) All warranty repairs must be carried out by Glen Dimplex or their nominated service agent
Note: warranty periods detailed above may vary in line with agreements with select retail and builder partners and may differ between Australia and New Zealand. The benefits conferred by this express warranty are in addition to the Consumer Guarantees referred to in section 3 and any other statutory rights you may have under the Australian / New Zealand Consumer Law and/or other applicable laws.
2. Warranty exclusions
This express warranty does not apply where:
a) The product has been installed, used or operated otherwise than in accordance with the product manual or other similar documentation provided to you with the product;
b) The product requires repairs due to damage resulting from accident, misuse, incorrect installation, insect or vermin infestation, improper liquid spillage, cleaning or maintenance, unauthorised modification, use on an incorrect voltage, powersurges and dips, voltage supply problems, tampering or unauthorised repairs by any persons, use of defective or incompatible accessories or exposure to abnormally corrosive conditions, events independent of human control which occurred after the goods left the control of Glen Dimplex;
c) The repair relates to the replacement of consumable parts such as fuses and bulbs or any other parts of the product which require routine replacement;
d) You are unable to provide us with reasonable proof of purchase for the product;
e) the breakdown occurs after the expiry of the express warranty period set out in section 1 or
f) the product was not purchased in Australia / New Zealand as a brand-new product.
3. Consumer guarantees
Our goods come with guarantees that cannot be excluded under the Australian / New Zealand Consumer Law. You are entitled to a replacement or refund for a major failure and for compensation for any other reasonably foreseeable loss or damage. You are also entitled to have the goods repaired or replaced if the goods fail to be of acceptable quality and the failure does not amount to a major failure.
MANUFACTURER GUARANTEE
4. How to make a claim.
You may make a claim under this warranty through our website, contacting our customer care line or via email. Contact details for Glen Dimplex Australia and New Zealand can be found at the end of this document
To make a valid claim under this warranty, you must:
a) Lodge the claim with us as soon as possible and no later than 14 days after you first become aware of the breakdown;
b) Provide us with the product serial number;
c) Provide us with reasonable proof of purchase for the product. This can take the form of a store receipt, new home handover form or other payment receipt documentation; and
d) If required by us, provide us (or any person nominated by us) with access to the premises at which the product is located at times nominated by us (so that we can inspect the product).
Washing
5. Warranty claims
If you make a valid claim under this warranty and none of the exclusions set out in section 2 apply, we will, at our election, either repair the product or replace the product with a product of identical specification (or where the product is superseded or no longer in stock, with a product of as close a specification as possible).
Goods presented for repair may be replaced by refurbished goods of the same type rather than being repaired. Refurbished parts may be used to repair the goods. Products are designed and supplied for normal domestic use. We will not be liable to you under this warranty for business loss or damage of any kind whatsoever.
Glen Dimplex Australia Pty Ltd
www.glendimplex.com.au
Australia
Ph: 1300 556 816
customer.care.ha@glendimplex.com.au
Glen Dimplex New Zealand Ltd
www.glendimplex.co.nz
New Zealand
Ph: 09 274 8265
nztechserv@glendimplex.co.nz
READ THE INSTRUCTION BOOKLET BEFORE INSTALLING AND USING THE APPLIANCE.
The manufacturer will not be responsible for any damage to property or to persons caused by incorrect installation or improper use of the appliance.
The manufacturer is not responsible for any inaccuracies, due to printing or transcription errors, contained in this manual. In addition, the appearance of the figures reported is also purely indicative.
The manufacturer reserves the right to make changes to its products when considered necessary and useful, without affecting the essential safety and operating characteristics. Glen Dimplex constantly seeks ways to improve the specifications and designs of their products.
Whilst every effort is made to produce up to date literature, this document should not be regarded as an infallible guide. Actual product only should be used to derive cut out sizes. All appliances must be installed by a qualified person/s with adherence to the relevant electrical, plumbing and building codes, with compliance being issued as required by state or national legislation.
Additionally, all upright cookers must have the anti-tilt device installed correctly in adherence to the relevant standards by a licenced installer. For maximum effectiveness and efficiency all rangehoods should be installed with the use of ductwork, by a licenced installer with adherence to the relevant state and national building codes and regulations.
All Glen Dimplex appliances are for Domestic use only, and must be installed by a licence installer into Domestic Applications only, without exception and to the required Authorities guidelines. Any installation outside of this will VOID warranty. Alfresco areas are not a Domestic application.
Glen Dimplex Australia Pty Ltd
www.glendimplex.com.au
Glen Dimplex New Zealand Ltd
www.glendimplex.co.nz
For service advice, please contact the Customer Care Centre by phone or email below.
Australia
Ph: 1300 556 816
customer.care.ha@glendimplex.com.au
New Zealand
Ph: 09 274 8265
nztechserv@glendimplex.co.nz