FlipXL - Smartphone Opel Mobile - Free user manual and instructions
Find the device manual for free FlipXL Opel Mobile in PDF.

User questions about FlipXL Opel Mobile
0 question about this device. Answer the ones you know or ask your own.
Ask a new question about this device
Download the instructions for your Smartphone in PDF format for free! Find your manual FlipXL - Opel Mobile and take your electronic device back in hand. On this page are published all the documents necessary for the use of your device. FlipXL by Opel Mobile.
USER MANUAL FlipXL Opel Mobile
Overview of the phone....6
Quick Setup Guide 7
Quick User Guide....9
Easy Call....12
Contacts....13
Messages....20
Call logs 29
Camera 31
Clock 32
Gallery....36
FM Radio....40
Music....40
Calendar....41
Calculator 42
File Manager 43
SOS 44
Settings 46
Network and Internet 46
Connected Devices 49
Battery....51
Display 51
Sound....53
Storage....56
Security and Location....57
System 59
Troubleshooting and support....62
The Bluetooth® word mark and logos are registered trademarks owned by Bluetooth SIG, Inc. and any use of such marks by 3 Feet Solutions Pty Ltd is under license. Other trademarks and trade names are those of their respective owners.
Safety Information
Welcome to Opel Mobile and thanks for purchasing our products. For the best performance, we recommend you read this manual carefully, especially the "safety instructions". This will take you a few minutes, but it will save you time later and will allow you to enjoy all the features on your device.
THIS MODEL MEETS INTERNATIONAL GUIDELINES FOR EXPOSURE TO RADIO WAVES
Your mobile device is a radio transmitter and receiver. It is designed not to exceed the limits for exposure to radio waves recommended by international guidelines. These guidelines were developed by the independent scientific organization ICNIRP and include safety margins designed to assure the protection of all persons, regardless of age and health.
The guidelines use a unit of measurement known as the Specific Absorption Rate, or SAR. The SAR limit for mobile devices is 2 W/kg and the highest SAR value for this device when tested at the ear was 0.149 W/kg*. As mobile devices offer a range of functions, they can be used in other positions, such as on the body as described in this user guide**. In this case, the highest tested SAR value is 1.773 W/kg*.
As SAR is measured utilizing the devices highest transmitting power the actual SAR of this device while operating is typically below that indicated above. This is due to automatic changes to the power level of the device to ensure it only uses the minimum level required to reach the network.
The World Health Organization has stated that present scientific information does not indicate the need for any special precautions for the use of mobile devices. They note that if you want to reduce your exposure then you can do so by limiting the length of calls or using a ‘hands-free’ device to keep the mobile phone away from the head and body.
Additional Information can be found on the website of the World Health Organization
*The tests are carried out in accordance with international guidelines for testing.
**For body worn operation, this phone has been tested and meets the RF exposure guidelines when used with the Opel Mobile accessories supplied or designated for this product. Use of other accessories may not ensure compliance with RF exposure guidelines
How to handle and preserve your device?
- Trying to modify, disassemble or repair the device or the charger yourself will make the warranty invalid. Only certified repairers may install or repair phone equipment.
- Avoid hitting or shaking your phone.
- The warranty of this phone may be annulled if you use unauthorised accessories. To prevent this from happening and to keep your phone working properly use only the battery charger and Micro USB cable that originally comes with the device.
- Make sure the device does not get wet. To avoid possible, short-circuit, electric shock or corrosion keep your phone away from rain, water splash, sweat or moisture. You must not use your device with your hands wet or immerse it in water. In case it gets wet keep the phone off and do not try to use a microwave to dry it.
- Do not use your phone when entering areas that are near flammable liquids.
- Observe all local laws and regulations on the use of mobile phones. Turn off the device before entering petrol stations, oil refineries or chemical plants.
- This product should not be used in extremely hot, cold, dusty, or humid spaces. It also should not be exposed to long periods of sunshine or strong magnetic fields.
- If you have a pacemaker keep the phone at least a 20cm distance from the place it is located. This phone may cause interference to some hearing aids and other electronic devices.
- Avoid all heat sources, ovens or other appliances (including amplifiers) that produce heat or have hot surfaces.
- Switch off the phone when entering an aircraft.
- Do not use a hand-held phone when operating any motor vehicles, heavy equipment or moving objects.
- Excessive high-volume levels or noise may affect your hearing. To prevent this from happening use an adequate volume in your earphones when you are listening to music or employing any of the multimedia features on the phone.
- You are fully responsible for keeping your information backed up and we do not take any legal responsibility for data that is damaged or lost. It is possible to erase or interfere with the information stored in your phone by a magnetic device when using your phone. To avoid this issue, keep your phone clear from magnetic devices.
- Pointing the torch into your own or another person's eyes will cause damage and may result in blindness.
Safety recommendations for accessories
- Use only Opel Mobile accessories or chargers that came with this phone.
-
Be careful when handling the battery. The lithium-ion battery can be put into use immediately after being unpacked. Use only the Opel Mobile battery that came with the device. We recommend charging the battery as soon as possible once the phone has been switched on.
-
CAUTION: RISK OF EXPLOSION IF BATTERY IS REPLACED BY AN INCORRECT TYPE. ENSURE YOU ALWAYS ONLY USE THE OPEL MOBILE BATTERY THAT IS SPECIFIED FOR THIS DEVICE. DISPOSE OF USED BATTERIES ACCORDING TO THE INSTRUCTIONS.
- Immediately stop using the battery charger if you smell an odour or overheats or a crack or swelling appears in the casing.
- In case you notice the cable, or the plug have suffered any damage, discontinue using it and contact Opel Mobile support line as soon as possible for advice.
- The optional memory card should be protected from strong shocks and static electricity. Handle with care.
Usage conditions and restrictions
- All packaging materials, especially plastic ones, must be disposed of properly. The lack of this procedure may cause a suffocation danger to children. Any packaging must be kept out of children's reach.
- This device is not a toy and not designed for children and strict adult supervision must be adhered to at all times. Keep the phone and the accessories beyond children's reach.
- This device can be recycled. To dispose of this device properly remember to follow local regulations. Local authorities may guide you on finding appropriate facilities to this end. The battery must never be disposed of in a fire.
- If this phone is lost or has been stolen, please notify your network service provider as soon as possible and ask for the SIM card to be deactivated.
- You are fully responsible for any damage caused by not following these instructions or for improper use of the device. We do not accept any liability for any improper use or mishandling on this device.
- In any event we are not liable for any direct or indirect personal injury or death liability damages due to the performance of the device or the Telecommunication service, if your device is not working as its intended, we recommend you stop using it immediately and contact customer support.
- This device is not intended to be a life saving device; If you are in a life-threatening medical emergency, we recommend you call emergency 000 immediately.
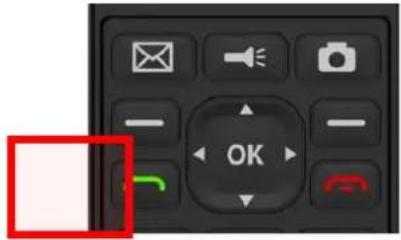
Overview of the phone
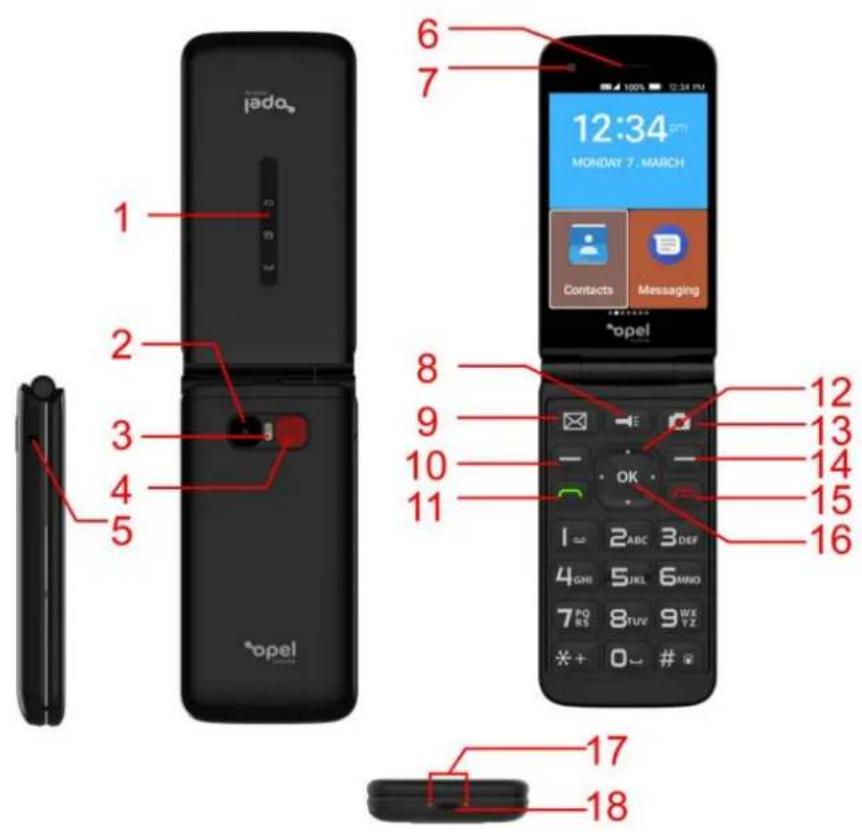
| 1 Notification Lights |
| 2 Rear Camera |
| 3 Flashlight/Torch |
| 4 SOS Key |
| 5 Headphone Jack |
| 6 Ear Speaker |
| 7 Front Camera |
| 8 Torch Shortcut Key |
| 9 Messages Shortcut Key |
| 10 Menu/Left Selection Key |
| 11 Answer Call/Call History Key |
| 12 Navigation Keys - Up, Down, left, Right |
| 13 Camera Shortcut Key |
| 14 Back/Right Selection Key |
| 15 Power On-Off/ End Call Key |
| 16 OK/Selection Key |
| 17 Charging Cradle Points |
| 18 USB Charging Port |
Quick Setup Guide
- Unpack all the contents out of the packaging and have your SIM card ready to insert into the phone.
(Please note this phone supports a Micro sized SIM card, if you do not have a micro sized SIM card, please contact your SIM card provider as they will be able to supply one for you)
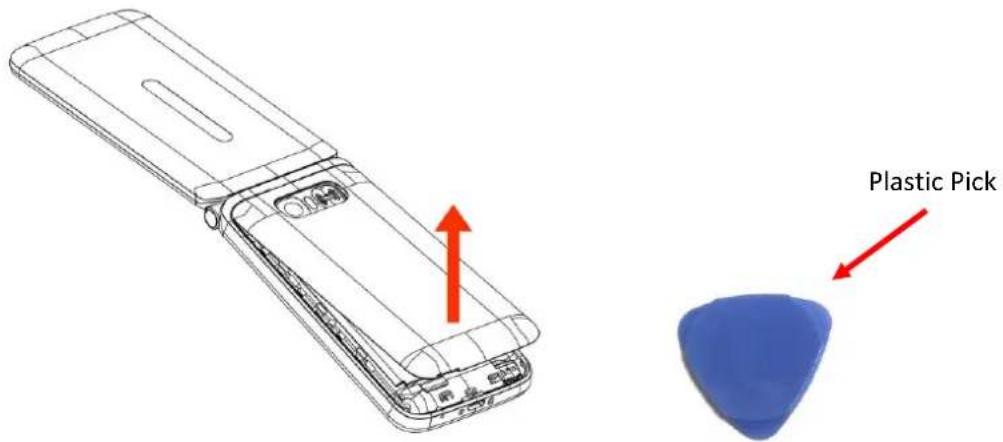
- Remove the back cover from the phone using the plastic pick provided to help you remove the cover easily.
Using the plastic pick provided, insert it in the lower left corner of the cover where there is a little opening and click the back cover off.
-
Remove the battery from the phone by lifting from the top and pulling out.
-
Slide your SIM card into the SIM tray (sliding in until it does not go in any further), ensure the gold plates are facing downwards and the cornered edge is in the top left-hand corner.
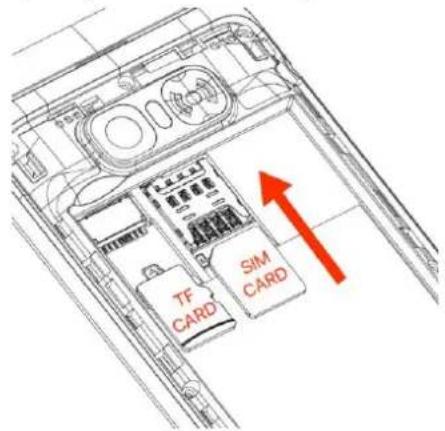
Please note: This phone supports a micro sized SIM card. If you do not have a micro sized SIM card, please contact your SIM card provider as they will be able to supply one for you.
-
If you wish to insert an optional TF card for extra phone storage, insert it into the TF card slot, ensure the gold plates are facing downwards when inserting it into the phone.
-
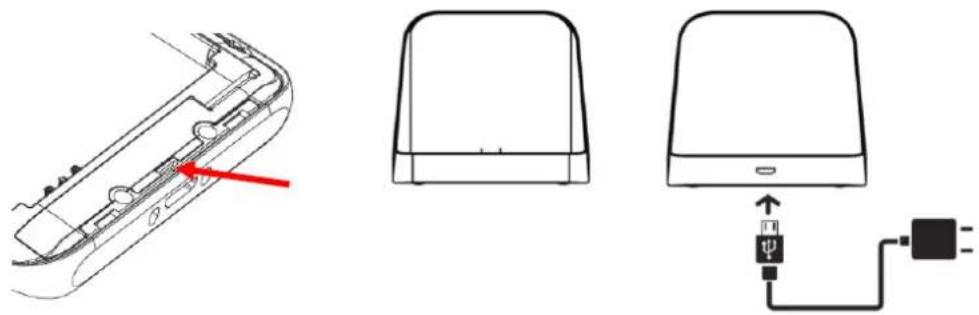
Re-insert the battery back into the phone. Ensuring the gold plates on the battery and the phone are aligned
-
Replace the back cover, push down on the outer edges until it has clicked into place.
- Place the phone on charge using the charging cradle provided or insert the Micro USB into the phones charging port located on the base of the phone.
natural_image
Technical diagram showing a device's internal structure and connected to a power outlet (no text or symbols present)Please note: Charge the phone for at least 3 hours prior to use. To ensure long battery life.
Turning the phone on for the first time
After charging, turn the phone on by holding down the power button.
The phone will begin to boot, once finished booting, your phone is ready to be used. If your sim card is inserted and is active the time and date will be automatically set based on your location.
Powering the Device on and off
- To power the device on hold down the power key for 3 seconds.
- To turn the phone off, hold the power button down for 3 seconds, the phone will then prompt you to power off and to confirm to power off.
Quick User Guide
Answer a call
- To answer an incoming call, flip open the phone and the call will be answered. You can turn off the "Flip to answer" function in the Settings menu. If this is turned off, to answer a call press the green "Answer" key.
End a call
- To end a call, close the flip phone or press the red hang up key.
Silence an incoming call
- To silence an incoming call, press the SOS button once on the back of the phone
Quick adjust Ringtone volume
- While in home screen, press the up and/or down navigation key to adjust the ringtone volume up or down
Dialling and using keypad numbers (123 mode)
-
To dial a phone number, press the numbers on the keypad then press the green "Answer" key to dial.
-
To type numbers while creating a contact or writing a message, press the "Hash" # key until "123" mode appears.
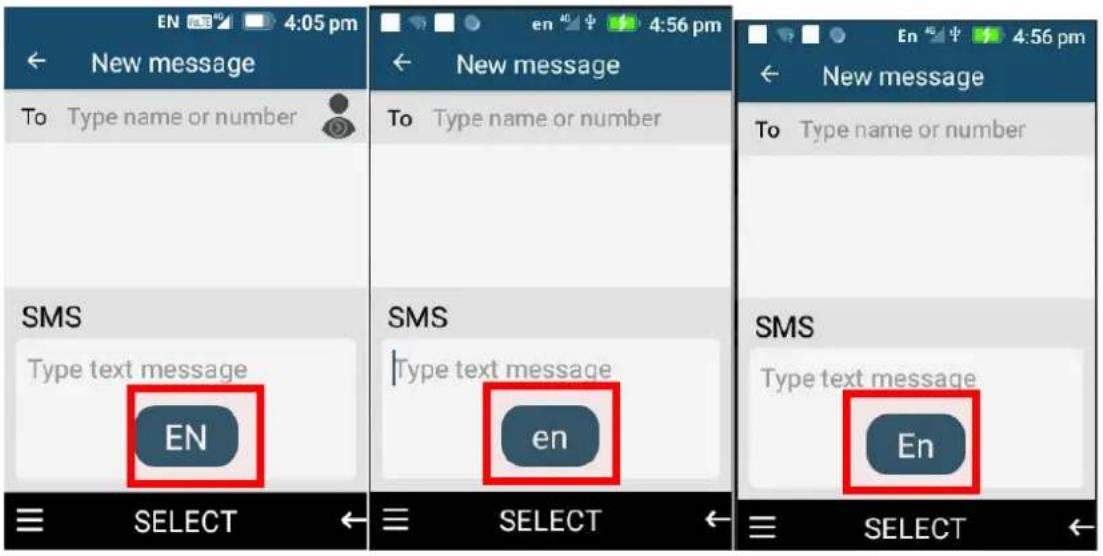
Typing Letters (en/En/EN/EnKT9 modes)
-
To type in letters, press the "Hash" # key to choose between En, en, EN, EnKT9.
-
EnKT9 is the predictive text mode (See predictive text below).
-
En/EN/en are standard text modes. E.g., When in this mode to type the letter "c", press the "2 ABC" key 3 times until the letter "c" comes up.
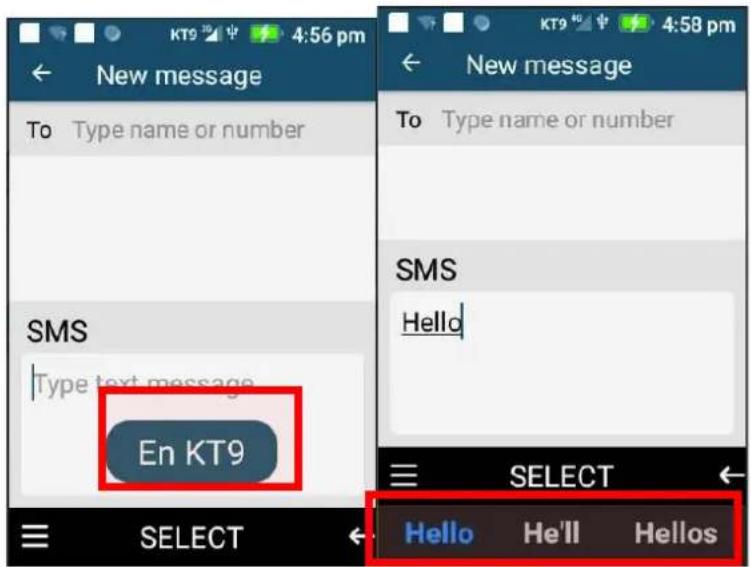
Predictive text (EnKT9 mode)
Predictive text is a smart way to type messages. This feature can make typing easier by suggesting words based on what you are typing.
- Use the keypad to type the word without pressing the same key multiple times. E.g., To type "hello", press the "4, 3, 5, 5, 6" keys once and the word "hello" will show up for selection. It also suggests other word options like what has been typed in.
- To choose another candidate word, use the cursor keys to highlight it and then press the "OK" key or the "Space" 0 key to select the word.
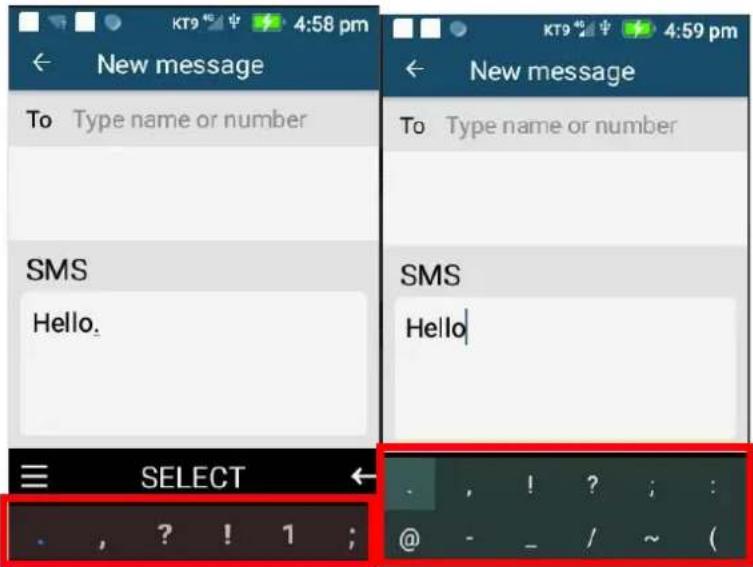
Symbols
To add symbols like dot, comma, question mark, etc., press the “Star” * key and scroll using the cursor keys to choose the symbol you wish to use. Confirm your selection with the “OK” Key.
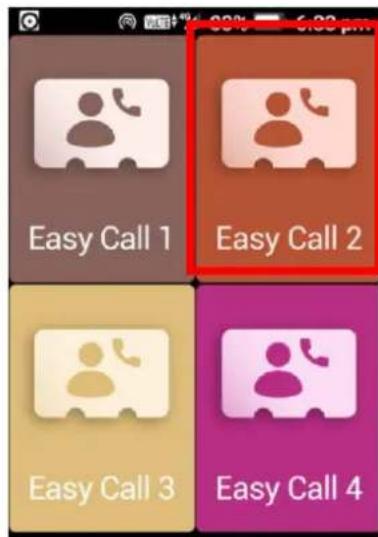
Easy Call
You can have 4 Easy Call contacts to make it easier to contact your most common or regular contacts.
-
To set up an Easy Call contact, while on the homepage press the left navigation key. Using the navigation key highlight an Easy Call position and press the ok key to open the contact list, highlight the contact you want to choose and press the ok key to add.
-
To delete an Easy Call contact, highlight the Easy Call contact, press and hold down the ok key and then select delete.
-
To dial an Easy Call contact, highlight the contact using the navigation keys and press the ok key once, the phone will then attempt to dial that contact.
Contacts
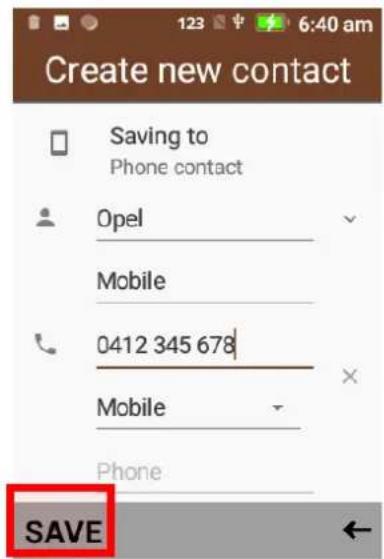
Adding a contact
- To add a contact press ok on contacts, then press the left selection key and press ok on New Contact.
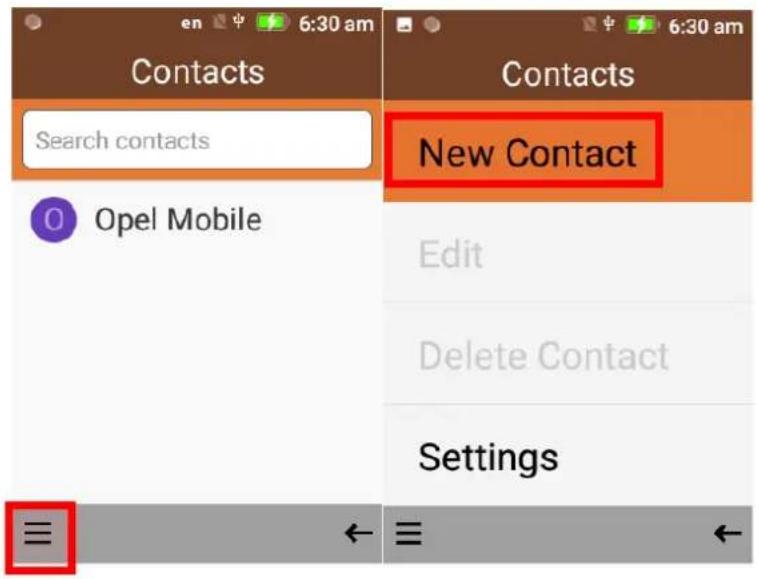
- Enter in the contacts details. Then press the left selection key to save this contact.
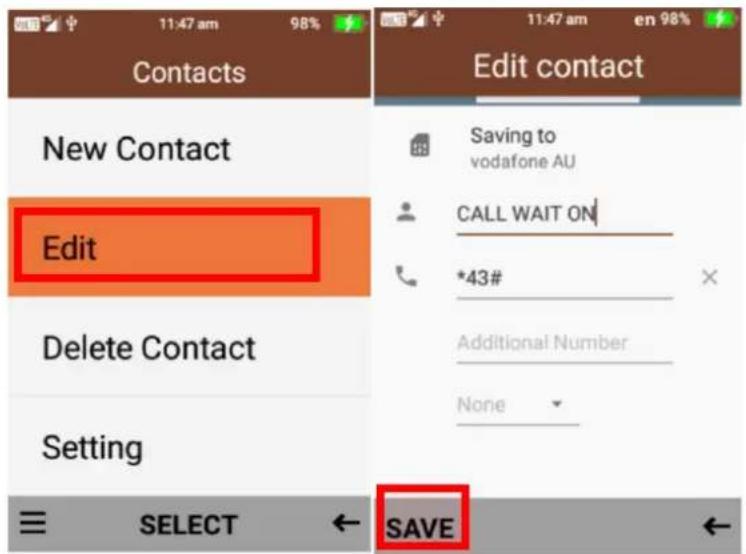
Edit a contact
- To edit a contact, highlight the contact using the navigation keys. Then click on the menu using the left selection key.
- Scroll down and select edit, you will then be able to add or amend any information on that contact. Once complete press ok on save.
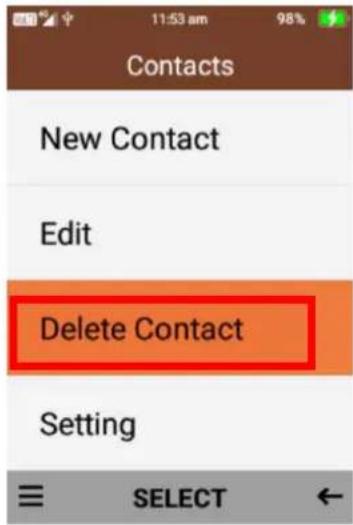
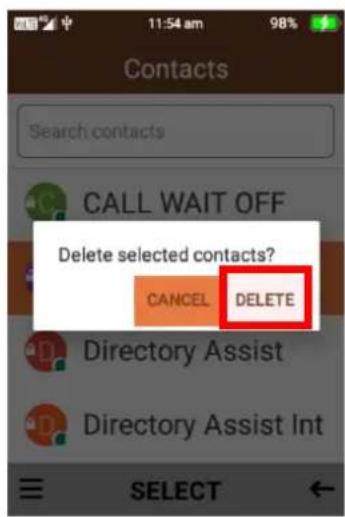
Delete a contact
- To delete a contact, highlight the contact you wish to delete using the navigation keys. Then click on the menu using the left selection key and select delete contact. Then confirm deletion
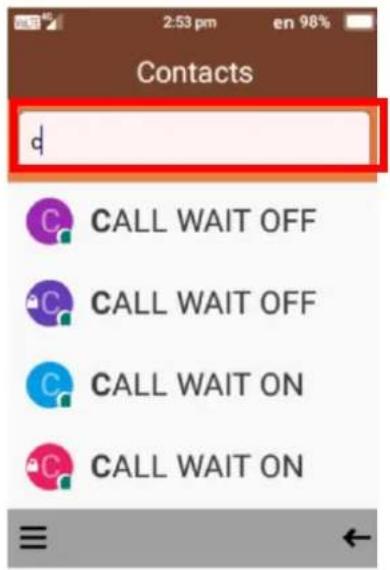
Searching contacts
- To search for a contact, highlight the search box using the navigation keys then type in the name of the contact you wish to find. It will then show you contacts with that name.
Calling and Messaging Contacts
- To call or message a contact in the contacts folder. Press select using the ok key on the contact you wish to call or message
- To call the contact press the down navigation key then the left navigation key and it will begin to ring that contact.
- To message the contact, press the right navigation key and it will open the message app for you to type and send a message
Contact settings
To access contact settings, click the menu using the left selection key then press ok on settings. Within settings you can adjust Default account for new contacts, change contacts to display, import contacts, export contacts and adjust call settings
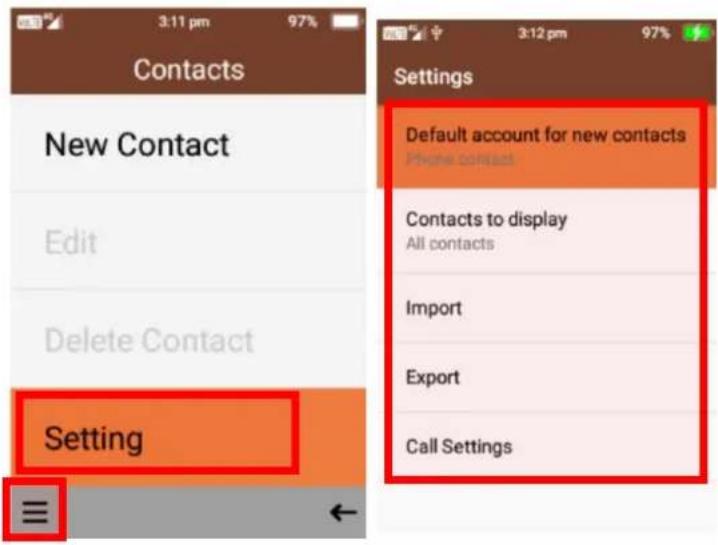
Default account for new contacts
- You can change the location of where to save new contacts. Either on the phone or on your sim.

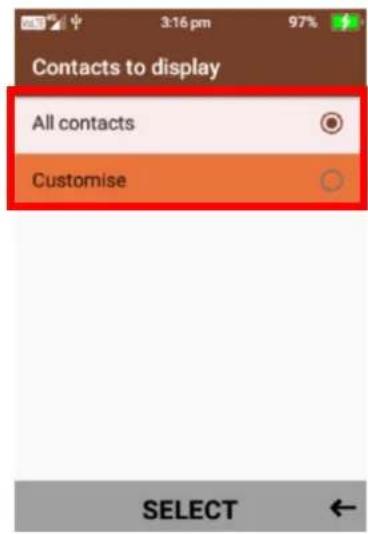
Contacts to display
- You can adjust to view all contacts or customise on what contacts to display.
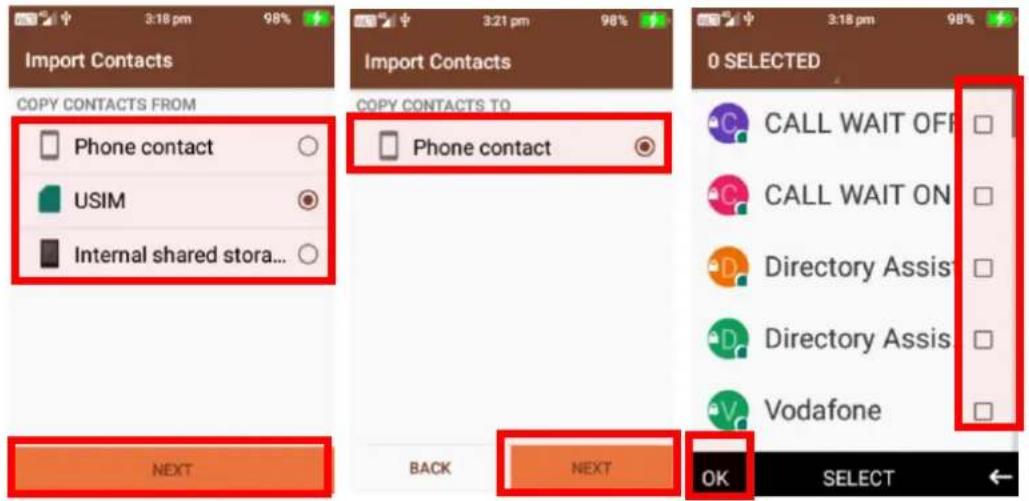
Import Contacts
- Within import, you can import contacts from your sim card or TF card. Choose where you want to import your contacts from, then click ok on next and choose where to copy them to,
then select ok on the contacts you wish to import and then press the left selection key to complete.
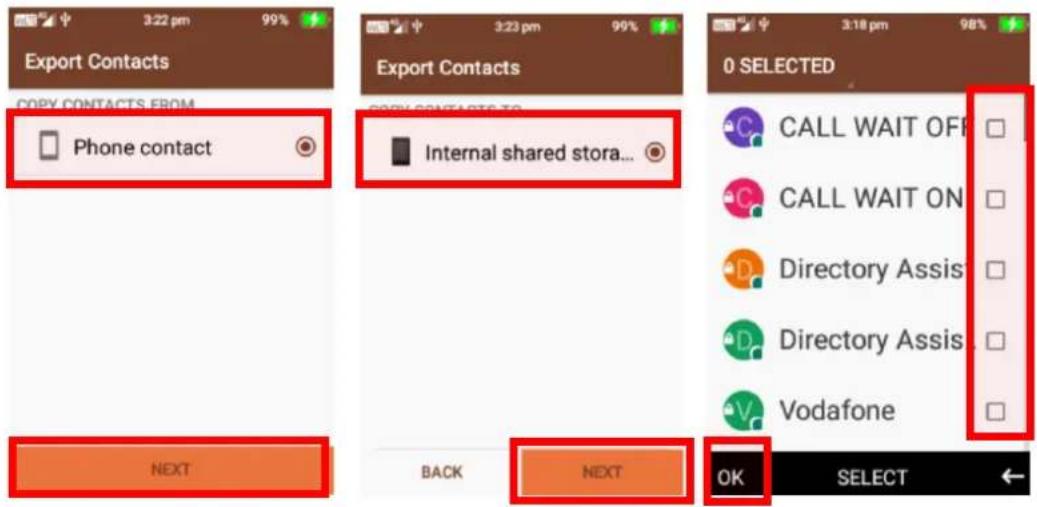
Export Contacts
- Within Export, you can export your phones contacts onto your sim card or TF card. Choose where you want to export from and then press ok on next. Then choose where you want to copy the contacts to and then press ok on next. Now select which contacts you wish to copy using the ok key and then press the left selection key to complete.
Call Settings
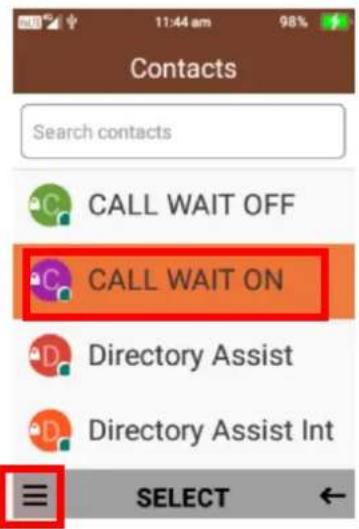
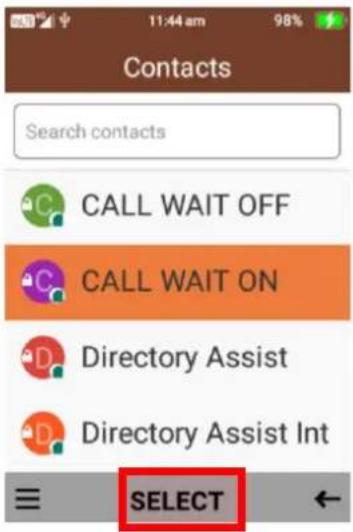
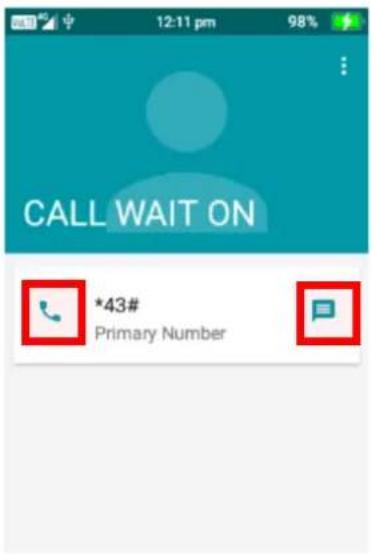
Within call settings you can adjust call forwarding, call barring, caller ID, call waiting and call blocking settings.
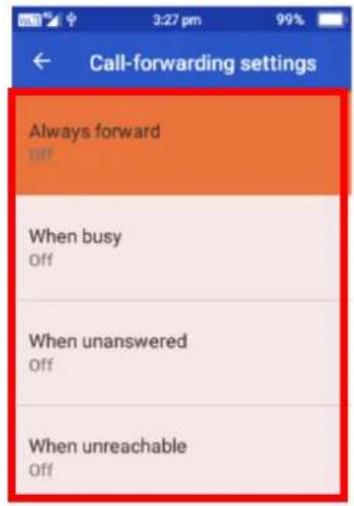
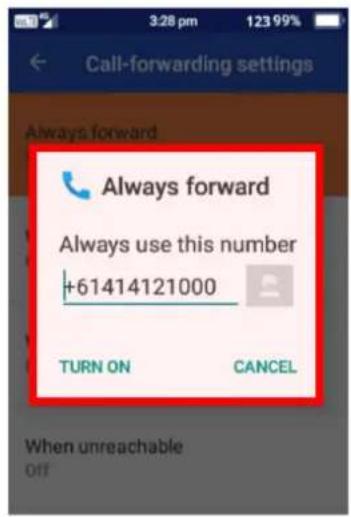
Call Forwarding
- Within Call Forwarding you can select to always forward calls, forward when busy, forward when unanswered and forward when unreachable. Select the options you wish to use and turn them on. You can then choose which number you wish callers to be forwarded to. The default number will be your sim providers voicemail service.
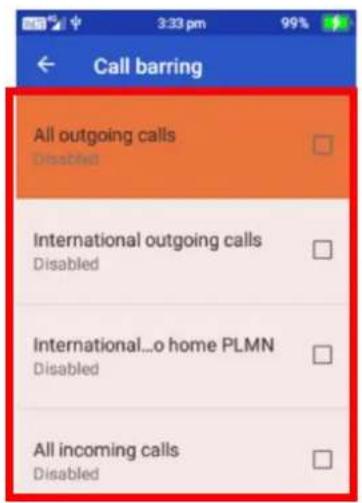
Call Barring
- Within call barring you can select to bar certain calls such as all outgoing calls, international outgoing calls, International outgoing home calls, all incoming calls, incoming calls while roaming and cancel all options. Select the options you wish to use.
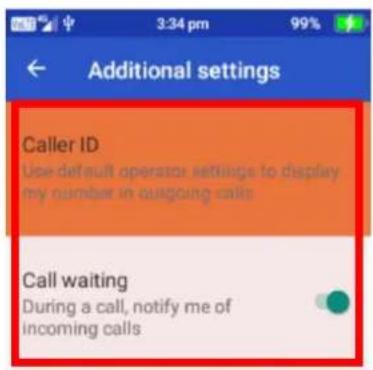
Additional settings
- Within additional settings you can adjust the caller ID settings and call waiting options. Press ok on them to adjust the settings.
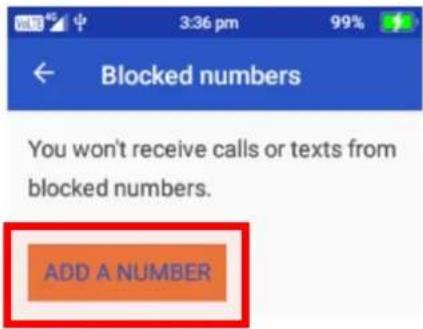
Call Blocking
- Under call blocking, you can block certain numbers from being able to call or text message you. Add the number you wish to block by pressing ok on add a number and by typing in the phone number.
Messages
To access messages, press the ok key on messages.
Here you can view previous conversations and messages or create new messages to message your friends and family. Messages from the same contact or phone number will be grouped into one thread, so it is easy for you to follow conversations.
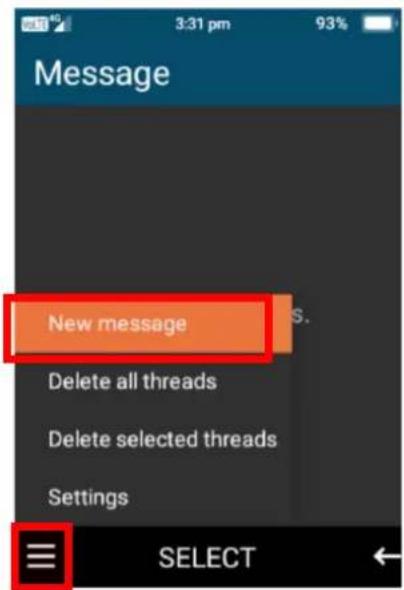
Creating a new message
- When messages are open, click on the left selection button to open the menu.
- Then click on new message using the ok button
- Type in the name or phone number of the person you wish to message using the keypad functions.

- Then scroll down to type your message using the keypad
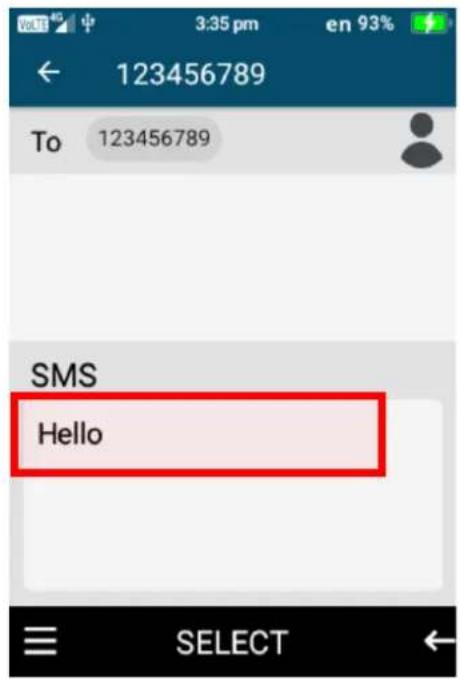
- To send the SMS, click menu using the left selection key and click ok on Send.
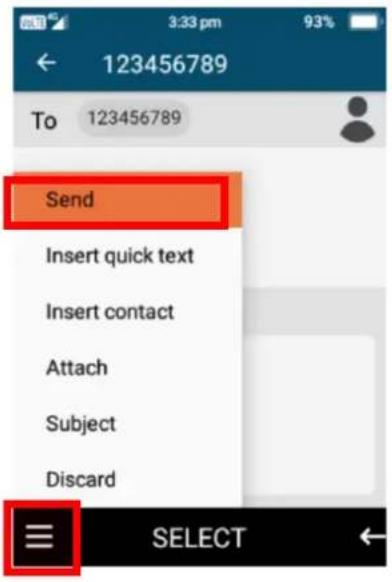
SMS/MMS Message options
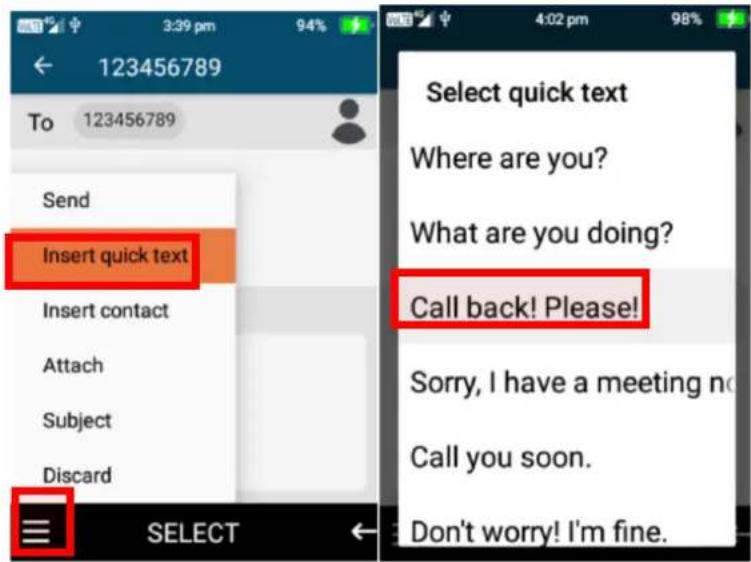
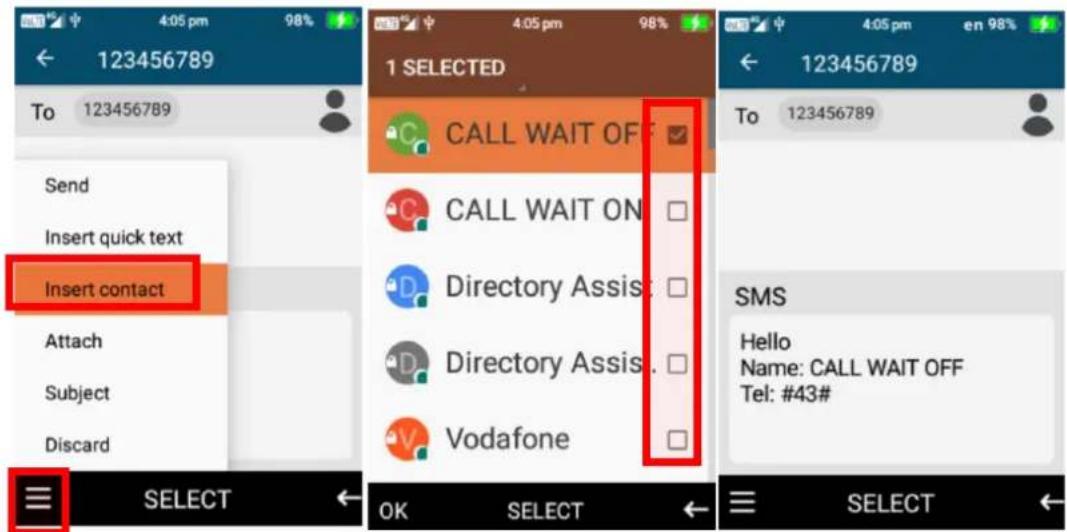
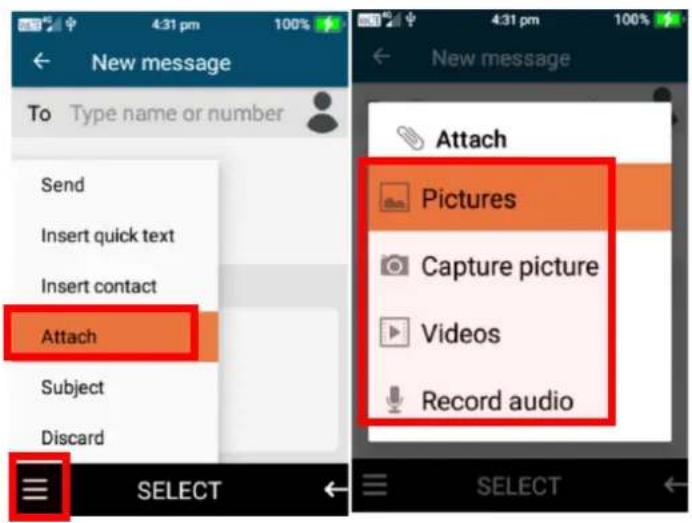
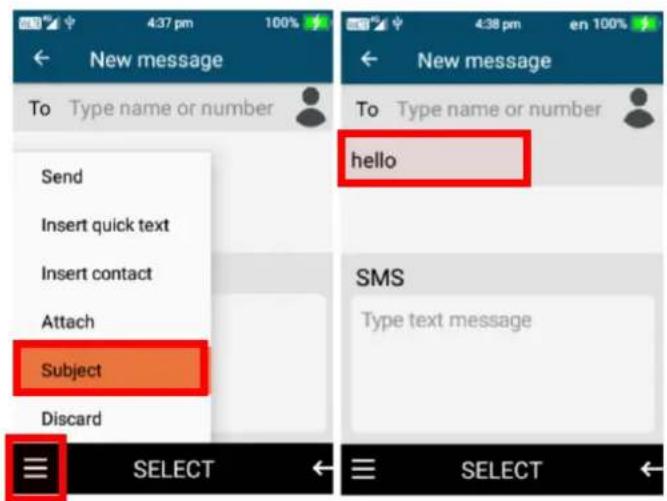
When creating a message there are other options you can choose to send to your contact/s such as: insert quick text, insert contact, attach a picture, video or audio, add a subject or discard this message.
- Insert quick text - here you can choose quick text comments by pressing the ok key on an option you wish to send.
- Insert contact – by selecting insert contact you can send the name and phone number of one of your contacts via a text message to another contact. Press ok on the selected contacts you wish to share and press the left selection key on ok.
- Attach – here you can attach pictures, capture a picture/video to attach, video or record audio. Press ok on attach and press ok to choose the picture/video or capture/record the picture, video or audio.
- Subject – here you can add a subject to your message, by typing your message subject using the keypad.
- Discard – Selecting discard will delete the message you are creating and go back to the message folder.
View and reply to messages
- To view a new message or a previous conversation press the ok key on the conversation you wish to view. Once opened you can scroll up and down the message conversation to read or view images that have been sent to you.
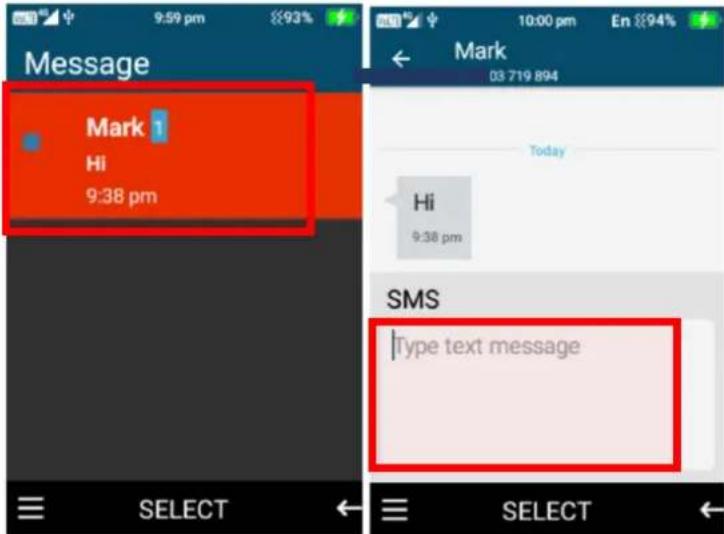
- To reply to a message, scroll down to the "type text message" then type the message or use the message menu options to attach pictures, videos or more.
Once complete select the menu option and click ok on send.
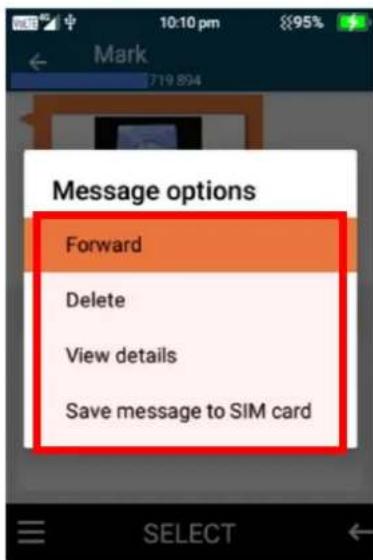
Save, delete, and forward images, video's, audio and text messages
- To save, delete or forward an image, video, audio or text message that has been sent to you. Open the message that contains the item you wish to save and scroll to that item, so it is highlighted.

- Once highlighted long press ok on the item, then choose whether you wish to forward, delete, or save the attachment.
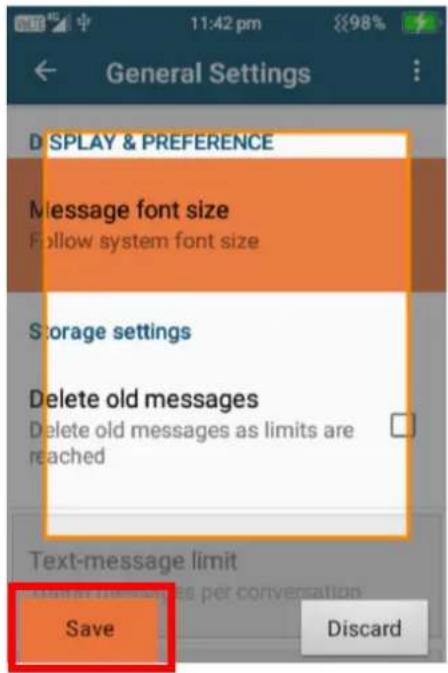
Message settings
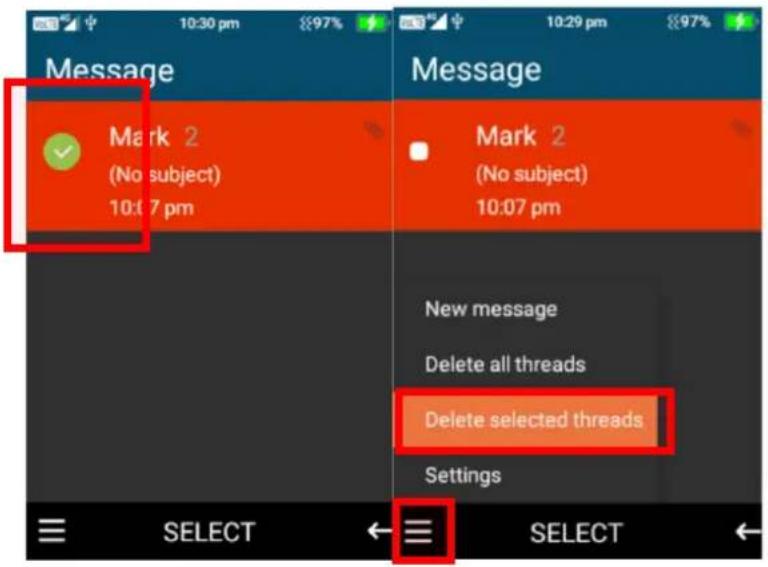
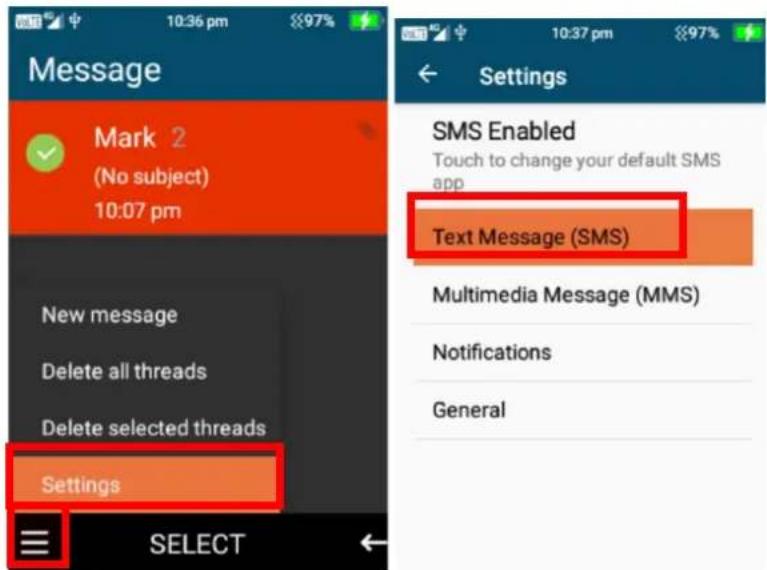
To open message settings, while in the main interface of messages, press the left selection key to open the message settings menu.
You can delete all threads, delete selected threads, adjust the SMS settings, amend the MMS settings, notification options and message font size options.
- Delete all threads – to delete all messages highlight this option and confirm to delete using the ok key.
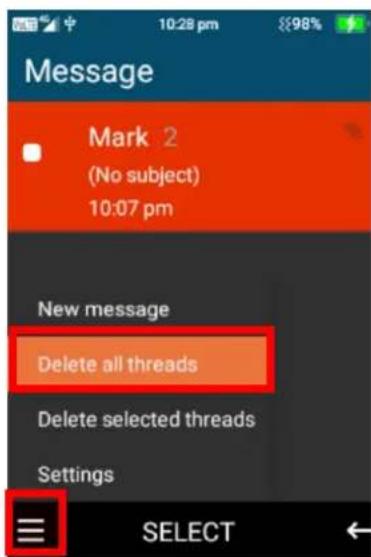
- Delete selected threads – Long press the ok key on the message conversation you want to delete until the tick icon appears. Then click on the menu and select delete selected threads and confirm to delete.
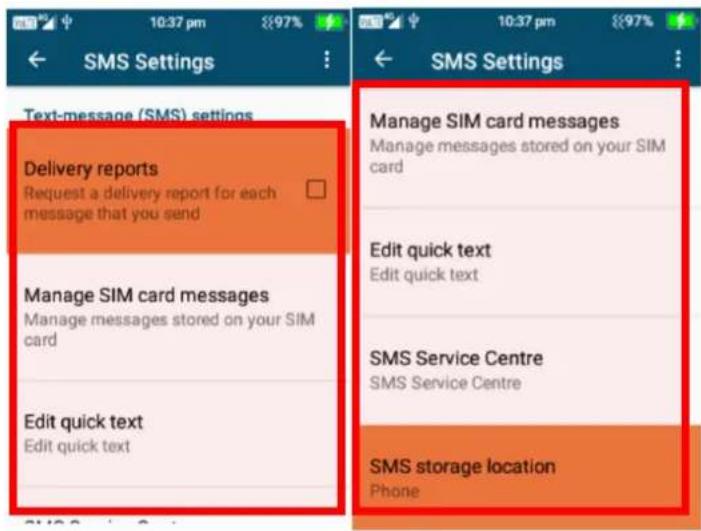
- Settings – Text Message (SMS) – Click ok on settings then text message (SMS), here you can turn on and request a delivery report for each message you send, manage your SIM card messages, edit, and add quick text message options (to add just type in the quick message you want to add and select ok on add), and change the SMS storage location.
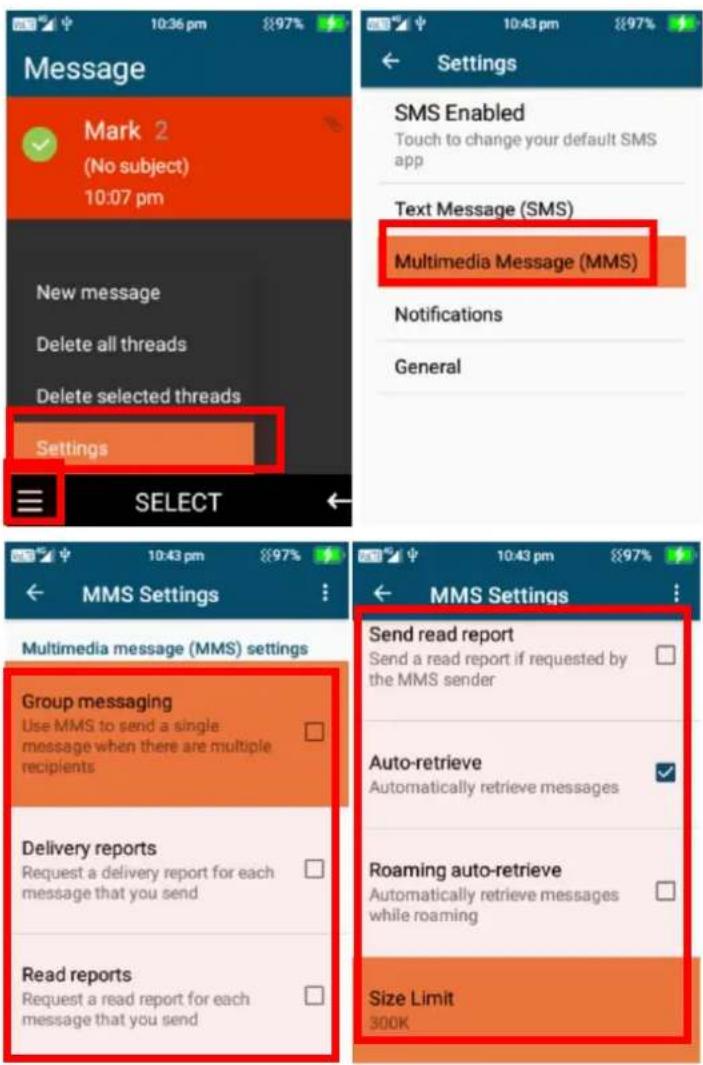
- Settings – Multimedia Message (MMS) – Click ok on settings then Multimedia Message (MMS), here you can enable group messaging, request delivery reports for each message you send, request a read report, send a read report, Turn Auto-retrieve messages on or off, turn roaming auto-retrieve messages on or off and adjust the size limit of MMS messages.
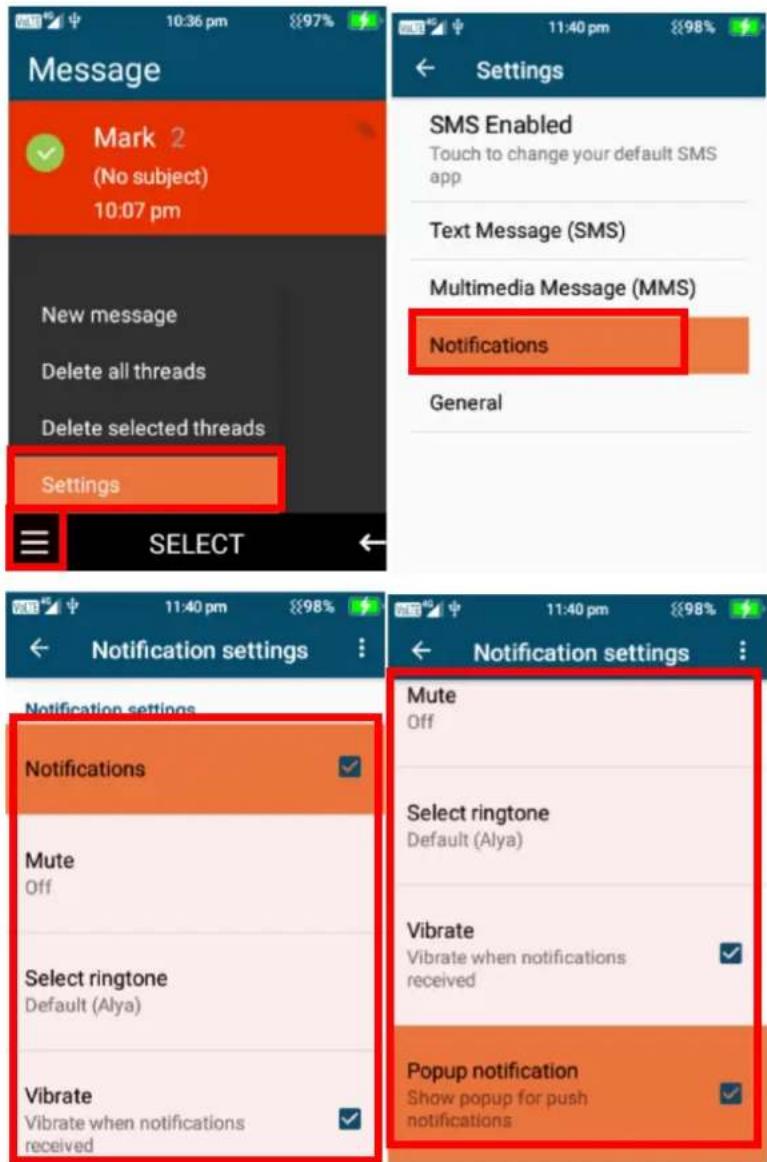
- Settings – Notification settings – here you can turn Notifications on or off, Mute notifications, select ringtone for message notifications, turn vibrate on or off, turn popup notification on or off.
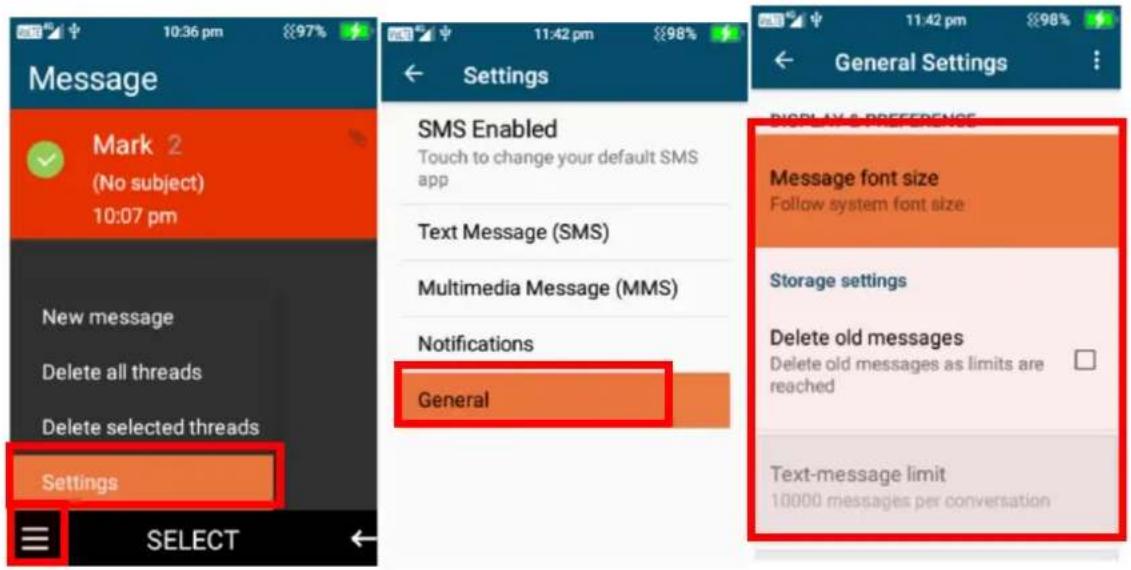
- Settings – General settings – here you can change message font size and delete old messages when size limits are reached.
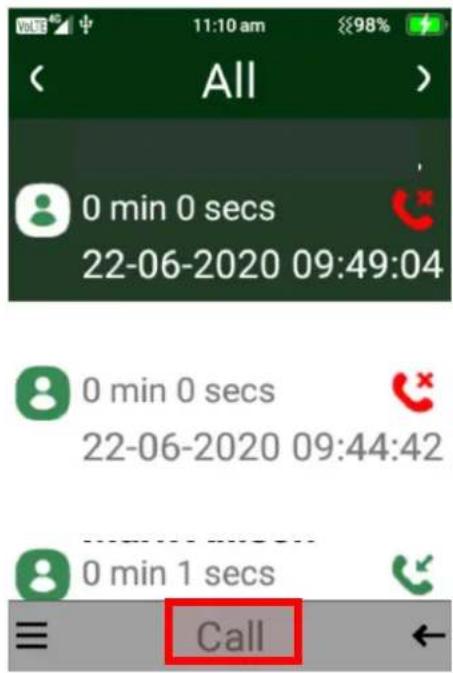
Call logs
To access call logs, scroll right using the navigation keys and press ok on Call logs.
Here you can view all your previous call logs.
Call from call logs
- To call from call logs highlight the person you want to call and press the green call key or press the ok button on call.
Call log menu options
To access the call menu options, click the left selection key on menu. Here you will be able to select to send a message, add as a new contact, add to existing contact, Delete, Batch delete and delete all call logs.
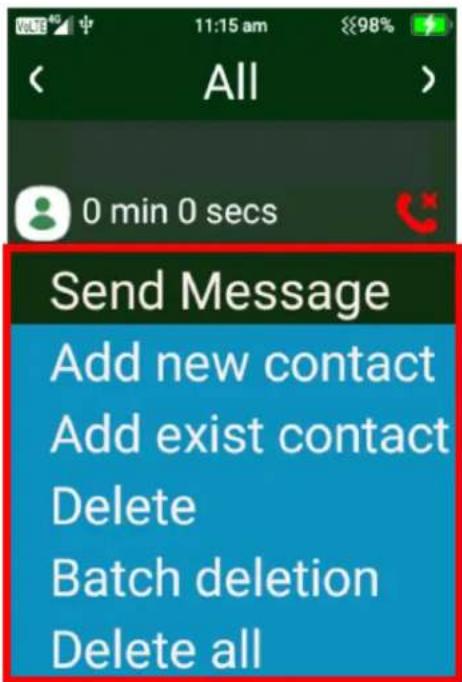
-
Send Message – Press ok on send message, this will take you to type a new message. Follow the same instructions as messages above
-
Add new contact – Pressing ok on add new contact will take you to add this number as a new contact. Follow the same instructions as above in contacts.
- Add to existing contact – Pressing ok on this will take you to the contact's page. Select the contact you wish to save the number to by highlighting that contact and pressing ok.
- Delete – Highlight the call log you want to delete, then press ok on delete and confirm deletion.
- Batch Deletion – Click ok on batch deletion then choose which call logs you wish to delete then press delete using the ok key.
- Delete all – Click ok on delete all to delete all call logs.
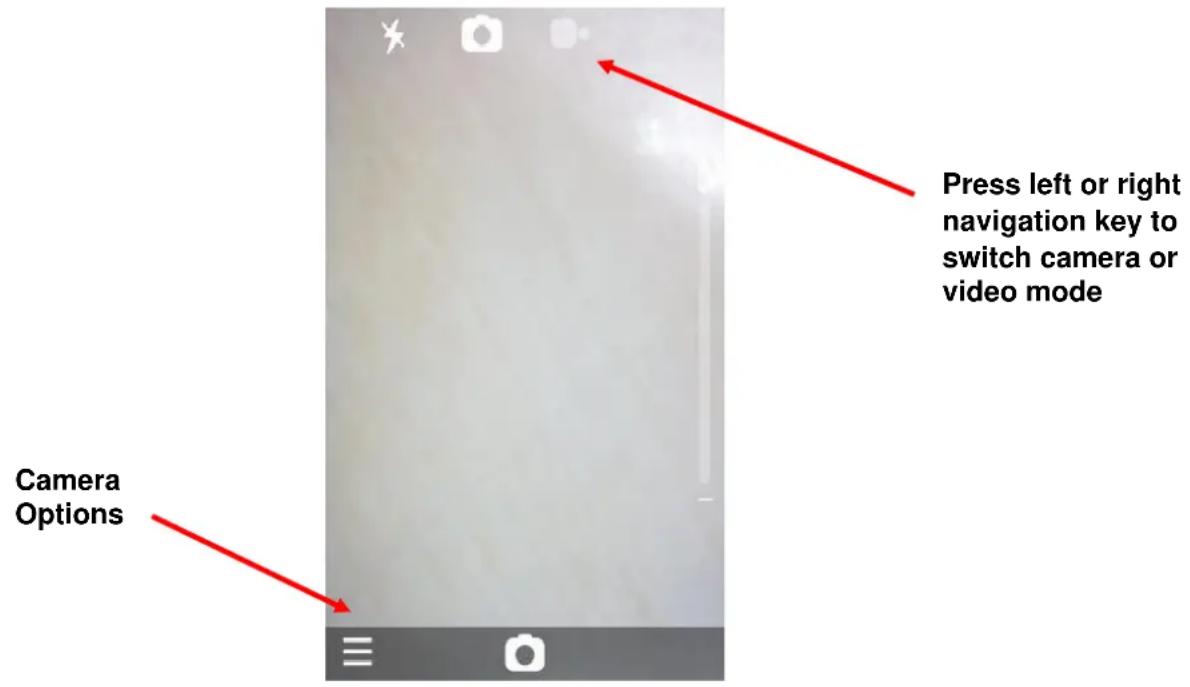
Camera
To access the camera, scroll across using the navigation key and press ok on the camera icon. Within the camera you can take still shot photos and videos. The phone has 2 cameras, one located on the back of the phone, and one located on the inside of the phone above the LCD screen.
- To take a photo, press the ok button to take a still shot photo
- To take a video, press the right selection key to change to video mode, then press the ok button to begin recording a video, to then stop recording press the ok button again.
- To access the cameras settings, click on the left selection key. Here you will be able to turn the flash on/off or auto, choose self-timer settings, go to the gallery, change where to save images and videos, change camera rear or front camera.
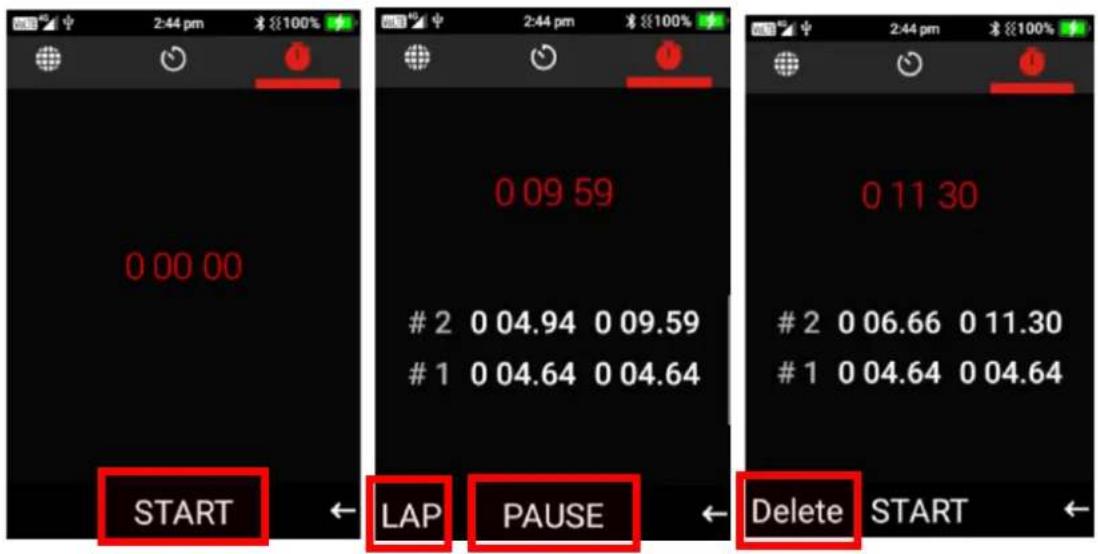
Clock
To access the clock function, scroll across using the left selection key and press ok on clock. In the clock app you can set alarms, view world clock, set timer and use the stopwatch.
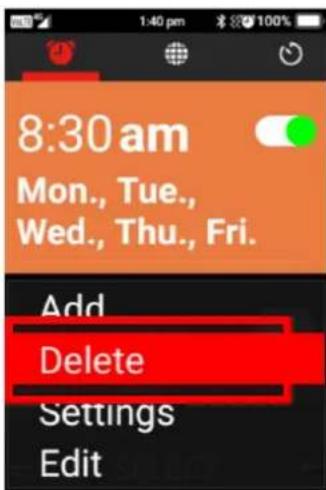
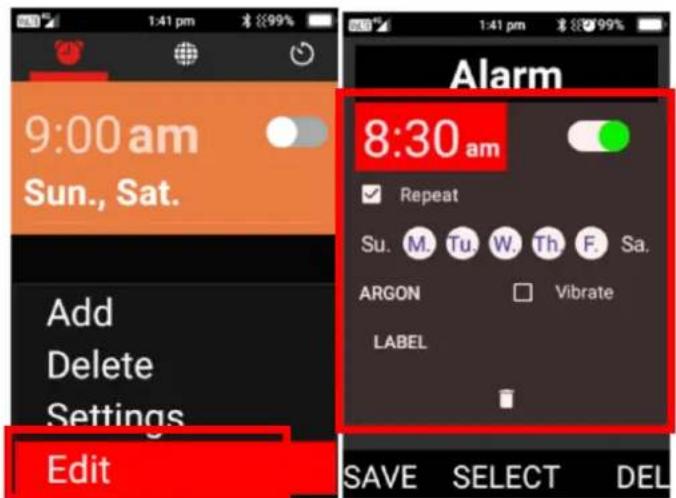
Alarm Clock
- Scroll across to alarm clock, here you can set alarms to wake you in the morning or for other events or reminders. You can select ok on a current alarm selection to turn it on.
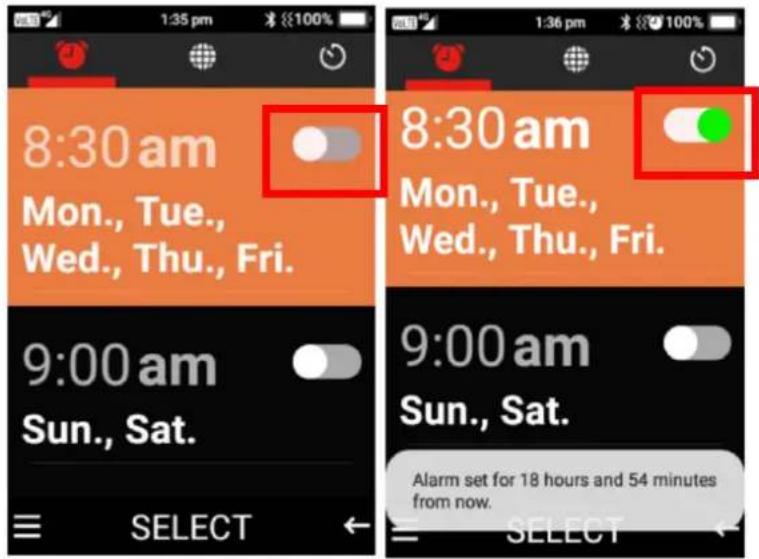
- Press the left selection key to add, delete, edit or change the alarm settings.

- Adding a new alarm – Select ok on add, then click ok on the time to adjust the time, using the down navigation key scroll down, press the ok key to turn the alarm on or off, press ok on
repeat if you want to repeat it on specific days, change alarm tone, turn vibrate on or off or add a label. Once complete click save using the left selection key.

- To delete an alarm, highlight the alarm you want to delete then press the left selection key and press ok on delete and confirm deletion.
- To edit an existing alarm, highlight the alarm you want to edit then press the left selection key on edit, then edit and press ok on save once complete.
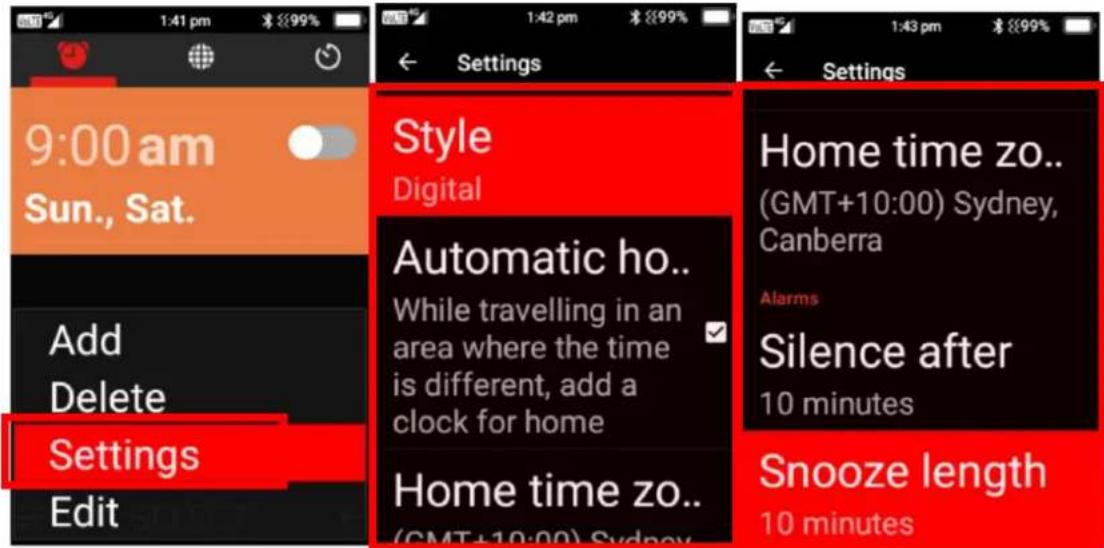
- Alarm Settings – within alarm settings you can adjust the clock style, automatic home clock options, home time zone options, silence alarms after a period of time and snooze time length.
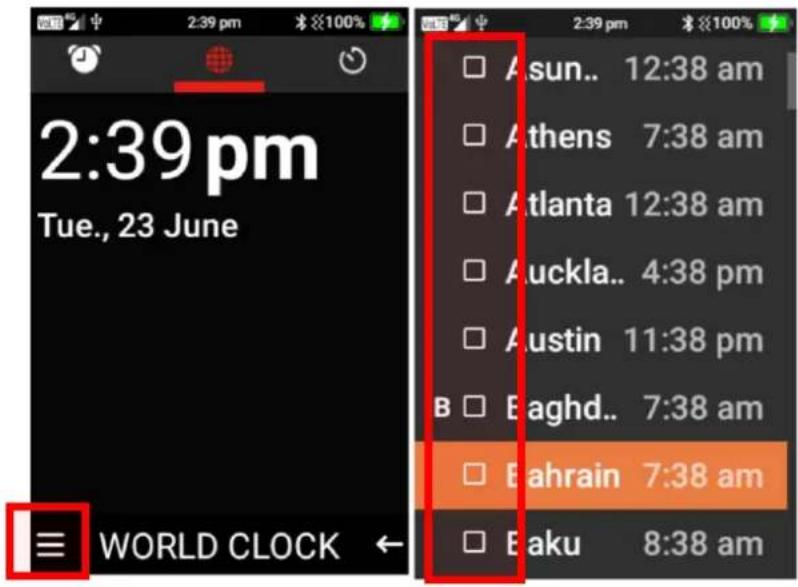
World Clock
- To add cities to your world clock list, press the left selection key, scroll down using the navigation keys until you find the cities you wish to include in your world clock, then press the ok key on those cities to add them
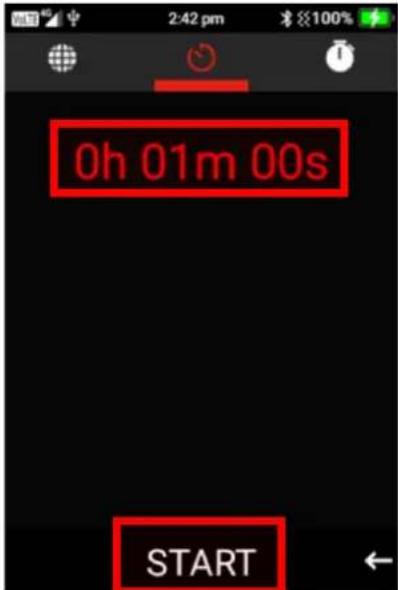
Timer
- Scroll across to the timer function, using the keypad number, type the time you wish to count down. For example, to do 1 Minute, type in 1, 0, 0. Then press ok on start to activate the timer, an alarm will sound once the time is up.
Stopwatch
- Press ok on start to begin the stopwatch. To add lap times, press the left selection key on lap. You can pause the timer and start again by pressing ok on pause then start button. To delete this timer, pause then select delete using the left selection key.
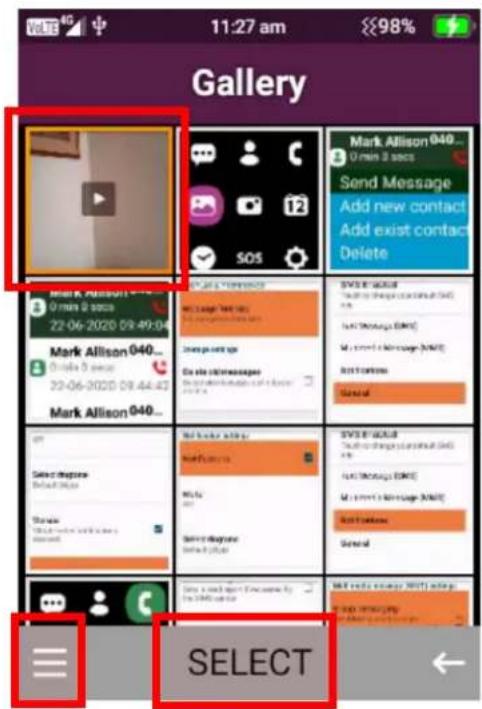
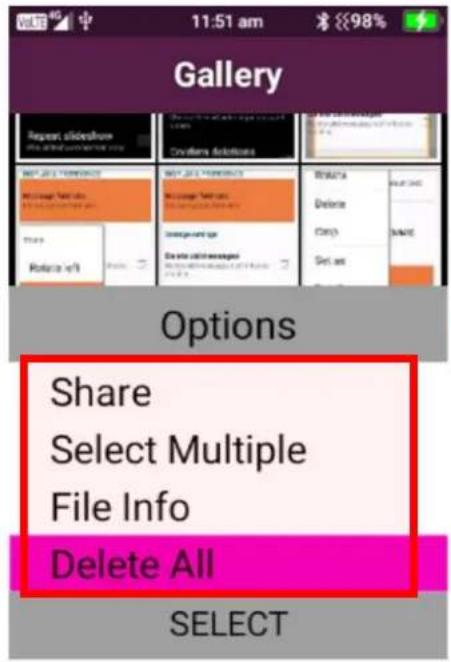
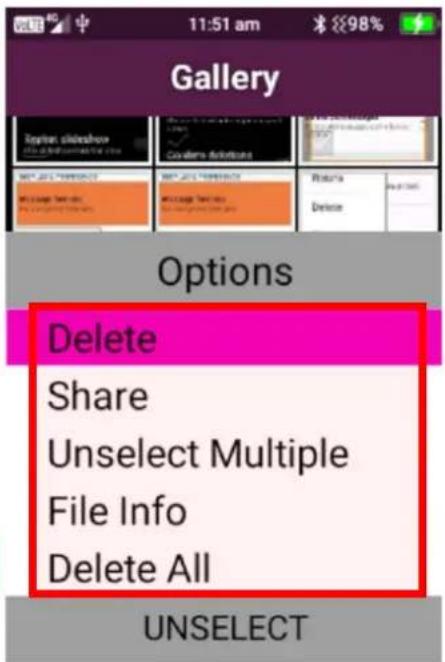
Gallery
To access your gallery, scroll right using the navigation keys and press ok on Gallery. Within the gallery you can view and share photos and videos.
- To view an image or video, scroll using the navigation keys until the image or video is highlighted. Then click ok to select.
-
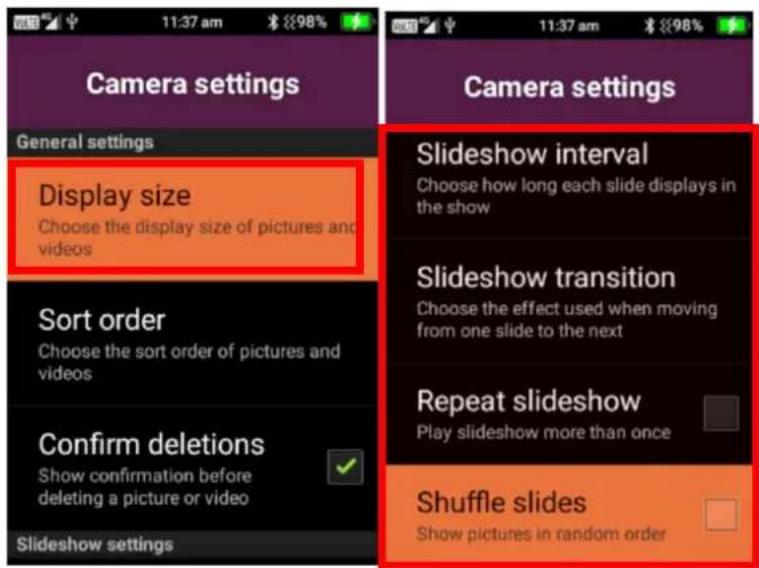
When the image is selected you can click the left selection key to open the menu to be able to share (Via MMS or Bluetooth), rotate, delete, crop, set as (Wallpaper), slideshow and settings.
-
Share – to share the image press ok on share and choose whether to share via message or Bluetooth. Sharing via messaging will bring up the messaging system to share this image with your contact. Sharing via Bluetooth will search for nearby Bluetooth devices to share the image with, connect to that device to share the image.
-
Rotate – to rotate an image, click ok on rotate and choose to rotate left or right using the ok key.
-
Crop – to crop an image, select ok on crop. Using the keypad, you can change the cropping's of the image. Number 2 will increase the top and bottom of the image, 8 will decrease the top and bottom of the image, 4 will increase the left and right side of the image and 6 will decrease the left and right side of the image. Once completed click ok on save.
- Set as – here you can select to set the image as a wallpaper or a contacts photo. Press ok on the option you wish to choose.
- Slideshow – Selecting slideshow will automatically begin to slideshow all your images and videos.
- Settings – Under settings you can adjust the display size of pictures and videos, Change the sort order of pictures, confirm deletion message, Slideshow interval settings, Slideshow transition options, repeat slideshow options and shuffle slideshow settings.
Gallery options – press the left selection key when the gallery is open to bring up the gallery options.
- Share – highlight an image then click ok on share to share the image via messages or Bluetooth
-
Select Multiple – press ok on select multiple to select multiple images/videos to share or delete
-
Delete all – this will delete all images and videos in gallery
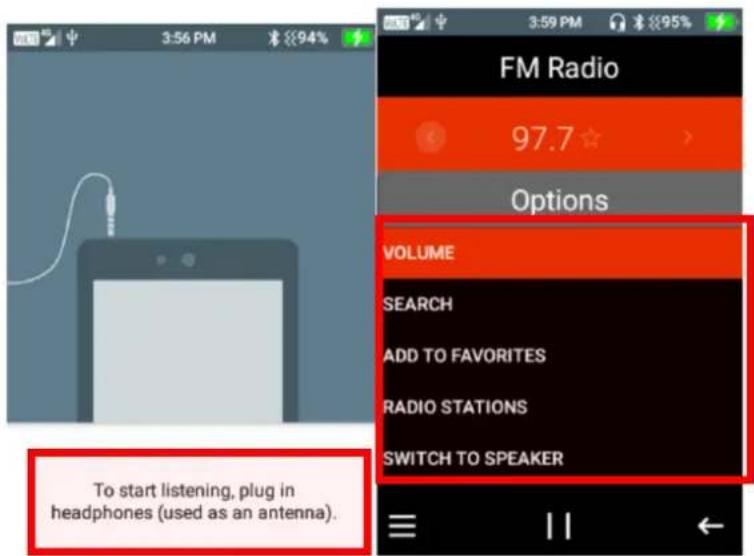
FM Radio
To use the FM Radio, ensure you insert headphones into the device, as these will act as the antenna. Please note: For a strong FM signal, it is best to be used in an outdoor environment.
- Press the menu icon using the left selection key, here you can adjust the volume, Search radio stations, add radio stations to favourites, scroll through radio stations and also switch to speaker mode.
Press ok on the function your wish to perform
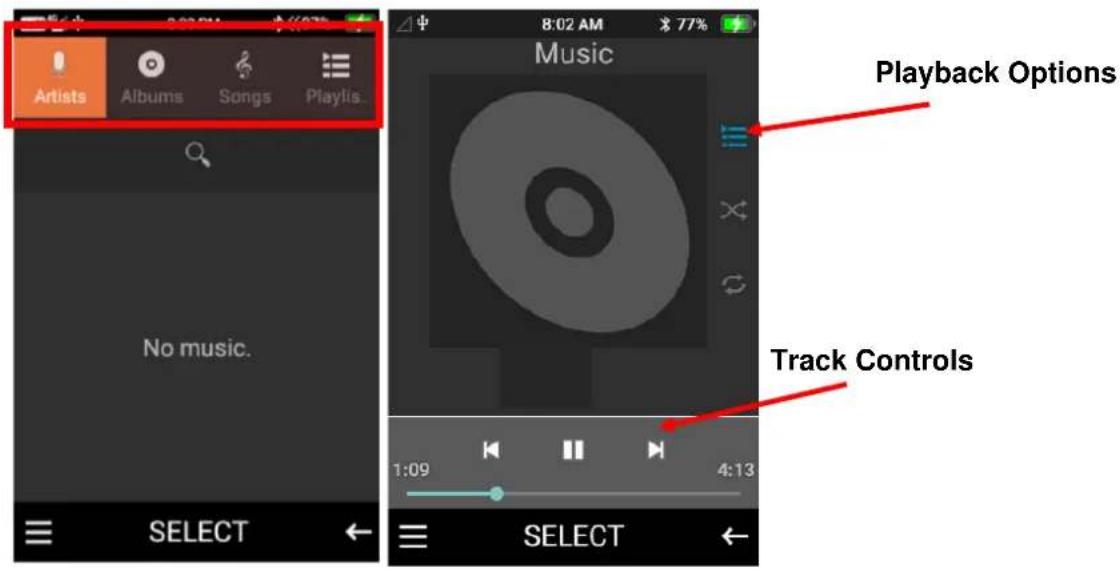
Music
Here you can play and store your own music. We suggest using a TF Card for storing music on the device. You can search your music by Artist, Album, or song. You are also able to create playlists.
Calendar
To access the calendar, scroll across using the navigation keys then press ok on the calendar icon. In calendar you can create events and/or reminders for specific dates.
- To create an event, click on the left selection key, then press ok on create. Type in the name, choose the start date, start time and whether to set an open alert for the event.
- Once complete click the left selection key to save.
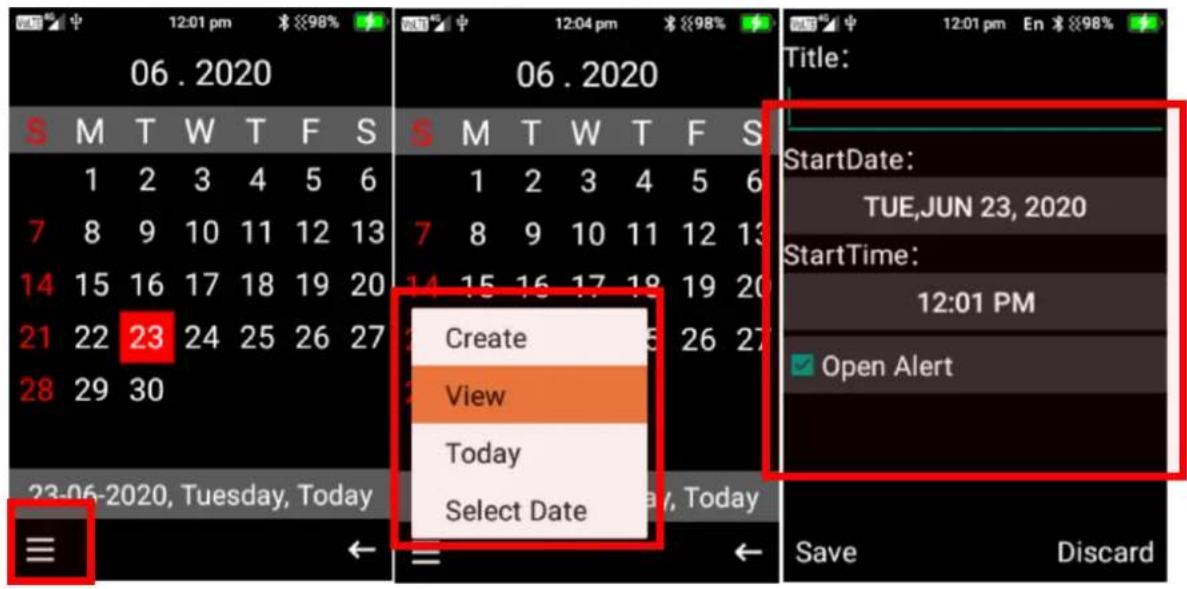
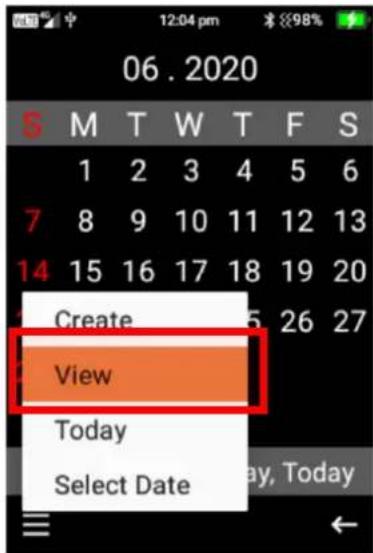
- Within the calendar menu you are also able to view events on the day that is highlighted, go to today's date and select a date you wish to view.
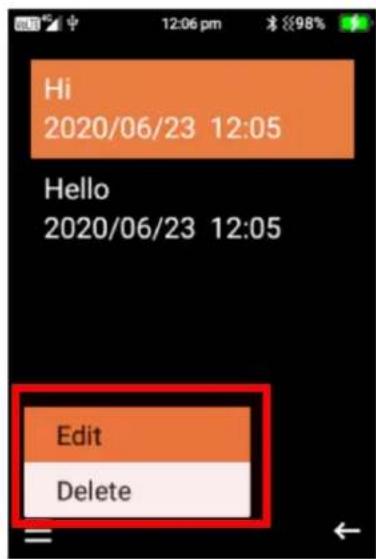
- To edit or delete an event that has been created. Click ok on the date of the event, then press the left selection key and select edit or delete on that event.
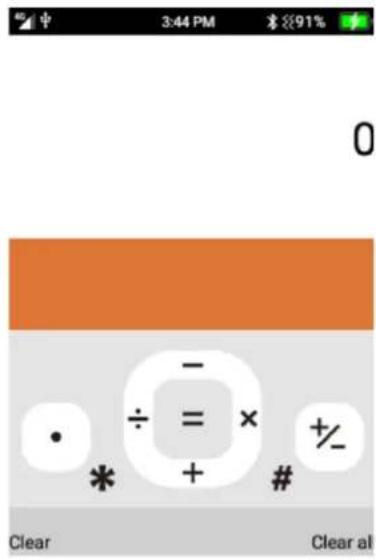
Calculator
This is just like any normal calculator.
Press the numbers on the keypad and use the Left/Right/Up/Down and ok cursor buttons for the calculations. The star button is a decimal point, and the hash key is the +/- selection.
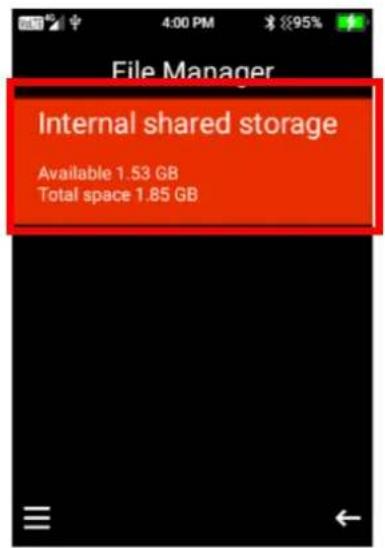
File Manager
Within the file manager, you can view all files and folders that are stored on your device.
Press ok on file manager and scroll through using the navigation keys to select folders to view contacts in each folder.
SOS
The SOS feature is designed for people who may need the function to easily contact their family or close friends if they are ever in need of help.
When the SOS is activated, it will send a text message to all your SOS contacts that you need help. The text message will also contain your current location (please note the phone requires a GPS signal to be able to send your location. In some areas the phone may not be able to pick up a GPS signal. Please ensure you have mobile data settings turned on for this feature to work). After it sends out the text messages it will then attempt to ring your SOS contacts until someone answers the call.
To activate the SOS feature, tap the SOS button on the back of the phone 3 times until you hear the SOS feature activate.
If you want to cancel or end the SOS feature, press the red end call key twice.
The SOS feature also has a Fall Detector. When the Fall Detector is turned on it will detect if the person with the device has had a sudden fall. If it detects they have fallen quickly, it will automatically set off the SOS alert and begin to contact and message the people selected as their SOS contacts.
How to setup the SOS function
- Enable the SOS feature by pressing ok on Enable SOS, when the toggle is green it means this feature is turned on. If you wish to use the fall detection feature, click ok on this function to turn it on.
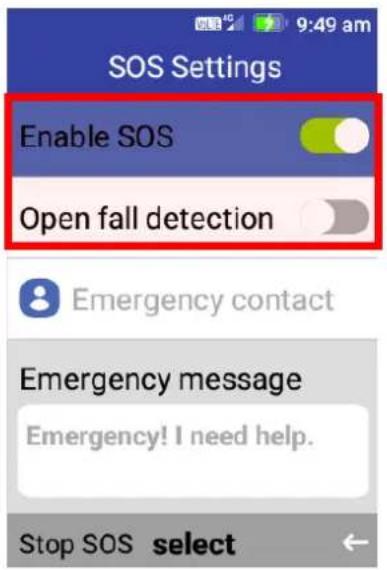
- Scroll down to emergency contact and press ok. You can add up to 5 SOS contacts. Press ok on an empty contact spot and type in their phone number or scroll across to the person's icon to add someone that is saved in your contacts list. Once complete scroll down to ok and press the ok key.
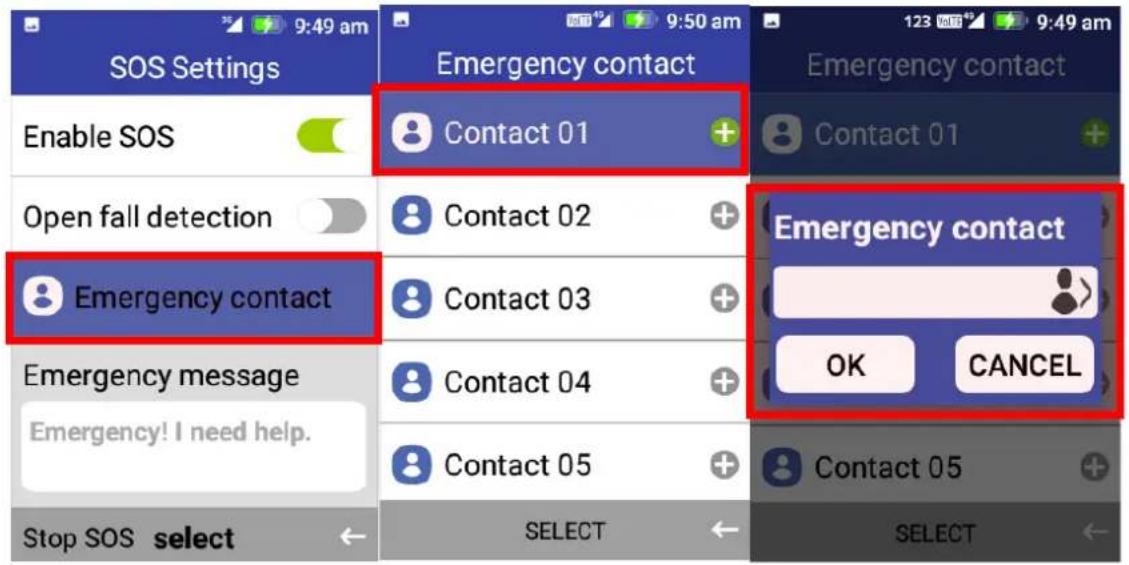
- Scroll down to emergency message – if you wish to amend this message you can press the right selection key to delete the current message, then use the keypad to type in your new message. Once complete press the end call key to exit.

PLEASE NOTE:
This device is not intended to be a life saving device; If you are in a life-threatening medical emergency, we recommend you call emergency 000 immediately.
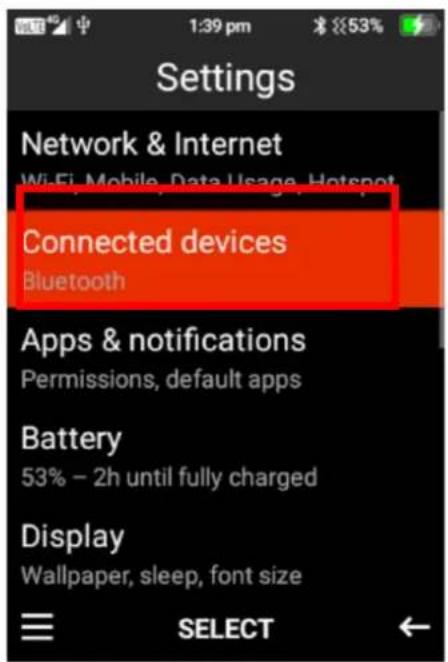
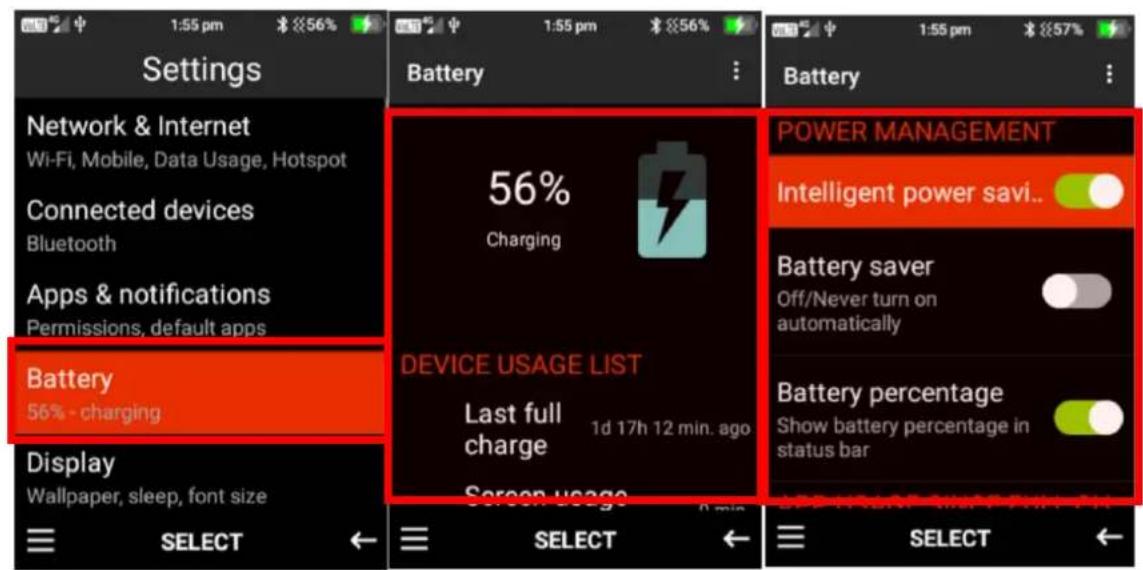
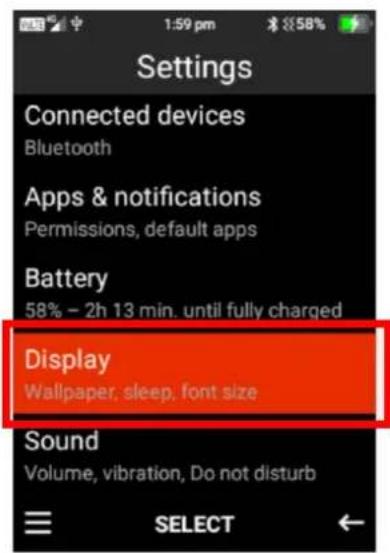
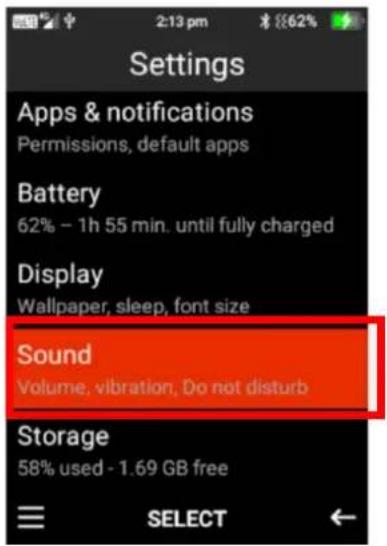
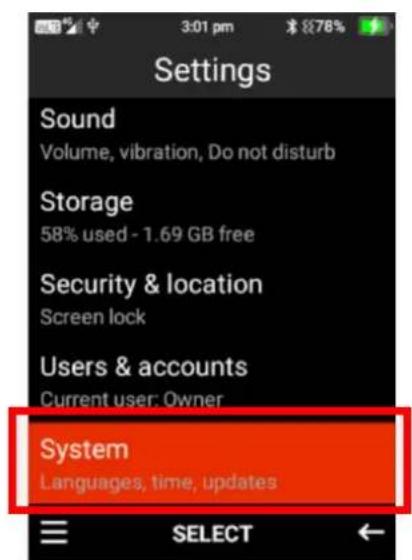
Settings
Under settings you can adjust the phone settings, like network and internet, Bluetooth, battery options, display settings, sound settings, storage options, security and location settings and system settings.
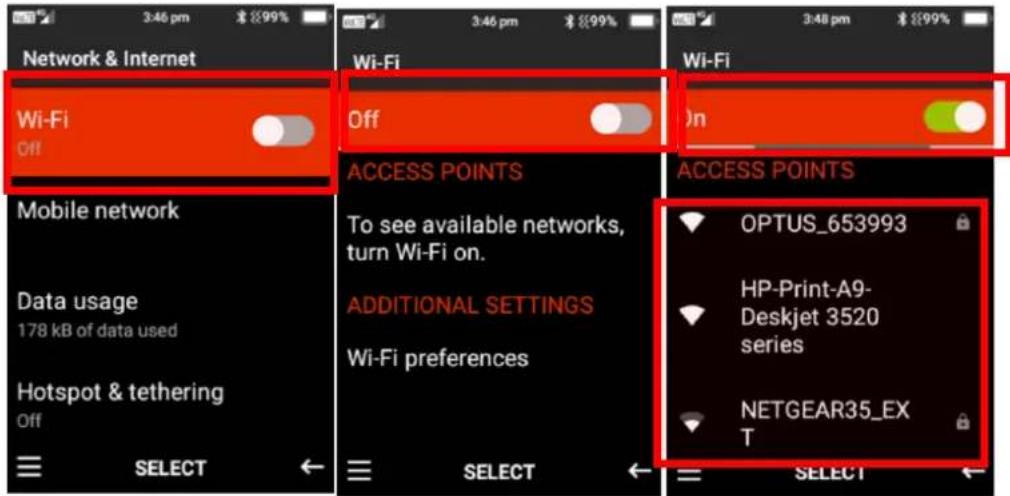
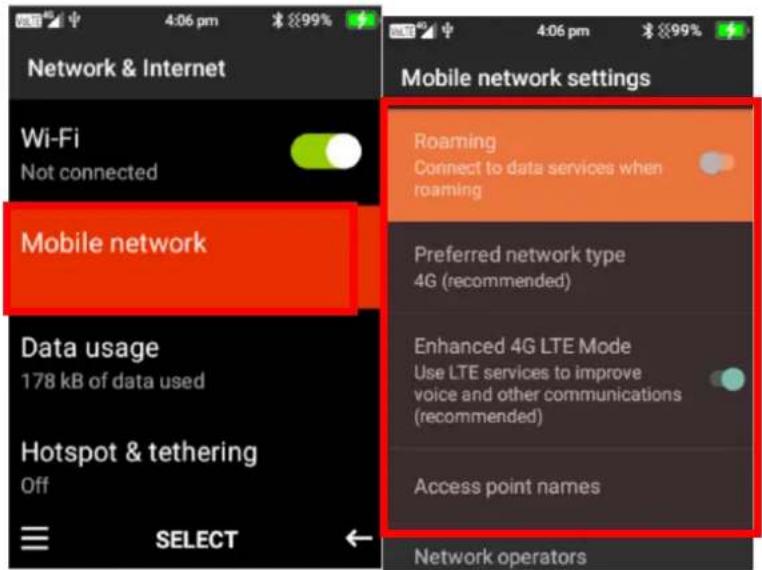
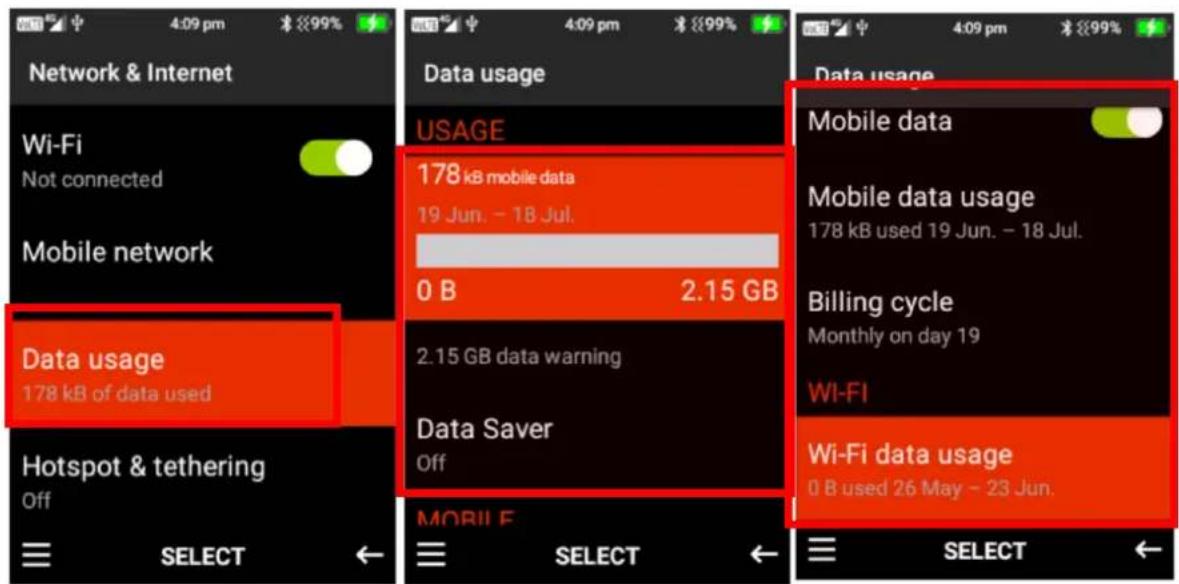
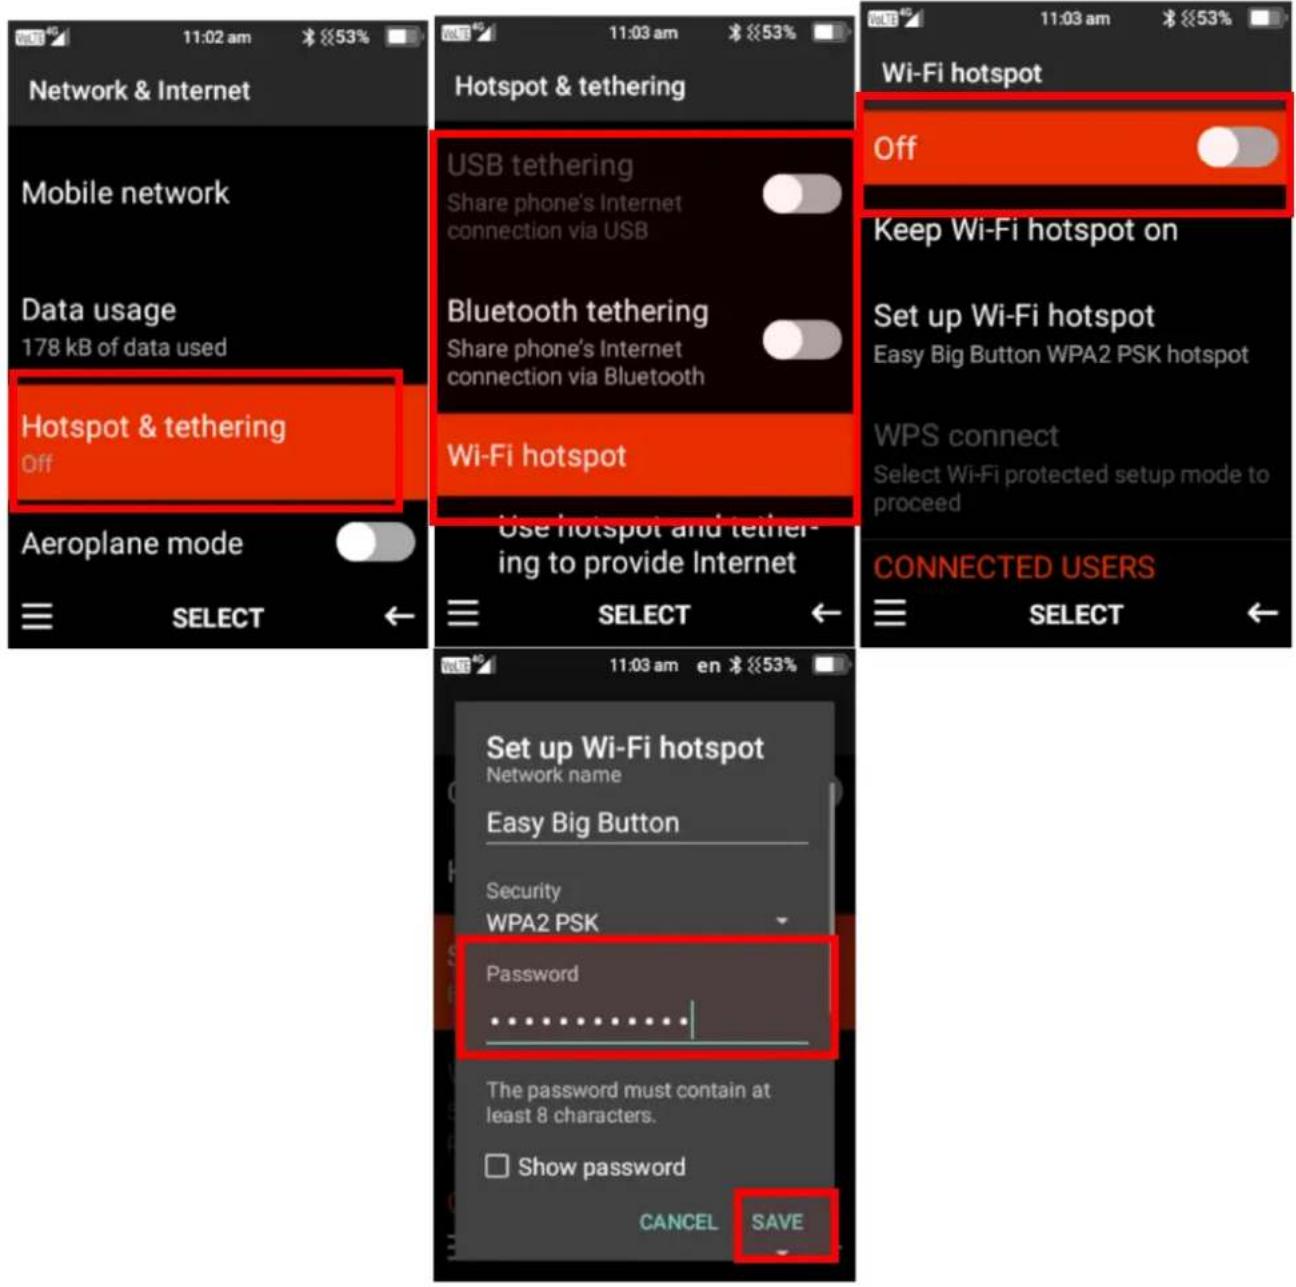
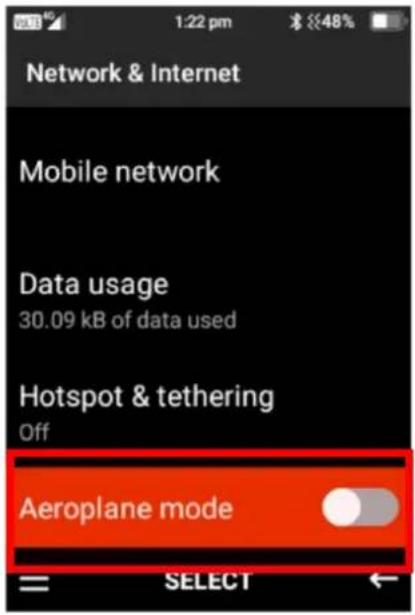
Network and Internet
Here you can select Wi-Fi options, mobile network settings, data usage options, hotspot and tethering and aeroplane mode.
- Wi-Fi – Press the ok key on Wi-Fi to open the Wi-Fi menu. Press the ok key on on/off to turn the Wi-Fi option on or off. To connect to Wi-Fi network, highlight and press ok on the network you wish to connect to, most will ask for the password to connect (Check your Wi-Fi router for the password). Once it connects it will say connected.
- Mobile Network settings – Here you can turn roaming settings on or off, Edit and choose preferred network type, Turn Enhanced 4G LTE mode on or off and change Access point names.
- Data usage – In Data usage you can set data usage warnings, turn data saver mode on or off and Turn Mobile data settings on or off
- Hotspot and tethering – Here you can turn your phone into a Wi-Fi hotspot, so you are able to connect another device to your phone to use the network as a Wi-Fi connection.
You can connect other devices via USB, Bluetooth or via Wi-Fi. To connect via USB, connect the USB from your phone to your other device and turn this feature on. To connect via Bluetooth, turn Bluetooth tethering on, then via your other device connect using Bluetooth.
To connect via Wi-Fi Hotspot – click on Wi-Fi hotspot and turn this feature on. Click on set up Wi-Fi hotspot to view the hotspot settings, such as the password to connect to the device and how many devices can be connected at once
- Aeroplane mode – You can turn aeroplane mode on and off by pressing ok on this feature. This will deactivate all the phones functions including, phone reception, Bluetooth and Wi-Fi.
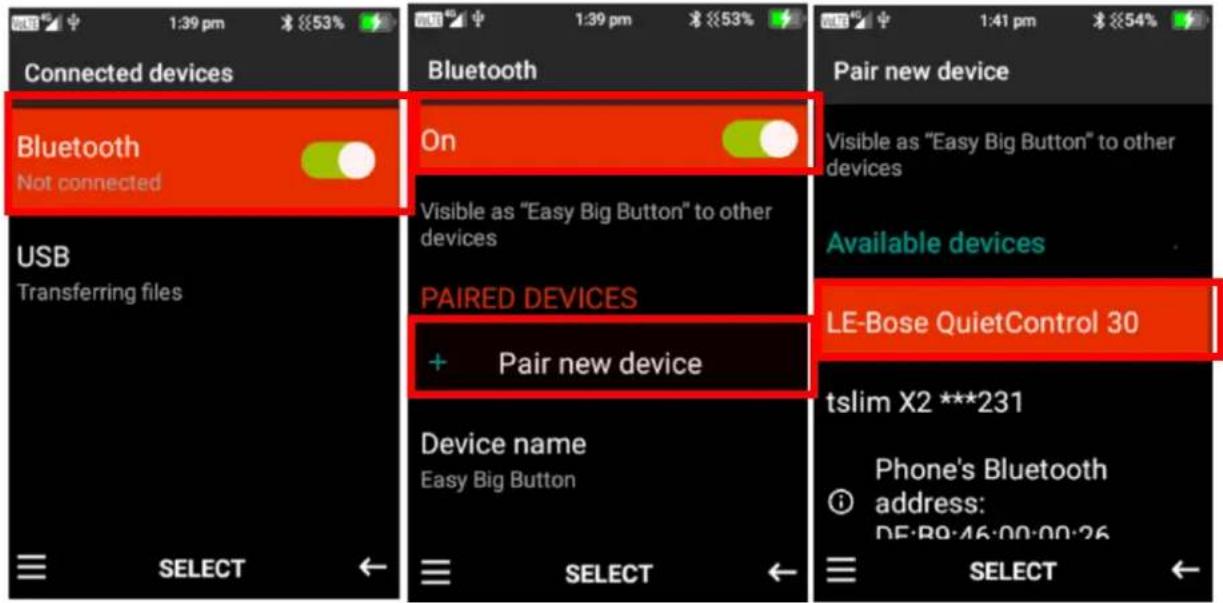
Connected devices
Here you can connect to other devices via Bluetooth or USB cable to transfer files, play music and more
- Connect via Bluetooth – Press ok on Bluetooth and turn Bluetooth on by pressing the ok key.
Click ok on Pair a new device to search for nearby devices. Once it has found the device you want to connect to press the ok key on the device and it will begin to pair, once paired it will say connected.
Please note: Some devices will require passwords to connect, ensure you read the instructions on the other device to connect via Bluetooth. TIP: some Bluetooth passwords are 1234 or 0000.
- Connect via USB – To connect to a device like a computer to transfer files, connect the USB to the device you want to connect to then connect the micro USB to the phones charging port. Once connected it will show it is charging, press the ok key to change to transfer files or transfer photos. It will then show on the computer that the phone is connected and you can transfer files or photos.

Battery
Within the battery menu, you can see the battery usage and performance. You can also change and adjust intelligent power savings, turn battery saver mode on or off, and turn battery percentage view on or off.
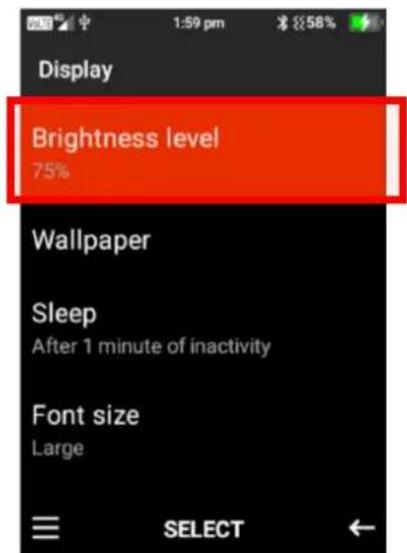
Display
In the display menu you can adjust the screen brightness, change the wallpaper, adjust the screen sleep timer and font size.
- Brightness level – Here you can adjust the brightness level of the phones screen. Press ok on this function, scroll left or right using the navigation keys to adjust the screens brightness level.
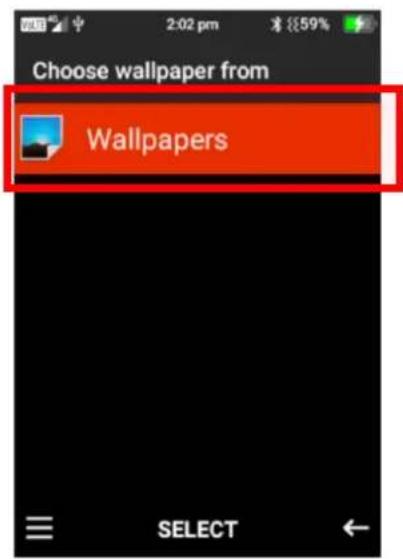
- Wallpaper – Here you can change the wallpaper on the phone display. Press ok on this function. You can then choose to add a wallpaper from your photos or select one that is pre-installed on the device.
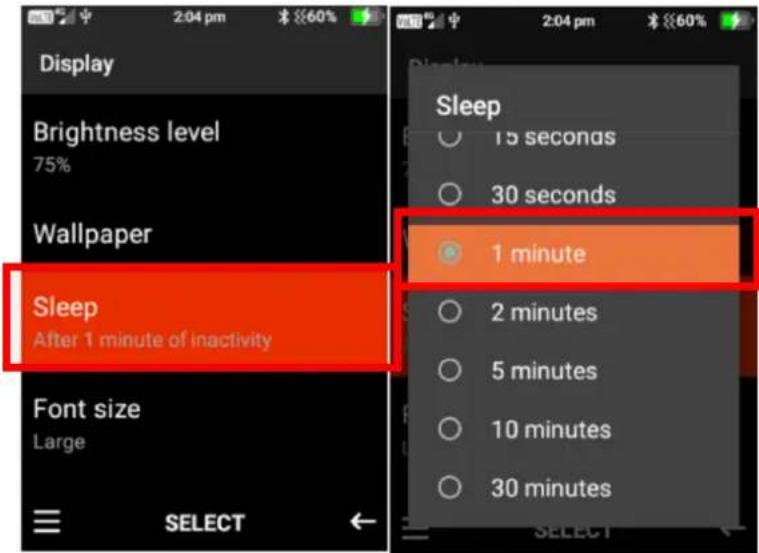
- Sleep – Here you can adjust the screen timeout timer. Press ok and then highlight the preferred timer and press ok to save that timer.
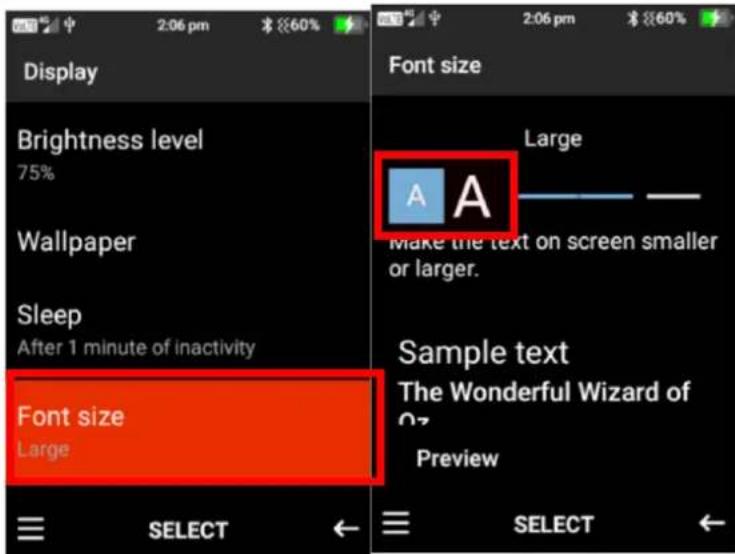
- Font size – Here you can adjust the size of the font on the phones display. Select font size, then using the left and right navigation keys the smaller letter A and press ok to decrease the size or highlight the larger letter A and press ok to increase the size.
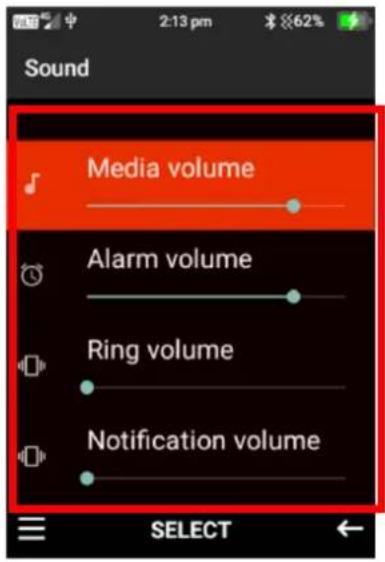
Sound
Within the sound menu you can adjust the media volume, alarm volume, ring volume, notification volume, adjust vibrate for calls, turn flip to answer on or off, change phone ringtones, notification sounds, alarm sounds, talking keypad, screen lock sounds, charging sounds and turn sound enhancement on or off.
- To adjust Media, Alarm, Ring, and Notification volume - Highlight the one you wish to change and press the left navigation key to decrease the volume or the right navigation key to increase the volume.
- Vibrate for calls – Press ok on this function to turn this on or off.
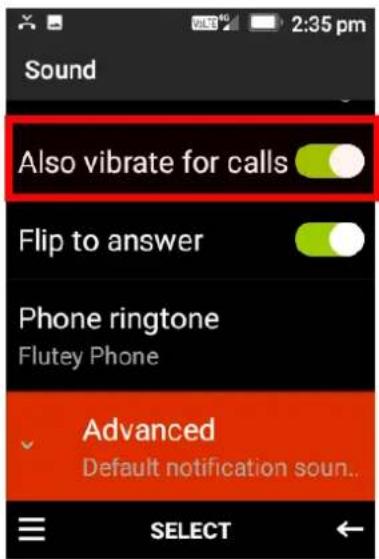
- Flip to answer – Press ok on this function to turn this on or off.
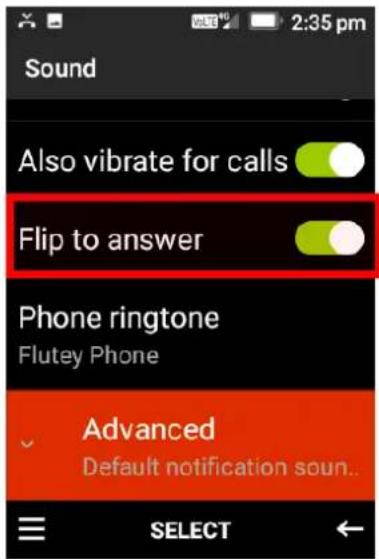
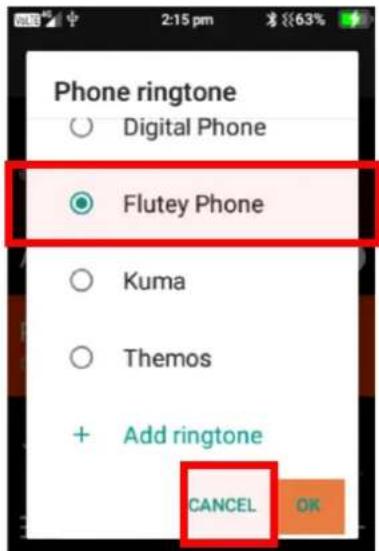
- Phone ringtone – Press ok on phone ringtone, using the up and down cursor buttons you can scroll through all the available ringtones, press the ok button to select your preferred ringtone then select ok.
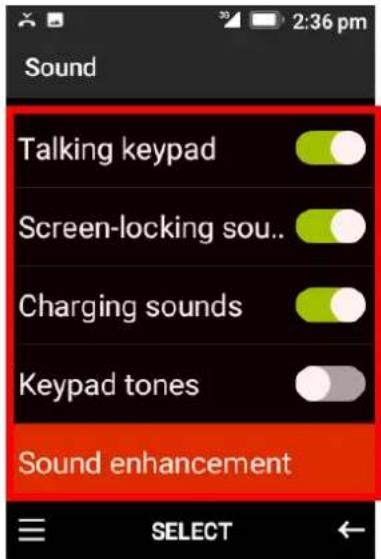
- Advanced – Under advanced you can change the notification sounds and alarm sounds. Follow the same instructions as changing ringtones. You can turn talking keypad, screen-lock sounds, charging sounds, keypad tones and sounds enhancement on or off. Press ok on these functions to turn them on or off.
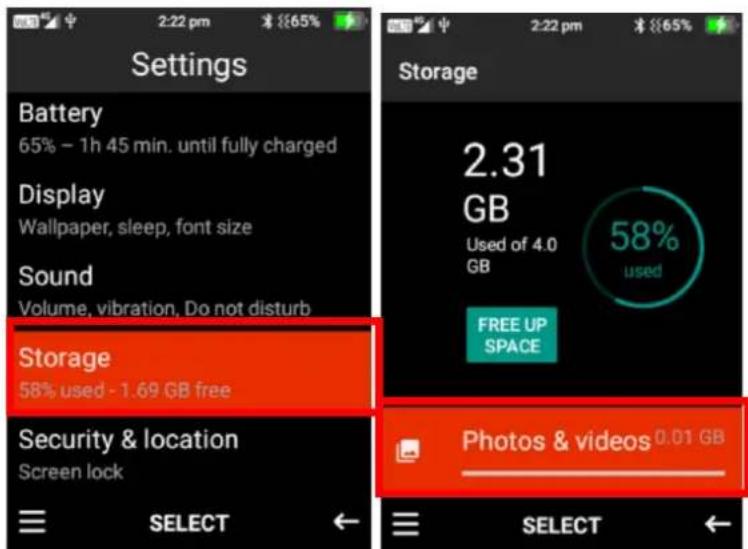
Storage
In the storage menu, you can view all files that are stored on your device and how much storage they are taking up on your device.
To view files in a storage location, highlight the folder and press ok to view what is in that folder.
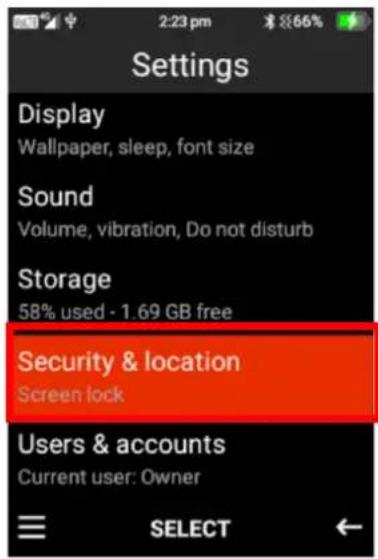
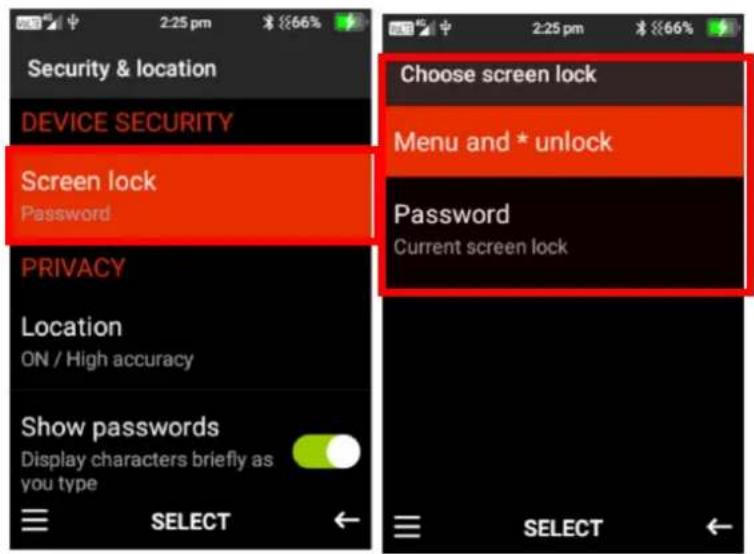
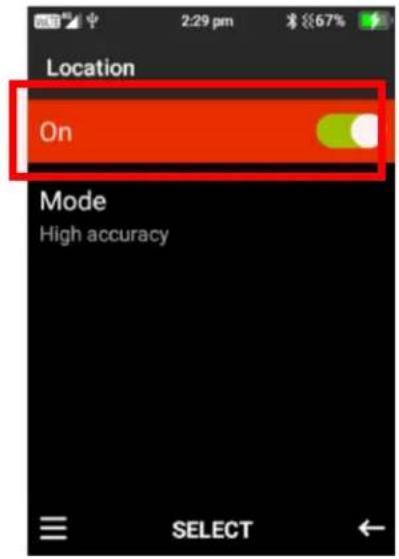
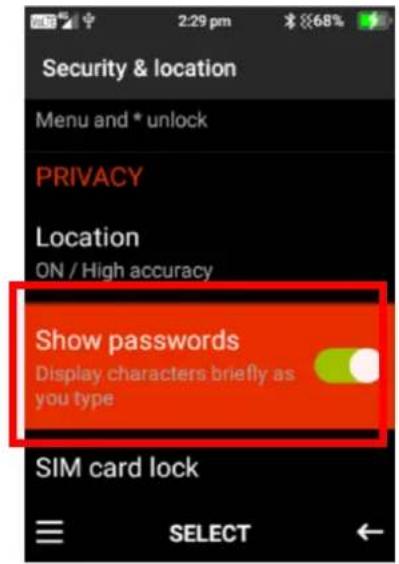
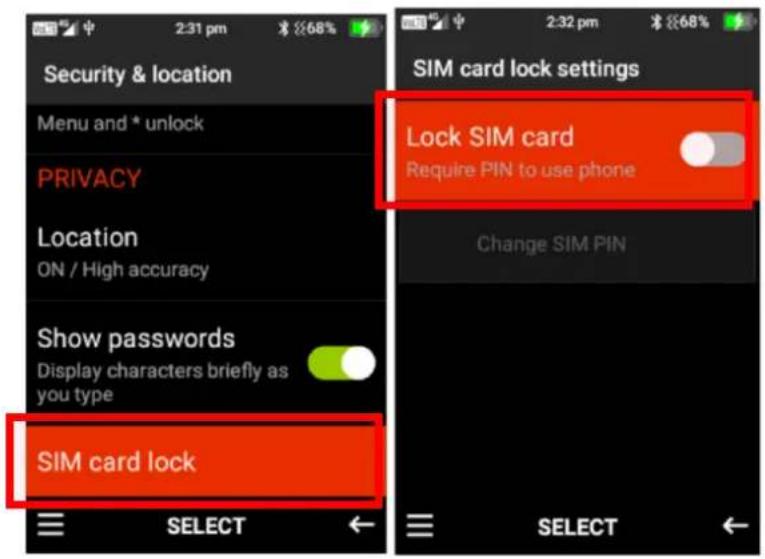
Security and Location
Within this folder you can create a screen lock, turn location services on or off, turn show passwords on or off and modify SIM card lock features.
- Screen Lock – Here you can choose to have no screen lock, Menu and *lock and/or a password lock. Press ok on the lock feature you wish to choose for your device.
- Location – Press ok on location to turn the location GPS feature on or off. Please note: if you turn this feature off the SOS GPS location SMS will not work.
- Show Passwords – Press ok on show passwords to turn this feature on or off. Turning it off will not allow you to see passwords when you're typing them.
- SIM Card Lock – Here you can turn SIM Card lock on or off. Press ok and type in the password to turn this feature on and off. Please note your SIM card provider would have provided the SIM card lock password when you originally received the SIM card.
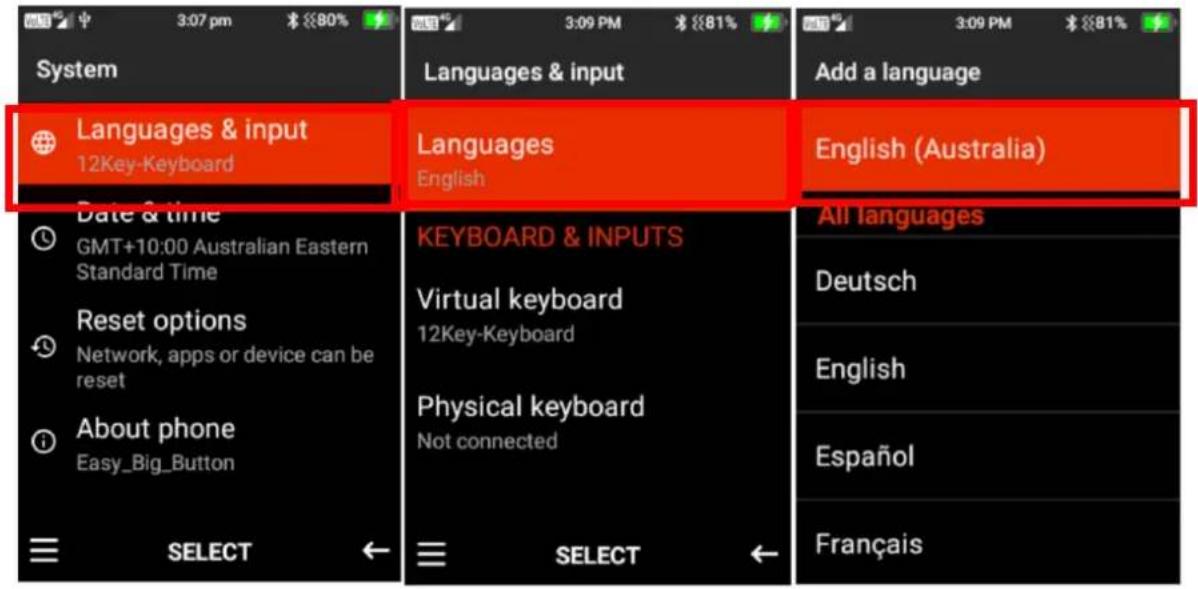
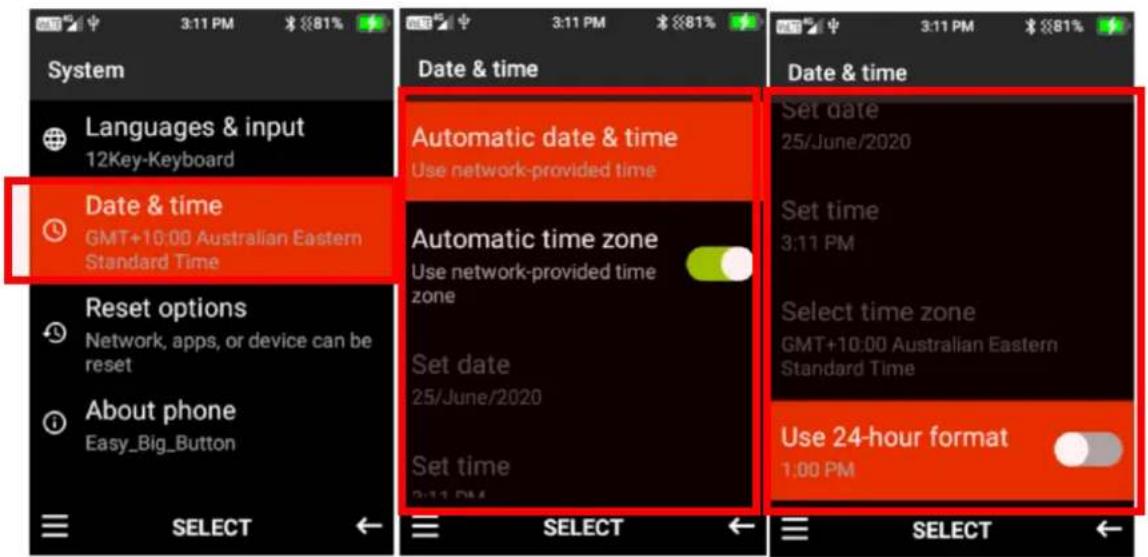
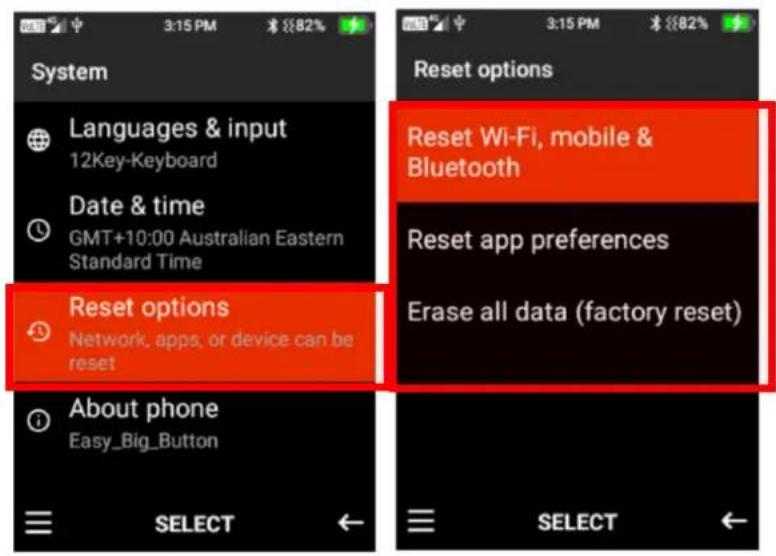
System
Within system, you can adjust the language and input options, date, and time settings, reset options and view information about the phone.
- Languages and input – Here you can change the language on your device. Press ok on languages and highlight the language you wish to use then press ok.
- Date and time – Here you can turn automatic time and date settings on and off, turn automatic time zone setting on or off, manually set the date, time, time zone and change the time format. Press the ok key on the functions you wish to change.
- Reset options – Here you can reset Wi-Fi, Bluetooth and app preferences to factory default. You are also able to Factory Reset your device which will erase all data and bring the phone back to the original factory/default settings.
Please Note: Erase all data (Factory Reset) cannot be undone once selected. This will reset and delete all information/data stored on this device.
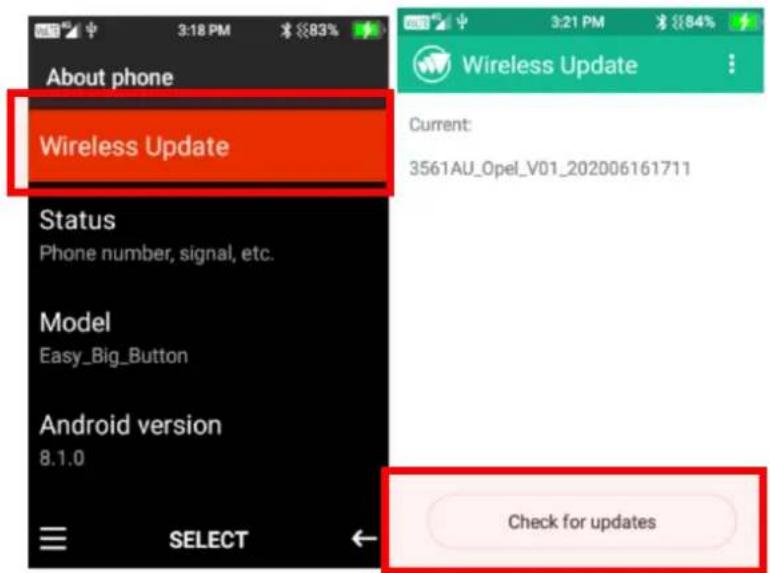
- About Phone – Within this function you can perform wireless updates and view the status of the device (Battery status, Battery level, SIM Status, IMEI Information, IP Address, Wi-Fi MAC address, Bluetooth address, Serial number and Up Time), Model, Android Version and other versions of the phone
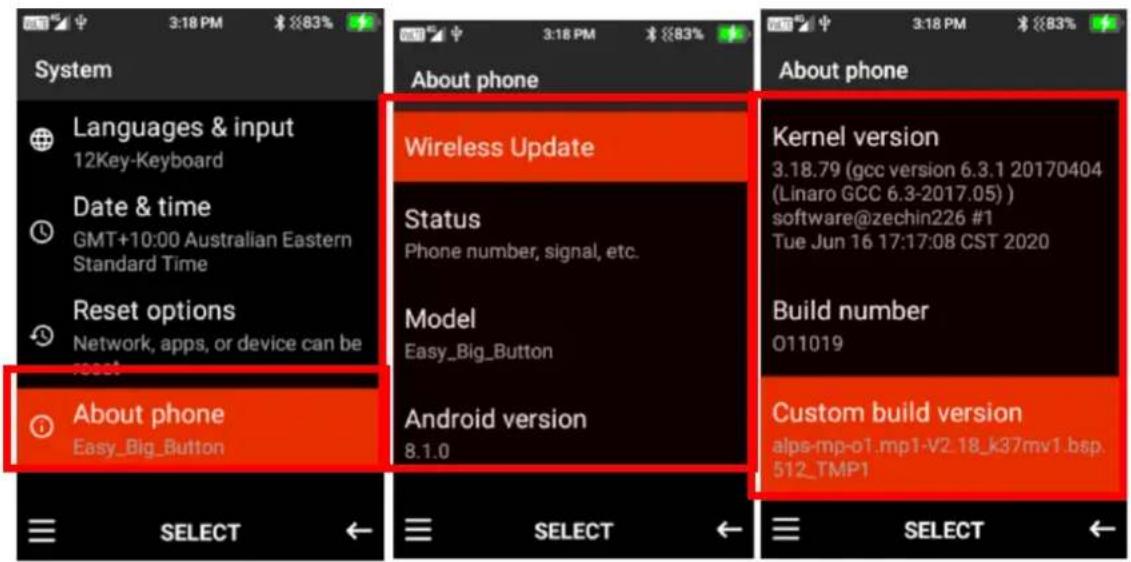
Wireless Update
To perform a wireless update press ok on wireless update, then highlight check for updates. If there are any updates the device will prompt you to update to the latest version.
Troubleshooting and support
If you are experiencing difficulties with your mobile phone, please go through the following troubleshoots:
The Mobile Phone will not power on
- Ensure the battery is inserted correctly.
- Ensure you have removed the battery sticker from the gold connection pins.
- Ensure you are pressing and holding the power button for 5 seconds to turn on the phone.
- Ensure you have charged the phone for at least 10 minutes.
The phone is asking for a PUK code
- This means you have input the incorrect password 3 times or more. Contact your network provider to retrieve your PUK code to unlock your phone. Only your network provider can help unlock your SIM.
SIM card error or no SIM card
- Ensure you have inserted the SIM card correctly and are using the correct size SIM card. Follow instructions in the quick set up guide for installing the SIM card.
- Your SIM card may be damaged or dirty. Ensure you replace your SIM with your network provider if this error occurs.
Failure to connect to the network
- Your network signal may be weak or out of range. Contact your network provider or try the phone in a different location to check your signal.
- Your SIM card may be damaged, invalid or has no credit. Contact your network provider for support.
- Ensure you have enough credit on your network provider's account. Contact your network provider for support.
Failure to make an outgoing call
- Ensure you have entered the correct phone number you wish to dial.
- Ensure you have enough credit on your network provider's account. Contact your network provider for support.
- Your signal strength may be weak. Check your signal strength and contact your network provider.
Cannot receive calls
- Ensure your mobile phone is switched on.
- Ensure you have enough signal strength to receive calls.
- Ensure you do not have the phone in flight mode.
- Ensure your SIM card is installed correctly.
Cannot hear anyone on the call
- Ensure your call volume is adjusted to your requirements. Using the volume keys on the left side of the phone
- Ensure you have sufficient signal strength.
The other party cannot hear you on the call
- Ensure your hand or fingers are not covering the microphone.
- Ensure you are speaking directly into the microphone.
- Ensure you have not muted the call.
- Ensure the other party has their volume turned up to their desired level.
Mobile Phone won't charge
-
Ensure the power plug is inserted in the wall socket correctly and the wall switch is turned on.
-
Ensure the wall power socket is working by testing another device or a separate power socket.
- Ensure you have inserted the micro-USB cord into the phone correctly.
- Ensure there is no dirt or dust accumulated in the phones power socket.
- Ensure you have left the phone on charge for at least 10 minutes as the battery may have run out of charge completely.
Mobile phone won't connect via Bluetooth
- Ensure you have turned on and activated the Bluetooth setting.
- Ensure you follow the Bluetooth instructions above.
- Ensure the other device has Bluetooth enabled.
- Your Bluetooth device may be too far away from the other device to connect. Ensure you are within range of this device to connect.
Mobile phone won't connect to Wi-Fi
- Ensure you have turned on and activated Wi-Fi on your phone. See Wi-Fi guide in the manual.
- Ensure the Wi-Fi you are connecting to is working.
- Your device may be too far away from the Wi-Fi Router. Ensure you are within range of this device to connect