Argent K6 RGB - Keyboard THERMALTAKE - Free user manual and instructions
Find the device manual for free Argent K6 RGB THERMALTAKE in PDF.


| Type | Mechanical keyboard |
| Layout | 60% (61 keys) |
| Switch Type | Cherry MX or equivalent (RGB) |
| Backlighting | Per-key RGB, 16.8 million colors |
| Connection | USB-C (detachable cable) |
| Cable Length | 1.8 m braided |
| Polling Rate | 1000 Hz |
| Key Rollover | N-key rollover |
| Programmable Keys | All keys programmable via software |
| Onboard Memory | Yes, for profiles |
| Dimensions (L x W x H) | 295 x 105 x 40 mm |
| Weight | Approx. 600 g |
| Power Source | USB bus-powered |
| Compatibility | Windows 10/11, macOS (limited) |
| Software | Thermaltake TT RGB Plus |
| Dedicated Media Keys | Via function layer |
| Wrist Rest | Not included |
| Warranty | 2 years |
Frequently Asked Questions - Argent K6 RGB THERMALTAKE
User questions about Argent K6 RGB THERMALTAKE
0 question about this device. Answer the ones you know or ask your own.
Ask a new question about this device
Download the instructions for your Keyboard in PDF format for free! Find your manual Argent K6 RGB - THERMALTAKE and take your electronic device back in hand. On this page are published all the documents necessary for the use of your device. Argent K6 RGB by THERMALTAKE.
USER MANUAL Argent K6 RGB THERMALTAKE
natural_image
Close-up of a retro computer keyboard with purple and blue iridescent keys (no visible text or symbols)ARGENT K6 RGB
Low Profile Mechanical Keyboard User Guide

Table of Contents
PAGE 05 KEYBOARD FEATURES OVERVIEW
PAGE 16 TT iTAKE INSTALLATION
PAGE 19 FUNCTIONS AVAILABLE ON THE HOME PAGE
PAGE 21 KEY CONFIGURATIONS
Default Funcons 22
- Single Key Funcons 23
- Macros 25
Mulmedia Funcons 27
Hot Keys 29
Program Execuon 31
Gaming Proles 36
Key Disable Funcons 38
PAGE 39 FUNCTIONS AVAILABLE ON THE MACRO PAGE
PAGE 41 HOW TO RECORD MACROS
Recording a Macro 42
Recording a Character Set 47
PAGE 49 FUNCTIONS AVAILABLE ON THE LIGHTING EFFECTS PAGE
PAGE 51 LIGHTING EFFECTS OVERVIEW
Stac 52
- Pulse 56
- Blink 60
Wave 64
- Spiral Rainbow 68
RGB Spectrum 72
Reacve 73
- Flow 77
- Ripple 81
Raindrop 85
- Snake 87
Music Mode 89
System Temperature 91
- Brick 92
Pervade 94

Table of Contents
PAGE 98 FUNCTIONS AVAILABLE ON THE SETTINGS PAGE

thermaltake
Chapter 1:
KEYBOARD FEATURES OVERVIEW
| RESTORE FACTORY SETTINGS | Press and hold for ve seconds to restore factory sengs (including all lighng eects and macros).※Aer the setngs are restored, a startup animaon will run once to indicate that all setngs have been restored. |
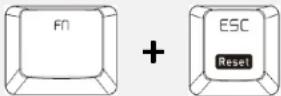 |
| Open the default email box. | |
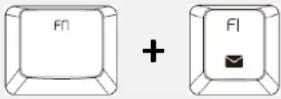 |
| WEB BROWSER | Open the default web browser/return to the home page. |
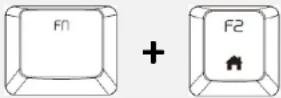 | |
| MY COMPUTER | Open my computer. |
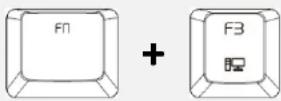 |
| CALCULATOR | Open the system's built-in calculator. |
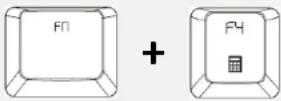 |
| MULTIMEDIA PLAYER | Open the system's built-in mulmedia player. |
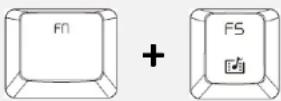 |
SWITCHING LIGHTING EFFECTS
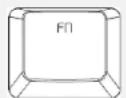
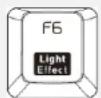
Stac:
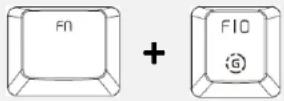
(1). Fn + F9 (red), F10 (green), and F11 (blue) to change the color of the lightng eect.
Pulse:
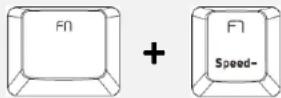
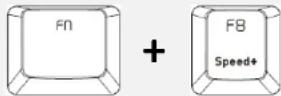
(1). Fn + F7 (slower) and F8 (faster) to adjust the speed of the lightng eect.
(2). Fn + F12 to switch between monochrome and random color modes.
(3). Under monochrome mode, Fn + F9 (red), F10 (green), and F11 (blue) can be used to adjust the color of the lightng eect.
Wave:
(1). Fn + F7 (slower) and F8 (faster) to adjust the speed of the lightng eect.
(2). Fn + ↑, ↓, ←, or → to change the direcon of running lights.
(3). Fn + F9 (red), F10 (green), and F11 (blue) to change the color of the lightng eect.
Spiral Rainbow:
(1). Fn + F7 (slower) and F8 (faster) to adjust the speed of the lightng eect.
(2). Fn + ← (counterclockwise) or → (clockwise) to switch the direcon of running lights.
(3). Fn + F9 (red), F10 (green), and F11 (blue) to change the color of the lightng eect.
RGB Spectrum:
(1). Fn + F7 (slower) and F8 (faster) to adjust the speed of the lightng eect.
Reacve:
(1). Fn + F7 (slower) and F8 (faster) to adjust the speed of the lightng eect.
(2). Fn + F12 to switch between monochrome and random color modes.
(3). Under monochrome mode, Fn + F9 (red), F10 (green), and F11 (blue) can be used to adjust the color of the lightng eect.
Flow:
(1). Fn + F7 (slower) and F8 (faster) to adjust the speed of the lightng eect.
(2). Fn + F12 to switch between monochrome and random color modes.
(3). Under monochrome mode, Fn + F9 (red), F10 (green), and F11 (blue) can be used to adjust the color of the lightng eect.
Ripple:
(1). Fn + F7 (slower) and F8 (faster) to adjust the speed of the lightng eect.
(2). Fn + F12 to switch between monochrome and random color modes.
(3). Under monochrome mode, Fn + F9 (red), F10 (green), and F11 (blue) can be used to adjust the color of the lightng eect.
Raindrop:
(1). Fn + F7 (slower) and F8 (faster) to adjust the speed of the lightng eect.
(2). Fn + F12 to switch between monochrome and random color modes.
(3). Under monochrome mode, Fn + F9 (red), F10 (green), and F11 (blue) can be used to adjust the color of the lightng eect.
Bricks:
(1). Fn + F7 (slower) and F8 (faster) to adjust the speed of the lightng eect.
(2). Fn + ↑ or ↓ to change the direcon of running lights.
(3). Fn + F12 to switch between monochrome and random color modes.
(4). Under monochrome mode, Fn + F9 (red), F10 (green), and F11 (blue) can be used to adjust the color of the lightng eect.
Concentric Circles:
(1). Fn + F7 (slower) and F8 (faster) to adjust the speed of the lightng eect.
(2). Fn + F12 to switch between monochrome and color modes.
(3). Under monochrome mode, Fn + F9 (red), F10 (green), and F11 (blue) can be used to adjust the color of the lightng eect.
| DECREASING THE SPEED OF LIGHTING EFFECTS | Five dierent lighng eect speeds (the slowest seng).will ash when the speed is set to the |
 |
| INCREASING THE SPEED OF LIGHTING EFFECTS | Five dierent lighng eect speeds (the fastest seng).will ash when the speed is set to the |
 |
| ADJUST THE BRIGHTNESS OF THE RED LIGHT | Ten brightness level sengs for the red light (the \ 1 \ A \ 1 will ash when the brightness is set to the brightest seng). |
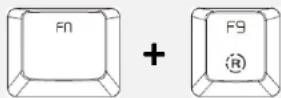 | ※Press and hold for three seconds to clear the red value (once cleared, the \ 1 \ A \ 1 will ash at the same me). |
| ADJUST THE BRIGHTNESS OF THE GREEN LIGHT | Ten brightness level setngs for the green light (the 1 A _ will ash when the brightness is set to the brightest seng).※Press and hold for three seconds to clear the green value (once cleared, the 1 A _ will ash at the same me). |
 |
| ADJUST THE BRIGHTNESS OF THE BLUE LIGHT | Ten brightness level setngs for the blue light (the set to the brightest seng). 1 1 will ash when the brightness is |
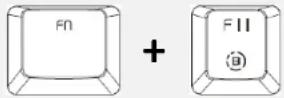 | ※ Press and hold for three seconds to clear the blue value (once cleared, the 1 1 will ash at the same me). |
| SWITCHING COLOR MODES | Can be used to switch between monochrome and random color modes for a specic lightng eect.※ Under monochrome mode, this key serves as the mixed-color indicator. |
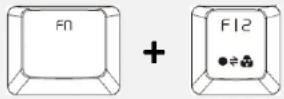 | |
| CHANGING THE DIRECTION OF LIGHTING EFFECTS | You can switch the running direcon of a specic lightng eect. |
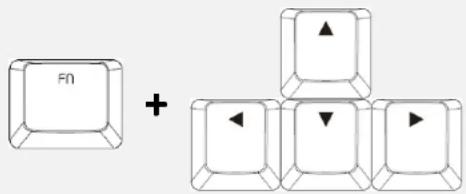 |
| SWITCHING PROFILES | Up to six proles can be saved. The current acve prole is shown by the color displayed on the [IMAGE].P1: Red, P2: Green, P3: Blue, P4: Yellow, P5: Purple, P6: Aquamarine.※ The color statuses described above are only visible under Game Mode. |
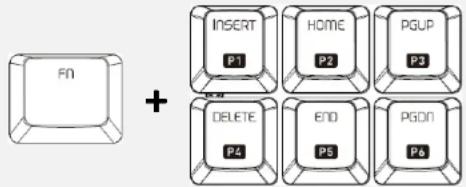 |
Macro Recording (only available under Game Mode):
(1). Press Fn + PrtSc to enter recording mode (the enre keyboard will light up and the Record buon will begin to ash).
(2). Press Fn + Any Key (excluding the recording key) to specify a key to save the macro under (a red light will appear aer a slight delay; if you press Fn + the same key, a blue light will appear without a delay). Once the key selecon is completed, all lights on the keyboard will go out, and the recording key will change from ashing to constantly lit.
(3). Enter the sequence to be recorded (keys recorded will ash in white).
(4). Aer the sequence is entered, press Fn + PrtSc to exit recording mode (the light for the Recording key will go o).
Macro Prompt Funcon:
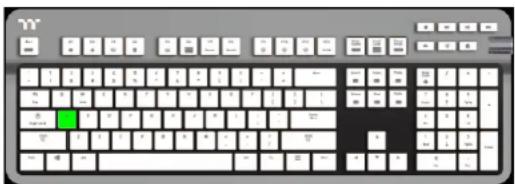
While in recording mode, if the key's backlight is solid white, that means there is currently no macro assigned to this key. If the key is solid green, that means a macro has been assigned to this key.
Shown in the following gure: the "A" key has a macro assigned to it.
natural_image
Front view of a classic computer keyboard with white keys and a green key (no text or symbols visible)※ Press and hold a key which has been assigned a macro for more than 3 seconds to erase the saved macro.
| AREA BACKLIGHT | Supports up to ve presets: FPS1、FPS2、MMO、MOBA、RTS。 |
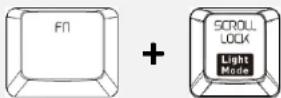 |
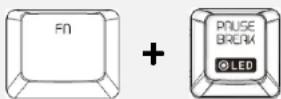
| RECORDING AREA BACKLIGHT | Recording procedure (recording can only be acvated while in area backlight mode):(1). Press Fn + Sclk to enter area backlight mode.(2). Press Fn + Pause to enter backlight recording mode (the recording button will ash).(3). Press Fn + F9 (Red), F10 (Green), and F11 (Blue) to produce a desired color by mixing the three colors together (F12 will display the blended color).(4). Press the key in each display area in order.(5). Once completed, press Fn + Pause to exit recording mode (the recording buon will stop ashing).※Press and hold for ve seconds to restore the area's preset light posion and color value( indicator lights will ash at the same me to indicate that the setngs have been restored). |
 | |
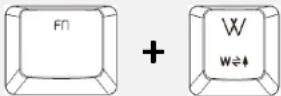
| SWITCHING WASD ANDTHE DIRECTION KEYS | Switches the funcons of WASD keys with the arrow keys. |
 |
| FULL KEYBOARD LOCK | Lock the enre keyboard (current status). |
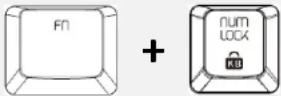 |
| GAME MODE | When this key is lit up in white, this means it is in non-game mode. Once game mode is acvated, the indicator color will light up in the color specied in the setup prole.※ While not operang under game mode, all keys will funcon according to their preset values. |
 | |
| FULL BRIGHTNESS ADJUSTMENT | A total of ve brightness levels are available for adjusng the brightness of the keyboard's lighng eects. |
 |
| LOCKING THE WINDOWS KEY | The windows key can be replaced with the funcon of the ctrl key. |
 | ※ Before the key is locked, a white-colored light will turn on. Aer the key is locked, an aquamarine-colored light will turn on. |
| MULTI-FUNCTION WHEEL | Fn + Wheel Side Buon (Mute) : Switches mul-funcon (at the same me to indicate the current status). |  |
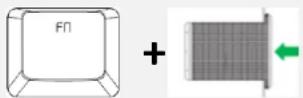 | Mul-Funcon:Scroll Up / Down : Mouse wheel up / downPress mute buon : Previous pagePress mute buon twice : Next page | |

thermaltake
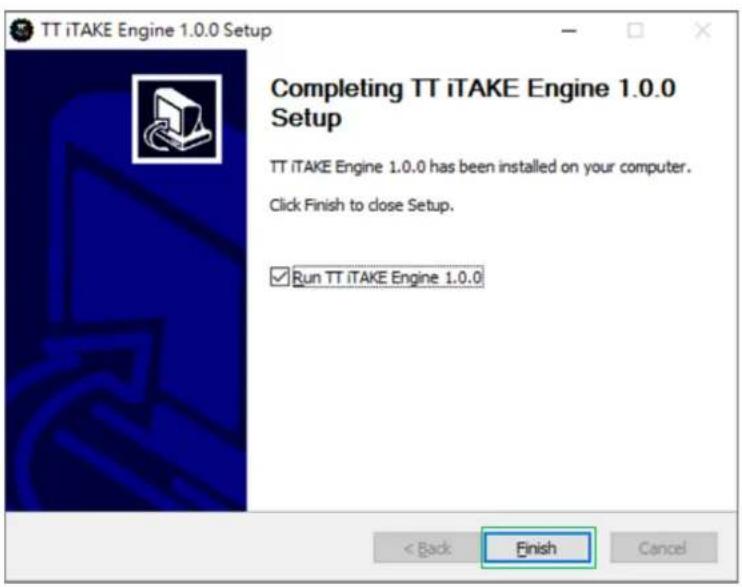
| Chapter 2: TT iTAKE INSTALLATION
Step 2:Step 1:
Click Install to begin the setup process. Launch the setup executable le (.EXE) le and
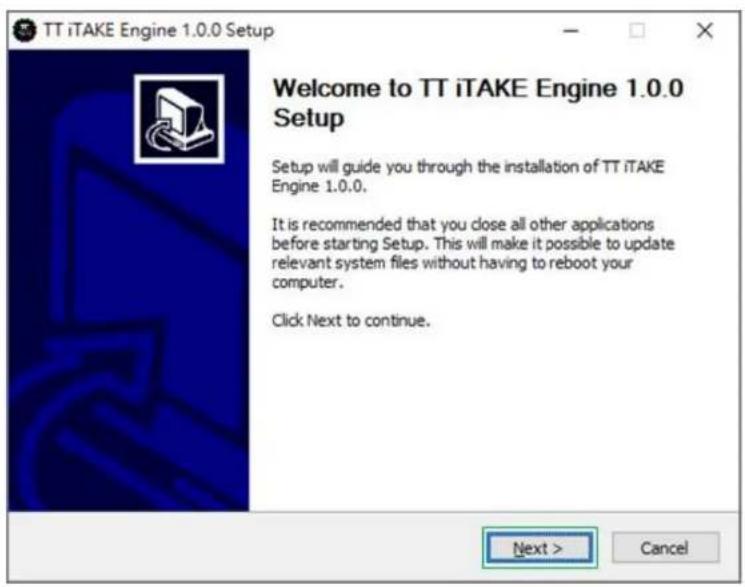
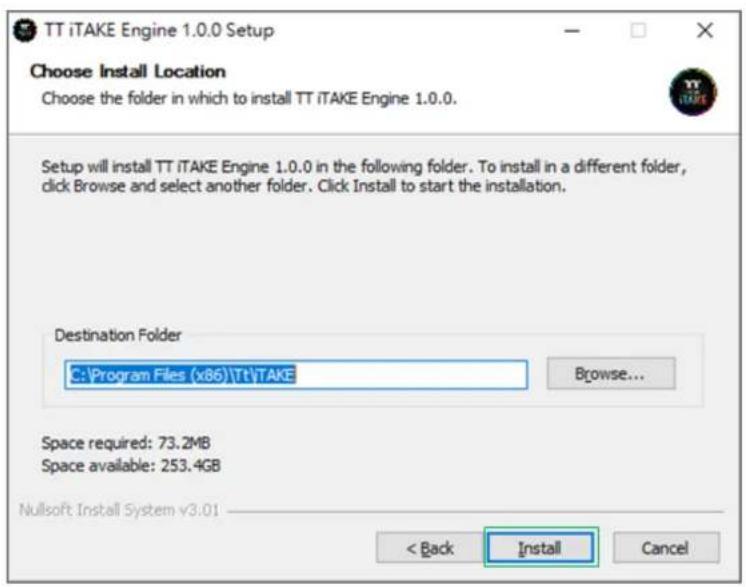
Step 3:
Click Finish to complete the installaon.

thermaltake
Chapter 3:
FUNCTIONS AVAILABLE ON THE HOME PAGE
Home Page
You can switch the keyboard model.
Proles
The Argent K6 RGB can support up to 6 proles, which can be switched as required.
Switching Conguraon Pages
Switches between the conguraon pages customize key operaon, macro recording, lightng eects and sync seng.
Funcons for Managing Proles
Up to 15 proles can be added for use. The funcons of each buon from le to right are:
Add: Create a new prole.
Delete: Delete an exisng prole.
Copy: Copy a prole.
Import: Import a prole.
Export: Export a prole.
Correcng the Name of a Prole
The name of a new prole can be modified directly.
Other Sengs / Shrink Window / Close Window
Other Sengs: Soware version, Amazon Alexa seng and switching the language used for the user interface.
Shrink Window: Close the display and minimize the program to the taskbar.
Close Window: Close the display and minimize the program to the lower right corner.
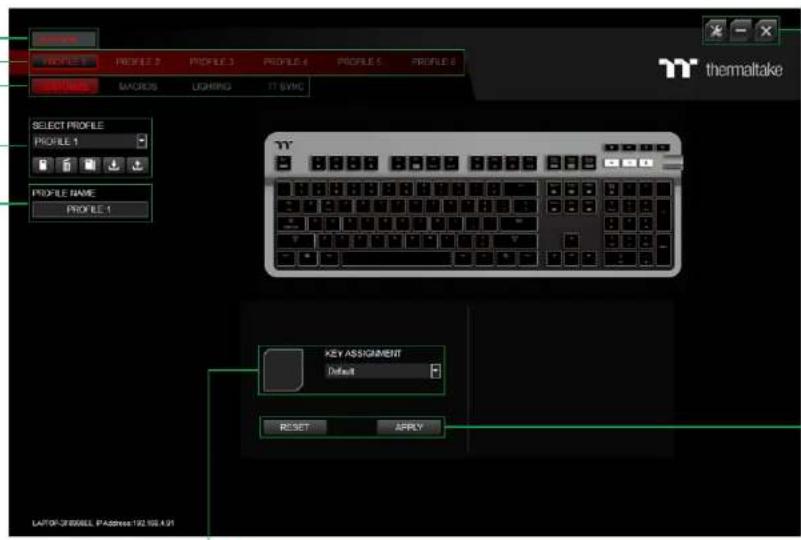
Assigning Key Funcons
Nine dierent funcons can be assigned.
Restore Keyboard Sengs for All Keys / Apply
Restore Keyboard Sengs for All Keys: All key funcons saved under the current prole will be restored to factory default values. Apply: Save and apply all sengs to the selected key.

thermaltake

thermaltake
| Chapter 4: KEY CONFIGURATIONS
Select a key, then select "Default" funcon from the drop-down list.
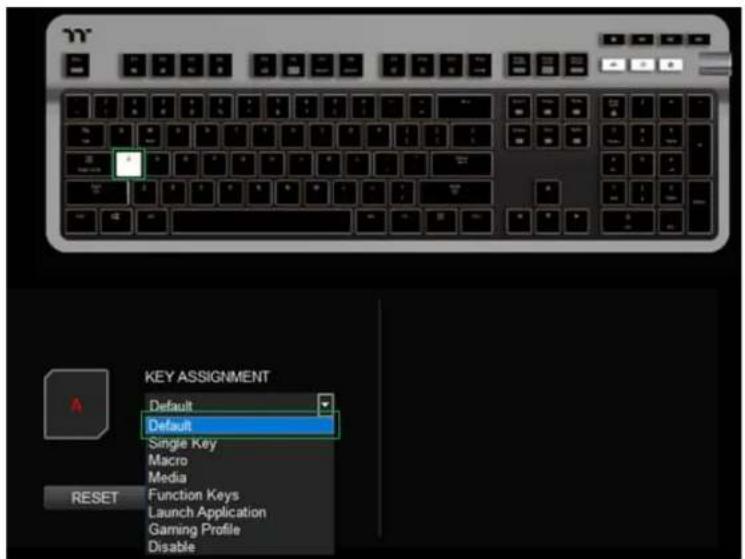
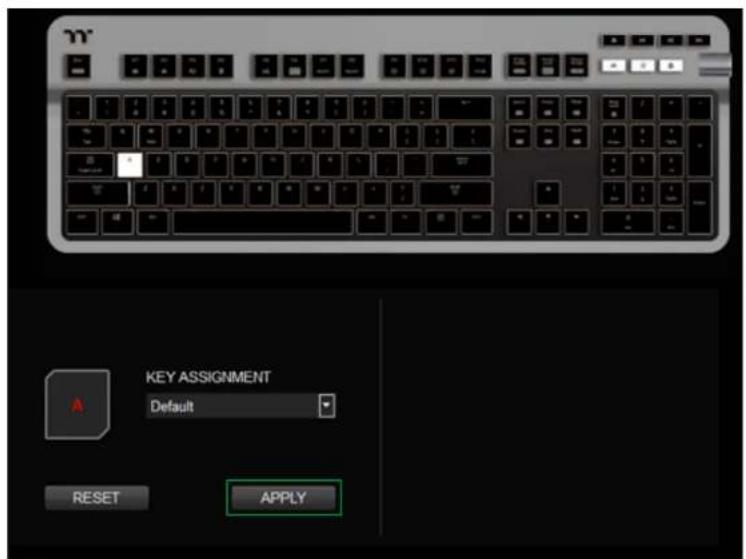
Step 2:Step 1:
Click Apply to change and save the new funcon.
Select a key, then select "Single Key" funcon from the drop-down list.
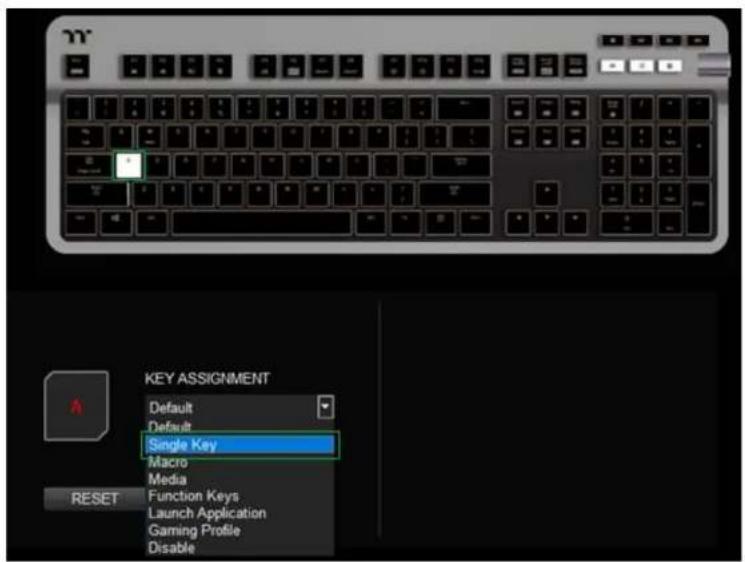
Step 2:Step 1:
Enter a new key value into the lower-right box.
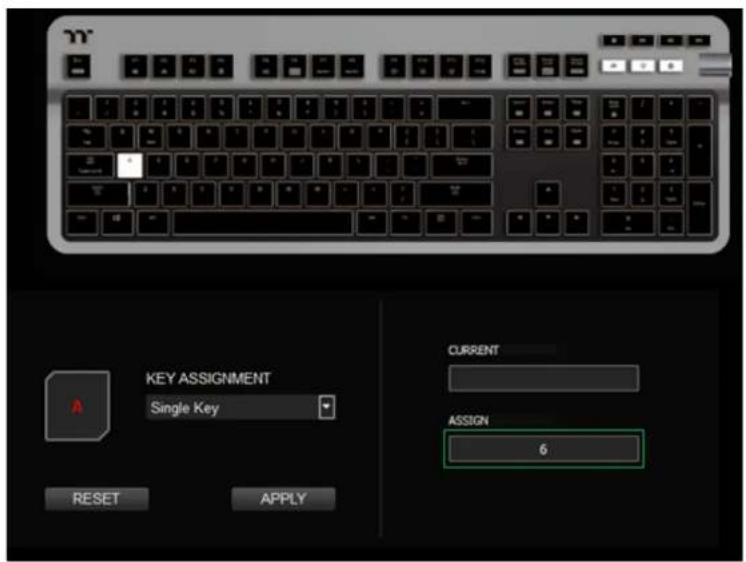
Click Apply to change and save the new funcon.
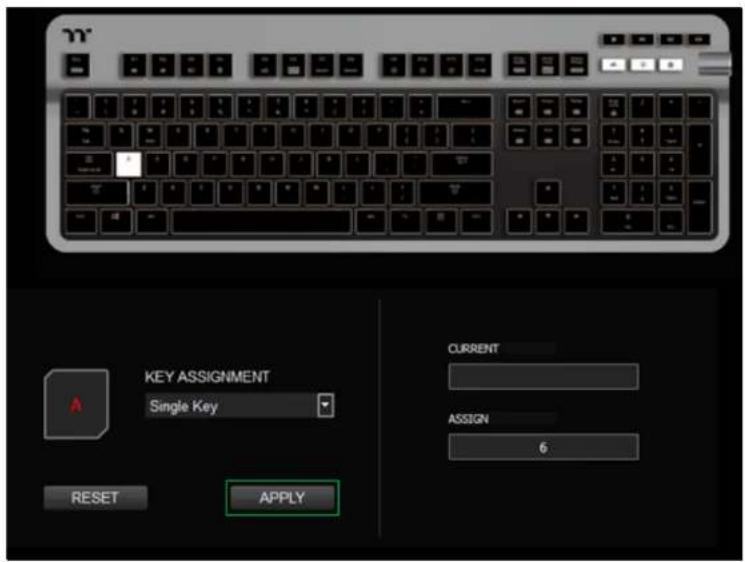
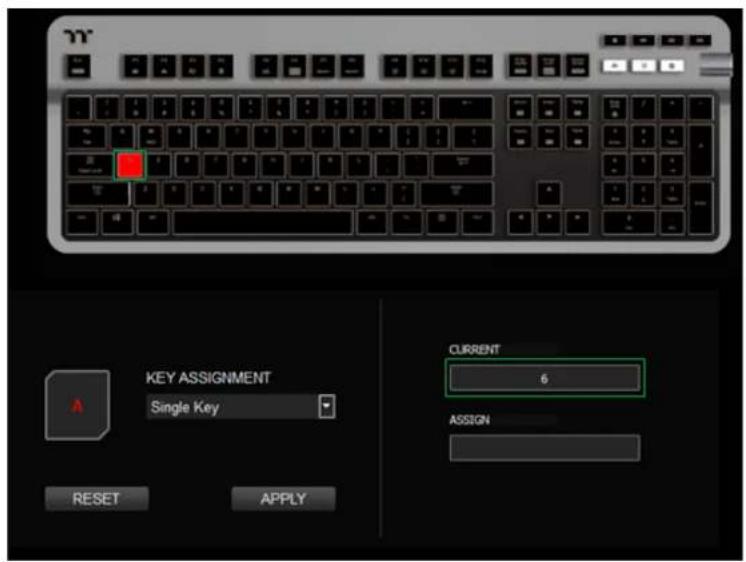
Step 4:Step 3:
Based on the informaon and color displayed on the screen, you will be able to see if the new key seng is applied properly.
Select a key, then select "Macro" funcon from the drop-down list.
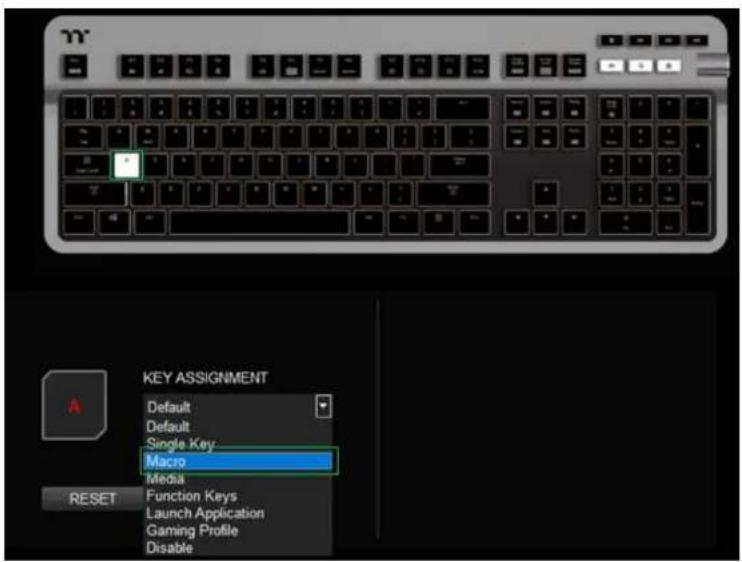
Step 2:Step 1:
Select a macro from the upper-right.
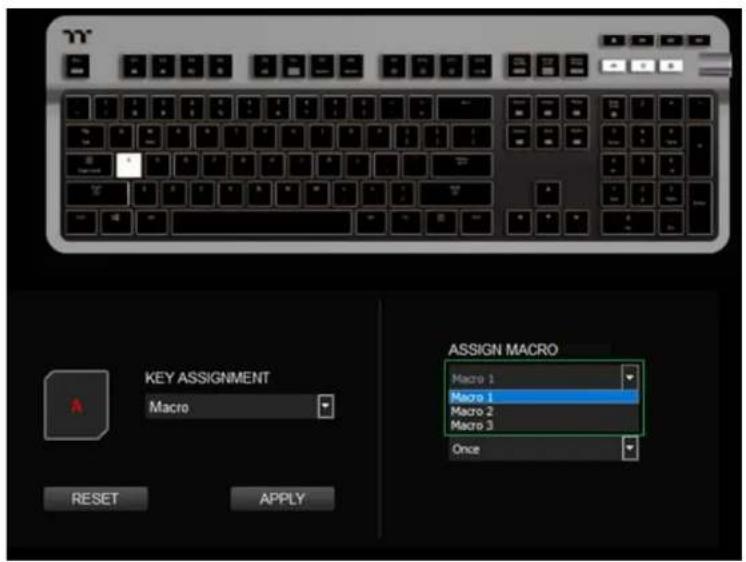
Select a macro repeat opon from the drop-down list located in the lower-right corner.
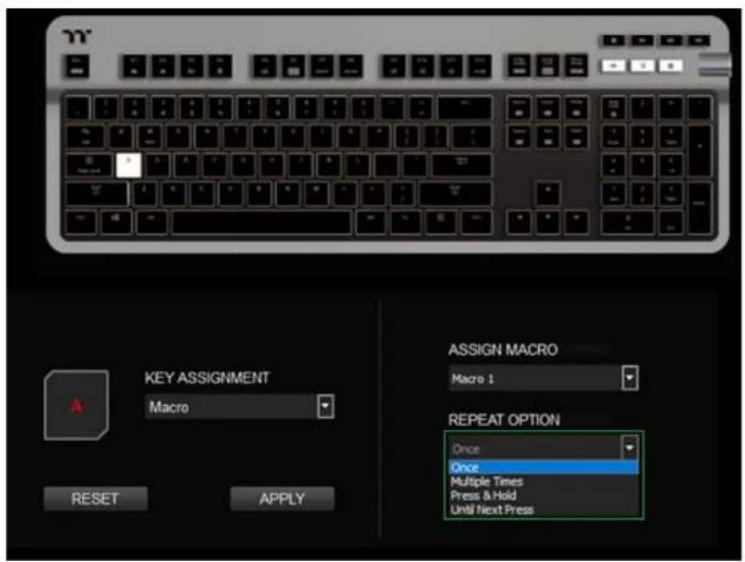
Step 4:Step 3:
Click Apply to save the new funcon. Verify if the new key funcon is applied properly by looking at the color displayed on the screen.
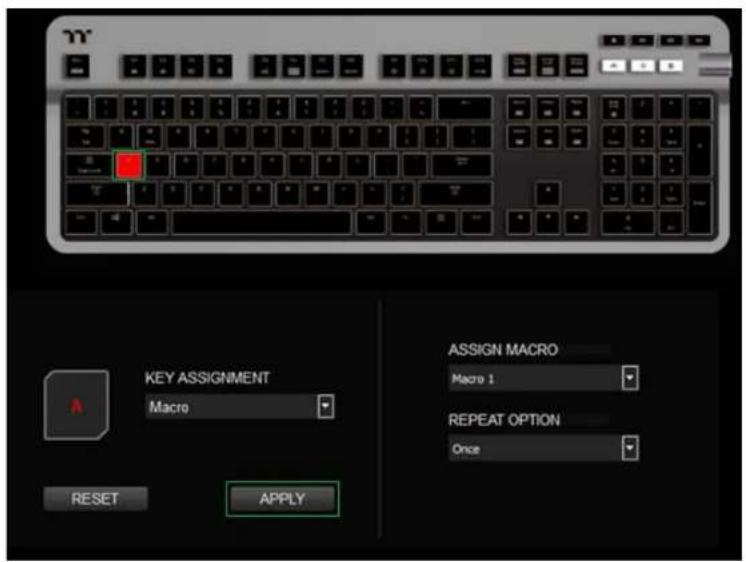
Select a key, then select "Media" funcon from the drop-down list.
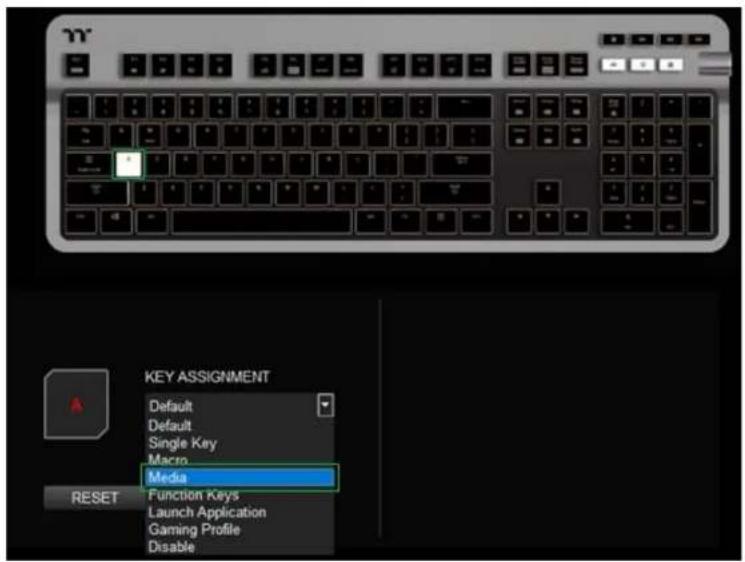
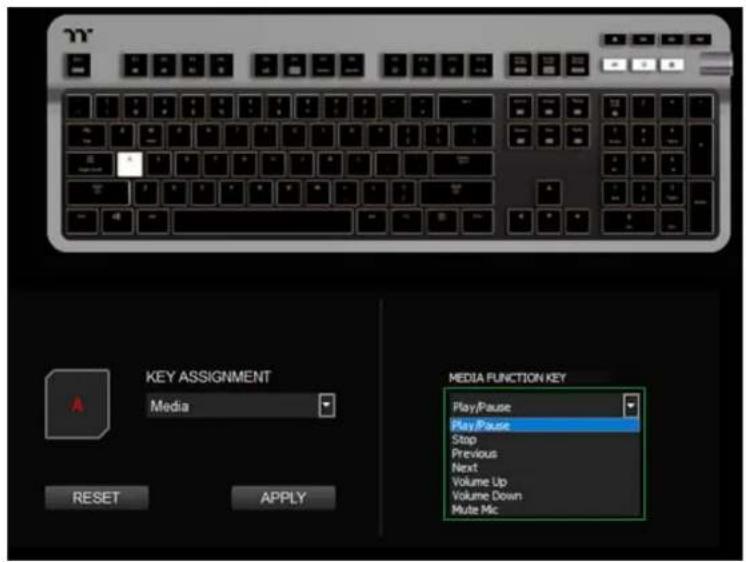
Step 2:Step 1:
Select a media funcon in the right drop-down list.
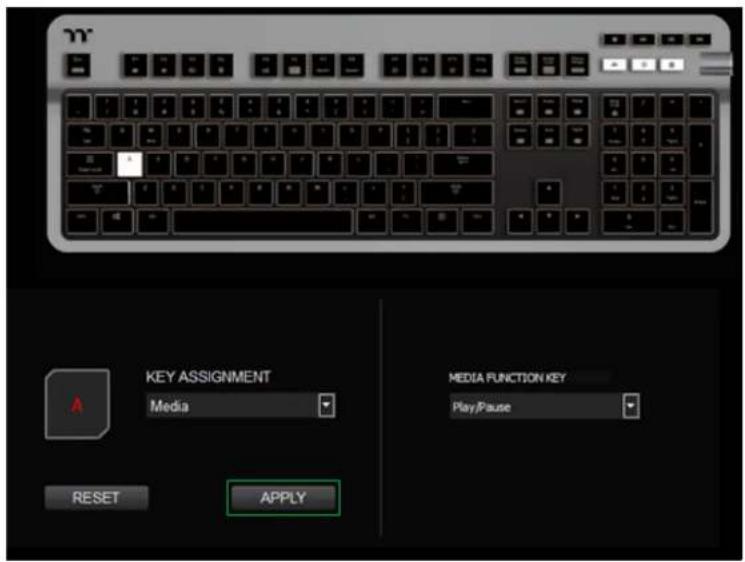
Click Apply to change and save the new funcon.
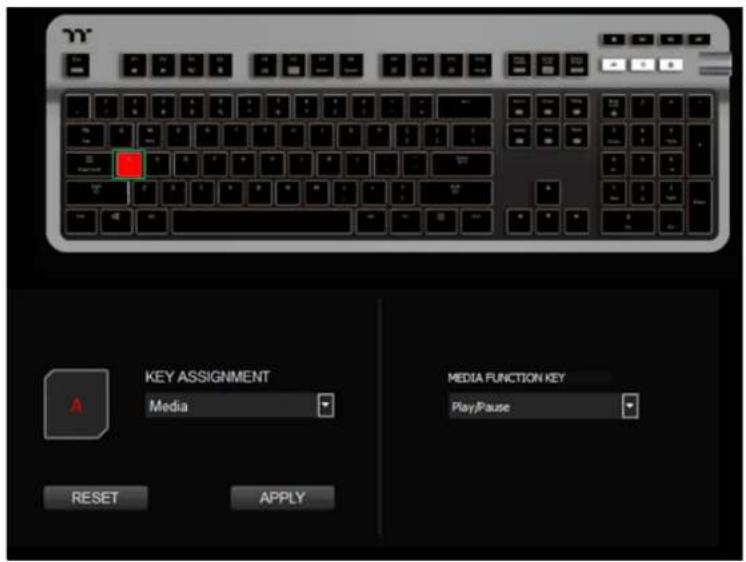
Step 4:Step 3:
Verify if the new key funcon is applied properly by looking at the color displayed on the screen.
Select a key, then select "Funcon Keys" funcon from the drop-down list.
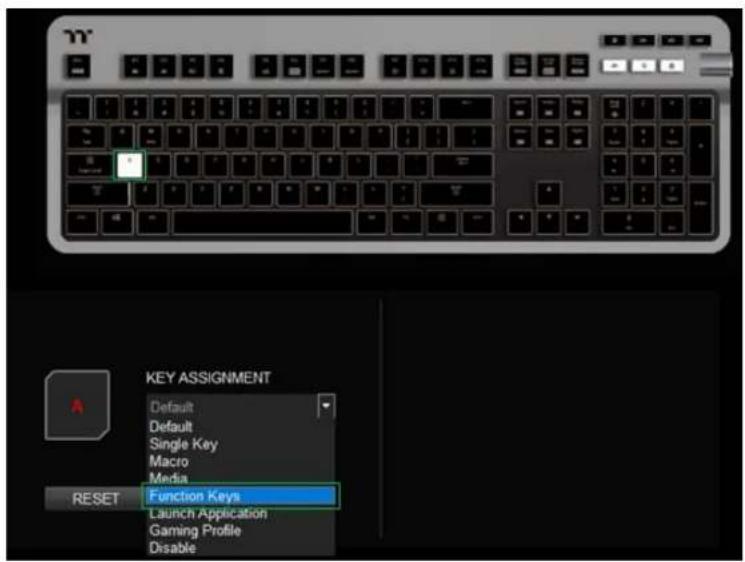
Step 2:Step 1:
Select a type of hotkey funcon in the upper-right drop-down list.
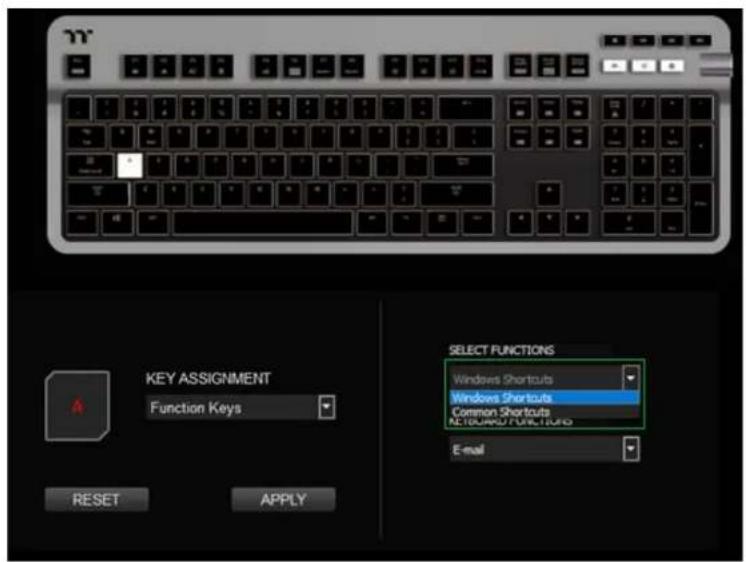
Select a keyboard funcon in the lower-right drop-down list.
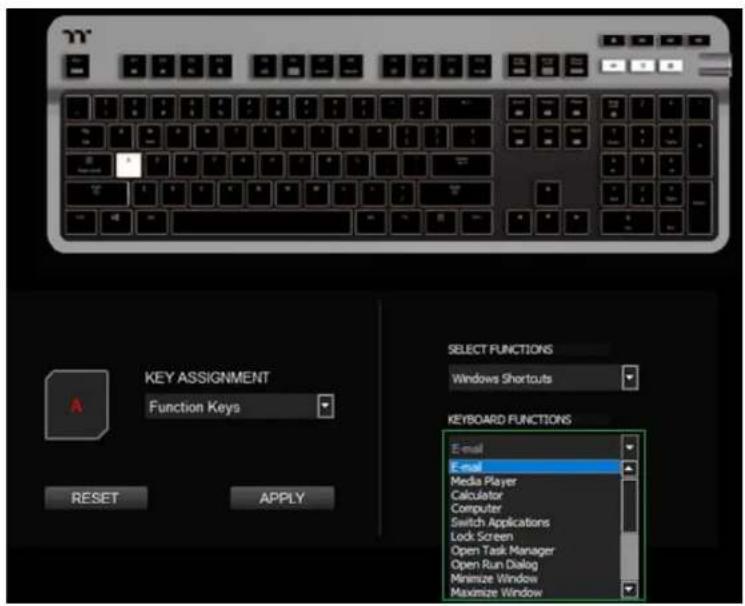
Step 4:Step 3:
Click Apply to save the new funcon. Verify if the new key funcon is applied properly by looking at the color displayed on the screen.
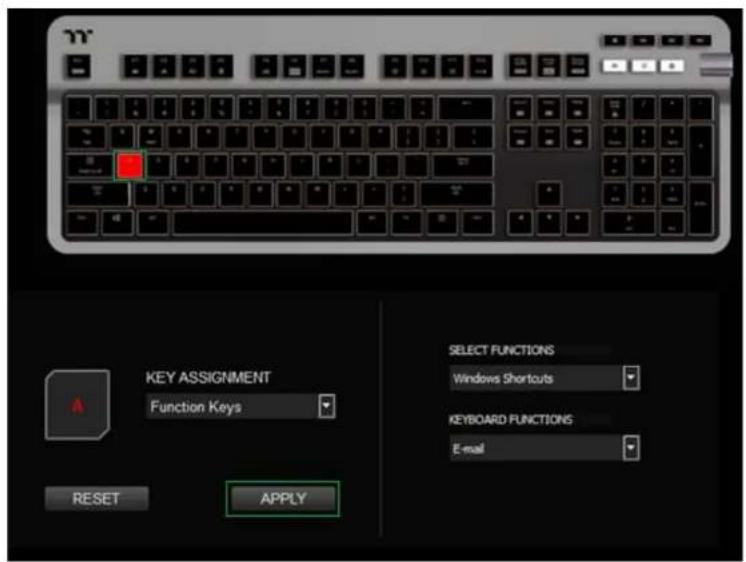
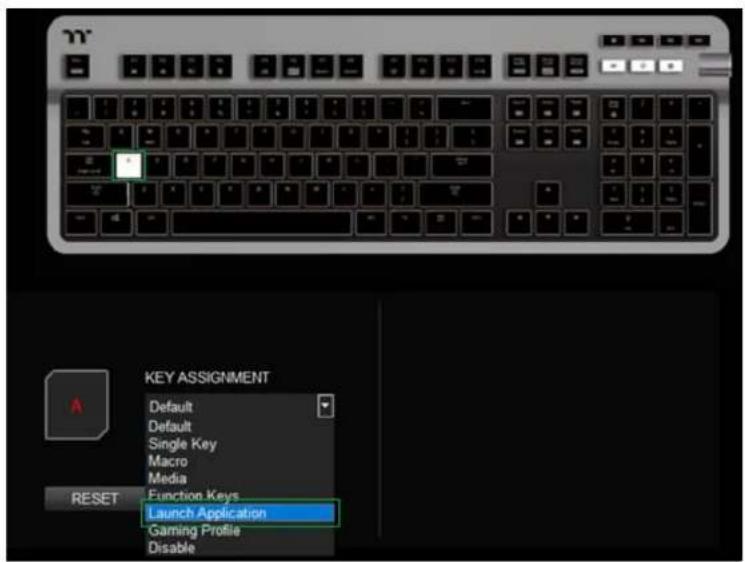
Select a key, then select "Launch Applicaon" funcon from the drop-down list.
Step 2:Step 1:
Select "Applicaon" in the upper-right drop-down list.
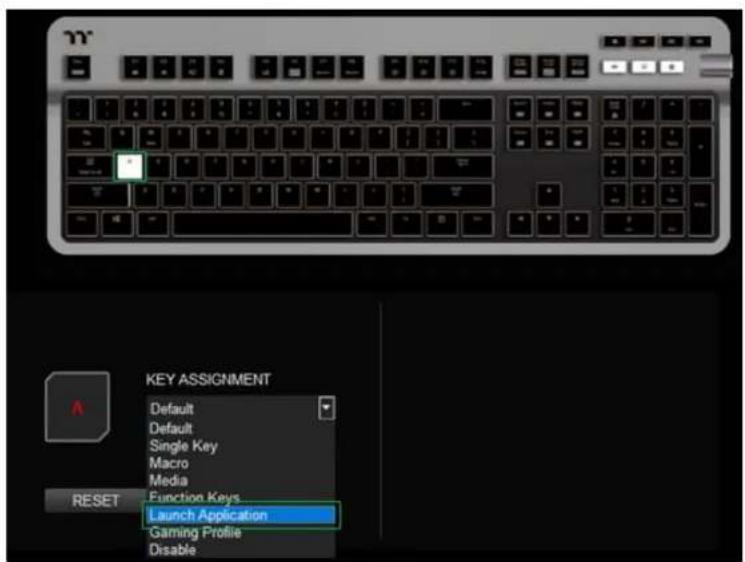
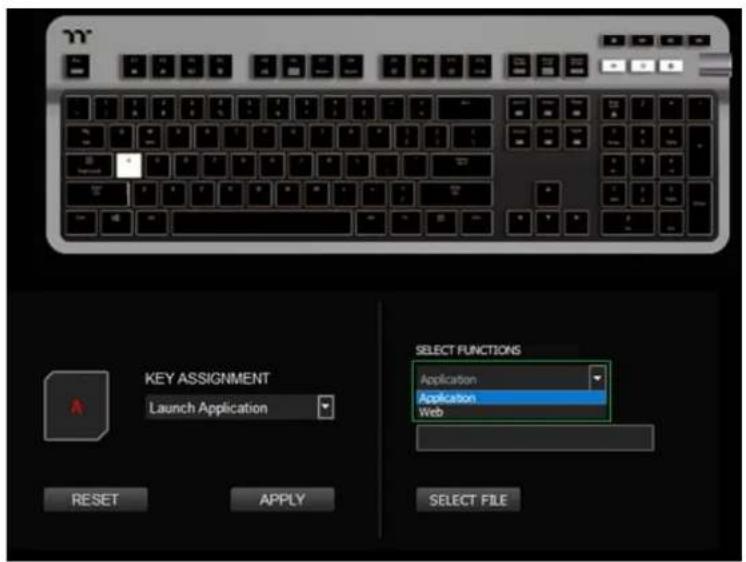
Click on the Select File buon located on the boom-right.
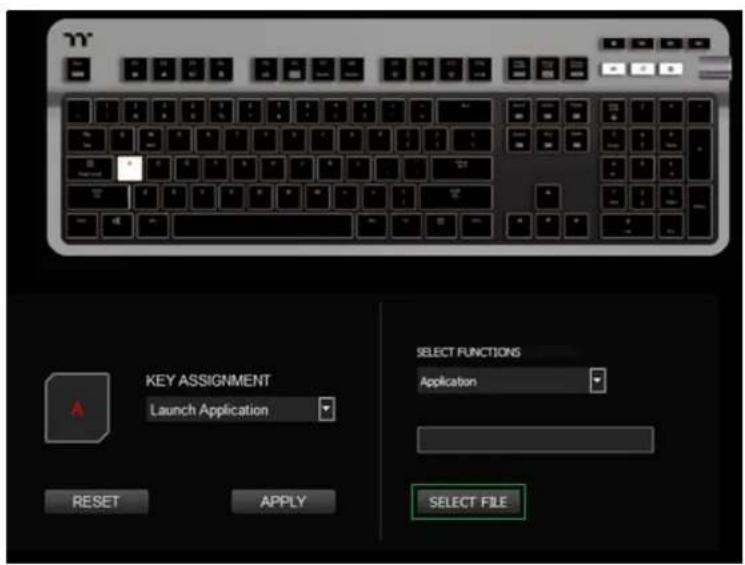
Step 4:Step 3:
Select the executable le (.EXE) to open.
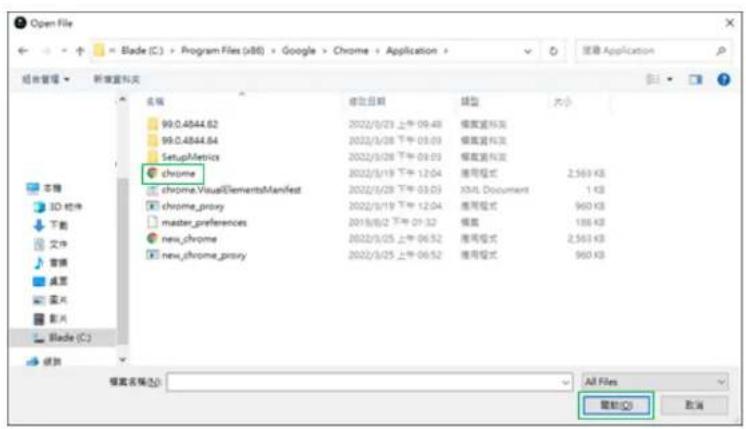
Click Apply to change and save the new funcon.
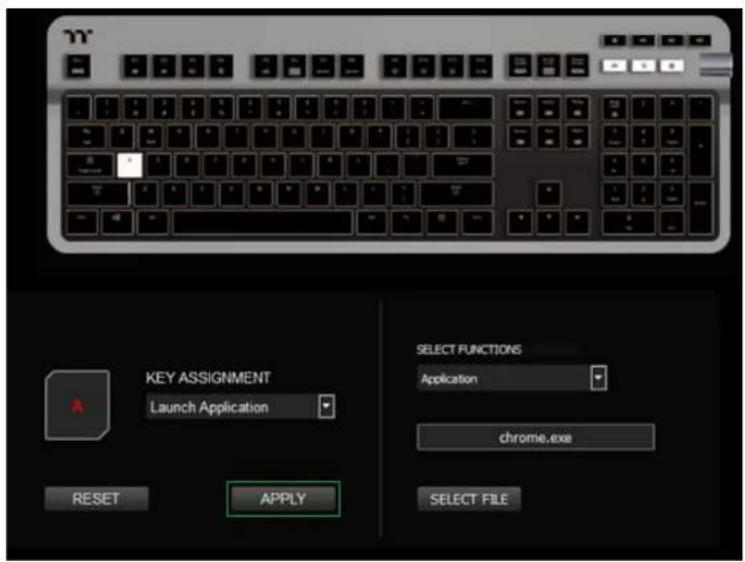
Step 6:Step 5:
Verify if the new key funcon is applied properly by looking at the color displayed on the screen.
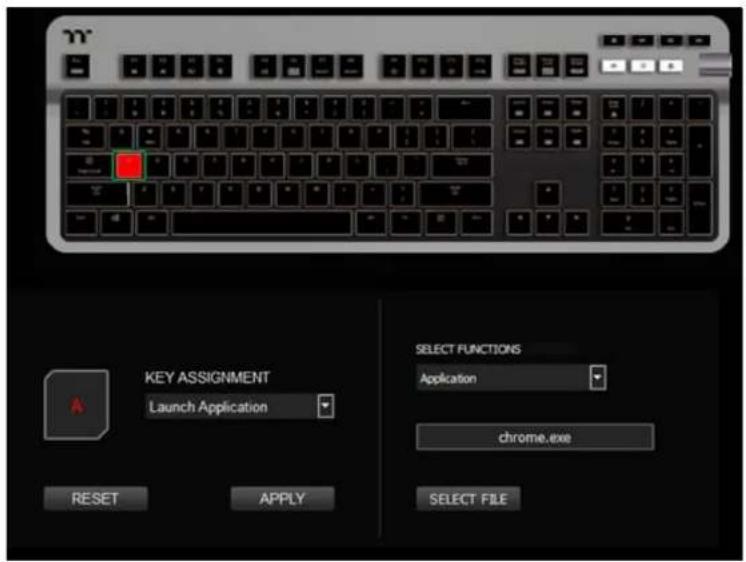
Select a key, then select "Launch Applicaon" funcon from the drop-down list.
Step 2:Step 1:
Select "Web" in the upper-right drop-down list.
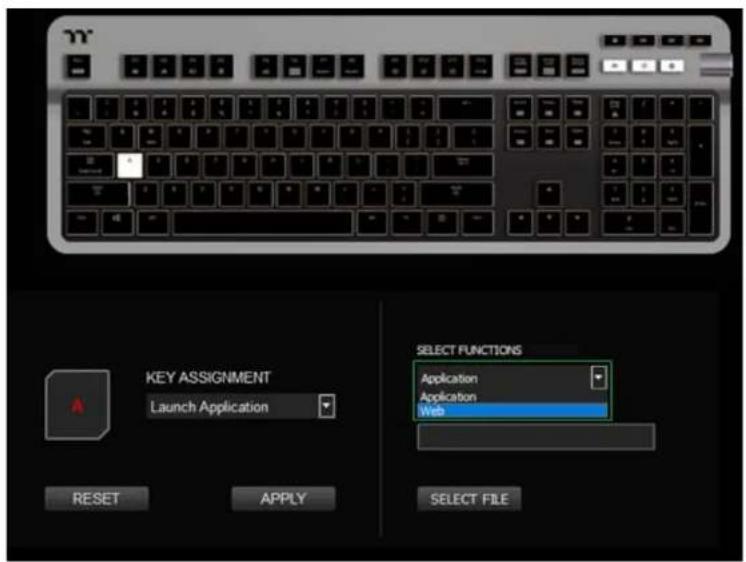
Enter the URL into the textbox located on the boom-right and press Enter.
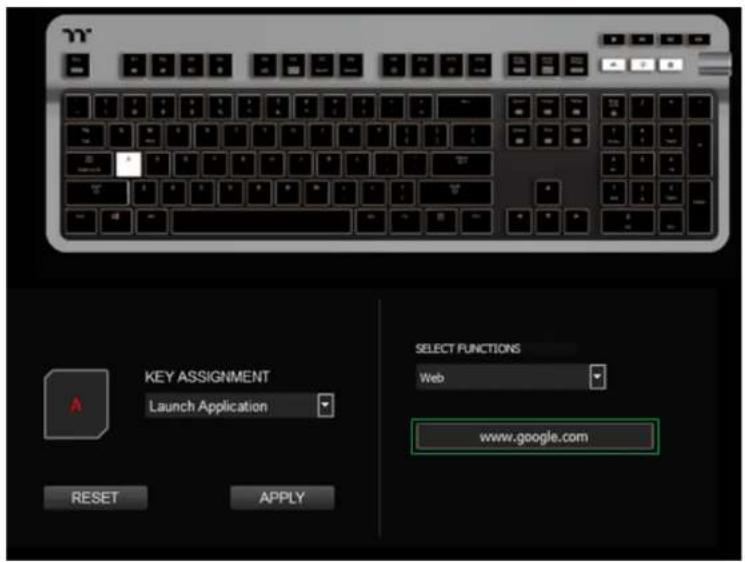
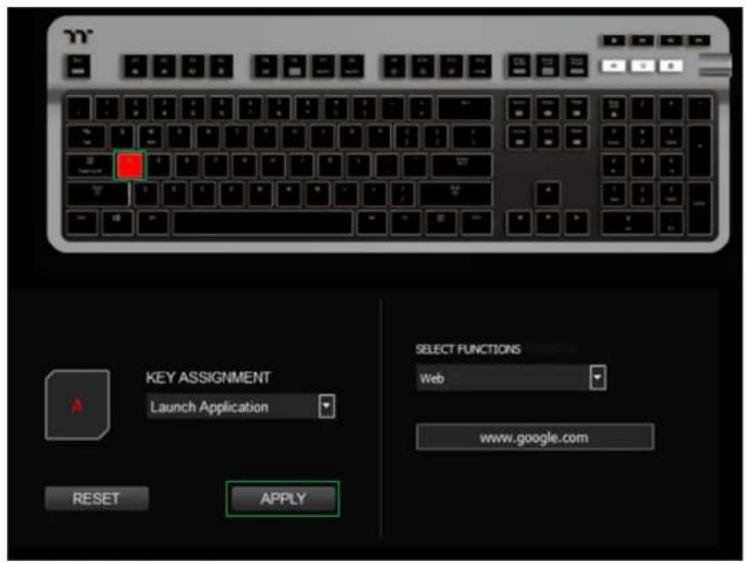
Step 4:Step 3:
Click Apply to save the new funcon. Verify if the new key funcon is applied properly by looking at the color displayed on the screen.
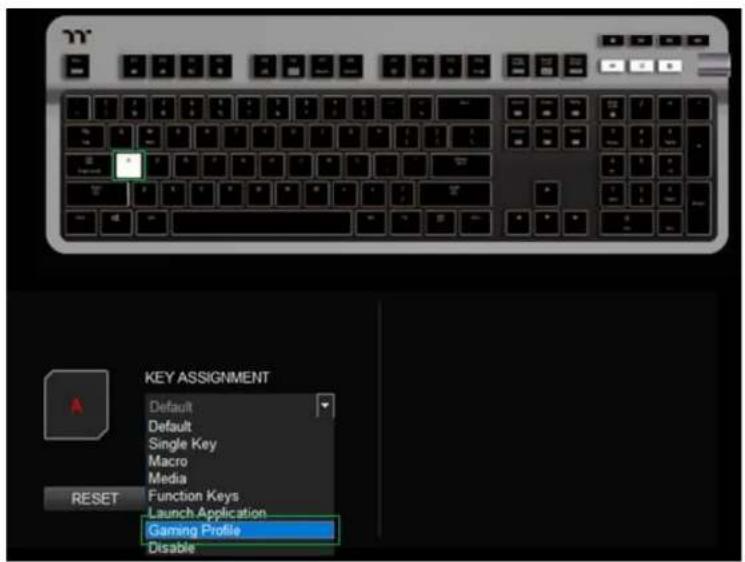
Select a key, then select "Gaming Prole" funcon from the drop-down list.
Step 2:Step 1:
Select a game tle in the upper-right drop-down list.
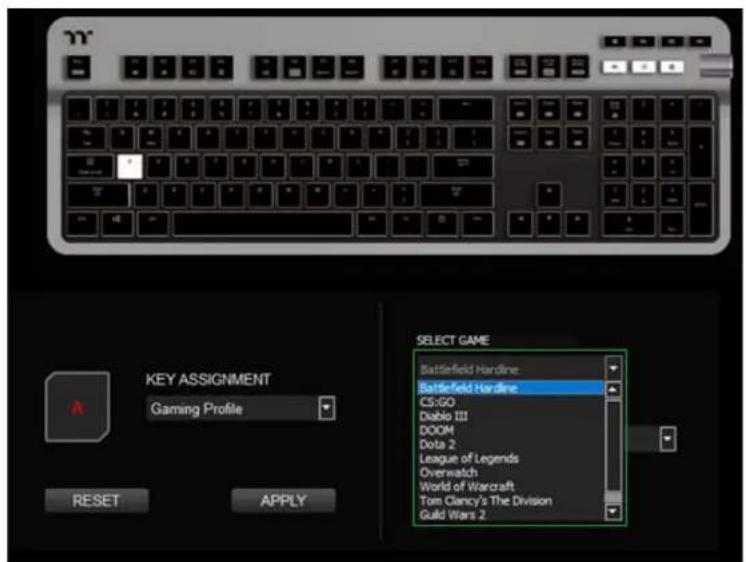
In the lower-right drop-down list, select an in-game acon.
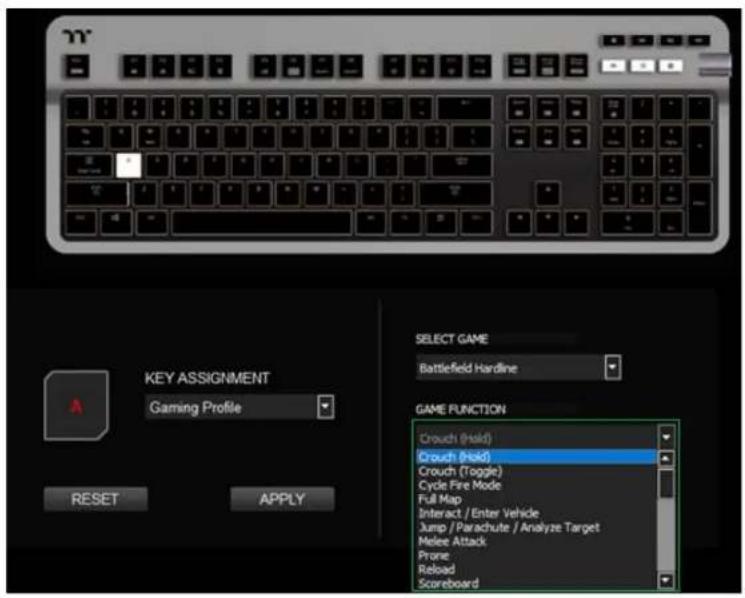
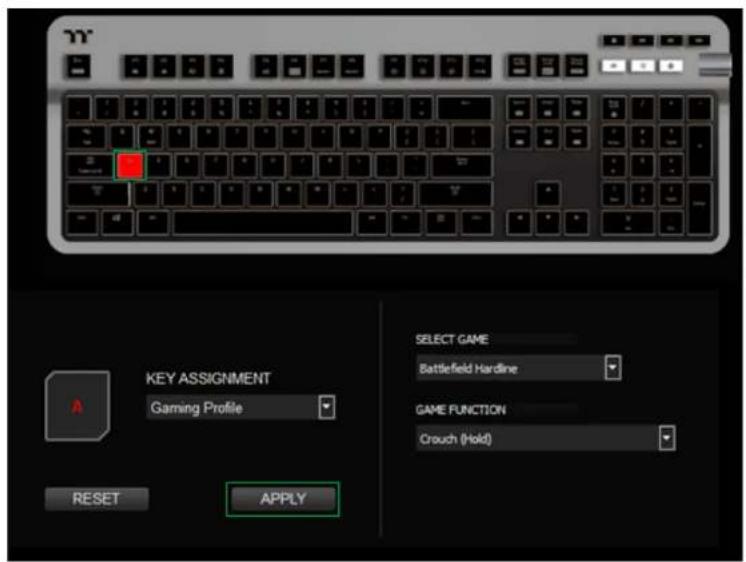
Step 4:Step 3:
Click Apply to save the new funcon. Verify if the new key funcon is applied properly by looking at the color displayed on the screen.
Select a key, then select "Disable" funcon from the drop-down list.
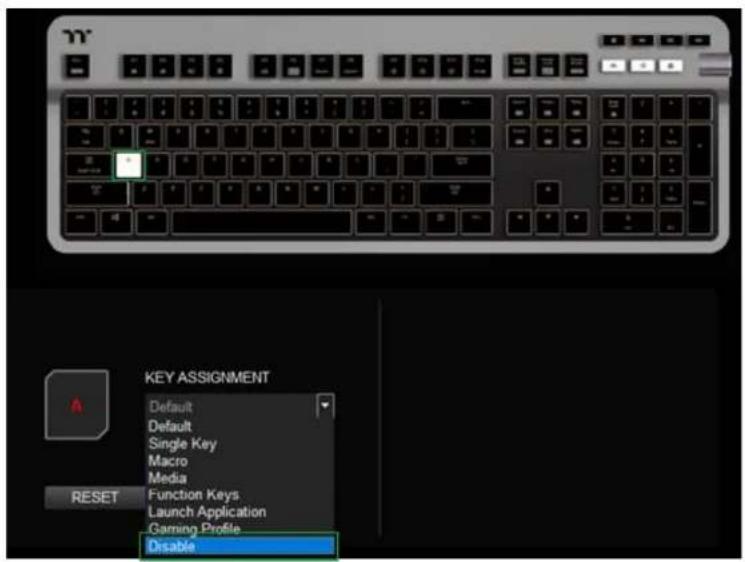
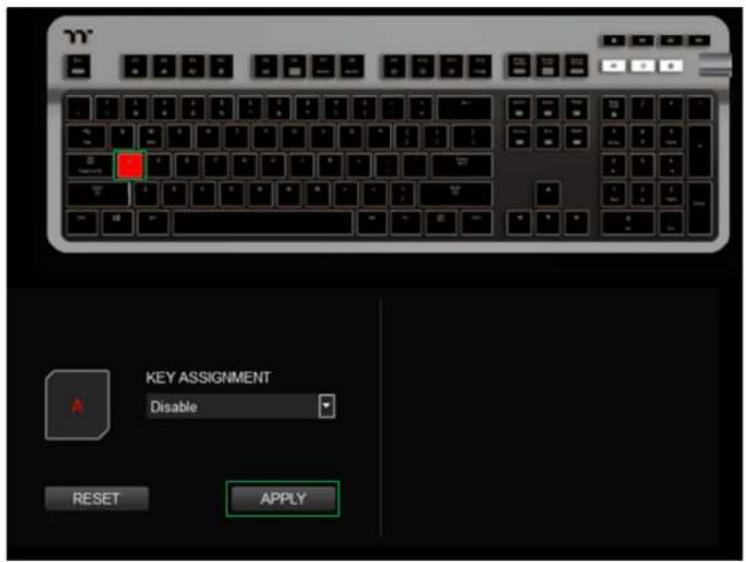
Step 2:Step 1:
Click Apply to save the new funcon. Verify if the new key funcon is applied properly by looking at the color displayed on the screen.

thermaltake
Chapter 5:
FUNCTIONS AVAILABLE ON THE MACRO PAGE
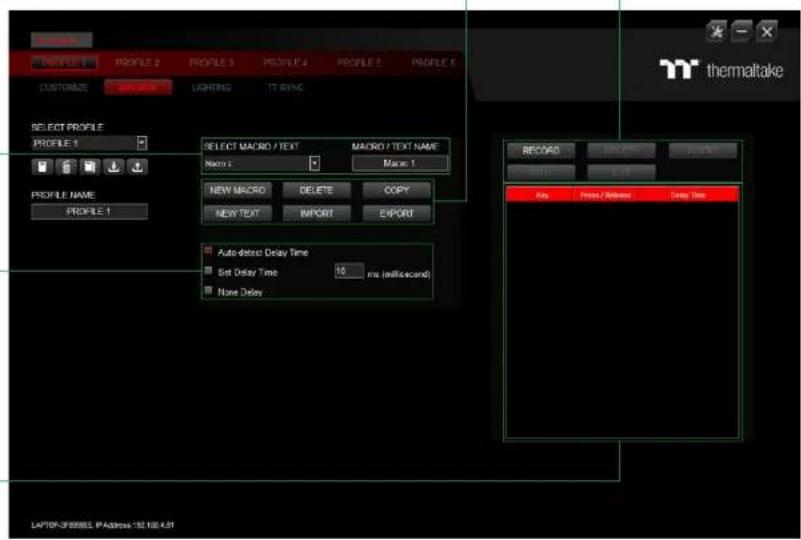
New Macro / Delete / Copy / New Text / Import / Export
New Macro: Create a new macro.
Delete: Delete a macro or text.
Copy: Copy a macro or text.
New Text: Create a new text.
Import: Import a macro or text.
Export: Export a macro or text.
Modifying the Name of a Macro / Text
You can change the name of a new macro or text directly.
Macro Recording Sengs
Auto-Detect Delay Time: Record a macro based on the me interval between each keystroke.
Set Delay Time: Record a macro based on the specied me interval.
None Delay: Record a macro without recording the me interval between each keystroke.
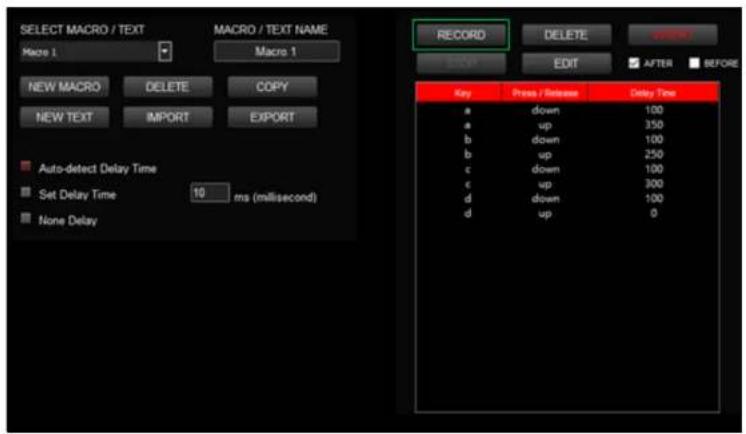
Macro Recording Area
You can verify the sequence recorded by the macro and the key assignment.
Record / Delete / Insert / Stop / Edit
Record: Begin macro recording.
Delete: Delete the assigned value of a specific key.
Insert: Insert an additional value above or below the existing value of a specific key.
Stop: End macro recording.
Edit: Edit the delay me of a specific key.

thermaltake
| Chapter 6: HOW TO RECORD MACROS
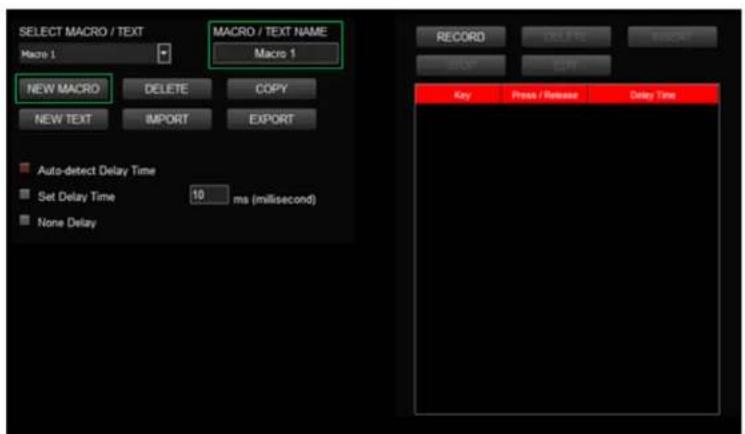
Step 1:
Add a new macro and modify its name.
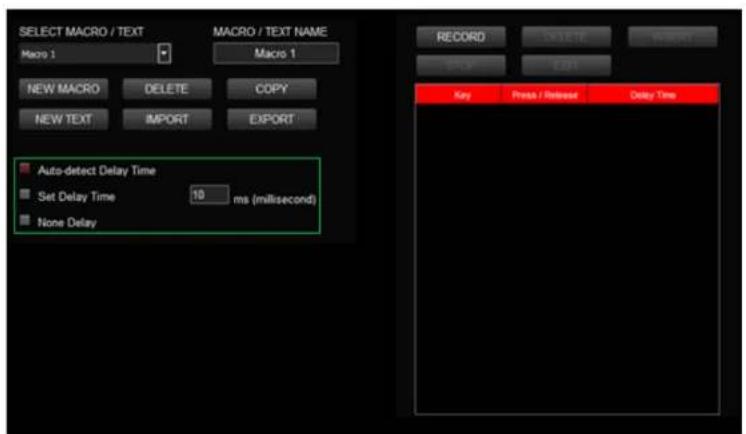
Step 2:
Select the delay method used to record the macro.
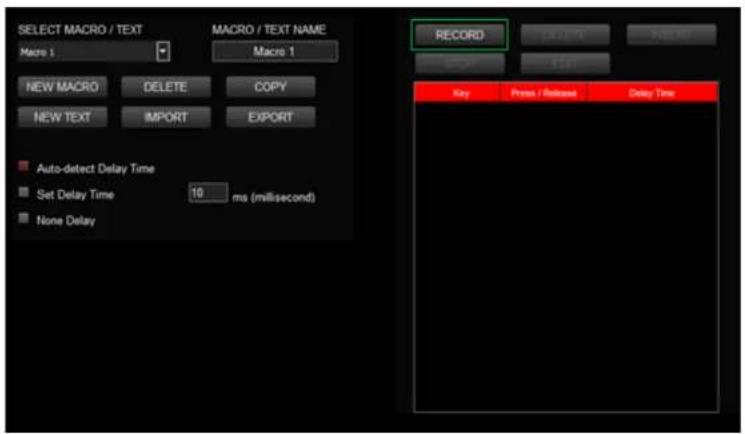
Press the record buon.
Step 4:Step 3:
Enter the sequence to be recorded from the keyboard, then press the stop buon to complete the recording.
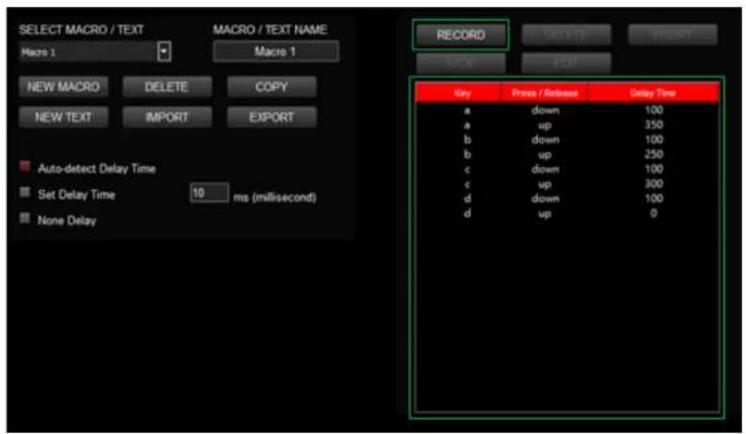
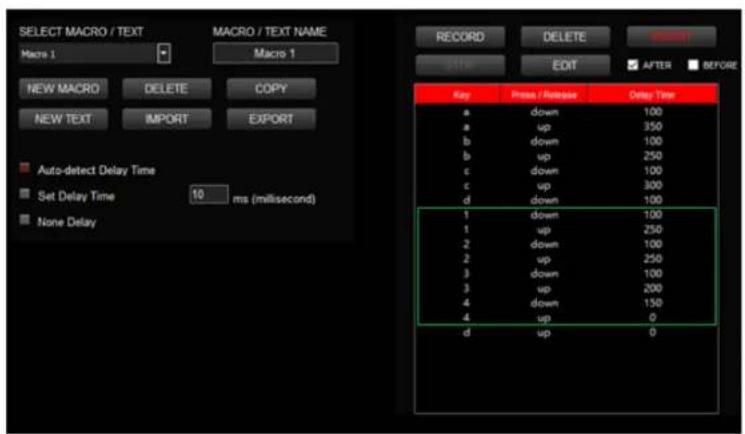
Step 2:Step 1:
Click the insert buon.Select a macro by clicking on the key it is assigned to.
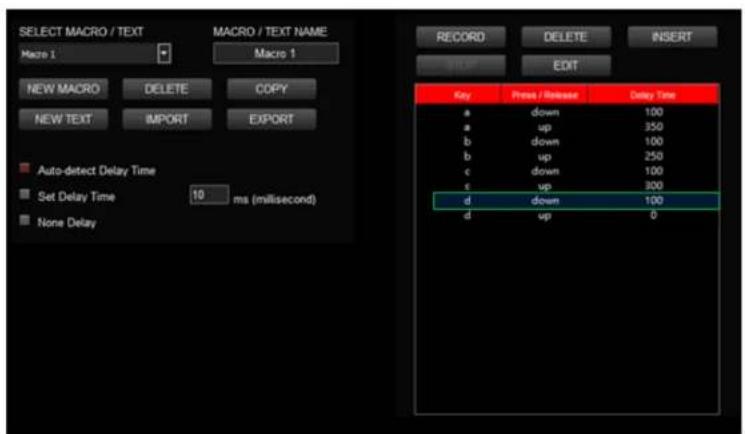
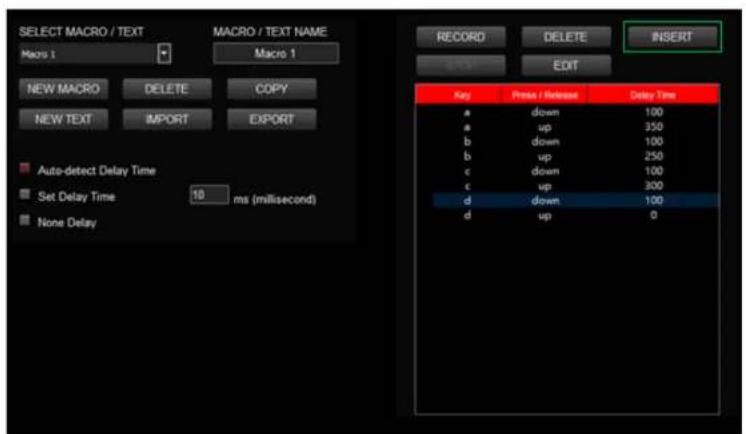
Select the posion where new content is to be inserted.
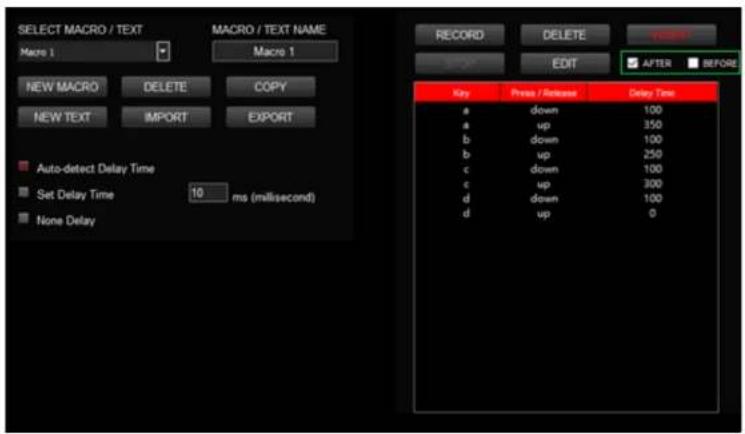
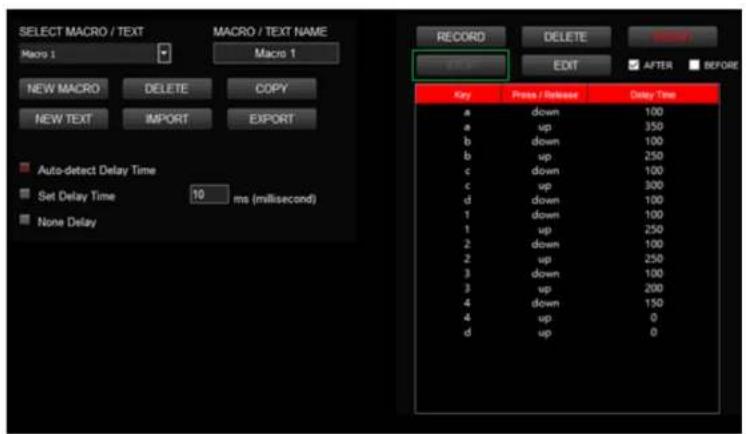
Step 4:Step 3:
Press the record buon.
Step 6:Step 5:
Enter the sequence to be recorded from the keyboard. Click the stop buon to complete the inseron process.
Add a new character set and modify its name.
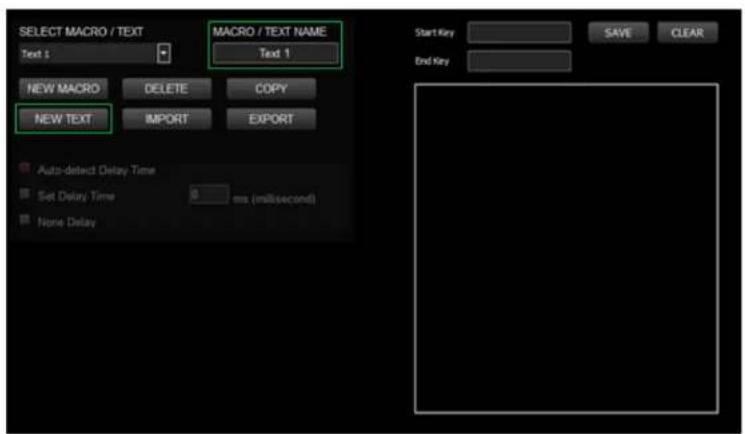
Step 2:Step 1:
Enter the values for the "Start Key" and "End Key" in the upper right corner.
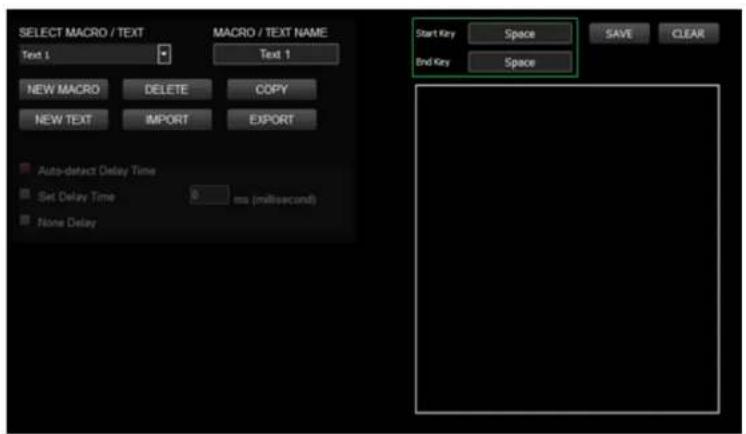
Click on the input box located at the boom-right corner and enter the characters to be recorded from the keyboard.
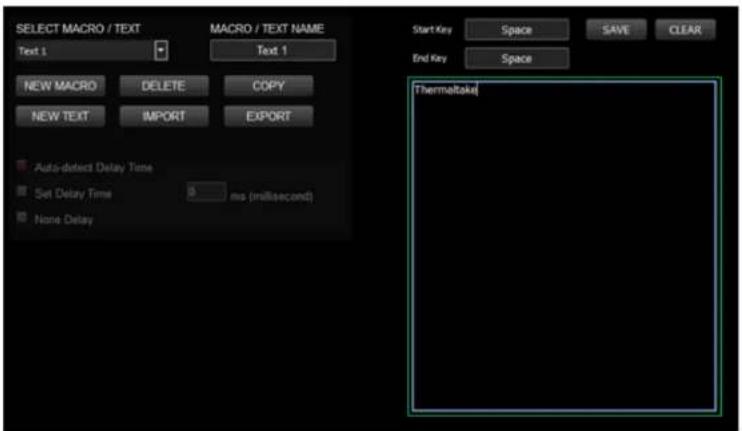
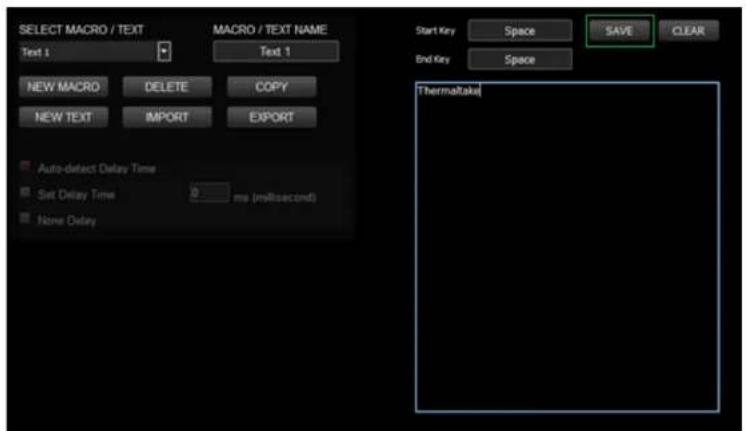
Step 4:Step 3:
Click the save buon to complete the recording of the character set.

thermaltake
Chapter 7:
FUNCTIONS AVAILABLE ON THE LIGHTING EFFECTS PAGE
Switching Lighng Eects
Keyboard light of 15 lighng eects are supported: Stac, Pulse, Wave, Spiral Rainbow, RGB Spectrum, Reave, Flow, Ripple, Raindrops, Snake, Blink, Brick, Pervade, Music Mode and System Temperature.
Lighng Eects Conguraons
Can be used to adjust the color, direcon, speed, and brightness level of the lightng eect; can also be used to switch to random colors.
Apply / Restore Lighng Eect Sengs
Apply: Apply the new lightng eect sengs to all keys on the keyboard.
Restore Lighng Eect Sengs: All lighng eect sengs saved under the current prole will be restored to factory default values.
Color Paern Sengs
Add Paern: Add a new paern with red to black gradient. Delete Paern: Delete the currently selected color paern. Insert Color Point: Add a red color point to the color paern. Delete Color Point: Delete the selected color point from the color paern.
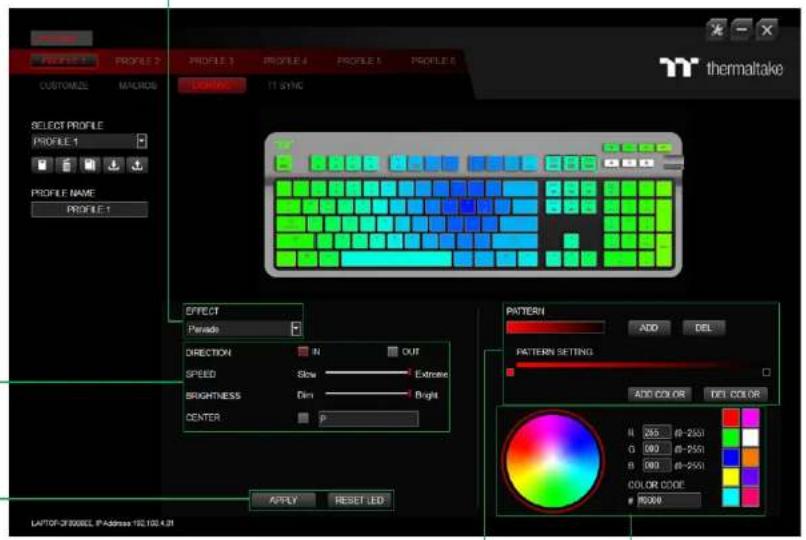
Color Wheel Sengs
You can select a color from the color wheel directly or enter RGB color values to adjust the color of the lightng eect.

thermaltake
| Chapter 8: LIGHTING EFFECTS OVERVIEW
Step 1:
Select "Stac" in the lightng eect drop-down list.
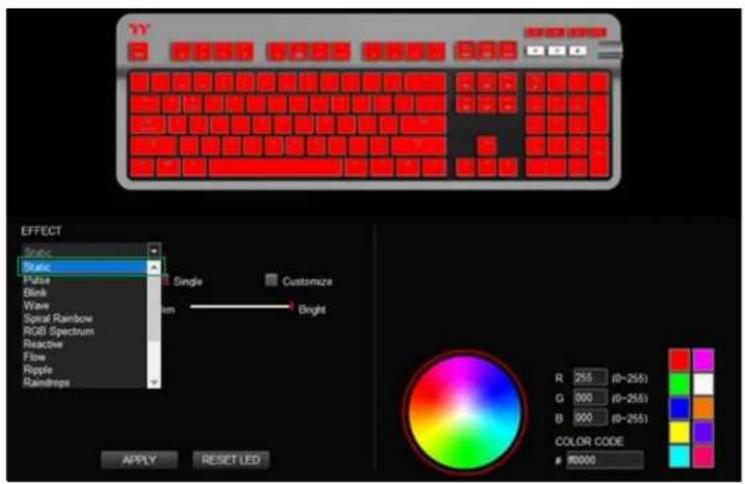
Step 2:
Click on a color inside the color wheel or enter the RGB color values to change the color.
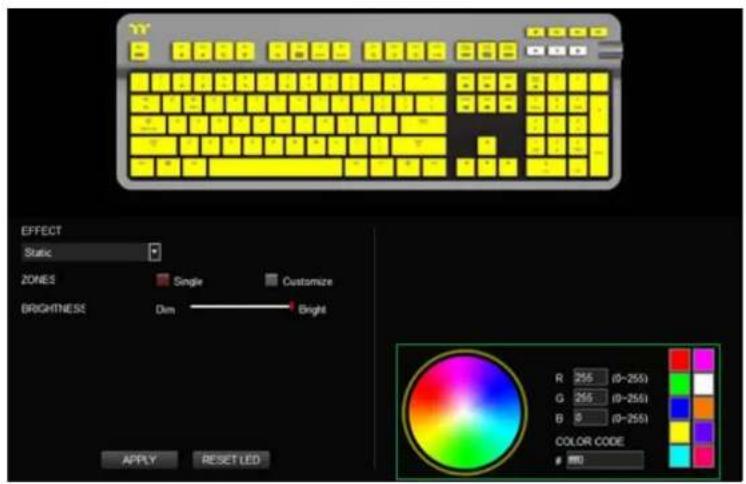
Step 4:Step 3:
Click apply to save the new sengs. Adjust the brightness level of the backlight.
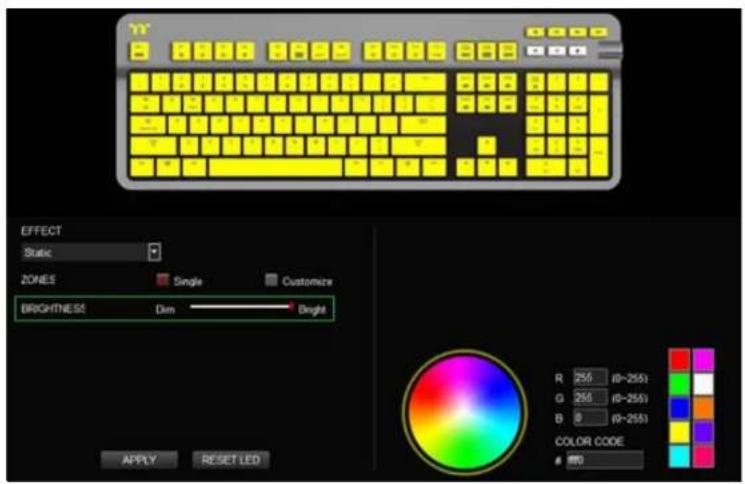
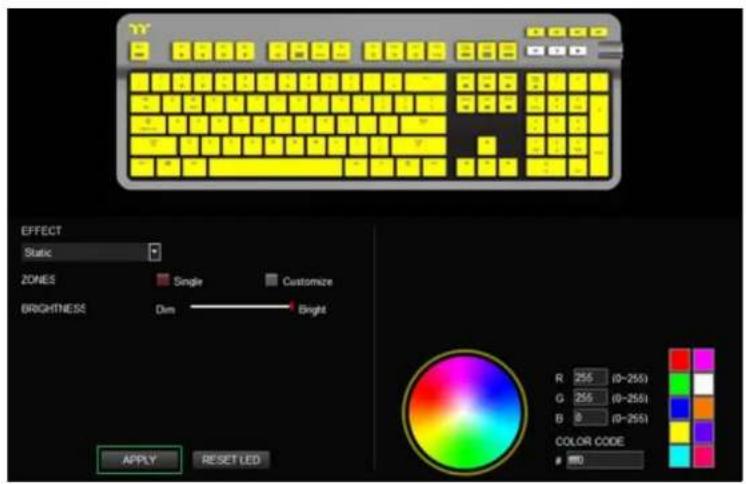
Switch the zones to "Customized".
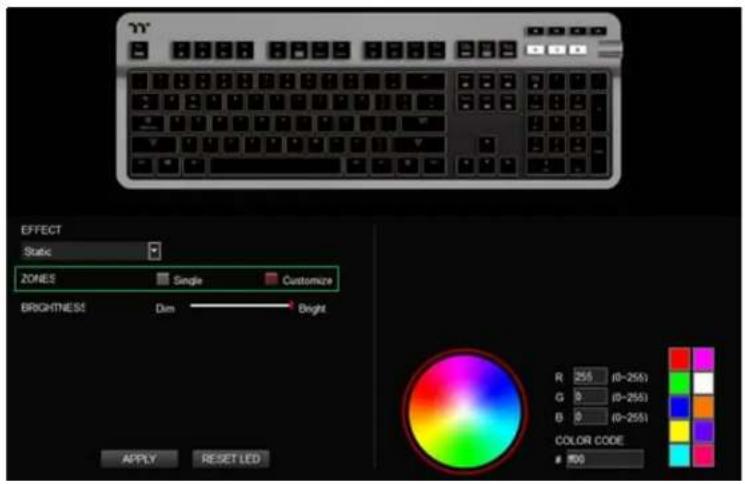
Step 2:Step 1:
Click on a color inside the color wheel or enter the RGB color values to change the color.
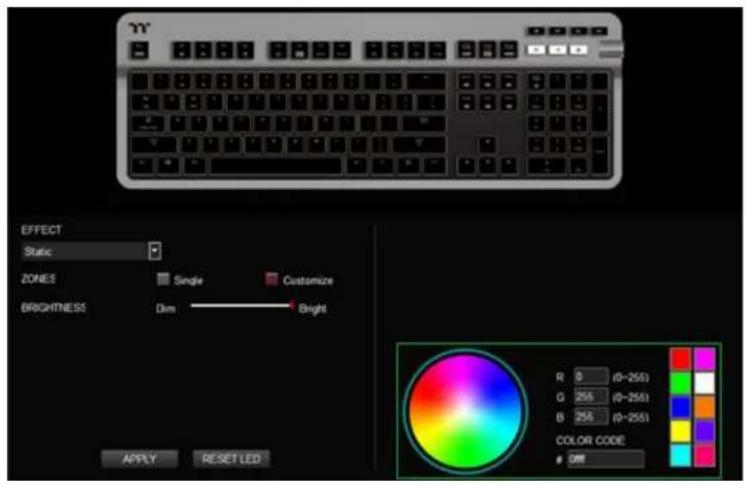
Click on the keyboard image with the le mouse buon to change the key color.
※ Right click to cancel the color.
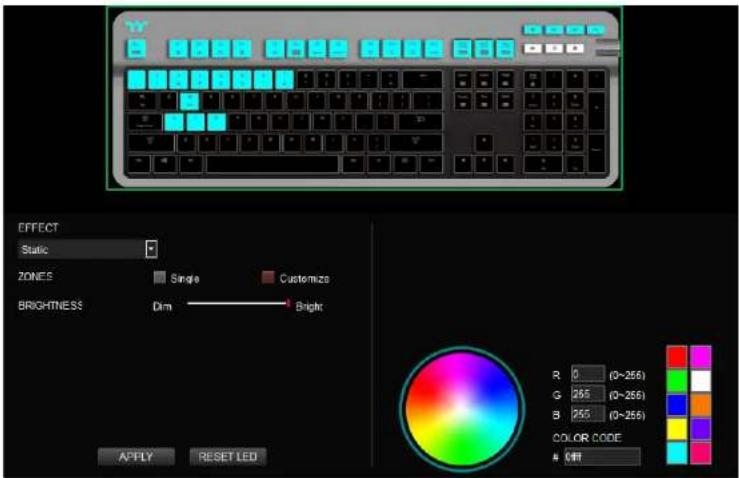
Step 4:Step 3:
Click apply to save the new sengs.
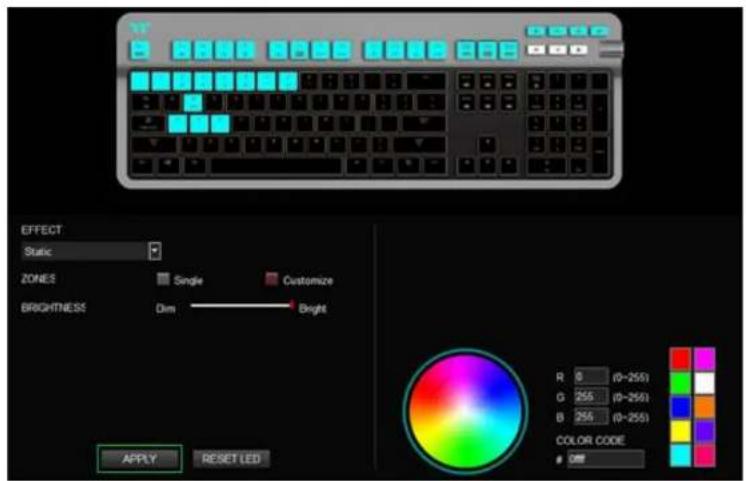
Select "Pulse" in the lightng eect drop-down list.
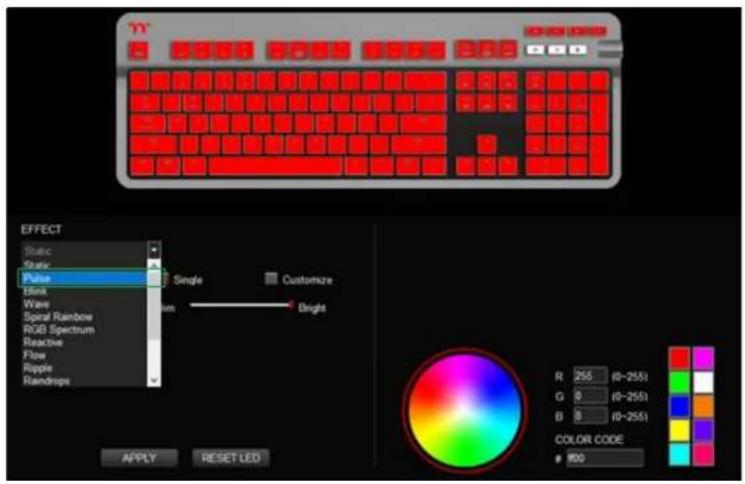
Step 2:Step 1:
Click on a color inside the color wheel or enter the RGB color values to change the color.
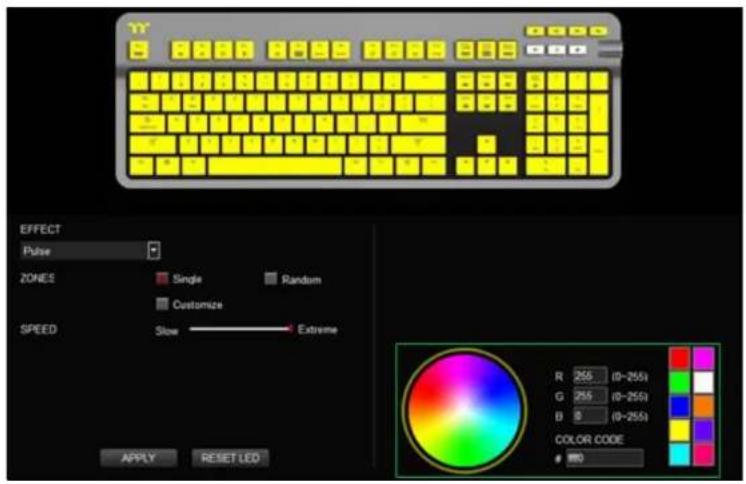
Adjust the backlight speed.
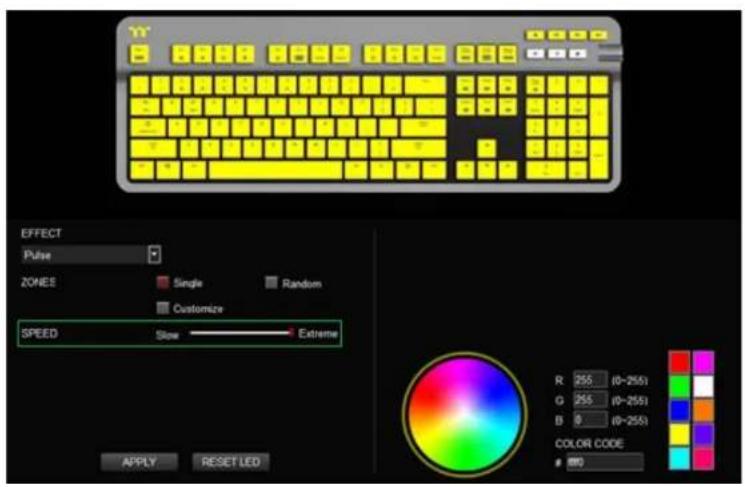
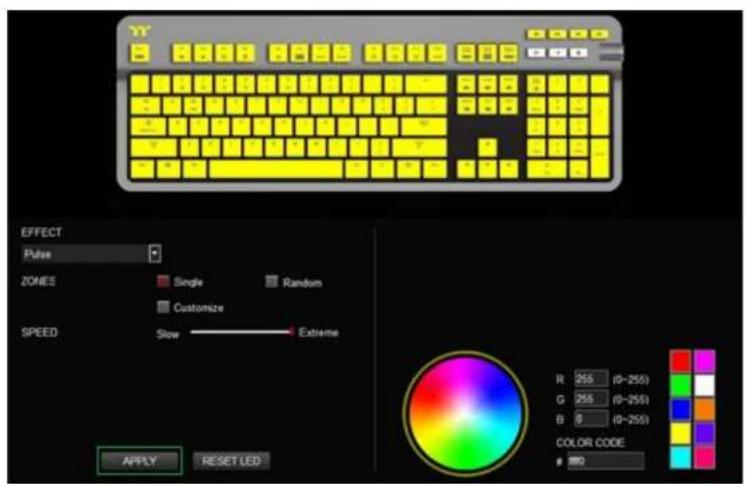
Step 4:Step 3:
Click apply to save the new sengs.
Switch the zones to "Customized".
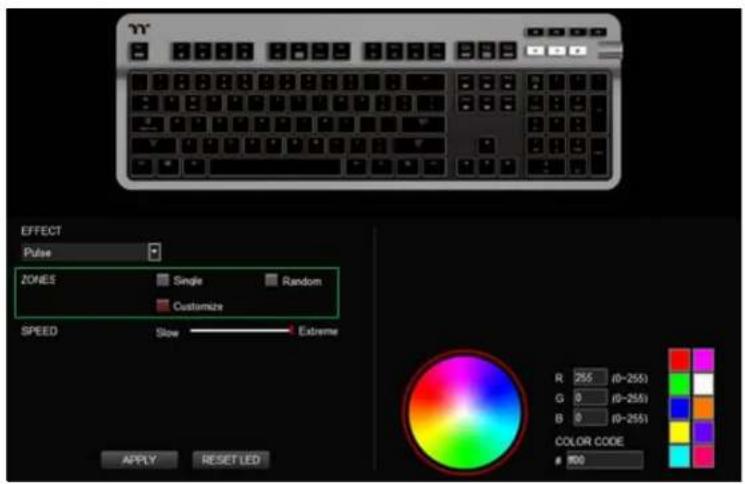
Step 2:Step 1:
Click on a color inside the color wheel or enter the RGB color values to change the color.
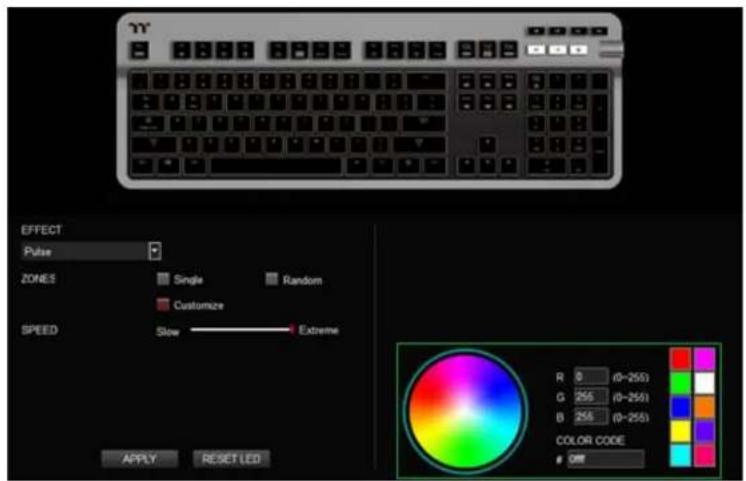
Click on the keyboard image with the le mouse buon to change the key color.
※ Right click to cancel the color.
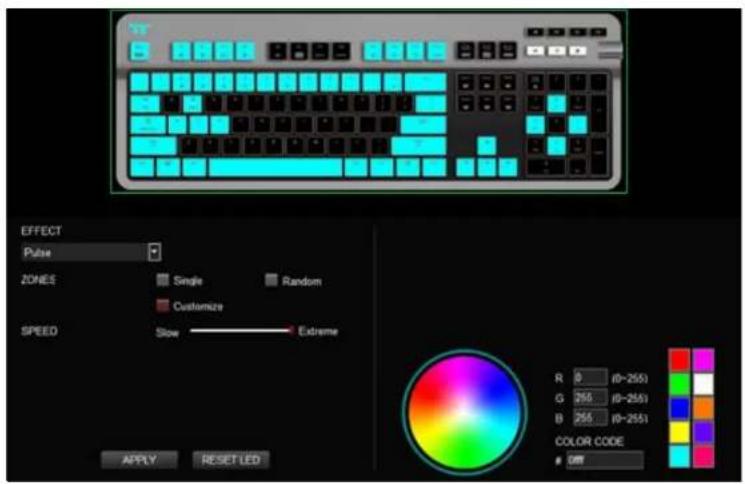
Step 4:Step 3:
Click apply to save the new sengs.
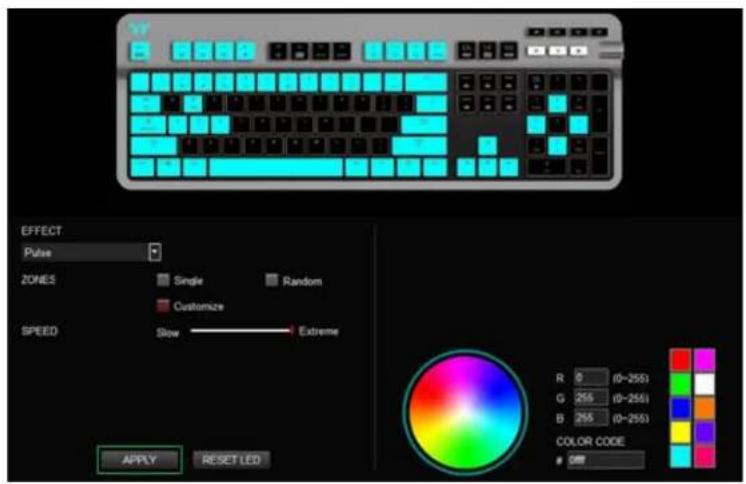
Select "Blink" in the lightng eect drop-down list.
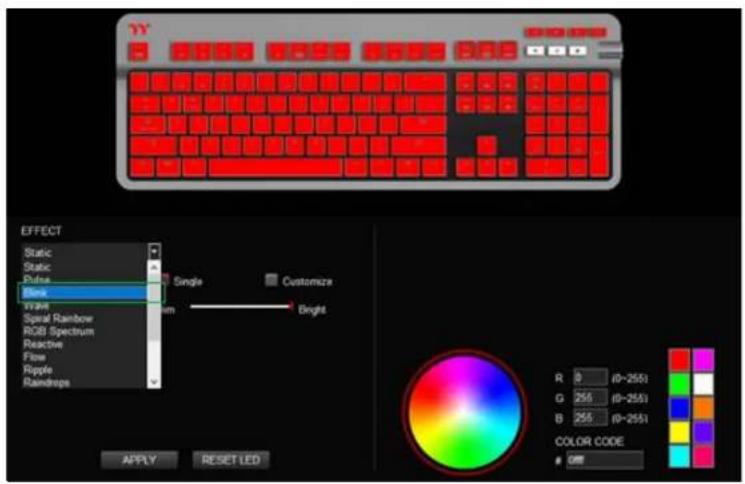
Step 2:Step 1:
Click on a color inside the color wheel or enter the RGB color values to change the color.
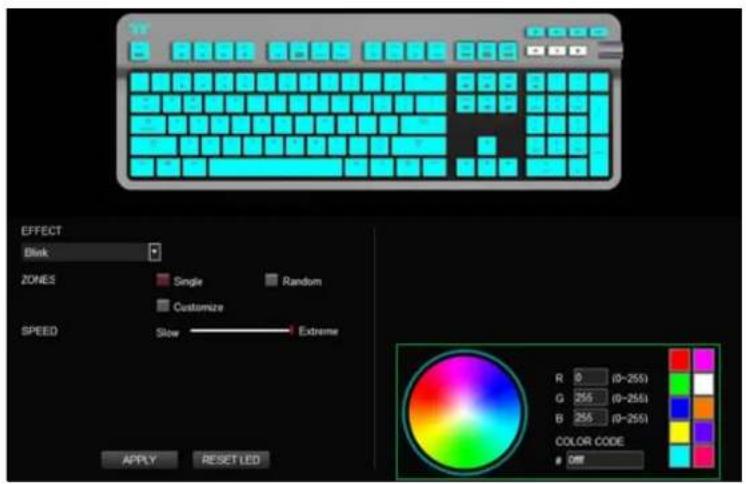
Adjust the backlight speed. Click apply to save the new sengs.
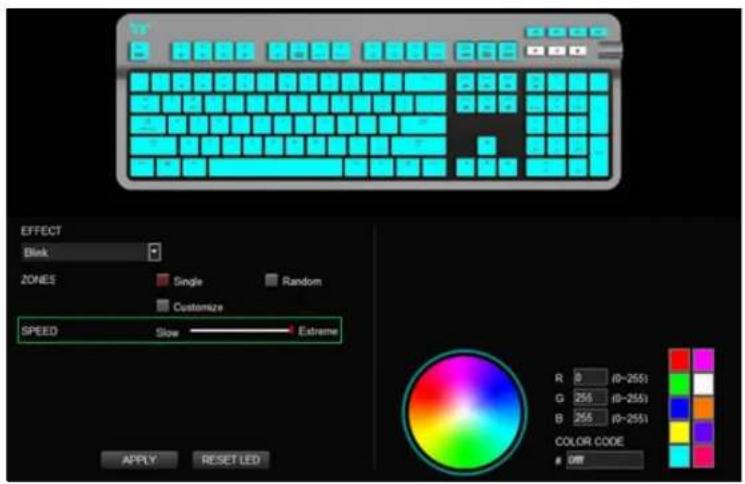
Step 4:Step 3:
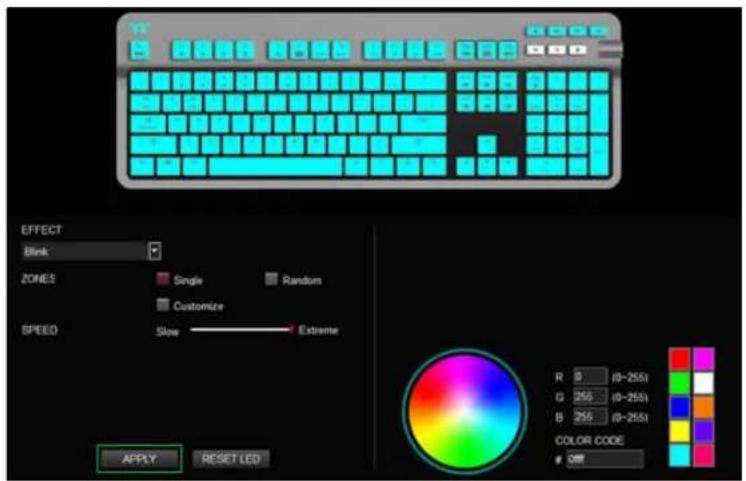
Switch the zones to "Customized".
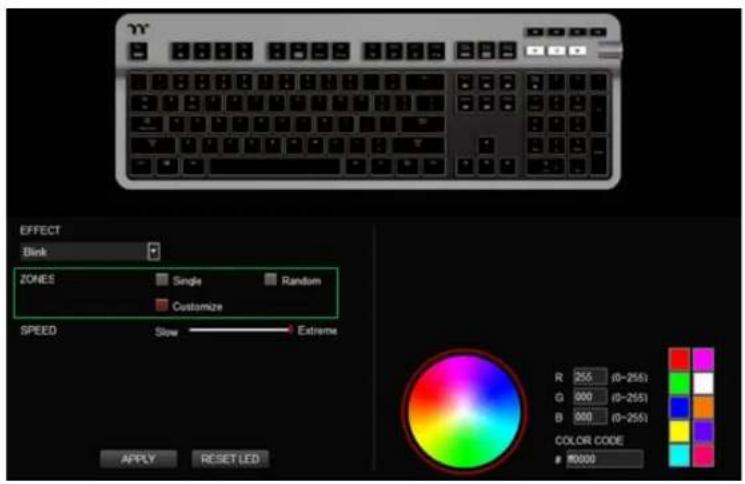
Step 2:Step 1:
Click on a color inside the color wheel or enter the RGB color values to change the color.
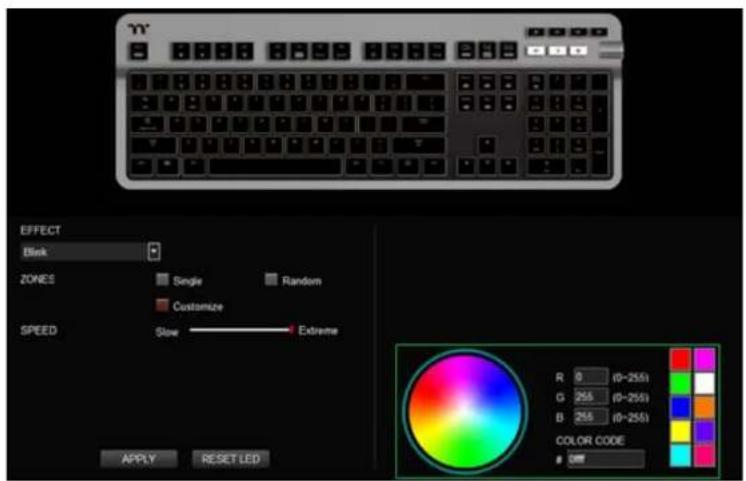
Click on the keyboard image with the le mouse buon to change the key color.
※ Right click to cancel the color.
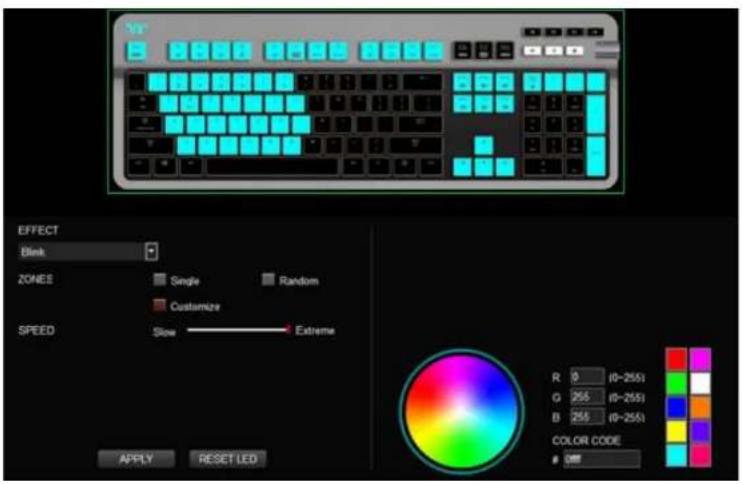
Step 4:Step 3:
Click apply to save the new sengs.
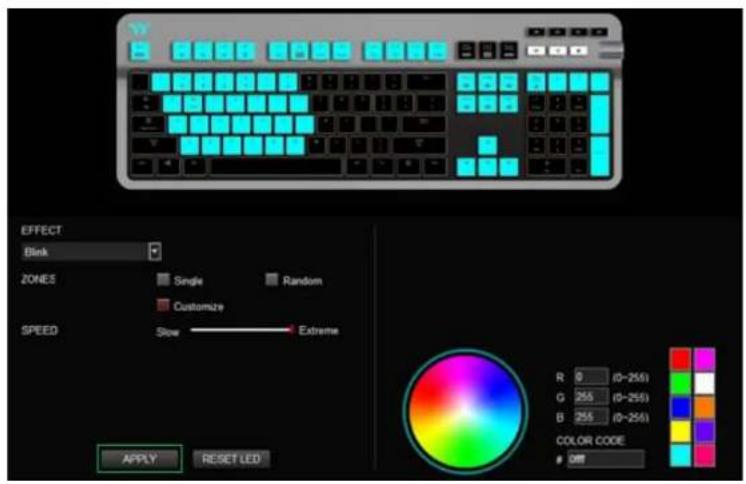
Step 2:Step 1:
Select a set of color paerns on the upper-right. Select "Wave" in the lightng eect drop
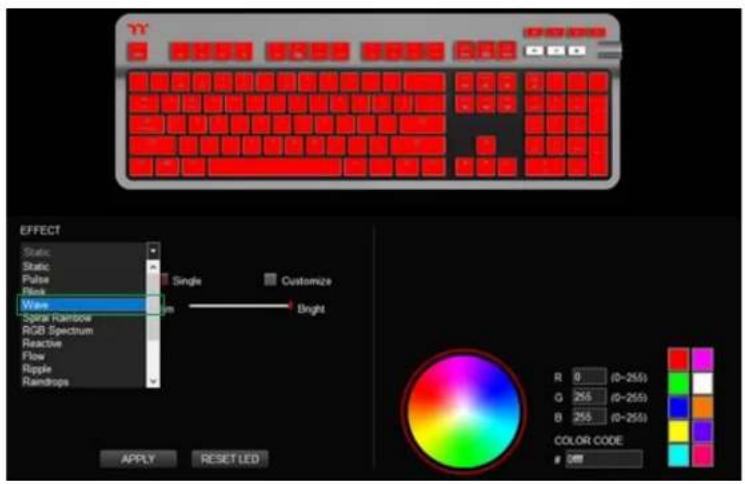
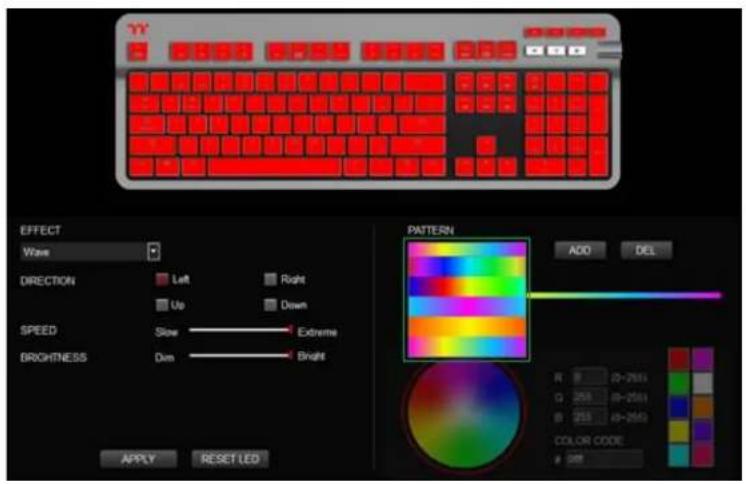
Set the direcon, speed, and brightness level of the lightng eect.
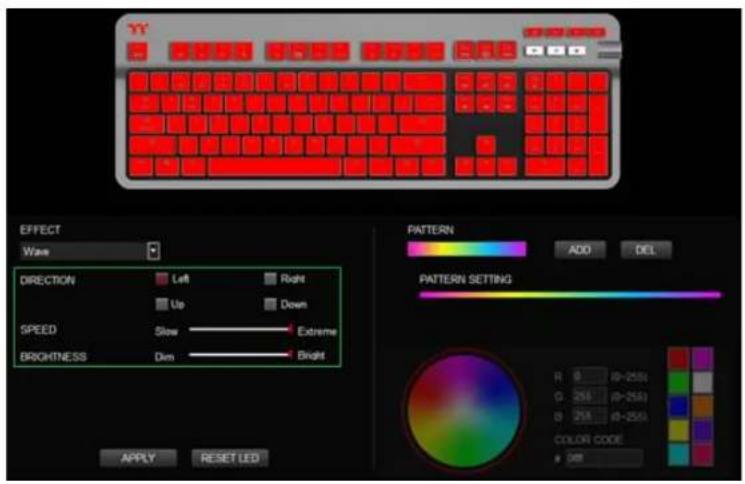
Step 4:Step 3:
Click apply to save the new sengs.
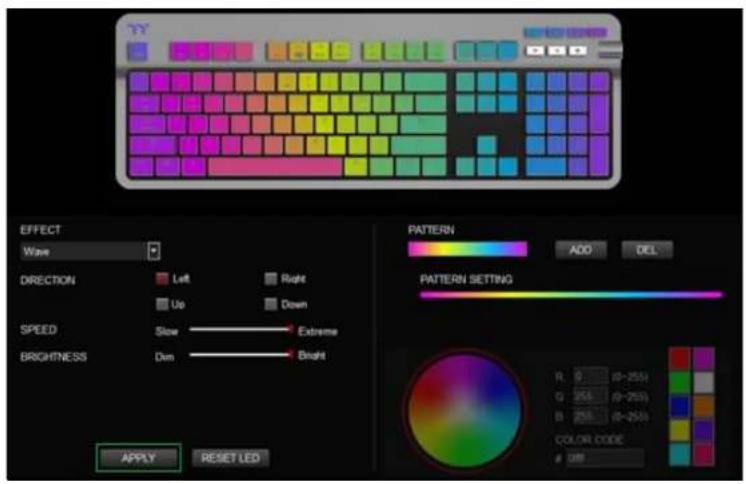
Step 2:Step 1:
Add a new color-inseron point and drag it to the desired posion.Add a new set of cc
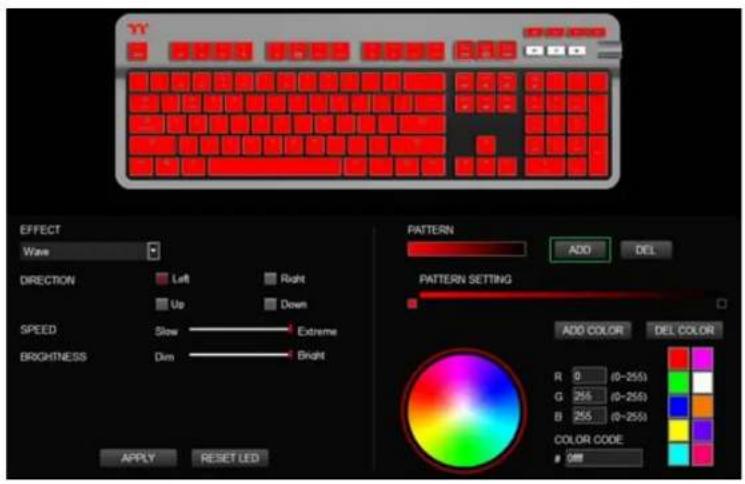
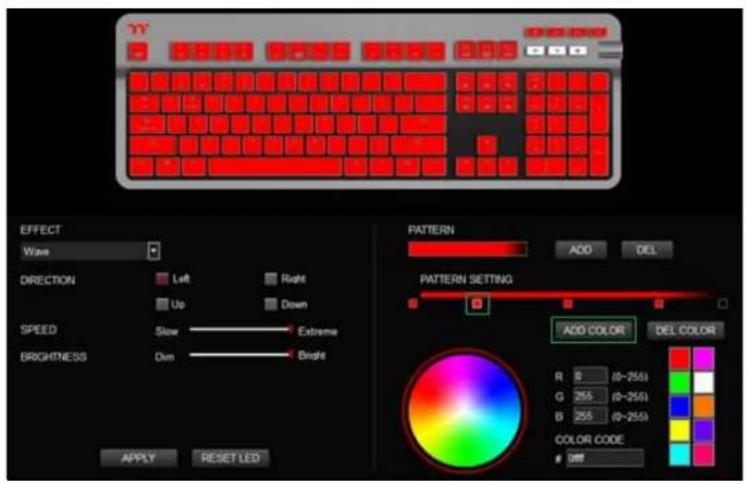
Click on each color-inseron point to modify its color.
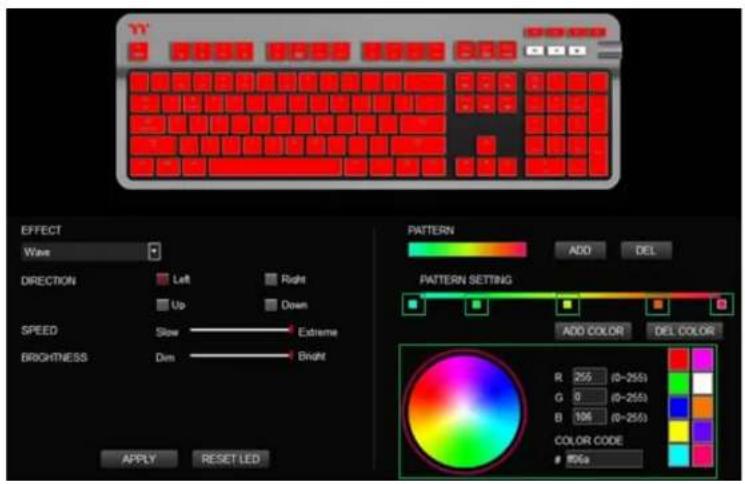
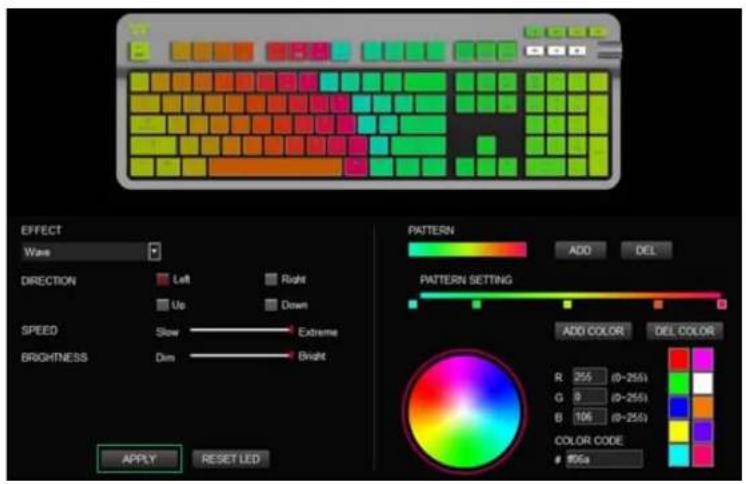
Step 4:Step 3:
Click apply to save the new sengs.
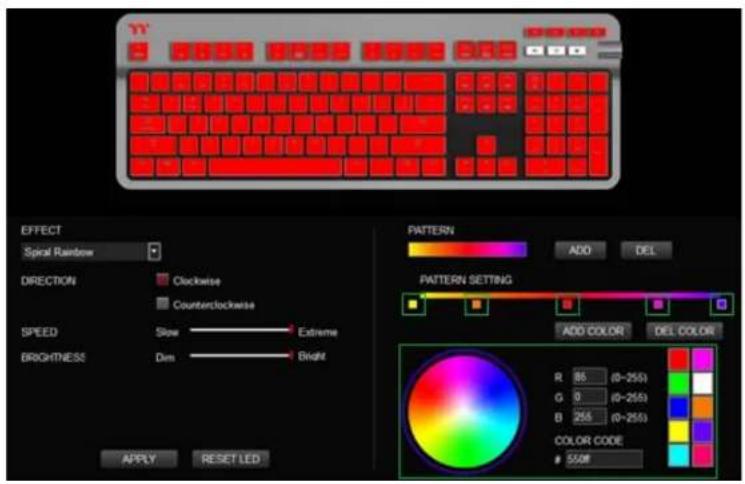
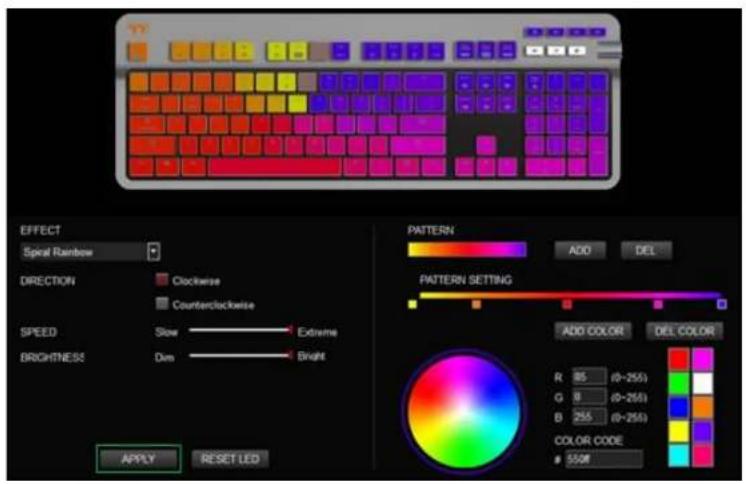
Select "Spiral Rainbow" in the lightng eect drop-down list.
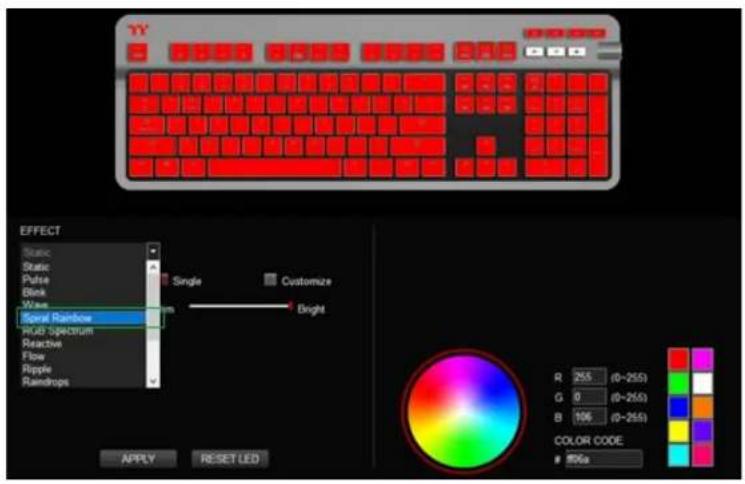
Step 2:Step 1:
Select a set of color paerns on the upper-right.
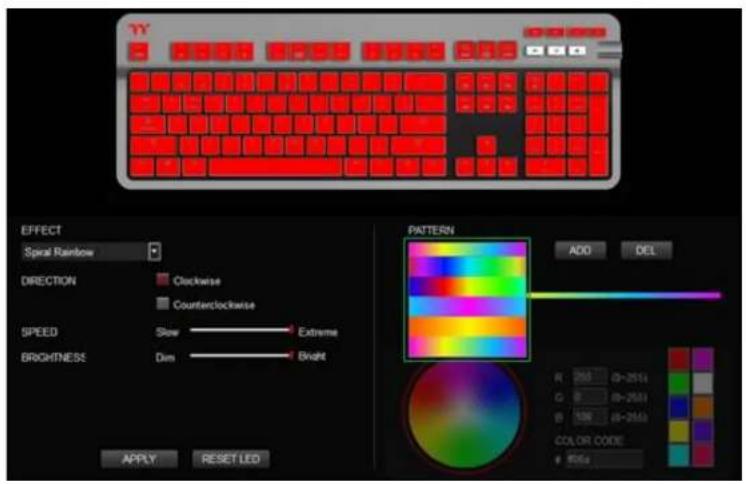
Step 4:Step 3:
Set the direcon, speed, and brightness level of the lightng eect. Click apply to save the new sengs.
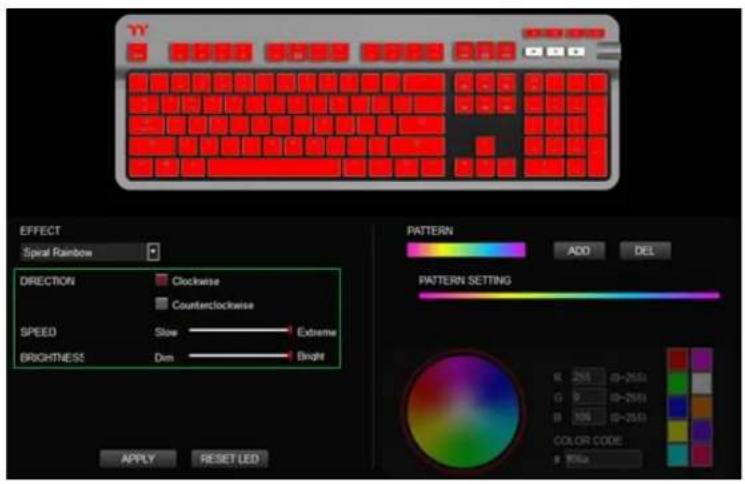
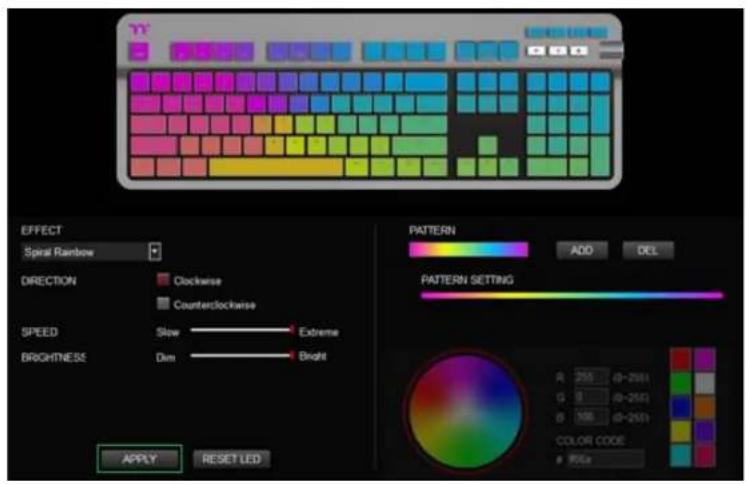
Step 2:Step 1:
Add a new color-inseron point and drag it to the desired posion.Add a new set of cc
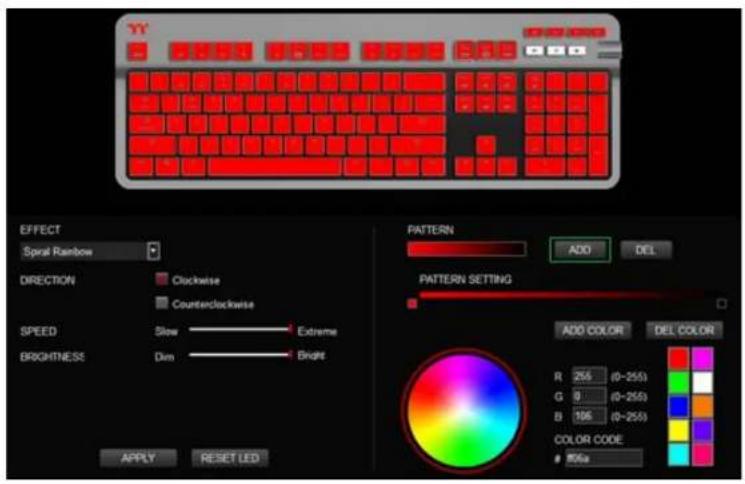
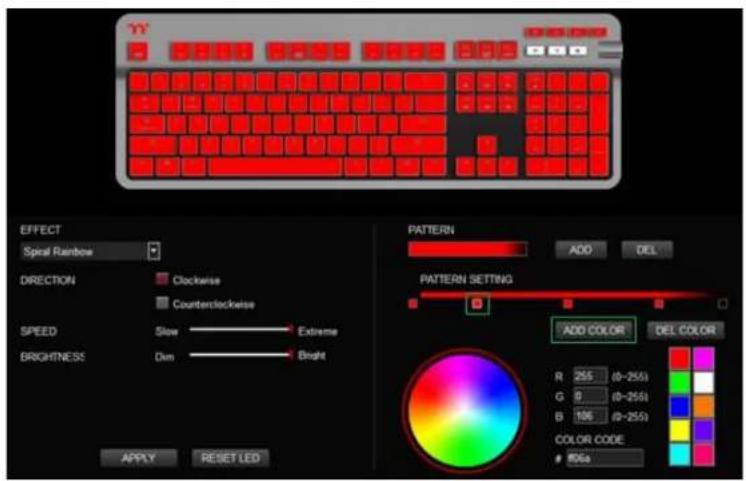
Step 4: Step 3:
Click on each color-inseron point to modify its color. Click apply to save the new sengs.
Select "RGB Spectrum" in the lightng eect drop-down list.
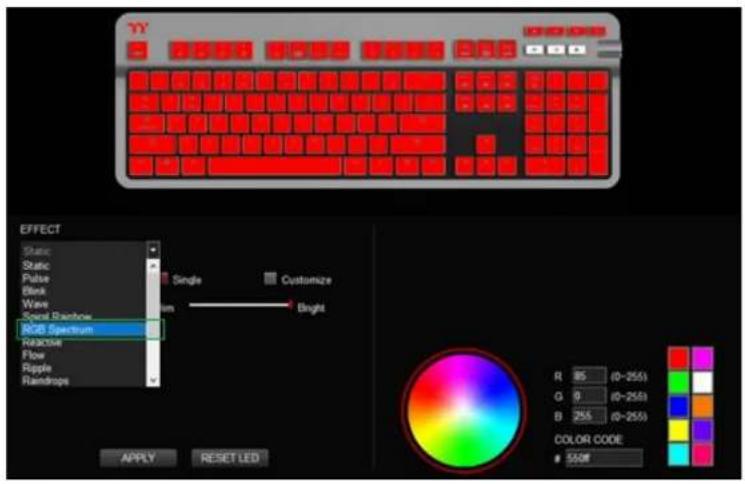
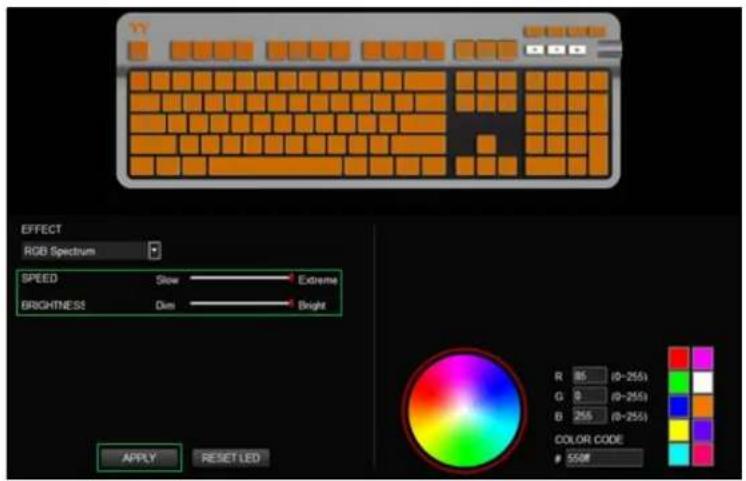
Step 2:Step 1:
Set the speed and brightness level of the backlight and click on Apply to save the new sengs.
Select "Reacve" in the lightng eect drop-down list.
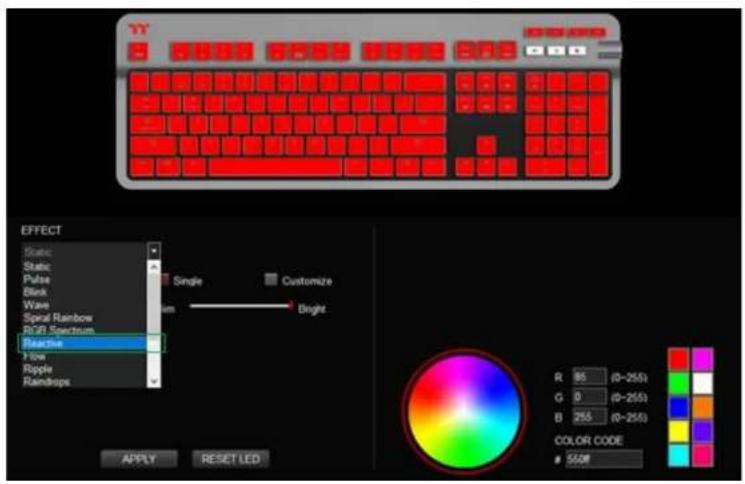
Step 2:Step 1:
Click on a color inside the color wheel or enter the RGB color values to change the color.
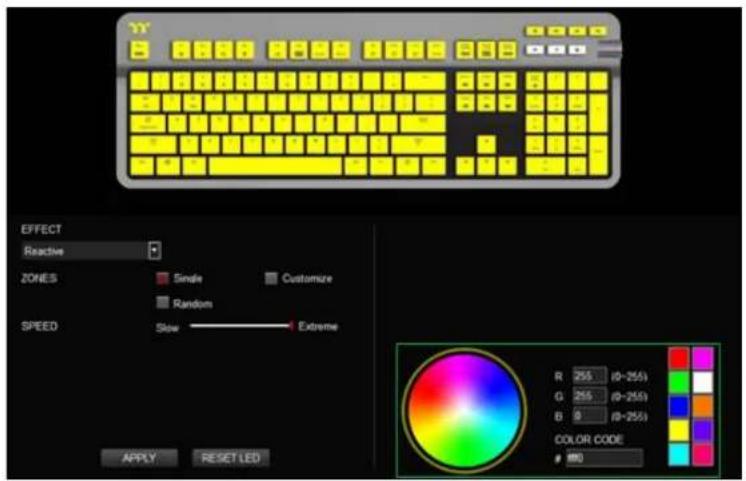
Step 3: Step 4:
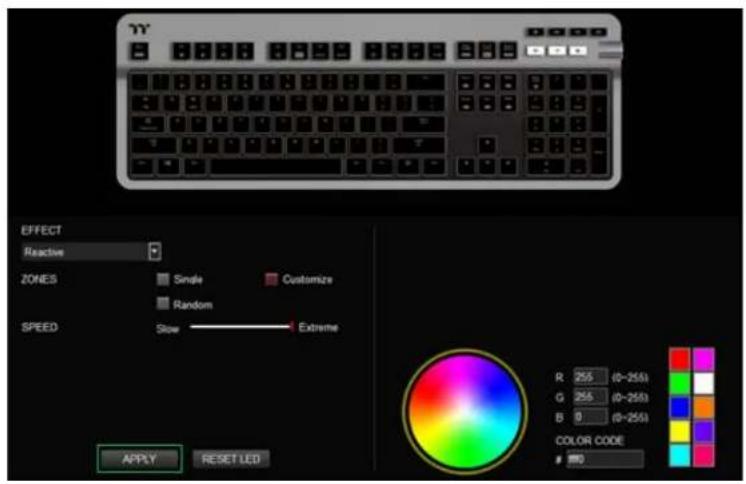
Adjust the backlight speed. Click apply to save the new sengs.
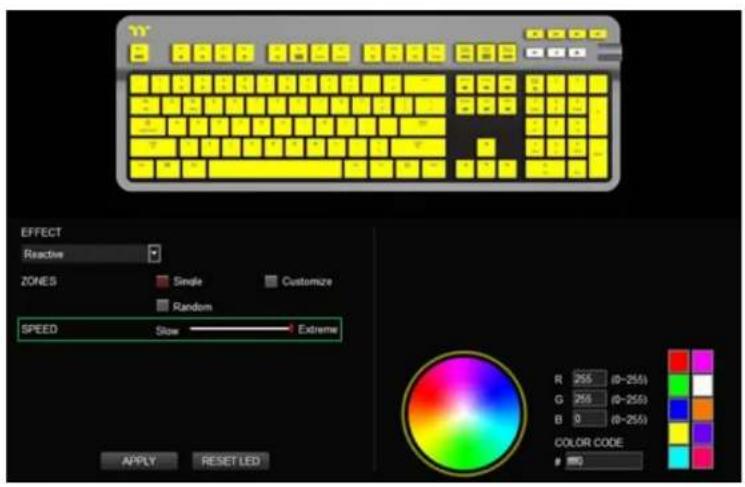
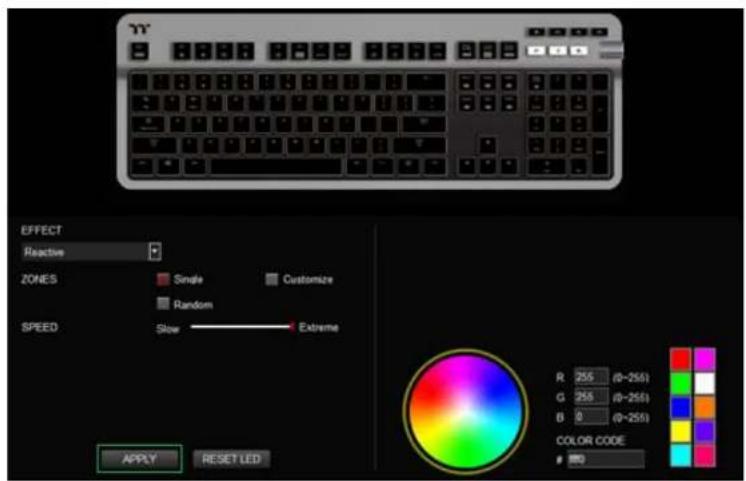
Switch the zones to "Customized".
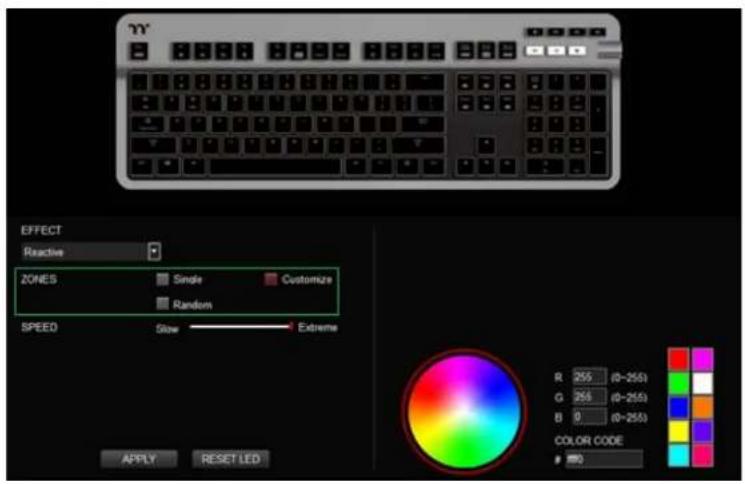
Step 2:Step 1:
Click on a color inside the color wheel or enter the RGB color values to change the color.
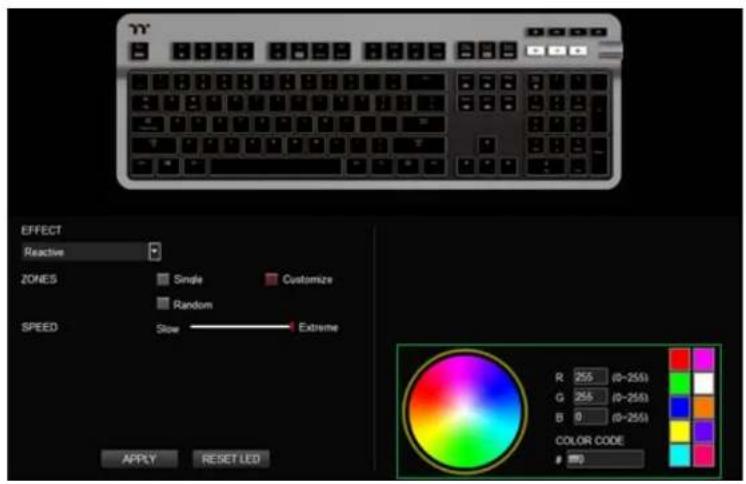
Click on the keyboard image with the le mouse buon to change the key color.
※ Right click to cancel the color.
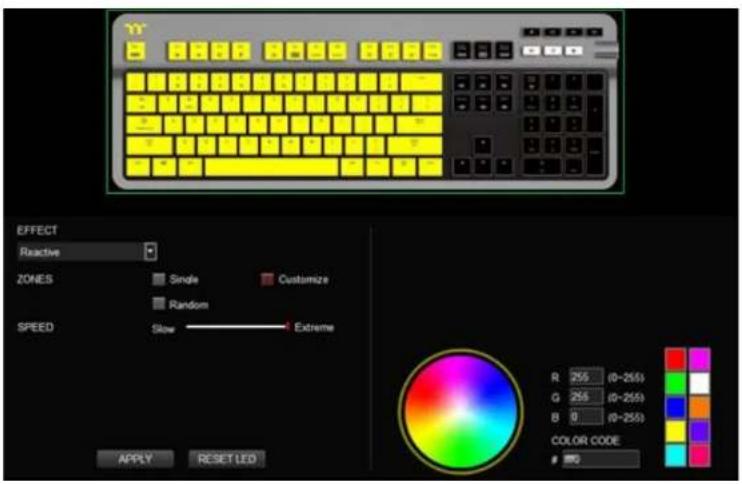
Step 4:Step 3:
Click apply to save the new sengs.
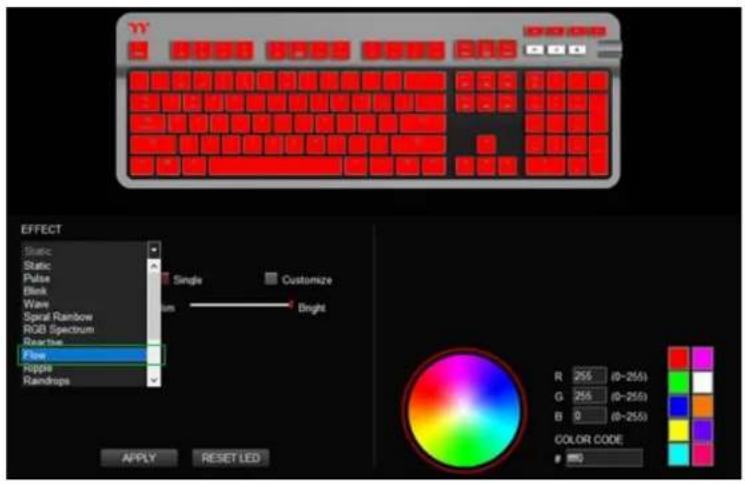
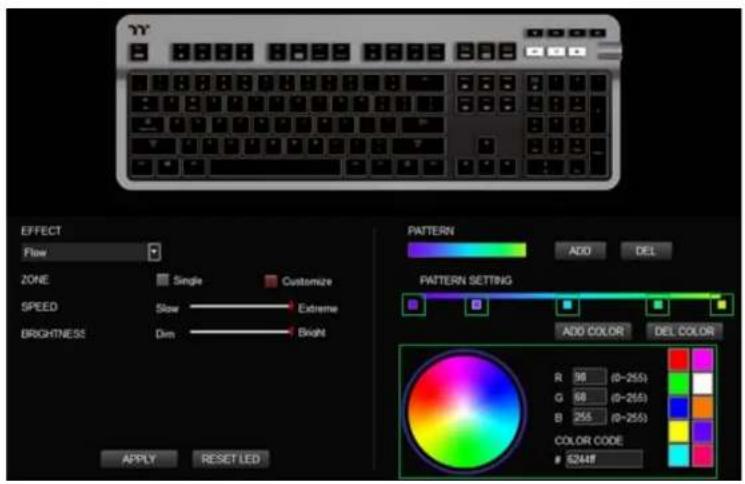
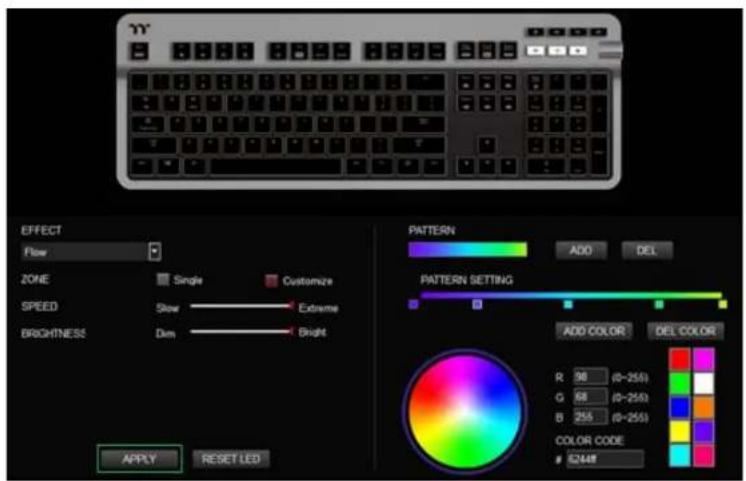
Select "Flow" in the lightng eect drop-down list.
Step 2:Step 1:
Click on a color inside the color wheel or enter the RGB color values to change the color.
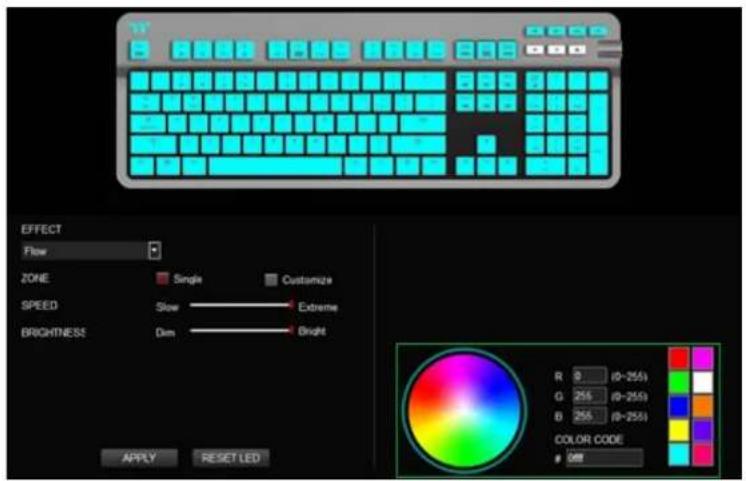
Set the speed and brightness level of the backlight.
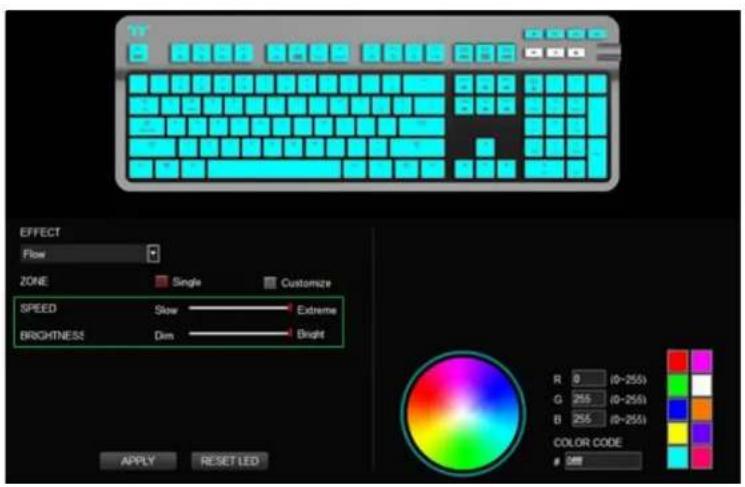
Step 4:Step 3:
Click apply to save the new sengs.
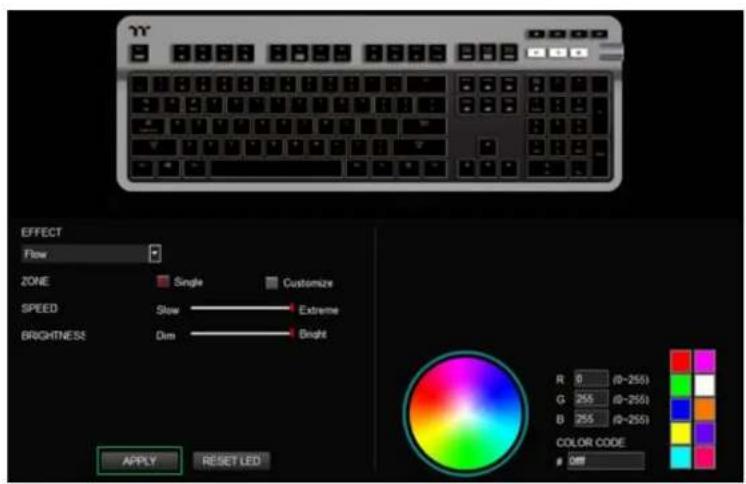
Set the zone to "Customized", then add a new set of color paerns.
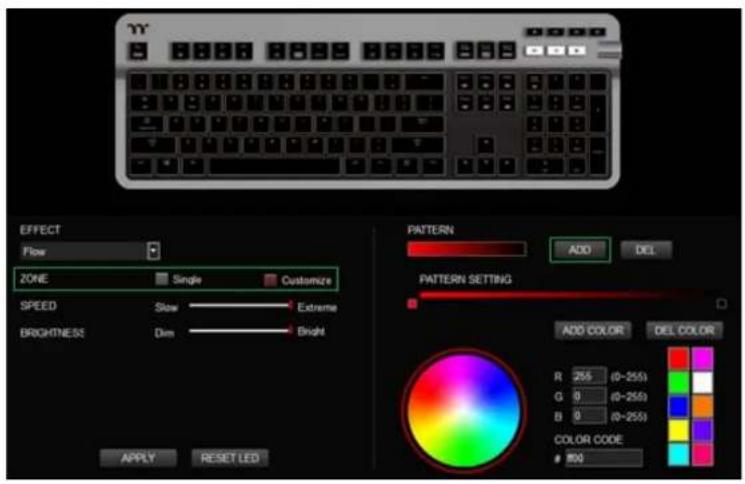
Step 2:Step 1:
Add a new color-inseron point and drag it to the desired posion.
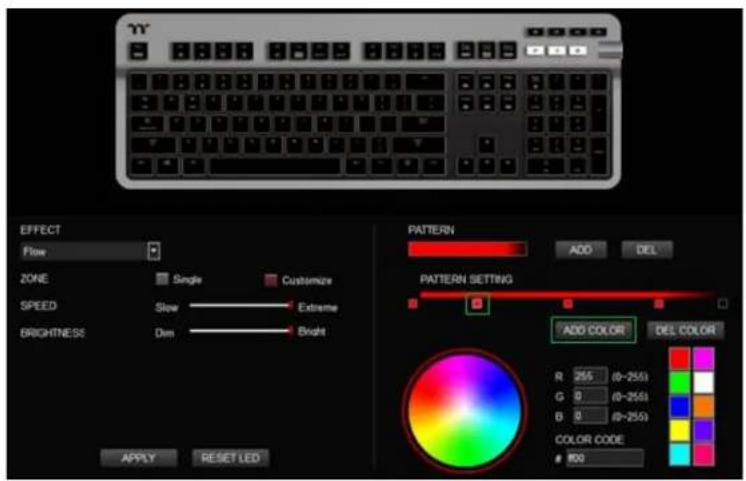
Step 4:Step 3:
Click on each color-inseron point to modify its color. Click apply to save the new sengs.
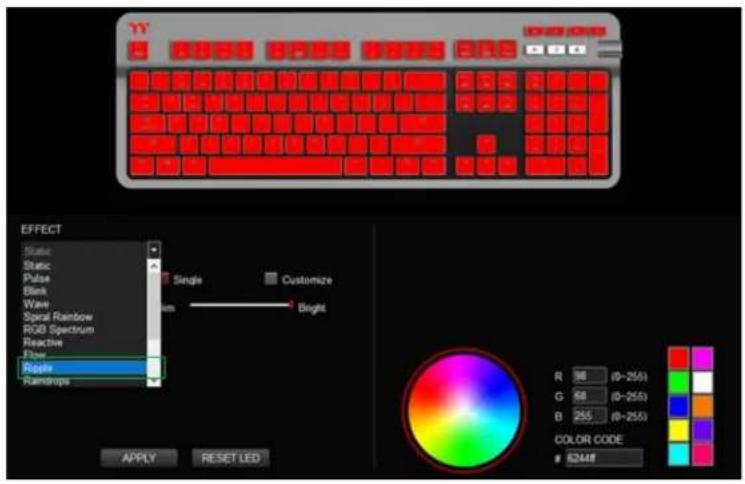
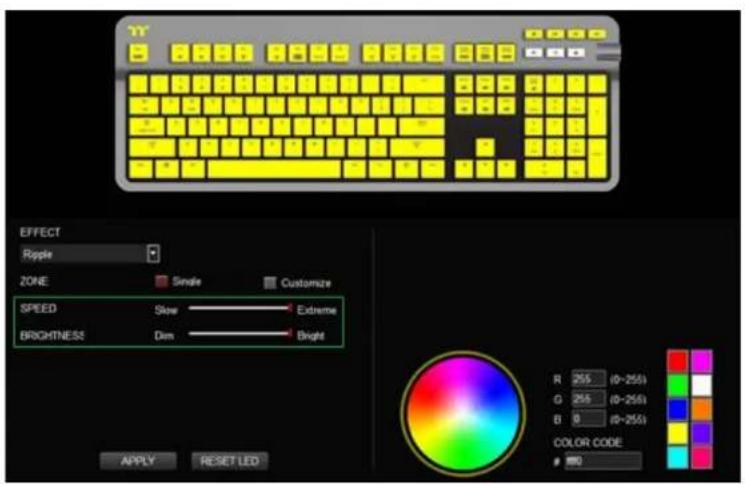
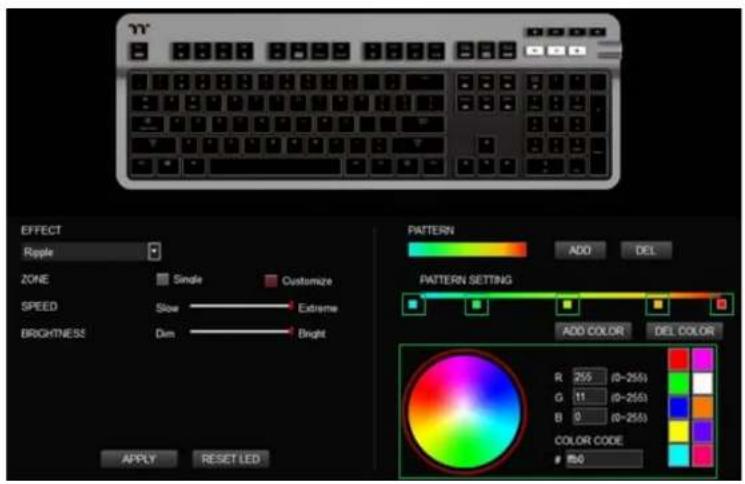
Select "Ripple" in the lightng eect drop-down list.
Step 2:Step 1:
Click on a color inside the color wheel or enter the RGB color values to change the color.
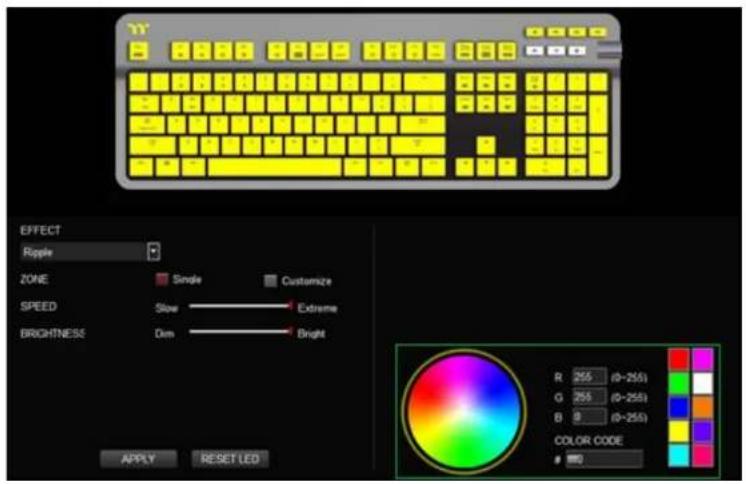
Set the speed and brightness level of the backlight.
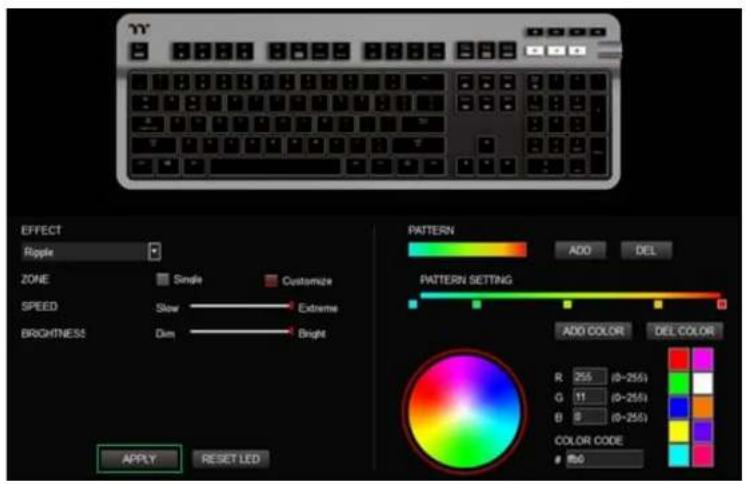
Step 4:Step 3:
Click apply to save the new sengs.
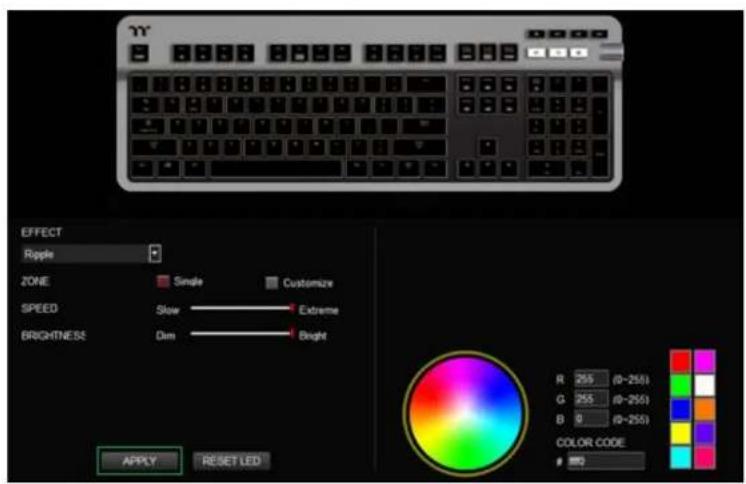
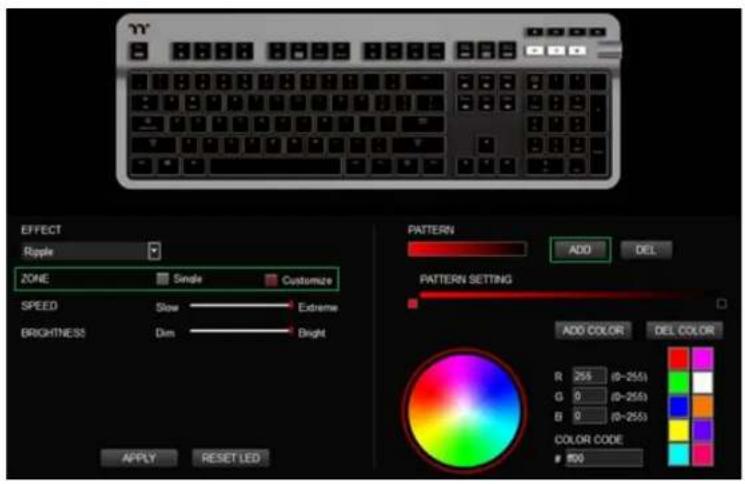
Set the zone to "Customized", then add a new set of color paerns.
Step 2:Step 1:
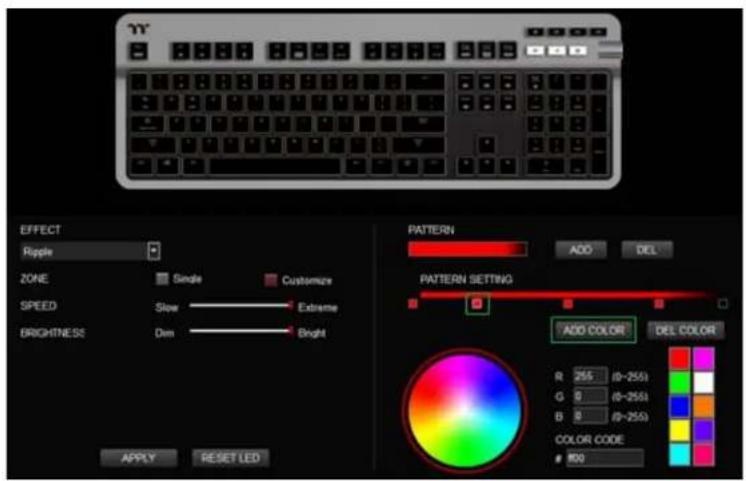
Add a new color-inseron point and drag it to the desired posion.
Step 4:Step 3:
Click on each color-inseron point to modify its color. Click apply to save the new sengs.
Select "Raindrops" in the lightng eect drop-down list.
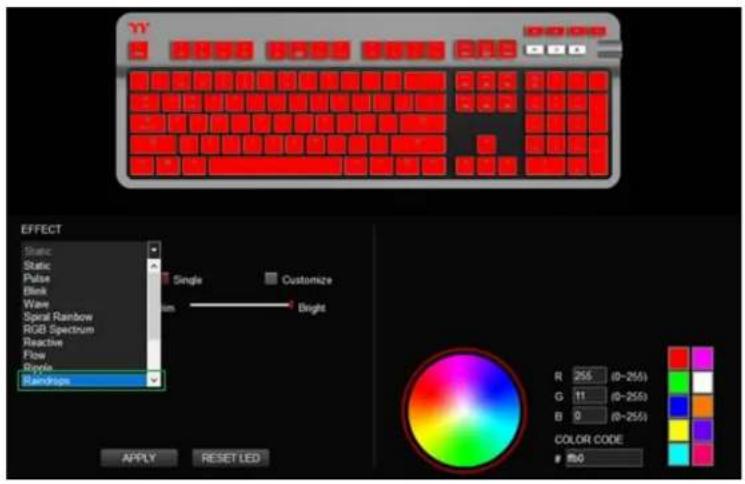
Step 2:Step 1:
Click on a color inside the color wheel or enter the RGB color values to change the color.
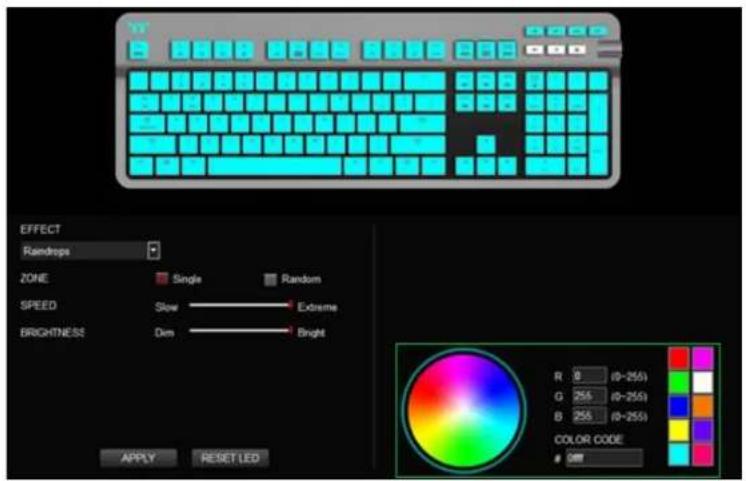
Step 4:Step 3:
Set the speed and brightness level of the backlight. Click apply to save the new sengs.
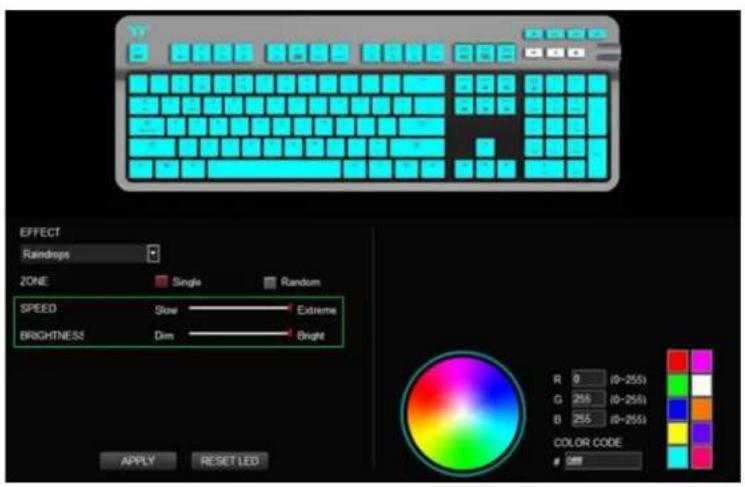
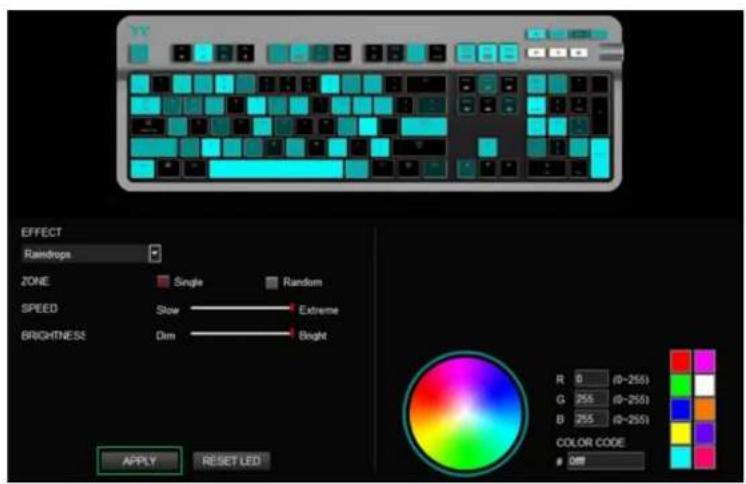
Select "Snake" in the lightng eect drop-down list.
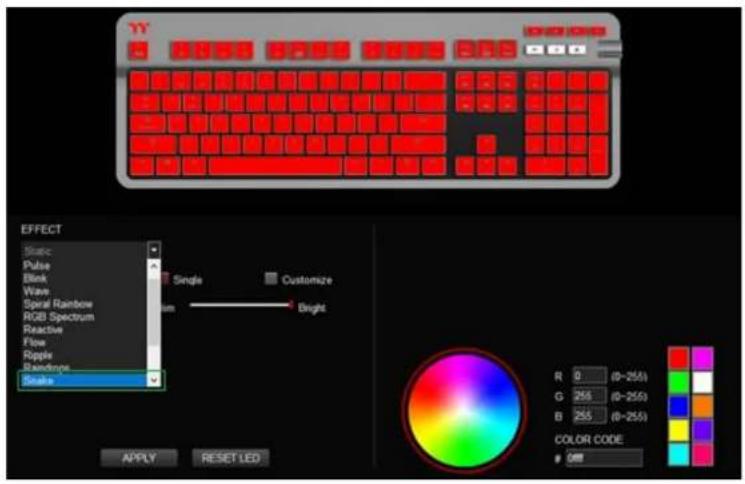
Step 2:Step 1:
Click on a color inside the color wheel or enter the RGB color values to change the color.
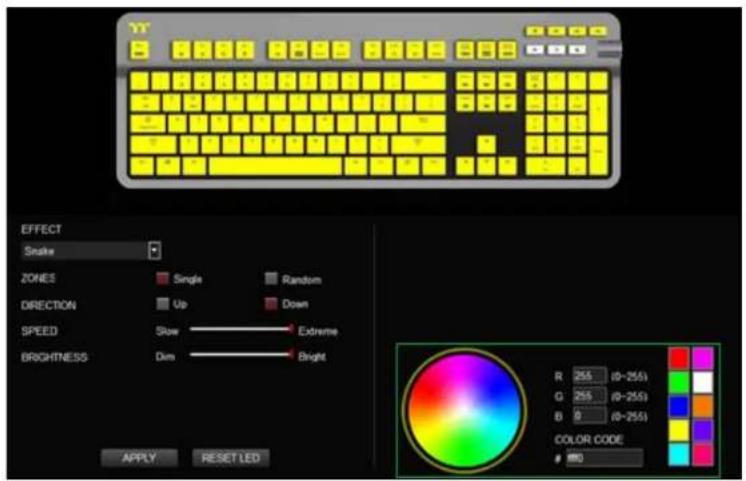
Set the direcon, speed, and brightness level of the lightng eect.
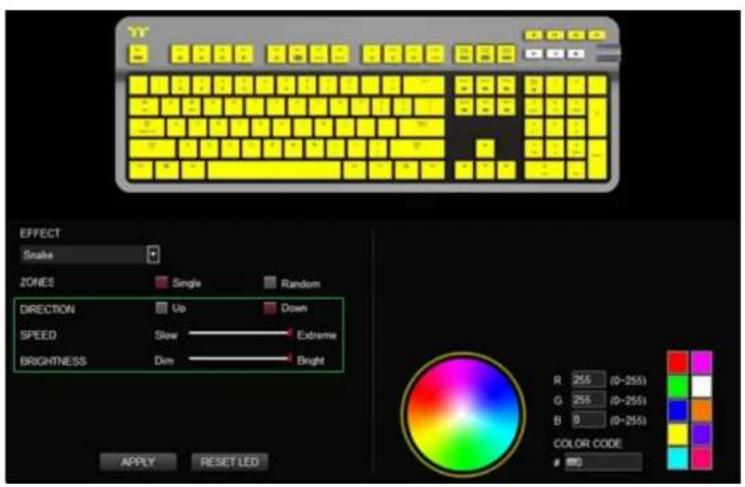
Step 4:Step 3:
Click apply to save the new sengs.
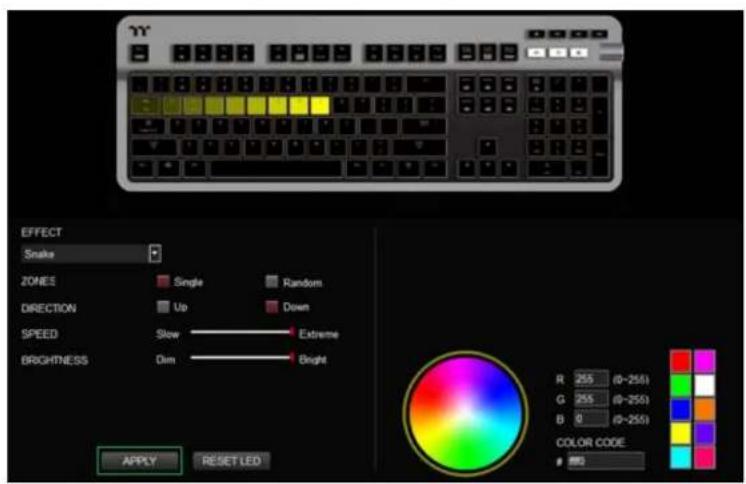
Step 2:Step 1:
Select "Music Mode" in the lightng eect drop-down list. Set the desired mode of lightng eects.
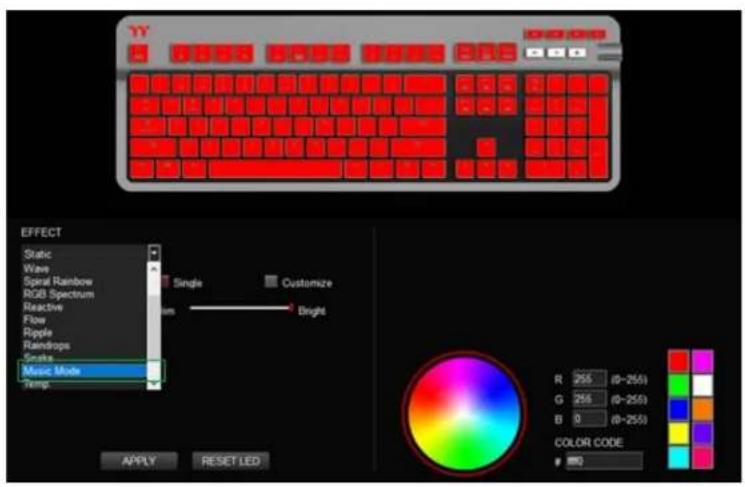
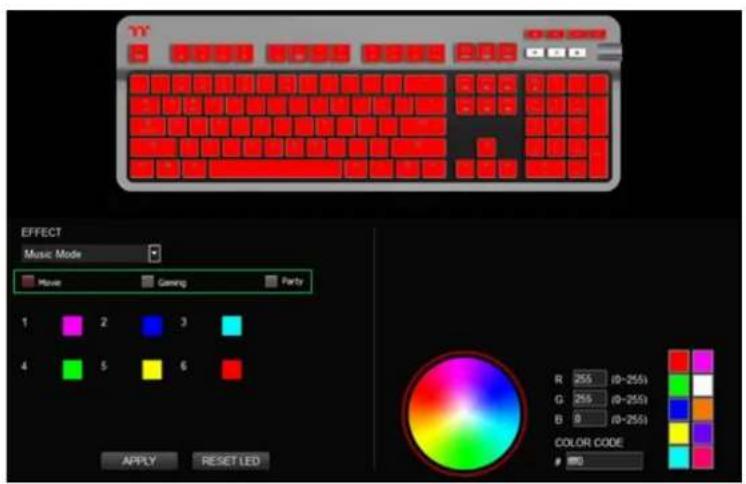
Click on a color inside the color wheel or enter the RGB color values to change the color of each row.
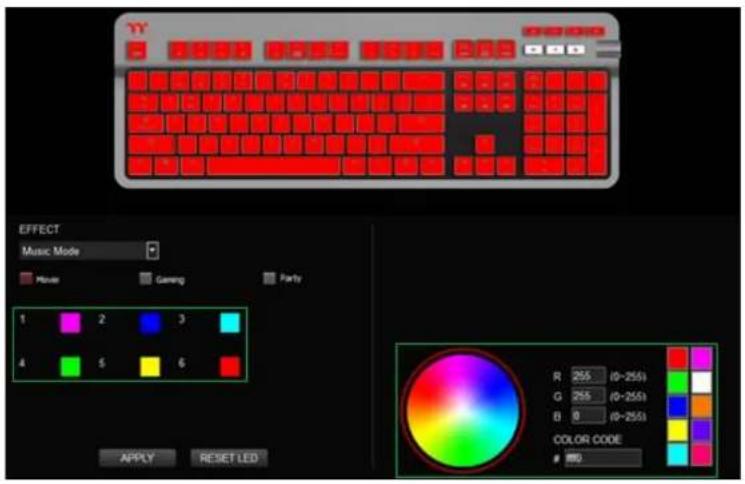
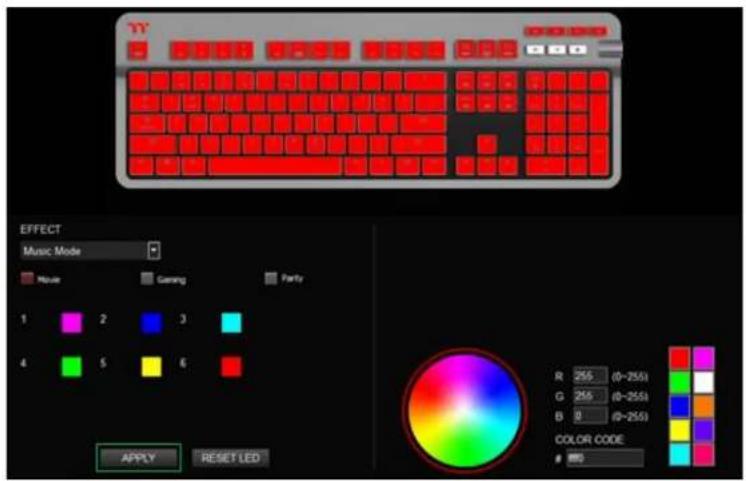
Step 4:Step 3:
Click apply to save the new sengs.
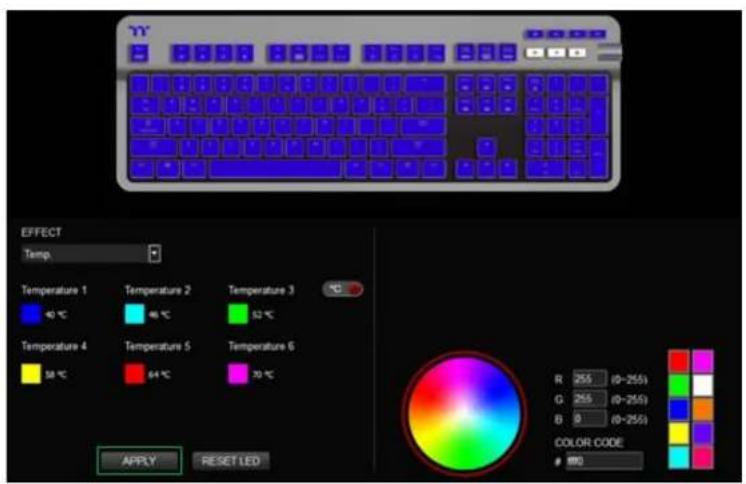
Select "System Temperature" in the lightng eect drop-down list.
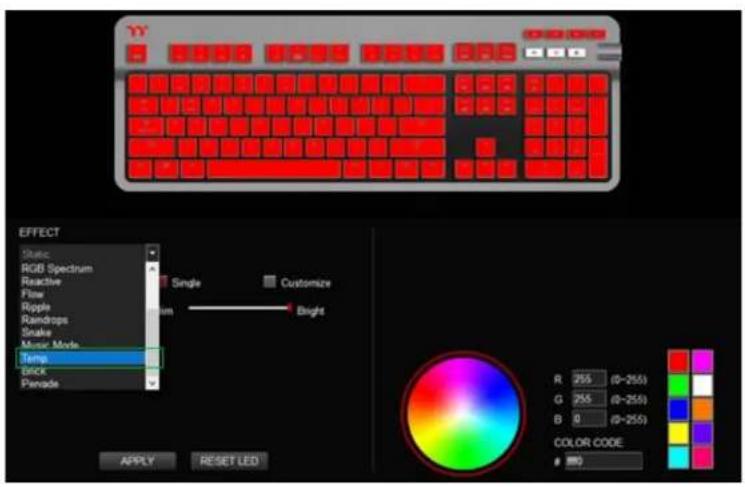
Step 2:Step 1:
Click apply to save the new sengs.
Select "Brick" in the lightng eect drop-down list.
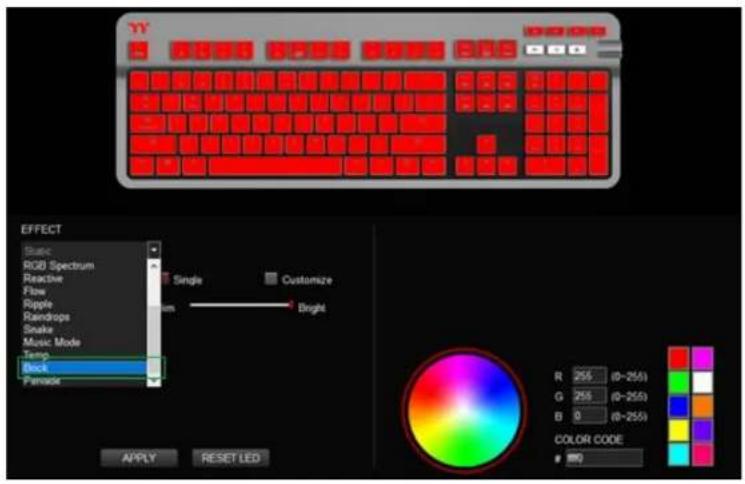
Step 2:Step 1:
Click on a color inside the color wheel or enter the RGB color values to change the color.
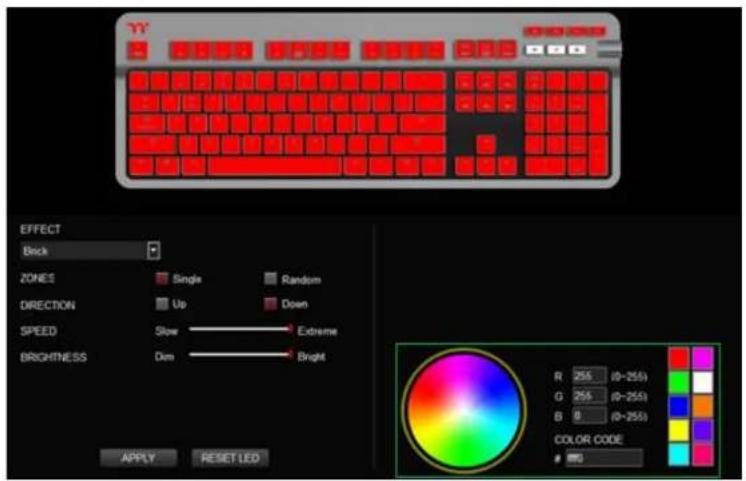
Set the direcon, speed, and brightness level of the lightng eect.
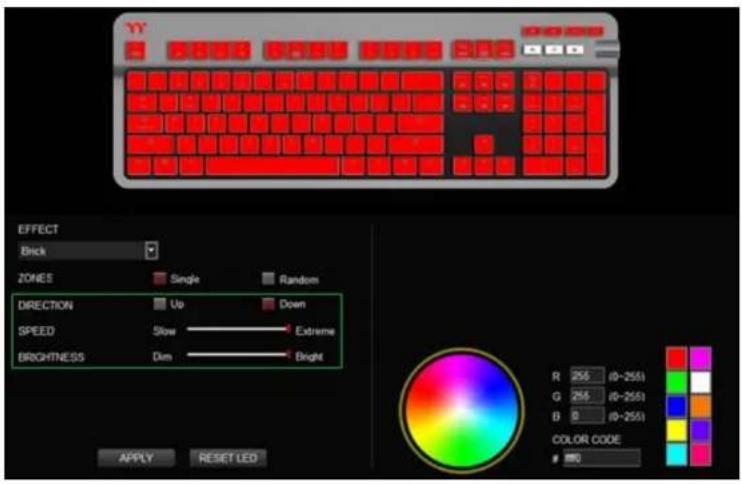
Step 4:Step 3:
Click apply to save the new sengs.
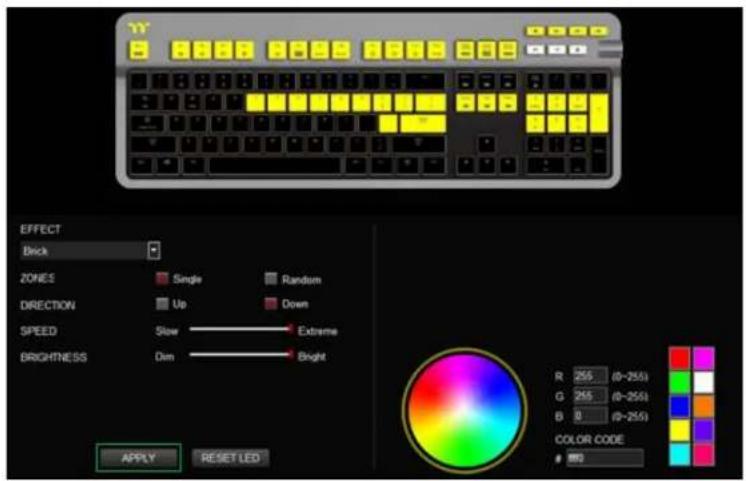
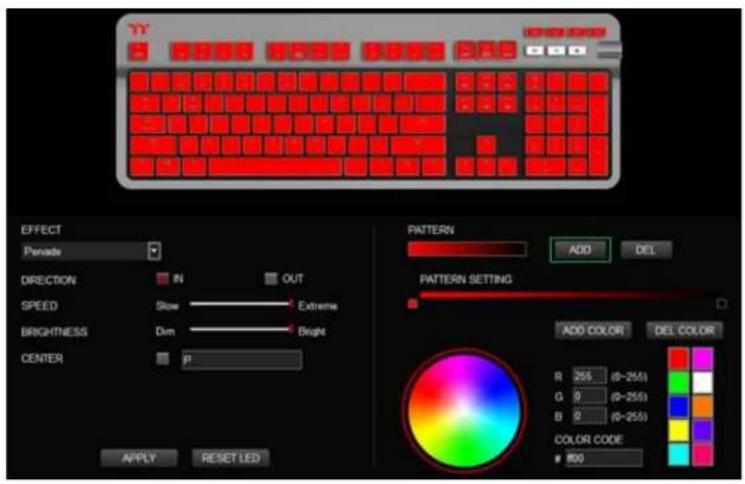
Select "Pervade" in the lightng eect drop-down list.
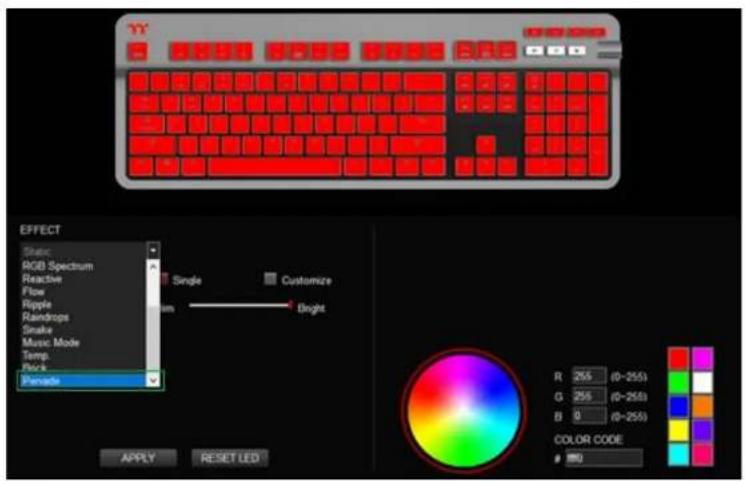
Step 2:Step 1:
Select a set of color paerns on the upper-right.
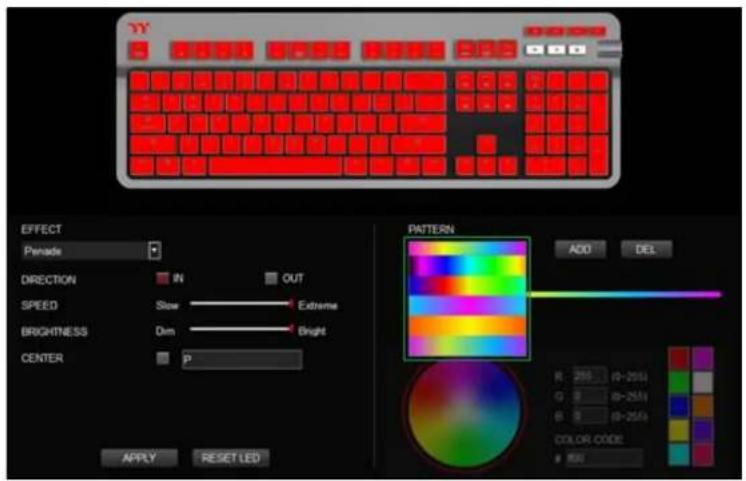
Step 4:Step 3:
Set the direcon, speed, brightness level and center of the lightng eect. Click apply to save the new sengs.
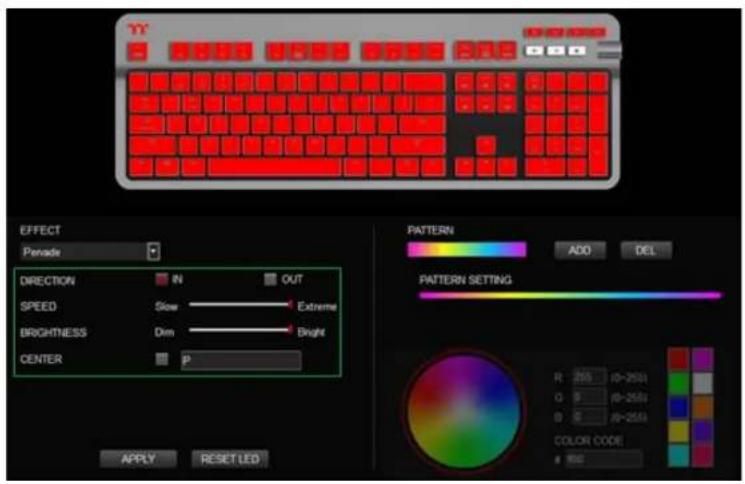
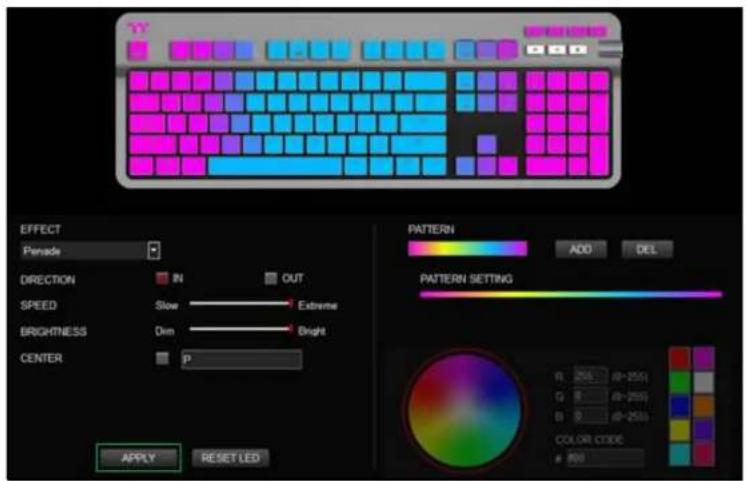
Step 2:Step 1:
Add a new color-inseron point and drag it to the desired posion.Add a new set of cc
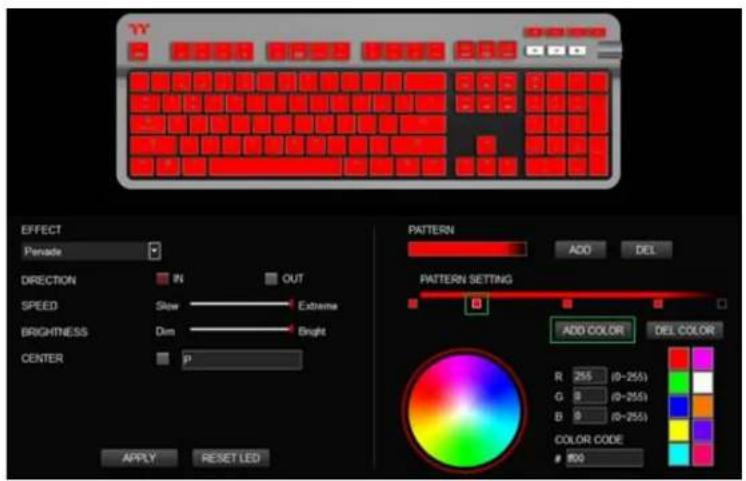
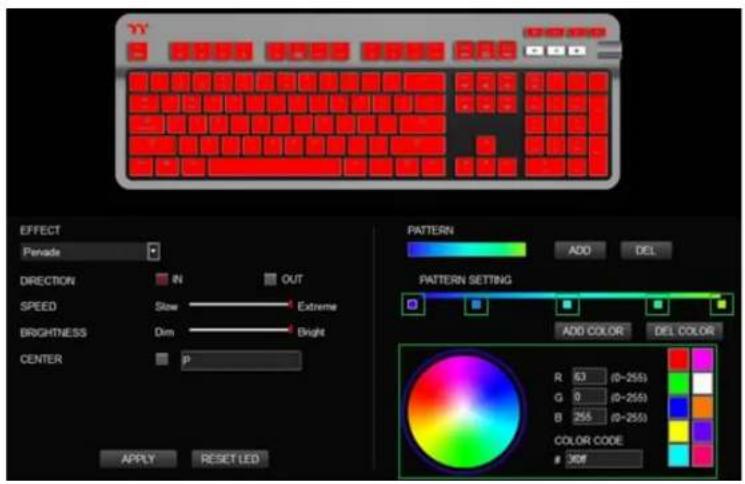
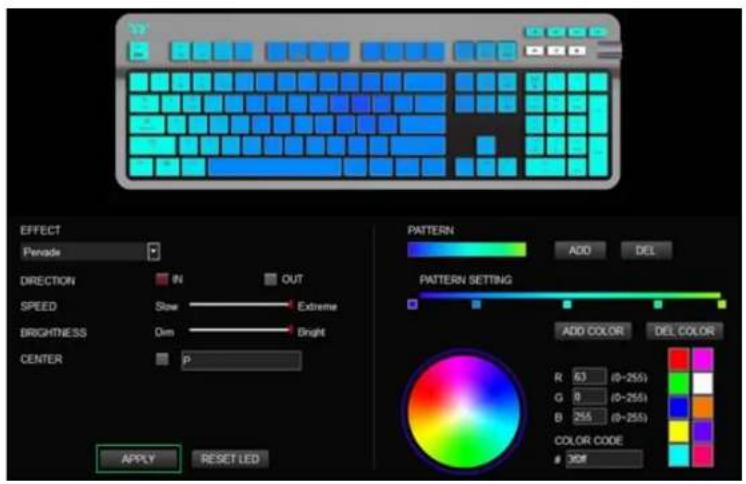
Step 4: Step 3:
Click on each color-inseron point to modify its color. Click apply to save the new sengs.

thermaltake
Chapter 9:
FUNCTIONS AVAILABLE ON THE SETTINGS PAGE
Language Sengs
Sets the language of the program's user Interface and theme.
Razer Chroma On / OFF
Users who have installed both the TT iTAKE Soware and Razer Synapse 3 can experience synchronized gaming and RGB lighng eects on their gaming gear.
Amazon Alexa Login
TT iTAKE soware support Amazon Alexa voice service, allowing you to control the lights by talking to the Alexa Enabled device.
TT iTAKE APP Password Seng
Enter four number or English alphabet.
※ Empty is disable funcon.
Ocial Website / Social Media
Ocial Website: Visit the Product social website. Social Media: Visit Thermaltake on Facebook.
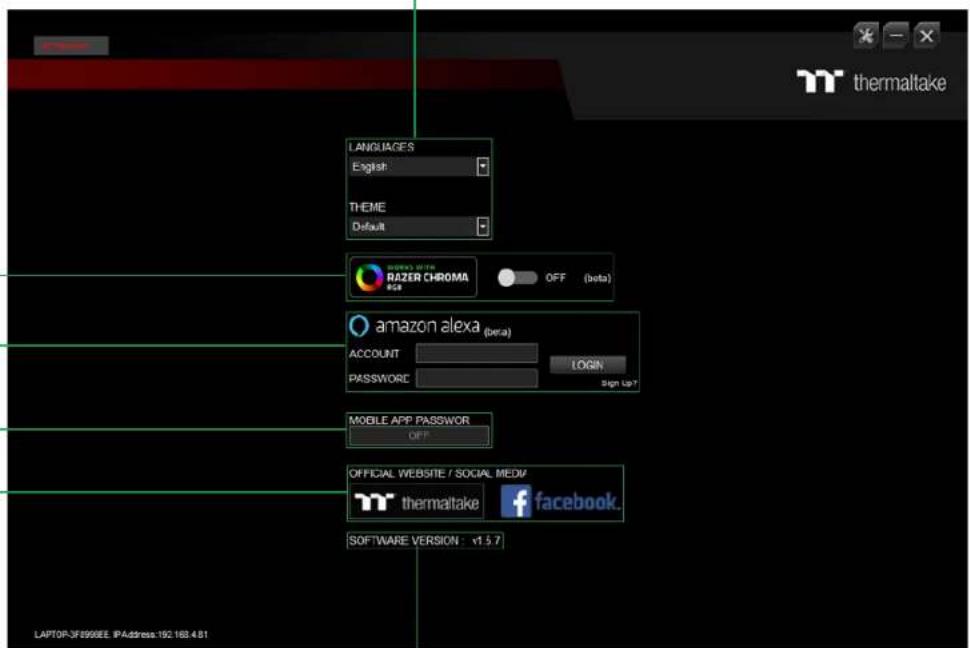
Soware Version
Soware Version: Displays the version number of the installed program.
- ARGENT K6 RGB
- Table of Contents
- PAGE 05 KEYBOARD FEATURES OVERVIEW
- PAGE 16 TT iTAKE INSTALLATION
- PAGE 19 FUNCTIONS AVAILABLE ON THE HOME PAGE
- PAGE 21 KEY CONFIGURATIONS
- PAGE 39 FUNCTIONS AVAILABLE ON THE MACRO PAGE
- PAGE 41 HOW TO RECORD MACROS
- PAGE 49 FUNCTIONS AVAILABLE ON THE LIGHTING EFFECTS PAGE
- PAGE 51 LIGHTING EFFECTS OVERVIEW
- Chapter 1:
- KEYBOARD FEATURES OVERVIEW
- SWITCHING LIGHTING EFFECTS
- Stac:
- Pulse:
- Wave:
- Spiral Rainbow:
- RGB Spectrum:
- Reacve:
- Flow:
- Ripple:
- Raindrop:
- Bricks:
- Concentric Circles:
- Macro Recording (only available under Game Mode):
- Macro Prompt Funcon:
- | Chapter 2: TT iTAKE INSTALLATION
- Step 2:Step 1:
- Step 3:
- Chapter 3:
- FUNCTIONS AVAILABLE ON THE HOME PAGE
- Home Page
- Proles
- Switching Conguraon Pages
- Funcons for Managing Proles
- Correcng the Name of a Prole
- Other Sengs / Shrink Window / Close Window
- Assigning Key Funcons
- Restore Keyboard Sengs for All Keys / Apply
- | Chapter 4: KEY CONFIGURATIONS
- Step 4:Step 3:
- Step 6:Step 5:
- Chapter 5:
- FUNCTIONS AVAILABLE ON THE MACRO PAGE
- New Macro / Delete / Copy / New Text / Import / Export
- Modifying the Name of a Macro / Text
- Macro Recording Sengs
- Macro Recording Area
- Record / Delete / Insert / Stop / Edit
- | Chapter 6: HOW TO RECORD MACROS
- Step 1:
- Step 2:
- Chapter 7:
- FUNCTIONS AVAILABLE ON THE LIGHTING EFFECTS PAGE
- Switching Lighng Eects
- Lighng Eects Conguraons
- Apply / Restore Lighng Eect Sengs
- Color Paern Sengs
- Color Wheel Sengs
- | Chapter 8: LIGHTING EFFECTS OVERVIEW
- R0000
- RED
- 300
- 100
- ON
- Off
- 000
- 900
- 80000
- 088
- 208
- 189
- 800s
- #CGs
- 800x
- 100a
- 900a
- 106a
- RGBa
- Step 4: Step 3:
- 550#
- 550#F
- Step 3: Step 4:
- 0
- 5
- 190
- 806
- 6244#
- E244#
- 82448
- 800
- 150
- 856
- 86
- 388
- #3
- 100.
- 50
- 103
- 55
- 850
- 30M
- Chapter 9:
- FUNCTIONS AVAILABLE ON THE SETTINGS PAGE
- Language Sengs
- Razer Chroma On / OFF
- Amazon Alexa Login
- TT iTAKE APP Password Seng
- Ocial Website / Social Media
- Soware Version
Brand : THERMALTAKE
Model : Argent K6 RGB
Category : Keyboard