Polar Axis Finderscope - Telescope accessory CELESTRON - Free user manual and instructions
Find the device manual for free Polar Axis Finderscope CELESTRON in PDF.

| Product Type | Telescope Polar Axis Finderscope |
| Brand | Celestron |
| Model | Polar Axis Finderscope |
| Length | Approximately 100 mm (3.9 in) |
| Diameter | Approximately 50 mm (2.0 in) |
| Weight | Approximately 200 g (7.0 oz) |
| Magnification | Fixed, typically around 10x |
| Field of View | Approximately 5° |
| Illumination | Built-in LED with adjustable brightness |
| Power Source | Internal battery (e.g., CR2032) or external power via cable |
| Reticle Type | Illuminated reticle with polar alignment pattern |
| Alignment Function | Centering on Polaris or Sigma Octantis for polar alignment |
| Mount Compatibility | Equatorial mounts with polar alignment feature |
| Eyepiece | Threaded for standard eyepiece accessories |
| Construction | Aluminum alloy body with optical glass lenses |
| Cleaning | Clean lenses with a soft brush and lens cloth; avoid solvents |
| Storage | Keep in a dry, dust-free environment |
| Safety | Never point at the sun; use only at night |
| Warranty | 1 year limited warranty (check local regulations) |
Frequently Asked Questions - Polar Axis Finderscope CELESTRON
User questions about Polar Axis Finderscope CELESTRON
0 question about this device. Answer the ones you know or ask your own.
Ask a new question about this device
Download the instructions for your Telescope accessory in PDF format for free! Find your manual Polar Axis Finderscope - CELESTRON and take your electronic device back in hand. On this page are published all the documents necessary for the use of your device. Polar Axis Finderscope by CELESTRON.
USER MANUAL Polar Axis Finderscope CELESTRON
Polar Axis Finderscope- CG-4 & CG-5 - #94223/94224
The Celestron Polar Axis Finder is designed to help you polar align your CG-4 (Omni Series) or CG-5 (Advanced Series) Equatorial Mount quickly, easily and with a high degree of accuracy. As a result, you can spend more time observing and less time setting up.
Polar alignment is the process of aligning the telescope with the Earth's rotational axis. Once done, this will allow you to track celestial objects as they move across the sky and accurately use your telescopes Setting Circles (CG-4 Mount). The Celestial Coordinate System, Motion of the Stars, Using Setting Circles, are described in the telescope instruction manual. For those using a telescope in the northern hemisphere, polar alignment is relatively easy due to the fact that the North
Celestial Pole (NCP) has a bright star close to it (Polaris) that's easy to find.
Installing the Polar Axis Finder
- Remove the finderscope housing on the rear of the telescope's polar housing
- Insert the Polar finder into the telescope housing and thread clockwise until tight.
- Remove the cap from the front of the polar housing a rotate the declination axis until you can see through the polar housing without obstruction. (for CG-5 mounts only)
Aligning the Optical Axis
text_image
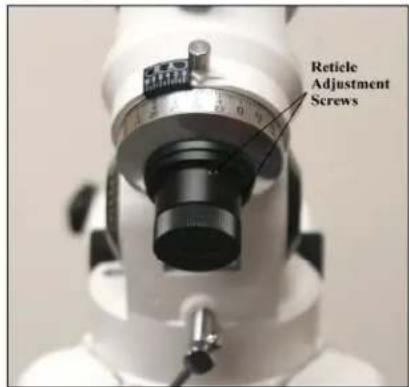
Reticle Adjustment ScrewsFigure 1
Before the polar finder can be used it needs to be aligned with the polar axis of your telescope's mount. Note, you can do this procedure at night while pointing at Polaris. However, it is probably easier to do it in the daytime using a distant point as your target (e.g., a street light a couple of hundred yards away). Before calibrating the optical axis, remove the telescope, the counterweights and the counterweight bar from the mount. Next,
using the altitude adjustment bolts, incline the polar axis until it is level to the ground.
To align the optical axis of the finder:
- Release the R.A. clamp and rotate the mount until the platform where the telescope sits is off to the right of the mount.
- Find an object in excess of one mile away and center it on the cross hairs.
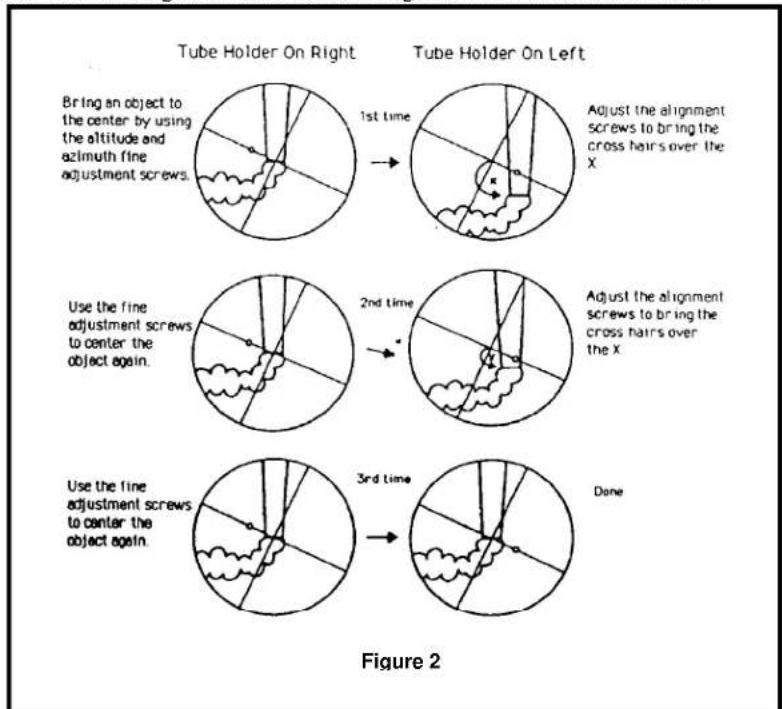
- Now, release the R.A. clamp again and rotate the mount so that the telescope platform is on the left side of the mount. The object originally seen at the intersection of the cross hairs will, most likely, have moved off-center (See figure 2). The point where the cross hairs intersect (center of the optical axis) will scribe a semi-circle around the point where the mechanical axis is pointing.
text_image
Tube Holder On Right Tube Holder On Left Bring an object to the center by using the altitude and azimuth fine adjustment screws. 1st time Adjust the alignment screws to bring the cross hairs over the X. Use the fine adjustment screws to center the object again. 2nd time Adjust the alignment screws to bring the cross hairs over the X. Use the fine adjustment screws to center the object again. 3rd time Done Figure 2-
Determine how far and in what direction the optical axis moved from the mechanical axis.
-
Use the three adjustment screws (See figure 1) on the polar scope to move the finder's optical axis (cross hairs) toward the point where the mechanical axis is pointing. Keep in mind that the image in the finder is inverted. It may take a few minutes to familiarize yourself with the screws that move the finder in the appropriate direction.
-
Repeat this process until the optical axis of the finder is centered on the rotational axis of the mount.
When finished, tilt the mount head to your correct latitude and re-install the optical tube and counterweight bar and follow the procedure for rough polar alignment in your telescope instruction manual.
Using the Polar Finder
Northern Hemisphere
-
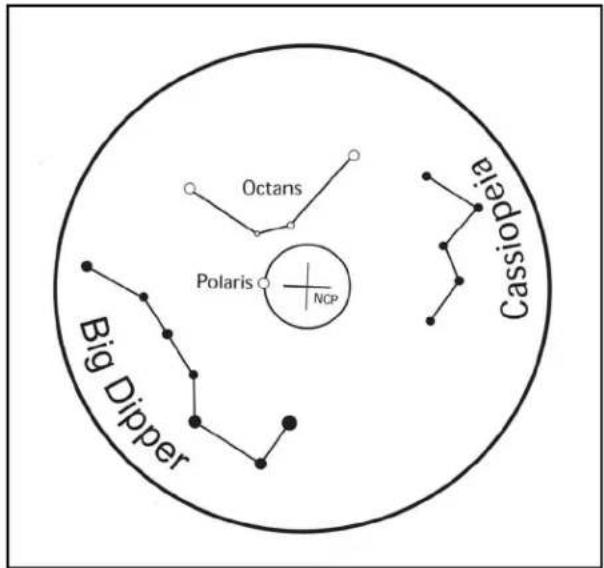
Identify the Big Dipper pattern in the constellation Ursa Major, or find the constellation Cassiopeia in the night sky. In spring and summer, the Big Dipper will be higher in the sky and easier to find. In fall and winter, Cassiopeia may be easier to use.
-
The patterns for both are etched on your polar scope reticle (Fig.3). Simply rotate your mount in RA until one of the patterns matches its actual orientation in the sky. Lock the RA axis. Now the small circle on the perimeter of the larger circle is in the correct position for locating Polaris.
-
Next, use your azimuth and altitude adjustment controls to place Polaris inside the small circle. Tighten your azimuth and altitude knobs, then tighten your locking shaft bolt to secure the mount to the tripod and you are done.
text_image
Octans Polaris NCP Big Dipper CassiopeiaFigure 3
Southern Hemisphere
There is a 4-star pattern in the polar scope that corresponds to four stars in the southern constellation Octans. You can use these stars to align your mount to the south celestial pole. Identify the pattern in the sky and point your telescope mount towards it. Once you can see all four stars in the field of your polar scope, simply rotate your mount in RA and adjust your altitude and azimuth positions until the stars line up with their positions on the reticle.
Warranty: Two year limited warranty. See the Celestron Accessory Catalog (#93685) for complete warranty details or contact Celestron #94223-INST 03-08