
KP180 - Webcam AOPEN - Free user manual and instructions
Find the device manual for free KP180 AOPEN in PDF.

| Product Type | Webcam |
| Model | KP180 |
| Brand | AOpen |
| Resolution | 640x480 VGA |
| Frame Rate | 30 fps |
| Connection | USB 2.0 |
| Microphone | Built-in |
| Focus Type | Fixed focus |
| Field of View | 60° |
| Compatibility | Windows, macOS |
| Dimensions (L x W x H) | 70 x 50 x 45 mm |
| Weight | 100 g |
| Power Source | USB-powered (5V) |
| Cable Length | 1.5 m |
| Mounting | Clip-on monitor or stand |
| Main Features | Plug and play, autofocus, low-light correction |
| Cleaning | Wipe lens with soft dry cloth |
| Safety | Avoid exposure to moisture and extreme temperatures |
| Spare Parts | Not available separately |
| Repairability | Non-user-serviceable |
Frequently Asked Questions - KP180 AOPEN
User questions about KP180 AOPEN
0 question about this device. Answer the ones you know or ask your own.
Ask a new question about this device
Download the instructions for your Webcam in PDF format for free! Find your manual KP180 - AOPEN and take your electronic device back in hand. On this page are published all the documents necessary for the use of your device. KP180 by AOPEN.
USER MANUAL KP180 AOPEN
natural_image
Line drawing of a video camera with lens and frame (no text or symbols)CONFERENCE CAMERA
KP180
180 STUDIO - Guide
1. Installation
(1) Please visit the AOPEN Downloads page to download the Windows and Mac versions of KP180 Studio.. The link is http://global.aopen.com/download.aspx
(2) From the Select a product pull down – Select "Webcam. Then Select KP180 under Select a model pull down
Downloads
Webcam KP180 Categories
OrderBy: LastUpdated
Advanced Search
| Categories | Software / Description | Version | Last:Updated | Download |
| KP180 Utility | V1.1319.1 | 1/11/2021 | $2243.1 KB | |
| 180 Studio Software for KP180, os support Windows 10 x 64. CS Support:Win10_64 | ||||
| V1.1319.1 | 1/11/2021 | $2710.2 KB | ||
| 180 Studio Software for KP180, os support Mac 10.13 and above. CS Support:Mac | ||||
| 1 | ||||
(3)
A secondary download location is available at the following link -
https://www.aopen.com/US_en/products_info/KP180 Scroll to the bottom of the page and look for the "Software Download" section.
(4) Select the downloaded compressed (.zip) file, decompress it, and then run the installation program. The file can be typically found in your "Downloads" directory.
(5) After running the 180 Studio installation program, a shortcut icon is created on your desktop. An example of the icon is shown below. Connect the KP180 Camera and double click the icon to run the application.
2. Operation Guide
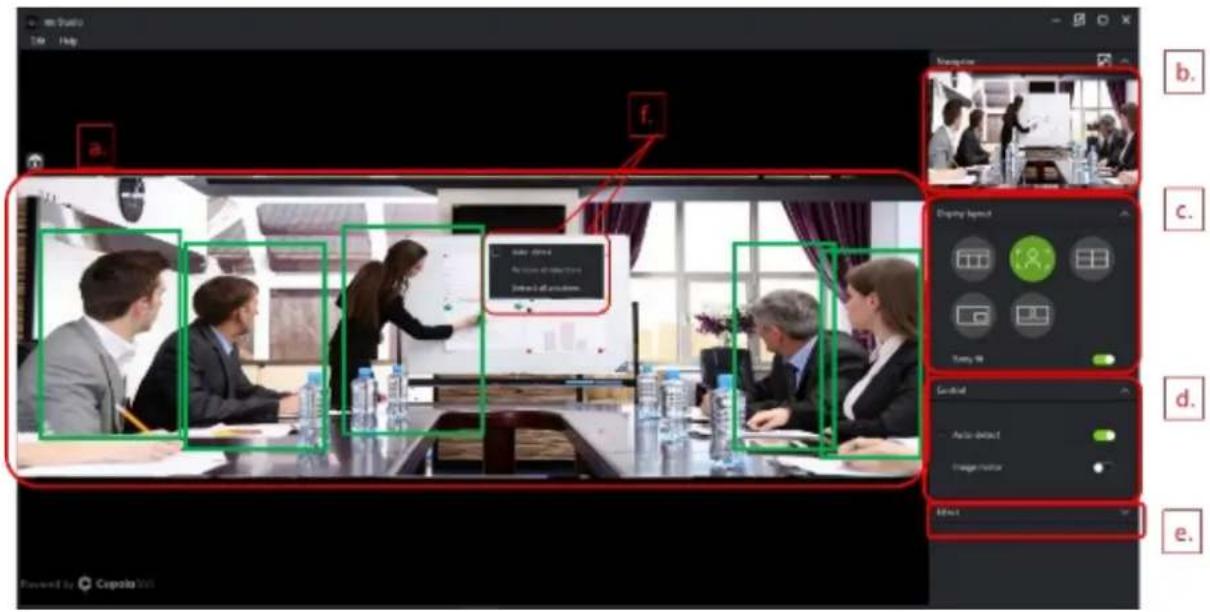
a. Control area
b. Navigator panel - broadcast preview
d. Display layout area
e. Effect options area
f. Frame area control panel
(2) Control area
- The space on the left side of the 180 Studio app is the control area, where you can frame participants or objects.
- After 180 Studio is opened, the Auto-detect function in the control panel will be turned "On" by default. This will automatically frame any person in the camera
view.
- To deactivate Auto-detect, use your mouse and click on the button selector named "Auto-detect"
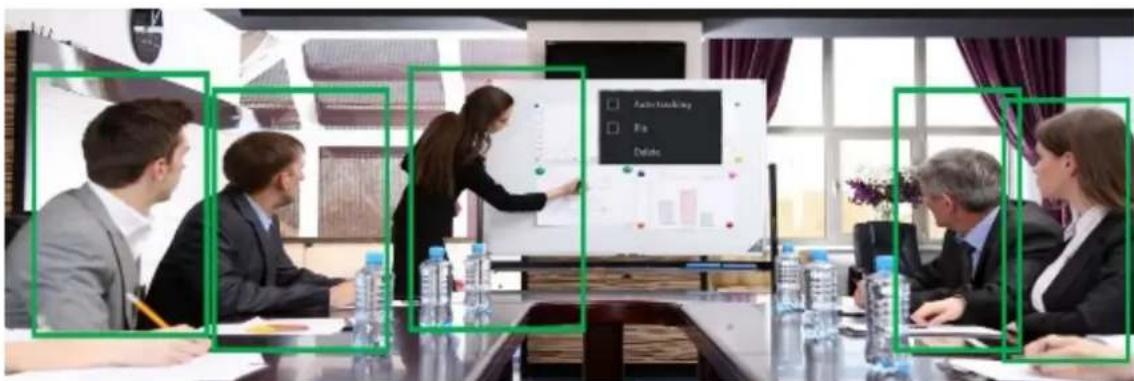
- To create a selection box — press and hold the left mouse button and drag a square or rectangle shape.
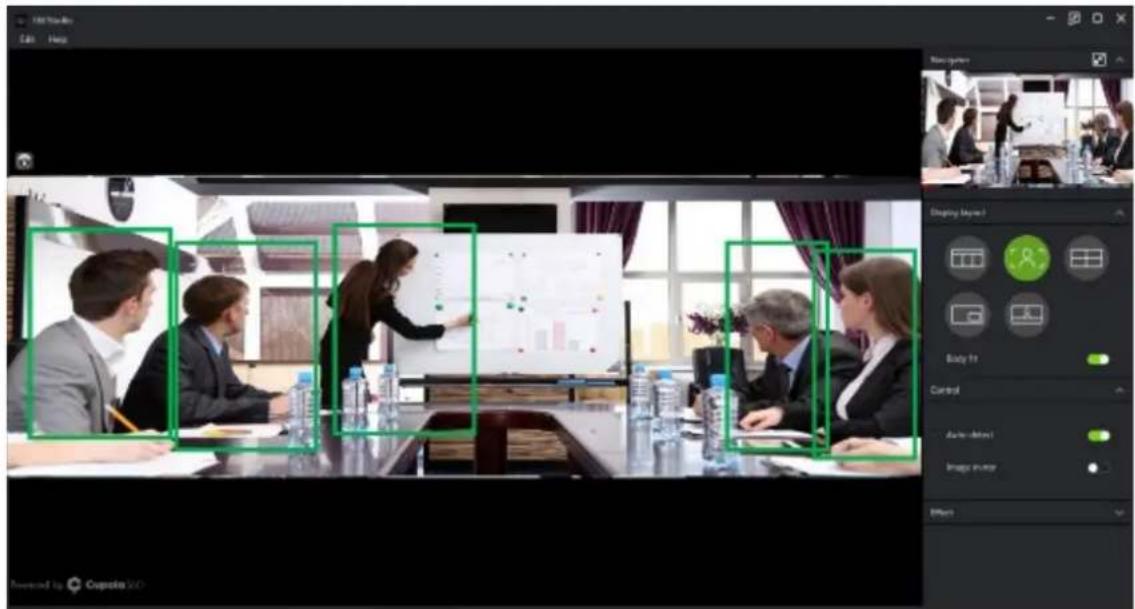
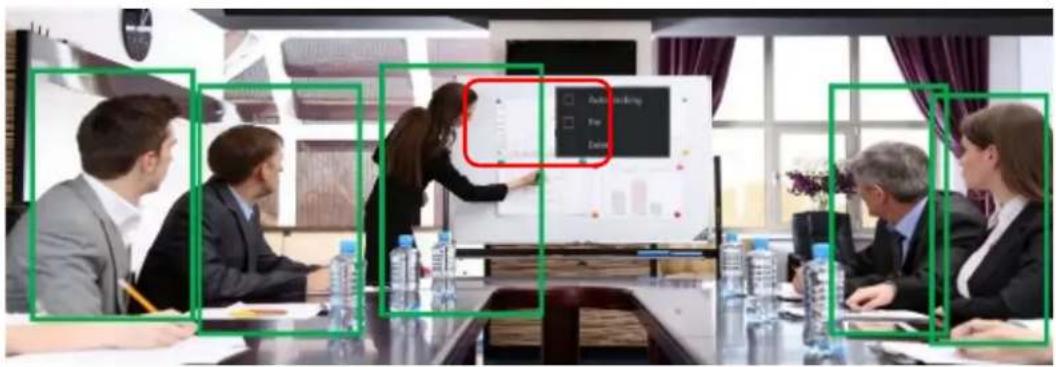
- Right-click inside of any green selection box and you have the following options:
• Auto tracking: This will automatically track the movement of participants. The frame selection area changes color from green to purple.
• Pin: To pin a frame. A pin icon will be shown on the frame.
- Delete: Removes the selection box
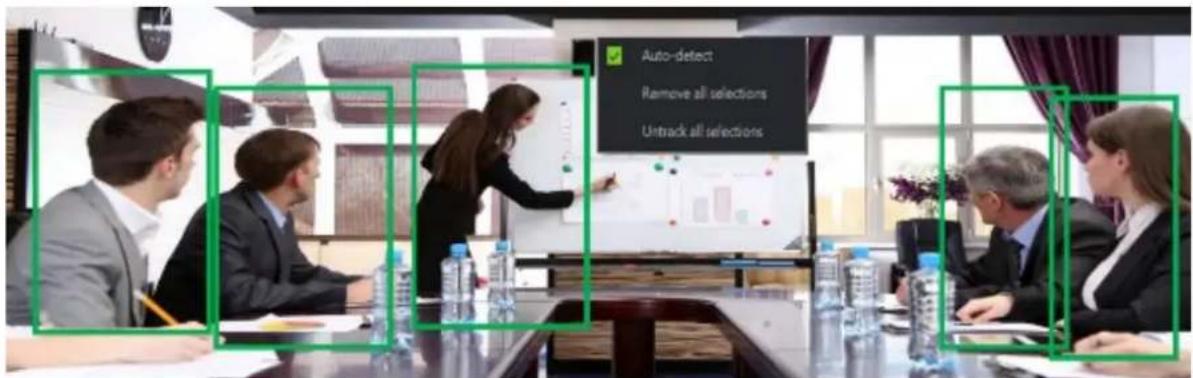
- Right-click inside the control area but not within the selection box to select the following:
• Auto-detect: It will automatically detect participants but will not track the movement of all participants.
- Remove all selections: This will remove all of the selection boxes.
- Untrack all selections: All tracked selection boxes (purple frame) will no longer be tracked and will turn green in color.
- Edit Base Position: Click on the icon shown (Upper Left Control
Area) to set the base image from 12 degrees down, center, and 12 degrees up.

(3) Navigator Panel – Broadcast Preview

- In the upper right corner of the 180 Studio screen, a preview windows is shown. This displays what your meeting software will broadcast.
- Press the icon in the upper right corner to separate the Navigator preview window from the right side of the screen.
- You can now move the preview windows around the left side control area.
(3) Control option area (Control Panel)
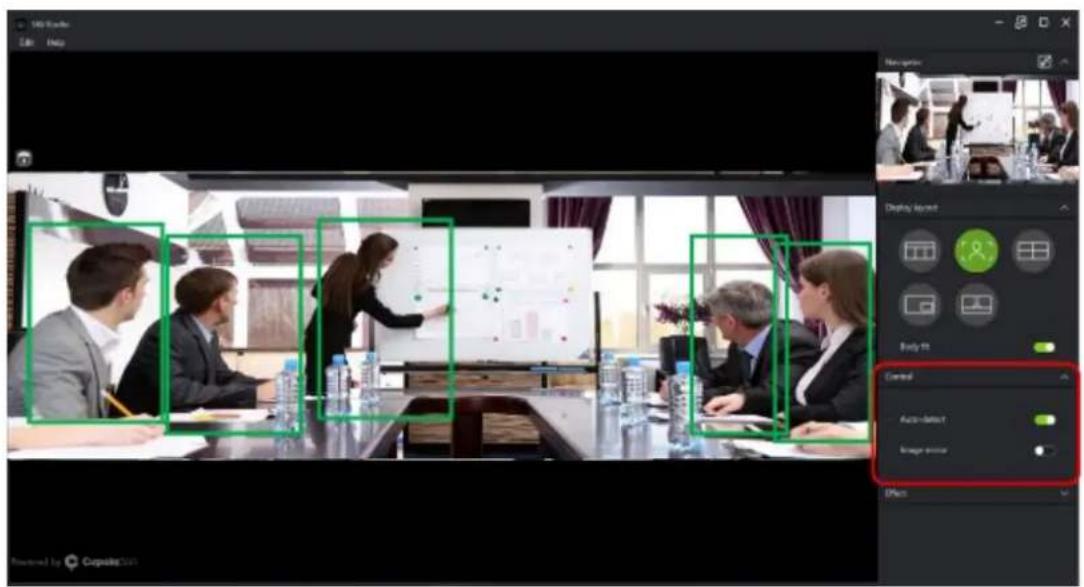
Auto-detect: When enabled, this will automatically select participants and focus on them.
Image mirror: This will mirror your displayed image.

(4) Display Layout - Conference mode selection area


Compose mode: Displays the panoramic view on top with 4 framed participants below.

Focus mode (default is on): Display the minimum range covered by each frame selection combination

Grid mode: Displays 4 selection areas. To frame an area, click the left mouse button and draw a frame around each participant or item you wish to display in the grid.

Picture in Picture: Displays 2 framed selection areas. This layout is great for product demonstrations since it allows you to frame a product in the large frame and a demonstrator in the small frame.

To pin a frame: Press the right mouse button and click Pin. A pin icon will be shown on the frame.

Presenter mode: Only the main presenter and panoramic screen are Displayed.
- The frame selection area of the main speaker can be fixed through the Pin function with the right mouse button;


- The panoramic frame selection area can be adjusted by selecting the arrows in the lower right and left corners of the dashed line white box and dragging the box to the desired position.
* Please note, Auto Detect and Auto Tracking might be affected by lighting or an object in your environment.
(5) Effect options area
Click the expand icon in the Effect area to expand the available preset options.
Use the mouse to select the following light sources:
• Normal: Balanced light source.
• Strong Light: Select this option if the room is very bright.
• Soft Light: Select this option if the room is softly lit.
• Low Light: Select this option if the room is darker.

- Custom: If the preset options are not providing the needed adjustments, selecting the Custom option and then selecting 'Advanced setting' will allow you to manually control the camera. The following adjustment items can be made:
- EV (Exposure Value) adjustment –This will darken or brighten the overall camera image.
- Flicker adjustment: Auto, 50Hz, 60Hz can be selected. For the U.S. and Canada, should be set to Auto or 60Hz.
• Lighting adjustment — Adjusts the camera image brightness - 3DNR adjustment – 3D Noise Reduction - Reduces the amount of noise (snow) in the camera image.
- Gamma adjustment – Adjusts the camera image contrast.
3. Having issues with 180 Studio?
A resource conflict may cause your Web conference software or the 180 Studio application to malfunction. Please follow the steps as below to fix the issue.
(1) Please exit the 180 studio and communication application.
(2) If you want to use the video feed from the 180 Studio application.
2.1 Exit out of the 180 Studio application.
2.2 Launch your web communication application and set the camera selection to "Studio Camera"
2.3 Launch the 180 Studio.
(3) If you want to use "KP180 Camera". (Use KP180 directly without 180 Studio.
3.1 Exit out of the 180 Studio application.
3.2 Launch communication application and set camera selection to "AOPEN KP180 Camera".
Brand : AOPEN
Model : KP180
Category : Webcam