
ProMount 80 - Speaker Stand DEFINITIVE TECHNOLOGY - Free user manual and instructions
Find the device manual for free ProMount 80 DEFINITIVE TECHNOLOGY in PDF.


| Product Type | Pivoting speaker wall mount |
| Brand | Definitive Technology |
| Model | ProMount 80 |
| Compatible Speaker Weight | Up to 8 lb (3.6 kg) |
| Thread Size | 1/4-20 |
| Material | Steel |
| Finish | Black |
| Mounting Type | Wall-mounted, pivoting ball joint |
| Included Components | Wall bracket, ball pivot, clinching ring |
| Required Fasteners | Not included (use appropriate wall anchors or toggle bolts) |
| Security Feature | Security loop for optional cable |
| Adjustment Range | Multi-directional pivoting via ball joint |
| Installation | Drill holes, mount bracket, attach speaker |
| Maintenance | Wipe with a dry cloth; avoid liquids |
| Safety Warning | Do not exceed 8 lb weight limit |
| Spare Parts Availability | Clinching ring, ball pivot, wall bracket (contact support) |
Frequently Asked Questions - ProMount 80 DEFINITIVE TECHNOLOGY
User questions about ProMount 80 DEFINITIVE TECHNOLOGY
0 question about this device. Answer the ones you know or ask your own.
Ask a new question about this device
Download the instructions for your Speaker Stand in PDF format for free! Find your manual ProMount 80 - DEFINITIVE TECHNOLOGY and take your electronic device back in hand. On this page are published all the documents necessary for the use of your device. ProMount 80 by DEFINITIVE TECHNOLOGY.
USER MANUAL ProMount 80 DEFINITIVE TECHNOLOGY
Definitive Technology®
The Leader in High-Performance Loudspeakers™
ProCinema™ Series
Pivoting Wall Mount
STEP 1
Unscrew the Clinching Ring and remove the Ball Pivot from the Wall Bracket.
STEP 2
Fasten the Ball Pivot to the 1/4-20 threaded receptacle on the back of your loudspeaker. Tighten with a wrench.
STEP 3
Using the Wall Bracket as a template, mark the hole positions on the wall where you wish to mount the loudspeaker. Drill, and install the Wall Bracket using fasteners (not provided) and methods appropriate to the wall structure encountered. If you are mounting on the wall and not screwing into a stud, you should use anchored toggle bolt or moly bolt type fasteners. Tighten fasteners securely.
STEP 4
Connect audio cables to the loudspeaker. Place the Clinching Ring over the Ball Pivot (narrow opening toward the loudspeaker). Holding the loudspeaker securely, insert the Ball Pivot into the Wall Bracket. Tighten the Clinching Ring onto the Wall Bracket. It is recommended that you install a security cable (not provided) between the loudspeaker and Wall Bracket security loop. This Wall Mount is not to be used to support weight exceeding 8 lb.
Clinching Ring Wall Bracket
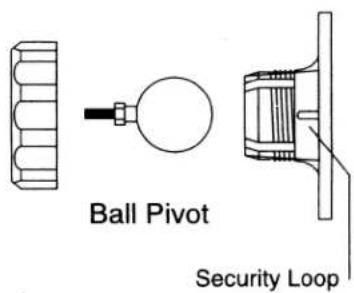
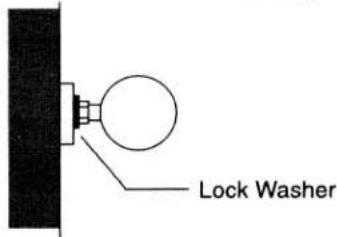
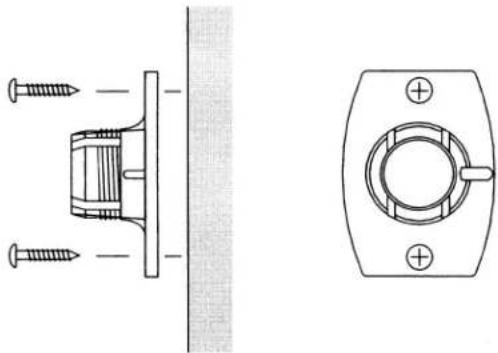
natural_image
Technical line drawing of a mechanical assembly with screws and a flange (no text or symbols)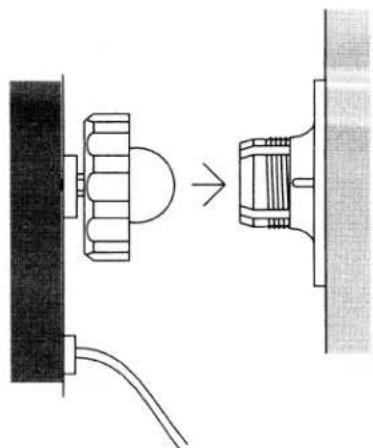
natural_image
Diagram showing a mechanical assembly with a bolt and housing, connected to a wall-mounted component (no text or symbols present)Brand : DEFINITIVE TECHNOLOGY
Model : ProMount 80
Category : Speaker Stand