SD-366 - Point of Sale Terminal Posiflex - Free user manual and instructions
Find the device manual for free SD-366 Posiflex in PDF.


| Product Type | Point of Sale Terminal |
| Brand | Posiflex |
| Model | SD-366 |
| Display Size | 15-inch TFT LCD |
| Touchscreen | Yes, resistive or capacitive (anti-glare) |
| Resolution | 1024 x 768 (XGA) |
| Processor | Intel Celeron J1900 (quad-core, 2.0 GHz) |
| RAM | 4 GB DDR3L (expandable) |
| Storage | 64 GB SSD |
| Operating System | Windows 10 IoT or Linux (optional) |
| Connectivity | Ethernet (10/100/1000), 4x USB 2.0/3.0, 2x serial (RS-232), VGA, audio |
| Power Supply | 12V DC input, external adapter (100-240V AC) |
| Weight | Approximately 7.5 kg (16.5 lbs) |
| Dimensions (W x D x H) | 370 x 290 x 300 mm (14.6 x 11.4 x 11.8 in) |
| Operating Temperature | 0°C to 40°C (32°F to 104°F) |
| Storage Temperature | -20°C to 60°C (-4°F to 140°F) |
| Humidity | 20% to 80% non-condensing |
| Certifications | CE, FCC, RoHS |
| Features | Fanless design, VESA mount compatible, front access I/O |
| Maintenance & Cleaning | Power off, clean with soft dry cloth; avoid liquids and abrasives |
| Safety | Use with grounded outlet; do not block ventilation; keep away from moisture |
| Spare Parts & Repairability | Touchscreen, power adapter, mainboard, and I/O board available; modular design for easy service |
| General Information | Designed for retail and hospitality; compatible with major POS software; 3-year limited warranty |
Frequently Asked Questions - SD-366 Posiflex
User questions about SD-366 Posiflex
0 question about this device. Answer the ones you know or ask your own.
Ask a new question about this device
Download the instructions for your Point of Sale Terminal in PDF format for free! Find your manual SD-366 - Posiflex and take your electronic device back in hand. On this page are published all the documents necessary for the use of your device. SD-366 by Posiflex.
USER MANUAL SD-366 Posiflex
SD360 SECURITY DEVICE USER'S MANUAL
Rev.: Original
I. FEATURES
● Optical Finger Print Sensor in USB interface
- Industry's most accurate fingerprint algorithm
● ISO 7811 Magnetic Stripe Reader in USB full speed HID interface
- Options for MSR heads covering 1&2 and all 3 tracks
● 3 tracks type MSR can read also AAMVA and CA DMV card
● Total power consumption: 300 mA @ 5V DC
- For integration in HT series Posiflex hybrid POS touch terminal systems.
FCC NOTICE
This equipment generates, uses, and can radiate radio frequency energy and, if not installed and used in accordance with the instructions manual, may cause interference to radio communications. It has been tested and found to comply with limits for a Class A digital device pursuant to subpart I of Part 15 of FCC Rules, which are designed to provide reasonable protection against interference when operated in a commercial environment. Operation of this
equipment in a residential area is likely to cause interference in which case the user at his own expense will be required to take whatever measures to correct the interference.
WARRANTY LIMITS
Warranty will terminate automatically when the equipment is opened by any person other than the authorized technicians. The user should consult his/her dealer for the problem happened. Warranty voids if the user does not follow the instructions in application at this merchandise. The manufacturer is by no means responsible for any damage or hazard caused by improper application.
The hardware utility program, including instructions for its use, is provided "AS IS" without warranty of any kind. Posiflex Technology, Inc., further disclaims all implied warranties including without limitation any implied warranties or of fitness for a particular purpose. The entire risk arising out of the use or performance of the software and documentation remains with you.
ABOUT THIS MANUAL
This manual is written in an attempt with full strength to assist the user to utilize the security upgrade kit SD360 for the Posiflex touch terminal systems. This series of products incorporate 2 delicately designed POS peripherals each can be used as an excellent tool to accommodate the required security specialty involved in POS business, kiosk and hospitality operation. This manual covers the conceptual and operational aspects of these units. For technical aspects involving opening of the unit or option implementation, it is only available to the authorized distributors.
The manufacturer of the SD300 series heartily apologizes to the user for reserving the right to change or to modify this manual without notice due to the rapid and constant progress and improvement on science and technology. The user may always obtain the most up to date information through any of our web sites: http://www.posillex.com or http://www.posillex.com.iw.
© Copyright Posiflex Technology Inc. 2012
All rights are strictly reserved. No part of this documentation may be reproduced, stored in a retrieval system, or transmitted in any form or by any
TRADE MARKS AND SERVICE MARKS
C EPOSIFLEX is a registered trademark of Posiflex Technology Inc., an ISO 9001 and ISO-14001 certified manufacturer. Other brand and product names are trademarks and registered trademarks and service marks of their respective owners.
II. INSTALLATION
1. HARDWARE INSTALLATION
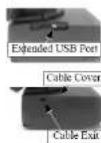
For SD-360 ordered with the host system like HT series, it is installed on the system at delivery. For separately ordered SD-360, it is delivered separately from the system and needs to be fixed onto the system per following instructions before use. However, before trying to install a SD-360, please check first that the extended USB port in the top side cable cover of HT series is not occupied for other purposes. Should there be any need for other application with this port, please use a self-powered type USB HUB (with its own power adaptor). However, Please gently press down and slide to side the top side cable cover of HT series to open it and connect the USB cable of SD-360 to the extension USB port and make the cable come through the cable exit when the cable cover is reapplied.
P/N: 19700901110
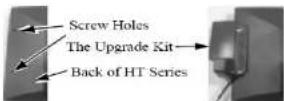
You may find two screw holes on the back of the right side of the display screen of HT series. Align the upgrade unit to the back of right edge of the display screen. Insert and fasten with the two screws with washers included in your kit, as indicated in the picture at left.
2. DRIVER INSTALLATION
- For Finger Print Sensor: To include the drivers for this sensor to perform finger print registration or verification (authentication) in an AP requires the software programmer to purchase and utilize its SDK (software developer's kit). However, Posiflex delivers this optical finger print sensor with its drivers. Please find it in the mini CD delivered with SD-360.
- For MSR: The magnetic stripe reader in SD-360, no matter how many tracks are in the reader head, connects to the host through USB port. It operates as a USB KB and therefore requires no driver installation. You only need to set the USB keyboard to be enabled in system CMOS setup if the OS does not do it automatically. Refer to "Operation Guide" for manipulation over the reader configuration.
III. OPERATION GUIDE
1. FINGER PRINT SENSOR
a. Cautions
-
Never pour the glass cleaner directly on the sensor window.
-
Never use alcohol-based cleaners.
-
Never submerge the sensor in liquid.
-
Never rub the window with an abrasive material, including paper.
-
Do not poke the window coating with your fingernail or any hard item, such as a pen.
b. Principle
The fingerprint sensor provides unrivalled facility security and positive user identification without compromising user convenience. It is designed to simply augment existing security infrastructures, such as proximity, magnetic stripe, PIN or to eliminate concerns about stolen, loaned. The finger print sensor software never stores fingerprint images. The finger print sensor software creates a fingerprint template, which is a highly compressed and digitally encoded mathematical representation of fingerprint features. This template is created when a user registers a finger and is stored in an encrypted file. When the user later touches the fingerprint reader to authenticate, a new template is created and compared to the "registered" template. If there is a match, the authentication is successful.
c. Finger Print Recognition
In order for the sensor to acquire a good image of your finger, you must place the pad of your finger but not the tip in the center of the sensor window, and apply gentle, even pressure. Do not "roll" your finger as usually practiced in the traditional ink and paper fingerprint taking technique. Pressing too hard will distort your fingerprint. Pressing too lightly will not expose a large enough area of your finger. Also, make sure to hold your finger on the sensor until you see the sensor light blink; this may take longer for dry fingers. Then, lift your finger. Although you may use any finger with the sensor, your index finger of either hand works best. If the sensor is capturing your finger image as indicated by the sensor blink and you have tried all the above suggestions, you may need to reregister your finger.
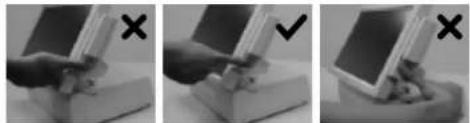
Please acquire your finger print recognition only in a comfortable gesture like the middle picture below with a check mark suggested. The manufacturer shall bear no liability to any harm caused by improper application like the rest two pictures.
d. Sensor Activation
There will always be a red light from the sensor to detect the presence of a finger when the sensor is activated. Failure to connect to a self-powered USB port will cause non-operation of the sensor. If you activate your terminal's power saving functionality but your third party application does not support this, then your fingerprint sensor will enter "sleep mode" even though your workstation does not. If this occurs, you will need to disconnect and reconnect the sensor to the USB port. Please check with your application developer for compatibility.
c. Cleaning the Sensor
Depending on the amount of use, the sensor window may need to be cleaned periodically. To clean it, apply the sticky side of a piece of adhesive cellophane tape on the window and peel it away as in the drawing at right.

Under heavy usage, the window coating on some sensors may turn cloudy from the salt in perspiration. In this case, gently wipe the window with a cloth (not paper) dampened with a mild ammonia-based glass cleaner.
2. MAGNETIC STRIPE READER
The MSR in SD-360 reads an ISO magnetic stripe card without driver. Yet, there is a "Posiflex USB MSR Manager" program provided to control some parameter configuration for this MSR. The features controllable in this program cover each track enable/disable, Alt+Num approach for ASCII codes and Leading/Stop code enable/disable. The function for enabling each track of course comes in effect only when the track is physically available. Please find in the mini CD delivered with SD-360 or Product Information CD delivered with Posiflex POS system the folder for "USBMSR" and "SetUp" this demo program or download the installation program from our web http://www.posiflex.com or http://www.posiflex.com.tw.
- SD360 SECURITY DEVICE USER'S MANUAL
- FEATURES
- FCC NOTICE
- WARRANTY LIMITS
- ABOUT THIS MANUAL
- TRADE MARKS AND SERVICE MARKS
- INSTALLATION
- HARDWARE INSTALLATION
- DRIVER INSTALLATION
- OPERATION GUIDE
- FINGER PRINT SENSOR
- a. Cautions
- b. Principle
- c. Finger Print Recognition
- d. Sensor Activation
- c. Cleaning the Sensor
- MAGNETIC STRIPE READER
Brand : Posiflex
Model : SD-366
Category : Point of Sale Terminal