
SLT958 EM WH - Range hood SIRIUS - Free user manual and instructions
Find the device manual for free SLT958 EM WH SIRIUS in PDF.


| Product Type | Ceiling Cassette Range Hood |
| Model | SLT958 EM WH |
| Brand | Sirius |
| Power Supply | 10A GPO in ceiling cavity |
| Ducting Size | 150 mm |
| Max Ducting Length | 7 m (minimum 2 m to motor) |
| Motor Options | SEM 1 (internal), SEM 2 (external), SEM 5 (external) |
| Remote Control | 6-channel radio control, frequency 433.92 MHz |
| Lighting | Yes (disconnectable for installation) |
| Grease Filters | Accessible via drop-down glass panels |
| Installation Type | Ducted outside only |
| Mounting | 4 x 250 mm threaded bolts to timber support |
| Safety Features | Emergency shutdown button; requires professional installation |
| Cleaning | Grease filters must be cleaned regularly; no steam cleaning |
| Warranty | 3 years parts & labor; 6 years with Sirius ducting; 10 years on off-board motors |
Frequently Asked Questions - SLT958 EM WH SIRIUS
User questions about SLT958 EM WH SIRIUS
0 question about this device. Answer the ones you know or ask your own.
Ask a new question about this device
Download the instructions for your Range hood in PDF format for free! Find your manual SLT958 EM WH - SIRIUS and take your electronic device back in hand. On this page are published all the documents necessary for the use of your device. SLT958 EM WH by SIRIUS.
USER MANUAL SLT958 EM WH SIRIUS
Congratulations on your purchase! Thank you for choosing a Sirius product.
Ceiling cassette user manual
INSTALLATION AND USE INSTRUCTIONS
SLT958 EM EAN #9351116001292
SLT958 EM WH EAN #9351116001780
SLT952 EM EAN #9351116001018
SLT968 EM EAN #9351116002053
SLT968 EM WH EAN #9351116002060
SLT960 EM EAN #9351116000936
BEFORE YOU INSTALL 4
TO THE ATTENTION OF THE USER 5
PRE-INSTALLATION CHECKS 6
OPENING THE GLASS PANELS 7
LINE MEASUREMENTS 8
INSTALLING THE TIMBER SUPPORT BEAMS 9
MOTOR AND VENTING OPTIONS 10
TOP VENT INSTALLATION 11
SIDE VENT INSTALLATION SEM 1 & SEM 2 12
SIDE VENT INSTALLATION SEM 7 & SEM 8 13
REMOTE CONTROL 15
OPERATION 16
DUCTING FROM MOTOR TO WALL 17
ELECTRICAL CONNECTION 17
WIRING DIAGRAMS 18
PARTS LIST 20
WARRANTY 23
BEFORE YOU INSTALL - DUCTING INFORMATION
Sirius warranty covers only Sirius product. If you choose to install a non-Sirius branded accessory such as flexible ducting, Sirius will only warrant the rangehood and motor. If installation is found to be the cause of failure or issue then charges will apply for service and parts.
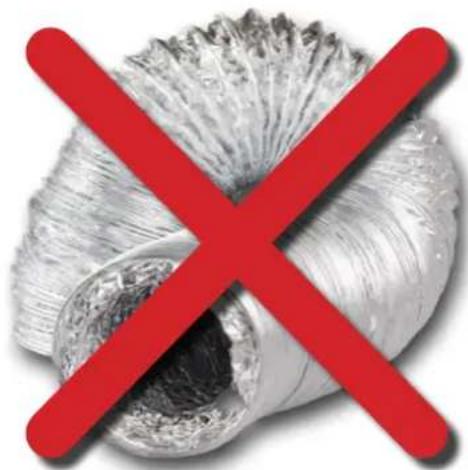
Flexible ducting is not permitted under any circumstances. Flexible ducting has been found to increase noise levels, increase vibration and reduce airflow. Sirius Semi-rigid or solid ducting can be used in lieu. There is a range available to suit any application.

WARNING

The appliance must be installed and connected to the power supply only by a qualified technician.
- There should be adequate ventilation of the room when the rangehood is used at the same time as appliances burning gas or other fuels (not applicable to appliances that only discharge the air back into the room)
- The details concerning the method and frequency of cleaning
- There is a fire risk if cleaning is not carried out in accordance with the instructions;
- Do not flambé under the range hood;
- CAUTION: Accessible parts may become hot when used with cooking appliances.
Ducting available at www.siriusbrand.com
6 Year Warranty when Sirius Ducting is used. Full replacement warranty on parts and labour.
See website for terms & conditions.
A reduction in the duct diameter from stated ducting size will void warranty.
If you are in doubt about the ducting, please contact Sirius on 1300 762 219 prior to installation
natural_image
Cross-shaped red prohibition symbol over a textured metallic shell (no text or symbols)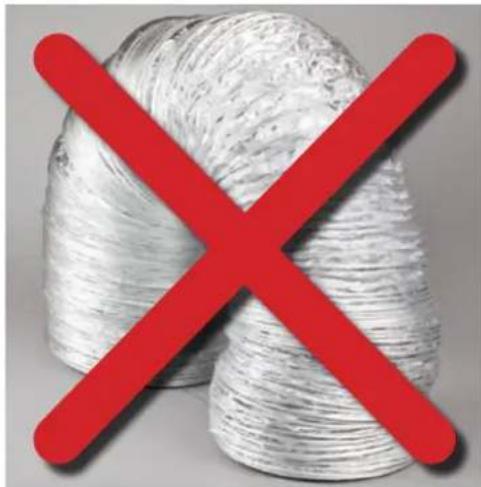
natural_image
Stack of white yarn spools with a red X symbol overlay (no text or symbols on spools)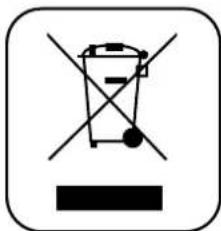
natural_image
Symbol of a trash bin crossed with a horizontal line, no text or numbers presentThe symbol on the product or on its packaging indicates that this product may not be treated as house-hold waste. Instead it shall be handed over to the applicable collection point for the recycling of electrical and electronic equipment. By ensuring this product is disposed of correctly, you will help prevent potential negative consequences for the environment and human health, which could otherwise be caused by inappropriate waste handling of this product. For more detailed information about recycling of this product, please contact your local city office, your household waste disposal service or the shop where you purchased the product. This appliance is marked according to the European directive 2002/96/EC on waste electrical and electronic equipment (WEEE).
TO THE ATTENTION OF THE USER
This rangehood is designed to work with ducted outside evacuation.

WARNING

Keep these instructions for use with the appliance. If the appliance should be sold or passed on to others, make sure that the instructions are passed on with it. We thank you for taking note of these suggestions before installing and using the appliance. They have been written for your personal safety and the safety of others.
SAFETY INSTRUCTIONS
These hoods have been designed for personal use in the home. The appliance must be used by adults. Make sure that the appliance is out of reach of children and that they do not use it to play with. Make sure that children do not operate the controls.
- When the appliance is delivered, check the overall appearance of the packaging. Check PARTS LIST on page 20 for all included parts prior to discarding packaging.
Any remarks should be written on the delivery docket, of which you keep a copy.
Your appliance is designed for normal domestic use. It is not designed for commercial or industrial use, or for purposes other than those for which it was designed.
- Any consequences of or damage from incorrect installation or incorrect use of the appliance will not be covered by the manufacturer's guarantee.
- Do not ever change or try to change the characteristics of this appliance. This would be a danger. Repairs must be performed only by an authorised technician.
- Always disconnect the hood before carrying out cleaning or maintenance operations.
- Adequately ventilate the room when a rangehood and other appliances, powered by energy other than electricity, are used simultaneously, so that the hood does not suck any combustion fumes.
- It is not allowed to cook food over open flames (flambé) or operate gas hobs without pots or pans on them under the hood itself (the flames sucked into the hood might damage the appliance).
- Frying under the appliance must be done under constant supervision as hot oils and fats may ignite.
- Respect the guidelines for cleaning and replacement of grease filters. Accumulated deposits of grease are a fire hazard.
- This appliance must not be used over cook tops powered by wood or coal or in any case, over cook tops with power levels that could damage the appliance.
- Never use steam or high-pressure devices for cleaning your hood (regulations regarding electrical safety).
- Never use the rangehood without the grease filters.
At Sirius, we are constantly seeking to improve our products. We reserve the right to modify their technical, functional, or aesthetic characteristics deriving from their upgrading.
Motors manufactured and approved by Sirius only are to be used at all times. Failure to comply with this will result in the forfeit of the manufacturer warranty.
The air collected must not be conveyed into a flue used for smoke or fumes from appliances powered by anything other than electricity (central heating systems, bathroom and toilet exhausts, etc.). As far as discharging exhaust air is concerned, please follow the guidelines given by competent authorities.
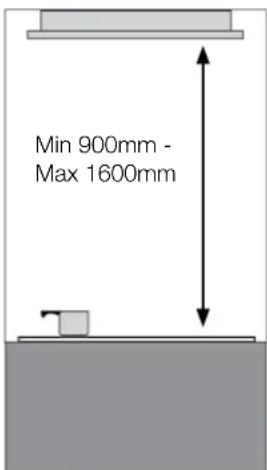
HEIGHT CLEARANCES: SLT952, SLT960, SLT968
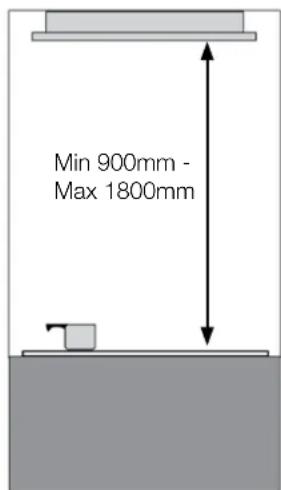
HEIGHT CLEARANCES: SLT958, SLT969
Check PARTS LIST on page 20 for all included parts prior to discarding packaging.
PRE-INSTALLATION CHECKS
Connect all of the electrical components to the unit and motor to make sure both the unit and the motor are functioning properly.
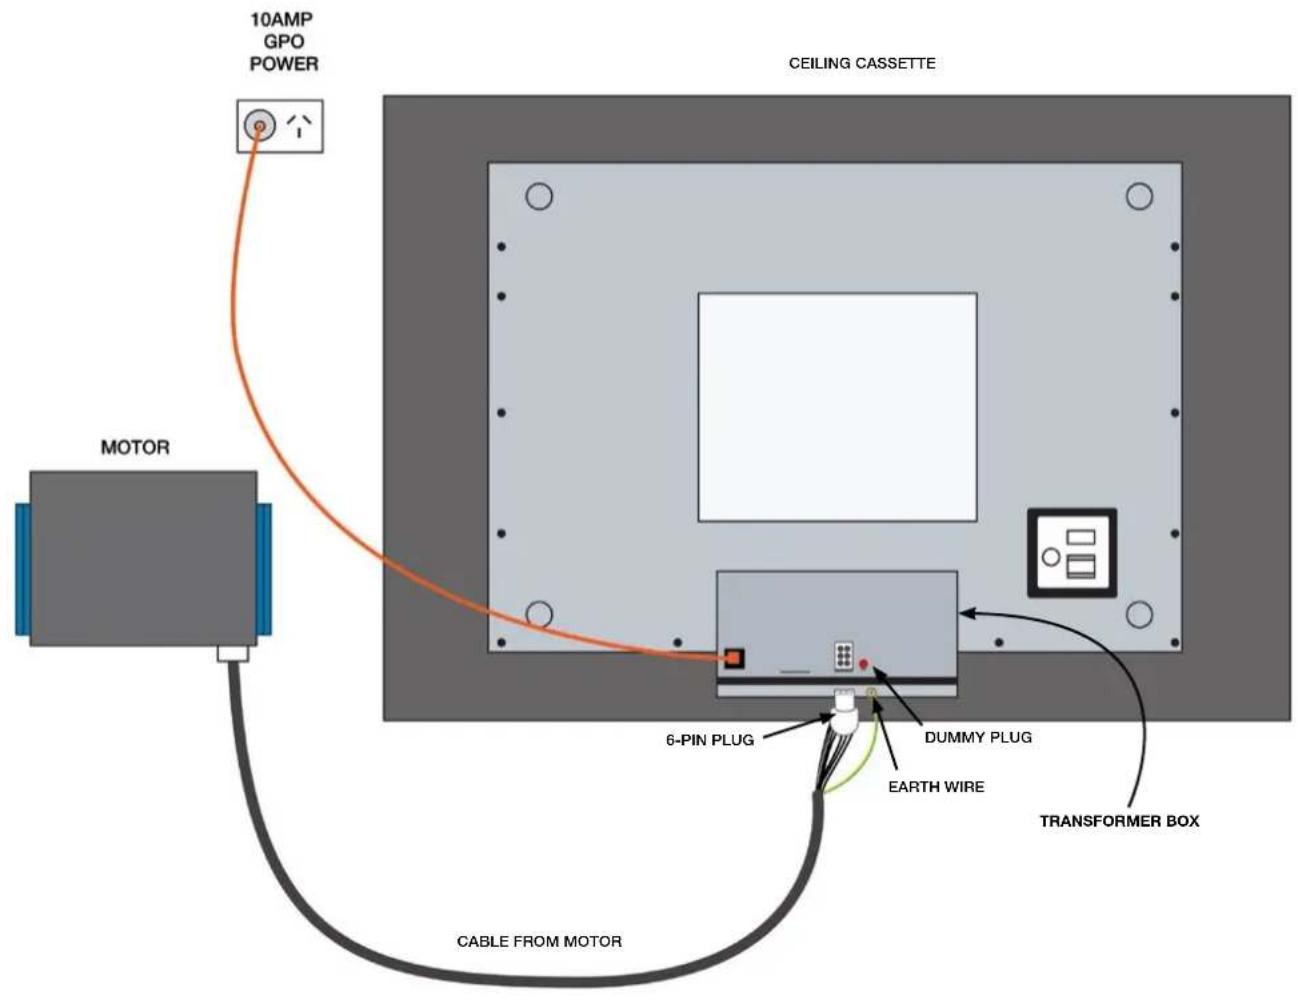
(NOTE: The motor plug is fitted with a dummy plug - with the exception of SEM1 motor - to protect the connection from dust. Ensure the red dummy plug is removed and replaced with the two pin motor plug from the power transformer box. Failure to do so will result in only two speeds operating).
Remove all plugs and proceed with installation if both unit and motor are fully operational.
CAUTION
Installation must comply with the regulations in force regarding the ventilation of enclosed environments. In particular, discharged air must not be conveyed into a duct used for fumes discharge or discharge from appliances using gas or other combustible materials. Air cannot be ducted into roof space.
The use of discontinued ducts is not allowed without the approval of a qualified technician.
BEFORE YOU INSTALL
Sirius warranty covers only Sirius product. If you choose to install a non-Sirius branded accessory such as flexible ducting, Sirius will only warrant the hood and motor. If installation or inferior parts are found to be the cause of failure or issue then charges will apply for service and parts.
Flexible ducting is not permitted under any circumstances. Flexible ducting has been found to increase noise levels, increase vibration and reduce airflow. Sirius Semi-rigid or solid ducting can be used in lieu. There is a range available to suit any application.
Available at www.siriusbrand.com
A reduction in the duct diameter from stated ducting size will void warranty. If you are in doubt about the ducting, please contact Sirius on 1300 762 219 prior to installation.
WARNING
Before proceeding with the installation of the ceiling cassette, please thoroughly inspect the entire unit (including the motor) for any damages, including all of the electrical connections. If any damage is found, cease installation and report it immediately to the retail partner that the cassette was purchased from.

NOTE

- Only use Sirius Ducting with a maximum length of 7 metres & minimum of 2 metres from the outlet collar on the cassette to the motor location.
- Limit the number of elbows in the ducting, since each 90 degree bend reduces the air capacity by 1 lineal metre (e.g. if there are 2 × 90 degree bends, the maximum duct length should not exceed 5 metres.)
- Avoid abrupt changes of direction where possible, bends of more than 90 degrees should be avoided at all costs.
- Use of 150mm ducting is applicable for SLT958 models only, 200mm ducting is applicable for SLT952 / SLT960 / SLT968.

WARNING

Reduction of the ducting diameter will void the manufacturer warranty as it will severely affect the performance of the motor and may cause damage with prolonged usage.

WARNING

Use ducting approved by standards enforced, see www.siriusbrand.com for details for approved ducting. The manufacturer will not be deemed responsible for air capacity and noise problems caused by failure to comply with the above and no warranty on the product will be provided.

DANGER

FAILURE TO INSTALL THE SCREWS OR FIXING DEVICE IN ACCORDANCE WITH THESE INSTRUCTIONS MAY RESULT IN ELECTRICAL HAZARDS OR ELECTROCUTION.

NOTE

The cassette requires one 10AMP GPO located inside the ceiling cavity to power both the lighting and the motor.
• SLT960 EM ONLY
Installation of the ceiling cassette can either be installed 50mm proud mounted or 260mm proud with the additional purchase of the stainless steel proud mount kit (SPS-76105980960)
OPENING THE GLASS PANELS - SLT960 EM
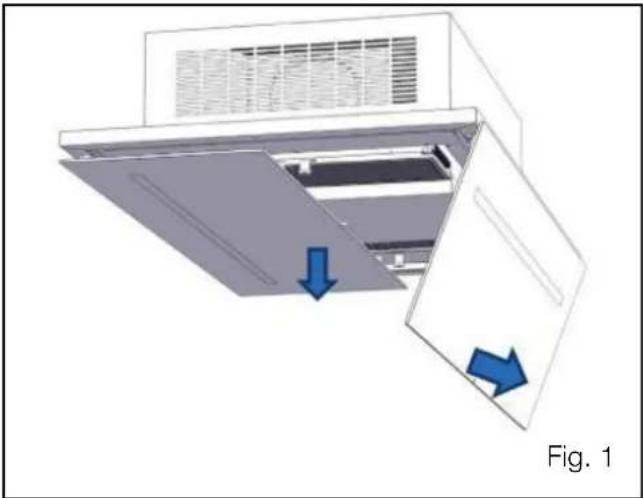
Step 1a: Accessibility to the filters is done by pulling down on the glass panels. These are held on by magnets.
Swing the glass panels downwards on either side to expose the grease filters. (Fig. 1)
natural_image
Diagram of a microwave oven with airflow arrows indicating cooling or ventilation (no text or symbols)OPENING THE LIGHT PANELS - SLT952 EM
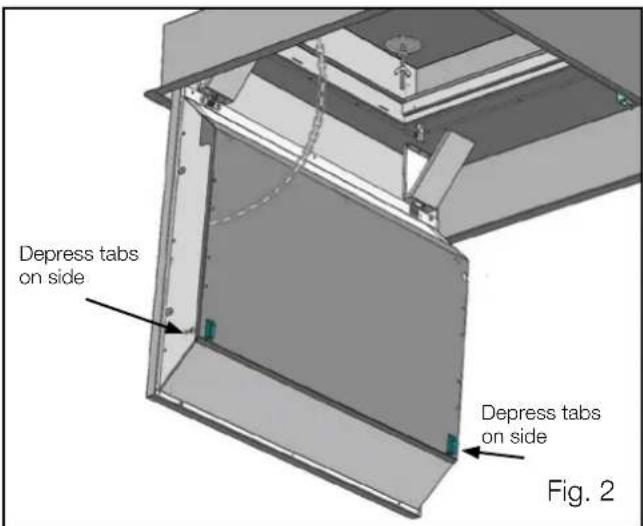
Step 1b: Depress the tabs on either side of the two panels, pull down and allow them to swing open to expose the grease filters. (Fig. 2)
A chain is fitted for safety purposes.
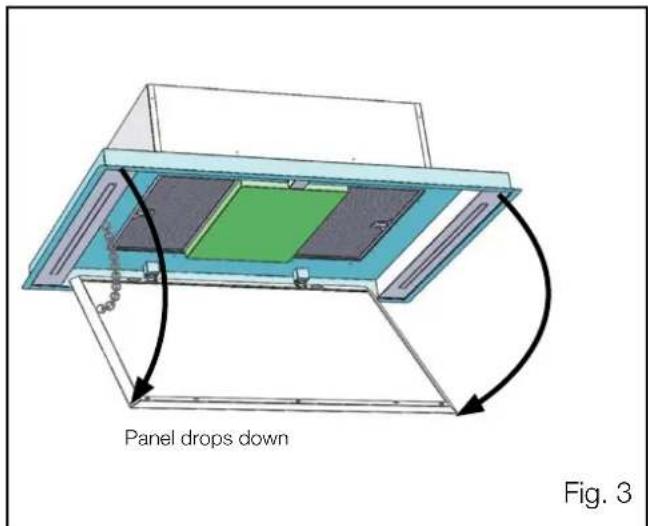
OPENING THE COVER PANELS - SLT958 EM, SLT958 EM WH, SLT968 EM, SLT968 EM
Step 1c: On the side where the speed control light is visible, pull down in the centre of the panel.
The panel is held on by a strong magnet. Allow the panel to swing open to expose the grease filters.
(Fig. 3) A chain is fitted for safety purposes.
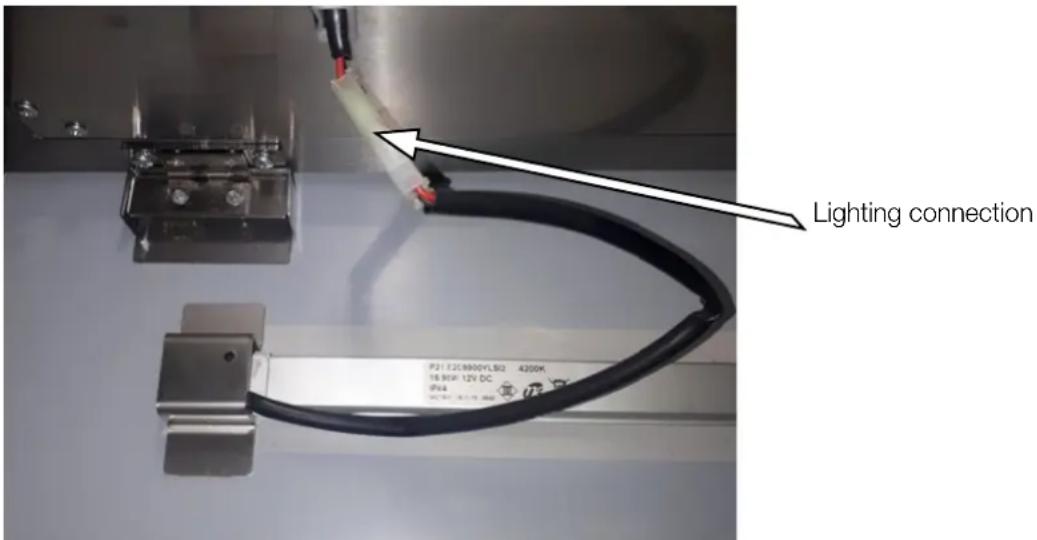
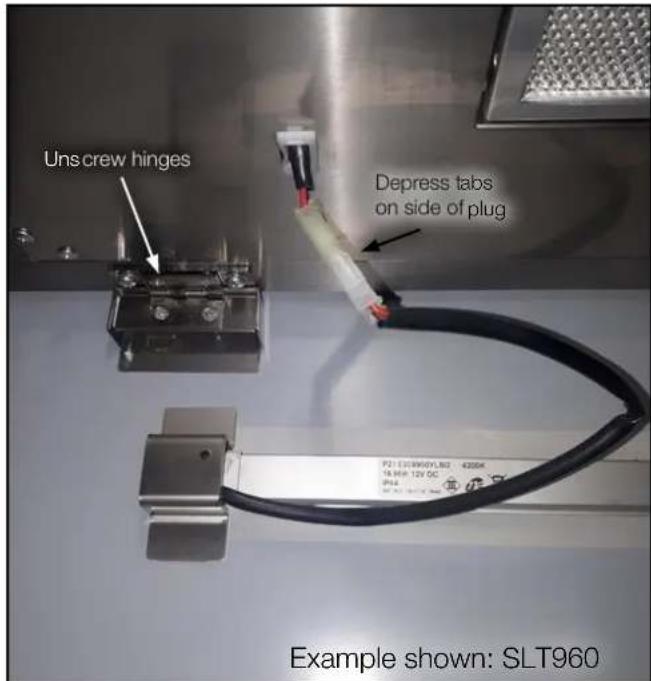
Step 1d: After swinging open the panel/panels on any of the cassettes, disconnect the lighting by depressing the tabs on the connection plug and pulling the cable.
So that no damage is caused during the installation process, remove the panels by unscrewing the hinges on the underside of the cassette. This will also lighten the cassette to make lifting it into place and installation easier.
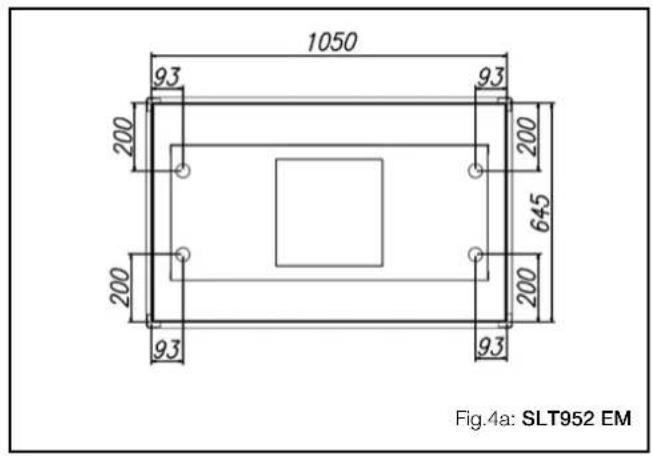
LINE MEASUREMENTS FOR MOUNTING HOLES
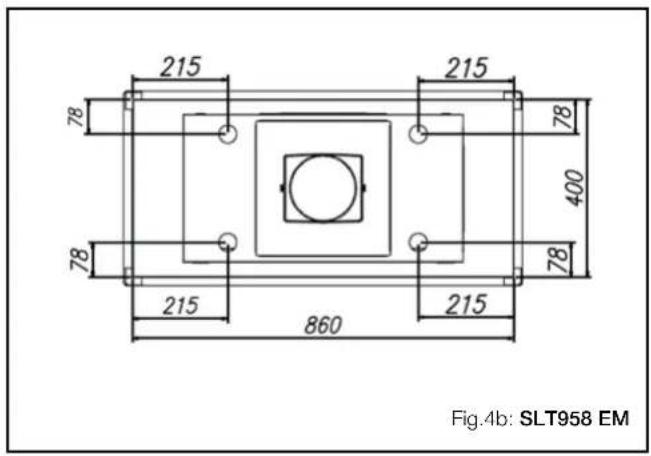
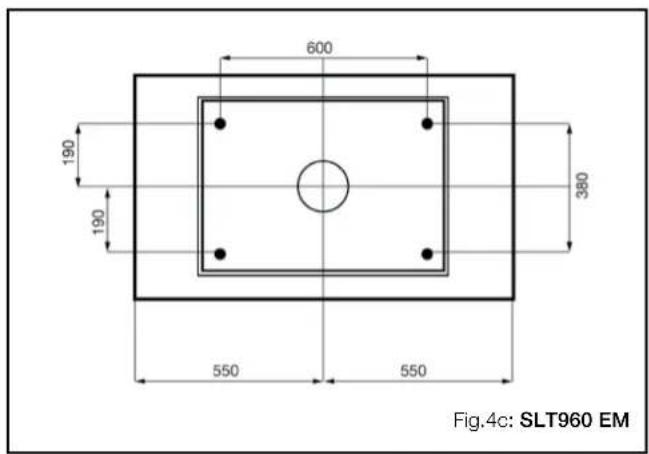
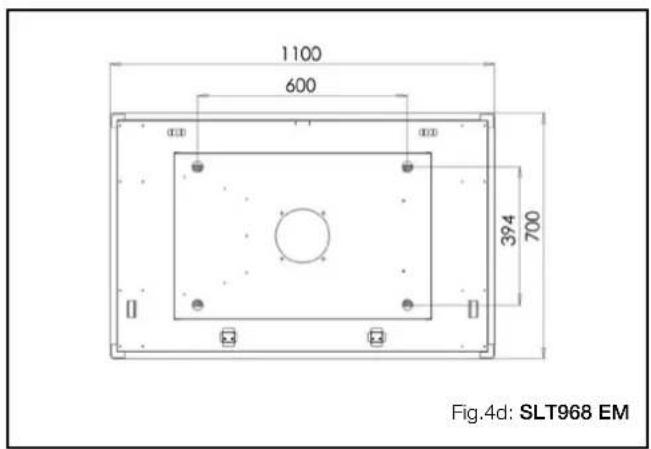

NOTE

As every installation will differ slightly depending on the ceiling cavity of the dwelling, this installation shall be used as a guide only.
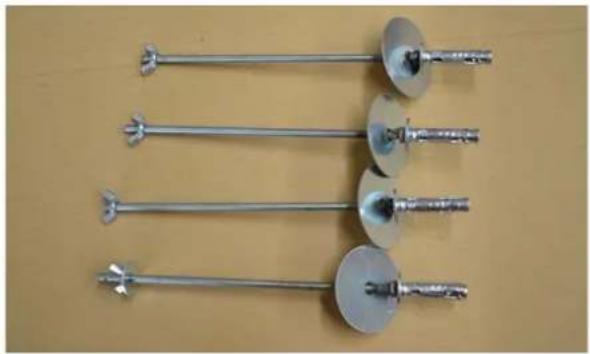
- These cassettes are held in place with the use of the 4 x 250mm threaded bolts. Using the measurements in the Fig. 4 line drawings ensure that there is timber framework (not supplied) inside the cavity to support the weight on the cassette. Please refer to each individual measurement for the exact location of the mounting holes or take a physical measurement of the location when the cassette has been unpackaged.
natural_image
Four metallic screwdrivers arranged horizontally on a plain yellow surface (no text or symbols visible)INSTALLING THE TIMBER SUPPORT BEAMS
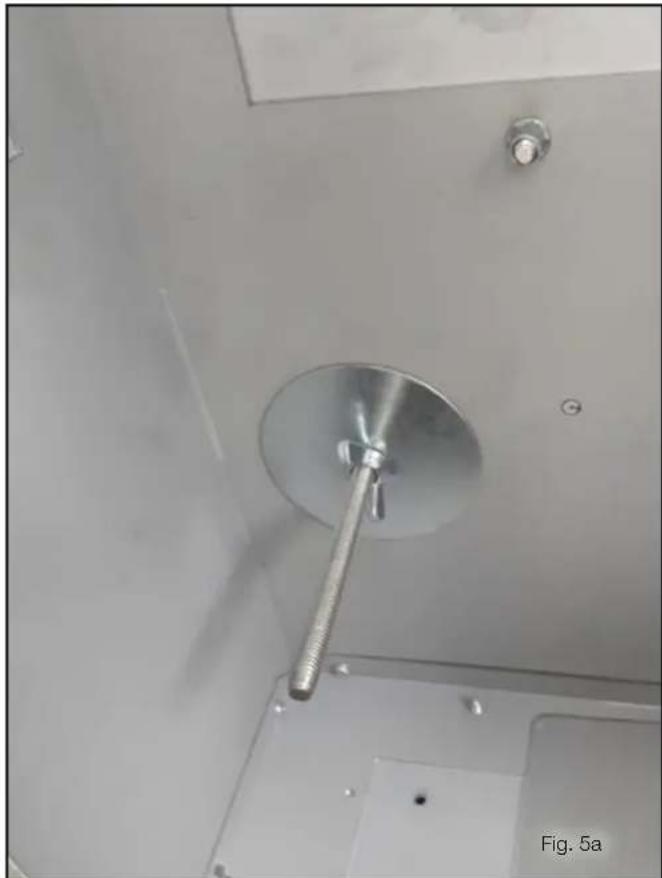
- After running the timber support beams in the cavity above, pre-drill 4 x 8mm holes through the timber and pass the 4 x 250mm bolts through them, ensuring that the larger washer is on the INSIDE OF THE CEILING CASSETTE. (Fig. 5a)
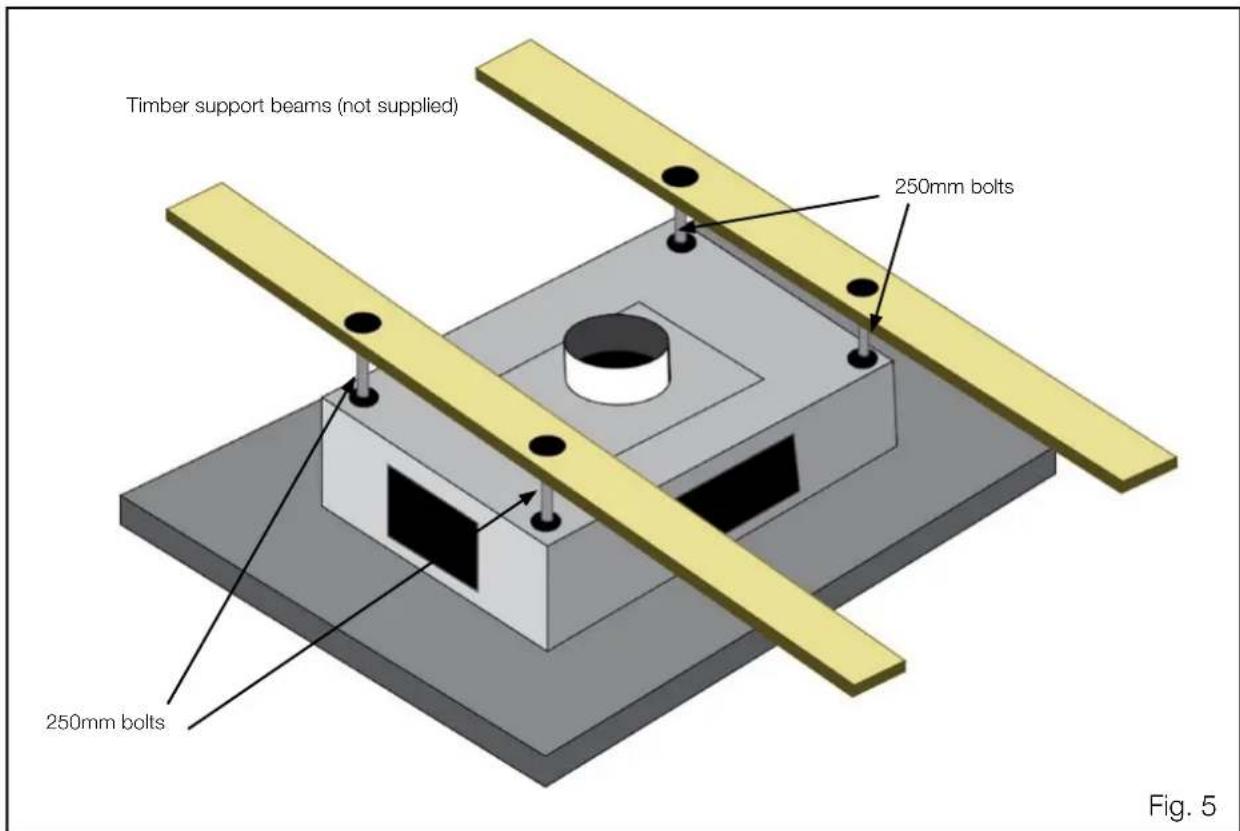
- Lift the cassette into position and ensure that the 4 x 250mm bolts pass through the mounting points. Fit the larger diameter washer first and then wind the wingnut up thr thread and tighten the cassette into position. These will enable you to flush the unit tight with the ceiling (Fig. 5a).
- After screws are fitted, replace the panels that were removed during Step 1d by reattaching the hinges and reattaching the light cable.
natural_image
Close-up of a metallic mechanical component with a threaded rod inserted, mounted on a white panel (no visible text or symbols)MOTOR AND VENTING OPTIONS:
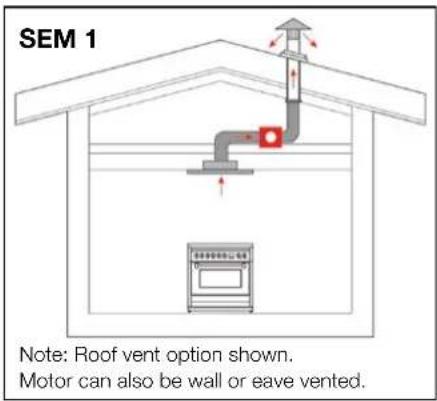
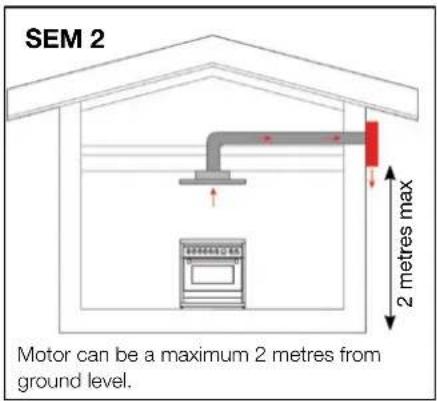
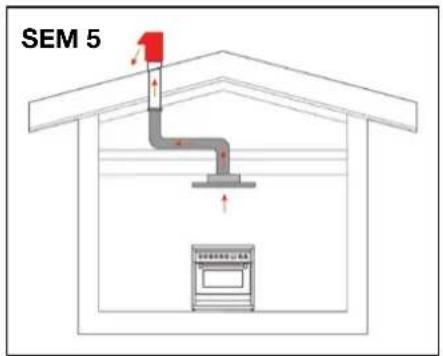
SLT958 EM (150mm DUCTING)

NOTE

Motor MUST be accessible for servicing at all times.
MOTOR AND VENTING OPTIONS:
SLT952 EM, SLT960 EM, SLT968 EM
(200mm DUCTING)
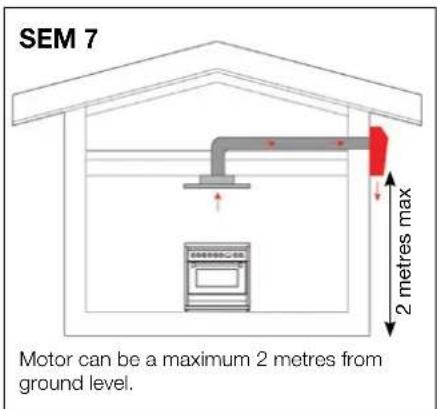
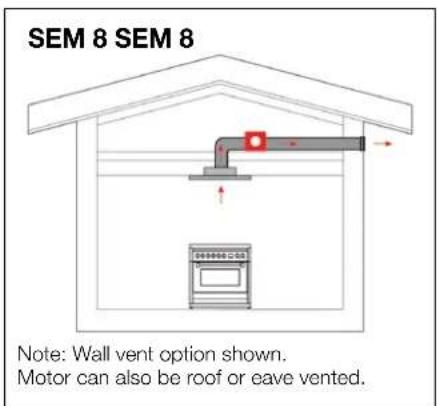
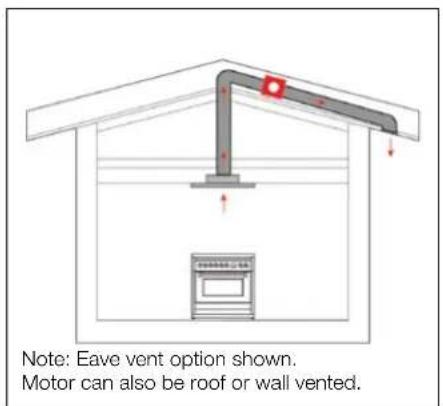

NOTE

Motor MUST be accessible for servicing at all times.
CONNECTION OF THE SELECTED OFFBOARD MOTOR: TOP VENT OPTION
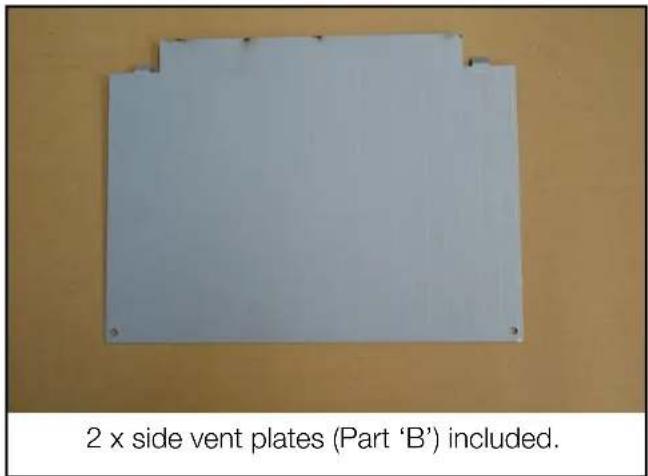
- Ensure that the two side venting options are blocked off with the included plates.
TOP VENT INSTALLATION
- Use 150mm ducting (Part 'K.1') for SLT958 EM models or 200mm ducting (Part 'K.2') for SLT952 / SLT960 EM / SLT968 EM models.
- The ducting fits directly onto the collar on the top adaptor plate (Part 'D').
- Fix in place using a universal ring clamp (Part 'G').
INTERNAL MOTOR:
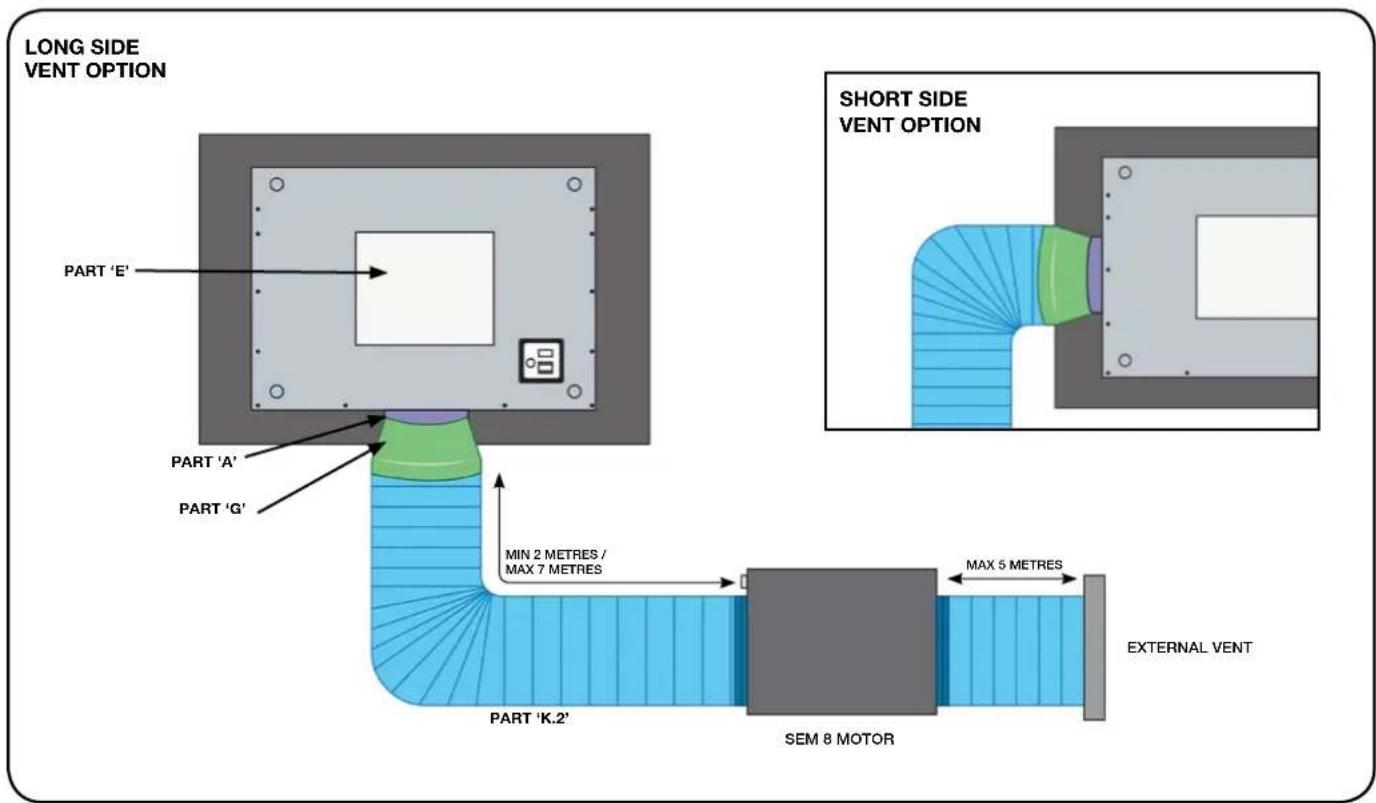
Ducting to SEM 1 (150mm) / SEM 8 motor (200mm)
Please note that the final exit point for SEM 1 or 8 can be through the roof, wall or eave vent.
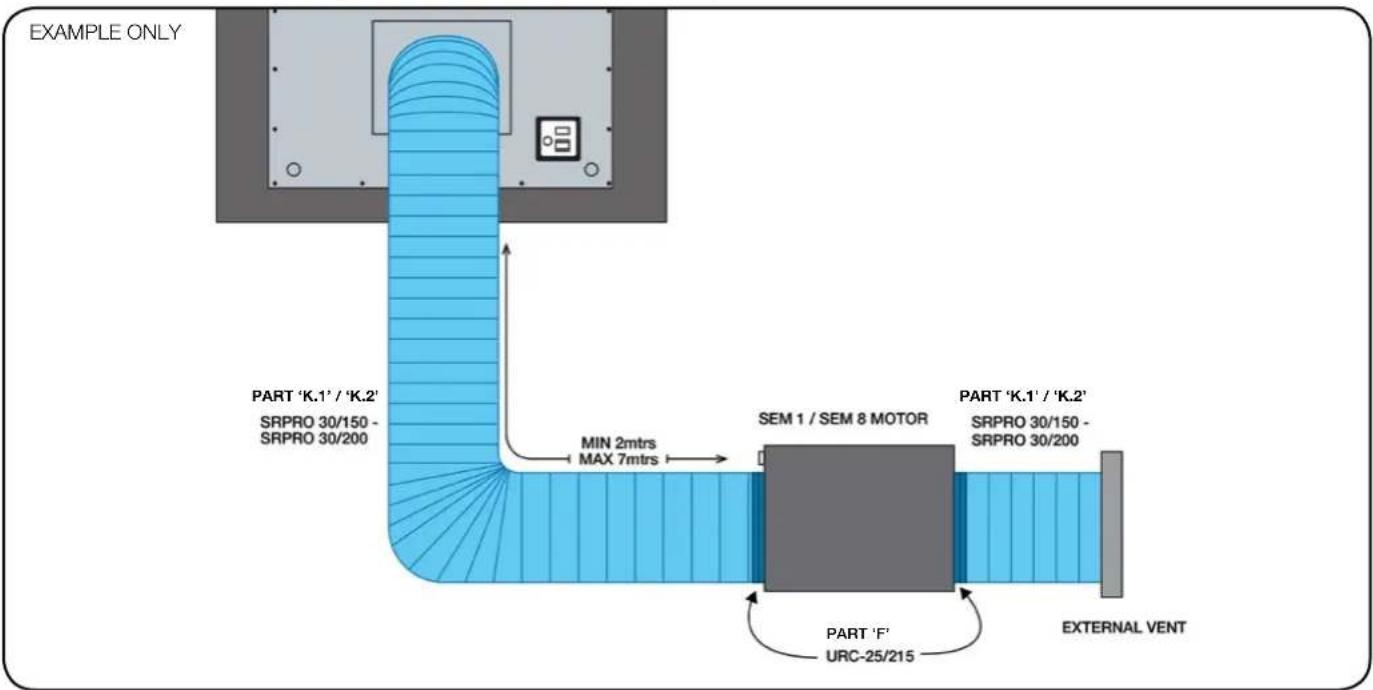
EXTERNAL MOTOR:
Ducting to SEM 2 (150mm) / SEM 7 motor (200mm)
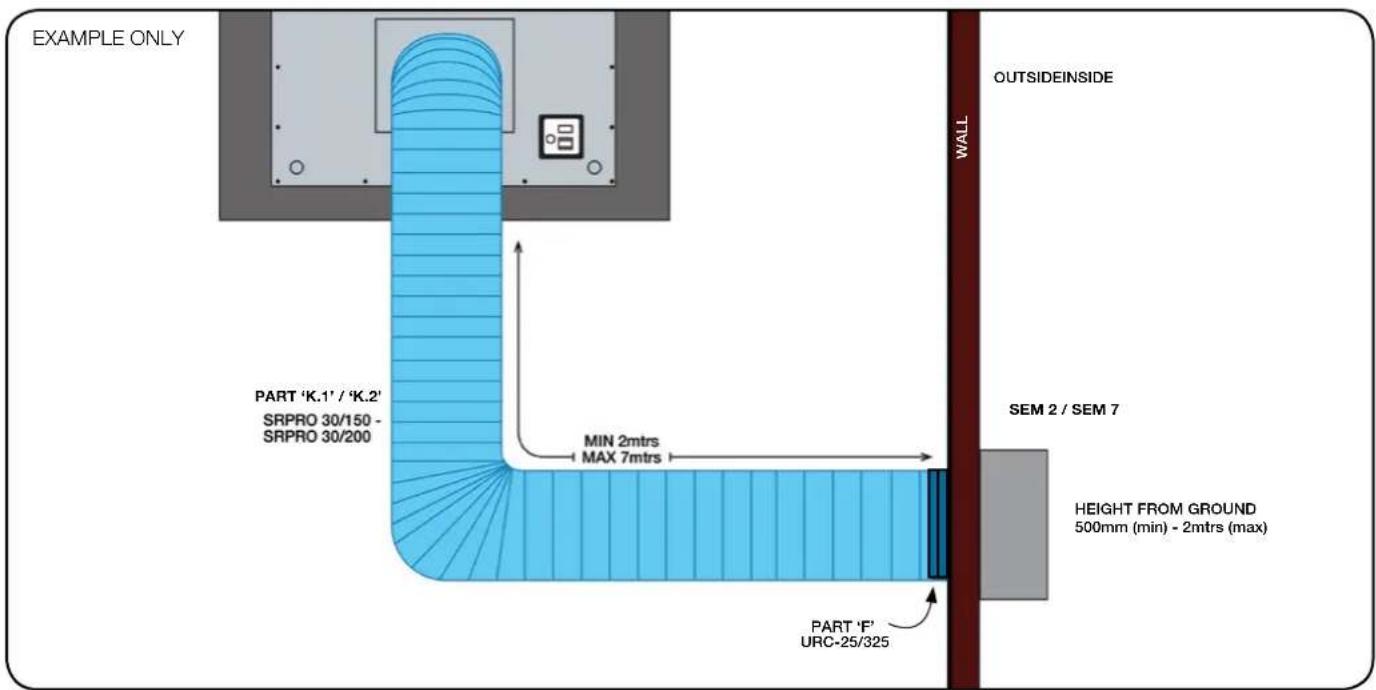
EXTERNAL MOTOR: Ducting to SEM 5 (150mm)
SLT958 EM models only: Download SEM5 user manual from www.siriusbrand.com
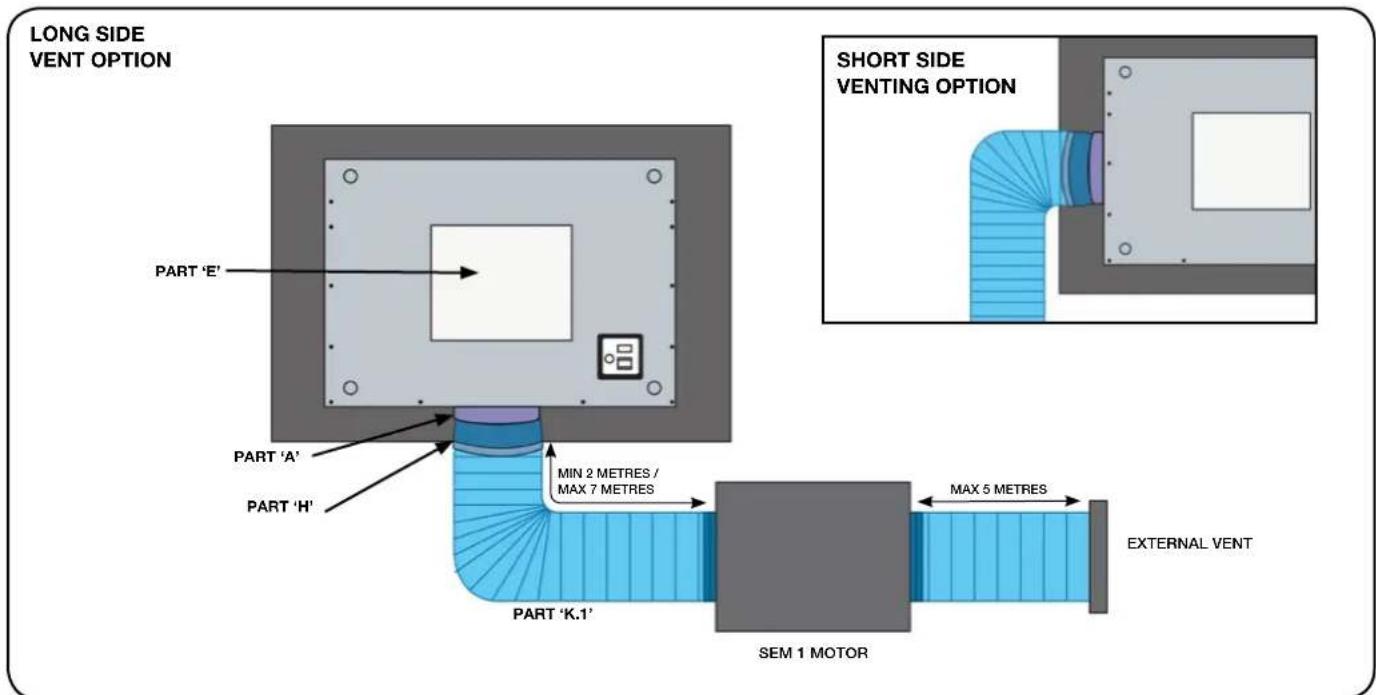
SIDE VENT INSTALLATION: SLT958 EM
150mm DUCTING: SEM 1 MOTOR (INTERNAL)
- Ensure that the unused side and top ports are blocked off using the supplied blocking ports (Part 'B' and Part 'E').
1A: Connect the top of the 150mm connector piece (Part 'H') to the round outlet on adaptor (Part 'A'), the connect length of 150mm ducting (Part 'K.1') to the bottom of the 150mm connector piece (Part 'H').
2A. Secure to the motor with a universal ring clamp (Part 'F').
natural_image
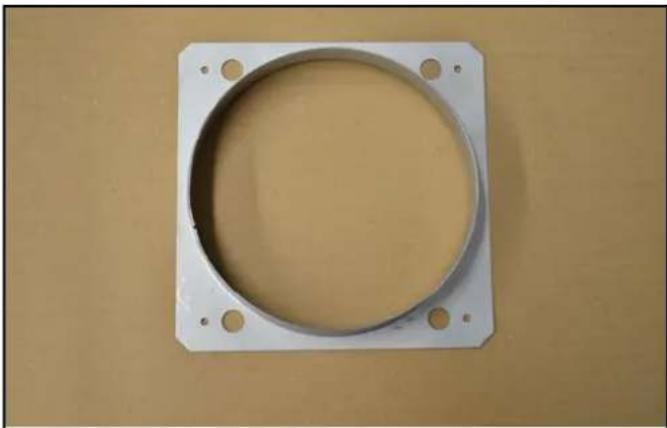
White square mechanical component with a circular recessed inner ring and four mounting holes, placed on a beige surface (no text or symbols visible)Side vent adapter (Part 'H').
SIDE VENT INSTALLATION: SLT958 EM
150mm DUCTING: SEM 2 MOTOR (EXTERNAL)
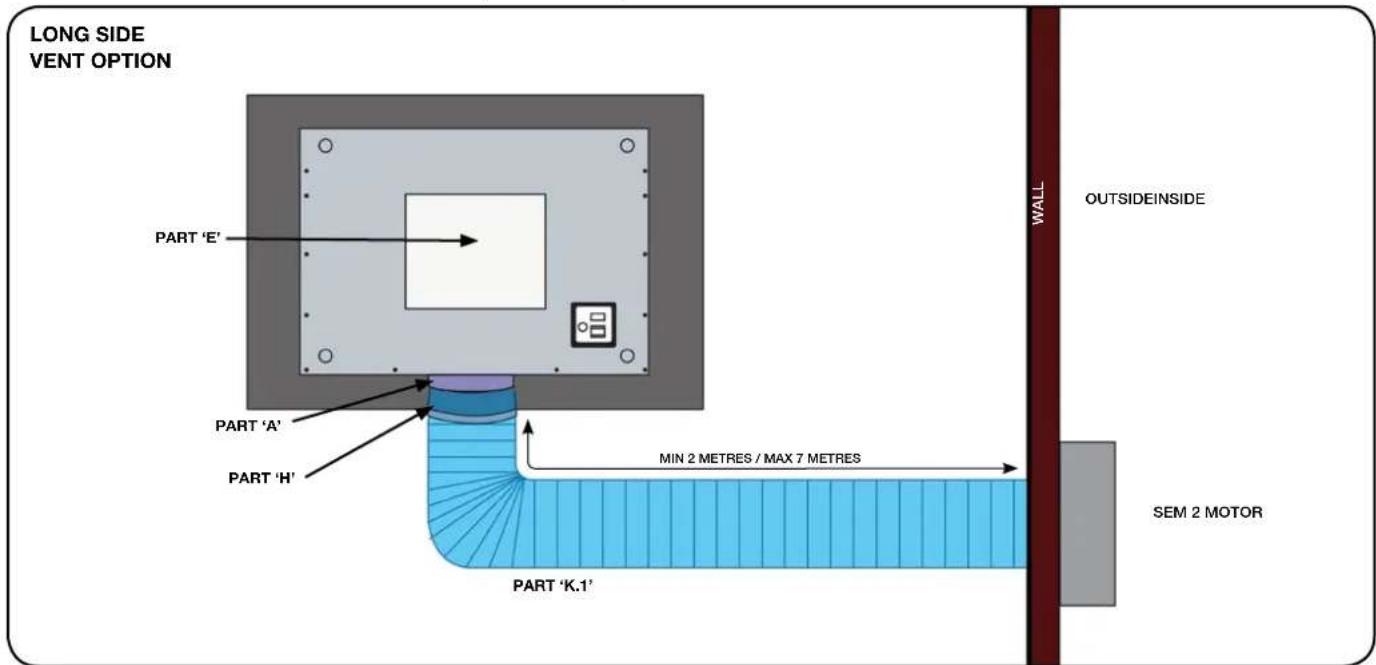
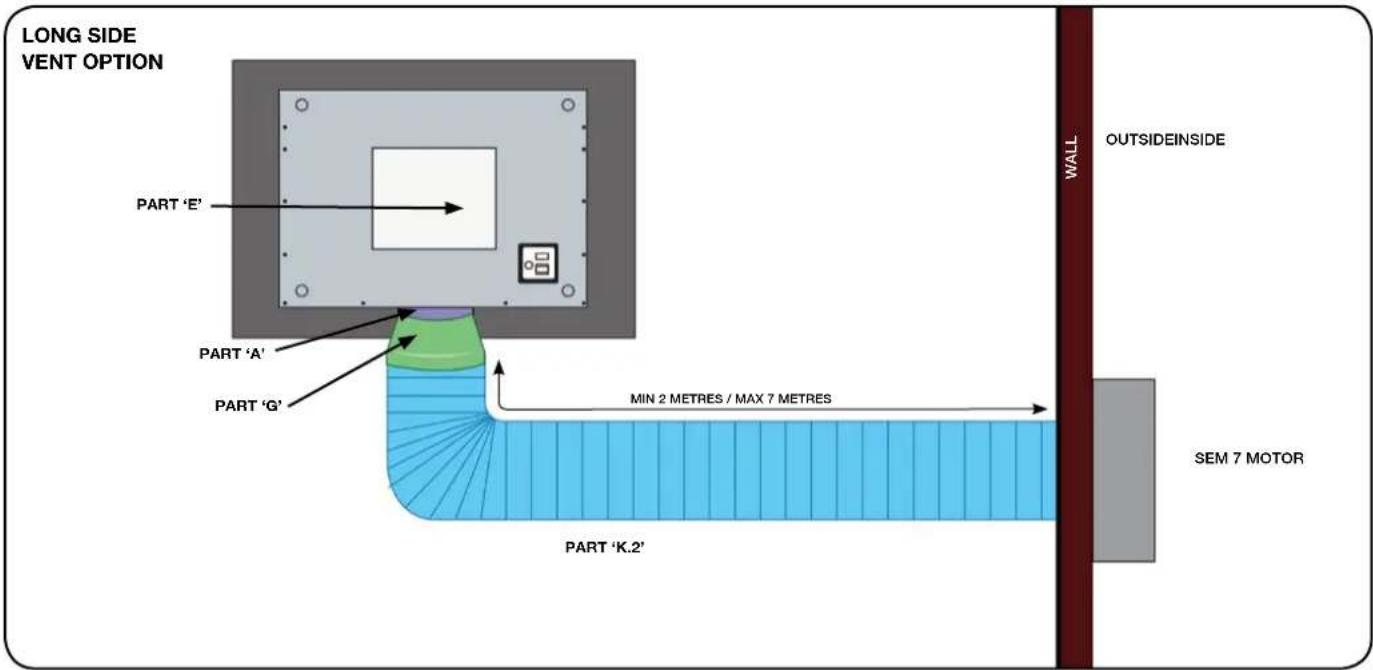
SIDE VENT INSTALLATION: SLT952 EM, SLT968 EM, SLT960 EM 200mm DUCTING: SEM 7 MOTOR (EXTERNAL)
- Ensure that the unused side and top ports are blocked off using the supplied blocking panels (Part 'B' and Part 'E').
1B: Connect a duct expander (Part 'G') to round adapter, then connect length of ducting (Part 'K.2') to the 200mm outlet.
2B: Secure to the motor with a universal ring clamp (Part 'G').
• See page 12 for ducting to vent (N/A for SEM 7 motor)
SIDE VENT INSTALLATION: SLT952 EM, SLT968 EM, SLT960 EM 200mm DUCTING: SEM 8 MOTOR (INTERNAL)
REMOTE CONTROL
Working:
6 channel control for rangehood remote.
- When the rangehood is first turned on, hold the lighting button for 5 seconds.
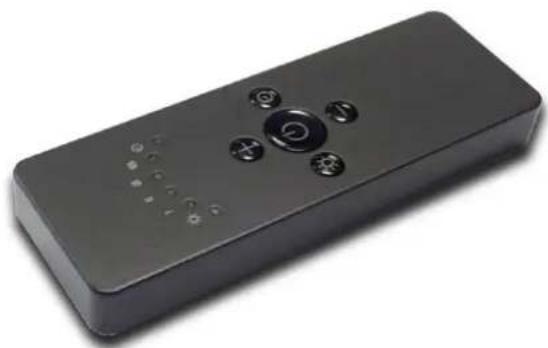
RC001 - RADIO CONTROL
Radio control used for the remote operation of rangehoods.
TECHNICAL DATA
- Alkaline battery powered: 12 V mod. 23 A
• Operating frequency: 433.92 Mhz
• Combinations: 32.768
• Max. consumption: 25 mA - Operating temperature: -20 ÷ +55^
• Dimensions: 120 x 45 x 15 mm.
OPERATING DESCRIPTION
The transmitter is equipped with 5 buttons for cooker hood management, as specified below:
: Light ON/OFF command.
: Motor ON (speed level 1) / OFF command.
: Reduce speed.
: Increase speed.
: 1⑩minute timer.
The manufacturer supplies the radio control unit ready to be used with codes preset in the factory.
natural_image
Black remote control device with buttons and indicator lights (no visible text or symbols)OPERATION MODE
Standard configuration:
Standard configuration requires all rangehood radio control systems to be provided with the same transmission code. In the event two rangehoods are installed in the same room or nearby, each system may affect the operation of the another. Therefore, the code of one radio control system must be changed.
Generating a new transmission code:
The radio control system is provided with preset codes. Should new codes be required, proceed as follows: Press simultaneously buttons:

for two seconds. When LEDs are on, press buttons:

(within 5 seconds). The LEDs flashing 3 times indicate the procedure is completed.
WARNING! This operation deletes permanently the preset codes.
Learning the new transmission code.
Once the transmission code is changed in the radio control unit, the electronic central unit of the cooker hood must be made to set the new code in the following way:
Press the main power-off button of the hood and then restore power to the electronic control unit. Within the next 15 seconds, press the Light Button to synchronise the central unit with the code.
Reset of the Factory configuration:
To restore the Factory configuration, follow the procedure described below: press simultaneously buttons:

for 2 seconds. When LEDs light on, press buttons:

(within 5 seconds). LEDs flashing 6 times in-dicate the procedure is completed.
WARNING! This operation deletes permanently the preset codes.
Emergency button:
In the event that the radio control does not work, use the emergency button to switch the appliance off. After any necessary repairs have been performed, reset the emergency button.
DUCTING FROM MOTOR TO WALL VENT: (SEM 1 and SEM 8)
- Run the length of ducting to the motor. (Additional lengths of ducting can be attached using an additional internal connector pieces.)
NOTE: No connector required as it connects directly to the collar of the motor.
- Secure with another universal ring clamp (Part 'F').
NOTE: The location of the motor is to be no less than 2 metres away from the rangehood. Failure to do so may result in additional noise level of the downdraft. Maximum distance is 7 metres, however 3 - 5 metres is optimum to minimise noise and maximise performance.
- Using another length of semi-rigid duct run from the exit collar on the SEM 1 / SEM 8 to a predetermined exit point and connect to weatherproof vent with a clamp.
See www.siriusbrand.com for multiple vent options or see our nearest retail partner.
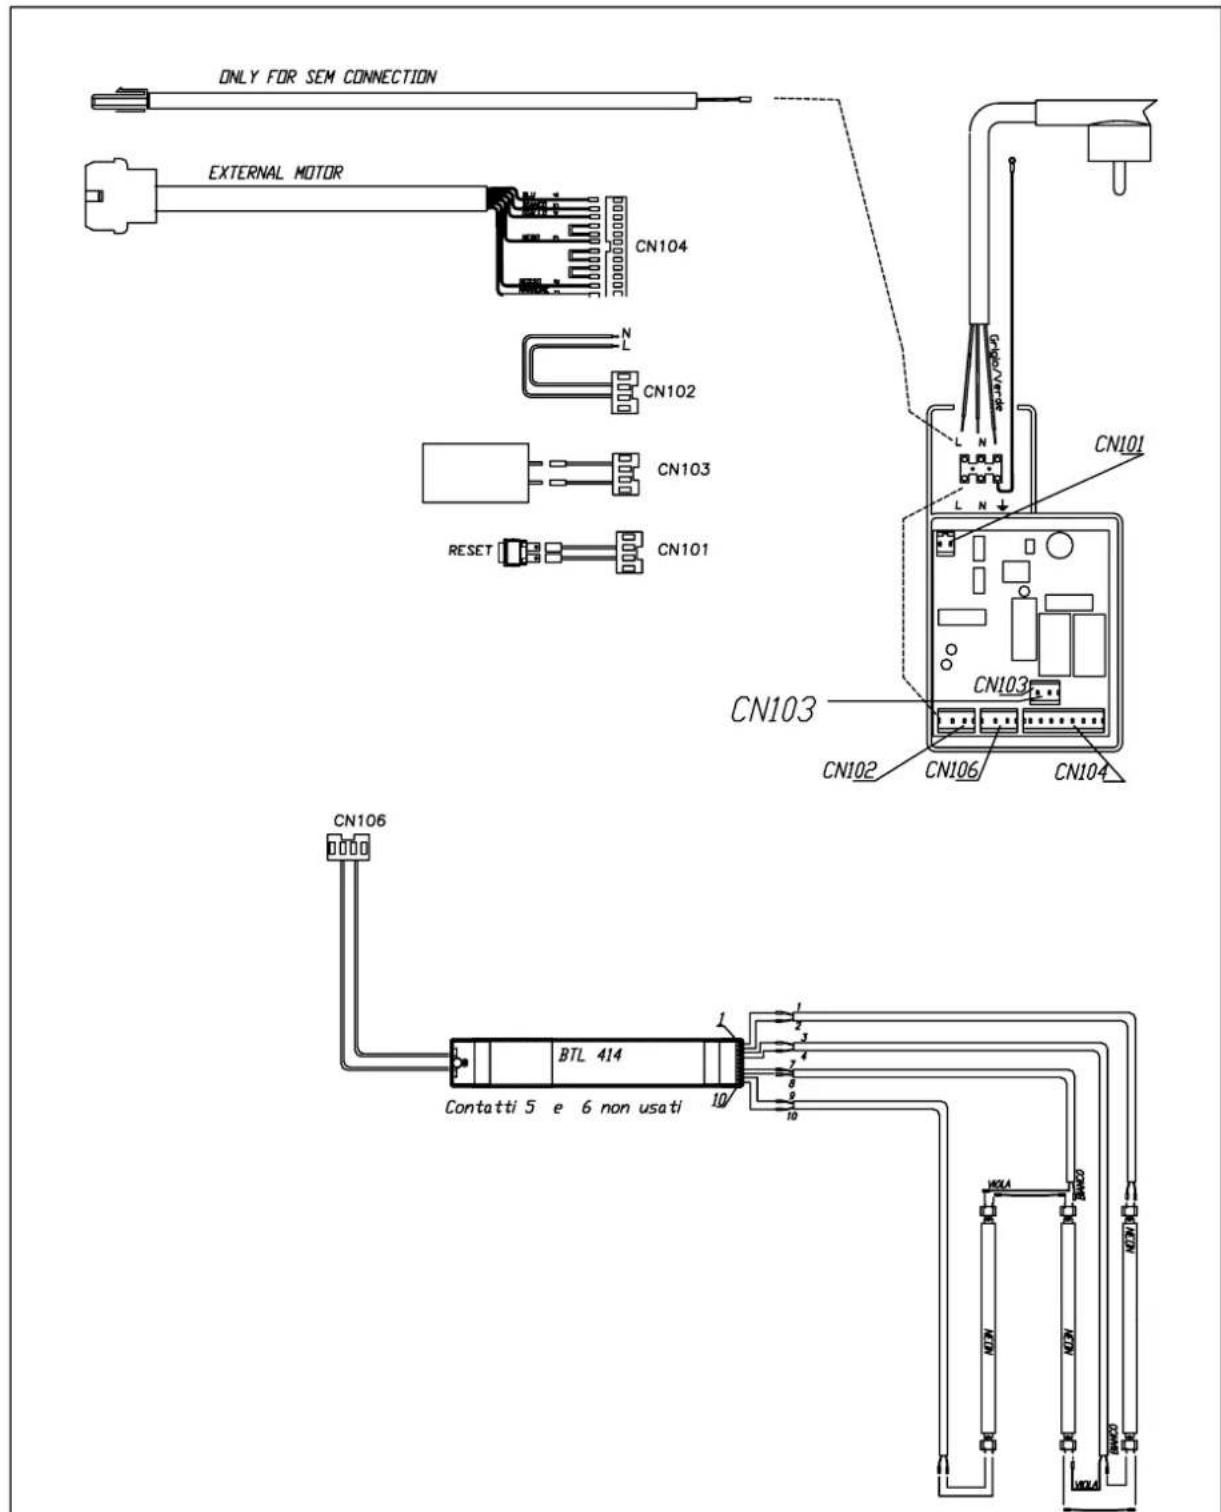
ELECTRICAL CONNECTION
PARTS LIST (INCLUDED)
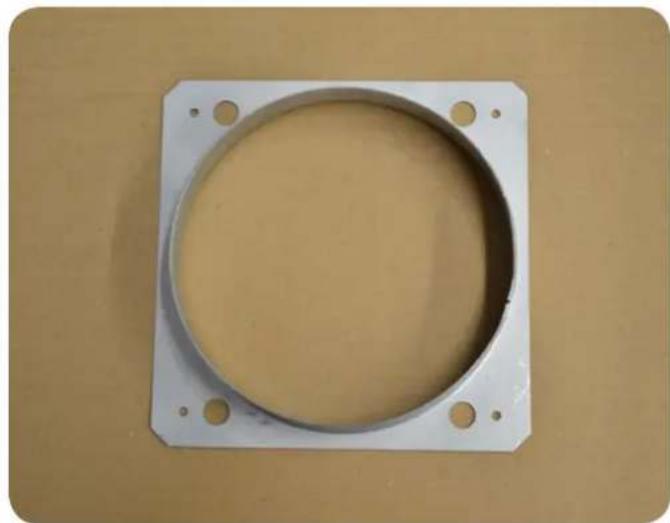
PART A
Side vent adapter
natural_image
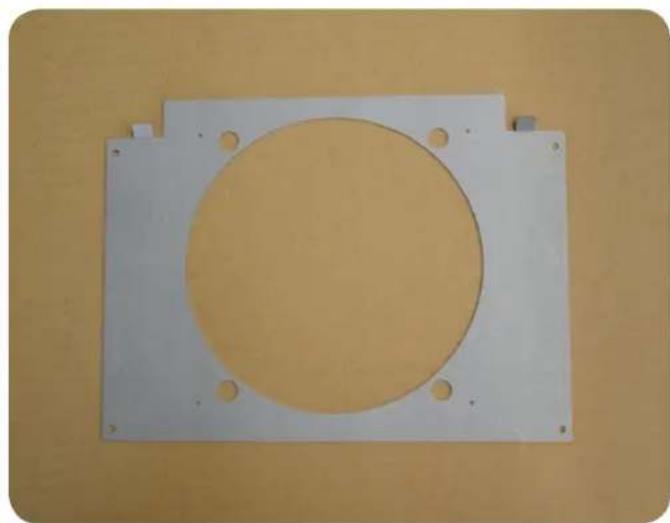
White square mechanical component with a circular recess and four mounting holes, placed on a beige surface (no text or symbols visible)PART C
Top bracket
natural_image
White rectangular plate with a circular cutout on top, placed on a wooden surface (no text or symbols visible)PART E
Front/rear vent cover plate
SPS-75059000082
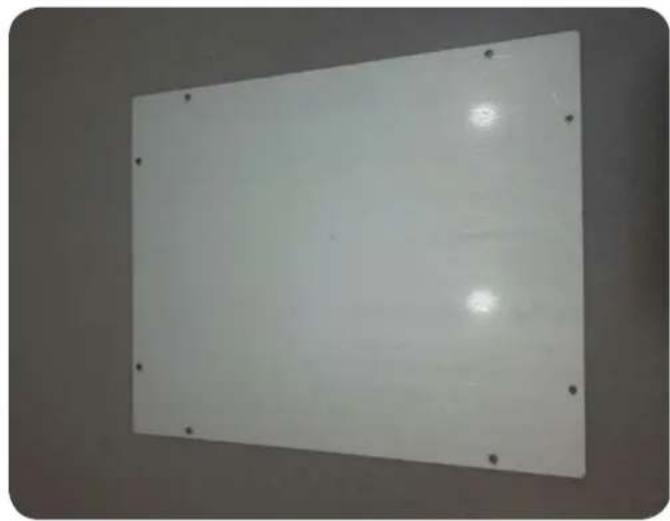
natural_image
Plain white rectangular panel with corner holes and a glossy surface, no text or symbols visible.PART B
Side vent cover
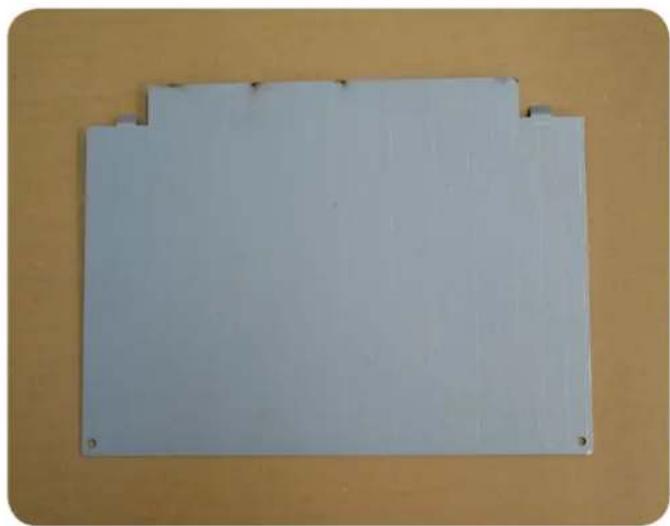
natural_image
Blank white plastic sheet on a wooden surface, no text or symbols visiblePART D
Front/rear vent adaptor
SPS-20059120071
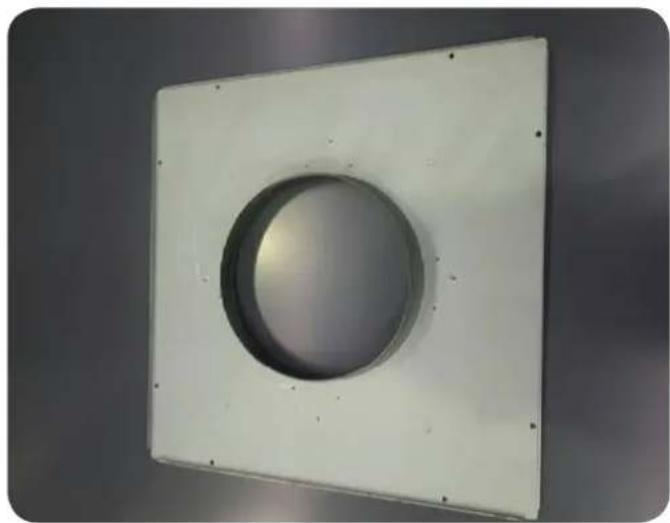
natural_image
White square mechanical component with a circular recessed inner ring, mounted on a plain surface (no text or symbols visible)PARTS LIST (NOT INCLUDED)
PART F
Universal ring clamp
URC25-215/325
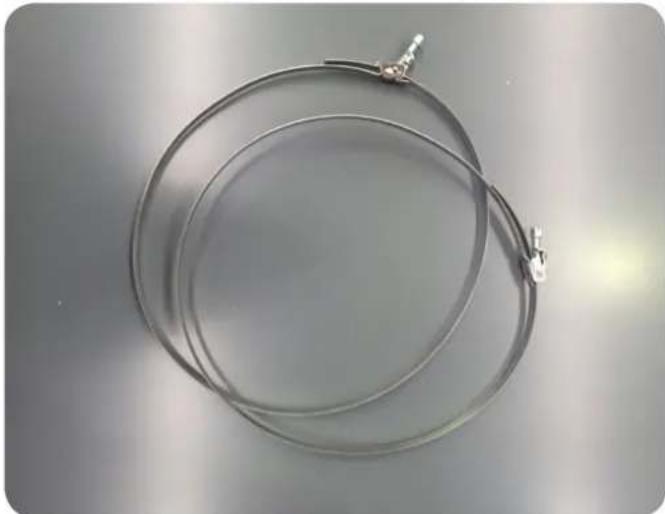
natural_image
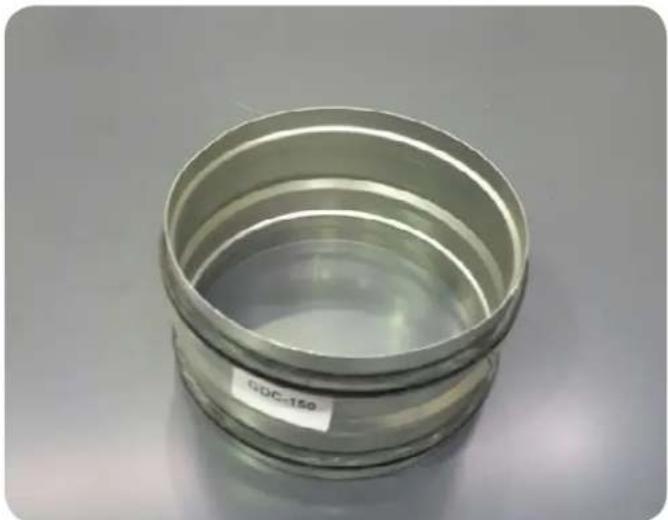
Coiled metal cable with metallic connectors, lying on a plain surface (no text or symbols visible)PART H
150mm diameter connector piece GDC-150
natural_image
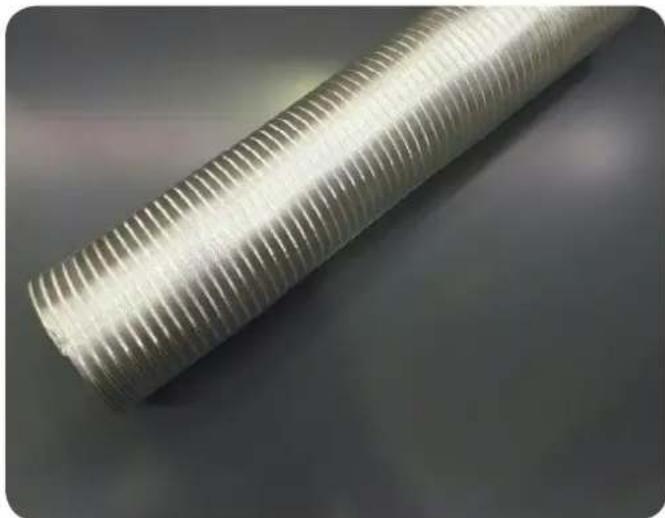
Stacked metallic cylindrical component with visible internal structure, labeled 'CDC-150' on label (no other text or symbols)Part K.1 / K.2
Semi rigid aluminium ducting 150mm / 200mm SRPRO 30/150 or SRPRO 30/200
natural_image
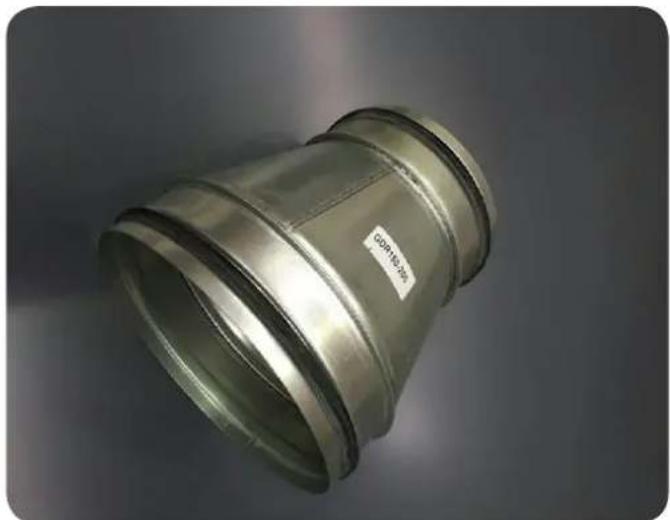
Close-up of a coiled, translucent plastic hose with coiled ridges (no text or symbols visible)PART G
150mm to 200mm Duct expander GDR 150/200
natural_image
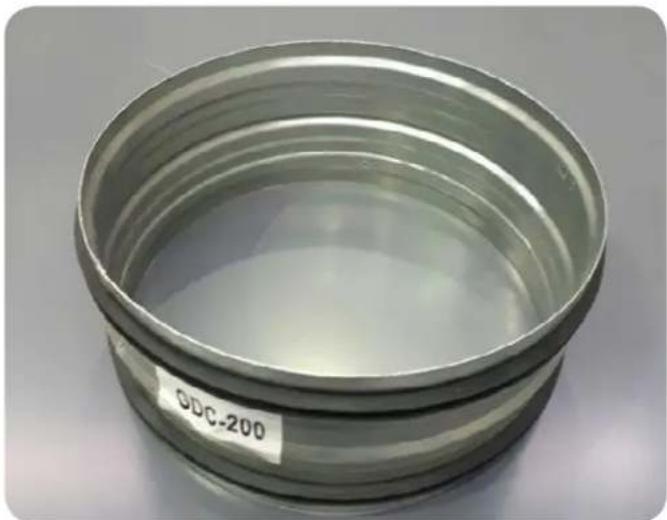
Metallic cylindrical pipe fitting with a label showing '00115-24' (no other text or symbols visible)PART J
200mm diameter connector piece GDC-200
natural_image
Close-up of a metallic cylindrical component with visible internal layers and a label reading 'ODC-200' on the side (no other text or symbols)Dear Customer,
Thank you for choosing this Sirius Rangehood.
We are sure that it will provide you with many years of excellent service. At Arisit Pty Limited we are dedicated to ensuring that our customers receive the best possible after-sales care.
The Sirius ‘Protection Plan’ has been devised to give you added peace of mind. Should you encounter any problems with your appliance, our nationwide team of specially trained technicians will deal with your call swiftly and efficiently.
PRIORITY SERVICE, ACCESSORIES & SPARE PARTS
AUSTRALIA
ARISIT PTY LIMITED
40-50 Mark Anthony Drive, Dandenong South,
VIC 3175, Australia
Phone: 1300 762 219
Email: consumer.care@arisit.com
NEW ZEALAND
ARISIT PTY LIMITED
1A Howe Street, Newton,
Auckland 1145, New Zealand
Phone: (09) 306 1020
Email: sales@aristonappliances.co.nz
Warranty
By registering your ownership NOW, you qualify for Sirius's Total Peace of Mind Protection Plan.
Australian & New Zealand 3 / 6 Year Protection Plan*
This guarantees your appliance for a full 3 years parts and labour & 10 years for the off-board motors (covering manufacturing defects only) from the date of purchase, subject to the Terms and Conditions overleaf.
*3 Year warranty is extended to a 6 year period only when Sirius ducting is installed.
Your Warranty
Register now to qualify.
Terms & Conditions
These Terms and Conditions apply only to Sirius products distributed in Australia and New Zealand by Arisit Pty Limited.
- This warranty applies for a period of 3 years on all products.
a) Warranty is extended to a 6 year period when Sirius ducting is installed.
b) All off-board motors are covered under warranty for a 10 year period for manufacturing defects only. - Warranty applies for parts and labour in Australia and New Zealand, commencing from date of purchase.
- This warranty applies only to the original purchaser/hire purchaser of this appliance and cannot be assigned or transferred. Failure to produce documentary proof of the date of original acquisition by the original purchaser will result in a charge being levied for work done, labour and parts supplied.
- This warranty does not apply to:
a) Consumable items such as filters, fuses, and light bulbs.
b) Damage to body work, paint work, glass, and plastic items (such as, but not limited to windows, covers, baskets, trays, worktops, door handles, control and kick panels.)
c) Corrosion & rust damage.
A fee may be charged following warranty claims where no fault is found with the appliance.
-
This warranty will not apply where:
a) The fault is caused by accident, misuse, an infestation of insect and or vermin, fire, flood or the use of products not approved by Arisit Pty Limited.
b) There has been a failure to comply with the manufacturer's operating and installation instructions.
c) Service, modification or repair has been carried out by anybody other than an approved Arisit Service Technician.
d) The appliance has been used/installed anywhere other than a private dwelling, or where it has been used other than for domestic use.
e) The appliance is subject to a rental agreement. -
Any defective part that has been replaced becomes the property of Arisit Pty. Limited.
-
This warranty applies only to Sirius appliances purchased and installed in Australia and New Zealand.
-
Loss of use of the appliance or consequential loss of any nature is not covered.
-
A charge may be levied at the discretion of Arisit Pty Limited if the call is deemed unnecessary or if the cause of failure is traced to external sourced such as, but not limited to: blown fused, power failure, faulty installation, customer misuse or negligence, etc
-
Where the appliance, the subject of a warranty claim or repair, is used or installed more than TWENTY (20) kilometres from the nearest Arisit Service Division or Authorised Service Agent, the cost of delivery to the nearest Service
Division or travel costs for a technician or Authorised Service Agent shall be for the account of the Purchaser. Where a built-in appliance is located or installed outside the Arisit Authorised Service Agent's normal service area, additional travel and labour costs shall be the account of the Purchaser.
-
Service is offered during normal business hours only, also appliances to have a clear access in a serviceable area
-
Arisit Pty Limited shall not under any circumstances be responsible in terms of this warranty for the replacement or repair of any part of the equipment which may have been damaged in transit, during and after installation or imperfections after installation.
-
Losses caused by act of God, failure to obtain spare parts, strikes or lockouts are not covered.
-
External off board motors must be installed a minimum of 2 metres and maximum of 7 metres away from the rangehood. This is for optimum sound and performance.
-
All motors must be accessible for servicing purposes and if installed above 2 metres from ground height additional cost will be incurred due to OH&S standards for service agents. Prior to install please check minimum & maximum installation details on the Sirius website, FAQ under support tab.
We reserve the right to amend any of the above without prior notice.
- This warranty does not affect your statutory rights.
To register for your warranty, please visit:
www.arisitwarranties.com.au/Customer-Registration.aspx or scan the QR code.

ARISIT PTY LIMITED (Australia)
ABN 23 091 616 294
40-50 Mark Anthony Drive
Dandenong South VIC 3175
P: Sales & Service: 1300 762 219
F: Sales & Service: (03) 9768 0838
E: arisit@arisit.com
ARISIT PTY LIMITED (New Zealand)
1A Howe Street Newton, Auckland 1145
PO Box 68-140 Newton, Auckland 1145
P: (09) 306 1020 - Fax: (09) 302 0077
E: sales2@aristonappliances.co.nz
www.arisit.com
www.siriusbrand.com

Year Warranty
when Sirius ducting is used.
Full replacement warranty on parts and labour. Check website for T&Cs.
Sirius Hocos and ducting products are only available from our select group of Sirius Professional Stock's nationwide. For the latest list of Sirius Stockists near you, please refer to www.siriusbrand.com
All efforts have been made to ensure that the information provided in this brochure is correct at the time of printing. Due to continuous product improvement and ongoing development, Sirus
reserves the right to make changes to the products and technical data without prior notice. Some products appearing in this brochure may be for illustrative purposes only. Diagrams are indicative measures only. Prior to commencing
cabinetry outputs the operating/installation instructions accompanying the product must be referred to at www.sir.usprend.com
10 year warranty on SEM motors.
- Congratulations on your purchase! Thank you for choosing a Sirius product.
- Ceiling cassette user manual
- BEFORE YOU INSTALL - DUCTING INFORMATION
- WARNING
- The appliance must be installed and connected to the power supply only by a qualified technician.
- Ducting available at www.siriusbrand.com
- Year Warranty when Sirius Ducting is used. Full replacement warranty on parts and labour.
- See website for terms & conditions.
- A reduction in the duct diameter from stated ducting size will void warranty.
- TO THE ATTENTION OF THE USER
- SAFETY INSTRUCTIONS
- Check PARTS LIST on page 20 for all included parts prior to discarding packaging.
- PRE-INSTALLATION CHECKS
- CAUTION
- BEFORE YOU INSTALL
- NOTE
- DANGER
- • SLT960 EM ONLY
- OPENING THE GLASS PANELS - SLT960 EM
- OPENING THE LIGHT PANELS - SLT952 EM
- OPENING THE COVER PANELS - SLT958 EM, SLT958 EM WH, SLT968 EM, SLT968 EM
- INSTALLING THE TIMBER SUPPORT BEAMS
- MOTOR AND VENTING OPTIONS:
- CONNECTION OF THE SELECTED OFFBOARD MOTOR: TOP VENT OPTION
- TOP VENT INSTALLATION
- INTERNAL MOTOR:
- EXTERNAL MOTOR:
- SIDE VENT INSTALLATION: SLT958 EM
- 150mm DUCTING: SEM 1 MOTOR (INTERNAL)
- 150mm DUCTING: SEM 2 MOTOR (EXTERNAL)
- SIDE VENT INSTALLATION: SLT952 EM, SLT968 EM, SLT960 EM 200mm DUCTING: SEM 7 MOTOR (EXTERNAL)
- REMOTE CONTROL
- Working:
- RC001 - RADIO CONTROL
- TECHNICAL DATA
- OPERATING DESCRIPTION
- OPERATION MODE
- Standard configuration:
- Generating a new transmission code:
- WARNING! This operation deletes permanently the preset codes.
- Learning the new transmission code.
- Reset of the Factory configuration:
- Emergency button:
- DUCTING FROM MOTOR TO WALL VENT: (SEM 1 and SEM 8)
- PARTS LIST (INCLUDED)
- PART A
- PART C
- PART E
- PART B
- PART D
- PARTS LIST (NOT INCLUDED)
- PART F
- PART H
- Part K.1 / K.2
- PART G
- PART J
- PRIORITY SERVICE, ACCESSORIES & SPARE PARTS
- AUSTRALIA
- NEW ZEALAND
- Warranty
- Your Warranty
- Register now to qualify.
- Terms & Conditions
Brand : SIRIUS
Model : SLT958 EM WH
Category : Range hood