The Home Cut VSM743TA - Beard trimmer VS Sassoon - Free user manual and instructions
Find the device manual for free The Home Cut VSM743TA VS Sassoon in PDF.

User questions about The Home Cut VSM743TA VS Sassoon
0 question about this device. Answer the ones you know or ask your own.
Ask a new question about this device
Download the instructions for your Beard trimmer in PDF format for free! Find your manual The Home Cut VSM743TA - VS Sassoon and take your electronic device back in hand. On this page are published all the documents necessary for the use of your device. The Home Cut VSM743TA by VS Sassoon.
USER MANUAL The Home Cut VSM743TA VS Sassoon
natural_image
Black hairbrush with a white 'VS' logo on the blade, no visible text or symbols on the object itself.THEHOMECUT
TOOL TIPS
for the clipping kit for easy at-home hair cutting.
HEY YOU!
TAKE A BOW FINE SIR.
THINGS ARE LOOKING UP & YOU'VE JUST MADE A QUALITY PURCHASE
WITH THIS NEW GROOMING TOOL.
WE KNOW YOU'VE GOT THIS, BUT BEFORE YOU JUMP INTO USING YOUR NEW SIDE KICK, HERE'S A FEW TIPS & TRICKS TO KNOW BEFORE LETTING YOUR CREATIVITY RUN LOOSE.
HIT UP VSFORMEN.COM.AU FOR MORE GROOMING & INSPIRATION OR FOLLOW US ONLINE

natural_image
Black-and-white portrait of a man with short hair and beard, resting his chin on his hand (no text or symbols visible)IMPORTANT SAFETY INSTRUCTIONS
When using electrical appliances, especially when children are present, basic safety instructions should always be followed, including the following:
Polythene bags over product or package may be dangerous. To avoid danger of suffocation, keep this wrapper away from babies and children. This bag is not a toy.
DANGER: When the unit is used in a bathroom, unplug it after use since the proximity of water presents a hazard even when the appliance is switched off

WARNING: Keep the appliance dry, unless it otherwise specified. Do not use this appliance in or near bathtubs, showers, basins or other vessels containing water.
- Do not immerse appliance in water or other liquids.
- Do not reach for an appliance that has fallen into water. Unplug immediately.
- Take care to avoid contact between the moving blades of the unit and the skin, paying particular attention to the face, neck and hands.
- This appliance is not intended for use by persons (including children) with reduced physical, sensory or mental capabilities, or lack of experience and knowledge, unless they have been given supervision or instruction concerning use of the appliance by a person responsible for their safety.
- Children should be supervised to ensure that they do not play with the appliance.
IMPORTANT: Always unplug the appliance when not in use or before cleaning. Do not leave unattended when plugged in or switched on. Do not place on any heat sensitive surface.
- Do not use any attachments other than those supplied by Conair Australia Pty Ltd.
- Use this appliance only for its intended use as described within this instruction booklet.
- This appliance is not intended for commercial use.
- Never drop or insert any object into an opening.
- Do not use the appliance with damaged or broken attachment combs or with any teeth missing from the blades, as injury may occur.
- Do not place on any surface while it is operating.
- Keep the cord away from heated surfaces
- Never twist or pull on the power cord.
- Do not use an extension cord with this appliance.
- After use do not wrap the cord around the appliance as in time this may cause the cord to fracture. Coil cord loosely by the side of the appliance in storage.
- Do not use outdoors or operate where aerosol (spray) products are being used or where oxygen is being administered.
- Do not use the appliance if it is damaged. In the event of damage, discontinue use immediately and contact your dealer for instructions on returning it for examination or exchange. If the supply cord is damaged, it must be replaced by the manufacturer, its service agent or similarly qualified person in order to avoid a hazard.
- Always ensure that the voltage to be used corresponds to the voltage marked on the unit.
THE HOME CUT
BRAVO. YOU'VE MADE A QUALITY PURCHASE.
The Home Cut is the clipping kit for easy at-home hair cutting.

text_image
1 2 3 4 VS WASIKIN 6 5 8 7- Diamond sharpened blades
- Mains powered
-
45mm clipping blade
-
6 cutting comb guides - grades #1, #2, #3, #4, #5, & #6 comb guides (3mm to 19mm) for cutting, shaping & fading
-
Barber comb
- Blade guard
- Cleaning brush
- Oil
PREPPING YOUR NEW TOOL
MAINS OPERATION
- A plastic cover has been placed over the plug to protect it from damage.
Remove the plastic cover before inserting into suitable power outlet. Ensure your new clipper is switched off before plugging into a power outlet. - Plug your new clipper into a suitable power outlet and switch the product on by sliding the on/off switch to the 'on' position.
The power screw allows you to adjust the power of your clipper.
To adjust the power screw - take a screwdriver or coin - turn the power Screw counter clockwise until the arm strikes the coil, making a clacking noise (Fig.1).
Then, turn the screw clockwise, until the noise stops and then turn about 45 degrees more. This is the maximum power setting (Fig.2).

natural_image
Pure diagram of a curved arrow with a circular arrow and a circular symbol inside, no text or labels present.
natural_image
Simple line drawing of a curved arrow passing through a rectangular frame with a circular arrow indicating rotation (no text or symbols)Fig.1 Fig.2
OILING THE BLADES
To get the sharpest, most precise cut, it is highly recommended to oil the blades before each use.
Using the oil supplied with your new clipper, unscrew the cap & cut off the very end of the plastic tube with a pair of scissors to release the oil.
Plug your clipper into a suitable power outlet and switch on. Gently squeeze the oil tube & apply 2 drops of oil onto the blades. Leave the clipper on for a further few seconds to allow the oil to thoroughly spread across each of the blades.
Switch off the clipper & remove any excess oil by gently dabbing with a cloth.
HOW TO USE THE HOME CUT
BEFORE USING
• Always inspect the clipper blades for noticeable signs of damage.
- Ensure the clipper blades are well oiled before using.
- Always inspect the clipper blades before use to ensure they are free from hair, debris etc.
- For best performance use on clean, dry hair that has been combed until tangle-free.
- Always check that the tips of the two blades are parallel and aligned correctly. Correctly aligned blades will provide best cutting performance. Failure to do this can result in injury.
ALIGNING THE BLADES
- First you'll need to remove the blades from your clipper. To remove the blades simply unscrew the two screws located on the back of the blade (see Fig.3). The two blades should then simply be removed from the clipper head. Keep the screws aside for reapplying the blades to the clipper head.

text_image
Fig. 3 Large blade (cutting comb) Blade screws Small blade (cutter)- To realign the blades, simply match them up, point to point. The top edge of the large blade should be 0.5mm to 1.2mm higher than the top edge of the small blade (see Fig.4). This is important so that the clipper does not cut too close, or come into contact with the skin.
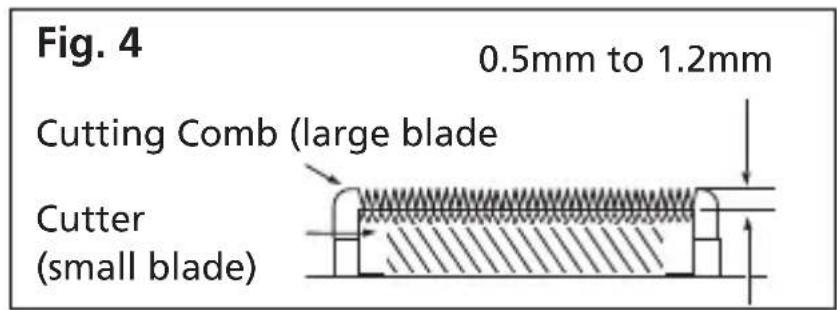
text_image
Fig. 4 0.5mm to 1.2mm Cutting Comb (large blade) Cutter (small blade)- The extreme left-hand tooth of the large blade must cover or be to the extreme left hand of the first small tooth on the small blade. Be sure that the extreme right-hand tooth of the large blade touches the extreme right-hand tooth of the small blade.
- To re-attach the blades to the clipper head, simply slide the small blade on to the white oscillating head, making sure that the small blade and large blade are still properly aligned. Line up the large blade with the two screw holes. Place the original screws, one in each hole and lightly tighten with a Philips head screwdriver until secure.
- The clipper is now suitable for use.
EASY CLIPPING, YOUR WAY
The Home Cut features 6 cutting comb guides - grades #1, #2, #3, #4, #5, and #6 comb guides (3mm to 19mm) for cutting, shaping & fading. The comb guides are marked with the following grade number:
| Cutting Length Grade | |
| 3mm #1 | |
| 6mm #2 | |
| 9.5mm #3 | |
| 13mm #4 | |
| 16mm #5 | |
| 19mm #6 |
- To attach a comb guide, ensure the appliance is switched off. Position the comb guide over the front of the clipper blade and slide over the head. Push and click the rear of the comb guide into position.
- To remove the comb guide, ensure the appliance is switched off. Push the tab on the rear of the comb guide away from the head and lift off.
CLIPPING TIPS
HIT UP VSFORMEN.COM.AU FOR MORE GROOMING & INSPIRATION OR
- Ensure the clipper is switched off.
- Attach the desired cutting comb guide as required.
- Switch the clipper on – the blades will start to move.
- Start cutting at the nape of the neck, holding the clipper with the teeth of the clipper pointing upwards, ensuring that the comb guide is resting flat against the head.
- Slowly move the clipper upwards and outwards through the hair towards your crown, against the direction of the hair growth. The comb guide will help to lift the hair and the blades will cut the hair to the length as shown on the comb guide.
- Once the desired length is achieved at the back of the hair, start clipping the top and sides.
- Hold the clipper to the front of your hair with the teeth pointing towards the back of your head, and move the clipper towards your crown. Repeat as necessary, moving in rows from the front and the sides of your head to the back.
CREATING A SHORT BACK & SIDES LOOK, WITH LENGTH ON THE TOP
- Ensure the clipper is switched off.
- Attach the desired cutting comb guide as required.
- Switch the clipper on – the blades will start to move.
- Hold the clipper to the front of your hair with the teeth pointing towards the back of your head and move the clipper towards your crown. Repeat as necessary, moving in rows from the front and the sides of your head to the back.
- If you then wish to take the back and sides of your hair to a shorter length, switch off the appliance and attach a shorter comb guide.
- Start cutting at the nape of the neck, and with the comb guide flat against the head, move the clipper upwards and outwards over the area you want to take shorter.
- Repeat on the sides of the hair, starting with the teeth of the clipper pointing upwards and comb guide flat against the area above the ear, again moving the clipper upwards and outwards.
OUTLINING
- To tidy up the edges around your cut e.g. neckline and sideburns, detach the comb guides.
- Hold the clipper upside down, so the front of the clipper is facing towards your head.
- Hold the clipper straight on your sideburns or neckline and move the clipper downwards. This will give you a clean, smooth finish.
CLIPPER CLEANING & MAINTENANCE
Because the clipper blades are precision made for a very special use, they should always be handled with care. To ensure long-lasting performance of your clipper, it is important to clean the blades + the comb guides after every use.
After each use, clean the clipper blade set as follows:
- Switch the clipper off and unplug from the power outlet.
- Using the cleaning brush, gently brush and blow any hairs from the blade set and head of your clipper.
- Remove the blades carefully noting which way round they are fitted (see ALIGNING THE BLADES for more detail).
Never place the blades under running water, as this can ruin the cutting performance of the blades. Always use the cleaning brush to clean the clipper head.
NOTE: Do not attempt to repair or replace the blades. In the event that the blades become blunt or damaged, contact the Conair CustomerCare Line (Conair Customer Service).
LIMITED TWO YEAR WARRANTY
Our goods come with guarantees that cannot be excluded under the Australian Consumer Law. You are entitled to a replacement or refund for a major failure and for compensation for any other reasonably foreseeable loss or damage. You are also entitled to have the goods repaired or replaced if the goods fail to be of acceptable quality and the failure does not amount to a major failure. In New Zealand our goods come with a guarantee that cannot be excluded under the Consumer Guarantee Act 1993.
Conair Australia Pty Ltd. will repair or replace (at our option) your appliance free of charge for twenty-four months from the date of purchase if the appliance is defective in workmanship or materials.
This warranty is an additional benefit and does not affect your legal rights. To obtain service under this warranty, please retain this section of the instruction booklet with your receipt/proof of purchase. You must present it to obtain replacement or service under the warranty.
The warranty may only be claimed where proof of original purchase is presented, i.e. original purchase receipt or invoice. Attach a copy of your purchase receipt and store in a safe place.
To make a warranty claim, call or email Conair Customer Service or you can return the defective product back to the place it was purchased where it will be replaced (see Point 12 in Conditions). Please provide the following details:
- Date of purchase
- Retailer Name & Location:
- Product Name/Model Number:
- Confirm you have your purchase receipt:
- Detail the problem with your product:
TO MAKE A WARRANTY CLAIM YOU MUST RETAIN YOUR PROOF OF PURCHASE.
WARRANTY AGAINST DEFECTS
A. AUSTRALIAN CONSUMER LAW
- Our goods come with guarantees that cannot be excluded under the Australian Consumer Law. You are entitled to a replacement or refund for a major failure and compensation for any other reasonably foreseeable loss or damage. You are also entitled to have the goods repaired or replaced if the goods fail to be of acceptable quality and the failure does not amount to a major failure.
- The guarantees under the Australian Consumer Law (“ACL”) are provided in sections 51 to 59 inclusive of the ACL (“Statutory Guarantees”) and the remedies are provided in sections 259 to 266 inclusive of the ACL (“StatutoryRemedies”).
B. VSFORMEN EXTENDED WARRANTY
-
In addition and subject to the Statutory Guarantees and Statutory Remedies, the following express warranty (“Warranty”) commences from the date of purchase and continues for a period of 24 months (“Warranty Period”) after which it expires. Subject to the conditions in Section C below, Conair warrants to the original purchaser (“Purchaser”) of the VSforMen product that is the subject of this warranty (“Product”) that if during the Warranty Period, the Product suffers from any defect caused by faults in materials or workmanship, Conair will a) replace the Product, or b) exchange defective parts in the Product or c) repair the Product, as Conair may choose in its discretion (“Warranty”). In this Warranty “Conair” means Conair Australia Pty Limited (ABN 64 068 492 044) of The Equinox Centre, Suite 101, 18Rodborough Rd, Frenchs Forest, NSW, 2086. in relation to Products purchased in Australia and Conair New Zealand Ltd in relation to Products purchased in New Zealand.
-
To honour the Warranty, Conair must replace, or exchange parts in, or repair, the Product, as Conair determines, in accordance with paragraph B1 above, subject always to the conditions in Section C below.
-
If any of the conditions in Section C below are inconsistent with any provisions of the ACL or regulations made thereunder, those provisions of the ACL or regulations shall prevail to the extent of the inconsistency.
C. CONDITIONS
- The Product must be used in accordance with manufacturer's instructions. This Warranty does not apply should the defectin or failure of the Product be attributable to misuse, abuse, accident, act of God such as lightning, or nonobservance of manufacturer's instructions on the part of the user. This Warranty does not cover ordinary wear and tear in the Product or its parts.
- Conair does not accept liability for a) any loss or damage however suffered, caused by or arising out of any failure to use the Product in accordance with the manufacturer's instructions, and b)
any indirect, consequential or economic loss or damage however caused.
- This Warranty is immediately void if – a) any serial number or appliance plate is removed or defaced, b) the Product has been serviced or otherwise repaired by a person not authorized to do so by Conair or where non approved replacement parts are used.
- The Product is designed for domestic use only. The Product must be connected to the electrical voltage supply as specified in the ratings label located on the Product. This Warranty does not cover defects arising from non-domestic use or incorrect voltage supply.
- This Warranty may only be claimed against where proof of original purchase is presented, for example, original receipt or invoice.
- Any parts of the Product that need to be replaced, or if the whole Product needs to be replaced, the replaced Product, become the property of Conair. The Warranty on any replacement Product or parts will expire on the same date that the Warranty Period on the original Product expires.
- The benefits provided by this Warranty are in addition to all other rights and remedies in respect of the Product which the Purchaser has under the ACL, and applicable laws in New Zealand, which rights and remedies by law may not be excluded. All other warranties and representations express and implied are hereby excluded.
- The defect must have occurred during the Warranty Period and Purchaser bears the onus of proving that fact, and that the defect was not caused by any of the causes excluded from this Warranty.
- This Warranty does not cover Products purchased from any person who is not a retailer serviced by Conair's authorised distributors or purchased second hand.
- The Purchaser is responsible for all postage and freight charges and any other expenses incidental to claiming against this Warranty.
- The Warranty excludes consumable items (such as blades or brushes) and normal wear and tear.
- If you're certain your product is defective, and the product is covered by the terms of this warranty, you need to take the product back to the place you purchased it from, where the retailer will replace the product for you on our behalf. In this event, per the terms of this warranty you will need to present this portion of the warranty card and the purchase receipt as proof of purchase so please make sure you keep both this card and your receipt on hand for the duration of the warranty period.
SPARE PARTS
Replacement parts may be available for your product. Contact us on the phone or email address provided for more details. Please provide your product name/model number details, date of purchase and part you require.
CONAIR®
Certain trademarks used under license from
The Procter & Gamble Company or its affiliates.
©2020 Conair Australia Pty. Ltd.
Suite 101, 18 Rodborough Rd
Frenchs Forest NSW 2086
Australia
Conair New Zealand Limited
PO BOX 251159
Pakuranga, Auckland 1706
New Zealand
CONTACT US
For advice & tips on your new VS product email us on:
aus_info@conair.com
CUSTOMER SERVICE
Australia: 1800 650 263
New Zealand: 0800 266 247
Visit VSFORMEN.COM.AU for grooming tips & inspiration.