
TV-24LE75T2 - Television Vivax - Free user manual and instructions
Find the device manual for free TV-24LE75T2 Vivax in PDF.


| Product Type | LED Television |
| Brand | Vivax |
| Model | TV-24LE75T2 |
| Screen Size (Diagonal) | 24 inches (61 cm) |
| Display Resolution | 1920 x 1080 pixels (Full HD) |
| Panel Type | LED |
| Energy Efficiency Class | A |
| On Mode Power Consumption | 24 W |
| Standby Power Consumption | < 0.5 W |
| Off Mode Power Consumption | 0 W |
| Annual Energy Consumption | 35 kWh/year |
| Aspect Ratio | 16:9 |
| Inputs | HDMI, VGA, SCART, AV (Composite), YPbPr, RF, USB, CI, VGA Audio |
| Outputs | Coaxial (digital audio), Earphone |
| USB Support | Photo (JPEG, BMP), Music (MP3), Video (DAT, VOB, MPG, AVI) |
| Teletext | Yes |
| Sleep Timer | Yes (up to 240 min) |
| Parental Lock | Yes (password protected) |
| Hotel Mode | Yes |
| DVB Tuner | DVB-T/C (digital terrestrial/cable) |
| Remote Control | Included (batteries not included) |
| Power Supply | DC 12V (external adapter) |
| Stand Installation | Included (3 screws) |
Frequently Asked Questions - TV-24LE75T2 Vivax
User questions about TV-24LE75T2 Vivax
0 question about this device. Answer the ones you know or ask your own.
Ask a new question about this device
Download the instructions for your Television in PDF format for free! Find your manual TV-24LE75T2 - Vivax and take your electronic device back in hand. On this page are published all the documents necessary for the use of your device. TV-24LE75T2 by Vivax.
USER MANUAL TV-24LE75T2 Vivax
natural_image
3D diagram of a device casing with internal components and an external grid panel (no text or symbols)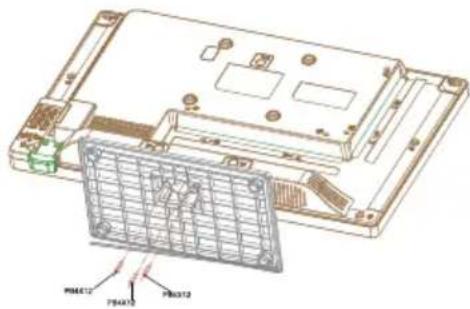
natural_image
Technical line drawing of a device chassis with internal components and a wire mesh structure (no text or symbols)natural_image
Illustration showing a no-smoking sign, a hand emitting smoke, and a computer monitor (no text or symbols)natural_image
Illustration of a computer monitor displaying a cartoon character (no text or symbols visible)Sigurnost

Ne čistite televizor benzinom te kemijskim ili alkoholnim razrjeđivačima jer će oštetiti kućište i ekran televizora.
Ekran možete čistiti čistom, mekom krpom no tek nakon što isključite televizor iz struje. Ne grebite ili udarajte ekran tvrdim predmetima jer bi se mogao oštetiti.


natural_image
Illustration showing a person using a device with no restrictions, a chair, and a monitor (no text or symbols)Ne postavljajte strujni kabel ili druge kabele na mjesta na kojima se može po njima gaziti. Ne preopterećujte strujni kabel ili utičnicu.
Ne postavljajte televizor na nestabilne površine.

natural_image
Illustration of a cable being twisted with lightning bolts around a computer monitor (no text or symbols)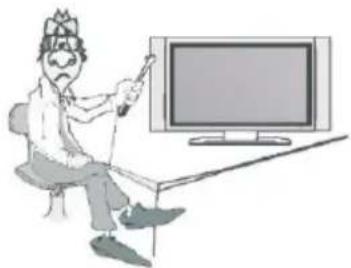
natural_image
Cartoon illustration of a person sitting at a desk watching a television (no text or symbols visible)Ne uklanjajte stražnji poklopac jer se unutar uređaja nalazi opasan napon koji može uzrokovati strujni udar. Interna podešavanja i provjere bi trebao vršiti isključivo ovlašteni servis.
Ne postavljajte na ili u blizinu televizora izvore otvorenog plamena.
natural_image
Illustration of a computer monitor with a crossed-out X symbol above it, no text or symbols present.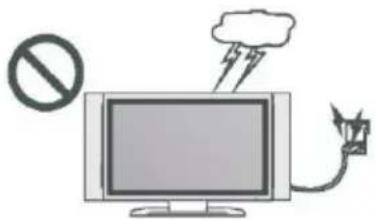
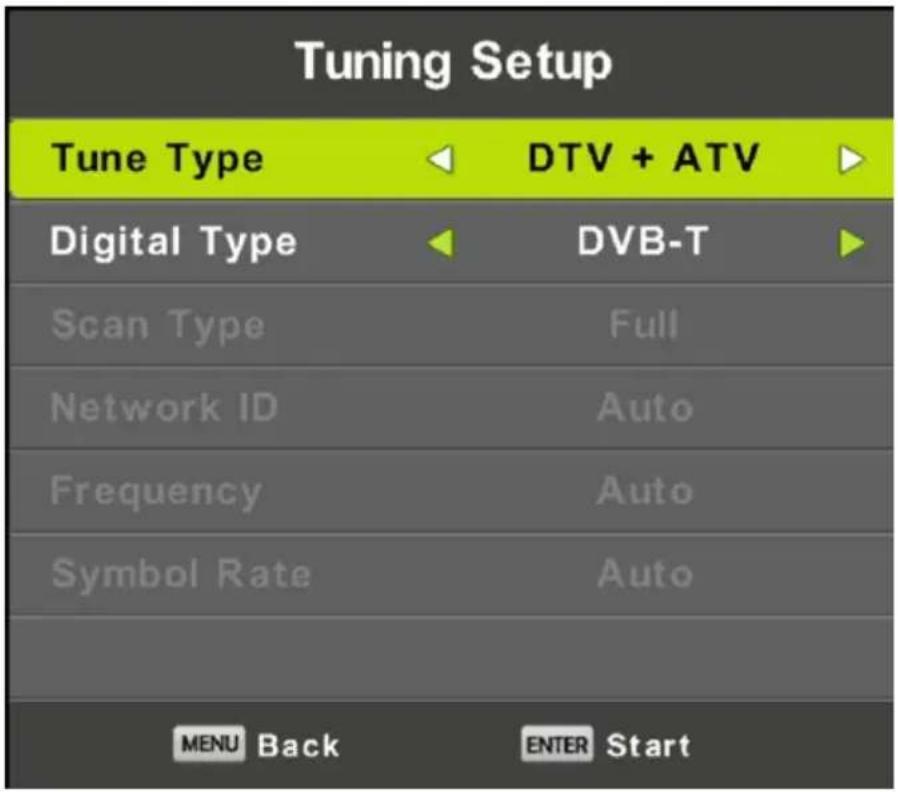
Auto Tuning
First tuning ATV, press Menu and left arrow button to skip ATV tuning, Second tuning DTV, press Menu and left arrow button to skip DTV tuning.
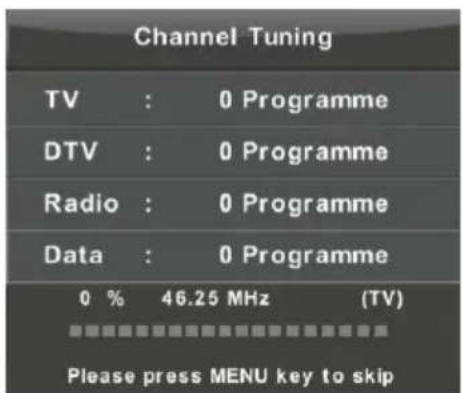
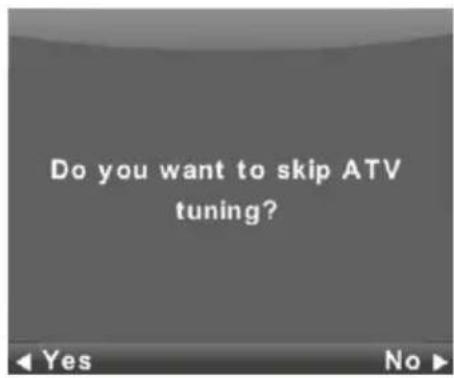

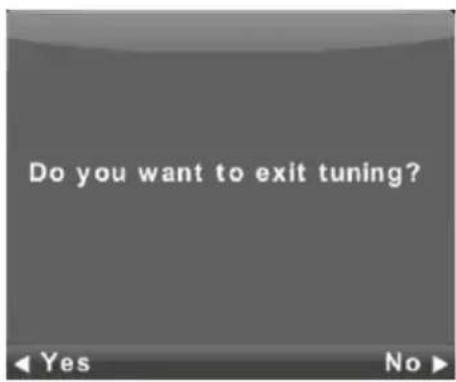
Izbornik kanala
- Pritisnite ▼ / ▲ tipku za biranje opcije koju želite podesiti u izborniku kanala.
- Pritisnite Enter tipku za podešavanje.
- Nakon podešavanja, pritisnite Enter tipku kako biste pohranili promjene i vratili se na prethodni izbornik.
- Automatsko ugađanje

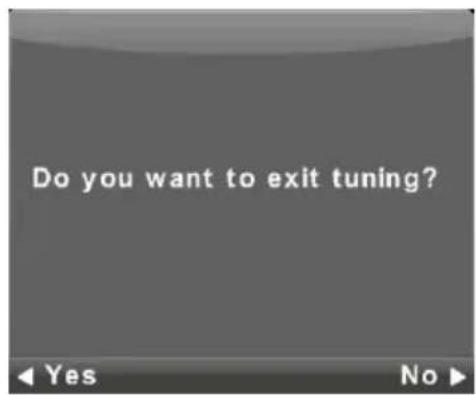
ATV ručno ugađanje

Pretraga
Pretražujte kanale.
Tekući kanal
Postavite broj kanala.
Postavke boja
Postavke zvuka
Odaberite postavke zvuka
Fino ugađanje
Podesite frekvenciju kanala na "fino".
DTV ručno ugađanje
Pritisnite ▼ / ▲ tipku za odabir DTV ručnog ugađanja, zatim pritisnite tipku Enter za ulaz u podizbornik. Pritisnite ◀ / ▶ tipku za odabir kanala, a zatim pritisnite Enter za pretragu programa.
Uređivanje programa

Pritisnite ▼ / ▲ tipku za odabit uređivanja programa, te potom pritisnite Enter tipku za ulaz u podizbornik.

Kljjučevi u tri boje su prečaci za programiranje kanala.
Prvo pritisnite tipku ▼ / ▲ za označivanje željenog kanala, zatim:
pritisnite crvenu tipku za brisanje programa na popisu.
pritisnite žutu tipku za pomicanje kanala na popisu favorita.
Pritisnite plavu tipku za preskakanje odabranog kanala.
Pritsnite Fav tipku za dodavanje ili brisanje kanala s Vaše liste favorita.
(Vaš TV automatski će preskakati kanale prilikom korištenja CH+/- za pregled kanala.)
Lista rasporeda
Pritisnite ▼ / ▲ tipku za odabir liste rasporeda. Zatim pritisnite Enter tipku za ulaz u podizbornik
![Schedule List (0% Used) 11:44 05 Nov 1/1 Programme Title Date 1 ONE HD 1 [DTV]Manual Timer Set 05/11/2019 Manual Timer Set 11:47~12:17 Move Add Edit Exit](/content/2026/05/1057032/images/540ef5b85df3029844c893a29f3dc0d6fce235b3f47b43f47f74f0b4094036c3.jpg)
Informacije o signalu
Pritisnite ▼ / ▲ tipku za odabir Informacija o signalu, pritisnite tipku Enter za pregled detaljnijih informacija o signalu. One su dostupne jedino kada je signal u DTV-u.

- Pritisnite tipku ▼ / ▲ za odabir opcije koju želite podesiti u izborniku za ZAKLJUČAVANJE SUSTAVA (LOCK SYSTEM) menu.
- Pritisnite tipku Enter/◄ / ► za podešavanje.
- Nakon završetka ugađanja, pritisnite tipku MENU za pohranu ugađanja i povratak na prethodni izbornik.
Zaključav anje

Priti snite tipku ▼ /▲ za odabir Ugađanje lozinke ( Set Password), zatim pritisnite ENTER za ulazak u podizbornik za unošenje nove lozinke.
Zaključavanje kanala
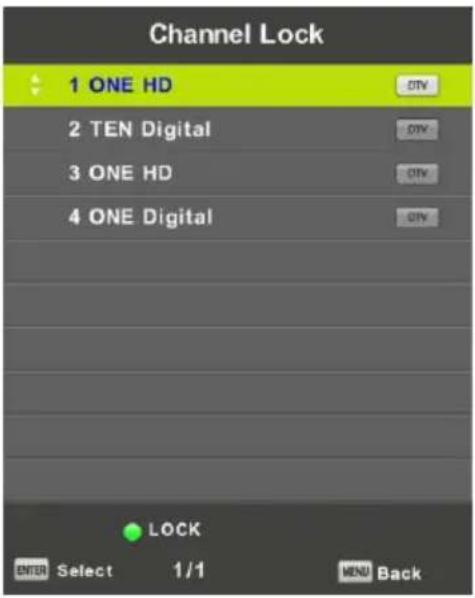
Pritisnite tipku ▼ / ▲ za odabir Zaključavanja kanala, zatim pritisnite Enter za ulazak u podizbornik.
Pritisnite tipku ◀ / ▶ i odaberite mapu koju želite gledati iz izbornika fotografija, te pritisnite tipku MEDIA za njen prikaz.
Izbornik video zapisa
Pritisnite tipku ◀ / ▶ i odaberite MOVIE u glavnom izborniku, te potvrdite pritiskom tipke ENTER.
Izbornik teksta (Text Menu)
natural_image
Simple line drawing of a blank rectangular area with a speaker icon emitting sound waves (no text or symbols)Mogući uzroci:
*Nisu uključeni strujni kabel, antena ili ulazni uređaji;
natural_image
Simple line drawing of a sad face with a speaker icon below (no text or symbols)Mogući uzroci:
natural_image
Simple line drawing of a bird with a speaker icon below (no text or symbols)Mogući uzroci:
*Antenski i video kabeli su oštećeni ili olabavljeni;
natural_image
Simple line drawing of geometric shapes including cube, cone, and circle with a speaker icon (no text or symbols)Mogući uzroci:
*Neispravna postavka sistema boja; Nisko postavljena razina boja; *
Antena je neispravno postavljena.
Rješenja:
*U izborniku promijenite sistem boja;
*Povećajte razinu boja;
natural_image
Technical illustration of a device casing with internal components and a wireframe grid view (no text or symbols)natural_image
Technical line drawing of a device chassis with internal components and a wire mesh structure (no text or symbols)natural_image
Illustration of a computer monitor displaying a cartoon character on screen (no text or symbols visible)
natural_image
Illustration showing a no-smoking sign, a road with smoke, and a computer monitor (no text or symbols)
natural_image
Illustration of a person interacting with a computer monitor and cable, showing a device connected to a wall-mounted device (no text or symbols present)Ekran možete da čistite čistom, mekom krpom ali tek posle isključenja televizora iz struje. Ne grebite ili udarajte ekran tvrdim predmetima jer bi mogla da nastanu trajna oštećenja
Bezbednost
natural_image
Illustration showing a person using a device with no restrictions, another person sitting on a chair, and a monitor on a table (no text or symbols)Ne postavljajte strujni kabl ili druge kablove na mesta na kojima po njimamože da se gazi. Ne preopterećujte strujni kabl ili utičnicu.

Ne postavljajte televizor na nestabilne površine.

natural_image
Illustration of a cord being twisted with lightning bolts around a computer monitor (no text or symbols)
natural_image
Cartoon illustration of a person sitting on a TV with a pointing hand (no text or symbols)Ne uklanjajte stražnji poklopac jer su neki delovi unutrašnjosti uređaja pod visokim naponom koji može da izazove strujni udar. Interna podešavanja i provere bi trebalo da obavlja isključivo ovlašteni servis.
Ne postavljajte na ili u blizinu televizora izvore otvorenog plamena.
natural_image
Illustration of a computer monitor with a crossed-out 'X' symbol and a leafy top (no text or labels)
Tokom grmljavinskih oluja, isključite antenu i uređaj iz struje kako ih ne bi oštetio strujni udar i držite sve osobe (posebno decu) dalje od antenskog kabla.
Sadržaj
Upozorenje 34
Bezbednost 34
Sadržaj.... 36

Auto Tuning
First tuning ATV, press Menu and left arrow button to skip ATV tuning, Second tuning DTV, press Menu and left arrow button to skip DTV tuning.


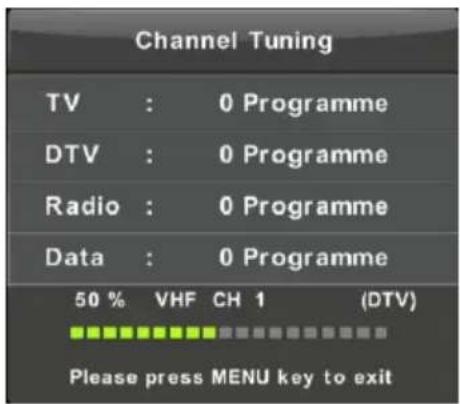

Izbornik kanala
- Pritisnite ▼ / ▲ tipku za biranje opcije koju želite podesiti u izborniku kanala.
- Pritisnite Enter tipku za podešavanje.
- Nakon podešavanja, pritisnite Enter tipku kako biste pohranili promjene i vratili se na prethodni izbornik.
- Automatsko ugađanje


ATV ručno ugađanje
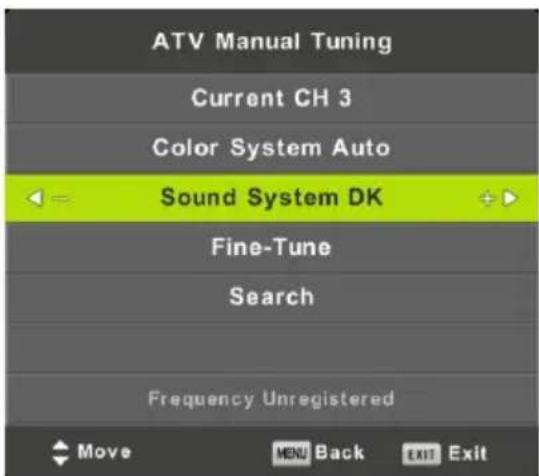
Pretraga
Pretražujte kanale.
Tekući kanal
Postavite broj kanala.
Postavke boja
Postavke zvuka
Odaberite postavke zvuka
Fino ugađanje
Podesite frekvenciju kanala na "fino".
DTV ručno ugađanje
Pritisnite ▼ / ▲ tipku za odabir DTV ručnog ugađanja, zatim pritisnite tipku Enter za ulaz u podizbornik. Pritisnite ◀ / ▶ tipku za odabir kanala, a zatim pritisnite Enter za pretragu programa.
Uređivanje programa

Pritisnite ▼ / ▲ tipku za odabit uređivanja programa, te potom pritisnite Enter tipku za ulaz u podizbornik.
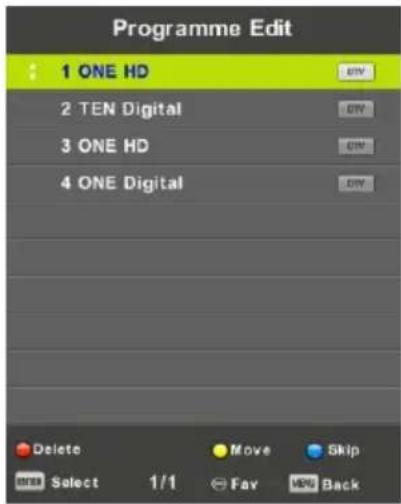
Kljjučevi u tri boje su prečaci za programiranje kanala.
Prvo pritisnite tipku ▼ / ▲ za označivanje željenog kanala, zatim:
pritisnite crvenu tipku za brisanje programa na popisu.
pritisnite žutu tipku za pomicanje kanala na popisu favorita.
Pritisnite plavu tipku za preskakanje odabranog kanala.
Pritsnite Fav tipku za dodavanje ili brisanje kanala s Vaše liste favorita.
(Vaš TV automatski će preskakati kanale prilikom korištenja CH+/- za pregled kanala.)
Lista rasporeda
Pritisnite ▼ / ▲ tipku za odabir liste rasporeda. Zatim pritisnite Enter tipku za ulaz u podizbornik
![Schedule List (0% Used) 11:44 05 Nov 1/1 Programme Title Date 1 ONE HD 1 [DTV]Manual Timer Set 05/11/2019 Manual Timer Set 11:47~12:17 Move Add Edit Exit](/content/2026/05/1057032/images/d4f9b0bd9a128663d2a1f29d55829265bb879f9245e1574dfec57cca94aa0dac.jpg)
Informacije o signalu
Pritisnite ▼ / ▲ tipku za odabir Informacija o signalu, pritisnite tipku Enter za pregled detaljnijih informacija o signalu. One su dostupne jedino kada je signal u DTV-u.

- Pritisnite tipku ▼ / ▲ za odabir opcije koju želite podesiti u izborniku za ZAKLJUČAVANJE SUSTAVA (LOCK SYSTEM) menu.
- Pritisnite tipku Enter/◄ / ► za podešavanje.
- Nakon završetka ugađanja, pritisnite tipku MENU za pohranu ugađanja i povratak na prethodni izbornik.
Zaključav anje

Pritisnite tipku ▼ /▲ za odabir Ugađanje lozinke ( Set Password), zatim pritisnite ENTER za ulazak u podizbornik za unošenje nove lozinke.
Zaključavanje kanala

Pritisnite tipku ▼ / ▲ za odabir Zaključavanja kanala, zatim pritisnite Enter za ulazak u podizbornik.
Pritisnite tipku ◀ / ▶ i odaberite mapu koju želite gledati iz izbornika fotografija, te pritisnite tipku MEDIA za njen prikaz.
Izbornik video zapisa
Pritisnite tipku ◀ / ▶ i odaberite MOVIE u glavnom izborniku, te potvrdite pritiskom tipke ENTER.
Izbornik teksta (Text Menu)
natural_image
Simple line drawing of a blank rectangular area with a speaker icon emitting sound waves (no text or symbols)Mogući uzroci:
*Nisu uključeni strujni kabl, antena ili ulazni uređaji;
natural_image
Simple line drawing of a sad face with a speaker icon below (no text or symbols)Mogući uzroci:
natural_image
Simple line drawing of a cow with a speaker icon below (no text or symbols)Mogući uzroci:
*Antenski i video kablovi su oštećeni ili olabavljeni;
natural_image
Simple line drawing of geometric shapes including cube, cone, and circle with a speaker icon (no text or symbols)Mogući uzroci:
*Neispravna postavka sistema boja;
*Nisko postavljen nivo intenziteta boja;
* Antena je neispravno postavljena.
Rešenja:
*U meniju promenite sistem boja;
*Povećajte razinu boja;
natural_image
Technical illustration of an electronic device casing with internal components and a wireframe grid view (no text or symbols)
natural_image
Simple line drawing of a computer monitor with a cartoon character on screen (no text or symbols)

natural_image
Simple line drawing of a person sitting on a path next to a computer monitor (no text or symbols)
natural_image
Illustration showing a person holding a device with a prohibition symbol, a chair, and a monitor (no text or symbols present)natural_image
Illustration of a cable being twisted from a computer monitor to a cable, with lightning bolts indicating electrical hazard (no text or symbols present)
natural_image
Illustration of a person sitting at a desk watching a television (no text or symbols visible)natural_image
Illustration of a computer monitor with a crossed-out 'K' symbol above it, no text or labels present.


Мени за канали


Audio jazik
Мени музички записи
Мени видео записи
Мени Текст (Text Menu)
natural_image
Technical illustration of a device casing with internal components and a wire mesh panel below (no text or symbols)
natural_image
Simple line drawing of a computer monitor with a cartoon dinosaur sketch on the screen (no text or symbols)
natural_image
Illustration showing a no-smoking sign, a hand holding a tree with smoke, and a computer monitor (no text or symbols)
natural_image
Illustration showing a person using a radio with a prohibition symbol, a chair, and a monitor (no text or symbols present)natural_image
Illustration of a cord being twisted with lightning bolts, connected to a monitor (no text or symbols)
natural_image
Illustration of a person sitting at a desk watching a television (no text or symbols visible)natural_image
Illustration of a computer monitor with a crossed-out X symbol and a leafy top (no text or labels)

Vendosje automatike
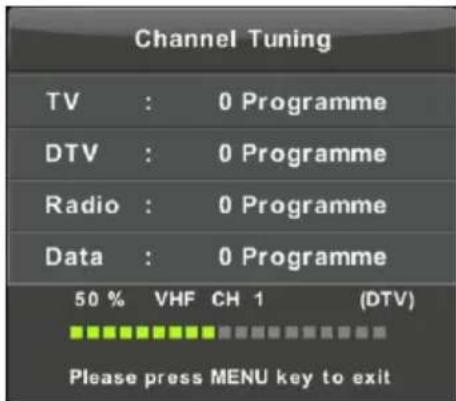

Menuja e kanaleve
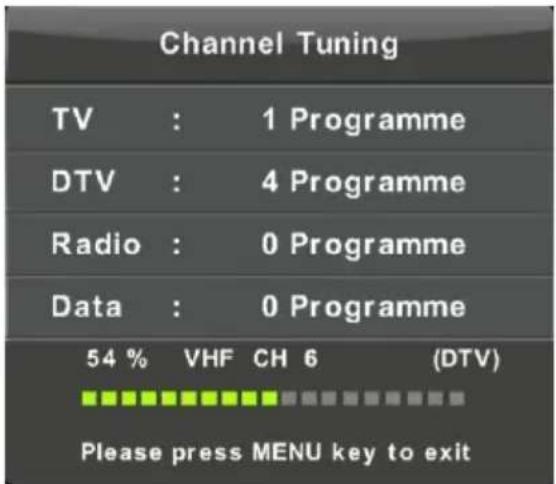

Informacione mbi sinjalin
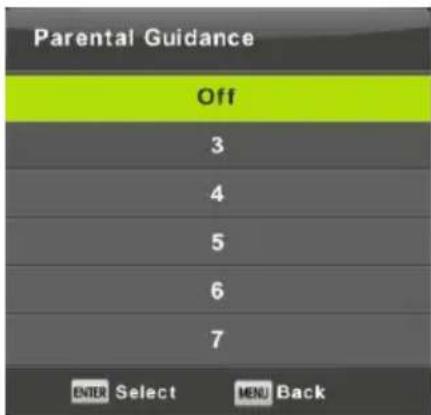
Kyçja prindërore (Parental Guidance
Instalimi i parë(First Time Installation)
Menuja e videos
Menuja e tekstit (Text Menu)
natural_image
Simple line drawing of a blank rectangular area with a speaker icon emitting sound waves (no text or symbols)Shkage të mundshme:
natural_image
Simple line drawing of a sad face with a speaker icon below (no text or symbols)Shkage të mundshme:
natural_image
Simple line drawing of a cow with a speaker icon below (no text or symbols)Shkaqe të mundshme:
natural_image
Simple line drawing of geometric shapes including cube, cone, and circle with a speaker icon (no text or symbols)Shkaqe të mundshme:
Attaching the Stand to the TV
1. Assemble the stand
Before attaching/detaching the stand, make sure to turn off the TV.
-Before performing work spread cushioning over the base area to lay the LED TV on.
This will prevent it from being damaged.
TV-24LE75T2
Stand installation instruction

natural_image
Technical illustration of a device chassis with internal components and a wire mesh panel (no text or symbols)- Remove the base from the bag and fix it to the rear housing as indicated by the arrow.

- Then fix it with 3pcs screws-PB4X12
Warning

Warning

No any spare parts for maintenance attached. Do not open the back cover to avoid electric shock. Please contact our after-sale service personnel if necessary
Warning: Do not open the back cover to avoid electric shock. No additional spare parts are inside the case. Any questions, please contact our service personnel.

A triangle with a lightning arrow in: Remind you of probable higt voltage here in case of electric shock.

A triangle with an excalmatory mark in :Remind you that the parts here are very important .if replacement etc.is needed,please refer to relevant technical Specifications.
Warning: Do not put the TV in rainy or foggy places to prevent from fire or electric shock. Do not apply hard objects to attrite or knock on the liquid crystal screen since these may cause scratches or damages.
Warning: Modifying the product without any authorization is forbidden.
NOTE:
excessive sound pressure from earphones and headphones can cause hearing loss. An appliance coupler is used as the disconnect device, the disconnect device shall remain readily operable.
Safety
Please immediately pull out the AC power plug from adapter if there is an abnormal sound or smell or the LED TV has sound but no picture, and contact after sales support.

The LED TV should be kept from high temperature heating objects or direct sunlight. It requires good ventilation. Allow 10cm between the LED TV and other appliances or built-in cabinet walls.


natural_image
Illustration of a computer monitor displaying a cartoon character (no text or symbols present)The LED TV should be kept free from rain, damp and dust to prevent electrical shock and short circuits. Do not cover the ventilation openings with table clothes, curtains, newspapers etc.


Do not wipe the LED TV with any petrol, chemical or alcohol based solvents as it will lead to product damage of the panel and cabinet.
You may clean the display panel with a soft clean cloth after pulling out the power plug. Do not repeatedly wipe the panel, nor scrape, tap or strike the panel with a hard object.
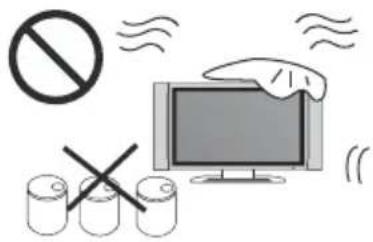
natural_image
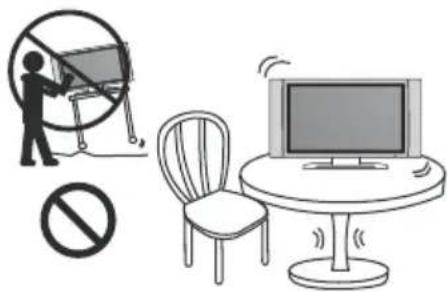
Illustration showing a person using a large circle to stop a monitor, with a prohibition symbol and a chair nearby (no text or symbols present)Do not place the power cord or other cables across a walkway in case it is trampled on. Do not overload the power cord or power socket.
Do not place the LED TV on an unstable surface.

natural_image
Illustration of a cable being connected to a monitor with lightning bolts (no text or symbols)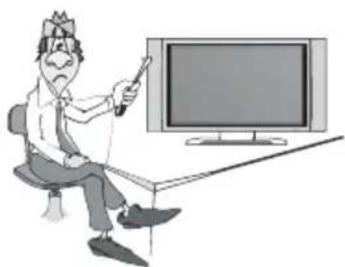
natural_image
Cartoon illustration of a person sitting at a desk with a TV, holding a pointer (no text or symbols present)Do not disassemble the back cover as it contains high voltages inside and will cause electric shock. Internal adjustments and checks should only be conducted by qualified professionals.
Do not place naked flame sources, such as lit candles on or near the LED TV.
Please pull out the power plug and contact after sales support if there are abnormal objects or water in the TV.
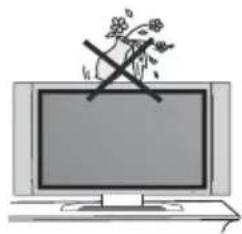
natural_image
Illustration of a computer monitor with a crossed-out floral symbol above it (no text or labels)
Pull out the power cord and antenna cable during electrical storms so the LED TV is not damaged by electrical surges. Keep all people away from the antenna cable during electrical storms.
Table of Contents
Warning....132
Safety....132
Table of Contents.... 134
Control Panel.... 135
Terminal Wiring Diagram.... 136
Remote Contro.... 137
First Time Setup 139
Menu Opreation.... 141
USB 158
Photo Menu 159
Music Menu 160
Movie Menu 161
Text Menu 162
Troubleshooting....163
Data and information contained in this manual are subject to change at any time without prior notice.
Product introduction
1. Brief Introduction
Production Introduction
Congratulations! You have chosen the latest generation high definition liquid crystal television. Endowed with high display quality and light weight, it is power-saving and radiationless with high sensitivity television reception. The new generation liquid crystal television will bring you safe&comfortable brand new visual experience.
Applying color active matrix TFT with brand new technologies, the product can provide high quality display image, flicker free television, VCD&DVD programs. In addition, it can be used as definition digital television or computer display. We believe the product will surely make you satisfied.
Thank you for purchasing and using our products!
Control panel
The control button for front panel is in the back of TV
LED TV-24LE75T2

1 POWER
Turn the TV on or enter into standby mode.
② INPUT
Signal source selection button.
③ MENU
Enter/exit the main menu.
④ VOL -
Volume decreasing short cut key; enter into the next menu and adjust OSD options (decreasing).
⑤ VOL +
Volume increasing short cut key; enter into the next menu and adjust OSD options(increasing).
⑥ CH-
Channel decreasing short cut key; decrease the channel No. and select the last option in the menu.
⑦ CH+
Channel increasing short cut key; increase the channel No. and select the next option in the menu.
Connecting Cables
This LED TV has digital multimedia performance and can be connected to multiple external devices. The following diagram presents the connections to other video and audio appliances.
LED TV-24LE75T2

- USB: It is used to updating the software of the DVB-T/C and DTV, and it should only be operated by a qualified TV technician.
User can access multi-media files stored in the USB device.
The supported format includes:
*.dat,*.vob,*.mpg and*.avi video formats.Besides,*.jpg,*.bmp and *.mp3
(DTV 1080p hd programs burn, you must use more than steaming system of speed or move hard disk).
2.HDMI: High-definition multimedia interface.
Note: Acceptable video signal 480P/576P/720P/1080i/1080P.
3.VGA: This can be connected with the D-sub 15 pin signal cable to your PC.
Scart input.4.SCART:
CI input.5.CI:
6.AV: To connect to the Composite VIDEO(R/L) output sockets on external video device.
7.VGA AUDIO: PC audio input.
8.COAXIAL: Digital TV sound output.
9.RF: Antenna/close circuit TV or Digital TV terminal.
10.EARPHONE: Headphone to headphones.
11.Y/Pb/Pr: Y/Pb/Pr input.
12.DC IN DC 12V in
Descriptions of Television Remote Control

TV MODE:
-
POWER Button( ⏻ ) Press this button to turn the TV on or into standby mode.
-
MUTE Button (☒) Press this button to mute the sound and the sign of mute will appear all the while if you do not press again.
-
AUDIO Button Change audio mode:left, right, mono, stereo.
4.ASPECT Button Select different size. 5.PMODE Button Select the different picture mode directly.
6.SMODE Button Select the different sound mode directly.
-
NUMBER (0-9) Buttons Press these buttons to enter digits. These buttons for direct access to use a channel to enter channel number for both ATV and DTV or enter password for Parental lock.
-
-/-Buttons Press to change the channel bit
-
Button This button is used to return to the previous channel
-
DISPLAY Button Press this button to display the information on current input.
-
MEDIA Button Enter to USB channel
- AUTO Button PC channel images automatic calibration shortcuts
- RED Button
Use in TXT, DTV and TV
-
GREEN Button Use in TXT, DTV and TV
-
YELLOW Button Use in TXT, DTV and TV
- CYAN Button
Use in TXT, DTV and TV
17.SLEEP Button Sleep time setting. 18.SOURCE Button
Source setting.
-
ENTER Button To confirm the choice with the highlighted menu item, to display the channel list in the no-menu.
-
◀/▶ Button Decrease/increase the option value.
-
▲/▼ Button
Select the previous/next function option.
22 MENU.Button Adjust out the system menu.
23 .EXIT Button Exit function.
-
CH ▲/▼ Buttons Increase/decrease the channel.
-
VOL▲/▼Buttons Increase/decrease the volume.

26. TEXT Button
Display the teletext on screen.
▶1 Button
Play or pause.
27 .REVEAL Button
Display the characters hided.
◀ Button
Fast reverse.
28. SIZE Button
Change the size of current page.
Button
Fast Forward.
29.INDEX Button
Ask for the list of main TV letter broadcast page Number.
Button
Press this button to STOP.
30 .S.TITLE Button
Display/OFF the subtitle on screen.
Button
Skip to previous track or chapter.
31. S.PAGE Button
Display the current sub-page.
Button
Skip to next track or chapter.
32 .HOLD Button
Hold the current page and prevent against being updated.
On DTV, press the button to enter the Time Shift function.
33.FAV Button
Favourite program channel button
34 .RADIO Button
In the DTV source, press is to enter "Radio" channel and press it again to enter
DTV channel
35.EPG Button
To show the Electronic Program Guide during no-menu state only.
36.R.LIST Button
Open the recording documents list
- ● Button
Record
38. FAV-button
Favourite program channel down button
39. FAV+ button
Favourite program channel up button
Notes:
The remote control shall be applied in effective reception scope of the television. Make the remote control point towards the infrared receiver of the liquid crystal television and ensure that there are no obstacles. Its normal operation distance will be shortened in direct sunlight or lamplight.
Be careful to use the remote control .avoid falling off or being trampled or splashed with liquids.
First Time Setup

Press INPUT button to display the input source list,
Press ▼ / ▲ or OK button to select the input source you want to,
Press OK button to enter the input source,
Press EXIT button to quit.
Connect an RF cable from the Tv's input called "RF-In" and to your TV Aerial socket.
Select Language
Press ◀ / ▶ button to select the language to be used for menus and message.
Select Country
Press ▼ / ▲ button to highlight country menu.
Press ◀ / ▶ button to select the country you want to.
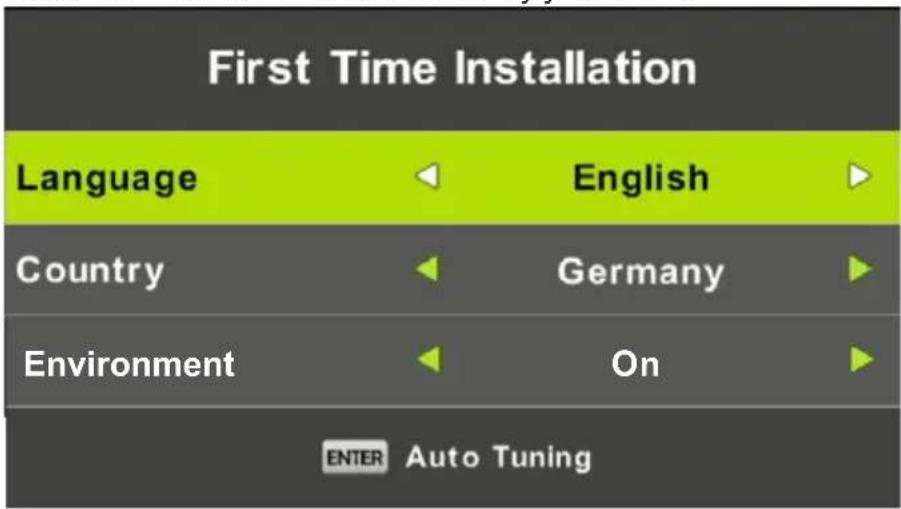
First Time Setup

Auto Tuning
First tuning ATV, press Menu and left arrow button to skip ATV tuning, Second tuning DTV, press Menu and left arrow button to skip DTV tuning.


Channel Menu
Press MENU button to display the main menu.
Press ◀ / ▶ button to select CHANNEL in the main menu.

- Press ▼ / ▲ button to select the option that you want to adjust in the CHANNEL menu.
- Press Enter button to adjust.
- After finishing your adjustment, Press Enter button to save and return to the previous menu.
Auto Tuning
Press ▼ / ▲ button to select Auto Tuning, then press Enter/▶ button to enter.
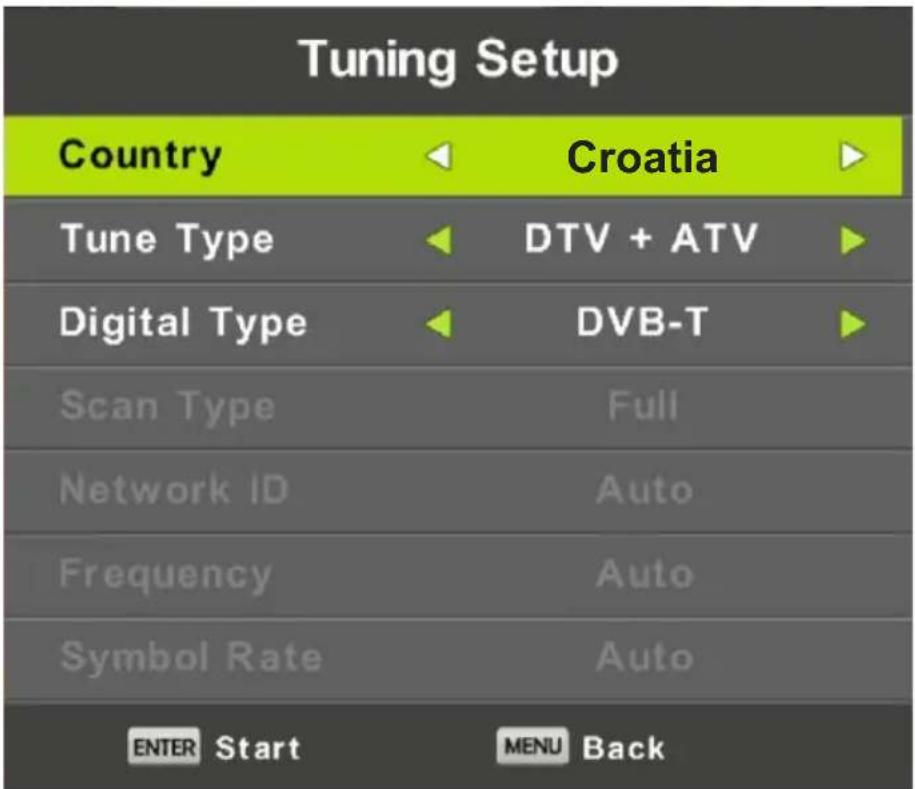
Menu Operation


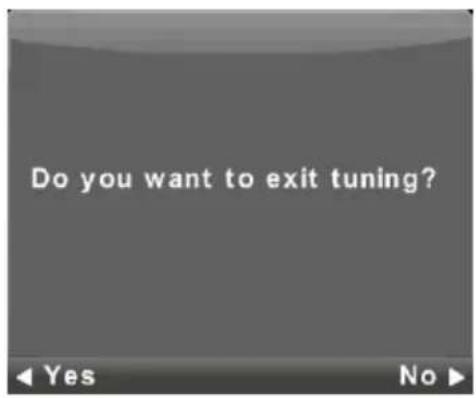
ATV Manual Tuning

Current CH
Set the channel number.
Color System
Select the color system
(Available System: AUTO, PAL, SECAM)
Sound System
Select the Sound system
Fine-Turn
Adjust the frequency of the channel finely.
Search
Start searching channel.
Menu Operation
DTV Manual Tuning
Press ▼ / ▲ button to select DTV Manual Tuning, then press Enter button to enter sub-menu.
Press ◀ / ▶ button to select channel, then press Enter button to search program.

Program Edit
Press ▼ / ▲ button to select Program Edit, then press Enter button to enter sub-menu.
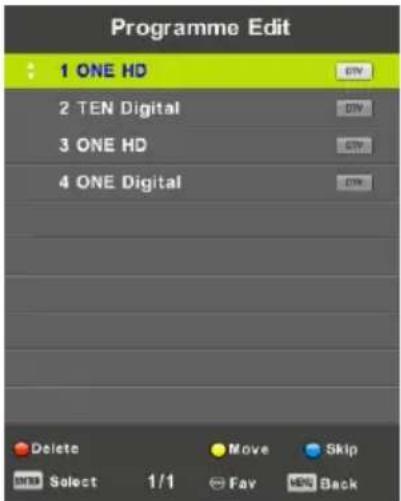

The three colored key is the shortcut key for programming the channel.
First press ▼ / ▲ to highlight the channel you want to select, then:
Press the Red button to delete the program in the list.
Press the Yellow button to move the channel in favorite list.
Press the Blue button to skip the selected channel.
Press Fav button to add or remote the channel to your favorite list.
(Your TV set will skip the channel automatically when using
CH+/- to view the channels.)
Menu Operation
Schedule List
Press ▼ / ▲ button to select Schedule List, then press Enter button to enter sub-menu. It is available in source.

Press the YELLOW button to enter the interface below.

When the time appointment is conflict, it will produce a warning message.

Signal Information
Press ▼ / ▲ button to select Signal Information, press the Enter button to see the detail information about the signal. Only available when there is signal in DTV.

Picture Menu
Press MENU button to display the main menu.
Press ◀ / ▶ button to select PICTURE in the main menu.
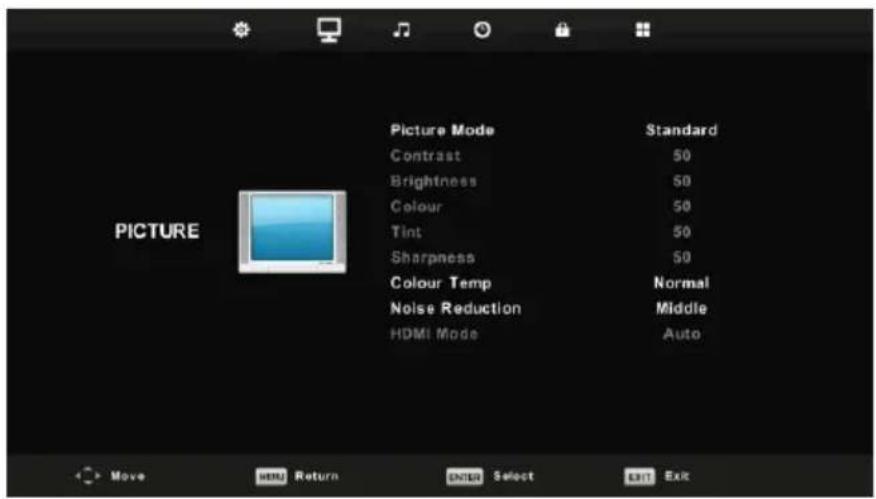
- Press ▼ / ▲ button to select the option that you want to adjust in the PICTURE menu.
- Press OK button to adjust.
- After finishing your adjustment, Press MENU button to save and return back to the previous menu.
Picture Mode
Press ▼ / ▲ button to select Picture Mode, then press OK button to enter sub-menu.
You can change the value of contrast, brightness, color, sharpness and tint when the picture is in Personal mode.
TIPS: You can press PMODE button to change the Picture Mode directly.

Menu Operation
Contrast/ Brightness/ Color/ Tint / Sharpness
Press ▼ / ▲ button to select option, then press ◀ / ▶ button to adjust.
Contrast Adjust the highlight intensity of the picture, but the shadow of the picture is invariable.
Brightness Adjust the optical fiber output of the entire picture, it will effect the dark region of the picture.
Color Adjust the saturation of the color based on your own like.
Tint Use in compensating color changed with the transmission in the NTSC code.
Sharpness Adjust the peaking in the detail of the picture.
Color Temp
Change the overall color cast of the picture.
Press ▼ / ▲ button to select Color Temperature, then press OK button to enter sub-menu.
Press ◀ / ▶ button to select. (Available Picture mode: Cool, Medium, Warm).
You can change the value of red, green and blue when the color temperature is in User mode.

Cold Increase the blue tone for the white.
Normal Increase the sex-linked colors for the white.
Warm Increase the red color for the white.
Noise Reduction
To filter out and reduces the image noise and improve picture quality.
Press ▼ / ▲ button to select Noise Reduction, then press OK button to enter sub-menu.
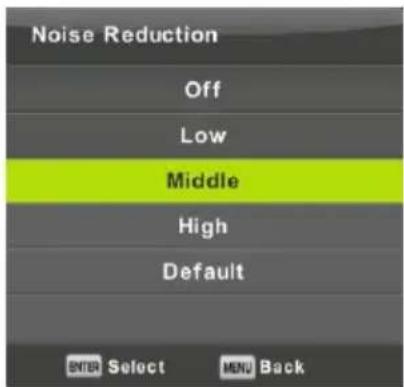
Menu Operation
Off Select to turn off video noise detection.
Low Detect and reduce low video noise.
Middle Detect and reduce moderate video noise.
High Detect and reduce enhanced video noise.
Default Set as Default.
Sound Menu
Press MENU button to display the main menu.
Press ◀ / ▶ button to select SOUND in the main menu.
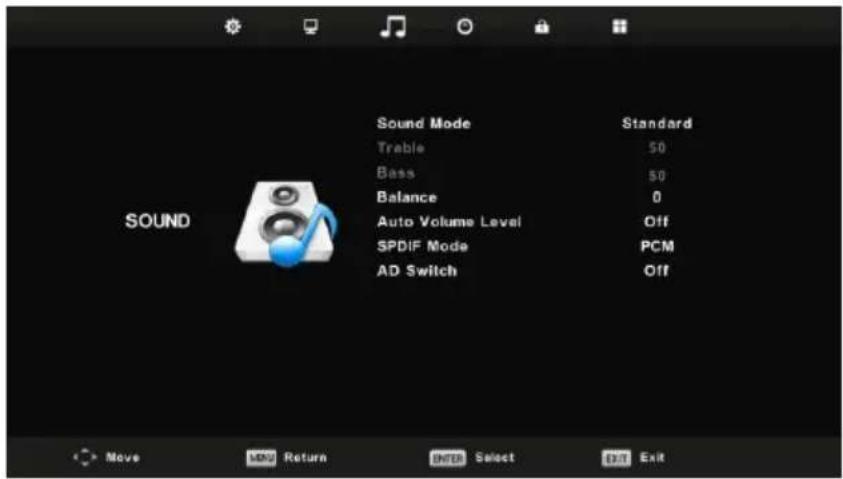
- Press ▼ / ▲ button to select the option that you want to adjust in the SOUND menu.
- Press Enter button to adjust.
- After finishing your adjustment, Press Enter button to save and return to the previous menu.

Sound Mode
Press ▼ / ▲ button to select Sound Mode, then press Enter button to enter sub-menu.
Press▼/▲ button to select.
Menu Operation
You can change the value of Treble and Bass when the sound is in Personal mode.
TIPS: You can press SMODE button on the remote control to change the Sound Mode directly.
Standard Produces a balanced sound in all environments.
Music Preserves the original sound.Good for musical programs.
Movie Enhances treble and bass for a rich sound experience.
Sports Enhances vocals for sports.
Personal Select to customize picture settings.
Note: The treble and bass are only available in User mode, you can adjust them as you like.
Balance
Press ▼ / ▲ button to select option, Press ◀ / ▶ button to adjust.
Auto Volume level
Press ▼ / ▲ button to select Auto Volume Level, then press ◀ / ▶ button to select On or Off.
SPDIF Mode
Press ▼ / ▲ button to select SPDIF Mode, then press ◀ / ▶ button to select Off / PCM / Auto.
AD Switch
Press ▼ / ▲ button to select AD Switch, then press ◀ / ▶ button to select On or Off.
Amblyopia function for the blind, the tracks will be mixed describe the current screen.
It need codestream to support.
NOTE:
Balance: This item can adjust the speaker's output, it enables you to listen to best at your position.
Auto Volume: This item is used for reducing the difference between channel and program's volume automatically.
Time Menu
Press MENU button to display the main menu.
Press ◀ / ▶ button to select TIME in the main menu.

- Press ▼ / ▲ button to select the option that you want to adjust in the TIME menu.
- Press Enter button I to adjust.
- After finishing your adjustment, Press Enter button to save and return to the previous menu.
Time Zone
Press ▼ / ▲ button to select Time Zone, then press Enter button to enter sub-menu.

Press ▼ / ▲ / ◀ / ▶ button to select time zone.
Sleep Timer
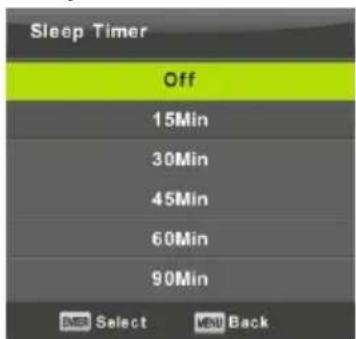
Press ▼ / ▲ button to select Sleep Timer, then press Enter button to enter sub-menu.
Press ▼ / ▲ button to select. (Available options are: Off, 10min, 20min, 30min, 60min, 90min, 120min, 180min, 240min).
Auto Standby

Press ▼ / ▲ button to select Auto Standby, then press Enter button to enter sub-menu.
Press ▼ / ▲ button to select.
Tips: The remote control does not make any operation in the hypothesis time, it will close down automatically. If you do any operation, it will reset the time.
OSD Timer
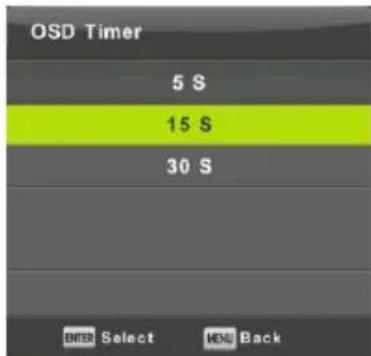
Press ▼ / ▲ button to select OSD Timer, then press Enter button to enter sub-menu.
Press ◀ / ▶ button to select.
Lock Menu
Press MENU button to display the main menu.
Press ◀ / ▶ button to select Lock in the main menu.

- Press ▼ / ▲ button to select the option that you want to adjust in the LOCK SYSTEM menu.
- Press Enter/◄ / ► button to adjust.
- After finishing your adjustment, Press MENU button to return back to the previous menu
Menu Operation
Lock System

Press ▼ / ▲ button to select Lock System, then press Enter button to make the following 3 options valid.
Default password is 0000, and if forget what you set, please call the service center.
Set Password

Press ▼ / ▲ button to select Set Password, then press Enter button to enter sub-menu to set new password.
Channel Lock

Press ▼ / ▲ button to select Channel Lock then press Enter button to enter sub-menu to select.
Press button to lock or unlock the Green channel.
Menu Operation
Parental Guidance

Press ▼ / ▲ button to select Parental Guidance, then press Enter button to enter sub-menu to select the number of age which is suitable for your children.
Key Lock
Press ▼ / ▲ button to select Key Lock, then press ◀ / ▶ button to select Off or On. When Key Lock's statue is on, you can't use the Key panel button.
Hotel Mode

- Press ▼ / ▲ button on the remote control to select hotel mode in the Lock menu.
- Press Enter button on the remote control to enter the sub-menu.
- After finishing your adjustment, Press MENU button to save and return back to the previous menu.
Hotel Mode
Press ▼ / ▲ button to select Hotel Mode, then press ◀ / ▶ button to select on or off.
Source Lock
Press ▼ / ▲ button to select Source Locke, then press Enter button to enter sub-menu to select.
Default Source
Press ▼ / ▲ button to select Default Source, then press Enter button to enter sub-menu to select.
Default Prog
Press ▼ / ▲ button to select Default Prog, then press ◀ / ▶ button to adjust. It is available when the default source is TV.
Max Volume
Press ▼ / ▲ button to select Max Volume, then press ◀ / ▶ button to adjust.
Clear Lock
Press ▼ / ▲ button to select Clear Lock, then press Enter button to clear the setting you have done before.
Setup Menu
Press MENU button to display the main menu.
Press ◀ / ▶ button to select SETUP in the main menu.

- Press ▼ / ▲ button to select the option that you want to adjust in the SETUP menu.
- Press Enter button to adjust.
- After finishing your adjustment, Press Enter button to save and return to the previous menu.
OSD Language
Select an OSD menu language can be displayed. Default English
is selected as menu language.
Press ▼ / ▲ / ◀ / ▶ button to select Menu Language.

TT Language
Press ▼ / ▲ button to select TT Language, then press Enter button to enter sub-menu.
Press ▼ / ▲ / ◀ / ▶ button to select TT language.
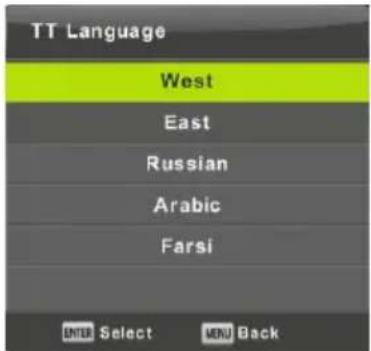
Menu Operation
Audio Languages
Press ▼ / ▲ button to select Audio Languages, then press Enter button to enter sub-menu.
Press ◀ / ▶ button to select the primary of Audio Languages.
Press ▼ / ▲ / ◀ / ▶ button to select the Audio Languages.

Subtitle Language
Press ▼ / ▲ button to select Subtitle Language, then press Enter button to enter sub-menu.
Press ◀ / ▶ button to select the primary of Subtitle Language.
Press ▼ / ▲ / ◀ / ▶ button to select the Subtitle Language.

Hearing Impaired
Press ▼ / ▲ button to select Hearing Impaired, then press Enter button to select On or Off.
PVR File System
Press ▼ / ▲ button to select PVR File System, then press Enter button to enter sub-menu.
Press ▼ / ▲ button to select Check PVR File System, then press Enter button to enter. Then it will check the USB speed.

Menu Operation
Aspect Ratio
Press ▼ / ▲ button to select Aspect Ratio, then press Enter button to enter sub-menu.
Press ▼ / ▲ button to select aspect ratio. (Available options are: Auto, 4:3,16:9, Zoom1, Zoom2).

Blue Screen
Press ▼ / ▲ button to select Blue Screen, then press Enter button to select On or Off.
First Time Installation
Press ▼ / ▲ button to select First time installation, then press Enter button to enter.
Reset
Press ▼ / ▲ button to select Reset, then press Enter button to enter sub-menu.
Software Update(USB)
Press ▼ / ▲ button to select Software Update (USB), plug your USB device in the USB slot, then press Enter button to update the right software.
HDMI CEC
Press ▼ / ▲ button to select HDMI CEC, then press Enter button to enter the sub-menu.
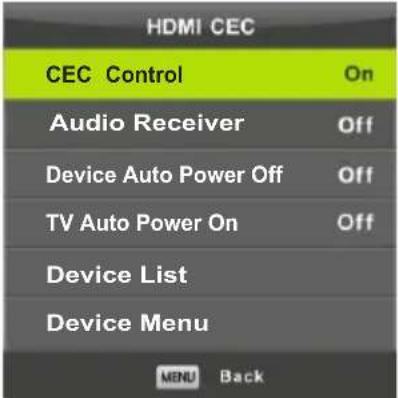
CEC Control Press ◀ / ▶ button to turn the CEC Control on or off.
Audio Receiver Press ◀ / ▶ button to turn the Audio Receiver on or off.
Device Auto Power Off Press ◀ / ▶ button to turn the Device Auto Power Off on or off.
TV Auto Power On Press ◀ / ▶ button to turn the TV Auto Power On on or off.
Device List Press Enter button to open the main menu of device.
Device Menu Press Enter button to open the main menu of device.
Screen Menu(Only PC Mode)
Press MENU button to display the main menu.
Press ◀ / ▶ button to select SCREEN in the main menu.
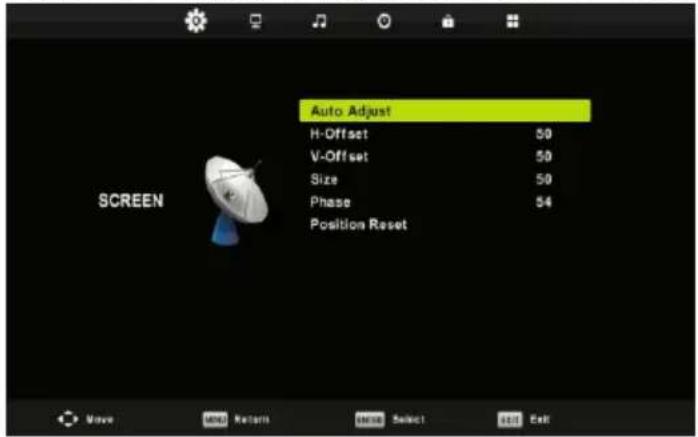
- Press ▼ / ▲ button to select the option that you want to adjust in the SCREEN menu.
- Press Enter button to adjust.
- After finishing your adjustment, Press Enter button to save and return to the previous menu.
Auto Adjust
Press Enter button to start adjusting H-Offset/V-Offset/Size/Phase automatically.
H-Offset.
Adjust the horizontal position of the picture.
Press ▼ / ▲ button to select H-Offset, then press Enter button to enter sub-menu.
V-Offset
Adjust the vertical position of the picture.
Press ▼ / ▲ button to select V-Offset, then press Enter button to enter sub-menu.
Size
Adjust the display size.
Press ▼ / ▲ button to select Size, then press Enter button to enter sub-menu.
Phase
Adjust the horizontal interfering lines.
Press ▼ / ▲ button to select Phase, then press Enter button to enter sub-menu.
Position Reset
Press ▼ / ▲ button to select Position Reset, then press Enter button to enter.
Notes:
- Noise Reduction in PICTURE option is invalid.
- AD Switch in SOUND option is invalid.
- TIME menu and description are the same as that for mode.Air
- Block Program and Parental Guidance in LOCK option is invalid.
- Audio Languages, Subtitle Language, Hearing Impaired and PVR File System in SETUP option is invalid.
- mode has no CHANNEL menu. PC
USB
Note: Before operating Media menu, Plug in USB device, then press INPUT button to set the Input Source to Media.
Press ▼ / ▲ button to select Media in the Source menu, then press Enter button to enter.
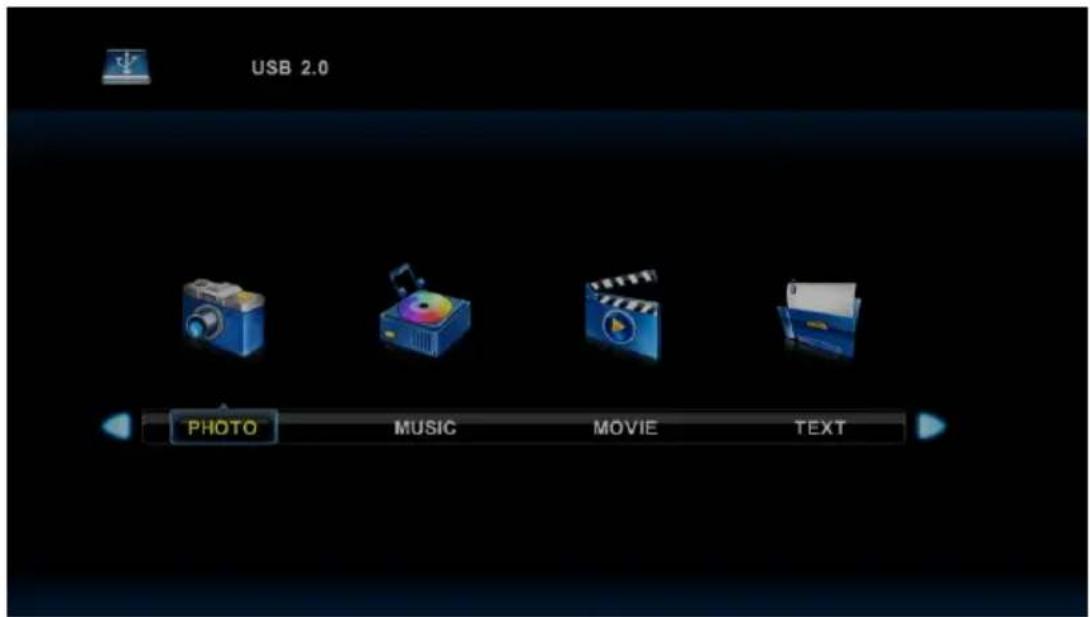
Press ◀ / ▶ button to select the option you want to adjust in the main Media menu, then press Enter button to enter.
Photo Menu
Press ◀ / ▶ button to select PHOTO in the main menu, then press Enter button to enter.
Press Exit button to return to the previous menu and exit menu to quit.
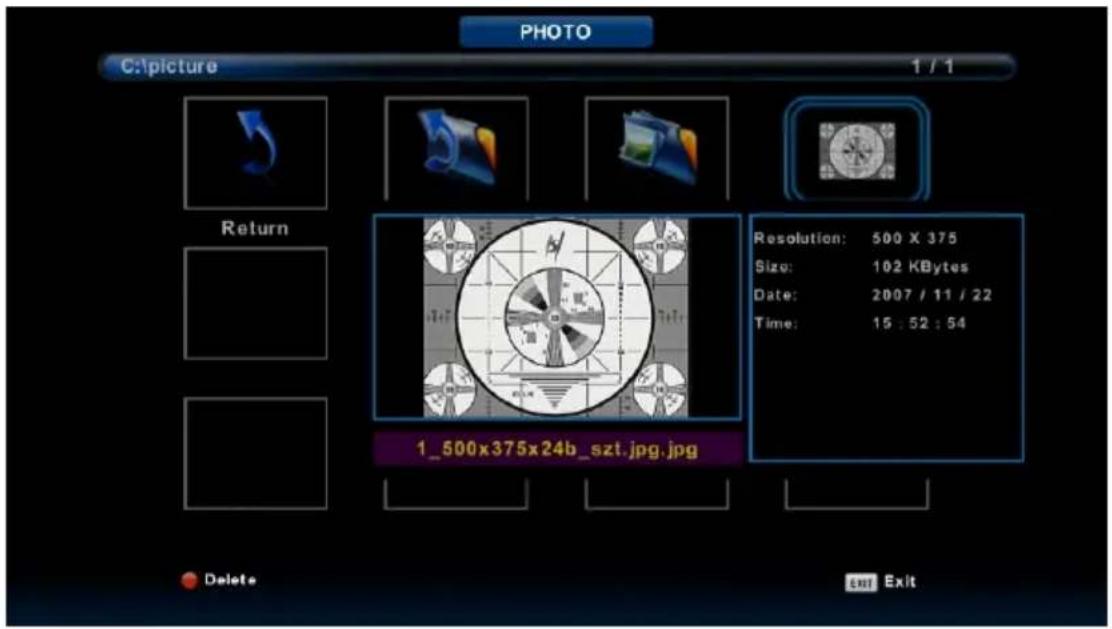
Press ◀ / ▶ button to select the file you want to watch in the file selecting menu, then press media button to display picture.
When highlighting the option you select, the file information will appear on the right and picture will be previewed in the center.

Music Menu
Press ◀ / ▶ button to select MUSIC in the main menu, then press Enter button to enter. Press Exit button to return to the previous menu and exit menu to quit.
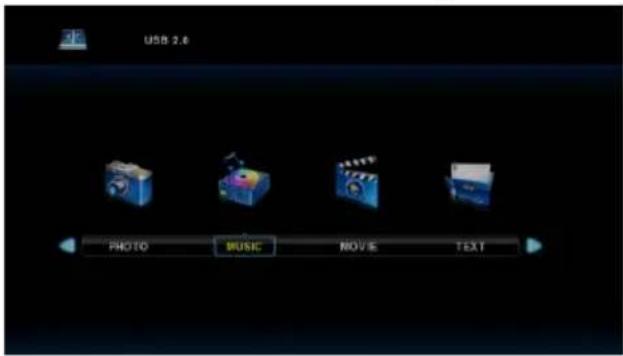

Press ◀ / ▶ button to select drive disk you want to watch, then press Enter button to enter. Press ◀ / ▶ button to select return option to the previous menu.

Movie Menu
Press ◀ / ▶ button to select MOVIE in the main menu, then press Enter button to enter.
Press Exit button to return to the previous menu and exit menu to quit.

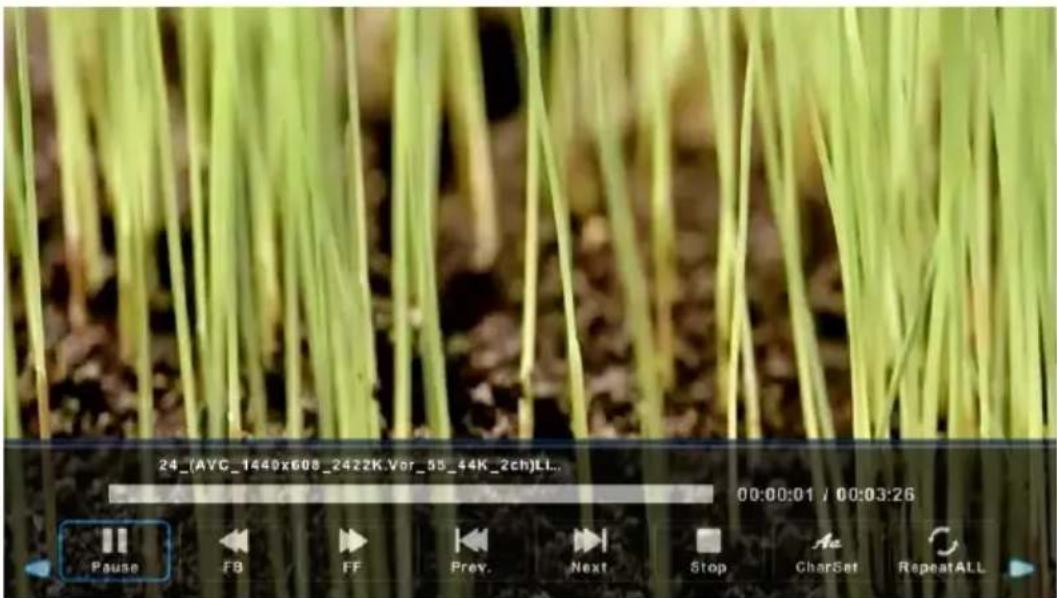
Press ◀ / ▶ button to select drive disk you want to watch, then press Enter button to enter. Press media button to play the selected movie.
Press display button to select menu in the bottom you want to run, then press Enter button to operate.
Press Exit button to back to the previous menu and exit button to quit the entire menu.
Text Menu
Press ◀ / ▶ button to select TEXT in the main menu, then press Enter button to enter.
Press Exit button to return to the previous menu and exit menu to quit.

Press ◀ / ▶ button to select drive disk you want to watch, then press Enter button to enter.
Press ◀ / ▶ button to select return option to back to the previous menu.

Troubleshooting
No image and voice


Possible causes:
*Power cord, antenna or input devices are not connected;
*The TV se is not powered on.
Resolutions:
*Check Power cord, antenna and input devices;
*Press Power key on the remote control;
*Press Power key on the set to power it off for 5 secpmds and then re-power it on.
No voice

Possible causes:
*The volume is too low; Muted or cancelled;
*Incorrect sound system.
Resolutions:
*Press Volume key to turn up the volume;
*Press Mute key to cancel Mute mode.
Well connect vonconnection to the background sound;
*Change the sound system in the menu.
Snows and noises:


Possible causes:
*The cable is damaged or gets loose;
*Incorrect channel preset;
*Improper antenna positioning.
Resolutions:
*Check whether the connection of the antenna cable,
DVD and the cables is correct;
*Reset channels or fine tune the channel;
*Adjust the direction of the antenna.
Achromatic colour

Possible causes:
*Incorrect Colour system settings; Low chroma level setting ;
*Improper antenna positioning.
Resolutions:
*Change the colour system into the local system in the menu;
*Increase chroma level;
*Adjust the direction of the antenna.
Remote control is no effect :
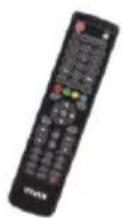

Possible causes:
*Battery runs up;
*Incorrect battery loading;
Resolutions:
*Check the battery electricity or replace the battery;
*Check if the poles of the battery are correct.
POŠTOVANI!
Zahvaljujemo na kupnji Vivax uređaja i nadamo se da ćete biti zadovoljni odabirom. Ako u jamstvenom roku bude potreban popravak proizvoda, molimo savjetujte se sa ovlaštenim prodavačem koji Vam je proizvod prodao ili nas kontaktirajte na dolje navedene brojeve i adrese. MOLIMO VAS DA PRIJE UPORABE PROIZVODA PAŽLJIVO PROČITATE UPUTE PRILOŽENE UZ PROIZVODI
JAMSTVENI LIST
VIVAX
HR
MODEL UREĐAJA
SERIJSKI BROJ
DATUM PRODAJE
BROJ RAČUNA PRODAVATELJA
POTPIS I PEČAT PRODAVATELJA
-
Ovim jamstvom M SAN Grupa kao davatelj jamstva u Republici Hrvatskoj jamči besplatan popravak istog u skladu s važećim propisima i u skladu s uvjetima opisanim u ovom jamstvenom listu. Ovim jamstvom jamčimo da će predmet ovog jamstva raditi bez pogreške uzrokovane eventualnom lošom izradom ili lošim materijalom izrade. Svi, eventualno nastali, kvarovi biti će besplatno otklonjeni u ovlaštenom servisu u jamstvenom roku.
-
UVJETI JAMSTVA Jamstveni rok počinje od dana kupnje proizvoda i traje 12 mjeseci, osim za Vivax Imago televizore (CRT, LCD, PDP) za koje jamstvo traje 24 mjeseca.
-
U slučaju kvara na proizvodu koji je predmet ovog jamstva, obvezujemo se da ćemo isti popraviti u najkraćem mogućem roku, a najkasnije u roku od 45 dana. Ako se proizvod ne može popraviti ili se ne popravi u roku od 45 dana, biti će zamijenjen novim. Jamstvo će biti produženo za vrijeme trajanja popravka.
-
Jamstvo se priznaje samo uz račun o kupnji, te uz ovaj jamstveni list koji mora biti ispravno popunjen odnosno mora sadržavati datum prodaje, pečat i potpis prodavatelja.
5. JAMSTVO NE OBUHVAĆA
POTPIS I PEČAT PRODAVATELJA
- Ovom garancijom garantira proizvođač proizvoda, preko KIM TEC d.o.o., kao uvoznika i davatelja garancije u Republici Bosni i Hercegovini besplatan popravak istog u skladu s važećim propisima i u skladu s uvjetima opisanim u ovom garantnom listu. Ovom garancijom garantiramo da će predmet ove garancije raditi bez greške uzrokovane eventualnom lošom izradom i lošim materijalom izrade. Svi eventualno nastali kvarovi biti će besplatno otklonjeni u ovlaštenom servisu u garantnom roku.
- UVJETI GARANCIJE Garantni rok počinje teći od dana kupnje proizvoda i traje 12 mjeseci, osim za Vivax Imago televizore (CRT, LCD, PDP) za koje jamstvo traje 24 mjeseca.
- U slučaju kvara na proizvodu koji je predmet ove garancije, obavezujemo se da ćemo isti popraviti u najkraćem mogućem roku, a najkasnije u roku od 45 dana. Ako se proizvod ne može popraviti ili se ne popravi u roku od 45 dana, biti će zamijenjen novim. Ako popravak proizvoda traje duže od 10 dana, garancija će se produžiti za vrijeme trajanja popravka.
- Garancija se priznaje samo uz račun o kupnji, te uz ovaj garantni list koji mora biti ispravno popunjen odnosno mora sadržavati datum prodaje, pečat i potpis prodavatelja.
- Davalac garancije osigurava servis i rezervne dijelove 7 godina od datuma kupnje.
- GARANCIJA NE OBUHVAĆA
POTPIS I PEÇAT PRODAVCA
- Ovom izjavom o saobraznosti proizvođač proizvoda, preko KIM TEC CG d.o.o., kao uvoznika i davaoca prava u Crnoj Gori besplatan popravak istog u skladu s vazećim propisima i u skladu s uslovima opisanim u ovoj izjavi o saobraznosti.
- Ovom izjavom o saobraznosti istićemo da će predmet ovog prava raditi bez greške uzrokovane eventualnom lošom izradom i lošim materijalom izrade. Svi eventualno nastali kvarovi biće besplatno otklonjeni u ovlašćenom servisu u predvidjenom roku za reklamaciju.
• USLOVI REKLAMACIJE: Rok za reklamaciju počinje teći od dana kupovine proizvoda i traje 24 mjeseca. - U slučaju kvara na proizvodu koji je predmet reklamacije, obavezujemo se da ćemo isti popraviti u najkraćem mogućem roku, a najkasnije u roku od 15 dana. Ako se proizvod ne može popraviti ili se ne popravi u roku od 15 dana, biće zamijenjen novim.
- Pravo na reklamaciju se priznaje uz fiskalni račun o kupovini, i uz ovu izjavu o saobraznosti koja mora biti ispravno popunjena, odnosno morasadržati datum prodaje, pečati potpis prodavca.
- Davalac izjave o saobraznosti osigurava servis i rezervne djelove 7 godina od datuma kupovine.
PRAVO NA REKLAMACIJU NE OBUHVATA
OBAVEZE POTROŠAČA
- Da se pridržava priloženog uputstva za upotrebu i pravilnika o upotrebi proizvoda
- Da eksploataciju opreme vrši u skladu sa priloženim uputstvom za upotrebu, navedenim u pripadajućoj tehničkoj dokumentaciji.
- Da obezbedi odgovarajući čslovedu kome će uređaj biti smešten:
• Temperatura vazduha 10-40 °C
• Relativna vlažnost vazduha od 10 do 90%
• Zaštita od direktnog sunčevog zračenja
• Zaštita od prašine i kondenzacije - Zaštita od raznih vrsta elektromagnetnih zračenja
- Da obezbedi stabilan izvor mrežnog napajanja (varijacije napona max. 10%, varijacije učestanosti max. 30%).
- Da obezbedi uzemljenu elektroinstalaciju, da bi se izbegle razlike potencijala, naročito ako se radi o dislociranoj opremi, koja je povezana (LAN mreže, Unix/Xenix terminali i si.).
- Da po mogućstvu sačuva i dostavi priloženu tehničku dokumentaciju u toku trajanja reklamacionog roka.
- Da instalaciju / servis poveri isključivo ovlašćenim licima kao i da pazi da ne ošeti kontrolnu nalepnicu.
IZJAVA UVOZNIKA/DISTRIBUTERA
- Proizvodi imaju propisane, odnosno deklarisane karakteristike kvaliteta.
- Proizvod će ispravno funkcionisati ako se korisnik pridržava uputstava iz priložene tehničke dokumentacije
- Trgovac je dužan je da vodi računa o ispravnom popunjavanju i overi Osnovnih podataka o proizvodu iz ovog lista
- Proizvođač definišu kao potrošni materijal proizvode / delove proizvoda kao što su toneri, kertridži, glave ink jet štampača, valjci za povlačenje, mehanizam za transport papira, baterije i sve ostalo slično navedenom, a shodno izjavi proizvođača.
Za utvrđivanje i otklanjanje nesaobraznosti u najkraćem mogućem roku, preporučujemo Vam najbliži servis sa priložene liste:
CENTRALNI SERVIS: KimTec servis d.o.o., Viline Vode bb, Slobodna Zona Beograd L12/3, Beograd, Tel. 011/20-70-684, Fax. 011/20-70-689 servis@kimtec.rs, www.kimtecservis.rs
| ME STO | NAZIV ADRESA TELEFON | ||
| Čačak | Quartz | Kneza Miloša 102 | 032/34-84-14 |
| Jagodina | RTV servis Aleksandar | Stevana Prvovenčanog BB TC YASSA | 035/245-570 |
| Kikinda | Karanović | Zmaj Jovina 2 | 0230/439-132 |
| Kladovo Omega elektronik | Trg Kralja Petra bb | 019/801-380 | |
| Kragujevac | Fokus | Ljubiše Bogdanovića 14 | 034/314-400 |
| Kraljevo | ETC servis | Dimitrija Tucovića 10,lok.13 | 036-234-517 |
| Kruševac | Electron | Stojana Miloševića 6 | 037/421-792 |
| Leskovac | TNT | Južnomoravskih brigada 156 B3 L8 | 016/223-789 |
| Leskovac | Vera szd | Stanoja Glavaša 9 | 016/237-855 |
| Loznica | C electronic | Karadjordjeva 26 | 015/893-560 |
| Mladenovac | On-line sztr | Milutina Milankovića 14/1 | 011/ 823-4813 |
| Niš | MD servis centar | Save Kovačevića 11 A | 018/4524-072 |
| Novi Pazar | Elmaz ETT | Generala Živkovića 66 | 020/390-100 |
| Novi Pazar | Elektrotehna | 1.maj 154 | 020/337-250 |
| Novi Sad | Spektar | Branimira Ćosića 23 | 021/477-80-44 |
| Obrenovac | SZER Pionir | Miloša Obrenovića 23 | 011/8721-386 |
| Obrenovac | Market servis Zlatko | Vuka Karadžića 105 | 011/87-24-214 |
| Pančevo | Bundalo | Đerdapska 16 | 013/371-530 |
| Pirot | DS elektronika | 7.juli br.6 | 010/313-690 |
| Požarevac | SR AVS | Kosančićeva 23 - 2 012/556-188, 012/556-189 | |
| Prokuplje | Solon | Ratka Pavlovića 195 | 027/325-466 |
| Sombor | Megatronic | Gruje Dedića 24 | 025/440-440 |
| Sremska Mitrovica | C electronic | Parobrodska 5 | 022/615-972 |
| Subotica | AVC | Luke Sučića 9 | 024/555-598 |
| Subotica | WM servis | Ruzmarina 2 ; PJ Frankopanska 36 | 024/523-765 |
| Šabac | Central service doo | Prote Smiljanića 52 | 015/319-530 |
| Šabac | Digipro doo | Jele Spiridonović Savić 22 | 015/300-450, 015/300-451 |
| Šid | SPIN | Cara Dušana 65 | 022/715-282 |
| Ub | Omega elektronik | Milana Munjasa 48 | 014/411-936, 014/410-884 |
| Užice | Radio elektro | Nikole Pašića 39 | 031/512-796 |
| Valjevo | TV servis Spasojević | Hajduk Veljkova 4 | 014/220-343 |
| Vranje | 5 com | Trg Bratstva jedinstva 10 | 017/404-994 |
| Vršac | Spektar | Nikite Tolstoja 49 | 013/838-961 |
| Zaječar | Electron | Ljube Nešića 88 | 019/424-946 |
| Zrenjanin | Servis Pakoci | Milana Stanivukovića 92 | 023/563-920 |
Ovlašćeni servis :
KIM-TEC SERVIS d.o.o Beograd, Viline vode bb, Slobodna zona Beograd L12/3, telefon 011/207-06-84, servis@kimtec.rs
| SERVISNI KUPON BR.1 | ||
| Naziv: | Ser. br. | Datum prijema: |
| Opis kvara: | Datum predaje: | |
| Opis radova ugrađeni delovi: | Servisirao: | |
| SERVISNI KUPON BR.2 | ||
| Naziv: | Ser. br. | Datum prijema: |
| Opis kvara: | Datum predaje: | |
| Opis radova ugrađeni delovi: | Servisirao: | |
| SERVISNI KUPON BR.3 | ||
| Naziv: | Ser. br. | Datum prijema: |
| Opis kvara: | Datum predaje: | |
| Opis radova ugrađeni delovi: | Servisirao: | |
Za klima uređaje:
Redovni godišnji servis vašeg klima uređaja, omogućava uređaju siguran i kvalitetniji rad.
Ukoliko obavite po jedan godišnji servis u naredne dve godine, automatski stičete pravo na servisiranje reklamacije bez naknade troška još dodatnih 12 meseci. Godišnji servis korisnik finansira iz sopstvenih sredstava.
SERVISNI PREGLED Servis / Montažer ____
Datum:
Važi do: ____
M.P.
SERVISNI PREGLED
Servis / Montazer
Datum: ____
Važi do: ____
M.P.
ПОЧИТУВАНИ!
Kosova Electronic Service Center
Kosova Electronic Service Center
-VIVAX Air Conditions; White Goods and Small Home Appliances
PRODUCT FICHE - INFORMACIJSKI LIST - INFORMATIVNI LIST ИНФОРМАТИВЕН ЛИСТ - INFORMACION GUIDE
Model: Vivax LED TV-24LE75T2
| A | PRODUCT FICHE | INFORMACIJSKI LIST | |
| B V | VAAxD | Robna marka | |
| C LED | DyTV | Tip uređaja | |
| D LED | DyTV 24LE75T2 | Model | |
| E | Energy Efficiency class | Razred energetske učinkovitosti | A |
| F 24" | Vsa 60cmeen Size | Dijagonala vidljivog zaslona | |
| G | On mode average power consumption (W) | Potrošnja el. energije u stanju uključenosti (W) | 24 |
| H | Annual energy consumption (kWh/Annum) * | Godišnja potrošnja energije (kWh/god) * | 35 |
| I <0.5 | Standby Power consumption (W) | Potrošnja energije u stanju mirovanja (W) | |
| J | Off mode power consumption (W) | Potrošnja energije u stanju isključenosti (W) | 0 |
| K 19 | 20-21-1080 pin | Rezolucija zaslona | |
| * | Based on the power consumption of the television operating 4 hours per day for 365 days. The actual energy consumption will depend on how the television is used. | Potrošnja energije kWh godišnje, na osnovi potrošnje električne energije televizora koji je u funkciji 4h dnevno 365 dana. Stvarna potrošnja energije ovisit će o načinu na koji se televizor koristi. |
- Sigurnost
- Auto Tuning
- Izbornik kanala
- ATV ručno ugađanje
- DTV ručno ugađanje
- Uređivanje programa
- Lista rasporeda
- Informacije o signalu
- Izbornik video zapisa
- Izbornik teksta (Text Menu)
- Bezbednost
- Sadržaj
- Мени за канали
- Audio jazik
- Мени музички записи
- Мени видео записи
- Мени Текст (Text Menu)
- Vendosje automatike
- Menuja e kanaleve
- Informacione mbi sinjalin
- Kyçja prindërore (Parental Guidance
- Instalimi i parë(First Time Installation)
- Menuja e videos
- Menuja e tekstit (Text Menu)
- Attaching the Stand to the TV
- Assemble the stand
- TV-24LE75T2
- Warning
- Safety
- Table of Contents
- Product introduction
- Brief Introduction
- Control panel
- POWER
- ② INPUT
- ③ MENU
- ④ VOL -
- ⑤ VOL +
- ⑥ CH-
- ⑦ CH+
- Connecting Cables
- Descriptions of Television Remote Control
- TV MODE:
- TEXT Button
- .REVEAL Button
- SIZE Button
- 29.INDEX Button
- .S.TITLE Button
- S.PAGE Button
- .HOLD Button
- 33.FAV Button
- .RADIO Button
- 36.R.LIST Button
- FAV-button
- FAV+ button
- Notes:
- First Time Setup
- Channel Menu
- Menu Operation
- ATV Manual Tuning
- DTV Manual Tuning
- Program Edit
- Schedule List
- Signal Information
- Picture Menu
- Picture Mode
- Contrast/ Brightness/ Color/ Tint / Sharpness
- Color Temp
- Noise Reduction
- Sound Menu
- Sound Mode
- Balance
- Auto Volume level
- SPDIF Mode
- AD Switch
- NOTE:
- Time Menu
- Time Zone
- Sleep Timer
- Auto Standby
- OSD Timer
- Lock Menu
- Lock System
- Set Password
- Channel Lock
- Parental Guidance
- Key Lock
- Hotel Mode
- Source Lock
- Default Source
- Default Prog
- Max Volume
- Clear Lock
- Setup Menu
- OSD Language
- TT Language
- Audio Languages
- Subtitle Language
- Hearing Impaired
- PVR File System
- Aspect Ratio
- Blue Screen
- First Time Installation
- Reset
- Software Update(USB)
- HDMI CEC
- Screen Menu(Only PC Mode)
- Auto Adjust
- H-Offset.
- V-Offset
- Size
- Phase
- Position Reset
- USB
- Photo Menu
- Music Menu
- Movie Menu
- Text Menu
- Troubleshooting
- No image and voice
- Possible causes:
- Resolutions:
- No voice
- Snows and noises:
- Achromatic colour
- Remote control is no effect :
- POŠTOVANI!
- JAMSTVENI LIST
- VIVAX
- HR
- MODEL UREĐAJA
- SERIJSKI BROJ
- DATUM PRODAJE
- BROJ RAČUNA PRODAVATELJA
- POTPIS I PEČAT PRODAVATELJA
- JAMSTVO NE OBUHVAĆA
- PRAVO NA REKLAMACIJU NE OBUHVATA
- OBAVEZE POTROŠAČA
- IZJAVA UVOZNIKA/DISTRIBUTERA
- Za klima uređaje:
- PRODUCT FICHE - INFORMACIJSKI LIST - INFORMATIVNI LIST ИНФОРМАТИВЕН ЛИСТ - INFORMACION GUIDE
Brand : Vivax
Model : TV-24LE75T2
Category : Television