
TPC-802 3G - Graphic tablet Vivax - Free user manual and instructions
Find the device manual for free TPC-802 3G Vivax in PDF.


| Product Type | Graphic Tablet (Tablet PC) |
| Model | TPC-802 3G |
| Brand | Vivax |
| Operating System | Android (likely) |
| Display | 8-inch (estimated from model name) |
| Processor | Not specified; typical for entry-level tablet |
| RAM | Not specified; typical 1 GB (estimated) |
| Storage | Not specified; expandable via microSD card |
| Cameras | Front webcam; rear camera (unspecified resolution) |
| Connectivity | Wi-Fi 802.11 b/g/n, Bluetooth 4.0, 3G mobile data, Micro USB 2.0 |
| Sensors | Accelerometer (auto-rotate) |
| Battery | Lithium-ion, rechargeable; capacity not specified; charging time ~4 hours |
| Dimensions | Not specified; typical 8-inch tablet: approximately 200 x 120 x 10 mm |
| Weight | Not specified; typical 350-400 g |
| Audio | Built-in speaker, microphone, 3.5 mm headphone jack |
| Supported Audio Formats | MP3, AAC, WAV, etc. |
| Supported Video Formats | Not specified; typical H.264, MP4 |
| Keyboard | On-screen virtual keyboard |
| FM Radio | Yes, requires headset as antenna |
| GPS | Not mentioned; likely no |
| SIM Card | Yes (for 3G data); standard SIM |
| Memory Card | microSD up to 32 GB (estimated) |
| SAR Value (Head) | 1.647 W/Kg (10g) |
| SAR Value (Body) | 1.650 W/Kg (10g) |
| Warranty | 12 months (Europe) |
| Cleaning | Use a damp soft cloth; no liquid or aerosol cleaners |
| Operating Temperature | -10°C to +55°C (charging) |
Frequently Asked Questions - TPC-802 3G Vivax
User questions about TPC-802 3G Vivax
0 question about this device. Answer the ones you know or ask your own.
Ask a new question about this device
Download the instructions for your Graphic tablet in PDF format for free! Find your manual TPC-802 3G - Vivax and take your electronic device back in hand. On this page are published all the documents necessary for the use of your device. TPC-802 3G by Vivax.
USER MANUAL TPC-802 3G Vivax
User manual / Service points
EN
User manual
TPC-802 3G
HR BIH CG
Upute za uporabu
Tablet
Sadržaj
I. Upozorenja .... 3
1 Sigurnosne informacije....3
1.1 Važne upute za promet .... 3
1.2 Isključivanje u bolnici .... 3
1.3 Isključivanje u zrakoplovu....3
1.4 Isključivanje prilikom ulijevanja goriva u automobil .... 3
1.5 Isključivanje u blizini područja eksplozije....3
2 Upozorenja za upotrebu Tablet PC-a....3
2.1 Smetnje 3
2.2Razumna upotreba....3
2.3 Kvalificirane usluge održavanja 3
2.4 Otpornost na vodu 3
3 Predostrožnosti kod upotrebe baterija .... 3
4 Upozorenja za djecu ....3
II. Početno pokretanje....4
1 Baterija 4
1.1 Uklanjanje/Umetanje baterije....4
1.2 Punjenje baterije 4
2 Povezivanje s mrežom....4
2.1 Uklanjanje/Umetanje memorijske kartice. 4
2.2 UKLJUČIVANJE/ISKLJUČIVANJE 4
2.3 Povezivanje s mrežom 4

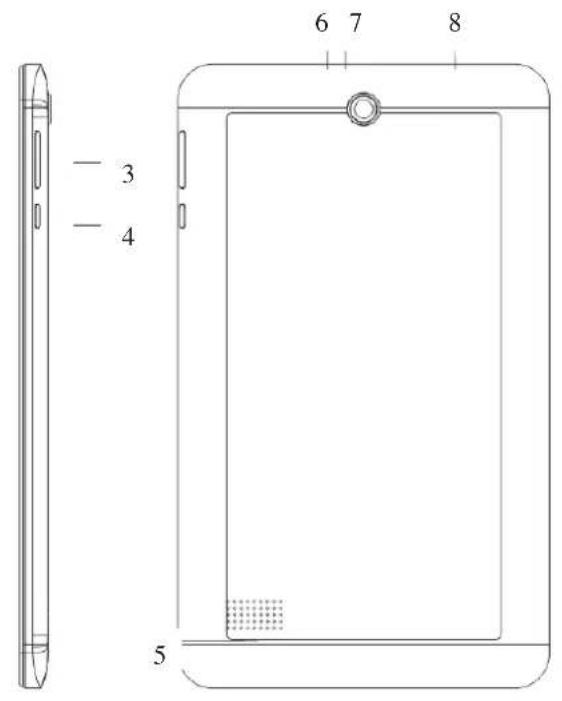
| 1 | Slušalica | 2 | Web kamera |
| 3 | Jačina zvuka +/- | 4 | Uključivanje/Isključivanje |
| 5 | Zvučnik | 6 | Ponovno pokretanje |
| 7 | Tablet pc | 8 | Micro USB |
■ Opis funkcija:

| 1 | Slušalica | 2 | Web kamera |
| 3 | Jačina zvuka (+/-) | 4 | Uključi/Isključi |
| 5 | Zvučnik | 6 | RESET |
| 7 | Tablet PC | 8 | Micro USB |
■ Opis funkcija:
| Power taster | Kratko pritisnite za “spavanje/buđenje”, a držite pritisnutim za pokretanje ili gašenje uređaja. |
| Jačina zvuka + | Pojačava jačinu zvuka |
| Jačina zvuka - | Smanjuje jačinu zvuka |
| HOME taster |  | Kliknite u bilo kojem interfejsu za povratak na glavni interfejs |
| Back taster |  | Kliknite za povratak na prethodni meni |
| Menu taster |  | Ovaj taster prikazuje se u interfejsu menija |
| Setting taster |  | Prikazuje istoriju nedavnih pregleda |
I. Upozorenja
Pročitajte pravila. Nepoštovanje pravila može da dovede do opasnosti ili kršenja zakona.
SAR (Specific Absorption Rate)
1 Safety Information....3
1.1 Traffic Safety First....3
1.2 Turn Off in Hospital .... 3
1.3 Turn Off in Airplane 3
1.4 Turn Off When Refueling....3
1.5 Turn Off near Blasting Sites .... 3
2 Cautions on Tablet PC Use....3
2.1 Interference....3
2.2 Reasonable Use .... 3
2.3 Qualified Maintenance Service 3
2.4 Water-Resistance....3
3 Precautions for use of Battery....3
4 Cautions for Children .... 3
II. Start to Use....4
1 Battery....4
1.1 Remove/Insert the Battery....4
1.2 Charge the Battery .... 4
2 Connecting to Network 4
2.1 Insert/Remove the Memory Card....4
2.2 Switch ON/OFF 4
2.3 Connection to Network 4
III. Function Menu Instruction .... 5
- Browser 5
- Calculator .... 5
- Calendar 5
- Camera 5
- Clock....5
- Downloads....6
- Email....6
- Facebook 6
- File Explorer ...... 6
- FM Radio 6
- Gallery....6
- Email....6
- Search....6
- Music....7
- Settings....7
- Sound Recorder 9
IV. Input 9
V. Quick Start Guide 9
■ Keys Function
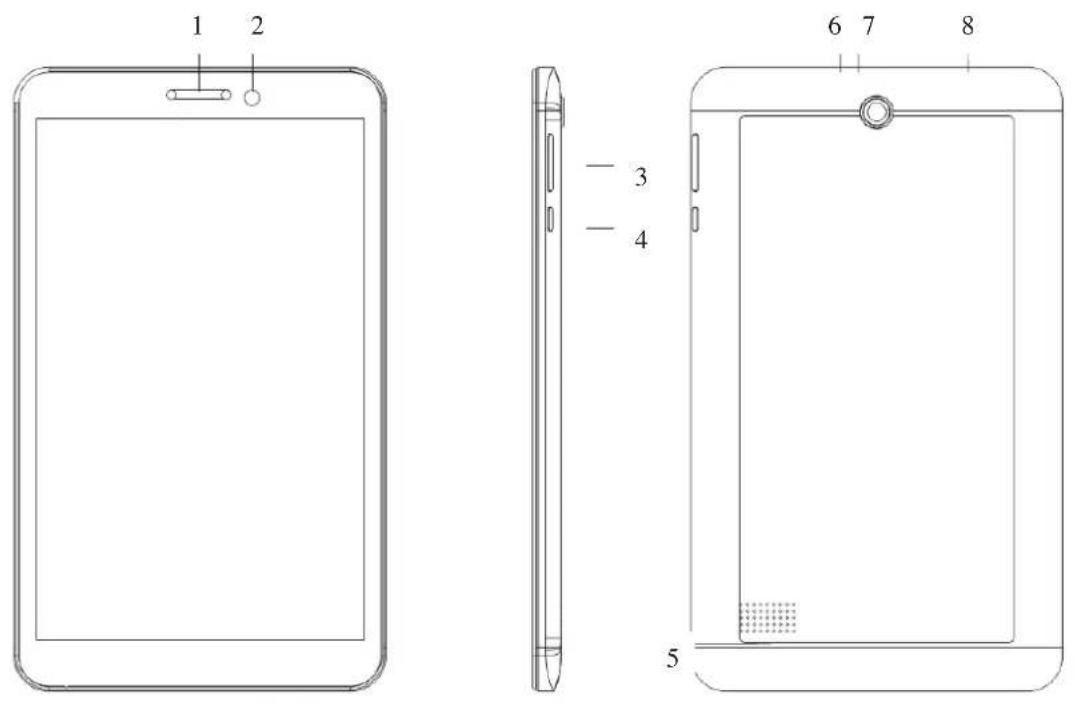
| 1 | Receiver | 2 | Webcam |
| 3 | Volume +/- | 4 | Power on/off |
| 5 | Speaker | 6 | RESET |
| 7 | Tablet pc | 8 | Micro USB |
■ Keys Function Description:
| Power button | Short press to sleep/wake up, long press to startup and shutdown. |
| Volume + (up) | increase the volume |
| Volume - (down) | decrease the volume |
HOME button (home)  | Click it in any interface will return to main interface. |
Back button (back)  | click it in any interface will return to previous menu |
Menu button  | This button will display in menu interface. |
Setting button  | display recently browsed history |
I. Cautions
Please read the concise rules. The breach of the rules may result in danger or violation of law.
1 Safety Information
1.1 Traffic Safety First
Please use the Tablet PC carefully when you drive a car. Park your car at roadside and then use the it if the driving condition is bad.
1.2 Turn Off in Hospital
Please abide by relevant provisions or regulations. Please turn off your WIFI near medical equipment.
1.3 Turn Off in Airplane
Wireless equipment has disturbance in the airplane, so the use of the WIFI in airplane is dangerous and illegal.
1.4 Turn Off When Refueling
Please don't use the Tablet PC in gas station or near fuels or chemicals.
1.5 Turn Off near Blasting Sites
Don't use the Tablet PC in blasting sites. Please observe relevant restrictions and carry out rules or regulations.
2 Cautions on Tablet PC Use
2.1 Interference
All tablet pcs may be interfered, which affect tablet pc calls.
2.2 Reasonable Use
Use only in the normal position. Do not touch the antenna area unnecessarily.
2.3 Qualified Maintenance Service
Only qualified personnel may install or repair this product.
2.4 Water-Resistance
Your device is not water resistant. Keep it dry.
3 Precautions for use of Battery
3.1 Do not dispose of batteries near or in a fire to avoid dangers.
3.2 Do not dispose of batteries in the garbage. Dispose of batteries to assigned battery recycling center.
4 Cautions for Children
Keep your device out the reach of children in case of accidental injury caused by incorrect use of the device as toys.
II. Start to Use
1 Battery
The battery which is initially 50% charged can be used immediately. Please fully charge/discharge the battery for the first three times to get maximum capacity.
1.1 Remove/Insert the Battery
■ Installing the battery
- Take out the back cover of the Tablet PC;
- Insert the battery to the correct battery pin and push it down to fix.
- Cover the back cover.
■ Remove the battery
Remove the battery according to the remove guide or sticker.
Note:
(1) Remove the battery before shutdown.
(2) Be sure to operate in accordance with the above method steps.
1.2 Charge the Battery
During charging, the battery indicator on the Tablet PC is a thunder icon. If the device is switched off during the charge, there will still be a charge indication on the screen that shows the tablet pc is still being charged. If the device is overused when the battery is low, it might take some time to appear the charging icon.
When the battery indicator on the screen says 'fully charged', then thunder icon will disappear, which means the completion of charging. If the tablet PC is switched off during charging, the screen will have a 'fully charged' scene. It generally takes 4 hours to charge the battery. During charging, the battery, the device and the charger will get hot. This is normal.
Attention: Charge the Tablet PC in a well ventilated place in which the temperature is from-10°C to +55°C. Use the charger provided by the manufacturer only. The use of unconfirmed charger may lead to dangers and violate the manufacturer's warranty clause. If the temperature is too high or too low during the charge, the device will automatically send a warning and stop charging to avoid damage to the battery or any danger.
2 Connecting to Network
2.1 Insert/Remove the Memory Card.
■ Switch off the Tablet PC.
■ Insert the memory card into the slot
■ Attention: This tablet PC doesn't support the hot-swap of T card. When you need to take out the inserted card, please switch off the device before taking out the memory card.
2.2 Switch ON/OFF
Do a long press the Switch on/off key to switch on/off the Tablet PC.
2.3 Connection to Network
When turn on the WIFI, the tablet will automatically search for available network. It will show
the information of the network provider, the status bar will show the signal strength and the network condition once the tablet PC is successfully connected to a network.
Attention: If the status bar shows "Empty in White Color", it means that you're out of network coverage (service coverage).
III. Function Menu Instruction
1. Browser
Select the browser icon to enter the Google Interface and you can search for websites.
2. Calculator
The Tablet PC is provided with a calculator with basic functions. You can carry out the operation for plus, minus, multiply, and divide by pressing the screen. You can use some functions in the advanced panel.
Attention: the accuracy is limited and round-off error may occur.
3. Calendar
Calendar You can add events for each day and assign reminder for specific events. Calendar page, touch the Menu button, you can also choose to refresh, search calendars to display, set operations.
4. Camera
The device comes with the camera, you can easily take photos and record video clips.
■ Photographs:
Into the camera preview screen, the camera program starts, placed horizontally tablet pc screen tie-screen display. Click on the screen below the camera icon to take a picture.
Camera interface under different icons represent different operating content See specific mobile content.
■ Camera:
Select the camera icon to switch to video camera preview screen, click on the camera icon at the bottom left. In the camera mode, click the camera icon on the bottom of the screen, and start shooting, and click again to stop shooting.
Video interface under different icon represents a different operating specific.
5. Clock
Touch set the alarm clock interface can enter the alarm interface, enter the alarm interface, touch the menu button pop-up menu options are as follows:
■ grandfather: clock: Click to return to the clock interface
■ to add Alarm clock: add more alarm entry.
■ setting: selectable silent mode, the alarm on or off, adjust the alarm volume size, select Snooze interval, set the volume button on the side of the alarm sounds.
Turn on alarm
-
Select an alarm entry into, select Enable alarm ", the right of the icon, open the green.
-
of the alarm time, repeat type, ring tones, vibration, label set.
Click "Finish" to save the alarm settings.
Note:
-
in order to ensure the alarm effect, do not set the tablet pc to silent mode.
-
alarm settings, if you replace the battery, to be carried out within one minute, otherwise the
shutdown alarm clock, Automatic Switcher, time and date information may be inaccurate or missing.
6. Downloads
You can check the downloaded or being-downloaded contents.
7. Email
First you need to set the Email account. Step 1: enter email address and password. Step 2: select account type, choose OK to connect.
8. Facebook
Facebook is a very popular social networking site around the world giving people the power to share and make the world more open and connected. Millions of people use Facebook everyday to keep up with friends uploads an unlimited number of photos, share links and videos, and learn more about the people they meet.
Please ensure that you have GPRS settings in your tablet pc to open Facebook. Contact your operator for GPRS settings.
9. File Explorer
You can manage file, including Download, Music, and Received File. Press menu key to create a new folder or select folders to copy, move and delete.
10. FM Radio
You can use your tablet PC to listen to FM radio stations once the original Headset is plugged into the accessories connector. Select FM Radio from the Menu to access the radio controls.
Attention: this handset doesn't have a built-in antenna. If you want to listen to the radio, please insert the headtablet pc first. Pressing the side key can adjust the volume.
11. Gallery
View pictures or video files stored on the memory card.
In the gallery interface, there are different folders. Select a folder and press to enter it. Press image or video to view pictures or videos.
When viewing the picture, if you press the screen, a menu with "share, delete, more" will pop out. Choose "share" to send the file through Bluetooth or via a message; press the menu key for further functions like detailed information: slideshow, set picture as, edit, and rotate left or right.
If you press the capture icon at the upper right corner, you can directly get a capture or record a video.
12. Email
Use the mailbox automatically receive mail. The user can set the time interval, take the initiative to go to the server to receive e-mail and read the body of the e-mail and attachments through mobile terminals, you can also directly reply, forward and compose a new email.
Note: To learn more business rates and other details, please consult your local carriers..
13. Search
Enter the search interface, input the search content, connection network search for relevant content. The touch of the upper left corner of the search icon can choose the searchable items, searchable items include: all, networks, applications and other..
14. Music
Use the Music player to play music files. The songs saved in your SD Card can be played using the Music Player of the device.
Click music library interface, the following options:
1 artists: in accordance with the artist's name to divide the type of songs.
2 Album: in accordance with the album name to view the songs.
3 songs: view all music list.
4 playlists: view the current playlist and pre-existing playlist.
Click on a song into the media player interface, touch the menu button pop-up menu:
■ Music Library: View native music library file.
■ party random play: random play party music.
■ add to playlist:: add the songs to the playlist.
■ as a ringtone: ringtones set to the track.
■ Delete: delete this repertoire
■ sound: open / close equalizer equalizer, editor equalizer
15. Settings
Wireless and networking
• WLAN: turn on or turn off the WLAN.
- WLAN settings: turn on or turn off the WLAN, to turn on or turn off automatic access can open network notification function or add WLAN network. Touch the menu button you can select the scan function or Advanced Settings.
- Bluetooth: turn on or off Bluetooth.
- Bluetooth settings: click to automatically search for and display the Bluetooth devices list, touch the Menu button, the Bluetooth name rename detection timeout setting, display the received file
Note:
A. display device name, search the device name is too long, it will automatically truncated to the appropriate length.
B. select pairing the device will pop up a dialog box, the user needs to enter the Bluetooth PIN match code. The two devices must use the same password. Headset or earpiece kit may use a fixed password, you can refer to the Bluetooth headset instructions. (Device can perform a lookup operation has been paired do not have to be matched.)
More
• flight mode: Turn on / off flight mode
• VPN: Add or modify the VPN network
• network sharing & portable hotspot: USB sharing networks or Bluetooth sharing network.
- WiFi Direct: start WiFi Direct operation will turn off the WLAN client / hotspot operation.
- mobile network: start the data access capabilities of the mobile network, set data roaming, the name of the access point, the priority network and network operators.
Display
• to adjust the screen brightness.
- set wallpaper
• turn on or off automatically rotate the screen.
• to adjust the delay time before the screen automatically locks
• set the tablet PC menu font size
Storage
Select the preferred installation location, and view storage space
Battery
Check the battery power consumption
Application
View what has been downloaded, SD card, running all applications
Accounts and Synchronization
Add Account sync email
Location-based services
My position:
☐ to select the location using google services.
Security
- Set up screen lock.
• turn on or off the password visible.
• to select the Device Manager.
• to select whether or not to use security credentials. - choose whether to install encrypted certificates from SD card.
• Clear credential storage of all content
Language and input method
Setting the language and default input method
Backup and reset
To reset DRM and restore the factory settings
Date and Time
• turn on or turn off automatic date & time.
• to set the date, time zone, and time.
• to select the time and date format.
Timer switch
The settings automatically start and auto-off time.
Auxiliary functions
• large font: open the function menu is displayed in large font
- press the "Power" button to end a call: open the function call, press the "Power" button to end the call and not turn off the screen.
Developer Options
Specific operation, please refer to the tablet pc, remember to exercise caution, should problems restart the tablet pc or to restore the factory settings
About tablet pc
View status messages, legal information, model and version information.
16. Sound Recorder
This equipment provides a long recording, make sure there is enough storage space for your tablet PC memory card.
Record sound
-
From the main screen, click on the "recorder"
-
Keep the tablet pc microtablet pc near the sound source.
-
Click "○" start recording sound, click on the "☐" end of the recording. After recording, click Save to save the recording, click to give up, give this recording, click ▶ Play the tape.
Tip:
Use the music player can play audio files directly.
IV. Input
-
Click the editing frame and a input option menu will pop out which include upper-case letters, lower-case letters and number mode.
-
Press to switch freely between English and Number typing.
- Press to insert facial expressions.
V. Quick Start Guide
Featured Function
Besides basic functions, your Tablet PC also has various practical and fast featured functions. They are briefly introduced as follows:
■ Music: Support playing audio files, including mp3 formats.
- Recorder: Support of sound recording and video recording.. You can check the generated recording file in the T card.
■ Camera: Support of picture-taking. You can change the camera settings to your preference.
■ Settings: You can change the Tablet PC settings to your preference, including wireless connection and network, basic settings, profiles and so on. You can change the functions of each item according to your own taste, such as date & time, schedule ON/OFF and so on.
SAFETY PRECAUTIONS
Read these safety instructions before using your device and store them for possible future reference. Always follow these basic safety precautions when using your Smartphone. This reduces the risk of fire, electric shock, and injury.
- Switch the mobile device off where the use of mobile devices is not allowed or where there is a risk of causing interference or danger, for example on board an aircraft, near medical equipment, fuel, chemicals or blasting sites.
- Do not use the phone while you are driving.
- Keep your phone and its accessories away from children.
- Cell phone can interfere with the functioning of medical devices such as hearing aids or pacemakers. People having active medical implants should keep their cell phone at least 15 cm away from the implant. Never carry wireless equipment in a breast pocket. Place such equipment at the opposite ear to the medical device. Follow the instructions provided by the medical implant manufacturer.
- Temporary or permanent hearing loss may occur if you use earphones or headphones at high volume.
- Using a headset risks not be able to correctly hear outside sounds. Do not use a headset when it could endanger your safety.
- If the charger cord is damaged, have it repaired by the manufacturer, its service or a similarly qualified person in order to avoid any hazard.
- This equipment is not water proof. Keep it dry.
- The product should be kept away from heat sources such as a radiator, heat register,
stove, or other products that generate heat.
- The battery should not be exposed to excessive heat such as sunshine, fire or similar.
- Do not attempt to service this product your self as opening or removing covers may expose you to dangerous voltage or other hazards and will void your warranty. Refer all servicing to qualified service personnel.
- Should there be slots and openings in the mobile device, they are provided for ventilation to ensure reliable operation of and protection from overheating. These openings should never be blocked by placing the product on a bed, sofa, rug, or other similar surface.
- Do not use liquid cleaners or aerosol cleaners. Use a damp soft cloth for cleaning.
- Files you download from the Internet can include viruses that will damage your device. To reduce this risk, only download files from sources you trust.
Hereby, MS Industrial Limited declares that the radio equipment is in compliance with Directive 2014/53/EU. The full text of the EU declaration of conformity is available at the following internet address: http://www.msan.hr/dokumentacijaartikala/
Operating instruction for your device is available at http://hr.vivax.com/ To download the instruction for use, follow instruction below.
- Open http://hr.vivax.com/ and click on PRODUCTS→smart
- Click on your devices model → Documents
- Select → User's Manual
SAR (Specific Absorption Rate)
Highest SAR value for this device:
Head:1.647(W/KG 10g)
Body: 1.650(W/KG 10g)
POŠTOVANI!
Zahvaljujemo na kupnji Vivaxuređaja i nadamo se da čete biti zadovoljni odabirom. Ako u jamstvenom periodu bude potreban popravak proizvoda, molim savjetujte se sa ovlaštenim prodavačem koji Vam je proizvod prodao ili nas kontaktirajte na dolje navedene brojeve i adrese. MOLIMO VAS DA PRIJE UPOTREBE PROIZVODA PAŽLJIVO PROČITATE TEHNIČKU DOKUMENTACIJU I UPUTE KOJI SU PRILOŽENI UZ PROIZVODI
JAMSTVENI LIST
VIVAX
HR
MODEL UREĐAJA
SERIJSKI BROJ
DATUM PRODAJE
BROJ RAČUNA PRODAVATELJA
POTPIS I PEČAT PRODAVATELJA
- Ovim jamstvom jamči
proizvođač proizvoda, preko M SAN GRUPA d.d, kao uvoznika i davatelja jamstva u Republici Hrvatskoj besplatan popravak istog u skladu s važećim propisima i u skladu s uvjetima opisanim u ovom jamstvenom listu. Ovim jamstvom jamčimo da će predmet ovog jamstva raditi bez greške uzrokovane eventualnom lošom izradom i lošim materijalom izrade. Svi eventualno nastali kvarovi biti će besplatno otklonjeni u ovlaštenom servisu u jamstvenom roku.
- UVJETI JAMSTVA Jamstveni rok počinje teći od dana kupnje proizvoda i traje 12 mjeseci.
- U slučaju kvara na proizvodu koji je predmet ovog jamstva, obavezujemo se da ćemo isti popraviti u razumnom roku - 45 dana Ako se proizvod ne može popraviti ili se ne popravi u razumnom roku - 45 dana, biti će zamijenjen novim. Jamstvo na uređaj se produžuje za ono vrijeme koliko traje popravak uređaja.
- Jamstvo se priznaje samo uz račun o kupnji, te uz ovaj jamstveni list koji mora biti ispravno popunjen odnosno mora sadržavati datum prodaje, pečat i potpis prodavatelja.
- JAMSTVO NE OBUHVAĆA
- brigade 1B, (Mejaši)
HR-21000 Split
Tel. (021) 684 000,
Fax. (021) 684 001
Radno vrijeme: 9:00 do 17:00 sati, pon-pet
POŠTOVANI!
Kosova Electronic Service Center
Kosova Electronic Service Center
-VIVAX Air Conditions; White Goods and Small Home Appliances
VIVAX
- SADRŽAJ
- UPOZORENJA .... 3
- POČETNO POKRETANJE....4
- UPOZORENJA
- START TO USE....4
- FUNCTION MENU INSTRUCTION .... 5
- INPUT 9
- QUICK START GUIDE 9
- CAUTIONS
- 1 SAFETY INFORMATION
- 1.1 TRAFFIC SAFETY FIRST
- 1.2 TURN OFF IN HOSPITAL
- 1.3 TURN OFF IN AIRPLANE
- 1.4 TURN OFF WHEN REFUELING
- 1.5 TURN OFF NEAR BLASTING SITES
- 2 CAUTIONS ON TABLET PC USE
- 2.1 INTERFERENCE
- 2.2 REASONABLE USE
- 2.3 QUALIFIED MAINTENANCE SERVICE
- 2.4 WATER-RESISTANCE
- 3 PRECAUTIONS FOR USE OF BATTERY
- 4 CAUTIONS FOR CHILDREN
- START TO USE
- 1 BATTERY
- 1.1 REMOVE/INSERT THE BATTERY
- NOTE
- 1.2 CHARGE THE BATTERY
- 2 CONNECTING TO NETWORK
- 2.1 INSERT/REMOVE THE MEMORY CARD
- 2.2 SWITCH ON/OFF
- 2.3 CONNECTION TO NETWORK
- FUNCTION MENU INSTRUCTION
- BROWSER
- CALCULATOR
- CALENDAR
- CAMERA
- CLOCK
- TURN ON ALARM
- DOWNLOADS
- FILE EXPLORER
- FM RADIO
- GALLERY
- SEARCH
- MUSIC
- SETTINGS
- WIRELESS AND NETWORKING
- MORE
- DISPLAY
- STORAGE
- BATTERY
- APPLICATION
- ACCOUNTS AND SYNCHRONIZATION
- LOCATION-BASED SERVICES
- SECURITY
- LANGUAGE AND INPUT METHOD
- BACKUP AND RESET
- DATE AND TIME
- TIMER SWITCH
- AUXILIARY FUNCTIONS
- DEVELOPER OPTIONS
- ABOUT TABLET PC
- SOUND RECORDER
- INPUT
- QUICK START GUIDE
- FEATURED FUNCTION
- SAFETY PRECAUTIONS
- POŠTOVANI
- JAMSTVENI LIST
- VIVAX
- HR
- MODEL UREĐAJA
- SERIJSKI BROJ
- DATUM PRODAJE
- BROJ RAČUNA PRODAVATELJA
- POTPIS I PEČAT PRODAVATELJA
- KOSOVA ELECTRONIC SERVICE CENTER
Brand : Vivax
Model : TPC-802 3G
Category : Graphic tablet