
LAC3705 - Car radio LG - Free user manual and instructions
Find the device manual for free LAC3705 LG in PDF.


| Product Type | Car Stereo |
| Brand | LG |
| Model | LAC3705 |
| Dimensions (W x H x D) | 178 x 50 x 160 mm |
| Weight | 0.8 kg |
| Power Supply | 12V DC (negative ground) |
| Maximum Power Output | 4 x 50W |
| RMS Power Output | 4 x 20W |
| Display | LCD with white backlight |
| Supported Media | CD, CD-R/RW, MP3, WMA |
| Tuner | FM/AM with 30 presets |
| Audio Controls | Bass, Treble, Balance, Fader |
| Inputs | Auxiliary (3.5 mm) on front |
| Outputs | RCA preamp outputs (front, rear, subwoofer) |
| Remote Control | Included (wired) |
| USB Port | Front USB for MP3/WMA playback |
| Detachable Faceplate | Yes |
| Clock | Built-in with time display |
| Equalizer | Preset EQ modes |
| Maintenance | Clean with dry cloth; avoid liquids |
| Safety | Use correct fuse rating (10A); professional installation recommended |
| Spare Parts | Replacement faceplate, remote, wiring harness available |
Frequently Asked Questions - LAC3705 LG
User questions about LAC3705 LG
0 question about this device. Answer the ones you know or ask your own.
Ask a new question about this device
Download the instructions for your Car radio in PDF format for free! Find your manual LAC3705 - LG and take your electronic device back in hand. On this page are published all the documents necessary for the use of your device. LAC3705 by LG.
USER MANUAL LAC3705 LG
CAR CD/MP3/WMA Receiver
OWNER'S MANUAL
MODEL : LAC3700, LAC3705, LAC3710, LAC3715
Before connecting, operating or adjusting this product, please read this instruction booklet carefully and completely.
The working life of this product is 7 years since the date of purchase.


Safety note

CAUTION
RISK OF ELECTRIC SHOCK DO NOT OPEN

CAUTION : TO REDUCE THE RISK OF ELECTRIC SHOCK DO NOT SPLIT COVER(OR BACK) NO USER SERVICEABLE PARTS INSIDE. REFER SERVICING TO QUALIFIED SERVICE PERSONNEL.

The lightning flash with the arrowhead symbol, within an equilateral triangle is intended to alert the user about the presence of uninsulated dangerous voltage within the product's enclosure that may be of sufficient magnitude to constitute a risk of electric shock.

The exclamation point within an equilateral triangle is intended to alert the user to the presence of important operating and maintenance (servicing) instructions in the literature accompanying the appliance.

Always operate the vehicle in a safe manner.
Do not become distracted by the vehicle while driving, and always be fully aware of all driving condition. Do not change settings, or any functions. Pull over in a safe and legal manner before attempting such operations.

Do not use for many hours at extremely low or high temperature. (-10\~60°C)

Toreduce the risk of electric shock, do not remove the cover or back of this product. There are no user-serviceable parts inside. Refer servicing to qualified service personnel.

Toreduce the risk of fire or electric shock, do not expose this product to dripping or splashing water, rain, or moisture.

The temperature of unit's outside can be extremely high, please use the unit after proper installation in your vehicle.

CAUTION : This product uses a Laser System.
To ensure proper use of this product, please read this owner's manual carefully and retain it for future reference. Should the unit require maintenance, contact an authorized service center.
Performing controls, adjustments, or carrying out procedures other than those specified herein may result in hazardous radiation exposure. Toprevent direct exposure to laser beam, do not try to open the enclosure. Visible laser radiation when open. DO NOT STARE INTO BEAM.
Safety note


- A defective or soiled disc inserted into unit can cause sound to drop out during playback.
- Handle the disc by holding its inner and outer edges.
- Do not touch the surface of the unlabeled side of the disc.

Do not stick paper or tape etc. on the surface.

Do not expose the disc to direct sunlight or excessive heat.

This unit cannot play 8cm disc (use 12cm disc only).

- Clean the disc before playback. Wipe the disc from the center outward with a cleaning cloth.
- Never use solvents such as benzine or alcohol to clean the disc.
Periodically wipe the contacts on the back of the control panel with a cotton swap moistened with alcohol.

A section whose title has one of the following symbols is applicable only to the disc represented by the symbol.
CD Audio CDs
MP3 MP3 files
WMA WMA files

Table of contents
Safety note 2-3
Table of contents 4
Before use ....5
Control panel 6
Remote control (optional) 7
Installation 8
Connection diagram 9
Connection....10
Basic operation 11-13
Radio operation 14
CD/MP3/WMA operation 15-16
Troubleshooting 17
Specifications 18

Disposal of your old appliance
- When this crossed-out wheeled bin symbol is attached to a product, it means the product is covered by the European Directive 2002/96/EC.
- All electrical and electronic products should be disposed of separately from the municipal waste stream via designated collection facilities appointed by the government or the local authorities.
- The correct disposal of your old appliance will help prevent potential negative consequences for the environment and human health.
- For more detailed information about disposal of your old appliance, please contact your city office, waste disposal service or the shop where you purchased the product.

This product is manufactured to comply with Directive 2005/83/EEC(ANNEX I, 3.2.9), 72/245/EEC, and 2006/95/EC.
Before use

Detaching the control panel
The control panel of this unit can be detached to prevent theft.
1 Press the (RELEASE) to open the control panel.
2 Hold the right part of the control panel.
3 Pull out the control panel.
4 Place the control panel in the supplied protective case.

Attachable control panel
The control panel of this unit can be detached to prevent theft.
1 Align the left side of the panel with the stopper.
2 push the right side or panel into the unit until it clicks.

Caution
- When detaching or attaching the control panel, do not press control buttons.
- The control buttons may not work properly if the control panel is not attached properly. If this occurs, gently press the display.
- Do not leave the control panel in any area exposed to high temperatures or direct sunlight.
- Do not drop the control panel or otherwise subject it to strong impact.
- Do not allow such volatile agents as benzine, thinner, or insecticides to come into contact with the surface of the control panel.

Control Panel

1 EJECT
2 [MUTE]
3 · Skip ▶▶▶I+
- Seek ▶▶▶1+
4 Remote Sensor - Optional
5 • Volume
- Power [PWR]
6 • Auto Store [AS]
- Preset Scan [PS]
- Equalizer [EQ]
7 DISC SLOT
8 · Search ▶▶ +
- Tune ▶▶ +
9 Display [DISP (CLOCK)]
10 Release
11 Select [SEL S]
12 · Search - ◀◀
- Tune -
13 Preset Station [1-6]
14 · MP3 Track +10/-10 [F+/F-] WMAM
- Folder Up/Down [F+/F-] WMA
15 Shuffle [SHF]
16 Repeat [RPT]
17 Intro Scan [SCAN]
18 Play/Pause ▶ II
19 Extreme Dynamic Sound System [XDSS]
20 [BAND]
21 · Skip - II
- Seek -
22 SOURCE [SRC S]
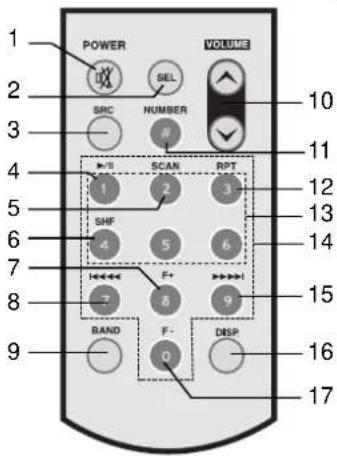
Remote control (optional)

1 Power [POWER] / Mute
2 Select [SEL]
3 Source [SRC]
4 Play / Pause ▶/II
5 Intro Scan [SCAN]
6 Shuffle [SHF]
7 • MP3 Track +10
• Folder Up [F+]
8 • CD Skip / Search I ◀◀ ◀◀
• Seek / Tune I ◀◀ ◀◀
9 [BAND]
10 Volume Up ▲Down
11 Number [#]
12 Repeat [RPT]
13 Preset Station [1-6]
14 Number [0 -9]
17 • MP3 Track -10 WMAM • Folder Down [F-] WMAM
Battery installation
1 Pull out the battery holder with a sharp product like a ball point pen.
2 Put the battery with and correctly on the battery holder.
3 Install the battery holder back into its original position.
Note
- Use only one CR2025 (3V) lithium battery.
- Remove the battery if the remote control is not used for a long period of time.
- Do not leave the product in a hot or humid place.
- Do not handle the battery with metallic tools.
- Do not store the battery with metallic materials.

Installation

Control panel
Basic Installation
Before installing, make sure that the ignition-switch is set to OFF and remove the terminal of the car battery to avoid short-circuiting.
1 Remove the existing receiver unit.
2 Make the necessary connections.
3 Install the installation sleeve.
4 Install the unit into the installation sleeve.

Removing the existing receiver unit.
If there is already an installation sleeve for the receiver unit in the dashboard, it must be removed.
1 Remove the rear support from the unit.
2 Remove the control panel and trim ring from the unit.
3 Insert the lever Ⓐ into the hole on one side of the unit. Perform the same operation on the other side and pull the unit out from the mounting sleeve.

Control panel
ISO-DIN Installation
1 Slide the unit into the ISO-DIN frame.
2 Fit screws removed from the old unit.
3 Slide the unit and frame into the dash opening.
4 Install the dash panel or adapter plate.
5 Install the trim ring to the unit.
6 Install the control panel to the unit.
Connection diagram

Before connecting, make sure that the ignition switch is set to OFF, and remove the battery terminal to avoid short circuits.
![graph TD A["Device"] -->|B ① Violet: Rear Right + B ② Violet/ Black Stripe: Rear Right - B ③ Gray: Front Right + B ④ Gray/ Black Stripe: Front Right - B ⑤ White: Front Left + B ⑥ White/Black Stripe: Front Left - B ⑦ Green: Rear Left + B ⑧ Green/ Black Stripe: Rear Left -| B A -->|A ② PHONE MUTE (ORA…](/content/2026/05/1056865/images/2268d3737885c84300c394b8be6f2f6c2035b0b3276c525616658bb69beb8ebd.jpg)

Connection
C Speaker Connections

A From antenna
B To the wiring of the vehicle colors of leads.
- BLACK: This lead is for the ground connection.
- ORANGE: This lead is for the phone line connection.
- PINK : This lead is for the dimmer line connection.
- RED: This lead is for connection to the power supply terminal when the ignition switch is set to ACC.
- YELLOW: This lead is for connection to the battery (back-up) terminal from which power is always supplied.
- BLUE : This lead is for the power antenna connection.
- BLUE/WHITE : This lead is for the remote amplifier on connection.
Connecting to Auxiliary Equipment (Optional)
Connect the AUDIO OUTPUT connector of this unit to the AUDIO INPUT connector of the Auxiliary Equipment.
![graph TD A["Device"] -->|FL (Front Left), FR (Front Right)| B["To AUDIO OUT"] A -->|RL (Rear Left), RR (Rear Right)| C["To AUDIO IN"] B --> D["Amplifier"] C --> D D --> E["To AUDIO IN"]](/content/2026/05/1056865/images/16eebfea0942732584b80ad493f689ccf7f44dfad8fe83c21267a9011de4384a.jpg)
Basic operation
Turning the unit on
Press PWR (POWER ☒ on the remote control) or any other button.
Note
When you insert the CD in the CD slot, the unit turns on.
Turning the unit off
Press PWR (or press and hold POWER ☒ on the remote control).
Selecting a source
Press SRC S repeatedly to select a source.
The indicator lights up in the following order. TUNER → CD → TUNER...
Note
You cannot select a source if a CD is not inserted.
Adjusting the volume
Rotate PWR (Press VOLUME ▲▼ on the remote control) to adjust the sound level.
Note
When you turn the unit off, the current volume level is automatically memorized. Whenever you turn the unit back on, it will operate at the memorized volume level.
Mute
1 Press MUTE (POWER ☒ on the remote control) to cut the sound.
2 T o cancel it, press again.

Basic operation
Changing the general settings
1 Press and hold SEL [S] (SEL on remote control) so that one of menu items appears.
2 Press SEL [S] (SEL on remote control) to scroll between menus.
DEMO OFF → BEEP 2ND
3 Rotate PWR clockwise or unclockwise to select one of the settings specified belows.
(Press VOLUME on the remote control.)
4 Press and hold SEL [S] (SEL on remote control) to finish the setting.
●DEMO ON / OFF
You can change the initial indication on the display to information name (function name, EQ name, etc...) while listen to a source.
DEMO ON
Displays information name while listen to source.
DEMO OFF
Cancels the function.
●BEEP 2ND / ALL
Sets the beep sound every time a button is pressed.
BEEP 2ND
The beep is generated when a key is long pressed. (1 sec)
BEEP ALL
The beep is generated when any key is pressed.
Using the EQ (Equalizer)
Press EQ repeatedly. The indicator lights up in the following order.
POP → CLASSIC → ROCK → JAZZ → VOCAL → SALSA → SAMBA → USER1 → USER2 → OFF
- POP : Optimized for R&B, Soul and Country music.
- CLASSIC : Optimized for orchestral music.
- ROCK : Optimized for Hard Rock and Heavy Metal music.
• JAZZ : Sweet sound with soft feeling.
• VOCAL : Powerful realism with strong sound quality.
• SALSA : Reproduces salsa music acoustics.
• SAMBA : Reproduces samba music acoustics. - USER1 : Use the menu to set the sound level you want.
- USER2 : Use the menu to set the sound level you want.
You can adjust each sound level to your preference. Once you select a USER mode and then make an adjustment, it automatically stored for the currently selected USER mode.
Refer to the "Adjusting the sound level" on the page 13.
Basic operation

Adjusting the sound level
1 Press SEL [S] (SEL on the remote control) repeatedly to select the mode you want to adjust from volume, bass, middle, treble, balance and fader.
The indicator lights up in the following order.
VOL → BAS → MID → TRB → BAL → FAD
2 Rotate the PWR (Press VOLUME ▲▼ on the remote control) to adjust the sound quality.
| Indication | Turn right Turn left | |
| VOL | Increase the volume level. | Decrease the volume level. |
| BAS | Increase the bass level. | Decrease the bass level. |
| MID | Increase the middle level. | Decrease the middle level. |
| TRB | Increase the treble level. Decrease the treble level. | |
| BAL | Decrease the level of the left speaker(s). | Decrease the level of the right speaker(s). |
| FAD | Decrease the level of the front speaker(s). | Decrease the level of the rear speaker(s). |
Note
When EQ and XDSS+ is set to "Off", you can adjust the sound level (BAS, MID, TRB) settings.
XDSS+ (Extreme Dynamic Sound System)
1 Press XDSS
XDSS+ : Improves the treble, bass sound.
2 T o cancel, press XDSS again.
Setting the clock
1 Press the DISP (CLOCK) and then, press and hold DISP (CLOCK) for more 1 second.
2 Press the ▶▶▶I+ to adjust the hour.
3 Press the - I◀◀ to adjust the minute.
Checking the clock
You can see the clock pressing DISP (CLOCK) (DISP. on the remote control).

Radio operation
Listening to radio stations
1 Press SRC Ⓢ to select the tuner.
2 Press the BAND repeatedly to select a band.
The indicator lights up in the following order. FM1 → FM2 → FM3 → MW(AM)
3 Auto Seek : Press - ||◀◀/▶▶I + (I◀◀ ◀◀/▶▶ ▶▶I on the remote control).
When a station is received, searching stops.
Manual Seek : Press - ◀◀/▶▶ + with quick presses.
The frequencies move up or down step by step.
Storing and recalling broadcast frequencies
You can easily store up to 6 broadcast frequencies for later recall at the touch of a button.
1 Press BAND to select desired band you want to store.
2 Select the desired frequency.
3 Press one of preset buttons 1-6 and hold until the beep sound.
The number you have pressed will flash in the preset number indicator and then remain lit. The selected radio station frequency has been stored in memory.
4 Repeat steps 1-3 to preset other stations.
The next time, you press the same preset button, the radio station frequency is recalled from the memory.
Note
- Up to 18 FM stations, 6 for each of three FM bands and 6 MW(AM) stations can be stored in the memory.
- When a station is stored on the preset numbers on which another station of the same band has already been preset, the previously preset station is automatically erased.
Auto search memory
This function lets you automatically store the 6 strongest broadcast frequencies.
1 Press and hold AS/PS.
The six strongest broadcast frequencies will be stored under preset button 1-6 in the order of their signal strength.
2 T o cancel, press AS/PS.
To scan the preset stations
Press AS/PS. Each preset station appears. To cancel, press AS/PS.
To tune in the preset stations
Press BAND to select the desired band and press the desired preset button 1-6 (preset button 1-6 on the remote control).
The preset station of the preset button 1-6 is displayed and the preset station is received.
CD/MP3/WMA operation

Playing an Audio CD and MP3/WMA Disc
The unit can play MP3/WMA formatted recordings on CD-ROM, CD-R or CD-RW discs. Before playing MP3/WMA recordings, read the notes on MP3/WMA Recordings on page 18. If you change the source, CD play also stops (without ejecting the CD). Next time you select "CD" as the source, CD play starts from where playback has been stopped previously.
- To directly play a file, press NUMBER (#) on remote control and then press the track number with 0-9 number.
Pause
1 Press ▶/H during playback.
2 T o return to playback, press▶/H again.
Skip to next track/file
Press briefly ▶▶▶I + (▶▶ ▶▶▶I on the remote control) to select the next track or file.
Skip to previous track/file
Press briefly - I◀◀(I◀◀◀◀ on the remote control) within 3 seconds of playing time.
Return to the beginning of the current track/file
Press briefly - I ◀◀◀(I ◀◀◀◀ on the remote control) after 4 seconds of playing time.
Search
Press and hold - ◀◀/▶▶ + (I◀◀ ◀◀/▶▶ ▶▶ I on remote control) for about 1 second during playback and then release at the point you want.
Intro scan
The first 10 seconds of each tracks/files (SCAN) or each files in the current selected folder (SCAN) on the disc are played.
1 Press SCAN.
- SCAN MP3 WMA (or SCAN CD) appears on the display window.
Press and hold SCAN for about 2 seconds during playback.
- SCAN appears on the display window. MP3 WMA
2 Press SCAN again.
- SCAN or ■ SCAN disappear from the display window and The intro scan is cancelled.
Repeat
The current selected tracks/files (1 RPT) or folder (■ RPT) on the disc is played repeatedly.
1 Press RPT during playback.
1 RPT appears on the display window. CD MP3 WMA
2 Press and hold RPT for about 2 seconds during playback.
- RPT appears on the display window. MP3 WMA
3 Press RPT again.
- 1 RPT or ■ RPT disappear from the display window and the repeat mode is cancelled.

CD/MP3/WMA operation
Shuffle
All of the tracks/files (SHF) or the current selected folder (■ SHF) on the disc is played randomly.
1 Press SHF during playback.
- SHF MP3 WMA (or SHF CD) appears on the display window.
Press and hold SHF for about 2 seconds during playback.
- SHF appears on the display window. MP3 WMA
2 Press SHF again.
- SHF or ■ SHF disappear from the display window and the random playback is cancelled.
Note
During random playback, if you press - I ◀◀◀(I ◀◀◀◀ on remote control), you won't go back to the previous track.
CD TEXT / ID3 TAG
When playing a disc containing information, you can see the CD TEXT/ID3 TAG information. In CD TEXT, information about the disc (disc title, performer and track title) is recorded. In a ID3 TAG, information about the file (Alburn title/ Song title/ Performer name) is recorded. In a WMA Content, information about the file (Song title/ Performer name) is recorded. If there is no information, "NO TEXT" will be shown in the display window.
Press DISP (DISP. on the remote control) repeatedly during MP3/WMA/CD TEXT file playback.
To go to a particular quickly (+10/-10 steps) MP3 WMA
(If there is no folder or one folder.)
Press F+ to skip to the next 10 track, and press F- to skip to the previous 10 track.
To skip to the next or previous folder MP3 WMA
(If there are more than two folders.)
Press F+ to skip to the next folder, and press F- to skip to the previous folder.
Note
Time display appearing on the display part when playing VBR file may vary and there may be some difference from actual time (both progress time and VBR are displayed at the same time when playing file).
Troubleshooting

| Symptom Cause Correction | ||
| Power doesn't turn on.The unit doesn't operate. | Leads and connectors are not properly connected.The fuse is blown. Noise and other factors are causing the built-in microprocessor to operate incorrectly. | Confirm once more that all connections are correct.Rectify the problem that caused the fuse to blow, and then replace it. Be very sure to install the correct fuse with the same rate.Turn the unit off and then on. |
| Playback is not possible. | The disc is dirty.The loaded disc is of a type this unit cannot play. | Clean disc.Check what type the disc. |
| No sound is heard.The volume level will not rise. | Cables are not connected correctly. | Connect the cables correctly. |
| There's no sound. | The volume level is low. | Adjust the volume. |
| There's audio skipping. | This unit is not firmly secured. | Secure this unit firmly. |
| The unit does not operate correctly even when the appropriate remote control buttons are pressed. | Battery power is low. Load new battery. | |
Specifications
MP3/WMA Disc compatibility with this unit is limited as follows:
- Sampling Frequency / 8 - 48kHz (MP3) 22.05 - 48kHz (WMA)
- Bit rate / within 8 - 320kbps (include VBR) (MP3) 32 -320kbps (WMA)
- CD-R/CD-RW file system should be "ISO 9660"
- If you record MP3/WMA files using software which cannot create a FILE SYSTEM, for example "Direct-CD" etc., it will not be possible to playback MP3/WMA files. We recommend that you use "Easy-CD Creator" which creates an ISO9660 file system.
Customers should also note that permission is required in order to download MP3/WMA files and music from the Internet.
Our company has no right to grant such permission. Permission should always be sought from the copyright owner.
GENERAL
| Output Power | .50W x 4CH (Max.) |
| Power Source | .DC 12V |
| Speaker impedance | .4Ω |
| Ground System | .Negative |
| Dimensions (W x H x D) | .181.5 x 50 x 200 mm (Without Control Panel) |
| Net Weight | .1.5 kg |
CD SECTION
| Frequency Response | .20 Hz-20 kHz |
| S/N Ratio | .80 dB |
| Distortion | .0.12% |
| Channel Separation (1kHz) | .55 dB |
RADIO SECTION
FM
| Frequency Range | .87.5-107.9, 87.5-108, 65-74 or 87.5-108 MHz |
| S/N Ratio | .53 dB |
| Distortion | .0.7% |
| Usable Sensitivity | .12 dBμV |
| AM (MW) | |
| Frequency Range | .520-1720 or 522-1620 kHz |
| S/N Ratio | .45 dB |
| Distortion | .1.0% |
| Usable Sensitivity | .28 dBμV |
Designs and specifications are subject to change without notice.
P/NO : MFL37340909


- CAR CD/MP3/WMA RECEIVER
- OWNER'S MANUAL
- MODEL : LAC3700, LAC3705, LAC3710, LAC3715
- SAFETY NOTE
- CAUTION
- RISK OF ELECTRIC SHOCK DO NOT OPEN
- TABLE OF CONTENTS
- DISPOSAL OF YOUR OLD APPLIANCE
- BEFORE USE
- DETACHING THE CONTROL PANEL
- ATTACHABLE CONTROL PANEL
- CONTROL PANEL
- REMOTE CONTROL (OPTIONAL)
- BATTERY INSTALLATION
- NOTE
- INSTALLATION
- BASIC INSTALLATION
- REMOVING THE EXISTING RECEIVER UNIT
- ISO-DIN INSTALLATION
- CONNECTION DIAGRAM
- CONNECTION
- C SPEAKER CONNECTIONS
- A FROM ANTENNA
- B TO THE WIRING OF THE VEHICLE COLORS OF LEADS
- CONNECTING TO AUXILIARY EQUIPMENT (OPTIONAL)
- BASIC OPERATION
- TURNING THE UNIT ON
- TURNING THE UNIT OFF
- SELECTING A SOURCE
- ADJUSTING THE VOLUME
- MUTE
- CHANGING THE GENERAL SETTINGS
- ●DEMO ON / OFF
- DEMO ON
- DEMO OFF
- ●BEEP 2ND / ALL
- BEEP 2ND
- BEEP ALL
- USING THE EQ (EQUALIZER)
- ADJUSTING THE SOUND LEVEL
- XDSS+ (EXTREME DYNAMIC SOUND SYSTEM)
- SETTING THE CLOCK
- CHECKING THE CLOCK
- RADIO OPERATION
- LISTENING TO RADIO STATIONS
- STORING AND RECALLING BROADCAST FREQUENCIES
- AUTO SEARCH MEMORY
- TO SCAN THE PRESET STATIONS
- TO TUNE IN THE PRESET STATIONS
- CD/MP3/WMA OPERATION
- PLAYING AN AUDIO CD AND MP3/WMA DISC
- PAUSE
- SKIP TO NEXT TRACK/FILE
- SKIP TO PREVIOUS TRACK/FILE
- RETURN TO THE BEGINNING OF THE CURRENT TRACK/FILE
- SEARCH
- INTRO SCAN
- REPEAT
- SHUFFLE
- CD TEXT / ID3 TAG
- TO GO TO A PARTICULAR QUICKLY (+10/-10 STEPS) MP3 WMA
- TO SKIP TO THE NEXT OR PREVIOUS FOLDER MP3 WMA
- TROUBLESHOOTING
- SPECIFICATIONS
- MP3/WMA DISC COMPATIBILITY WITH THIS UNIT IS LIMITED AS FOLLOWS
- GENERAL
- CD SECTION
- RADIO SECTION
Brand : LG
Model : LAC3705
Category : Car radio