TCC-9420 - Car stereo LG - Free user manual and instructions
Find the device manual for free TCC-9420 LG in PDF.

| Product Type | Car Stereo with CD/MP3 Player |
| Model | LG TCC-9420 |
| Dimensions (W x H x D) | 178 mm x 50 mm x 150 mm |
| Weight | 0.7 kg (1.5 lbs) |
| Power Supply | 12V DC (negative ground), 10A fuse |
| Maximum Power Output | 50W x 4 channels |
| Tuner Bands | AM/FM (FM: 87.5-108 MHz, AM: 522-1620 kHz) |
| Playback Media | CD, CD-R/RW, MP3 files on CD |
| Audio Inputs | Front AUX (3.5 mm), USB port |
| Bluetooth | Hands-free calling and audio streaming |
| Display | LCD dot matrix with white illumination |
| Equalizer | Preset EQ modes (Rock, Pop, Classic, Jazz) |
| Remote Control | IR remote included (battery type: CR2025) |
| Detachable Faceplate | Yes, theft-deterrent design |
| Steering Wheel Control | Compatible with optional adaptor |
| Clock Function | 12/24 hour display with RDS CT |
| Signal-to-Noise Ratio | CD: >85 dB, Tuner: >65 dB |
| Frequency Response | CD: 20 Hz - 20 kHz |
| Removable Panel Key | 1 key included for detaching faceplate |
| Warranty | 1 year limited warranty |
| Certifications | CE, FCC |
Frequently Asked Questions - TCC-9420 LG
User questions about TCC-9420 LG
0 question about this device. Answer the ones you know or ask your own.
Ask a new question about this device
Download the instructions for your Car stereo in PDF format for free! Find your manual TCC-9420 - LG and take your electronic device back in hand. On this page are published all the documents necessary for the use of your device. TCC-9420 by LG.
USER MANUAL TCC-9420 LG
Detachable Front Panel Car Receiver
OWNER'S MANUAL
MODEL:TCC-9420
Take time to read the OWNER & MANUAL Inportunity. Frequently with rehabilitation and operating procedures will help you obtain the best performance from your CAB Recovery
PIN 3628R F017K
Installations
■ Precautions:
- Do carefully not to touch the next side panel of the unit when removing the unit from the installation sleeve, since it may be hot. On this side the
cooling the arm located - The unit is designed to organize only on 12 volt DC expense ground electrical system.
- When you replace the fuse, be sure to use a funnel of specified amperage for each wire as mentioned in chapter "Constructions." Using a funnel of higher amperage may cause serious damage to the unit.


Notes: ▶ Use only the parts includes with the unit to there is proper installation. The use of unauthorized and can also manufactures.
▶ Consult with your nearest car audio dealer if installation requires the driving of takes or other complications of the vehicle.
▶ Do not use the front panel on a way of piping the unit during installation and wiring. The front panel may come away and the unit may drop on the door

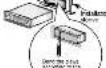
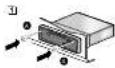
■ When removing the unit from the installation sleeve If you need to remove the unit from the installation sleeve proceed as follows ■ Remove the rear supporter from the unit
Remove the heel panel from the unit
① Insert the lower ② into hole on one side of the unit and pull the lower toward you. Do the same operation on the other side and pull out the unit from the installation share
Connections
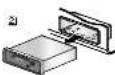
■ Main connector Connect the main connector to the female connector on the back of the unit
■ Antenna Connection insert the plug of the car antenna cator into the jack at the rear of the unit. ■ Ground Connection
▶ Connect the ground lead (optional) ■ Line Out Jacks (Optional)
The vehicle and secure it using the screw provided Connect to the line in PCA jacks of the power amplifier
on the vehicle for this purpose ■ Power Antenna
- If this connection is loose or if the case is connected to something other than a male part of the car, more or fewer other may result in Lead/External Amplifier Remote Turn-on Lead
Your will find a separate key
■ Power Supply Lead (Red)
(1964) Connect the net power supply will be used in the 12V + thermal controlled by the car lighorn switch.
■ Connect the CD changer (optional)
You can get together with control for a CD changer which you can buy, if not yet done, take.
The suitable card shown on the scheme will be provided together with the CD changer.
Be used with non-automatic antennas, it is automatic car engine is used, which connecting the level the entire will be approximately extended when the mode switch is turned on. This car also be used as a remote turn-on device to connect an amplifier that has a remote closing load. Using this connection will be seen, famous turning current of the radio and an external amplifier.
■ Precautions
▶ Do not bring the connecting cords near parts without temperature will rise when the vehicle is drawn
▶ Secure the connectors securely so that they are
Technical info production. Improper connection can recall in room or hamper.
Anxtra Sond
The car receiver is not assigned to utilize the vehicle a channel are the electrical return cath from the solder to the radio, always
Use the manufacturer wire between each speaker and your name unit
■ 4-Speaker
■ 4 speakers connection
Use 4-5 Ominipedan
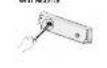
Detachable Front Panel
The front panel of the port can be detached to prevent theft
■ Detaching the Front Panel
- Price the RELEASE barrier
(■) To open the front panel ● Push the front panel to
0211
- 2017年

① Write the form parts in the supplied prospective case

Front Pass
■ Attaching the Front Panel
Funct

[Figure]
m - 1 0 ;
The quick brown fox jumps over the lazy dog.


Location of Controls
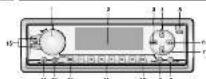

POWER(PNR) Button
CON DIAL
LCD Display
① ASPS Dux
LOUD Buns RELEASE
- RELEASE(###)
- DIRECTION(▲▼)SUB)
Setting the
- AWSONOFF Union
- TONOMYCHEN
- NUTE 200
⑧ POLATER(PO)
- PRESET Buttons
- BANKING FURS - CLOCK BUTON
# SELECTION (SEU) Button
● TUNE UPIDOWN (HHHH)
Euron (FFREW, ELECTR)
- ELECTR. H. EVA - CASSETTE 92
Setting the Clock Time
Press CLOCK (on non once)
momentarily to display the
→Pass the CLOCK button
for more than 2 seconds
and clock inclusion with
deployed for 5 seconds Adjust the stock within 5
seconds
▶ Picking TUNE (▶)
[Unicorn] UFA (im)
button adjusts the minute
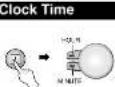
9 Press the CLOCK button
the ordinary 50% of the
sucorale
Sound Adjustment
■ Power ON and OFF
PassPOWER(PWR)
butter of impersion bullon Lantheuron
Pw POWER (PSR)
limit off
Note:
When you turn on the unit is normalized automatically.
volume level currently before
you turn off. Whenever you
at the volume level
monized
■ Loudness Function
Press the LOUD button, act as
the business credit which books to compare the
human ear's lack of sensitivity
16592 912
■ Muta Function
▶ MUTE action is open
The previous work is
share a what any butam
ремонталі кідвал.
■ SELEC
Button Express to the SELECTO
(1) SELU button to change the
control of volume bass ticolor
Balance 130
Note:
the arm cannot stop the bars and trouble in the EQ on mode
■ CONTROL UP/DOWN
DIAL
- After you have selected the proper mode by using the
SELECTION (SEL) (brk)
control the desired value
seconds. After you finish
selecting models. The unit
● Proportions display in all
nodes.
A numeric display is accumulated by using the
SOMENZIE BY LIMING THIS chat
- FUNCTION/FUNC
■ FUNCTION (FUNC.) Button
This button serves to switch
over between the whole sources and can be a greater
(cassette = radic)
■ EQUALIZER (EQ)
Button
Each press of the EQ buhon
equal zur modo, as follows
PCP - CLASSIC - ROOF
Release POP ....
• POP: Downloaded for Has Soul and Country
FISK.
-CLASSIC Optimized for
- EOC/ Dated by Hand
Horn and Heavy
Merisl music
Tape Playback
■ Basic Operation
- Open the front panel
图
图 1
HUIHAN HAO: Exo Road
The following table is:
if more than 30 seconds have elapsed after opening to the front.
panel unit was tuned of
wormeloly
9 real costofu The 2007-145-2020
the create a new version, loaded and plus begins
(1)


■ Auto Music Search
(AMS)
▶ Your car receiver has the safety perception body
3.50% (5) 100% (6) 40% (2) 100% (2)
beginning of next or before
Одески сей и скверти
ИС-я в баркиме, арт.
the AIGATION And then
pans for HUMF (pen)
buch the cassion of
(1) 2017年1月1日
Using searching AMS
All shots in the display


- Election a Cassette


