60-ME-44 - Range hood MPM - Free user manual and instructions
Find the device manual for free 60-ME-44 MPM in PDF.


| Product Type | Wall-Mounted Range Hood |
| Brand | MPM |
| Model | 60-ME-44 |
| Installation | Wall-mounted |
| Operation Modes | Extraction (ducted) or Recirculation (with optional carbon filter) |
| Control Type | Mechanical push-button |
| Fan Speeds | 3 speeds + turbo mode (auto speed reduction after 5 minutes) |
| Lighting | GU10 lamp (halogen or LED, replaceable) |
| Grease Filter | Aluminium, washable (every 35 hours of operation) |
| Carbon Filter | Optional, replace every 6 months |
| Minimum Installation Height (Electric Hob) | 45 cm |
| Minimum Installation Height (Gas Hob) | 65 cm |
| Recommended Cleaning Frequency | At least monthly or every 35 hours of operation |
| Safety Features | Automatic timer, turbo mode, touch panel lock (for cleaning) |
| Power Supply | Check rating plate (typical 220-240 V) |
| Dimensions (Width) | 60 cm (model designation) |
Frequently Asked Questions - 60-ME-44 MPM
User questions about 60-ME-44 MPM
0 question about this device. Answer the ones you know or ask your own.
Ask a new question about this device
Download the instructions for your Range hood in PDF format for free! Find your manual 60-ME-44 - MPM and take your electronic device back in hand. On this page are published all the documents necessary for the use of your device. 60-ME-44 by MPM.
USER MANUAL 60-ME-44 MPM
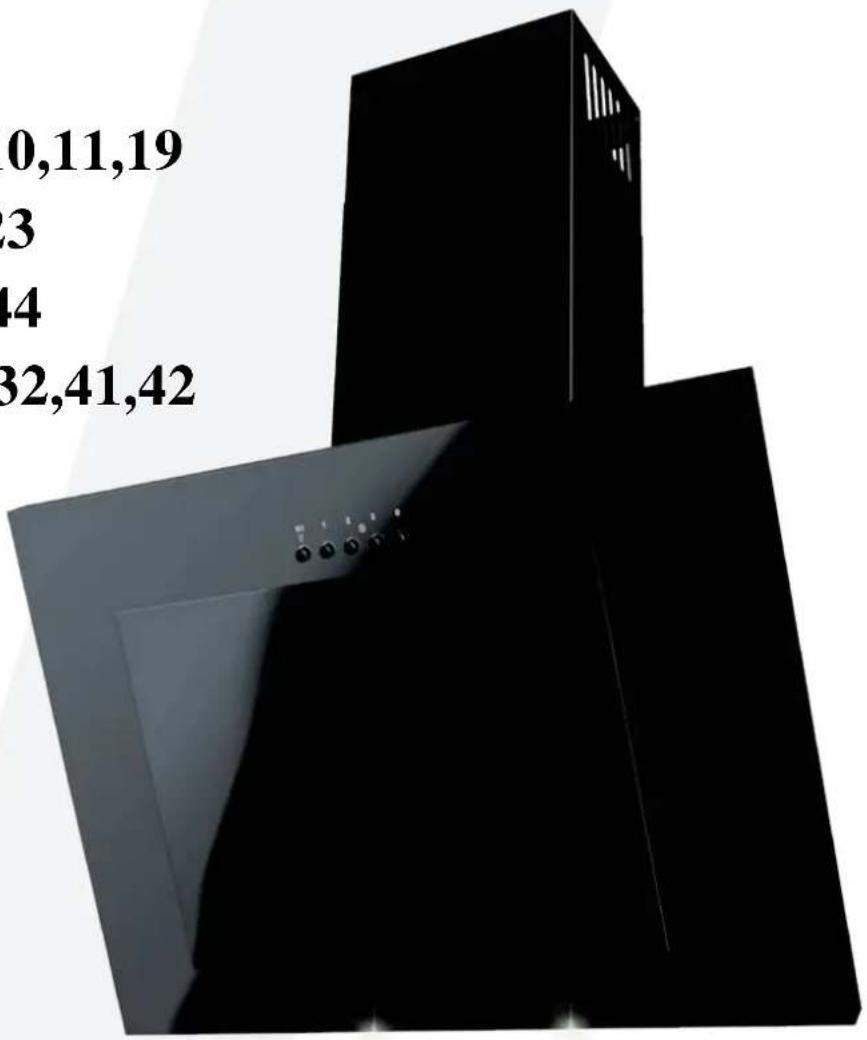
Wall-Mounted Range Hood Operation Manual
MPM-50-OV-03
MPM-60-OV-09,10,11,19
MPM-90-OV-22,23
MPM-60-ME-43,44
MPM-60-OM-31,32,41,42
MPM agd S.A.
Thank you for your trust and purchasing of our product. Our device was designed in order to meet your expectations in terms of functionality and esthetics. It will certainly become a practical and decorative element for every kitchen. We hope that the device will serve you for many years.
Before starting the range hood assembly, please read attentively this Operation Manual. It will allow you to avoid any mistakes in course of installation, and problems in course of range hood operation.
The cooking range hood is designed for household application, and is used for elimination of vapors and odours arising during the cooking process.
△NOTE: The Manufacturer is not liable for any damages arising due to the incorrect assembly or failure to comply with the requirements of this Operation Manual.
⚠ - Caution, please pay attention to the highlighted text.
General safety and assembly requirements
- This Operation Manual shall be maintained, in order to be able to use it in every further moment.
- Read this Operation Manual attentively, as it contains the detailed information regarding the installation, assembly and maintenance of the hood.
- The hood appearance may differ from the hood presented at drawings in this Manual, however all recommendations regarding the operation, maintenance and assembly of the hood remain unchanged.
- Do not make any electrical or mechanical changes in the hood construction.
- Do not connect the device to power before finishing the assembly.
- Any assembly or maintenance operations shall be performed in the protective gloves.
- Do not use the hood without the correctly installed filter.
- The assembly non-complying with this Operation Manual, may cause the electrical shock danger.
- Do not use the open flame under the kitchen hood.
- The meals cooked on the fat base shall be constantly controlled, as overheated fat may flame out easily.
- The air sucked by the hood may not be withdrawn into the chimney channel used for extraction of the combustion gases from gas or other fuel devices (does not apply to the closed circuit hoods).
- If any other non-electric devices are used in the house besides the hood (for example, liquid fuel furnaces, blow-through heaters, boilers), the sufficient ventilation of air (air supply) shall be ensured.
- Do not disconnect the plug from the socket drawing the power cable.
- The power cable may not touch the hot surface.
- Do not start the device if the power cable is damaged.
- The replacement of the damaged power cable may be performed by the manufacturer; the service maintenance shall be performed by the qualified technician.
- The hood shall be cleaned both inside and outside, at least monthly, or every 35 hours of hood operation. Each time, before the hood cleaning, the hood shall be disconnected from the power (disconnect the power cable plug or turn off the safety levers).
- The device may be used by the children in the age of at least 8 years, and by the persons with limited physical, mental abilities, or by persons with a lack of experience in device operation, provided that the due supervision or training in terms of the safe device operation was ensured, in order to make clear all the related risks.
- The children shall not play with the device.
- The children without the supervision shall not perform the device cleaning and maintenance.
- The device is market according to European Union Directive 2002/96/EU, about the electric and electronic equipment (WEEE). Ensuring the correct disposal of the device, you will help to limit the risks of a negative impact over the environment and health.
NOTE:
The accessible parts may become hot in course of the cooking range operation. The use of screws or other fastening elements with violation of the Manual requirements, may cause the electrical shock.
Environment protection
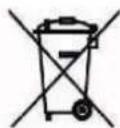
Fig. A
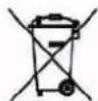
Li-FeS2
Fig. B
The device was designed and manufactured from the high-quality recycling materials and components.
The crossed waste container sign (Fig. A) on the product means that it is subject to the selective waste collection, according to the Directive of the European Parliament and Council 2012/19/EC. If the product is marked with the crossed waste container sign (Fig. B), it means that the product contains the batteries which are subject to the selective waste collection, according to the Directive of the European Parliament and Council 2006/66/EC.
This sign informs that the electrical and electronic equipment, as well as the batteries (if any), after their useful life period may not be disposed with other household waste. The user is obliged to transfer the device and the batteries (if any) to the electrical and electronic equipment collection points. The operators of the collection points, including the local collection points, retailers and municipal entities, provide the creation of network for such devices and batteries (if any) collection. The correct disposal of the device and batteries (if any) will help to avoid any consequences harmful to human health and environment, caused by the possible containment of dangerous components in the devices and batteries, or by the undue storage and processing of such equipment and batteries. The individual household plays an important role in supporting the reprocessing and recycling of the equipment. At this stage, the approaches which will influence the future protection of clean natural environment are formed. The individual households are also one of the largest consumers of the small appliances, that's why their sustainable use influences the recuperation of recyclable materials. In case of incorrect disposal of the product, the penalties provided by the national legislation may be applied.
Technical specifications
The technical specifications specified in this Operation Manual, and in the labels attached to the hood, have been obtained by measurements and calculations made according to the EU resolution No. 65/2014 and 66/2014.
Fig.1 General view of the range hood.
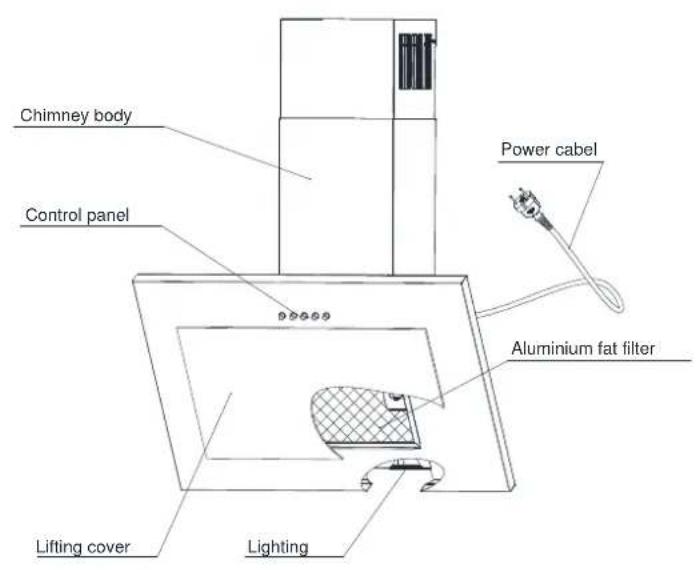
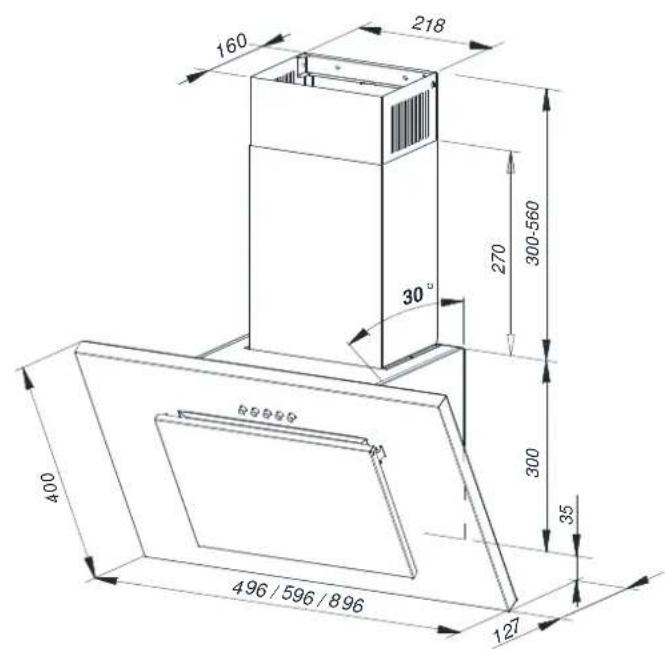
Fig. 2 Dimension drawing.
Operation
The hood is intended for sucking in the vapours during the meals cooking. The device may work in two modes:
As the extracting hood: the vapours are extracted from the premise through the withdrawal tube. The withdrawal tube is not supplied with the device, and should be acquired separately.
NOTE:
■ The shortest possible vapours evacuating channel shall be used.
■ Use the flue pipe with maximally smooth internal surface (the use of Spiro type pipes is not recommended).
■ Use the flue channel with as low number of bends as possible (the bending angles shall not exceed 90^ ).
- The changes in flue channel sections are not advised (from higher section to lower section, for example the change from ∅150 mm to ∅120 mm).
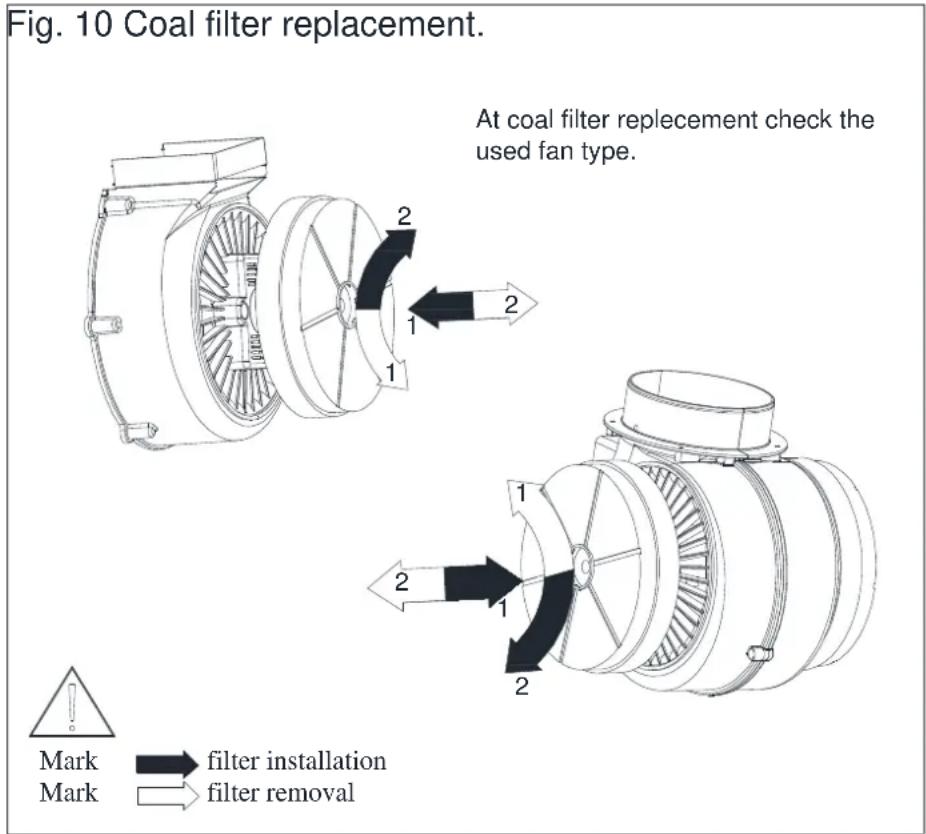
As the absorber: the vapours are cleaned from fat and odours, before they are returned back to the premise through the grills in the top part of the chimney body. To make the hood work in the absorber mode, install the coal filter (Fig.10). The coal filter is not included in the standard equipment, and should be acquired separately.
Hood installation
NOTE:
The use of screws and fastening elements not specified in the Operation Manual may cause the electrical shock.
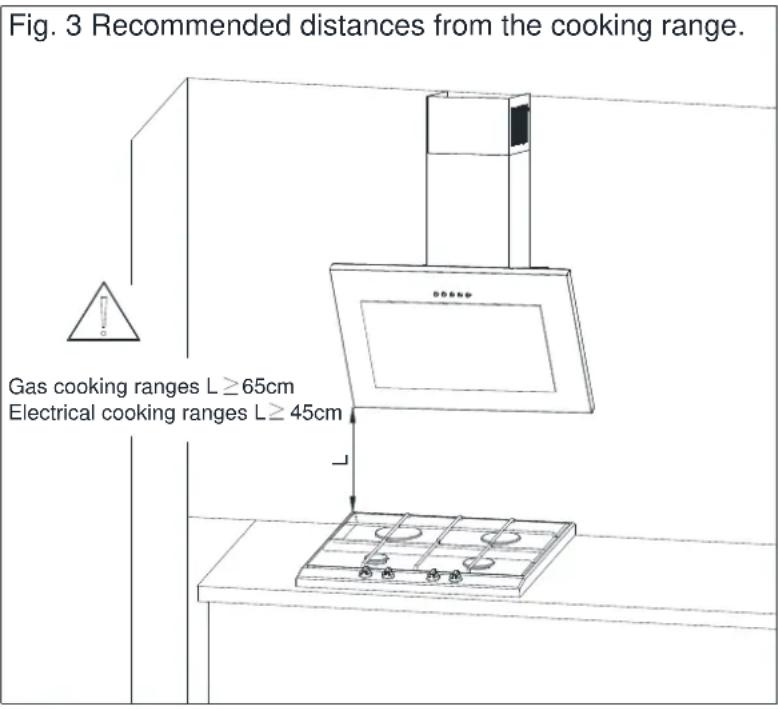
The minimum distance of hood hanging between the surface of kitchenware placement over the cooking range (gas, electric range), and lowest part of the hood (Fig.3) shall amount at least 45 cm for electric cooking ranges and at least 65 cm for gas cooking ranges. Should the cooking range operation manual provide the higher distance for hood installation, such higher distance requirement shall be maintained.
The installation of the hood and chimney body is shown at the figures (Fig.4 - Fig.9). The hood is equipped with the fixing pins matching to the most part of walls and ceilings. In course of the assembly, observe the common rules for air exhaust from the premises.
Before starting the installation:
■ Check if the purchased
device dimensions match to the planned installation place.
- Disassembly and remove (if possible) any furniture remaining in the hood installation area, in order to ensure the easy access to ceiling or wall, where the hood shall be mounted. If it is not possible, protect the furniture elements remaining in the adjacent area.
- Check, if there is a socket near the mounting area, and control if the hood may be connected to the ventilation channel for vapours evacuation.
- Check if there are no cables (electrical, hydraulic, etc.) in places in which the drilling will be performed.
- Prepare the following tools: tape ruler, pencil, drill / electric screwdriver, drilling tool ∅8, screwdriver, builder's level.
Assembly operation:
-
Define the axis of cooking range, and project it onto the wall, where the hood will be mounted. Sign all characteristic points of hood fastening. Make the openings with the drill. (Fig. 4)
-
Into the openings, insert the screw plugs. In two openings marked with A screw also the screws (leaving 7 mm of screw length outside the screw plug, Fig.5).
- Open the hood cover and remove the fat filter (Fig.6).
- Screw the chimney body fastening element, hang the hood on two untightened screws (Fig. 7).
- Place the level on the hood body. Rotating the element marked with A, adjust the hood level according the level's indications, and then tighten two screws previously screwed partially and screw in two remaining screws (Fig. 8).
Place the chimney body on the hood body. Then, draw delicately the hood part signed with B upwards, until it becomes possible to screw it to the fastening element previously attached to the wall (Fig. 9).
NOTE: this assembly operation shall be performed very carefully, in order to avoid the scratching of chimney body and hood itself.
Fig. 4 Assembly dimensions.
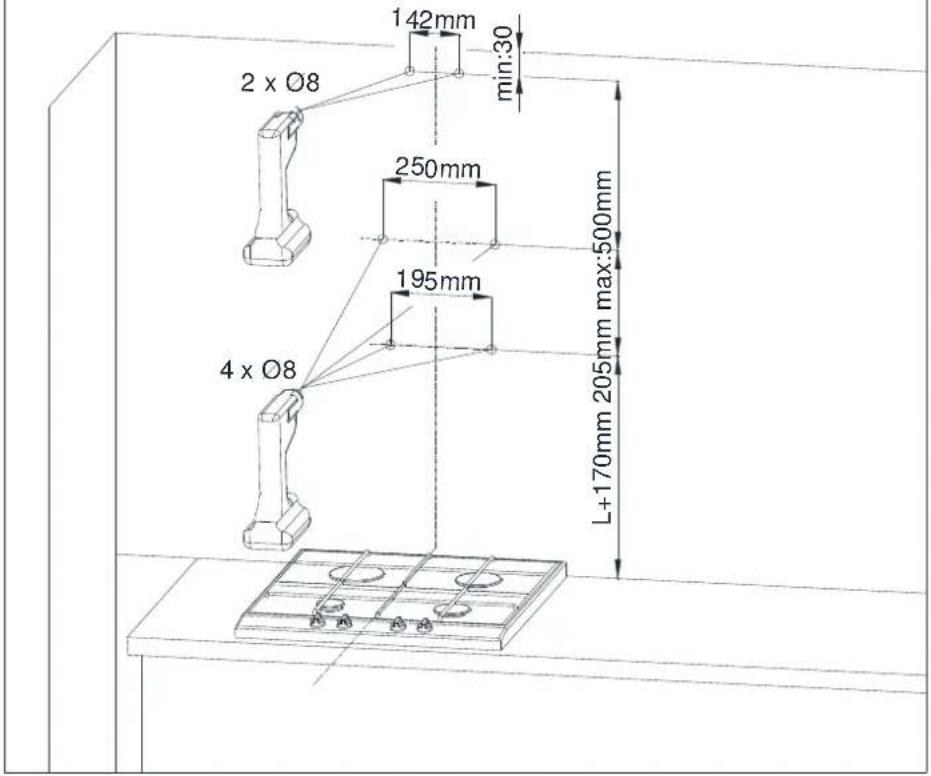
Fig. 5 Screw plugs assembly.
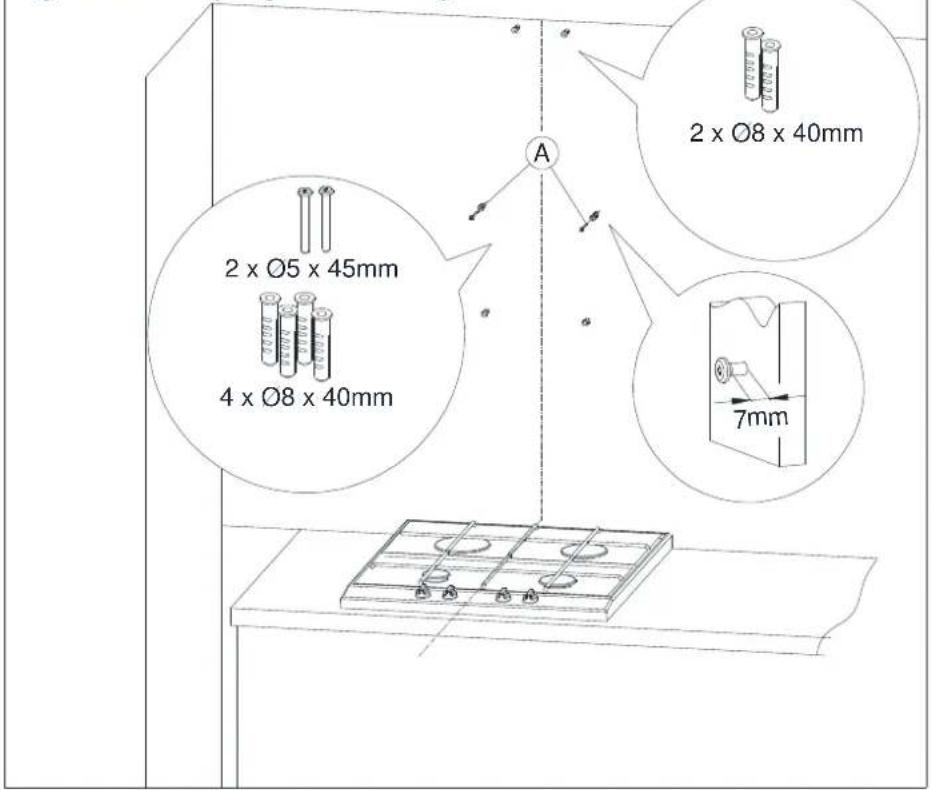
Fig. 6 Aluminium fat filter removing.
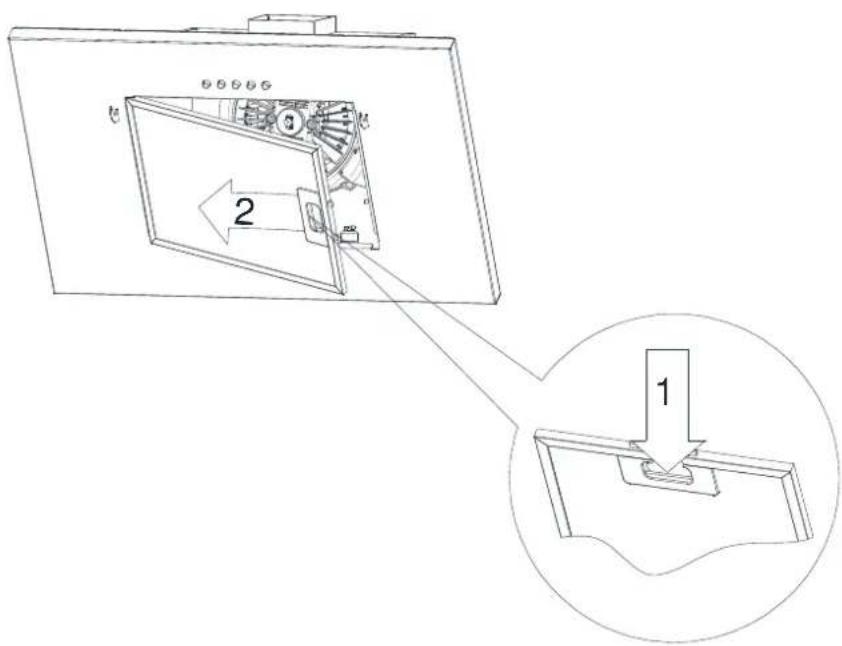
Fig. 7 Hood hanging.
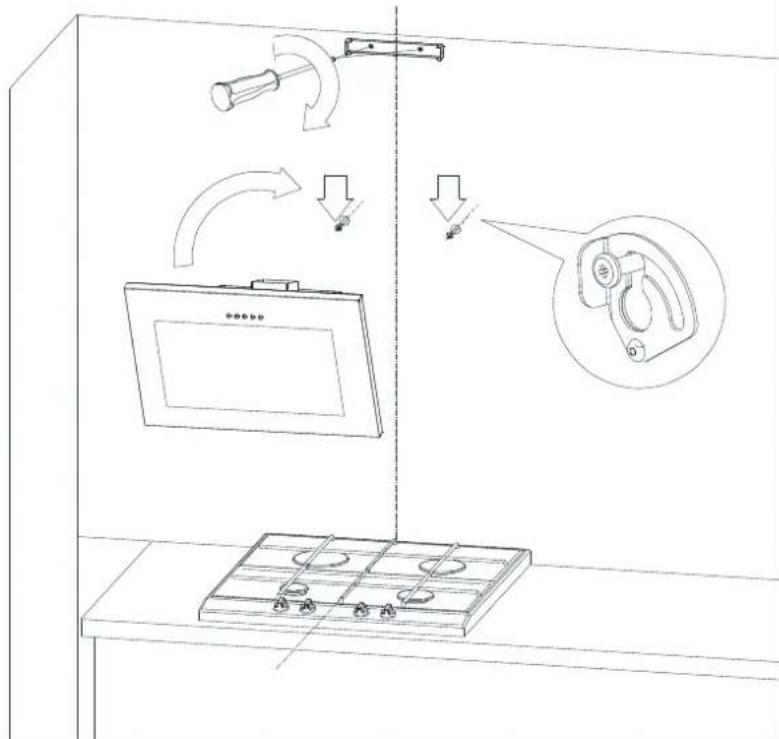
Fig. 8 Range hood positioning.
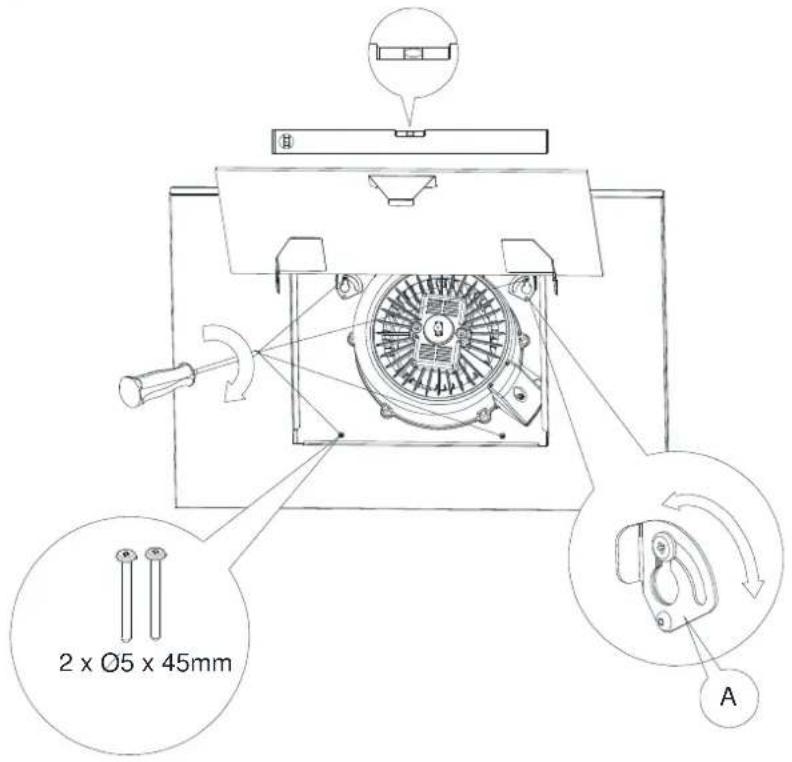
Fig. 9 Chimney body assembly.
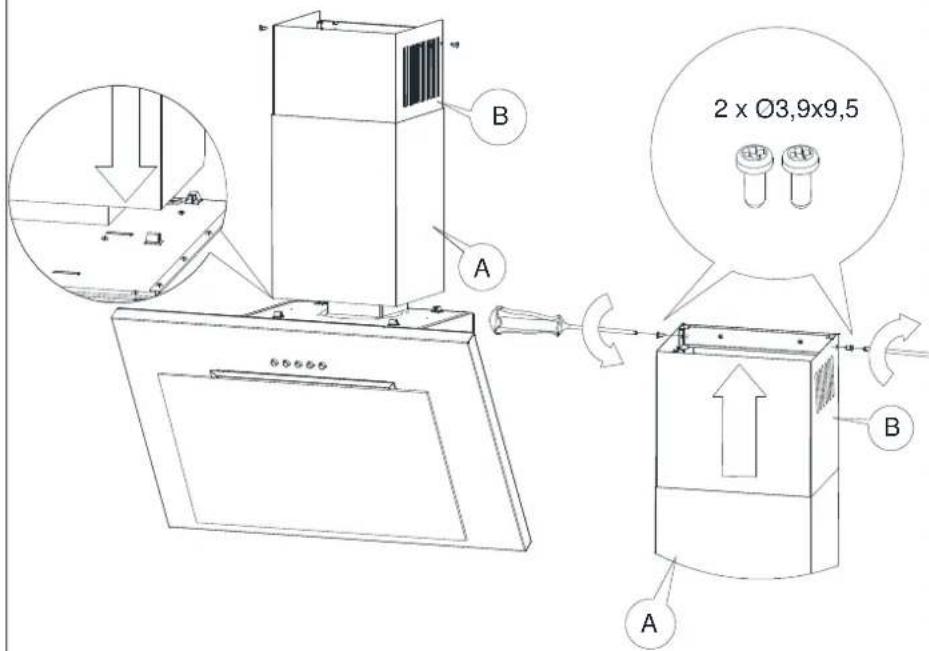

Be especially attentive while drawing the chimney body cut
Electrical connections
The network voltage shall correspond to the voltage indicated at the plate placed inside the hood. If the hood is equipped with a plug, insert it into the socket complying with the applicable requirements, and located in the easily accessible place. If the hood is not equipped with a plug, the hood installations shall be performed by a person having the required authorizations (such as electrician).
Cleaning and maintenance
Before performance of any actions related to the device maintenance, disconnect the plug from the socket, or turn the safety lever off. The hood shall be cleaned with delicate detergents, do not use the abrasive detergents. The regular maintenance enhances significantly the hood operation quality and service life. The hood cleaning shall be performed at least monthly, or every 35 hours of hood operation. DO NOT EVER USE ANY ALCOHOL-BASED DETERGENTS FOR HOOD CLEANING. The satin (inox) elements shall be cleaned with special liquids.
NOTE:
The failure to comply with the instructions concerning the device cleaning and filters replacement, may cause a risk of fire. It is recommended therefore to comply with these requirements. The manufacturers is not liable for any damages of a motor or fire caused by incorrect operation.
Fat filter
The hood is equipped with aluminium filter stopping the particles of fat emitted in course of cooking. To remove the filter, move the clamps in the direction of arrows (Fig.6). The filter shall be cleaned manually by its immersion into the water with dish washing liquid for approx. 15 minutes, under the temperature equal to 40-50°C. After 15 minutes, wash and accurately rinse the filter. The filter must be dry before its installation in the hood. It is also possible to wash the filter in the dish washing machines. In course of washing, the filter colour may change, which does not influence its filtering characteristics. The failure to
clean the filter regularly reduces the hood performance, and may cause the fire. The filter shall be cleaned at least every 35 hours of hood operation.
Coal filter
The hood may be equipped with the coal filter. The coal filter is used when the hood is not connected to ventilation duct only. The filter shall be installed on the fan body, like it is shown in the drawing (Fig.10). The coal filter shall be replaced every 6 months.
NOTE:
Do not wash or regenerate the coal filter.
Light replacement
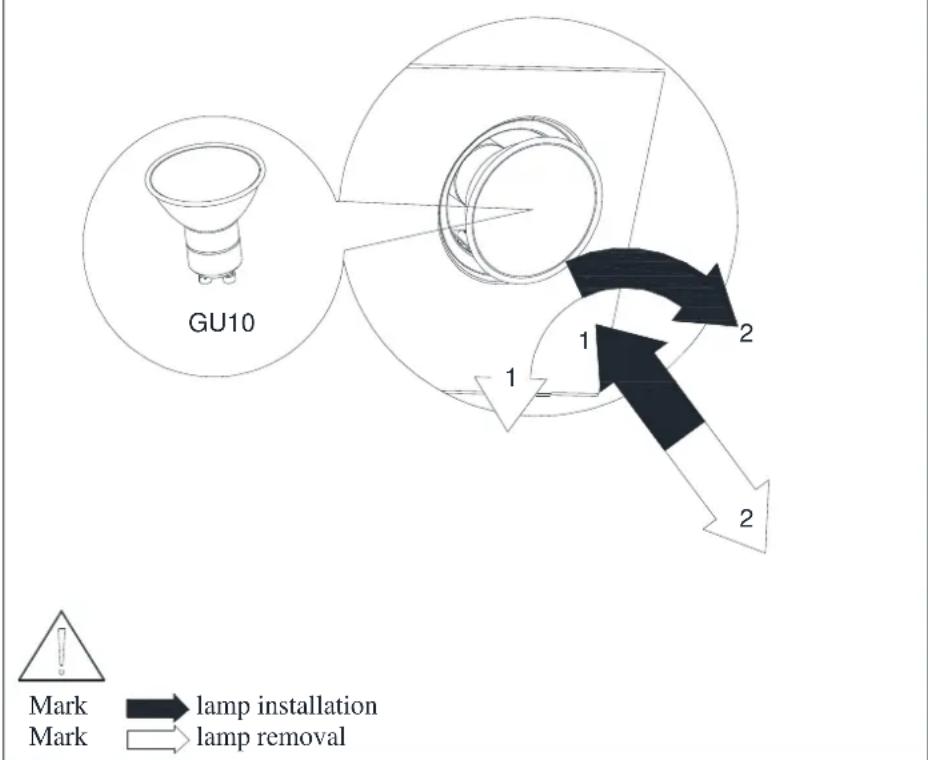
Before starting any works related to the light replacement, switch off the power. If the hood was previously turned on, wait previously until the lams become cold, and then start their replacement. The lamp replacement is illustrated in Figure 11.
NOTE:
■ Before the replacement of lamps, switch the hood power off.
- Do not touch the lamps when they are hot.
- Be attentive not to touch the lamp installed with hands.
Fig. 11 Lights replacement.
flowchart
graph TD
    A["GU10"] --> B["lamp installation"]
    B --> C["lamp removal"]
    style A fill:#f9f,stroke:#333
    style B fill:#bbf,stroke:#333
    style C fill:#dfd,stroke:#333
Hood operation control
The hood is equipped with the mechanical control system.
■ button “0” – hood fan switched off
- button “1”- hood fan switched on, with minimum speed
- button “2” - hood fan switched on with medium speed
- button “3” - hood fan switched with maximum speed
The higher speed means the higher air circulation.
- Button 📋 - switches the light on. To switch the life off, press the button one more time.
How to reduce the cooking impact to the environment
- In order to reduce the energy consumption, cook in the kitchenware under the cover.
- The hood aluminium filters shall be kept clean (the recommended time of work of aluminium filter between its cleaning: max. 35h of hood operation).
■ The ventilation ducts shall not be blocked. - The fan operation speed during the cooking shall be always set on minimum level which allows to withdraw the vapours considering the actual cooking intensiveness.
Product characteristics
Product characteristics are placed inside the hood.
Troubleshooting
| Trouble | Possible cause | Trouble elimination | |
| 1* | During the hood operation, the pulsing "F"symbol is displayed. | After 35 hours of operation, the hood informs on the need to clean or replace the fat filter. | Touch and hold for approx.. 8 seconds the "-" touch button.Wash the filter in the dishwasher, or replace the filter. |
| 2* | The sign "-." (minus and a point in the bottom right corner) is displayed, the hood does not respond to the attempt to switch it on. | The touch panel is locked – this is a function used for the hood cleaning. | To unlock the panel, touch and hold for approx..10 seconds the button with a power switch symbol. |
| 3* | No symbol is displayed, the hood does not respond to the control touch buttons. | The touch control panel may be hanged up. | Turn off the hood power for approx.. 15 seconds, and switch it on again. |
| 4* | The speed symbol is displayed, the hood does not respond to the control touch buttons. | The touch control panel may be hanged up. | Turn off the hood power for approx.. 15 seconds, and switch it on again. |
| 5* | The hood turbine switches off after 15 minutes of operation, the display shows, for example, "1." (current speed number and a point in the bottom right corner of the display). | The control panel automatic timer has been activated. | To disable the automatic timer, press and hold "+" symbol for approx.. 10 seconds, or switch the hood off. |
| 6* | At the forth speed, "4" is pulsing, after 5 minutes the speed is decreased to a third speed. | The hood is equipped with the turbo mode, which decreases the speed automatically for energy saving. | The turbo mode shall be used for intensive cooking only. |
| 7* | The hood may be controlled with the control panel only, and it does not respond to the remote control commands. | The battery in the remote control is low, or the distance is too high. | Replace the battery. |
| 8 | The hood sucking is too low. Possible reason: the filters are dirty. | Wash or replace the fat filter.Replace the coal filter (if any). | |
| 9 | One or more lights do not light. Halogen / LED lamp burned-out. | Replace the lamp with a new one, with characteristics indicated in the hood Operation Manual. | |
| 10 | The hood generates increased noise and vibrations. | The possible reason may be the incorrect hood mounting to the wall or kitchen cabinet. Not all the required screws have been screwed in, or they have been left untightened. | The hood shall be mounted to the wall or kitchen cupboard in all point indicated by manufacturer. After the hood vertical and horizontal position adjustment, all the screws shall be tightened. |
| * applies to the hoods with a touch control panel | |||
| If the above specified recommendations do not solve the problem, contact the authorized house appliances service centre authorized to perform the repair works. The hood user is not authorized to perform any repairs himself. The list of service centres may be found in the warranty card, or at our website,. | |||
Notes
Notes
- Wall-Mounted Range Hood Operation Manual
- General safety and assembly requirements
- NOTE:
- Environment protection
- Technical specifications
- Operation
- Hood installation
- Assembly operation:
- Electrical connections
- Cleaning and maintenance
- Fat filter
- Coal filter
- Light replacement
- Hood operation control
- How to reduce the cooking impact to the environment
- Product characteristics
- Troubleshooting
- Notes
Brand : MPM
Model : 60-ME-44
Category : Range hood