
6106235 - Lighting WESTINGHOUSE - Free user manual and instructions
Find the device manual for free 6106235 WESTINGHOUSE in PDF.


| Product Type | Ceiling Light Fixture |
| Model Number | 6106235 |
| Brand | Westinghouse |
| Dimensions (H x W x D) | 10 x 15 x 15 inches |
| Weight | 4.5 lbs |
| Power Source | Hardwired, 120V AC |
| Light Source | E26 Medium Base (bulb not included) |
| Recommended Bulb Type | LED, CFL, or Incandescent up to 60W |
| Lumens | Up to 800 lumens (depending on bulb) |
| Color Temperature | Adjustable with bulb selection (2700K-5000K) |
| Dimmable | Yes, when used with dimmable bulbs and compatible dimmer switch |
| Materials | Metal housing with frosted glass diffuser |
| Finish | Brushed Nickel |
| Installation Type | Ceiling mount |
| Mounting Location | Indoor dry locations |
| Energy Efficiency | Compatible with energy-saving bulbs |
| Safety Rating | UL Listed for safety |
| Warranty | 5-year limited manufacturer warranty |
| Cleaning Instructions | Wipe with dry cloth; do not use harsh chemicals |
| Replacement Parts | Contact Westinghouse for glass replacement |
Frequently Asked Questions - 6106235 WESTINGHOUSE
User questions about 6106235 WESTINGHOUSE
0 question about this device. Answer the ones you know or ask your own.
Ask a new question about this device
Download the instructions for your Lighting in PDF format for free! Find your manual 6106235 - WESTINGHOUSE and take your electronic device back in hand. On this page are published all the documents necessary for the use of your device. 6106235 by WESTINGHOUSE.
USER MANUAL 6106235 WESTINGHOUSE
Installation and Safety Instructions
Warning: Electrical shock can result in serious injury.
Read and follow instructions exactly as shown. If instructions are unclear, do not proceed. Contact a qualified electrician. Read all instructions before beginning. Proper wiring is essential for safe operation of this fixture. When cutting or drilling into walls or ceilings, do not damage electrical wiring, gas lines, or water lines. If any of the fixture or wiring components are damaged, do not install fixture. Return to place of purchase.
If the external flexible cable or cord of this luminaire is damaged, it shall be exclusively replaced by the manufacturer or his service agent or a similar qualified person in order to avoid a hazard.
For indoor use only.
ASSEMBLY INSTRUCTIONS FOR INDOOR LIGHTING FIXTURE
Congratulations on your Westinghouse purchase. This fixture has been designed to give you many years of beauty and service. For questions and comments, please visit www.westinghouselighting.eu/contact-us and www.westinghouselighting.de/contact-us
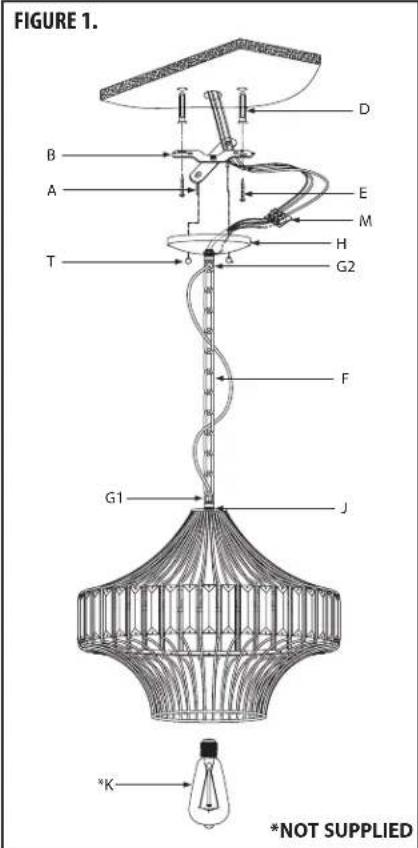
NOTE: Carefully unpack fixture and parts. Make sure all parts are included before discarding any packing materials (see figure 1).
MOUNTING AND WIRING INSTRUCTIONS
NOTE: Line art shown may not exactly match the fixture enclosed. However, the installation instructions do apply to this fixture.
- Thread mounting screws (A) into mounting bar (B).
- Place mounting bar flush against ceiling at desired mounting location. Using outside mounting bar holes as a guide, mark where pilot holes are to be drilled.
- Inset two plastic anchors (D) into the pilot holes (for drywall ceiling).
- Align outside mounting bar holes with plastic anchors (D) (If applicable). Secure mounting bar (B) into place using wood screws (E).
- Thread fixture loop (G) onto nipple 1 (J) of fixture base (I).
NOTE: Do not twist or kink wires when sliding fixture loop (G) downward. - Open one link on bottom end of chain (F). Attach to loop (G1). Securely closed link on chain (F).
- Lace wires up through every other link on chain (F) then through canopy (H) and nipple.
- Open one link on top end of chain (F). Attach to loop (G2) on canopy (H). Securely closed link on chain (F).
- Make an electrical connection by loosening the terminal screws on the terminal block (M) and inserting the live, neutral and ground terminals.
- Tighten terminal screws. Make sure there are no stray wires.
- Raise canopy (H) to ceiling, allowing mounting screw (A) to protrude through openings in canopy (H) and secure into place with cap nuts (T).
- Install lamp (K) (not supplied). (Please do not exceed the maximum capacity recommended on the socket).
CLEANING AND CARE
To clean, wipe fixture with soft cloth. Clean glass with mild soap. Spray from chemical cleaners can discolor the finish of fixture. Do not use scouring pads, powders, steel wool or abrasive paper to clean this fixture.
NOTE FOR FIXTURES THAT ARE SOLID BRASS:
Your hand-crafted, solid brass lighting fixture has been coated with a durable, baked-on acrylic lacquer which gives maximum protection against the weather. However, in time the brightness of the brass will tarnish, giving way to an authentic old-world brass finish. To keep your solid brass fixture looking new for years to come, regularly apply a good quality, non-abrasive car wax to all metal surfaces, giving the fixture an extra protective covering.
Meaning of crossed-out wheeled dustbin:
Do not dispose of electrical appliances as unsorted municipal waste, use separate collection facilities. Contact you local government for information regarding the collection systems available.
If electrical appliances are disposed of in landfills or dumps, hazardous substances can leak into the groundwater and get into the food chain, damaging your health and well-being.
When replacing old appliances with new ones, the retailer is legally obligated to take back your old appliance for disposal at least free of charge.
Appliance specifications - TECHNICAL CHARACTERISTICS
| Rated voltage 220-240V~ | |
| Rated frequency 50/60 Hz | |
| Rated wattage E27 Max.40W | |
| Protection class CLASS I | |
| IP number IP20 | |
| Ambient temperature 40 | ^ |
Westinghouse Lighting, Philadelphia, PA 19154-1029, U.S.A. www.westinghouselighting.com
W, WESTINGHOUSE, and INNOVATION YOU CAN BE SURE OF are trademarks of Westinghouse Electric Corporation.
Used under license by Westinghouse Lighting. All rights reserved.
Made in China
Brand : WESTINGHOUSE
Model : 6106235
Category : Lighting