
EHI845BB - Cooker ELECTROLUX - Free user manual and instructions
Find the device manual for free EHI845BB ELECTROLUX in PDF.


| Product Type | Freestanding Cooker |
| Brand | Electrolux |
| Model | EHI845BB |
| Color | Black |
| Height (cm) | 90 |
| Width (cm) | 60 |
| Depth (cm) | 60 |
| Weight (kg) | 55 |
| Power Supply | 220-240 V, 50/60 Hz, 16 A |
| Energy Source | Electric |
| Hob Type | Ceramic Glass (4 zones) |
| Oven Type | Multifunction (Fan, Grill, etc.) |
| Oven Capacity (L) | 71 |
| Cleaning System | Catalytic (self-cleaning) side panels |
| Safety Features | Child lock, auto shut-off, residual heat indicators |
| Spare Parts Availability | Authorized service centers, online stores |
| Repairability Index | 8/10 (easily repairable by professionals) |
| Warranty (years) | 2 |
Frequently Asked Questions - EHI845BB ELECTROLUX
User questions about EHI845BB ELECTROLUX
0 question about this device. Answer the ones you know or ask your own.
Ask a new question about this device
Download the instructions for your Cooker in PDF format for free! Find your manual EHI845BB - ELECTROLUX and take your electronic device back in hand. On this page are published all the documents necessary for the use of your device. EHI845BB by ELECTROLUX.
USER MANUAL EHI845BB ELECTROLUX
Thank you for purchasing an Electrolux cooktop. You've chosen a product that brings with it decades of professional experience and innovation. Ingenious and stylish, it has been designed with you in mind. So whenever you use it, you can be safe in the knowledge that you'll get great results every time. Welcome to Electrolux.
BEFORE USING YOUR APPLIANCE
Check for any damage or marks. If you find the appliance damaged or marked you must report it within 7 days to claim for damages under the manufacturers warranty.
Before you use the appliance, we recommend that you read through the whole user manual which provides the description of the product and its functions. To avoid the risks that are always present when you use a gas appliance, it is important that the product is installed correctly and that you read the safety instructions carefully to avoid misuse and hazards.
For future reference, please store this booklet in a safe place.
This appliance complies with the requirements of Australian Standard AS 4551 & AS/NZS 60395.2.6.
CONDITIONS OF USE
This appliance is intended to be used in household and similar applications such as:
- Staff kitchen areas in shops, offices and other working environments
- Farm houses
- By clients in hotels, motels and other residential type environments
- Bed and breakfast type environments.
BEFORE YOU CALL
Please ensure you read the instruction manual fully before you call for service, or a full service fee could be applicable.
Record model and serial number here:
Model number:
Serial number: ____
CONTENTS
Safety information 3
Product description 5
Operating instructions ____
Helpful hints and tips 10
Care and cleaning 13
Troubleshooting ____ 14
Environment concerns 15
Installation 15
Technical information 18
Warranty ____ 20
SYMBOLS
! WARNING!
This symbol indicates information concerning your personal safety.
CAUTION!
This symbol indicates information on how to avoid damaging the appliance.
i IMPORTANTI
This symbol indicates tips and information about use of the appliance.
ENVIRONMENT!
This symbol indicates tips and information about economical and ecological use of the appliance.
SAFETY INFORMATION
Please read the user manual carefully and store in a handy place for later reference. Pass the user manual on to possible new owners of the appliance.
Read the following carefully to avoid damage or injury.
NOTE: You must read these warnings carefully before installing or using the appliance. If you need assistance, contact your Customer Care Department. The manufacturer will not accept liability, should these Instructions or any other safety instructions incorporated in this book be ignored.
Children and vulnerable people safety
WARNING!
Risk of suffocation, injury or permanent disability.
- Do not let persons, children included, with reduced physical sensory, reduced mental functions or lack of experience and knowledge use the appliance. They must have supervision or instruction for the operation of the appliance by a person who is responsible for their safety.
- Do not let children play with the appliance.
- Keep all packaging away from children.
- Keep children and pets away from the appliance when it operates or when it cools down. Accessible parts are hot.
- If the appliance has a child safety device, we recommend that you activate it.
Children and vulnerable people safety
WARNING!
Only a qualified person must install this appliance.
- Remove all the packaging
- Do not install or use a damaged appliance.
- Obey the installation instruction supplied with the appliance.
- Keep the minimum distance from the other appliances and units.
- Always be careful when you move the appliance because it is heavy. Always wear safety gloves.
- Seal the cut surfaces with a sealant to prevent moisture causing swelling.
Children and vulnerable people safety
! WARNING!
Risk of suffocation, injury or permanent disability.
- Do not lat persons, children included, with reduced physical sensory, reduced mental functions or lack of experience and knowledge use the appliance. They must have supervision or instruction for the operation of the appliance by a person who is responsible for their safety.
- Do not let children play with the appliance.
- Keep all packaging away from children.
- Keep children and pots away from the appliance when it operates or when it cools down. Accessible parts are hot.
- If the appliance has a child safety device, we recommend that you activate it.
Installation
! WARNING!
Only a qualified person must install this appliance.
- Remove all the packaging.
- Do not install or use a damaged appliance.
- Obey the installation instruction supplied with the appliance.
- Keep the minimum distance from the other appliances and units.
• Always be careful when you move the appliance
because it is heavy. Always wear safety gloves. - Seal the cut surfaces with a sealant to prevent moisture causing swelling.
- Protect the bottom of the appliance from steam and moisture.
- Do not install the appliance adjacent to a door or under a window. This prevents hot cookware to fall from the appliance when the door or the window is opened.
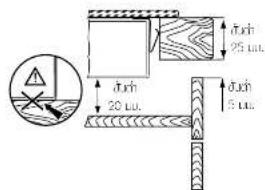
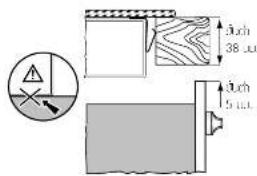
- If the appliance is installed above drawers make sure that the space, between the bottom of the appliance and the upper drawer, is sufficient for air circulation.
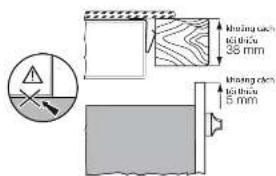
- Make sure that the ventilation space of 5mm, between the worktop and the front of the below unit, is free. The warranty does not cover damages caused by the lack of an adequate ventilation space.
- The bottom of the appliance can get hot. We recommend to install a non-combustile separation panel under the appliance to prevent access to the bottom.
4 electrolux.com 5
SAFETY INFORMATION
Use
! WARNING!
Risk of injury, burns or electric shock.
• Use this appliance in a household environment.
- Do not change the specification of this appliance.
- Do not use an external timer or a separate remote-control system to operate the appliance.
Do not let the appliance stay unattended during operation.
- Do not operate the appliance with wet hands or when it has contact with water.
- Do not put cutlery or saucepan lids on the cooking zones. They can become hot.
- Set the cooking zone to "off" after each use. Do not rely on the pan detector.
- Do not use the appliance as a work surface or as a storage surface.
- If there is a crack on the surface, disconnect power supply to prevent the electrical shock.
- Users with a pacemaker must keep a distance of minimum 30cm from the induction cooking zones when the appliance is in operation.
! WARNING!
Risk of fire or explosion.
- Fats and oil when heated can release flammable vapours. Keep flames or healed objects away from fats and oils when you cook with them.
• The vapours that very hot oil releases can cause spontaneous combustion.
• Used oil, that can contain food remnants, can cause fire at a lower temperature than oil used for the first time. - Used oil, that can contain food remnants, can cause fire at a lower temperature than oil used for the first time.
- Do not put flammable products or items that are wet with flammable products in, near or on the appliance.
- Do not try to extinguish a fire with water. Disconnect the appliance and cover the flame with a lid or a fire blanket.
! WARNING!
Risk of damage to the appliance.
- The glass ceramic can be damaged by objects falling onto it.
- The edge of the glass ceramic can be damaged by being knocked by the cookware.
- Cookware made of cast iron, cast aluminium or with damaged bottoms can scratch the glass ceramic if pushed across the surface.
- Before spillage can become burnt on to the cooking surface, remove it with a damp cloth.
• To avoid damaging cookware and glass ceramics, do not allow saucopans or frying pans to boil dry. - Do not use the cooking zones with empty cookware or without cookware.
- Do not use the cooking zones with empty cookware or without cookware.
- Do not let cockware boil dry to prevent damage to cookware and the ceramic glass.
- Do not cover the parts of the appliance with aluminium foil.
NOTE: Damage including broken glass or scratches caused by misuse outlined above is not covered under warranty.
Care and cleaning
! WARNING!
Risk of damage to the appliance.
- Regularly clean the appliance to prevent the deterioration of the surface material.
- Do not use water spray and steam to clean the appliance.
- Clean the appliance with a moist soft cloth. Only use neutral detergents. Do not use abrasive products, abrasive cleaning pads, solvents or metal objects.
Disposal
! WARNING!
Risk of Injury or suffocation.
- Disconnect the appliance from the mains supply.
- Cut off the mains cable and discard it.
PRODUCT DESCRIPTION
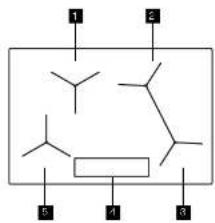
EHI845BB
chemical
Chemical structure diagram with labeled atoms and functional groups1 Induction cooking zone
2 Induction cooking zone
■ Induction cooking zone
4 Control panel
b 1 induction cooking zone
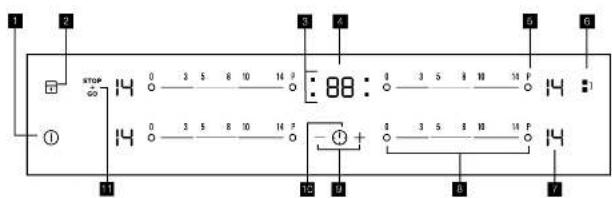
Control panel layout
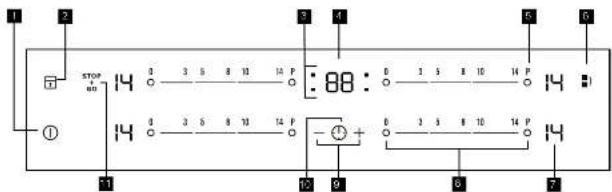
| Sensor field Function | ||
| 1 | 1 | To activate and deactivate the appliance |
| 2 | 5 | To lock / unlock the control panel |
| 3 | Timer Indicators of cooking zones To show for which cooking zone you set the time | |
| 4 | The timer display | To show the time in minutes |
| 5 | P | To activate the Power function |
| 6 | 1 | To activate the Bridge function |
| 7 | A heal soiling display | To show the heal soiling |
| 8 | Control bar | To set a heat setting |
| 9 | +/- | To increase or decrease the time |
| 10 | 1 | To set a cooking zone |
| 11 | Sets all operating zones to a keep warm setting | |
6 electrolux.com 7
PRODUCT DESCRIPTION OPERATING INSTRUCTIONS
Heat setting displays
| Display Description | |
| 0 | The cooking zone is deactivated |
| 1. 2 | The cooking zone operates |
| 3 | The 3" function operates |
| 8 | The automatic heat up function operates |
| 9 | Power function operates |
| 11 digit | There is a malfunction |
| 12 / = / _ | Optihual Control (3 stop Residual heat indicator) : continue cook / stay warm / residual heat |
| 13 | Lock / The child safety function operates |
| 14 | Not correct cockware or too small or no cockware on the cooking zone |
| 15 | The automatic switch off function operates |
OptiHeat control (3 step residual heat indicator)
! WARNING!
- / = / _ Risk of burns from residual heat!
Opti heat Control shows the level of the residual heat. The induction cooking zones make the heat necessary for cooking directly in the bottom of the cookware. The glass ceramic is hot from the heat of the cookware.
On and off
Touch ① for 1 second to activate or deactivate the appliance.
Automatic switch off
The function deactivates the appliance automatically if:
- All cooking zones are deactivated ( ②).
- You do not set the heat setting after you activate the appliance.
- You spill something or put something on the control panel for more than 10 seconds, (a pan, a cloth, etc). An acoustic signal sounds after some time and the appliance deactivates. Remove the object or clean the control panel.
- The appliance becomes too hot (e.g. when a saucepan bois dry). Before you use the appliance again, wait for the cooking zone to cool down.
- You use incorrect cockware. The symbol 📄 comes on and the cooking zone deactivates automatically after 2 minutes.
- You do not deactivate a cooking zone or change the heat setting. After some time ☐ comes on and the appliance deactivates. See the table below.
Automatic switch off times
| Heat setting | 0 1 3 | N - 1 | 8 - 9 | 10 - 11 |
| Stops after 6 hours 5 hours 4 hours 1.5 hours | ||||
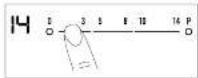
The heat setting
Touch the control bar at the heat setting. Change to the left or the right, if it is necessary. Do not release before you have a correct heat setting. The display shows the heat setting.
8 electrolux.com 9
OPERATING INSTRUCTIONS OPERATING INSTRUCTIONS
Automatic heat up
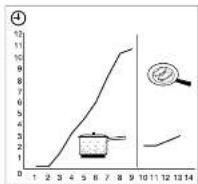
You can get a necessary heat setting in a shorter time if you activate the Automatic Heat Up function. This function sets the highest heat setting for some time (see the graphic), and then decreases to the necessary heat setting. To start the Automatic Heat Up function for a cooking zone:
-
Touch P(图) comes on in the display).
-
Immediately touch the necessary heat setting. After 3 seconds [1] comes on in the display. To stop the function change the heat setting.
Switching on and off the power function
The Power function makes more power available to the induction cooking zones. The Power function is activated for 5 minutes at most. After that the induction cooking zone automatically switches back to heat setting ☑. To switch on, touch P _1 ☑ comes on. To switch off, touch a heat setting between ☐ and ☑.
Power management
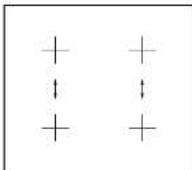
The power management divides the power between two cooking zones in a pair (see the illustration). The power function increases the power to the maximum level for one cooking zone in the pair. The power in the second cooking zone automatically decreases. The heat setting display for the reduced zone changes between two levels.
Count down timer
Use the Count Down Timer to set how long the cooking zone operates for one cooking session. Set the Count Down Timer after the selection of the cooking zone. You can set the heat setting before or after you set the timer.
• To set the cooking zone: touch ① again and again until the indicator of the required cooking zone comes on.
- Starting the Court Down Timer: touch + of the timer to set the time (30 - 99 minutes). When the indicator of the cocking zone fleashes slower, the time counts down.
- Checking the remaining time: select the cooking zone with Ⓐ. The indicator of the cooking zone flashes faster. Display shows the remaining time.
- Changing the Count Down Timer: select the cooking zone with Ⓗ touch + or - .
- Stopping the timer, select the cooking zone with ①. Touch -, The remaining time counts backwards to ②. The indicator of the cooking zone goes out. To switch off you can also touch + and - at the same time.
- When the time sepses, the sound operates and 00 flashes. The cooking zone switches off.
- Stopping the sound: touch
Count up timer
Use the Count up Timer to monitor how long the cooking zona operates.
- Selection of the cooking zone (if more than 1 cooking zone operates): touch ⏻ again and again until the indicator of a necessary cooking zone comes on.
- Starting the Count up Timer touch — of the timer UP comes on. When the indicator of the cooking zone flashes slower, the time counts up, display switches between UP and time elapsed (minutes).
- Checking the elapsed time: select the cooking zone with Ⓐ. The indicator of the cooking zone flashes faster. Display shows the elapsed time.
- Stopping the Count up Timer: select the cooking zone with ⏻ and touch + or - to switch off the timer. The indicator of the cooking zone goes out.
Minute minder
You can use the timer as a Minute Minder while cooking zones are not operating. Touch Ⓗ Touch + or - of the timer to select the time. When the time elapses, the sound operates and CO flashes.
- Stopping the sound: touch ⏱.
Stop+go
The function sets all cooking zones that operate to the lowest heat setting (☐). When operates, you cannot change the heat setting.
12 does not stop the timer function.
• To activate this function touch 📄. 📋 comes on.
• To deactivate this function touch "The heat setting that you set before comes on.
Lock
When the cooking zones operate, you can lock the control panel, but not ①. It prevents an accidental change of the neat setting. First set the neat setting. To start this function touch ②. The symbol ③ comes on for 4 seconds. The Timer stays on. To stop this function touch ④. The heat setting that you set before comes on. When you stop the appliance, you also stop this function.
The child safety device
This function prevents an accidental operation of the hob. Starting the child safety device;
- Start the hot with Ⓑ Do not set the heat settings.
- Touch ☑ for 4 seconds. The symbol ☐ comes on.
- Stop the hob with . ①
Switching off the child safety device:
- Start the hob with Ⓐ. Do not set the heat settings. Touch ⏻ for 4 seconds. The symbol ⏱ comes on.
- Stop the hob with ①.
Overding the child safety device for one cooking session:
- Start the hole with Ⓐ. The symbol 📁 comes on.
- Touch ☐ for 4 seconds. Set the heat setting in less than 10 seconds. You can operate the hob.
-
When you stop the hob with ①, the child safety device operates again.
-
electrolux.com
HELPFUL HINTS AND TIPS
OffSound Control (deactivation and activation of the sounds)
Deactivation of the sounds
Deactivate the appliance.
- Touch ① for 3 seconds. The displays come on and goes out. Touch □ for 5 seconds. b0 comes on, the sound is on. Touch +, b1 comes on, the sound is off. When this function operates, you can hear the sounds only when:
- you touch ①
• 1. he Minute Minder comes down.
• the Count Down Timer comes down. - you put something on the control panel.
Activation of the sounds
Deactivate the appliance. Touch Ⓞ for 3 seconds. The displays come on and goes out. Touch ⏻ for 3 seconds. b I comes on, because the sound is off. Touch +, b0 comes on. The sound is on.
i IMPORTANT
INDUCTION COOKING ZONES
For induction cocking zones a strong electro-magnetic field creates the heat in the cookware very quickly.
Cookware for induction cooking zones
! WARNING!
Use the induction cooking zones with correct cookware.
Cookware material:
- correct: cast iron, steel, enamelled steel, stainless steel, the bottom made of multi-layer (with correct mark from a manufacturer).
- not correct: aluminium, copper, brass, glass, ceramic, porcelain.
Cookware is correct for an induction hob if:
- some water boiling very quickly on a zone set to the highest heal setting.
- a magnet pulls on to the bottom of the cookware.
i IMPORTANT
THE BOTTOM OF THE COOKWARE
Must be as thick and flat as possible.
Use of the cooking zones
! IMPORTANT
Put the cookware on the cross which is on the surface that you cook. Cover the cross fully. The magnetic part of the bottom of the cookware must be 125mm minimum. Induction cooking zones adapt to the dimension of the bottom of the cookware automatically. You can cook with the large cookware on two cooking zones at the same time.
The noises during operation
If you can hear
- crack noise: cockware is made of different materials (Sandwich construction).
- whistle sound: you use one or more cooking zones with high power levels and the cookware is made of different materials (Sandwich construction).
• humming: you use high power levels. - clicking: electric switching occurs.
- hissing, buzzing: the fan operates.
The noises are normal and do not refer to any defects. If unfamiliar with induction units please first compare the operating sounds of a demonstration model at your retailer before calling service, if a service call is placed and the sounds are normal you will be charged for the visit.
HELPFUL HINTS AND TIPS
Energy saving
ENVIRONMENT
HOW TO SAVE ENERGY
- If it is possible, always put the ids on the cookware.
- Put cookware on a cooking zone before you start it.
- Use the residual heat to keep the food warm or to melt it.
i IMPORTANT
The cooking zone efficiency is related to the diameter of the cookware. The cookware with a smaller diameter than the minimum receives only a part of the power generated by the cooking zone. For the minimum diameters see the Technical data chapter.
Öko Timer (Eco Timer)
ENVIRONMENT
To save energy, the heater of the cooking zone deactivates before the count down timer sounds. The difference in the operation time depends on the heat setting level and the length of the cooking operation.
Examples of cooking applications
The relation between the heat setting and the cooking zone consumption of power is not linear. When you increase the heat setting it is not proportional to the increase of the cooking zone consumption of power. It means that the cooking zone with the medium heat setting uses less than a half of its power.

IMPORTANT
The data in the table is for guidance only.
| Heat setting | Use to: | Time | Hints | Nominal power consumption |
| u 1 | Koop cocked foods warm | as required | Cover | 3% |
| 1-3 Hollandalss sauce, moll: butter, chocolate, oatline | 5 - 25 min Mix occasionally 3-8% | |||
| 1-3 Solidify: flurry omelettes, baked eggs | 10 - 40 min Cook with a lid on 3-8% | |||
| 3-5 Smmer rice and milk based dishes, heating up ready-cooked meats | 25 - 50 min Add at least twice as much liquid as rice, stir milk dishes part way through | 8-10% | ||
| 5-7 | Steam vegetables, fish, moat | 20 - 45 min | Add some tablespoons of liquid | 13-16% |
| 7-9 | Steam potatoes | 20 - 60 min | Use max. 1/2 L water for 750 g of potatoes | 18-25% |
| 7-9 | Cook larger quantities of food, stews and soups | 60 - 150 min | Up to 3 L liquid plus ingredients | 18-25% |
| 9-12 | Gentle fry: escalope, veal cordon blou, culdis, rissolcs, sausages, liver, roux, eggs, pancakes, coughnuts | as necessary | Turn halfway through | 25-45% |
| 12-13 | Heavy fry, hash browns, loin steaks, steaks | 5 - 15 min | Turn halfway through | 45-64% |
| 14 | Boll large quantities of water, cook pasta, saar meat (gourash, pot roast), deep fry chips | 100% | ||
| P | Boll large quantities of water. Power management is activated. | |||
The Power function is suitable for heating large quantities of water.
Information on acrylamides
Important! According to the newest scientific knowledge, if you brown food (especially food that contains starch), acrylamides can pose a health risk. Thus, we recommend that you cook at the lowest temperatures and do not brown food too much.
CARE AND CLEANING
Clean the appliance after each use. Always use cookware with clean bottom.

IMPORTANT
Scratches or dark stains on the glass ceramic have no effect on how the appliance operates.
To remove the dirt
- Remove immediately: melted plastic, plastic foil, and food with sugar. If not, the dirt can cause damage to the appliance. Use a special scraper for the glass. Put the scraper on the glass surface at an acute angle and move the blade on the surface.
Remove after the appliance is sufficiently cool: imuscale rings, water rings, fat, slains, shiny metallic discolourations. Use a special cleaning agent for glass ceramic or stainless steel.
- Clean the appliance with a most cloth and some detergent.
- At the end rub the appliance dry with a clean cloth.
TROUBLESHOOTING
| Problem | Possible cause | Remedy |
| Red rings, Imascals or water rings, shiny metallic or other discolouration, scratches/shadows, bubbles or other miscellaneous marks or stains on ceramic glass cooktop surface. | Cooktop surface has not been cleaned correctly. Cleaning/ maintenance of the cooktop surface is not covered under warranty. If a service call is placed to clean the cooktop you will be charged for the visit. | Use a ceramic glass cleaner such as Cerapol. |
| Pitting of ceramic glass surface. | Spilovers of liquid with high sugar content. | These types of spills must be removed immediately with a special scraper for the glass. It not permanent damage to the cooktop glass can occur which is not covered under warranty. |
| You cannot activate the appliance or operate it. | · You touched 2 or more sensor fields at the same time. · The Stop-Co function operates. · There is water or fat stains on the control panel. | Activate the appliance again and set the nest setting in less than 10 seconds. Touch only one sensor field. Refer to the chapter "Operating instructions" Clean the control panel. |
| An acoustic signal sounds and the appliance deactivates. An acoustic signal sounds when the appliance is deactivated. | You put something on one or more sensor fields. | Remove the object from the sensor fields. |
| The appliance deactivates. | You put something on the sensor field. | Remove the object from the sensor field. |
| The residual heat indicator does not come on. | The cooking zone is not hot because it operated only for a short time. | If the cooking zone operated sufficiently long to be hot, speak to the service centre. |
| The Automatic Heat Up function does not operate. | The cooking zone is hot. The highest heat setting is set. | Let the cooking zone become sufficiently cool. The highest heat setting has the same power as the Automatic Heat Up function. |
| The heat setting changes between two levels. | The Power management is activated. | Refer to "Power management". |
TROUBLESHOOTING
| The sensor fields become hot. | The cookware is too large or you put it too near to the controls. | Put large cookware on the rear cooking zones if necessary. |
| There is no signal when you touch the panel sensor fields. | The signals are deactivated. Activate the signals (refer to "OffSound control"). | |
| □ comes on | The automatic switch-off operates. | Deactivate the appliance and activate it again. |
| □ comes on | The Child Safety Device or the Lock function operates. | Refer to the chapter "Operating instructions". |
| □ comes on | No cookware on the cooking zone.Incorrect cookware.The diameter of the bottom of the cookware is too small for the cooking zone.The cookware do not cover the cross. | Put cookware on the cooking zone.Use the correct cookware.Use larger diameter cookware.Cover the cross fully. |
| □ and number comes on | There is an error in the appliance. Disconnect the appliance from the electrical supply for some time. Disconnect the fuse from the electrical system of the house. Connect it again. If □ comes on again, speak to the after sales service. | |
| □ comes on | There is an error in the appliance, because either the cookware rolls dry or you've used intract cookware. Overheating protection for cooking zone operates. The automatic switch-off operates. | Deactivate the appliance. Remove the hot cookware. After approximately 30 seconds, activate the cooking zone again. If the cookware was the problem, the error message goes out of the display, but the residue heat indicator can stay. Let the cookware become sufficiently cool and refer to "Cookware for the induction cooking zone" to see if your cookware is compatible with the appliance. |
If you tried the above solutions and cannot repair the problem, speak to your dealer or the customer service centre. Give the data from the rating plate and an error message that comes on.
Make sure you operated the appliance correctly. If not the servicing by a customer service technician or dealer will not be free of charge, also during the warranty period. The instructions about the customer service and conditions of guarantee are in the guarantee booklet.
1514 elec
Environmentoentocconcerns
The symbol on the product or on its packaging indicates that this product may not be treated as household waste. Instead it should be taken to the appropriate collection point for the recycling of electrical and electronic equipment. By ensuring this product is disposed of correctly, you will help prevent potential negative consequences for the environment and human health, which could otherwise be caused by inappropriate waste handling of this product. For more detailed information about recycling of this product, please
contact your bcal council, your household waste disposal service or the shop where you purchased the product.
PACKAGING MATERIAL
The packaging materials are friendly to the environment and can be recycled. The plastic components are identified by marking: >PE<,>PS<, etc. Discard the packaging materials as household waste at the waste disposal facilities in your municipality.
Installation Instructions
⚠ Warning! Safety instructions ⚠ Warning! This must be read! The laws,
ordinances, directives and standards in force in the country of use are to be followed (safety regulations, proper recycling in accordance with the regulations, etc.)
Important! Installation may only be carried out by a qualified electrician.
The minimum distances to other appliances and units are to be observed.
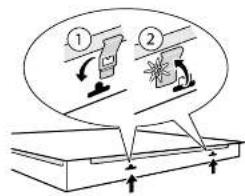
Anti-shock protection must be provided by the installation, for example drawers may on-ly be installed with a protective floor directly underneath the appliance.
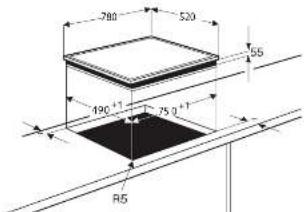
The cut surfaces of the worktop are to be protected against moisture using a suitable sealant. The sealant seals the appliance to the work top with no gap. Do not use silicon sealant between the appliance and the work top.
Avoid installing the appliance next to doors and under windows. Otherwise hot cook-
ware may be knocked off the rings when doors and windows are opened.
Caution! Warning! Risk of injury from electrical current.
- The electrical mains terminal is Ivo. Make electrical mains terminal tree of voltage.
• Observe electrical safety rules. - Ensure anti-shock protection by installing correctly.
- The appliance must be connected to the electrical supply by a qualified electrician.
- Loose and inappropriate plug and socket connections can make the terminal over-heat. Have the clamping connections correctly installed by a qualified electrician.
Use strain relief clamp on cable. - A ventilation gap of 5 mm underneath the cooktop must be left.
Caution! The surface temperature exceeds 95°C. To avoid a hazard, underbench access must be restricted
Electrical Connection
Before connecting, check that the nominal voltage of the appliance, that is the voltage stated on the rating plate, corresponds to the available supply voltage. Also check the power rating of the appliance and ensure that the wire is suitably sized in accordance with local wiring rules to suit the appliance power rating. The rating plate is located on the owner casing of the hoh. The heating element voltage is AC230V. The appliance also works perfectly on networks with AC220V- or AC240V-. Means for disconnection must be incorporated in the fixed wiring in accordance with local wiring rules. The hoh is to be connected to the mains using a device that allows the appliance to be disconnected from the mains at all polls with a contact
opening width of at least 3 mm, e.g. auto-matic line protecting cut-out, earth leakage trips or luse. If this appliance's mains cable is damaged, it must be replaced by a special cable
(type HOSBB-F T max 90°C; or higher).
The latter is available from the Customer Care Department.
The connection must be carried out as shown in the diagram.
The earth lead is connected to terminal 12 .
The earth lead must be longer than leads carrying electric current. The cable connections must be made in accord
ance with regulations and the terminal screws tightened security.
Finally, the connecting cable is to be secured with the main cable deal and the covering closed by pressing firmly (lock into place).
Before switching on for the first time, any protective roll or stickers must be removed from the glass ceramic surface.
a Warning! Once connected to the
mains supply check that all cooking
Zanes are ready for use by briefly switch each on in two at the maximum setting.
- A duplicate rating label is supplied with this unit. For easy identification of this unit after installation, stick it to a readily available surface adjacent to the cooktop.
Sticking on the seal
- Clean theworktop around the cutout area.
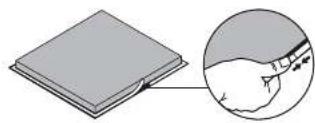
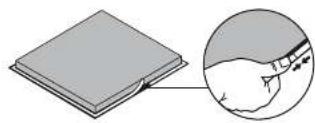
- Stick the single-sided aches vs sealing tape provided on the underside of the hcb around the outside edge ensuring that it is not stretched. The two ends of the tape should join in the middle of one side. After trimming the tape (allow it to overlap by 2.3 mm), press the two ends together.
Assembly
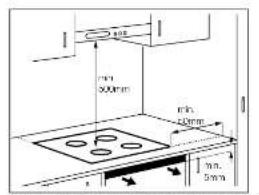
NOTE: The clearance must be used to cover the minimum requirements for both the carpeted and ockles. Refer to the carpeted metal beam manual.

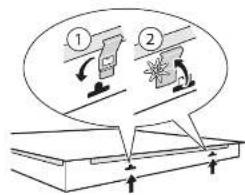
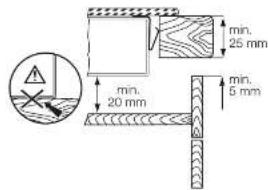
Waring Surface temperatures of base exceed 95°C.
under bench access must be restricted by use of non combustible barrier on installation
- electrolux.com
TECHNICAL INFORMATION
Model.
Induction 7.4 kW
Ser.Nr.
ELECTROLUX
| Cooking zone | Nominal Power (Max heat setting) (W) | Power Function activated (W) | Power function maximum duration (min) | Minimum cookware diameter (mm) |
| Right rear | 2300 W | 3200 W | 10 | 125 |
| Right front | 2300 W | 3200 W | 10 | 125 |
| Left rear | 2300 W | 3200 W | 10 | 125 |
| Left front | 2300 W | 3200 W | 10 | 125 |
The power of the cooking zones can be different in some small ranges from the data in the table. It changes with the material and dimensions of the cookware.
Cable
Cable types applicable for installation or replacement: H05R1-F, H05S5-F, H05W-V, H05V2V2-F. For the section of the cable refer to the total power (on the rating plate) and to the table:
| Total power | Section of the cable |
| Maximum 3500W | 3 × 1.5mm^2 |
| Maximum 5500W | 3 × 2.5mm^2 |
| Maximum 7000W | 3 × 4mm^2 |
| Maximum 8800W | 3 × 6mm^2 |
The earth cord (green / yellow cable) must be 2 cm longer than phase and neutral cables (blue and brown cables).
Wiring Diagram
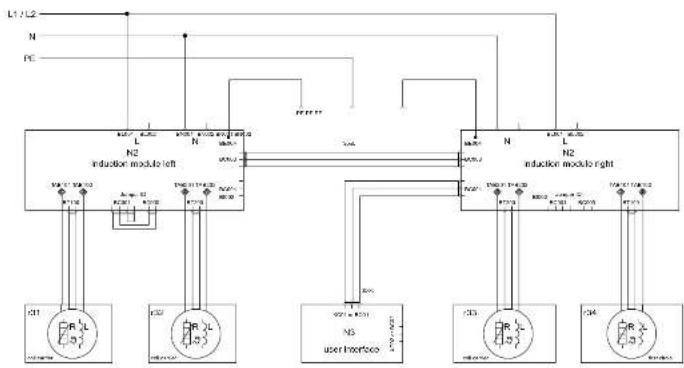
flowchart
graph TD
    A["Induction module left"] --> B["N2"]
    A --> C["Induction module right"]
    B --> D["User Interface"]
    C --> E["User Interface"]
    D --> F["R_L"]
    E --> G["R_L"]
    H["Input"] --> I["Ground"]
    J["Input"] --> K["Ground"]
    L["Input"] --> M["Ground"]
    N["Input"] --> O["Ground"]
    P["Input"] --> Q["Ground"]
    R["Input"] --> S["Ground"]
    T["Input"] --> U["Ground"]
    V["Input"] --> W["Ground"]
    X["Input"] --> Y["Ground"]
    Z["Input"] --> AA["Ground"]
    AB["Input"] --> AC["Ground"]
20 electrolux.com
Warranty
We, Electrolux, undertake that with warranty period (refer to each country location for warranty period - months) the purchase this Electrolux appliance or any part thereof is proved to be defective by reason only of faulty workmanship or materials, we will, at our option repair or replace the same FREE OF CHARGE for labour, materials or carriage on condition that:
- The appliance has been correctly installed and used only on the electricity supply stated on the rating plate.
- The appliance has been used for normal domestic purposes only, and in accordance with the manufacturer instructions.
- The appliance has not been serviced, maintained, repaired, taken apart or tampered with by any person not authorized by us.
All service work under this warranty must be undertaken by an authorized Electrolux Service Center. Any appliance or defective part replaced shall become the Company property. This warranty is in addition to your statutory and other legal rights. This warranty does not include maintenance, like cleaning of hood. The manufacturer waives all liability for failure to observe the instructions for the appropriate installation, maintenance and use of the appliance.
Customer Care Center
Indonesia.
Hotline service: 08041119999
Consumer Care Center Tel: 1300-58-11 22 Electrolux Forms Appliances Sdn. Bhd. Corporate Office Address: Unit T2-7, 7th Floor,
Tower 2, Jayas33 Hyperoffice, No. 3,
Consumer Care Center Address: Lot 06, No. 28, Jalan 15/22.
Tamar: Perindustrin Tiong Nam, 40200 Shah Alam, Selangor
Consumer Care Center Fax: 1+60 31 5524 2621 Email
malaysa.customercare@electrolux.com
Philippines
Consumer Care Center Toll Free :
1 000 10 845 CARE 2273
Consumer Care Hotline : (+63 2) 845 CAFE 2273 Electrolux
Philippines, Inc.
10th Floor, With Avenue Building
5th Avenue Corner 32nd Street
Bonifacio Global City,
Tacuia Philippines 1634
Trunkine: +83 2 737 4756
Website: www.electroux.com.ph
Email: wecare@electrolux.com
Singapore
Consumer Care Center Tel: (+65) 6727 3699 Electrolux S.E.A. Pte Ltd.
1 Fusionopolis Place,
07-10 Galaxis, West Lobby
Singapore 198522.
Office Fax : (-65) 6727 3611
Email: customer-care.an@electrolux.com
Vietnam
Consumer Care Center Toll Free: 1500-58-88-99 Tel: (+84 29) 3910 5465
Elecholux Vietnam Ltd.
Floor 9th, A&B Tower
76 Le La sheet - Ben Thanh Ward - District 1 Ho Chi Minh
City , Vietnam
Office Tel: +54 281 3910 5465
Office Fax: (1-84 28) 3910 5470
Email: vncare@electroix.com
Thailand
Consumer Care Tel: (+68 2) 725 9000 Electrolux Thailand Co., Ltd.
Flecholux Building 14th Floor
1910 New Phetchsburl Road,
Bangkapi, Hua Khwang, Bangkok 10310 Office Tel: (+66 2)
7259100
Office Fax : | (66 2) 7259299
Email: customercaretnal@electclux.com
Hongkong
Tel (+652) 8203 0299
Dah Chong Hong, Ltd. - Service Centre 9/F., Yee Lim
Godown Block C
2-28 Kwai Lok Street, Kwai Chung, N.T.
EHI845BB

KTIUKSHAN
gdomado@domalseu

Electrolux
2 electrolux.com
ดําดับสนุนย์
coaununinorlek outnaeunmeeranefansr spulcer wamnriu wosun laaunie kouen wauuena niscu unluereffencu wawtukcosidc meconuifchu acssaaedlubonfomn uutat mokoficufu koowunui spauuukoepudwaewahccdupred codousgja hans
roumsibouwacnuiueoyu
dosecunocesbaru učeniržechrú ninnjukudwčetnú "csuronura mureš, lochru spichorinserdomi. 7 su nindeomstovanmst, dules mijawodneu lekmenas choginotu
neuren, oskoumaloion, enveuchliyehnlede niubelamien; übr uoodian de foreminutuquwachniawariu melon luen; forstiradusabidu wecunlmoioi wertunfiärte fechitudestodwade huiwegendos venu erludschurunourasodin eucwarenluorssaholgi 38eclustedyn
www.nuca.com Australia, Singapore AS 4551 & AS/NZS 60035.26
de kolumslou
DeyachuromiLiberia 3
5
###
rPcfl,veksh,th ____ 10
reglerartronucera 10
14
The following table provides the information in English:
chemical
Chemical structure diagram with numbered positions and a central rectangular element1
2 CHILOVICUUSGOTTS
3 CHNCHUUS2015
4
5 chinoanunusportis
SUIUUUCOIIWVACUFU
| ### | ||
| 1 | 1 | ### |
| 2 | 2 | ## / ### |
| 3 | ### | ### |
| 4 | ### | ### |
| 5 | P | ### |
| 6 | 1 | ### |
| 7 | ### | ### |
| 8 | ### | ### |
| 9 | +/- | ### |
| 10 | 7 | ### |
| 11 | # | ### |
6 electrolux.com
ค่าอธุบายพลิตภัณฑ์
The following table is in English:
• ๑๒๐๙๒๘๖๕๖๔๐ ๒๒๐๙๒๘๖๕๖๔๐ ๒๒๐๙๒๘๖๕๖๔๐ ๒๒๐๙๒๘๖๕๖๔๐ ๒๒๐๙๒๘๖๕๖๔๐ ๒๒๐๙๓๐ ๒๒๐๙๓๐ ๒๒๐๙๓๐ ๒๒๐๙๓๐ ๒๒๐๙๓๐ ๒๒๐๙๓๐ ๒๒๐๙๓๐ ๒๒๐๙๓๐ ๒๒๑๑
• COMUNIONAL DE LA
meanān menān juocuān suōng shēng shūn hān maugon rān kān kān:
- 101.3 m2 on answer to the end of 101.3 m2 do using a function that is + anterior by using a function for the function positive function under the value of U
- 67.13:①
• WORU Minute Minder 150709
• cfuhenlcerfosudan
• FC, CORDEN, INDO, FL
เมืองอิสย์มหกรรม
Domehouuocunurshwir iwi ① un 3 cum coecowa bocchulunuzo iwi ■ un 3 cum butyutu uboom beacunugrda iwi + auehru bguangju aeo auehungctelzu
i
ชิมพิศน์บุคสติ
The following table represents the results of the results presented in the above.
i ส่งสําหน
Coquenanaduocesnjuibiuuornamu
| msdohnouedu | msdohu: kan douru | 7 | desmeliowbomuiuni |
| U1 | eyama, cuuboma tawr. 3% | ||
| 1-3 oecoueu co, sana ruji foBenfara senru | 5 - 25 um nuasa 3-8% | ||
| 1-3 minico "daua loku 10 - 40 um japcudau" 3-8% | |||
| 1-3 hordureset'duo ucau senouomshafagi | 25 - 50 um nuamvihenach euninsnuufuluizeniu san | 8 - 3% | |
| 5-7 in un neodobatei J 20 - 40 um buh 2-3 juu 13-18% | |||
| /9 | Cotueto 20 - 60 um buh 1/4 Bos ensutuo | 750 ma | 18-25% |
| 7-9 | decomeluschun opiea'qi | 60 - 150 um | 18-25% |
| 9-12 | ncodalworu fennanu rorocnoudearu Prasn du ga li wumlaun | nuishou | 25-45% |
| 12-13 | ncodalworu kousot si sichtouaftn | 5 - 15 um wendoukulantco | 45-64% |
| 14 | cuhuannum wadir deneaines decu clustnor | 100% | |
| P | nuhuannum detavanduclanslomewabou | ||
(2) Power, Power, and Utilities
ด้วยการตุนเรื่องค่า
davirul smlu, pinnanmetsinga impulso de nurkemfou (cuwemenslneclou) andersedui vebveladogum w daro isuhkinusponmeda gumpheva leu, usmuinsdeonantuzloarlu
msgallamnunada
• excited by EUCNECOSHIM/DEI
The following table is in English:
rsfo.dere.biochunemurghoefuangsh
Kiluyn Tübejimo eran derelösekocodovarenen
Kuunun (Econ)
In the research of the human resources
for a course of your school in school
dongmuununisouwugp

(1) 2017-04-26, UchimusukurukurukurukurukurukurukurukurukurukurukurukurukurukurukurukurukurukurukurukurukurukurukurukurukurukurukurukurukurukurukurukurukurukurukurukurukurukurukurukurukurukurukurukurukurukurukurukurukurukurukURU (2) 2017-04-26, Uchimusukurukurukurukurukurukurukurukurukurukurukurukurukurukurukurukurukurukurukurukurukurukurukurukurukurukurukurukurukurukurukurukurukurukurukurukurukurukurukurukurukuruh (3) 2017-04-26, Uchimusukurukurukurukurukurukurukurukurukurukurukurukurukurukurukurukurukurukurukurukurukurukurukurukurukuruh (4) 2017-04-26, Uchimusakulakarakarakarakarakarakarakarakarakarakarakarakarakarakarakarakarakarakarakarakarakarakarakarakarakarakarakarakarakarakarakarakarakarakarakarakarakarakarakarakarakarakarakarakarakarakarakarakarakarakarak
Consumer Care Center all line:
830 10.645 CML 22/3
Consumer Care Holins: (163 2) 845 CARE 2273 Electrical Philippines, Inc.
C# Door With Avenue Building
5th Avenue Corner 12nd Street
Bentacio Global City.
Tuugu Philippines 1634
In line -237/34/56
Website: www.dcmtnw.com
Email:vecareSelectclx.com
Singapore
Consumer Care Corp Tel: (+50) 5/27/3069 Electric S.F.A.
File ID:
1 Fus onopola Place,
407 10 Celena, Westlolly
Suglaxoe 138597.
Office Tax: (+65) 6727 361
Email: customer@cninfo.com
Vietnam
Consumer Care Center Toll Free: 1800-58-68-99
Tel: (184 28; 3910 5465
Hedelux Victor Ltd.
East 9th, ABB Tower
76 Le Lai steer - Ben Tranh Ward - Dianic 1- to Ch. Mih
Ch. Viemom
Offcn Tel: (+84 28) 3910 5465
Office Fax: 1484 23; 3910 5470
Email: vrcore@electrolux.com
Thailand
Consumer Care Ltd (66 2), /25 9000 LethoLak, Ireland Co., Ltd
Electrolux Building 14th Floor
19 C New Hetchoburt Food
Banglapi, Hui Khwang, Banglao: 10310
Office Tel: (166 2)7259100
Office Fax: (165 21 7259299
Email: e.bhmscarchb@alcdral.com
Hongkong
Tel: (1852) 3203 0298
Dah Chong Harg, Ltd. - Service Centre 8/F., Yee Lim
Gecam Block C
2 28 Kwa Ink Street, Kam Chung, N.
EHI845BB

chemical
Chemical structure diagram with labeled atoms and functional groupsLima y. 50% vay sht ctn phu, 29p ng 15 hlu bheu shu hun khupen nghu mua rha cuang upi chu ran huan mng hui ma su bap. Tham kdo hung dian lap upi cua rhan may huk mi


Appliances Son, Bhd. Corporate Office Address: Unit T2-7
7th Floor.
Tower 2, Jaya33 Hyperoffice, No. 3,
Consumer Care Center Address: Lot C6, No. 28, Jalan 15/22,
Taman Perindustrain Tiong Nam, 40200 Shah Alam, Selangor
Consumer Care Center Fax : (+60 3) 5524 2521 Email :
malaysia.customercare@electrolux.com
Philippines
Consumer Care Center Toll Free :
1-800-10-845-CARE 2273
Consumer Care Hotline : (+63.2) 845 CARE 2273 Electrolux
Philippines, Inc.
10th Floor. W5th Avenue Building
5th Avenue Corner 32nd Street
Bonifacio Global City,
Taguig Philippines 1634
Trunkline: +63 2 737-4756
Website : www.electrol.x.com.ph
Email: wecare@electrolux.com
Singapore
Consumer Care Center Tel: (+65) 6727 3699 Electrolux S.E.A.
Pte Ltd.
1 Fusionopolis Place.
07-10 Galaxis, West Lobby
Singapore 138522.
Omc Fax: (+65) 6727 3611
Email: customer-care.sin@electroix.com
Vietnam
Electrolux Building 14th Floor
1910 New Phetchaburi Road.
Bangkapi, Huai Khwang, Bangkok 10310 Office Tel: (+66 2)
7259100
Office Fax: (+66 2) 7259299
Email: Customercanethai@electrolux.com
Hongkong
Tel: (+852) 8203 0298
Dah Chong Hong, Ltd. - Service Centre B/F., Yee Lim
Godown Block C
2-28 Kwai Lok Street, Kwai Chung, N.T.
ANC A16532701 RevB

natural_image
Pure decorative pattern with repeating geometric motifs and no text or symbols- BEFORE USING YOUR APPLIANCE
- CONDITIONS OF USE
- BEFORE YOU CALL
- CONTENTS
- SYMBOLS
- ! WARNING!
- CAUTION!
- i IMPORTANTI
- ENVIRONMENT!
- SAFETY INFORMATION
- Children and vulnerable people safety
- WARNING!
- Installation
- Use
- Care and cleaning
- Disposal
- PRODUCT DESCRIPTION
- PRODUCT DESCRIPTION OPERATING INSTRUCTIONS
- On and off
- Automatic switch off
- The heat setting
- OPERATING INSTRUCTIONS OPERATING INSTRUCTIONS
- Switching on and off the power function
- Power management
- Count down timer
- Count up timer
- Minute minder
- Stop+go
- Lock
- The child safety device
- HELPFUL HINTS AND TIPS
- OffSound Control (deactivation and activation of the sounds)
- Deactivation of the sounds
- Activation of the sounds
- i IMPORTANT
- INDUCTION COOKING ZONES
- Cookware for induction cooking zones
- Cookware material:
- Cookware is correct for an induction hob if:
- THE BOTTOM OF THE COOKWARE
- Use of the cooking zones
- ! IMPORTANT
- The noises during operation
- Energy saving
- ENVIRONMENT
- HOW TO SAVE ENERGY
- Öko Timer (Eco Timer)
- Examples of cooking applications
- IMPORTANT
- Information on acrylamides
- Clean the appliance after each use. Always use cookware with clean bottom.
- To remove the dirt
- Environmentoentocconcerns
- Installation Instructions
- Electrical Connection
- Sticking on the seal
- TECHNICAL INFORMATION
- Warranty
- Customer Care Center
- Indonesia.
- Philippines
- Singapore
- 07-10 Galaxis, West Lobby
- Vietnam
- Thailand
- Hongkong
- electrolux.com
- ดําดับสนุนย์
- roumsibouwacnuiueoyu
- de kolumslou
- electrolux.com
- i ส่งสําหน
- ด้วยการตุนเรื่องค่า
- msgallamnunada
Brand : ELECTROLUX
Model : EHI845BB
Category : Cooker