HOR61S8CEWSW1 - Cooker HAIER - Free user manual and instructions
Find the device manual for free HOR61S8CEWSW1 HAIER in PDF.

| Type of Product | Freestanding Electric Cooker |
| Brand | Haier |
| Model | HOR61S8CEWSW1 |
| Width | 60 cm |
| Depth | 60 cm |
| Height | 85 cm |
| Weight | Approx. 50 kg |
| Power Supply | 220-240V, 50/60 Hz |
| Number of Burners | 4 (with 2 additional zones) |
| Hob Type | Ceramic (induction capable) |
| Oven Capacity | 70 L |
| Oven Functions | Grill, Convection, Bottom heat, Defrost |
| Control Type | Touch + Rotary knobs |
| Timer | Yes (digital) |
| Child Lock | Yes |
| Automatic Shut-off | Yes |
| Cleaning Method | Wipe with damp cloth; oven: catalytic liners |
| Energy Class | A |
| Spare Parts Available | Yes (via Haier service) |
| Repairability Index | 8/10 |
Frequently Asked Questions - HOR61S8CEWSW1 HAIER
User questions about HOR61S8CEWSW1 HAIER
0 question about this device. Answer the ones you know or ask your own.
Ask a new question about this device
Download the instructions for your Cooker in PDF format for free! Find your manual HOR61S8CEWSW1 - HAIER and take your electronic device back in hand. On this page are published all the documents necessary for the use of your device. HOR61S8CEWSW1 by HAIER.
USER MANUAL HOR61S8CEWSW1 HAIER
INSTALLATION INSTRUCTIONS
USER GUIDE
Freestanding cooker
HOR61 models
NZ AU
Haier
Safety and warnings 2
Installation instructions
4
Oven controls and setting the clock 7
First use - conditioning the oven and warmer drawer 9
Using the oven and warmer drawer 10
Oven functions 12
Oven cooking charts 14
Oven cooking tips 17
Using the timer 18
Automatic cooking 19
Using the ceramic glass cooktop 20
Using the radiant cooktop 21
Cookware 22
Care and cleaning 23
Troubleshooting 30
Warranty and service 33
IMPORTANT!
SAVE THESE INSTRUCTIONS
The models shown in this user guide may not be available in all markets and are subject to change at any time. For current details about model and specification availability in your country, please go to our website www.haier.co.nz/www.haier.com.au or contact your local Haier dealer.

WARNING!

Hot Surface Hazard
Accessible parts will become hot when this appliance is in use.
Take care to avoid touching hot surfaces inside the oven or on the cooktop.
Use oven mitts or other protection when handling hot surfaces such as oven shelves or dishes.
Take care when opening the oven door. Let hot air or steam escape before removing or replacing food.
Supervise children and keep them safely away until the oven is cool.
Failure to follow this advice could result in burns and scalds.

WARNING!

Electrical Shock Hazard
Switch the appliance off at the power supply before replacing fuses or the oven lamp.
If the cooktop surface is cracked, switch the appliance off at the power supply and contact your service centre. Do not use until repaired.
Failure to follow this advice may result in electrical shock or death.

WARNING!

Tipping Hazard
All cookers can tip. Keep children away and take care. The anti-tip brackets supplied must be installed.
Failure to follow these instructions could result in injury.

WARNING!

Fire Hazard
Never leave the cooktop unattended during use - Boilover causes smoking and greasy spillovers that may ignite.
Cooking grease or oil may also self-ignite at high temperatures. Take extreme care when frying.
Never use your appliance for warming or heating the room. Persons could be injured or a fire could start.
Keep the area around the appliance free from combustible materials (e.g. wall coverings, curtains, drapes), gasoline and other flammable vapours and liquids.
Do not let cooking grease or other flammable materials accumulate on or near the appliance.
Do not hang any articles (e.g. dish towels) off the oven handle. Some fabrics may ignite or melt from the heat.
Be sure that all the controls are turned off and the appliance is cool before using any type of aerosol cleaner on or around the appliance.
Chemicals in such cleaners could, in the presence of heat, ignite or cause metal parts to corrode.
Failure to follow this advice may result in death or serious injury.
IMPORTANT SAFETY INSTRUCTIONS
- Isolating switch: make sure this appliance is connected to a circuit which incorporates an isolating switch providing full disconnection from the power supply.
• Household appliances are not intended to be played with by children. - Children of less than 8 years old must be kept away from the appliance unless continuously supervised. This appliance can be used by children aged from 8 years and above, and persons with reduced physical, sensory or mental capabilities or lack of experience and knowledge, if they have been given supervision or instruction concerning the use of the appliance in a safe way and they understand the hazards involved. Cleaning and user maintenance shall not be done by children without supervision.
• After use, ensure the dials are all in the 'OFF' position. - Safe food handling: Food should be left in the oven for as short a time as possible before and after cooking. This is to avoid contamination by organisms which may cause potential food poisoning. Particular care should be taken during warmer weather.
- Do not place aluminium foil, dishes with reflective qualities, water, ice or any object on the oven floor as this will cause a heat build-up which irreversibly damages the enamel.
- If the electrical supply cord is damaged, it must only be replaced by an authorised person.
- Do not stand or place heavy objects on the door.
- Do not use harsh abrasive cleaners or sharp metal scrapers to clean the oven door glass since they scratch the surface, which may result in shattering of the glass.
- Do not use a steam cleaner to clean any part of the cooker.
- Do not keep flammable substances in the oven or in the drawer.
- Do not operate your appliance by means of an external timer or separate remote-control system.
- Under unfavourable electrical supply conditions, the appliance may cause temporary voltage drops.
Installing your cooker
! WARNING!

Electrical Shock Hazard
Before obtaining access to terminals, all supply circuits must be disconnected.
Failure to follow this advice may result in electrical shock or death.
IMPORTANT!
Connection of this cooker to fixed or flexible wiring must be made by a suitably registered person. Connection by an unregistered person can cause a safety hazard.
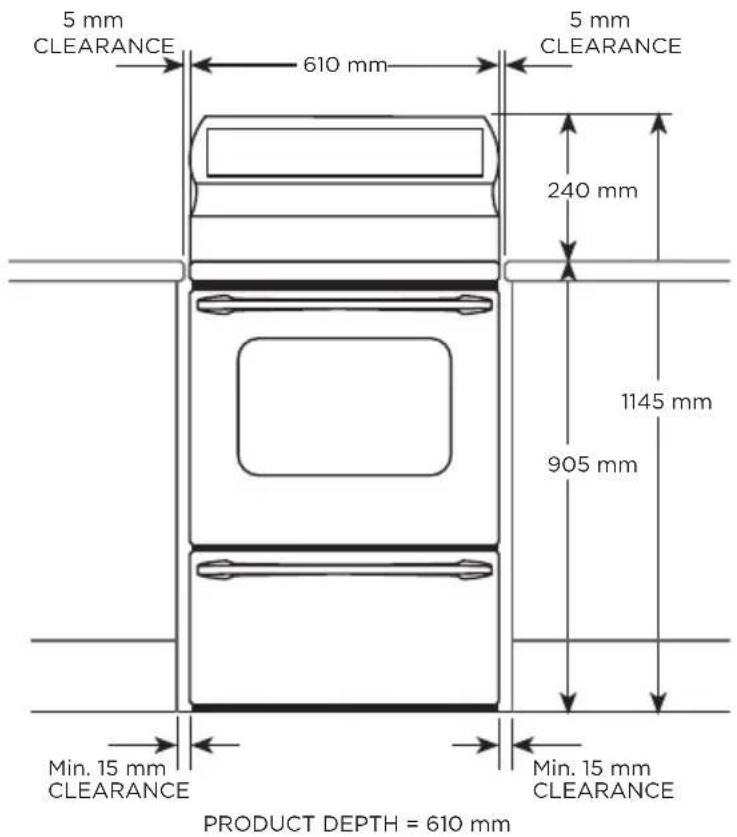
Dimensions and clearances
Power
OR61S2CEWW
220-240/380-415 V 2N AC 50 Hz 47.6A
OR61S4CEWW
220-240/380-415 V 2N AC 50 Hz 47.6A
OR61S8CEWSW
220-240/380-415 V 2N AC 50 Hz 53.7A
Important notes on surrounding cabinetry
IMPORTANT!
- Haier strongly recommend that the sides of the adjacent cabinetry are made of a heat-resistant material. This is to avoid potential damage (ie when open door grilling).
INSTALLATION INSTRUCTIONS
Electrical connection
- Some models have two side-mounted power outlets: the power socket on these cookers are rated at 250V 10A AC only.
- We recommend that the cooker sub circuit is protected by a suitably rated Miniature Circuit Breaker (M.C.B) but not connected to a Residual Current Device (R.C.D) or an Earth Leakage Breaker (E.L.C.B). In New Zealand this appliance must be connected to the electrical supply using a cable fitted with an appropriately rated plug. The plug must be compatible with the socket-outlet fitted to the final subcircuit in the fixed wiring that is intended to supply the appliance.
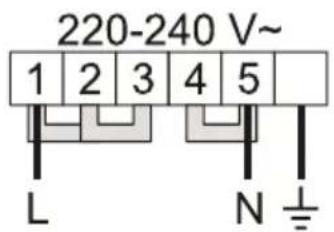
Single phase connection:
- The supply cable should be at least equivalent to an ordinary PVC sheathed and insulated min. 4 mm ^2 , three-core (twin and earth), min. 1 m long flexible cable.
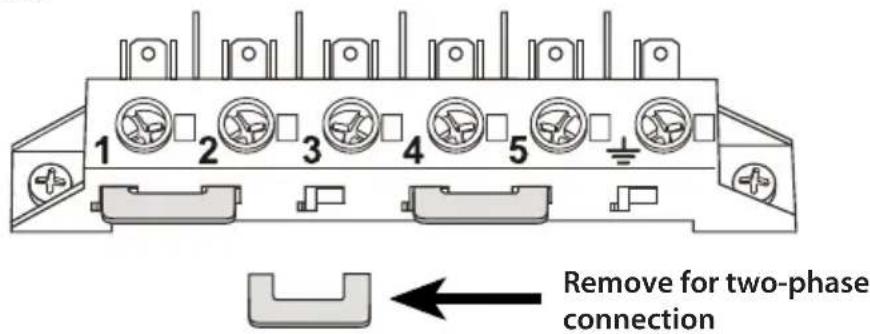
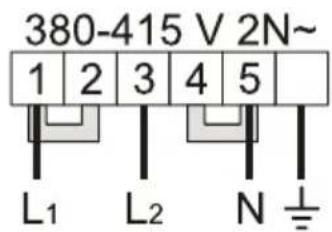
Two-phase connection:
- The supply cable should be at least equivalent to an ordinary PVC sheathed and insulated, min. 2.5 mm ^2 , four-core, min. 1 m long flexible cable. If fitted the bridging link between 2 and 3 should be removed, as shown. Failure to this will result in damage to the appliance.
- This appliance must be connected to a circuit which incorporates an isolating switch providing full disconnection from the power supply.
- If you raised the cooker to align it with the bench, make sure the base of the cooker cannot slip.
Connecting the cable
① Remove the cable access cover (lower right hand corner).
② Provide a minimum of 1 metre of cable.
- For 220-240 single phase operation, connect phase wire to terminal 1 (with links between 1-2 and between 2-3 fitted).
- For 380-415V two phase operation, remove the link between 2-3 and connect phase 1 wire to terminal 1 (with link between 1-2 fitted); then connect phase 2 wire to terminal 3.
③ Connect neutral wire to terminal 5 (with link between 4-5 fitted).
④ Connect ground wire to earth terminal 12 .
⑤ Replace cover; check that no conductors are trapped by the wiring cover.
INSTALLATION INSTRUCTIONS
Anti-tip brackets
Two anti-tip brackets are supplied with the accessories so that the cooker can be secured to the wall to prevent it from tipping over. Use the two screws on the back panel of the cooker, as shown.
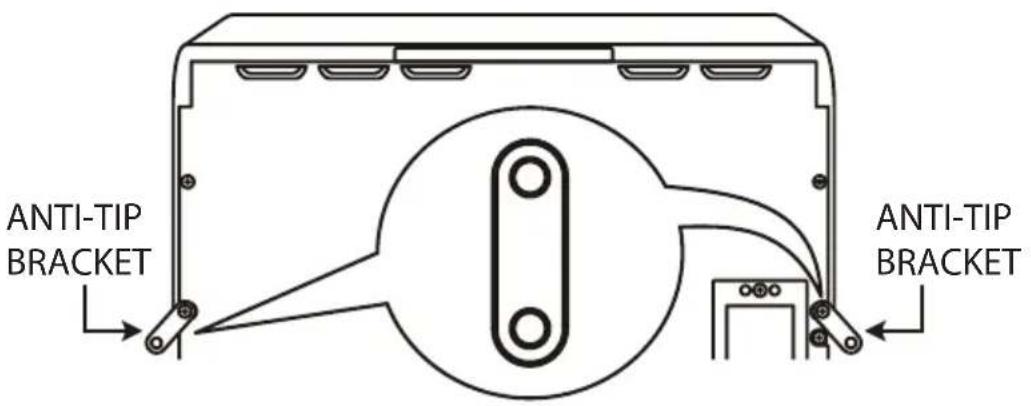

WARNING!
Tipping Hazard
All cookers can tip. Keep children away and take care. The anti-tip brackets supplied must be installed.
Failure to follow these instructions could result in injury.
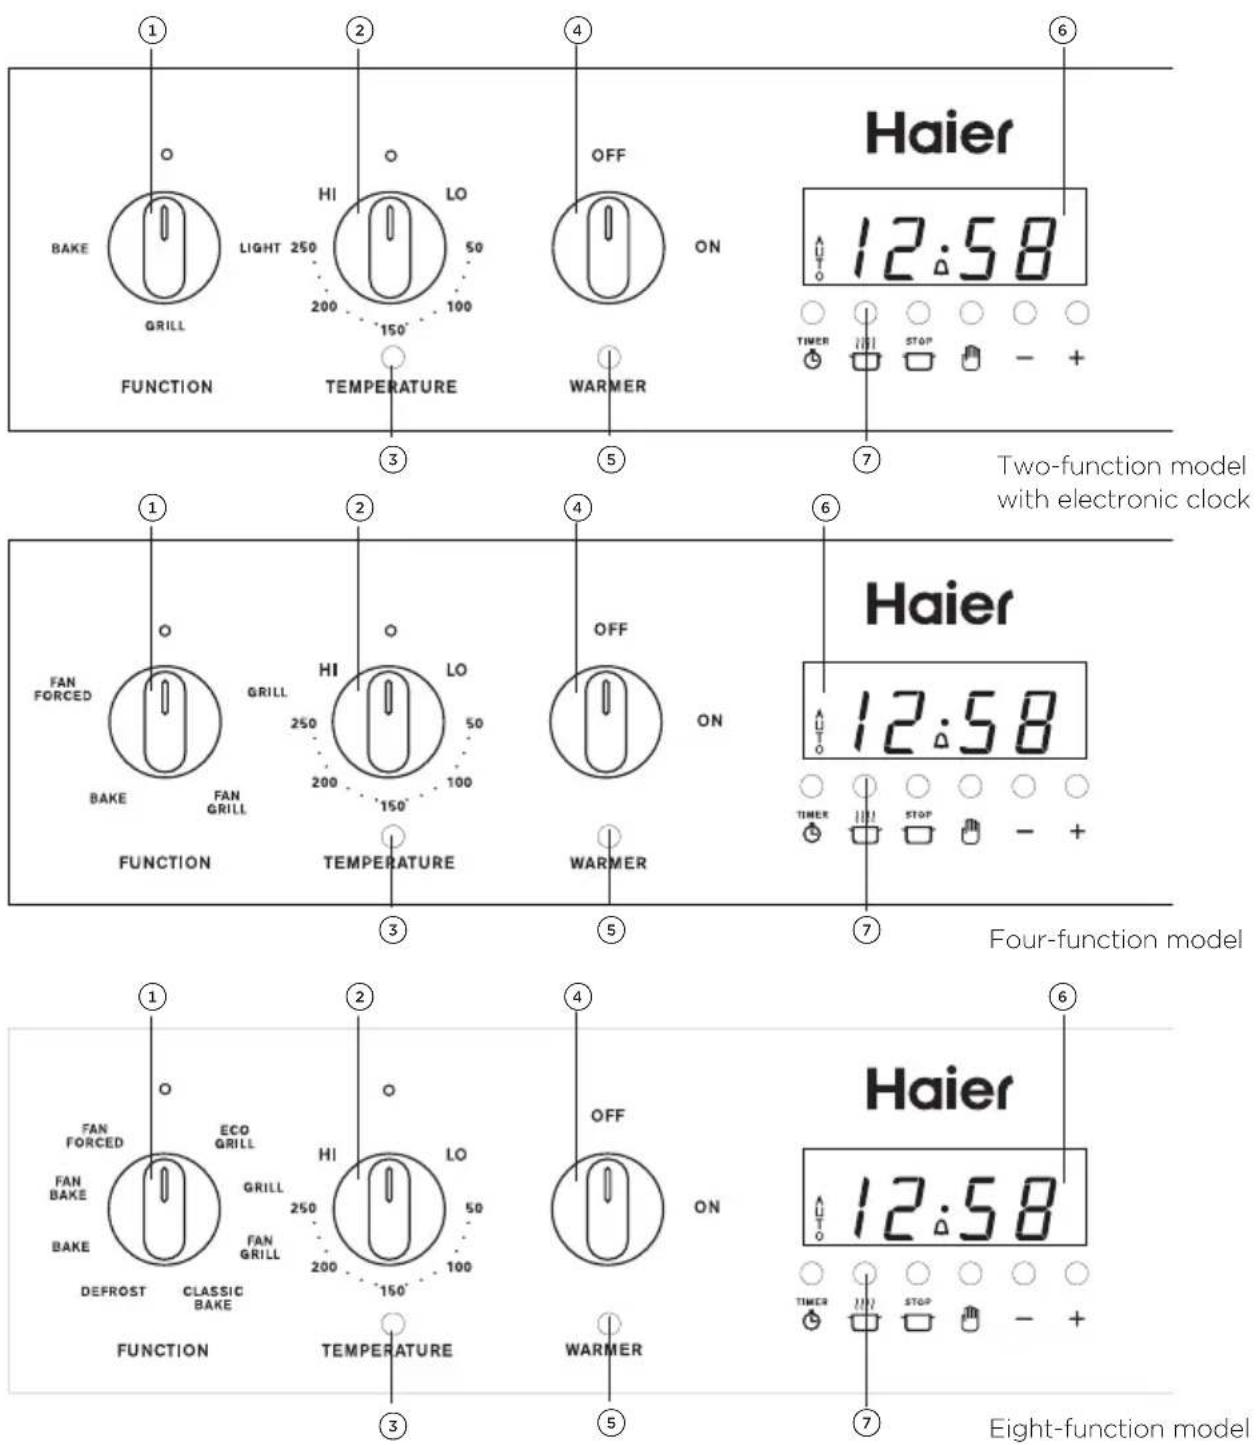
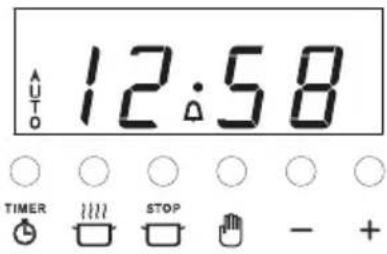
① Function knob
② Temperature knob
③ Temperature indicator light
④ Warmer drawer knob
⑤ Warmer drawer indicator light
⑥ Clock display
⑦ Control buttons
Buttons


sets the timer

sets the cooking time for automatic cooking

sets the stop time for automatic cooking

sets the clock, returns oven to manual mode, ncls automatic cooking
— decreases time and beep volume
+ increases time
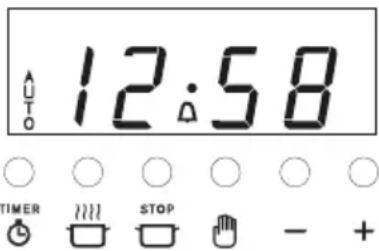
Illuminated symbols
IF THE DISPLAY SHOWS IT MEANS THAT... FOR MORE INFORMATION
| flashing with | The clock needs to be set. See instructions below. | ||
| AUTO | steadily lit The oven is automatic cooking. | See section ‘Automatic cooking’ | |
| flashing and beeping | Automatic cooking has finished or has been set incorrectly (the stop time is before the time of day). | ||
| A | steadily lit The timer is set. | See section ‘Using the timer’ | |
| flashing and beeping | The set time is up. | ||
To set the clock
When the power to the cooker is turned on or restored after a power failure, 000 and AUTO will flash in the display.

② Press — and + until you have the correct time of day.
We recommend conditioning the oven before any cooking or baking and conditioning the warmer drawer before using it for keeping food warm. Conditioning will burn off any manufacturing oil residues and ensure that you get the best results right from the start.
Conditioning the oven
① Read this user guide, taking special note of the ‘Safety and warnings’ section.
② Make sure that the cooker is secured to the wall with the two anti-tip brackets.
③ Remove all accessories and packaging. Make sure you peel any protective film off the surfaces. Discard the film immediately, keeping it out of reach of children.
④ If your model has an electronic clock, set the clock. See 'Oven controls and setting the clock' for instructions.
IMPORTANT!
The oven will not work until the clock has been set.
⑤ Check the side racks are correctly in place on both sides and fit the oven accessories as shown in 'Using the oven and warmer drawer'.
⑥ Heat the oven for 1 hour at 200°C on BAKE (two-function models) or FAN BAKE (four and eight-function models).
⑦ After 30 minutes is up, select GRILL (two-function models) or FAN GRILL (four and eight-function models).
- Leave the temperature at 200^ for 5 minutes.
- There will be a distinctive smell during the conditioning. This is normal, but make sure your kitchen is well ventilated.
- Once cooled, remove the oven accessories and the side racks on both sides, wipe out the oven with a damp cloth and mild detergent, and dry thoroughly.
- Refit the side racks as shown in ‘Using the oven and warmer drawer’.
Conditioning the warmer drawer (some models only)
① Turn the empty warmer drawer on and leave it on for 30 minutes.
② Turn off and allow the warmer drawer to cool, then wipe out with a damp cloth and mild detergent and dry thoroughly.
USING THE OVEN AND WARMER DRAWER
natural_image
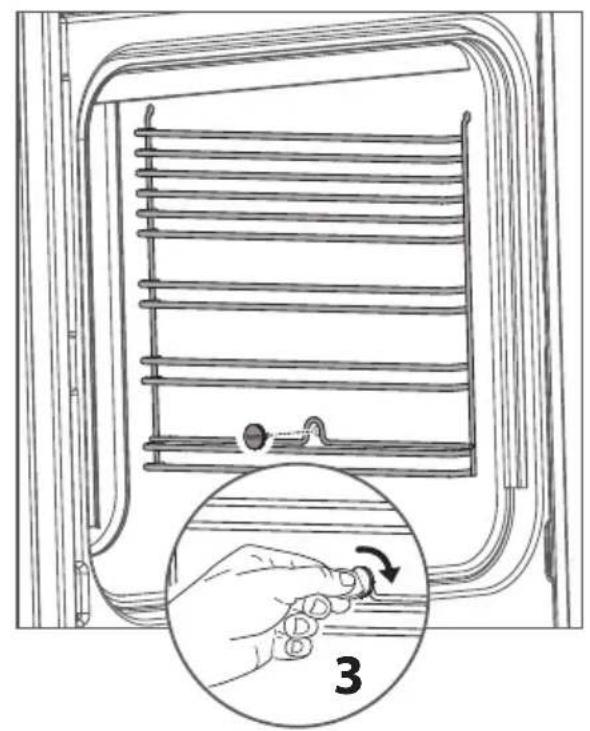
Diagram of a refrigerator with horizontal insulation and a hand holding a coin, showing a numbered callout (no text or symbols present)To fit the side racks
① Fit the side racks on the oven walls making sure they are the right way up, as in the illustrations.
② For each side rack, the two wire ends at the top shall be correctly inserted into the two openings on the side wall.
③ Tighten the fixing screw at the bottom.
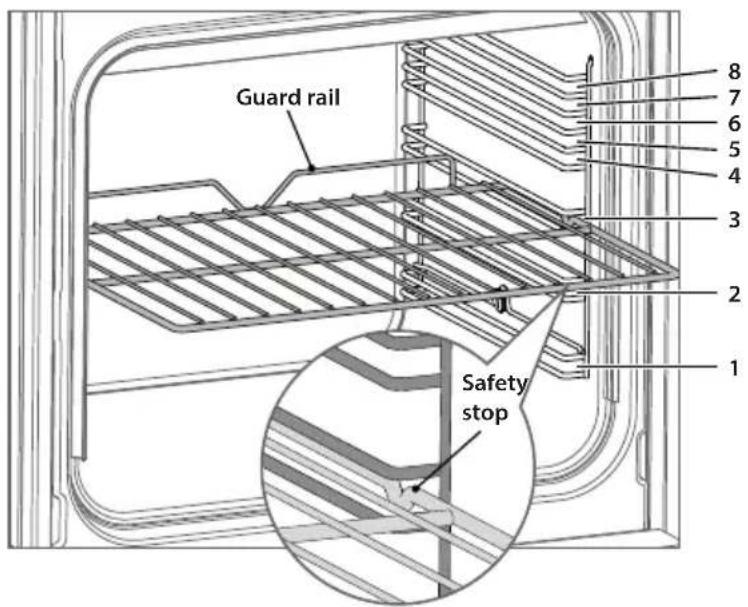
Slide in the oven racks, making sure that
• they are between the two wires of a shelf position;
• the stop notches (safety stops) point down;
• the guard rail is at the back.
- Note: the oven trays shall be placed above the oven rack.
Shelf positions
To start cooking
① Slide in the shelves you will need, making sure that:
• the safety stops point down
• the guard rail is at the back.
② Select a function.
• The oven light will come on.
③ Set the temperature.
- The temperature indicator light will come on.
- It will go out when the oven has reached the set temperature.
During cooking
- The temperature indicator light may come on and go out again as the oven maintains the temperature.
- Set the temperature back to ⬆ (OFF) before changing functions.
When you have finished cooking
Turn both the function and temperature knobs to the ⬆ (OFF) position.
Warmer drawer (some models only)
The warmer drawer has a low-powered element and is useful for keeping hot food warm or for warming plates and serving dishes. To use, turn the warmer drawer knob to ON. Its indicator light will glow when the drawer is on.
Note:
• The warmer drawer is not suitable for reheating food from cold.
- In models with no electronic clock, the drawer below the oven does not have a heating element and is therefore used for storage only.
- Depending on your model, your oven may have only some or all of the functions below.
- See sections ‘Oven cooking tips’ and check the ‘Oven cooking charts’ for the recommended shelf positions.
ALL MODELS

BAKE
This is the traditional method of cooking. It is most suitable for food that requires long cooking such as rich fruit cakes and traditional roasts. Heat comes from the top and bottom elements in the oven. The bottom element is concealed beneath the oven floor. You will achieve a better result with baking if the oven is preheated first. Cooking one shelf of food at a time is preferable.
Use FAN FORCED for multi-shelf baking (available in four-function and eight-function models only).
griLL
GRILL cooks a large area of food by using heat from the upper element and is suitable for family meals or larger amounts of food. Do not set the temperature higher than 225^ C in this function. We recommend you use 225^ C to grill meats.
For best results when grilling, leave the oven door open at the first stop position.
FOUR-FUNCTION & EIGHT-FUNCTION MODELS ADD
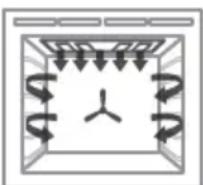
fAN griLL
The fan circulates heat from the grill element around the oven. FAN GRILL is suitable for foods you would normally fry, eg sausages and meatballs. It also cooks larger cuts of meat and whole chickens well, giving a result that is similar to a rotisserie. Fan grilling is carried out with the door closed, and the oven does not need to be preheated. Do not set the temperature higher than 200^ C in this function.
natural_image
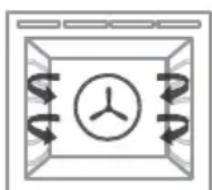
Simple diagram of a ventilation duct with airflow arrows and a central circular component (no text or symbols)fAN fOrCED
Fan forced cooking circulates heat from the element around the fan throughout the oven. This function is particularly good for multi-shelf cooking, batch baking or cooking several dishes together. Use also for casseroles and baked vegetables, as you can place them anywhere in the oven except on the oven floor.
EIGHT-FUNCTION MODELS ONLY ADD

flowchart
graph TD
    A["Start"] --> B{Decision}
    B -->|Yes| C["Process"]
    B -->|No| D["End"]
fAN BAKE
A fan at the rear of the oven circulates hot air from the top and bottom elements around the oven. The fan tends to dry the surface of the food being cooked, which makes it suitable for crisping foods, eg slices, pastries and oven-roasted vegetables.
FAN BAKE can be used at a low temperature (50°C) for drying fruit, vegetables and herbs.
natural_image
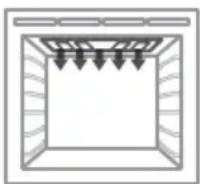
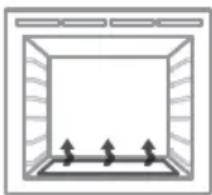
Simple line drawing of a window with three upward-pointing arrows at the bottom (no text or symbols)CLASSiC BAKE
CLASSIC BAKE uses heat from the bottom element only. It is particularly suitable for quiches, pies and slices that require more cooking on the bottom. We recommend that you preheat the oven on BAKE or FAN BAKE then switch to CLASSIC BAKE once the oven is at the desired temperature.
natural_image
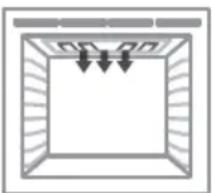
Simple line drawing of a rectangular frame with internal vertical lines and arrows indicating downward flow (no text or symbols)ECO griLL
ECO GRILL is suitable for single servings or small pieces of food. By using it you can save energy because you heat a smaller portion of the grill element. Do not set the temperature higher than 225^ C in this function. For best results when grilling, leave the oven door open at the first stop position.

dEfrOST - this is not a cooking function
DEFROST allows you to defrost food using the oven fan without any heat. This prevents food from drying out or starting to cook. Leave the temperature setting at the Ⓧ (OFF) position as no heat is required. Defrosting this way is particularly good for delicate foods.
Remove food from the oven as soon as it is thawed.
| Baking | BAKE | fAN FORCED | fAN BAKE | CLASSIC BAKE | grILL | fAN grILL |
| Biscuits - single tray | ● | ○ | ○ | |||
| Biscuits - 2-3 trays | ○ | ● | ○ | |||
| Slices/squares | ○ | ○ | ● | ● | ||
| Butter cake | ● | ○ | ○ | |||
| Fruit cake | ● | ○ | ○ | |||
| Sponge | ● | ○ | ○ | |||
| Meringues | ● | ○ | ○ | |||
| Scones | ○ | ○ | ● | |||
| Muffins | ○ | ○ | ● | |||
| Pizza | ○ | ○ | ● | |||
| Single shelf baking | ● | ○ | ● | |||
| Multi-shelf baking | ○ | ● | ○ | |||
| Pastry & pies | ||||||
| Bacon & egg pie | ○ | ○ | ● | ○ | ||
| Lemon meringue | ○ | ○ | ● | ○ | ||
| Quiche | ○ | ○ | ○ | ● | ||
| Meats | ||||||
| Beef roast | ● | ○ | ○ | ○ | ||
| Steak | ● | |||||
| Lamb roast | ● | ○ | ○ | ○ | ||
| Lamb chops | ○ | ● | ||||
| Pork roast | ● | ○ | ○ | ○ | ||
| Pork chops | ○ | ● | ||||
| Poultry | ||||||
| Chicken-whole | ○ | ○ | ○ | ● | ||
| Chicken pieces | ○ | ○ | ○ | ● | ||
| Family favourites | ||||||
| Casserole | ○ | ● | ○ | ○ | ||
| Lasagne | ○ | ○ | ● | ○ | ||
| Macaroni cheese | ○ | ○ | ● | ○ | ||
| Complete oven meals | ○ | ● | ○ | |||
| Reheating | ○ | ● | ○ | |||
Key: ● Recommended function Alternative function
The times and temperatures in the cooking charts are a guide only and are based on the oven being preheated first (except in the case of FAN GRILL).
Baking chart
| FOOD | FAN FORCED BAKE | |||||
| SHELF POSITION | TEMP (°C) | TIME (MIN) | SHELF POSITION | TEMP (°C) | TIME (MIN) | |
| Baked foods | ||||||
| Light fruit cake 1 135 - 155 90 -120 1 150 90 - 120 | ||||||
| Banana cake 1 160 - 170 60 - 65 1 160 - 170 55 - 60 | ||||||
| Biscuits | 2-3 | 175 - 180 | 0 - 12 | 3 | 175 - 180 | 10 - 12 |
| Scones | 3 | 210 - 220 | 10 - 15 | 3 | 225 | 10 - 15 |
| Slices | 2 | 160 - 175 | 20 - 25 | 2 | 160 - 180 | 20 - 25 |
| Meringues | 2-3 | 100 - 120 | 55 - 65 | 2 | 100 - 120 | 60 - 70 |
| Sponge | 1 | 165 - 185 | 20 - 30 | 2 | 170 - 190 | 20 - 30 |
| Chicken - whole (per 500g) | 1 175 - 180 30 - 35 | 1 180 30 - 35 | ||||
| Custard tart - pastry case | 1 | 170 - 190 | 14 - 16 | 1 | 180 - 200 | 14 - 48 |
| Custard tart - filling | 1 170 then | 150* | 6 - 8 then 30 - 35* | 1 170 then | 150* | 6 - 8 then 30 - 35* |
* This is a two-stage baking process: adjust the temperature after the first stage.
Grilling chart
| FOOD | GRILL | FAN GRILL | ||||
| SHELF POSITION | TEMP (°C) | TIME (MIN) | SHELF POSITION | TEMP (°C) | TIME (MIN) | |
| Toast | 4 | 225 | 50 - 60 secs/side | |||
| Sausages (well done)** | 3 | 225 | 10 - 15 | |||
| Chicken (whole) | 1 | 175 - 180 | 30 - 35 per 500 g | |||
**When grilling thicker items such as sausages, turn often to ensure even browning.
| Roasting chart | |||
| FOOD | BAKE | ||
| TEMP(°C) | MINUTES PER500 G | INTERNAL TEMP(°C) | |
| Beef | |||
| Rare 160 - 170 30 | - 35 60 - 65 | ||
| Medium 160 - 170 | 35 - 45 65 - 75 | ||
| Well done 160 - 170 | 45 - 60 75 - 80 | ||
| Mutton | |||
| Well done 160 - 170 | 45 - 60 80 - 85 | ||
| Hogget/lamb | |||
| Medium 160 - 170 | 30 - 40 79 - 82 | ||
| Well done 160 - 170 | 45 - 60 82 - 85 | ||
| Pork | |||
| Well done 180 - 185 | 40 - 45 78 | ||
| Chicken | |||
| Well done 160 - 180 | 25 - 30 82 | ||
| Venison | |||
| Rare* 220 3 per cm | 65 - 70 | ||
| thickness | |||
*Brown prior to roasting in an oiled frypan on high heat.
Generally, the top shelf positions are for grilling, and the middle and lower positions are suitable for baking, roasting and casseroles. Do not place anything on the oven floor.
IMPORTANT!
Do not place aluminium foil, dishes with reflective qualities, water, ice or any object on the oven floor as this will cause a heat build-up which irreversibly damages the enamel.
Baking
• Always position the oven shelves before turning the oven on.
- Grease tins and line bases with non-stick paper. For rich mixtures and fruitcakes, line the sides of the tins as well.
- Turn cakes onto baking racks when cool. Leave sponges in tins for at least 10 minutes before inverting.
- Always preheat the oven until the temperature indicator light turns off. This is particularly important when baking.
Grilling
- The length of time your food takes to grill will be affected by its thickness and temperature.
- When grilling thicker items such as sausages, turn them often to ensure even browning.
- Always grill with the door open to the first stop position unless you use FAN GRILL, when the door should be closed and the oven does not need preheating.
• The door and cooktop may become hot. Take care and keep children away.
Roasting
- A large piece of meat requires fewer minutes per 500g than a smaller piece. Meat with a bone will cook faster than a rolled roast.
- Do not add water to your roast as this has a steaming effect.
- Use a meat thermometer to ensure an accurate result. As the internal temperature of the meat will continue to rise during standing, please allow for this in your calculation. This is particularly important if you want a rare or medium rare roast.
You can use the timer at any time, even when the oven is not in use.
IMPORTANT!
The timer does NOT turn the oven off.
To set the timer
① Press Ⓞ 00 will show and the Symbol will start flashing.
② Press — and + to set the time you want (up to 23 hours and 59 minutes, in 1-minute steps).
- After a few seconds, the clock will show the time of day with the symbol steadily lit. The timer is now counting down.
To check the remaining time

To cancel the timer
① Press ⏻ until the time is reset to 0:00
• After a few seconds, the clock will show the time of day.
When the set time is up
- The timer will beep and the 🔔 symbol will flash. Press to stop the beeping and turn the timer off.
• After a few seconds, the clock will show the time of day.
To adjust the beep volume
Press — to hear the next volume level. The last one selected will be stored.
To set the oven for automatic cooking
① Set the oven:
- Check the clock shows the correct time (eg 12:07).
- Select the function and set the temperature.
• The oven will turn on.
② Set the cooking time:
- Decide how long the food will take to cook, allowing time for preheating if necessary (eg 40 minutes).
- Press
- Use and to set the cooking time.
AUTO will show in the display.

③ Set the stop time:
- Decide when you want your food to be ready by (eg 13:30).
- Press
- Use and to set the stop time.
You can turn the oven on manually and set it to turn off automatically by setting the stop time (step 3 above).
When automatic cooking is set
- If there is time before cooking starts, the oven will turn off and the current time of day and AUTO will show in the clock display, indicating that the oven is set for automatic cooking.
- The oven will automatically turn on at the required time (eg 12:50) and turn off at the set stop time (eg 13:30).
• To see the remaining cooking time, press ☐
• To see the set stop time, press - To cancel automatic cooking, press 📋 and turn the function and temperature knobs to ⬆ (OFF).
When the stop time is reached
• The oven will turn off, the timer will beep and AUTO will flash.
① Press 🔍 to stop the beeping and return the oven to manual mode.
② Turn the function and temperature knobs to ⬤ (OFF).
- The ceramic cooktop is made from glass ceramic, a tough material that is not affected by changes in temperature. If cared for, it will continue to function well and look attractive for many years.
- Temperature limiters are fitted to the elements to prevent the glass from overheating. The limiters may turn the elements on and off during cooking.
- Aluminium and copper cookware can leave a metallic residue on the glass surface. Clean this off with ceramic glass cleaner after every use. If it is left, it becomes difficult to remove. See section ‘Care and cleaning’.
To start cooking
- Turn the knob of the cooking zone you wish to use to HI, then adjust as necessary.
- When using the dual cooking zone, you may choose to use the inner zone only (●) or the full dual cooking zone (💡)
'On' indicators
These will glow when the corresponding cooking zone is on.
'Hot surface' indicators
These will continue to glow even after you have turned the corresponding cooking zone(s) off, until the glass becomes cool enough to be safely touched.
When you have finished cooking
- When you have finished using a cooking zone, turn its knob to the ⬆ (OFF) position. The corresponding ‘On’ indicator will go out.
- When you have finished using your cooktop, check that all 'On' indicators are unlit.
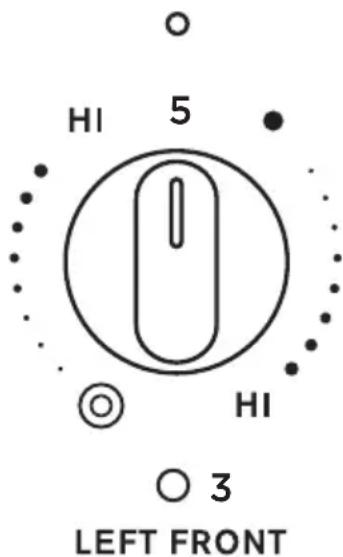
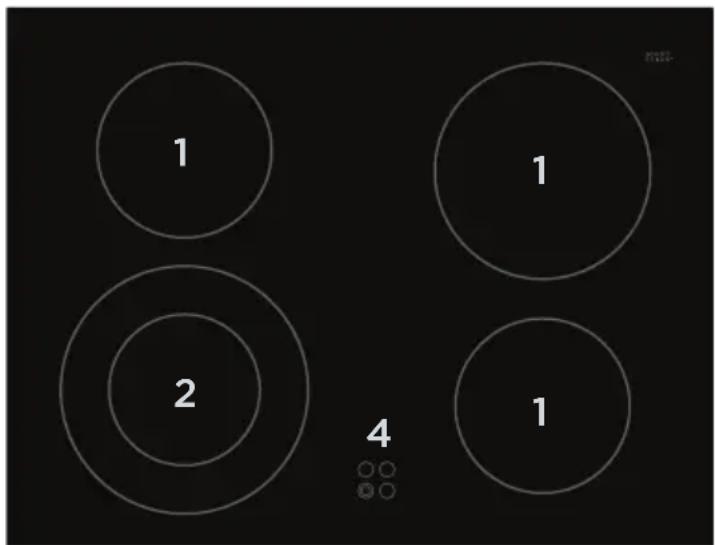
① Single cooking zone
② Dual cooking zone
③ 'On' indicator
④ 'Hot surface' indicators
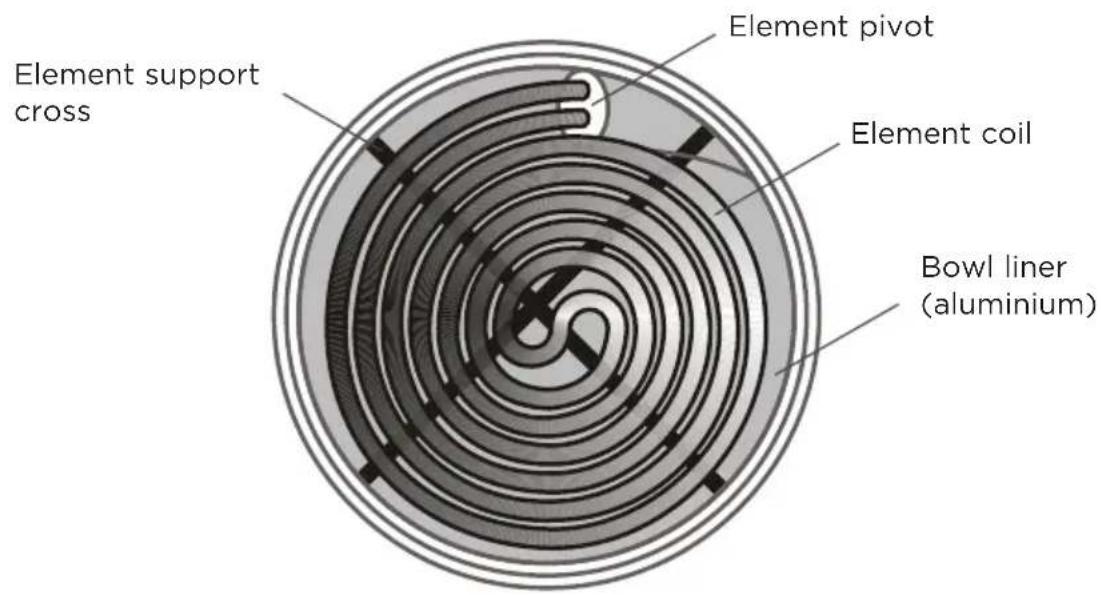
⑤ Dual cooking zone control
- The element coils are designed to lift and rotate around the pivot, allowing easy access to the element bowls and bowl liners for cleaning. See 'Care and cleaning' for details.
IMPORTANT!
Before using an element, always check that its bowl liner and support cross are properly in place.
To start cooking
Turn the knob of the element you wish to use to HI, then adjust as necessary.
'On' indicators (some models only)
These will glow when the corresponding element is on.
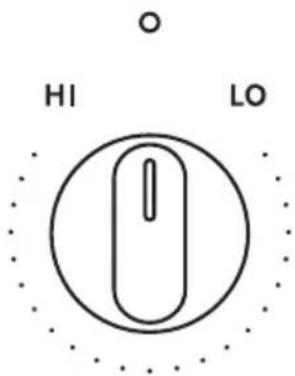
'On' indicator
(some models only)

LEFT REAR
When you have finished cooking
- When you have finished using an element, turn its knob to the ⬆ (OFF) position.
- When you have finished using your cooktop, check that all knobs have been turned to the ⬤ (OFF) position.
IMPORTANT!
Beware of hot surfaces: elements and nearby surfaces may be hot enough to cause burns even after the elements have been turned off. Take extreme care and avoid touching these surfaces until they have cooled to a safe temperature. Pay special attention to children.
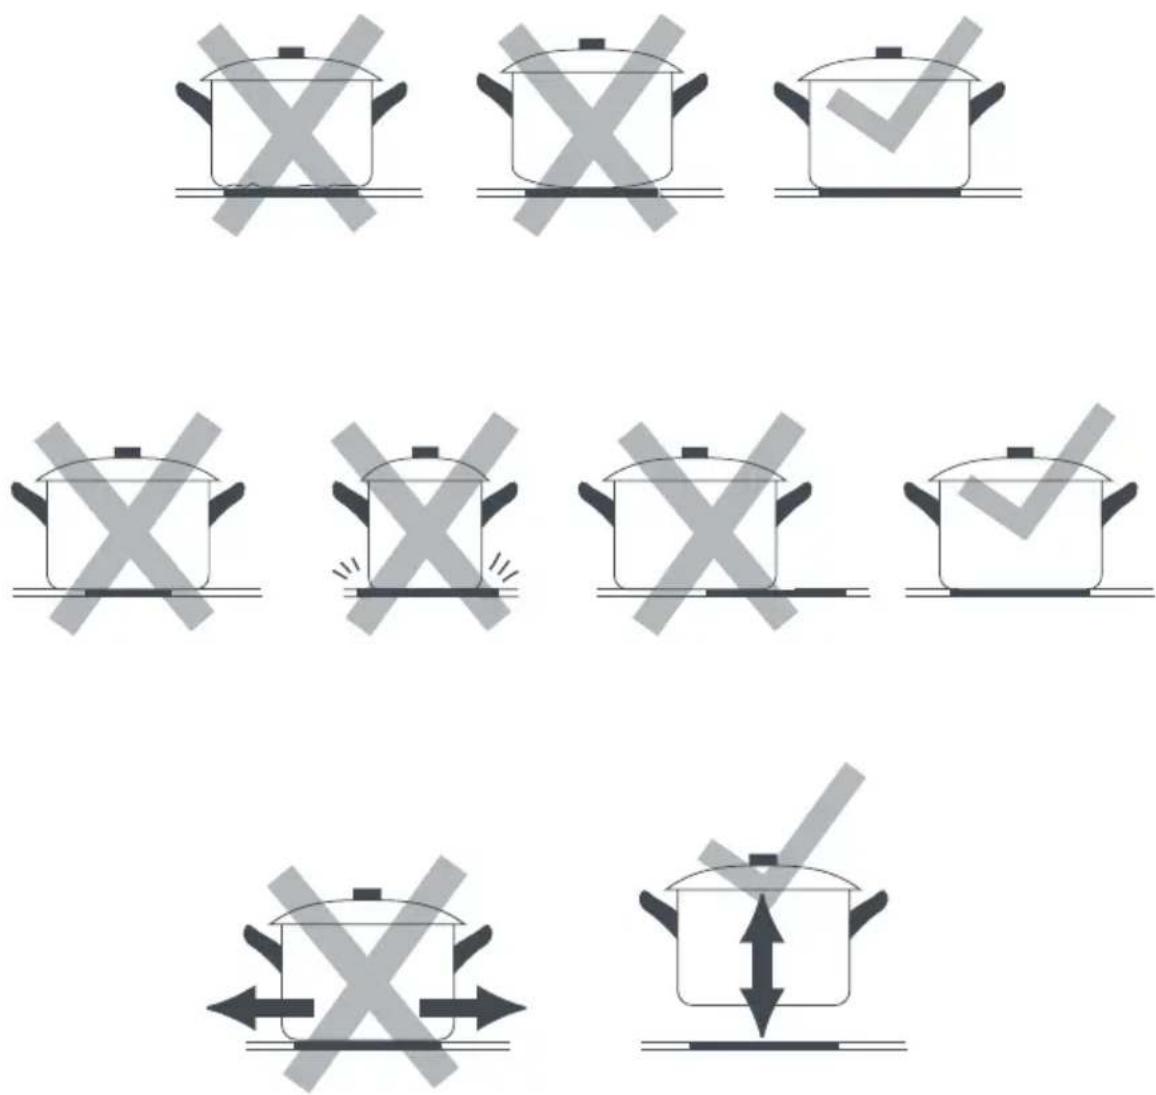
To get the best use out of your cooktop, consider the following points when selecting pots and pans.
- It is important that the bottoms of the pots and pans are the same size as the cooking zone or element.
- A flat base makes better contact with the cooking zone or element, resulting in shorter cooking times.
- Aluminium and copper cookware can leave a metallic residue on the glass surface. Clean this off with ceramic glass cleaner after every use. If it is left, it becomes difficult to remove. See section 'Care and cleaning'.
- Jagged edges on saucepans or heavy frypans may scratch element coils of the ceramic glass.
- Round-based woks should NOT be used on radiant elements without a wok ring as they will damage the element bowls.
- Always lift pots and pans off ceramic glass cooktops - do not slide, or they may scratch the cooktop surface.
IMPORTANT!
- Always disconnect the cooker from the power supply before any cleaning or maintenance.
- Before any cleaning or maintenance, make sure the part of the cooker you are about to handle or clean is a safe temperature to touch.
- Do not use abrasive cleaners, scourers, pads or steel wool to clean any part of the cooker. These will dull the appearance of enamel surfaces and scratch the glass. Some nylon scourers may also scratch. Check the label.
- Do not use a steam cleaner.
- Be sure that all the controls are turned off and the appliance is cool before using any type of aerosol cleaner on or around the appliance. Chemicals in such cleaners could, in the presence of heat, ignite or cause metal parts to corrode.
WHAT? HOW? IMPORTANT!
| General Advice | ||
| Cooktop and oven | Wipe out the oven and wipe down the cooktop after every use, especially if there has been a food spill. Regular cleaning will prevent stains from becoming stubborn and more difficult to remove later. | · Avoid leaving alkaline or acidic substances (such as lemon juice, vinegar or salty spills) on the enamel surfaces (oven cavity, radiant element bowls, radiant cooktop).· Do not use cleaning products with a chlorine or acidic base, as these are corrosive. |
Outside of cooker
| Door and drawer front, handles, control panel, knobs | 1 Soften any stubborn stains under a hot soapy cloth for a few minutes, then wipe with a damp cloth and mild detergent.2 Dry thoroughly with a soft cloth. | Take particular care when cleaning the control panel. Make sure that all the knobs are turned O (OFF) and that the cloth is not too wet. |
| WHAT? HOW? IMPORTANT! | ||
| Oven | ||
| Cavity (enamel) | 1 Remove the side racks and the oven door for easier access to the cavity. See instructions after this cleaning chart for removing the oven door.2 Wipe the inside of the oven using a household detergent or an ammonia-based cleaner. Alternatively, and especially if the cavity is heavily soiled, use an oven cleaner.3 Wipe with a clean damp cloth and allow to dry completely.4 Refit the side racks as indicated in the chapter ‘Using the oven and warmer drawer’.5 Refit the oven door. | To prevent soiling from becoming ‘baked on’ and stubborn, we recommend removing any spills, food or grease stains from the enamelled surfaces after each use.To make cleaning the oven ceiling easier, the grill element can be lowered. See illustrations and instructions after this cleaning chart.If using ‘off the shelf’ oven cleaners, always follow the manufacturer’s instructions. |
| Oven door glass | 1 Clean using a soft cloth with a solution of mild detergent or baking soda and hot water, then wipe dry.2 Wipe with a glass cleaner and dry with a soft, lint-free cloth. | Don’t use oven cleaners or any other harsh/abrasive cleaners, cloths, scouring pads, steel wool or sharp metal scrapers to clean the glass surfaces. These scratch the glass, which in turn could result in the glass cracking or shattering. |
| Oven shelves | Clean with a solution of mild detergent and hot water.Pre-soak burnt-on stains in a solution of laundry powder and hot water, then remove with a dishwashing brush. | |
| Oven lamp cover | 1 Check that the cooker has been disconnected from the power supply and the lamp cover is cool.2 Remove the lamp cover following the instructions in ‘Replacing the oven light bulb’.3 Clean the lamp cover using a household detergent or an ammonia-based cleaner.4 Wipe the glass cover with a clean cloth and allow to dry completely.5 Replace the lamp cover, ensuring that it clicks into place. | Always replace the oven lamp cover before using the oven. Using the oven without the oven lamp cover will create a safety hazard.The notch in the inner edge of the cover must be on the side closer to the oven floor. See ‘Replacing the oven light bulb’ for illustration. |
| Oven | ||
| Rubber sealaround oven | Wipe very gently with a dampcloth and mild detergent. | Take care not to displacethe rubber seal whilecleaning it.Take care not to sprayany oven cleaner or othercaustic cleaner on therubber seal, as doing somay damage it. |
| Warmer or storage drawer | ||
| Drawer interior(enamel) | Wipe out with a soft cloth usinga mixture of warm water and milddetergent. | Do not store any flammableobjects or substances in thedrawer. |
| Ceramic glass cooktop | ||
| Light soiling afterevery use (eg.fingerprints,greasy stains) | 1 Wipe with a soft, dampcloth and mild detergent. Amicrofibre cloth is ideal forthis.2 Wipe dry with a clean cloth orpaper towel. | Before cleaning, make surethat the glass is safetemperature to touch (all the‘Hot surface’ indicators areunlit). |
| Non-sugaryboilovers, spillsand food stains(e.g. pasta water,burnt-on greaseormilk) | 1 Remove the soiling withceramic cooktop cleaner usinga sponge or non-abrasivescourer suitable for ceramicglass.2 Remove any excess cleanerand wipe dry with a cleancloth or paper towel.3 Apply ceramic cooktopconditioner or protectorfollowing the instructions onthe dispenser. A microfibrecloth is ideal for this. | Heavy-duty scourers, somenylon scourers and harsh/abrasive cleaning agentsmay scratch the glass.Always read the label tocheck if your cleaner orscourer is suitable.Never leave cleanerresidue on the cooktop:the glass may becomestained. |
| Hot sugary spills(e.g. jam, syrup,vegetablewater), meltedplastic wrap oraluminium foil | Remove these immediatelywith a spatula or razor bladescraper suitable for ceramic glasscooktops, but beware of hot spillsand surfaces:1 Hold the blade or utensil ata 30° angle and scrape thesoiling or spill to a cool area ofthe cooktop.2 Immediately clean the soilingup with a dish cloth or papertowel.3 Follow the instructions for‘Light soiling after every use’above. | Remove stains left bymelts and sugary food orspillovers immediately. Ifleft to cool on the glass,they may be difficultto remove or evenpermanently damage theglass surface.Cut hazard: the blade ina scraper is razor-sharwhen the safety coveris retracted. Use withextreme care and alwaysstore safely out of reach ofchildren. |
| WHAT? HOW? IMPORTANT! | ||
| Ceramic glass cooktop | ||
| Metallic stains caused by cookware with copper or aluminium base | Follow the instructions for ‘Non-sugary boilovers, spills and food stains’ above.For stubborn metallic stains, try using a razor blade scraper suitable for ceramic glass cooktops, holding it at a 30° angle. | If the cooktop is not cleaned after every use and copper or aluminium stains are allowed to burn onto the surface, they may react with the glass and no longer be removable. They don’t, however, affect performance. |
| Radiant cooktop - See ‘Using the radiant cooktop’ for illustration of parts | ||
| White enamel around elements | Soften any stubborn stains under a hot soapy cloth for a few minutes.Wipe with a soft, damp cloth and mild detergent. | Do not use excessive amounts of water or pour any liquids directly on the cooktop. Take special care to avoid using liquids around the element pivots. |
| Element coils Remove any large food particlesNo other cleaning is required, as the high temperatures during use will burn off all stains and soiling. | ||
| Bowl liners (aluminium) | 1 Once an element coil has cooled, lift and rotate it for access to the bowl liner.2 Remove the bowl liner and place it in a mixture of warm water and vinegar.3 Clean with a non-abrasive sponge or dishwashing brush.4 Rinse clean under running water, then dry.5 Replace the bowl liner and element support cross before lowering the element coil back into place. | Bowl liners may get discoloured or permanently stained with use. This is normal, but you may want to replace them from time to time. You can purchase new bowl liners from your nearest Haier dealer or through Customer Care.After cleaning, make sure you replace the bowl liners and element support crosses. |
| Element bowls (enamel) and element support crosses | 1 Once an element coil has cooled, lift and rotate it for access to the bowl and support cross.2 Soften any stubborn stains under a hot soapy cloth.3 Wipe the bowl out with a soft, damp cloth and mild detergent or an ammonia-based liquid cleaner.4 Remove any large food particles from the support cross and wipe with a soft, damp cloth and mild detergent. | Do not fill the bowl with liquid or pour any liquid directly into it. Take special care to avoid using liquids around the element pivots.The element bowls are not removable.The support crosses may get discoloured or permanently stained with use. This is normal.After cleaning, make sure you replace the bowl liners and element support crosses. |
Removing and refitting the oven door
To remove
① Open the door to the first stop position.
② Holding the handle firmly with both hands, lift the door up and away from the cooker to disengage the hinges.
IMPORTANT!
Do not place your hands near the hinges while removing or replacing the door. The hinges are spring-loaded and could cause an injury when they snap back.
To refit
③ Holding the handle firmly with both hands, slide the hinge arms into the slots.
④ Lift the door and push it from the bottom to engage the hinges.
⑤ Close the door firmly and check if it is properly in place.
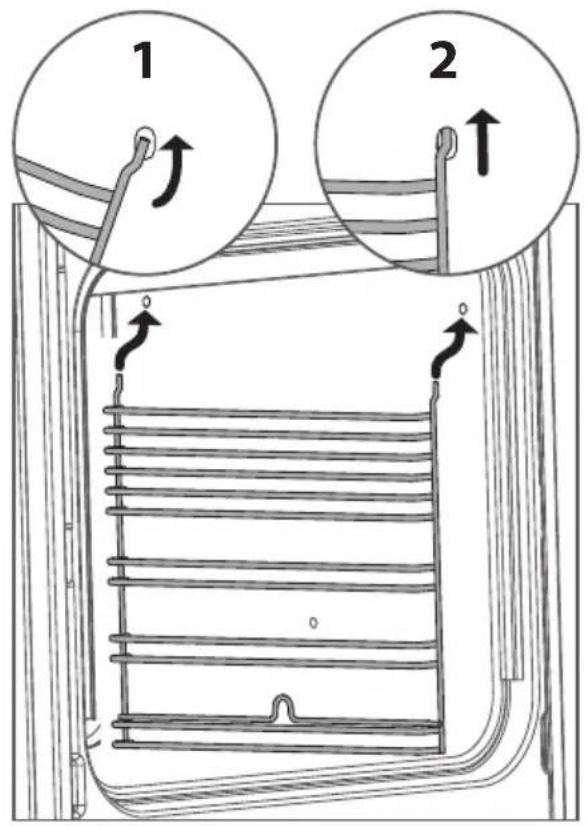
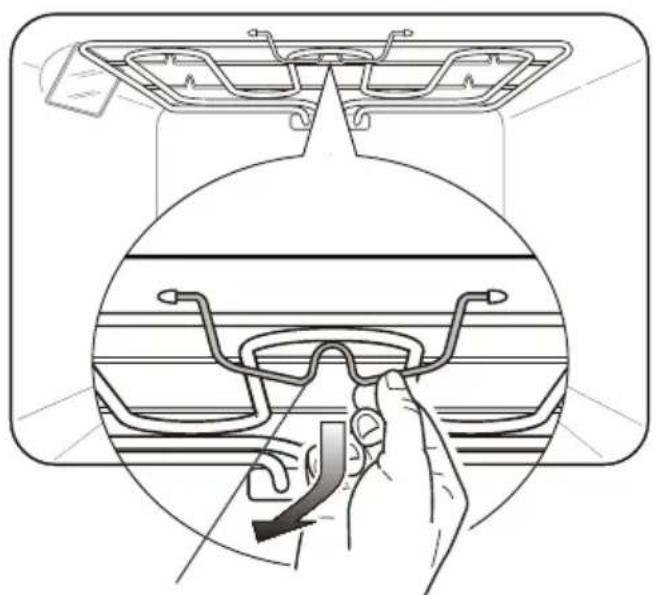
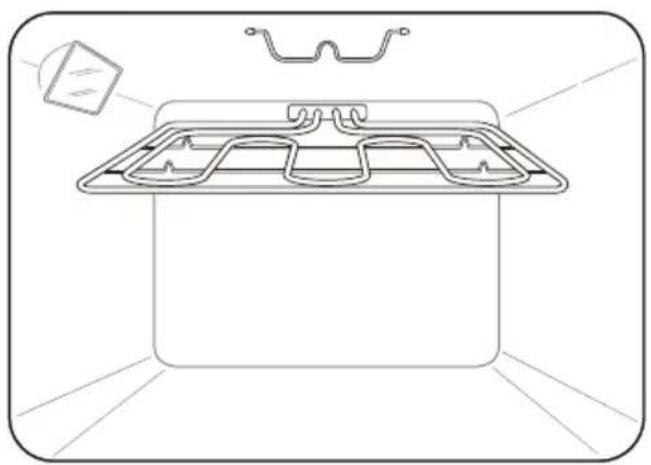
Drop-down grill element
IMPORTANT!
Before lowering the grill element, make sure that it has cooled down.
- The grill element is held in place by a wire clip at its front. To release and lower the element, pull the wire clip down and swing it slightly towards you.
- When you have finished cleaning the oven ceiling: raise the grill element all the way up, then swing the wire clip towards the back of the oven to hook the element into place. Make sure that the element is securely fixed.
• The grill element itself will self-clean during use.
natural_image
Diagram showing a hand adjusting eyeglasses on a car intake tray (no text or symbols present)Wire clip
natural_image
Line drawing of a rectangular appliance with internal compartments and a small inset showing a cube (no text or symbols)Replacing the oven light bulb
Note: oven bulb replacement is not covered by your warranty.
① Let the oven cavity and the grill element cool down.
② Turn the power to the cooker off at the wall.
IMPORTANT!
Disconnect the cooker from the power supply before continuing.
③ Remove the left side rack by following in reverse order the procedure indicated on Page 10.
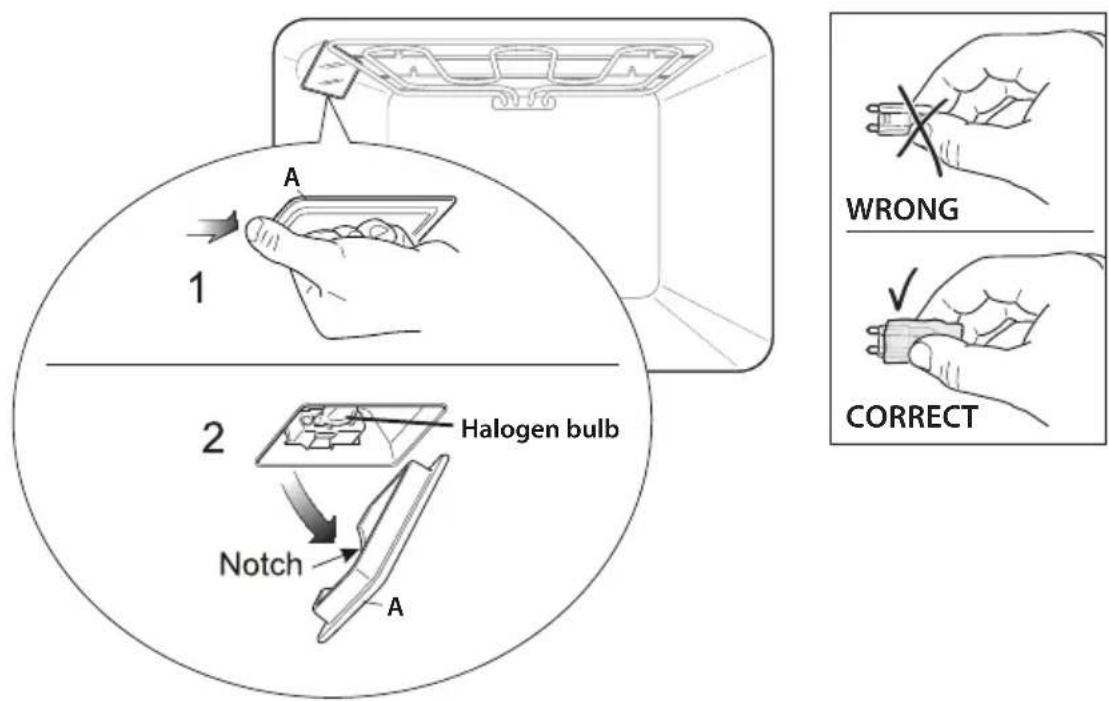
④ Grip the front edge of the lamp cover and pull it away from the oven wall to remove.
IMPORTANT!
Never use screwdrivers or other utensils to remove the cover "A". This could damage the enamel of the oven or the lampholder. Use only hands.
⑤ Replace the bulb. Your oven uses a G9 halogen bulb with the specifications 220-240V, 50/60Hz suitable for high temperatures (300°C) and same power (check watt power as stamped in the lamp itself) of the replaced lamp.
IMPORTANT!
Never replace the bulb with bare hands; contamination from your fingers can cause premature failure. Always use a clean cloth or gloves.
⑥ Refit the protective cover "A" operating in reverse order.
IMPORTANT!
The notch in the inner edge of the cover must be on the side closer to the oven floor.
⑦ Reassemble the left side rack by following the procedure indicated at Page 10. ⑧ Turn the power to the cooker back on. If your model has an electronic clock, set the clock.
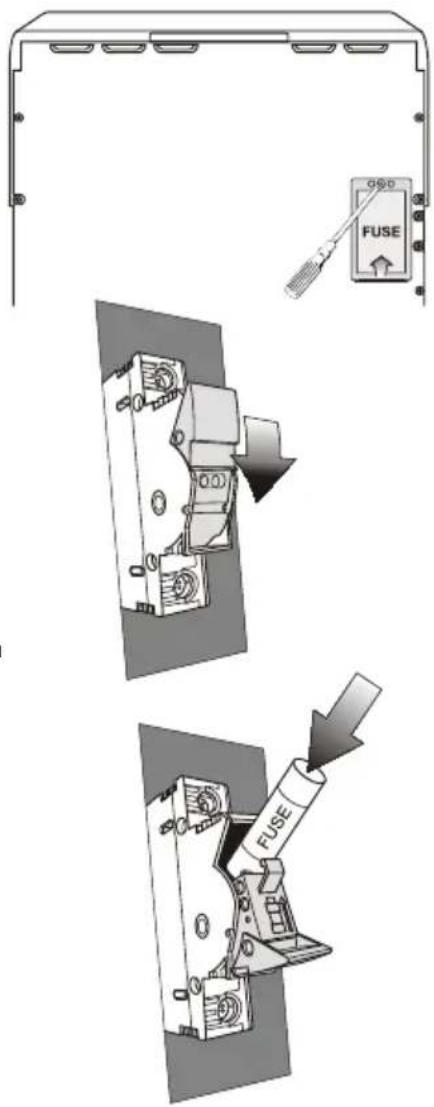
Replacing the fuse in the side-mounted power outlets (some models only)
The two side-mounted power outlets (some models only) are internally fused with one 16 A fuse. Be careful not to overload them as this will blow the fuse.
IMPORTANT!
The power socket outlets on these cookers are rated at 250V 10A AC only.
If required, the fuse can be replaced by following these steps:
① Turn the power to the cooker off at the wall.
! WARNING!

natural_image
Black hand with lightning bolt symbol indicating electrical hazard (no text or labels)Electrical Shock Hazard Before accessing the fuse, ensure that the cooker has been disconnected from the power supply. Failure to do so could result in death or electric shock.
② Unscrew the anti-tip brackets, then pull the cooker out from the wall, so the back fuse cover on the right-hand side is accessible.
③ Remove the screw holding the fuse cover in place and remove the fuse cover.
④ Open the fuse housing, as shown, and remove the blown fuse cartridge.
⑤ Slide in the replacement fuse cartridge. Ensure that it is rated 16 A. (Two replacement fuse cartridges are supplied with the cooker.)
⑥ Close the fuse housing.
⑦ Refit the fuse cover.
⑧ Push the cooker back into position.
⑨ Refit the anti-tip brackets.
⑩ Turn the power to the cooker back on at the wall and set the clock.
! WARNING!
natural_image
Silhouette of a person sitting on a bench with a large object falling into the air (no text or symbols)Tipping Hazard All cookers can tip. Keep children away and take care. The anti-tip brackets supplied must be installed. Failure to follow these instructions could result in injury.
Troubleshooting chart
If there is a problem, check the chart below to see if you can fix it. If the problem cannot be fixed or persists, call your Authorised Repairer or Customer Care.
| PROBLEM POSSIBLE | CAUSE WHAT TO DO | |
| Baking too brown on top | Oven not preheated. Always | preheat the oven until the temperature indicator light goes out. FAN BAKE and BAKE take approximately 15-20 minutes to preheat. FAN FORCED preheats in approximately 13-17 minutes. |
| Baking tins too large for the recipe. | Use correctly sized baking tins. | |
| Baking tins not evenly spaced on the shelves. | Stagger baking tins so that there's at least 3 cm between the tin and the oven wall. This is to allow hot air and radiant energy to circulate better. | |
| Baking not evenly sized on trays eg scones and biscuits. | Make items in a batch the same size and shape and space them evenly over the trays. | |
| Shelf position too high for specific function. | Lower shelf position by one. | |
| Baking at too high a temperature. | Lower the temperature. | |
| Baking too brown on bottom | Baking tins too large for the recipe. | Use correctly sized tins. |
| Position of shelf too low in the oven. | Cook one shelf higher. | |
| Opening the oven door frequently during baking. | Do not open the door until at least 3/4 of the cooking time has passed. | |
| Baking temperature too high. | Lower the temperature. | |
| PrOBLEM POSSIBLE | CAUSE WHAT TO dO | |
| Cakes have cracked thick crust | Baking temperature too high. | Lower the temperature. |
| Position of shelf too high in oven. | Cook one shelf lower. | |
| Cake batter overmixed. Mix just long enough to combine ingredients. | ||
| Pan too deep. Check size of pan and use recommended size. | ||
| Incorrect function eg GRILL/FAN GRILL. | Change to a function which supplies top & bottom element heat (BAKE) and/or convection currents (FAN BAKE/FAN FORCED). | |
| Baking pale, flat and undercooked | Aluminium foil in oven. Remove foil. Foil liners reflect the heat back down in the oven which will damage the enamel. | |
| Shiny tins/trays being used from older-style oven with unconcealed bottom element - oven slow to cook. | Rather than absorbing the heat and heating food, shiny baking tins/trays reflect the heat back towards the bottom of the oven resulting in poor cooking performance. Food tends to take longer to cook and does not brown well. Using baking utensils with dark, dull surfaces shortens the cooking period in concealed lower element ovens. | |
| Baking temperature too low. | Raise the temperature. | |
| Shelf position too low in the oven. | Cook one shelf higher. | |
| Baking time too short. Increase cooking times. | ||
| Incorrect tin size. Use correctly sized tin: check recipe specification. | ||
| Incorrect function eg CLASSIC BAKE. | Change to a function which supplies top & bottom element heat (BAKE) and/or convection currents (FAN BAKE/FAN FORCED). | |
| Baking taking too long to cook | Shelf position too low. Move | shelf position up by one. |
| Temperature too low. Raise | the temperature. | |
| Shiny trays/tins being used. | Use dark, dull baking tins and pans: they absorb heat more quickly and speed up the cooking process. | |
| Baking tin too large. Use the | tin size stated in the recipe. | |
| Incorrect function eg CLASSIC BAKE. | Try changing to a fan function.Fan ovens speed up cooking and distribute heat more evenly; they also increase the rate of browning. | |
| Cake has fallen in the centre | Baking temperature too low. | Raise the temperature. |
| Opening the door too early in baking. | Do not open the door until at least 3/4 of the cooking time has passed: a sudden burst of cold air can make cakes sink in the middle. | |
| Baking time too short. Increase cooking time. | ||
| Proportions of ingredients incorrect. | Check recipe. | |
| Oven not working but cooktop elements working | Clock not set. Set the clock. | Refer to ‘Oven controls and setting the clock’ for instructions. |
| Oven set for automatic cooking. | See section ‘Automatic cooking’. | |
Before you call for service or assistance ...
Check the things you can do yourself. Refer to the installation instructions and your user guide and check that:
① Your product is correctly installed.
② You are familiar with its normal operation.
If after checking these points you still need assistance or parts, please refer to the Service & Warranty book for warranty details and your nearest Authorised Service Centre, Customer Care, or contact us through our website listed on the back cover.
Complete and keep for safe reference:
Model
Serial No.
Purchase Date
Purchaser
Dealer
Suburb
Town
Country
www.haier.com.au
www.haier.co.nz
Copyright © Haier 2019. All rights reserved.
The product specifications in this booklet apply to the specific products and models described at the date of issue. Under our policy of continuous product improvement, these specifications may change at any time. You should therefore check with your Dealer to ensure this booklet correctly describes the product currently available.
NZ