
Optiquest Q19wb - Screen VIEWSONIC - Free user manual and instructions
Find the device manual for free Optiquest Q19wb VIEWSONIC in PDF.


| Product Type | LCD Monitor |
| Model | Optiquest Q19wb |
| Screen Size | 19 inches (viewable diagonal) |
| Aspect Ratio | 16:10 Widescreen |
| Native Resolution | 1440 x 900 (WXGA+) |
| Contrast Ratio | 1000:1 (typical) |
| Response Time | 5 ms (typical) |
| Brightness | 300 cd/m² (typical) |
| Viewing Angle | 170° horizontal / 160° vertical (typical) |
| Connectivity | VGA (D-Sub) input |
| Power Consumption | Typical: 30 W, Standby: < 1 W |
| Input Voltage | AC 100-240 V, 50/60 Hz |
| Dimensions (W x H x D) | With stand: 440 x 370 x 180 mm |
| Weight | Net: 4.5 kg (with stand) |
| VESA Mount | 100 x 100 mm |
| Features | Auto-adjust, On-Screen Display (OSD), Energy Star compliant |
| Cleaning | Use a soft, dry cloth. Avoid harsh chemicals. |
| Safety | Place on stable surface, ensure proper ventilation |
| Spare Parts / Repairability | Contact ViewSonic support for service; typical MTBF 50,000 hours |
Frequently Asked Questions - Optiquest Q19wb VIEWSONIC
User questions about Optiquest Q19wb VIEWSONIC
0 question about this device. Answer the ones you know or ask your own.
Ask a new question about this device
Download the instructions for your Screen in PDF format for free! Find your manual Optiquest Q19wb - VIEWSONIC and take your electronic device back in hand. On this page are published all the documents necessary for the use of your device. Optiquest Q19wb by VIEWSONIC.
USER MANUAL Optiquest Q19wb VIEWSONIC
Compliance Information....1
Important Safety Instructions....2
Declaration of RoHS Compliance....3
Copyright Information 4
Product Registration....4
Getting Started
Package Contents 5
Precautions 5
Quick Installation 6
Wall Mounting (Optional) 7
Using the LCD Display
Setting the Timing Mode....8
OSD and Power Lock Settings....8
Adjusting the Screen Image 9
Main Menu Controls 11
Other Information
Specifications 14
Troubleshooting.... 15
Customer Support 16
Cleaning the LCD Display 17
Limited Warranty 18
TCO Information
TCODevelopment

Congratulations!
The display you have just purchased carries the TCO'03 Displays label. This means that your display is designed, manufactured and tested according to some of the strictest quality and environmental requirements in the world. This makes for a high performance product, designed with the user in focus that also minimizes the impact on our natural environment.
Some of the features of the TCO'03 Display requirements:
Ergonomics
Good visual ergonomics and image quality in order to improve the working environment for the user and to reduce sight and strain problems. Important parameters are luminance, contrast, resolution, reflectance, colour rendition and image stability.
Energy
- Energy-saving mode after a certain time - beneficial both for the user and the environment
- Electrical safety
Emissions
- Electromagnetic fields
- Noise emissions
Ecology
- The product must be prepared for recycling and the manufacturer must have a certified environmental management system such as EMAS or ISO 14000
- Restrictions on
a. chlorinated and brominated flame retardants and polymers
b. heavy metals such as cadmium, mercury and lead.
The requirements included in this label have been developed by TCO Development in co-operation with scientists, experts, users as well as manufacturers all over the world. Since the end of the 1980s TCO has been involved in influencing the development of IT equipment in a more user-friendly direction. Our labelling system started with displays in 1992 and is now requested by users and IT-manufacturers all over the world.
For more information, please visit
www.tcodevelopment.com
Compliance Information
For U.S.A.
This device complies with part 15 of FCC Rules. Operation is subject to the following two conditions: (1) this device may not cause harmful interference, and (2) this device must accept any interference received, including interference that may cause undesired operation.
This equipment has been tested and found to comply with the limits for a Class B digital device, pursuant to part 15 of the FCC Rules. These limits are designed to provide reasonable protection against harmful interference in a residential installation. This equipment generates, uses, and can radiate radio frequency energy, and if not installed and used in accordance with the instructions, may cause harmful interference to radio communications. However, there is no guarantee that interference will not occur in a particular installation. If this equipment does cause harmful interference to radio or television reception, which can be determined by turning the equipment off and on, the user is encouraged to try to correct the interference by one or more of the following measures:
- Reorient or relocate the receiving antenna.
- Increase the separation between the equipment and receiver.
- Connect the equipment into an outlet on a circuit different from that to which the receiver is connected.
- Consult the dealer or an experienced radio/TV technician for help.
Warning: You are cautioned that changes or modifications not expressly approved by the party responsible for compliance could void your authority to operate the equipment.
For Canada
This Class B digital apparatus complies with Canadian ICES-003.
CE Conformity for European Countries

The device complies with the requirements of the EEC directive 89/336/EEC as amended by 92/31/EEC and 93/68/EEC Art.5 with regard to "Electromagnetic compatibility", and 73/23/EEC as amended by 93/68/EEC Art.13 with regard to "Safety."
Following information is only for EU-member states:
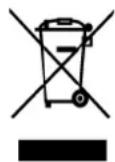
The mark shown to the right is in compliance with the Waste Electrical and Electronic Equipment Directive 2002/96/EC (WEEE).
The mark indicates the requirement NOT to dispose the equipment as unsorted municipal waste, but use the return and collection systems according to local law.
Important Safety Instructions

- Read these instructions completely before using the equipment.
- Keep these instructions in a safe place.
- Heed all warnings.
- Follow all instructions.
- Do not use this equipment near water. Warning: To reduce the risk of fire or electric shock, do not expose this apparatus to rain or moisture.
- Clean with a soft, dry cloth. If further cleaning is required, see “Cleaning the Display” in this guide for further instructions.
- Do not block any ventilation openings. Install the equipment in accordance with the manufacturer's instructions.
- Do not install near any heat sources such as radiators, heat registers, stoves, or other devices (including amplifiers) that produce heat.
- Do not attempt to circumvent the safety provisions of the polarized or grounding-type plug. A polarized plug has two blades with one wider than the other. A grounding type plug has two blades and a third grounding prong. The wide blade and the third prong are provided for your safety. If the plug does not fit into your outlet, consult an electrician for replacement of the outlet.
- Protect the power cord from being tread upon or pinched, particularly at the plug, and the point where if emerges from the equipment. Be sure that the power outlet is located near the equipment so that it is easily accessible.
- Only use attachments/accessories specified by the manufacturer.
- Use only with the cart, stand, tripod, bracket, or table specified by the manufacturer, or sold with the equipment. When a cart is used, use caution when moving the cart/equipment combination to avoid injury from tipping over.
- Unplug this equipment when it will be unused for long periods of time.
- Refer all servicing to qualified service personnel. Service is required when the unit has been damaged in any way, such as: if the power-supply cord or plug is damaged, if liquid is spilled onto or objects fall into the unit, if the unit is exposed to rain or moisture, or if the unit does not operate normally or has been dropped.
Declaration of RoHS Compliance
This product has been designed and manufactured in compliance with Directive 2002/95/EC of the European Parliament and the Council on restriction of the use of certain hazardous substances in electrical and electronic equipment (RoHS Directive) and is deemed to comply with the maximum concentration values issued by the European Technical Adaptation Committee (TAC) as shown below:
| Substance Proposed Maximum Concentration | Actual Concentration | |
| Lead (Pb) 0.1% < 0.1% | ||
| Mercury (Hg) 0.1% < 0.1% | ||
| Cadmium (Cd) 0.01% < 0.01% | ||
| Hexavalent Chromium ( Cr^6+ ) | 0.1% < 0.1% | |
| Polybrominated biphenyls (PBB) 0.1% < 0.1% | ||
| Polybrominated diphenyl ethers (PBDE) 0.1% | < 0.1% |
Certain components of products as stated above are exempted under the Annex of the RoHS Directives as noted below:
Examples of exempted components are:
- Mercury in compact fluorescent lamps not exceeding 5 mg per lamp and in other lamps not specifically mentioned in the Annex of RoHS Directive.
- Lead in glass of cathode ray tubes, electronic components, fluorescent tubes, and electronic ceramic parts (e.g. piezoelectronic devices).
- Lead in high temperature type solders (i.e. lead-based alloys containing 85% by weight or more lead).
- Lead as an allotting element in steel containing up to 0.35% lead by weight, aluminium containing up to 0.4% lead by weight and as a cooper alloy containing up to 4% lead by weight.
Copyright Information
Copyright © ViewSonic® Corporation, 2007. All rights reserved.
Macintosh and Power Macintosh are registered trademarks of Apple Computer, Inc.
Microsoft, Windows, Windows NT, and the Windows logo are registered trademarks of Microsoft Corporation in the United States and other countries.
ViewSonic, the three birds logo, OnView, ViewMatch, and ViewMeter are registered trademarks of ViewSonic Corporation.
VESA is a registered trademark of the Video Electronics Standards Association. DPMS and DDC are trademarks of VESA.
ENERGY STAR ^® is a registered trademark of the U.S. Environmental Protection Agency (EPA).
As an ENERGY STAR ^® partner, ViewSonic Corporation has determined that this product meets the ENERGY STAR ^® guidelines for energy efficiency.
Disclaimer: ViewSonic Corporation shall not be liable for technical or editorial errors or omissions contained herein; nor for incidental or consequential damages resulting from furnishing this material, or the performance or use of this product.
In the interest of continuing product improvement, ViewSonic Corporation reserves the right to change product specifications without notice. Information in this document may change without notice.
No part of this document may be copied, reproduced, or transmitted by any means, for any purpose without prior written permission from ViewSonic Corporation.
Product Registration
To meet your future needs, and to receive any additional product information as it becomes available, please register your product on the Internet at: www.viewsonic.com. The ViewSonic Wizard CD-ROM also provides an opportunity for you to print the registration form, which you may mail or fax to ViewSonic.
For Your Records
Product Name:
Q19wb
ViewSonic 19" LCD Display
Model Number:
VS11443
Document Number:
Q19wb-1_UG_ENG Rev. 1B 01-10-07
Serial Number:
Purchase Date:
Product disposal at end of product life
The lamp in this product contains mercury. Please dispose of in accordance with local, state or federal laws.
ViewSonic is concerned about the preservation of our environment. Please dispose of this product properly at the end of its useful life. For TCO'03 recycling information, please refer to our website:
- USA: www.viewsonic.com/pdf/RecyclePlus.pdf
- Europe: www.viewsoniceurope.com
- Taiwan: recycle.epa.gov.tw
Getting Started
Congratulations on your purchase of a ViewSonic ^® LCD display.
Important! Save the original box and all packing material for future shipping needs.
NOTE: The word “Windows” in this user guide refers to the following Microsoft operating systems: Windows '95, Windows NT, Windows '98, Windows 2000, Windows Me (Millennium), and Windows XP.
Package Contents
Your LCD display package includes:
- LCD display
- Power cord
• Audio cable (stereo mini jack) - Video cable
- Wizard CD-ROM
- Quick Start Guide
NOTE: The CD includes the User Guide PDF files and INF/ICM display optimization files. The INF file ensures compatibility with Windows operating systems, and the ICM file (Image Color Matching) ensures accurate on-screen colors. ViewSonic recommends that you install both the INF and ICM files.
Precautions
- Sit at least 18" from the LCD display.
- Avoid touching the screen. Skin oils are difficult to remove.
- Never remove the rear cover. This LCD display contains high-voltage parts. You may be seriously injured if you touch them.
- Avoid exposing the LCD display to direct sunlight or another heat source. Orient the LCD display away from direct sunlight to reduce glare.
-
Always handle the LCD display with care when moving it.
-
Place the LCD display in a well ventilated area. Do not place anything on the LCD display that prevents heat dissipation.
- Ensure the area around the LCD display is clean and free of moisture.
- Do not place heavy objects on the LCD display, video cable, or power cord.
- If smoke, an abnormal noise, or a strange odor is present, immediately switch the LCD display off and call your dealer or ViewSonic. It is dangerous to continue using the LCD display.
- Do not rub or apply pressure to the LCD panel, as it may permanently damage the screen.
Quick Installation
1. Installing the Base
1.1 Align the monitor with the opening in the base.
1.2 Note that the longer section of the base points forward.
1.3Snap the moni-
tor into its base.
A clear click sound will affirm that the base is connected correctly.
1.4 Verify that the monitor is securely attached to the base by looking at the bottom of the base and making sure that the clips are fully engaged in the base.
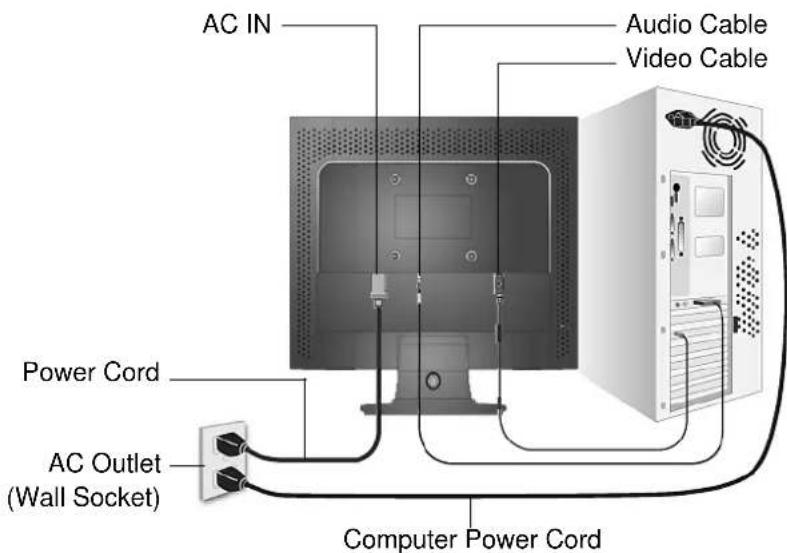
2. Connect power cord (and AC/DC adapter if required)
3. Connect video cable
• Make sure both the LCD display and computer are turned OFF
- Remove rear panel covers if necessary
- Connect the video cable from the LCD display to the computer
Macintosh users: Models older than G3 require a Macintosh adapter. Attach the adapter to the computer and plug the video cable into the adapter.
To order a ViewSonic ^® Macintosh adapter, contact ViewSonic Customer Support.
4. Turn ON LCD display and computer
Turn ON the LCD display, then turn ON the computer. This sequence (LCD display before computer) is important.
NOTE: Windows users may receive a message asking them to install the INF file. This is on the CD.
5. Insert the ViewSonic Wizard CD into the computer's CD drive.
Follow the on-screen instructions. If your computer does not have a CD-ROM drive, please refer to Customer Support page.
- Wait for the CD-ROM to auto-start.
NOTE: If the CD-ROM does not auto-start: double-click on the CD-ROM icon in the Windows Explorer, then double-click on viewsonic.exe. - Follow the on-screen instructions.
6. Windows users: Set the timing mode (resolution and refresh rate)
Example: 1280 x 1024 @ 60 Hz.
For instructions on changing the resolution and refresh rate, see the graphics card's user guide.
Installation is complete. Enjoy your new ViewSonic LCD display.
To be best prepared for any future customer service needs: print this user guide and write the serial number in “For Your Records” on page 3. (See back of LCD display.)
You can register your product online at the ViewSonic website for your region. See the Customer Support table in this guide.
The ViewSonic Wizard CD-ROM also provides an opportunity for you to print the registration form which you may mail or fax to ViewSonic.
Wall Mounting (Optional)
To obtain a wall-mounting kit, contact ViewSonic® or your local dealer. Refer to the instructions that come with the base mounting kit. To convert your LCD display from a desk-mounted to a wall-mounted display, do the following:
-
Verify that the Power button is turned Off, then disconnect the power cord.
-
Lay the LCD display face down on a towel or blanket.
-
Remove the Plastic Covers from the back of the LCD display.
-
Remove the four screws attaching the base.
-
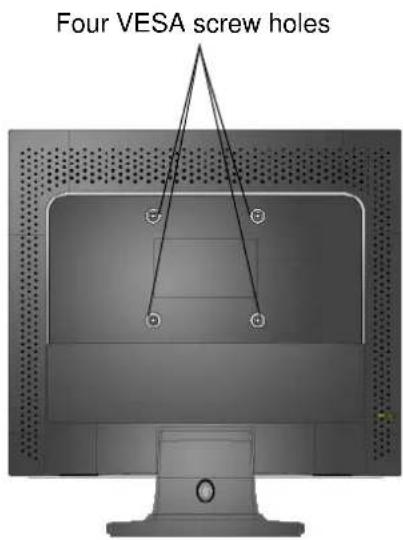
Remove the Rubber Plugs from inside the four VESA screw holes.
-
Attach the mounting bracket from the VESA compatible wall mounting kit (100 mm x 100 mm distance).
-
Attach the LCD display to the wall, following the instructions in the wall-mounting kit.
Using the LCD Display
Setting the Timing Mode
Setting the timing mode is important for maximizing the quality of the screen image and minimizing eye strain. The timing mode consists of the resolution (example 1280 x 1024) and refresh rate (or vertical frequency; example 60 Hz). After setting the timing mode, use the OSD (On-screen Display) controls to adjust the screen image.
For the best picture quality set your LCD display timing mode to:
VESA 1440 X 900 @ 60Hz.
To set the Timing Mode:
- Set the resolution: Right-click on the Windows desktop > Properties > Settings > set the resolution.
- Set the refresh rate: See your graphic card's user guide for instructions.
WARNING: Do not set the graphics card in your computer to exceed the maximum refresh rate of 85Hz; doing so may result in permanent damage to your LCD display.
OSD and Power Lock Settings
- OSD Lock: Press and hold [1] and the up arrow ▲ for 10 seconds. If any buttons are pressed the message OSD Locked will display for 5 seconds.
- OSD Unlock: Press and hold [1] and the up arrow again for 10 seconds.
- Power Button Lock: Press and hold [1] and the down arrow ▼ for 10 seconds. If the power button is pressed the message Power Button Locked will display for 5 seconds. With or without this setting, after a power failure, your LCD display's power will automatically turn ON when power is restored.
- Power Button Unlock: Press and hold [1] and the down arrow ▼ again for 10 seconds.
Adjusting the Screen Image
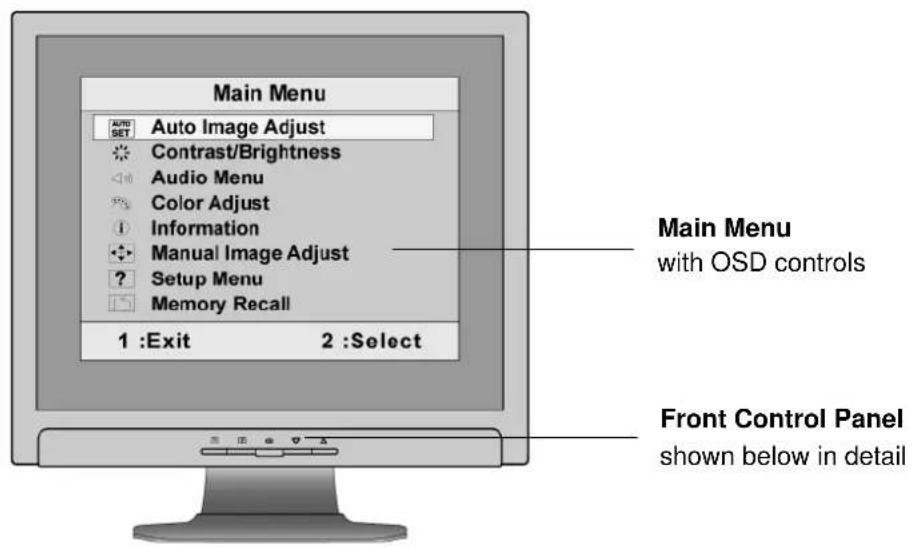
Use the buttons on the front control panel to display and adjust the OSD controls which display on the screen. The OSD controls are explained at the top of the next page and are defined in “Main Menu Controls” on page 11.
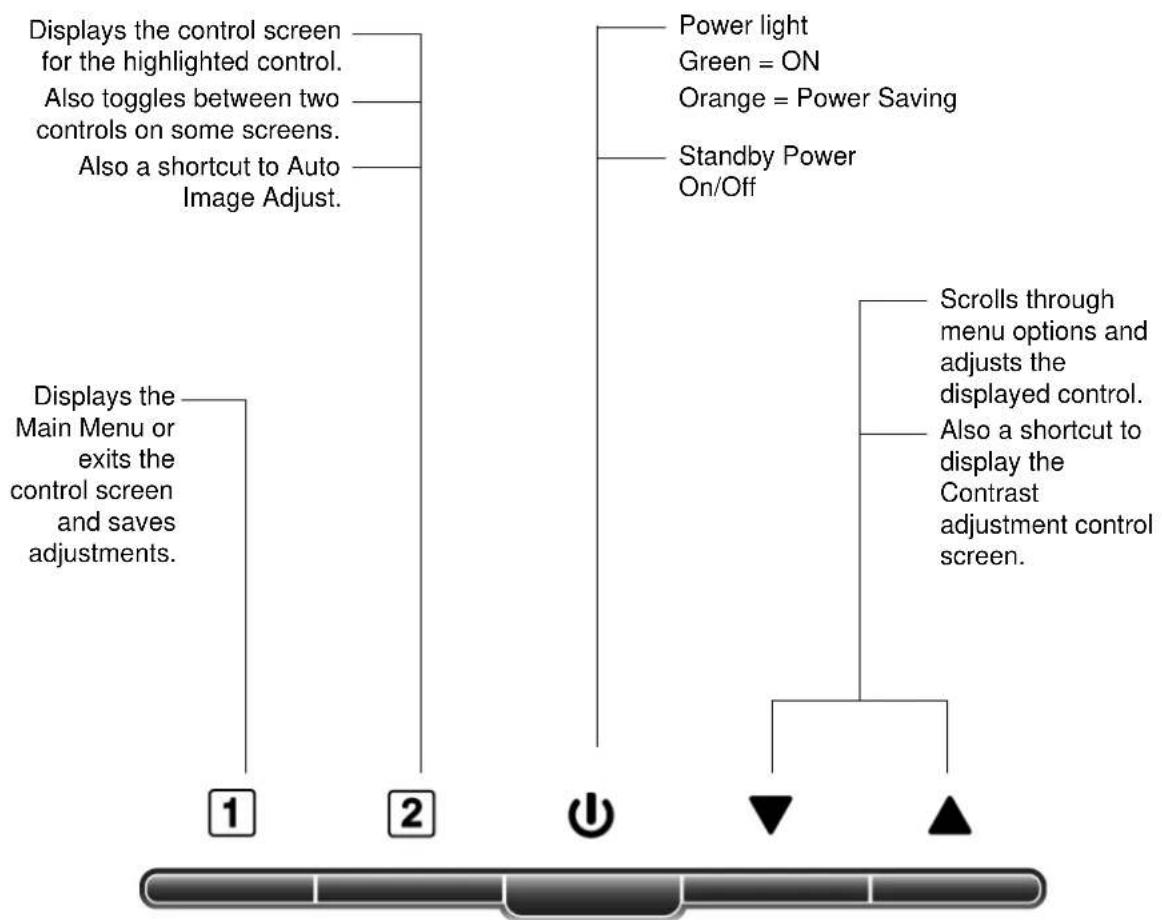
flowchart
graph TD
    A["Displays the Main Menu or exits the control screen and saves adjustments."] --> B["1"]
    C["Displays the control screen for the highlighted control. Also toggles between two controls on some screens. Also a shortcut to Auto Image Adjust."] --> D["2"]
    E["Power light Green = ON Orange = Power Saving"] --> F["●"]
    G["Standby Power On/Off"] --> H["▼"]
    I["Scrolls through menu options and adjusts the displayed control. Also a shortcut to display the Contrast adjustment control screen."] --> J["▲"]
Do the following to adjust the display setting:
- To display the Main Menu, press button [1].
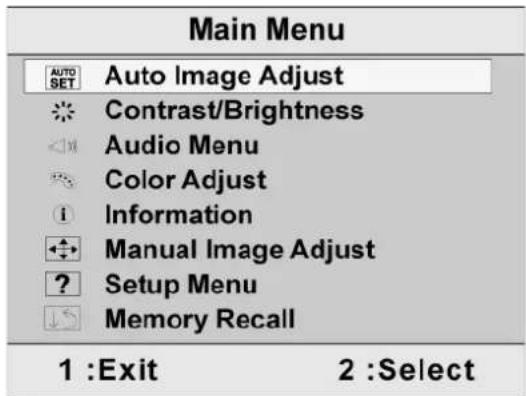
NOTE: All OSD menus and adjustment screens disappear automatically after about 15 seconds. This is adjustable through the OSD timeout setting in the setup menu.
-
To select a control to adjust, press ▲ or ▼ to scroll up or down in the Main Menu.
-
After the desired control is selected, press button [2]. A control screen like the one shown below appears.

-
To adjust the control, press the up ▲ or down ▼ buttons.
-
To save the adjustments and exit the menu, press button [1] twice.
The following tips may help you optimize your display:
- Adjust the computer's graphics card so that it outputs a 1280 x 1024 @ 60Hz video signal to the LCD display. (Look for instructions on “changing the refresh rate” in the graphics card's user guide.)
- If necessary, make small adjustments using H. POSITION and V. POSITION until the screen image is completely visible. (The black border around the edge of the screen should barely touch the illuminated “active area” of the LCD display.)
Main Menu Controls
Adjust the menu items shown below by using the up ▲ and down ▼ buttons.
Control Explanation

Auto Image Adjust automatically sizes, centers, and fine tunes the video signal to eliminate waviness and distortion. Press the [2] button to obtain a sharper image.
NOTE: Auto Image Adjust works with most common video cards. If this function does not work on your LCD display, then lower the video refresh rate to 60 Hz and set the resolution to its pre-set value.

Contrast adjusts the difference between the image background (black level) and the foreground (white level).

Brightness adjusts background black level of the screen image.

Audio Adjust
Volume increases the volume, decreases the volume, and mutes the audio.
Mute temporarily silences audio output.

Color Adjust provides several color adjustment modes, including preset color temperatures and a User Color mode which allows independent adjustment of red (R), green (G), and blue (B). The factory setting for this product is 6500K (6500 Kelvin).
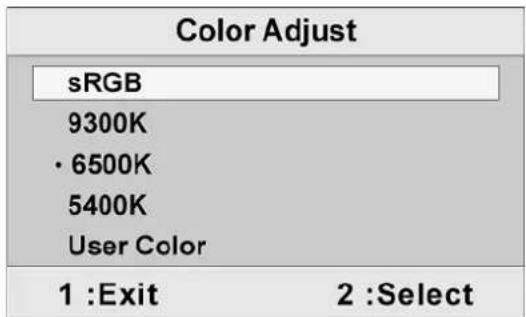
sRGB-This is quickly becoming the industry standard for color management, with support being included in many of the latest applications. Enabling this setting allows the LCD display to more accurately display colors the way they were originally intended. Enabling the sRGB setting will cause the Contrast and Brightness adjustments to be disabled.
9300K-Adds blue to the screen image for cooler white (used in most office settings with fluorescent lighting).
6500K-Adds red to the screen image for warmer white and richer red.
5400K-Adds green to the screen image for a darker color.
User Color Individual adjustments for red (R), green (G), and blue (B).
- To select color (R, G or B) press button [2].
- To adjust selected color, press▲and▼.
Important: If you select RECALL from the Main Menu when the product is set to a Preset Timing Mode, colors return to the 6500K factory preset.

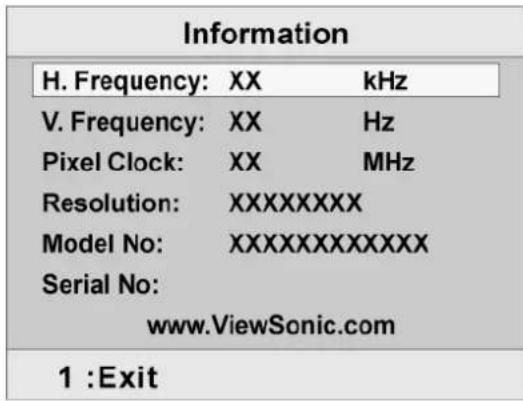
Information displays the timing mode (video signal input) coming from the graphics card in the computer, the LCD model number, the serial number, and the ViewSonic® website URL. See your graphics card's user guide for instructions on changing the resolution and refresh rate (vertical frequency).
NOTE: VESA 1280 x 1024 @ 60Hz (recommended) means that the resolution is 1280 x 1024 and the refresh rate is 60 Hertz.

Manual Image Adjust displays the Manual Image Adjust menu.
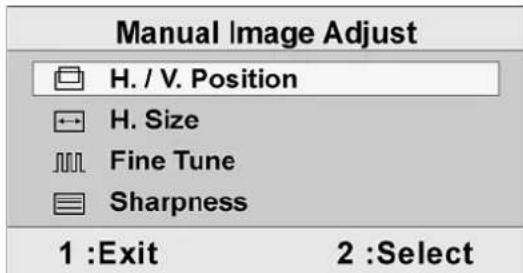
H. Size (Horizontal Size) adjusts the width of the screen image.
H./V. Position (Horizontal/Vertical Position) moves the screen image left or right and up or down.
Fine Tune sharpens the focus by aligning text and/or graphics with pixel boundaries.
NOTE: Try Auto Image Adjust first.
Sharpness adjusts the clarity and focus of the screen image.

Setup Menu displays the menu shown below:
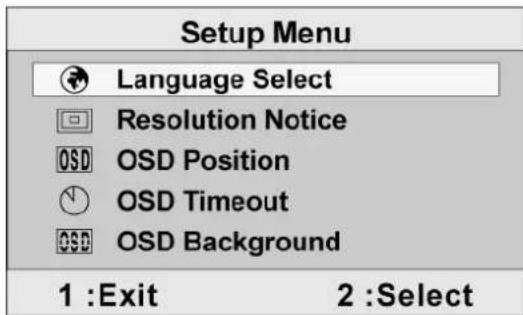
Language Select allows the user to choose the language used in the menus and control screens.
Resolution Notice displays the Resolution Notice menu shown below.
| Resolution Notice | |
| For the best quality, change the resolution to 1280 x 1024 | |
| Press "1" to clear message Press "2" to disable message | |
| 1 :Exit | 2 :Select |
Resolution Notice advises the optimal resolution to use.
OSD Position allows the user to move the OSD menus and control screens.
OSD Timeout sets the length of time the OSD screen is displayed. For example, with a “15 second” setting, if a control is not pushed within 15 seconds, the display screen disappears.
OSD Background allows the user to turn the OSD background On or Off.

Memory Recall returns the adjustments back to factory settings if the display is operating in a factory Preset Timing Mode listed in the Specifications of this manual.
Exception: This control does not affect changes made with the User Color control, Language Select or Power Lock setting.
Other Information
Specifications
| LCD Type | 19" (full 19" viewable diagonal area), TFT (Thin Film Transistor), Active Matrix WXGA LCD, 0.285 mm pixel pitch | |
| RGB vertical stripe | ||
| Anti-Glare | ||
| Input Signal Video Sync RGB analog (0.7/1.0 Vp-p, 75 ohms) | ||
| Separate Sync, f_h:30-82 kHz, f_v:50-75 Hz | ||
| Compatibility PC | Up to 1440 X 900 Non-interlaced | |
| Power Macintosh up to 1440 X 900 | ||
| Resolution Recommended and supported | 1440 X 900 @ 60 Hz | |
| 1280 x 1024 @ 60, 75 Hz | ||
| 1024 x 768 @ 60, 70, 72, 75 Hz | ||
| 800 x 600 @ 56, 60, 72, 75 Hz | ||
| 640 x 480 @ 72, 75 Hz | ||
| 720 x 400 @ 70 Hz | ||
| Power Voltage 100-240 VAC, 50/60 Hz (auto switch) 1.2A | ||
| Display area Full Scan 410.4 mm (H) x 256.5 mm (V) | ||
| Operating conditions | Temperature | 32° F to + 104° F (0°C to + 40°C) |
| Humidity | 10% to 90% (non-condensing) | |
| Altitude | To 10,000 feet | |
| Storage conditions | Temperature | -4° F to + 140° F (-20°C to + 60°C) |
| Humidity | 10% to 90% (non-condensing) | |
| Altitude | To 40,000 feet | |
| Dimensions | Physical | 448 mm (W) x 377 mm (H) x 194 mm (D) |
| 17.6" (W) x 14.8" (H) x 7.6" (D) | ||
| Weight | Physical | 9.9 lb (4.5 kg) |
| Regulations | UL, CUL, FCC-B (ICES), CB, CE, TOC'03, ICES-003B, TUV/GS, TVU ERGO (covers ISO 13406-2 and MPR II), TUV-s, NOM, GOST-R/Hygienic, ENERGY STAR®, CCC, BSMI, PSB, C-TICK, SASO, RoHS | |
| Power saving modes | On Off | Normal |
| <1W | ||
| Preset Timing Mode (pre-adjusted to VESA® 1440 X 900 @ 60 Hz) | ||
| Warning: Do not set the graphics card in your computer to exceed these refresh rates; doing so may result in permanent damage to the LCD display. | ||
Troubleshooting
No power
- Make sure power button (or switch) is ON.
- Make sure A/C power cord is securely connected to the LCD display.
- Plug another electrical device (like a radio) into the power outlet to verify that the outlet is supplying proper voltage.
Power is ON but no screen image
- Make sure the video cable supplied with the LCD display is tightly secured to the video output port on the back of the computer. If the other end of the video cable is not attached permanently to the LCD display, tightly secure it to the LCD display.
- Adjust brightness and contrast.
- If you are using an Macintosh older than G3, you need a Macintosh adapter.
Wrong or abnormal colors
- If any colors (red, green, or blue) are missing, check the video cable to make sure it is securely connected. Loose or broken pins in the cable connector could cause an improper connection.
- Connect the LCD display to another computer.
- If you have an older graphics card, contact ViewSonic® for a non-DDC adapter.
Control buttons do not work
- Press only one button at a time.
Customer Support
For technical support or product service, see the table below or contact your reseller.
NOTE: You will need the product serial number.
| Country/Region Website | T = TelephoneF = FAX | ||
| United States www.viewsonic.com | T= 800 688 6688F= 909 468 1202 | service.us@viewsonic.com | |
| Canada www.viewsonic.com | T= 866 463 4775F= 909 468 5814 | service.ca@viewsonic.com | |
| Latin America (Mexico/Chile) | www.viewsonic.com | T= 866 323 8056F= 909 444 5655 | soporte@viewsonic.com |
| United Kingdom www.viewsoniceurope.com/uk | www.viewsoniceurope.com/uk/Support/Calldesk.htm | ||
| Europe, Middle East, Baltic countries, and North Africa | www.viewsoniceurope.com Contact your reseller | ||
| Australia/New Zealand | www.viewsonic.com.au | AUS= 1800 880 818NZ= 0800 008 822 | service@au.viewsonic.com |
| Singapore/Malaysia/ Thailand | www.ap.viewsonic.com T= 65 | 64616044 service@sg.viewsonic.com | |
| South Africa and other countries | www.ap.viewsonic.com | T= 886 2 2246 3456F= 886 2 2249 1751 | service@sd.viewsonic.com |
| India www.in.viewsonic.com T= 1800 11 9999 | service@in.viewsonic.com | ||
| Hong Kong | www.hk.viewsonic.com | T= 852 3102 2900 | service@hk.viewsonic.com |
| Macau | www.hk.viewsonic.com | T= 853 700 303 | service@hk.viewsonic.com |
| Korea | www.kr.viewsonic.com | T= 080 333 2131 | service@kr.viewsonic.com |
Cleaning the LCD Display
- MAKE SURE THE LCD DISPLAY IS TURNED OFF.
- NEVER SPRAY OR POUR ANY LIQUID DIRECTLY ONTO THE SCREEN OR CASE.
To clean the screen:
- Wipe the screen with a clean, soft, lint-free cloth. This removes dust and other particles.
- If the screen still not clean, apply a small amount of non-ammonia, non-alcohol based glass cleaner onto a clean, soft, lint-free cloth, and wipe the screen.
To clean the case:
- Use a soft, dry cloth.
- If the case still not clean, apply a small amount of a non-ammonia, non-alcohol based, mild non-abrasive detergent onto a clean, soft, lint-free cloth, then wipe the surface.
Disclaimer
- ViewSonic ^ does not recommend the use of any ammonia or alcohol-based cleaners on the LCD display screen or case. Some chemical cleaners have been reported to damage the screen and/or case of the LCD display.
- ViewSonic will not be liable for damage resulting from use of any ammonia or alcohol-based cleaners.
Limited Warranty VIEWSONIC® LCD DISPLAY
What the warranty covers:
ViewSonic warrants its products to be free from defects in material and workmanship, under normal use, during the warranty period. If a product proves to be defective in material or workmanship during the warranty period, ViewSonic will, at its sole option, repair or replace the product with a like product. Replacement product or parts may include remanufactured or refurbished parts or components.
How long the warranty is effective:
ViewSonic LCD displays are warranted for 1 year for all parts including the light source and 1 year for all labor from the date of the first consumer purchase.
Who the warranty protects:
This warranty is valid only for the first consumer purchaser.
What the warranty does not cover:
- Any product on which the serial number has been defaced, modified or removed.
- Damage, deterioration or malfunction resulting from:
a. Accident, misuse, neglect, fire, water, lightning, or other acts of nature, unauthorized product modification, or failure to follow instructions supplied with the product.
b. Repair or attempted repair by anyone not authorized by ViewSonic.
c. Any damage of the product due to shipment.
d. Removal or installation of the product.
e. Causes external to the product, such as electrical power fluctuations or failure.
f. Use of supplies or parts not meeting ViewSonic's specifications.
g. Normal wear and tear.
h. Any other cause which does not relate to a product defect.
-
Any product exhibiting a condition commonly known as "image burn-in" which results when a static image is displayed on the product for an extended period of time.
-
Removal, installation, and set-up service charges.
How to get service:
- For information about receiving service under warranty, contact ViewSonic Customer Support (Please refer to Customer Support page). You will need to provide your product's serial number.
- To obtain warranted service, you will be required to provide (a) the original dated sales slip, (b) your name, (c) your address, (d) a description of the problem, and (e) the serial number of the product.
- Take or ship the product freight prepaid in the original container to an authorized ViewSonic service center or ViewSonic.
- For additional information or the name of the nearest ViewSonic service center, contact ViewSonic.
Limitation of implied warranties:
There are no warranties, express or implied, which extend beyond the description contained herein including the implied warranty of merchantability and fitness for a particular purpose.
Exclusion of damages:
ViewSonic's liability is limited to the cost of repair or replacement of the product. ViewSonic shall not be liable for:
- Damage to other property caused by any defects in the product, damages based upon inconvenience, loss of use of the product, loss of time, loss of profits, loss of business opportunity, loss of goodwill, interference with business relationships, or other commercial loss, even if advised of the possibility of such damages.
- Any other damages, whether incidental, consequential or otherwise.
- Any claim against the customer by any other party.
Effect of state law:
This warranty gives you specific legal rights, and you may also have other rights which vary from state to state. Some states do not allow limitations on implied warranties and/or do not allow the exclusion of incidental or consequential damages, so the above limitations and exclusions may not apply to you.
Sales outside the U.S.A. and Canada:
For warranty information and service on ViewSonic products sold outside of the U.S.A. and Canada, contact ViewSonic or your local ViewSonic dealer.
The warranty period for this product in mainland China (Hong Kong, Macao and Taiwan Excluded) is subject to the terms and conditions of the Maintenance Guarantee Card.
4.3: ViewSonic LCD Warranty LCD_LW01 Rev. 1a 06-30-06

bar
| Category | Value | |---|---| | Category 1 | 100 | | Category 2 | 100 | | Category 3 | 100 | | Category 4 | 100 | | Category 5 | 100 | | Category 6 | 100 | | Category 7 | 100 | | Category 8 | 100 | | Category 9 | 100 | | Category 10 | 100 | | Category 11 | 100 | | Category 12 | 100 | | Category 13 | 100 | | Category 14 | 100 | | Category 15 | 100 | | Category 16 | 100 | | Category 17 | 100 | | Category 18 | 100 | | Category 19 | 100 | | Category 20 | 100 | | Category 21 | 100 | | Category 22 | 100 | | Category 23 | 100 | | Category 24 | 100 | | Category 25 | 100 | | Category 26 | 100 | | Category 27 | 100 | | Category 28 | 100 | | Category 29 | 100 | | Category 30 | 100 | | Category 31 | 100 | | Category 32 | 100 | | Category 33 | 100 | | Category 34 | 100 | | Category 35 | 100 | | Category 36 | 100 | | Category 37 | 100 | | Category 38 | 100 | | Category 39 | 100 | | Category 40 | 100 | | Category 41 | 100 | | Category 42 | 100 | | Category 43 | 100 | | Category 44 | 100 | | Category 45 | 100 | | Category 46 | 100 | | Category 47 | 100 | | Category 48 | 100 | | Category 49 | 100 | | Category 50 | 100 | | Category 51 | 100 | | Category 52 | 100 | | Category 53 | 100 | | Category 54 | 100 | | Category 55 | 100 | | Category 56 | 100 | | Category 57 | 100 | | Category 58 | 100 | | Category 59 | 100 | | Category 60 | 100 | | Category 61 | 100 | | Category 62 | 100 | | Category 63 | 100 | | Category 64 | 100 | | Category 65 | 100 | | Category 66 | 100 | | Category 67 | 100 | | Category 68 | 100 | | Category 69 | 100 | | Category 70 | 100 | | Category 71 | 100 | | Category 72 | 100 | | Category 73 | 100 | | Category 74 | 100 | | Category 75 | 100 | | Category 76 | 100 | | Category 77 | 100 | | Category 78 | 100 | | Category 79 | 100 | | Category 80 | 100 | | Category 81 | 100 | | Category 82 | 100 | | Category 83 | 100 | | Category 84 | 100 | | Category 85 | 100 | | Category 86 | 100 | | Category 87 | 100 | | Category 88 | 100 | | Category 89 | 100 | | Category 90 | 100 | | Category 91 | 100 | | Category 92 | 100 | | Category 93 | 100 | | Category 94 | 100 | | Category 95 | 100 | | Category 96 | 100 | | Category 97 | 100 | | Category 98 | 100 | | Category 99 | 100 | | Total (Total) = [sum of bars] / [bar chart] + [line chart] = [bars] * bar chart- Getting Started
- Using the LCD Display
- Other Information
- TCO Information
- TCODevelopment
- Congratulations!
- Ergonomics
- Energy
- Emissions
- Ecology
- Compliance Information
- For U.S.A.
- For Canada
- CE Conformity for European Countries
- Following information is only for EU-member states:
- Important Safety Instructions
- Declaration of RoHS Compliance
- Copyright Information
- Product Registration
- For Your Records
- Product disposal at end of product life
- Package Contents
- Precautions
- Quick Installation
- Installing the Base
- Connect power cord (and AC/DC adapter if required)
- Connect video cable
- Turn ON LCD display and computer
- Insert the ViewSonic Wizard CD into the computer's CD drive.
- Windows users: Set the timing mode (resolution and refresh rate)
- Installation is complete. Enjoy your new ViewSonic LCD display.
- Wall Mounting (Optional)
- Setting the Timing Mode
- OSD and Power Lock Settings
- Adjusting the Screen Image
- Do the following to adjust the display setting:
- The following tips may help you optimize your display:
- Main Menu Controls
- Control Explanation
- Audio Adjust
- Specifications
- Troubleshooting
- No power
- Power is ON but no screen image
- Wrong or abnormal colors
- Control buttons do not work
- Customer Support
- Cleaning the LCD Display
- To clean the screen:
- To clean the case:
- Disclaimer
- Limited Warranty VIEWSONIC® LCD DISPLAY
- What the warranty covers:
- How long the warranty is effective:
- Who the warranty protects:
- What the warranty does not cover:
- How to get service:
- Limitation of implied warranties:
- Exclusion of damages:
- Effect of state law:
- Sales outside the U.S.A. and Canada:
Brand : VIEWSONIC
Model : Optiquest Q19wb
Category : Screen