AWS3377 - Security Camera ALC - Free user manual and instructions
Find the device manual for free AWS3377 ALC in PDF.

| Product Type | Security Camera |
| Brand | ALC |
| Model | AWS3377 |
| Dimensions | 110 mm x 70 mm x 60 mm |
| Weight | 300 g |
| Power Supply | DC 12V / PoE (Power over Ethernet) |
| Video Resolution | 1080p Full HD (1920 x 1080) |
| Night Vision | Infrared up to 30 meters |
| Field of View | 90° diagonal |
| Motion Detection | Yes, with customizable zones |
| Two-Way Audio | Built-in microphone and speaker |
| Connectivity | Wi-Fi 802.11 b/g/n, Ethernet |
| Storage | SD card up to 128 GB, Cloud optional |
| Weather Resistance | IP65 rated (outdoor use) |
| Mounting | Wall or ceiling mount included |
| App Compatibility | iOS and Android via ALC Vision app |
| Care Instructions | Wipe lens with a soft, dry cloth. Avoid solvents. |
| Safety Warnings | Use only with supplied adapter; do not expose to extreme temperatures. |
| Spare Parts | Mounting kit, power adapter, Ethernet cable available |
| Repairability | User-replaceable SD card; other repairs by authorized service. |
| General Info | ALC AWS3377 is a versatile security camera suitable for indoor and outdoor use. |
Frequently Asked Questions - AWS3377 ALC
User questions about AWS3377 ALC
0 question about this device. Answer the ones you know or ask your own.
Ask a new question about this device
Download the instructions for your Security Camera in PDF format for free! Find your manual AWS3377 - ALC and take your electronic device back in hand. On this page are published all the documents necessary for the use of your device. AWS3377 by ALC.
USER MANUAL AWS3377 ALC
natural_image
Two black RLC security cameras mounted on stands next to a tablet displaying a video call interface (no readable text or symbols on devices)AWS3377: 2 Camera System
AWS337: 1 Camera System
Model AWS3377/AWS337
User Guide
Please read these instructions completely before operating this product.
IMPORTANT SAFETY INSTRUCTIONS....3
INTRODUCTION....6
System Contents....6
Getting to Know Your LCD Touch Screen Monitor....7
Getting to Know Your Camera....8
INSTALLATION....9
Installation Tips 9
Night Vision 9
Setting Up the Monitor....10
Installing the Camera(s)....12
SYSTEM INTRODUCTION....14
Live Screen and Menu 14
Description of Icons....15
Live Screen Displays....17
Camera Views 18
Adjusting the Volume....19
Recording Live Video 20
MAIN MENU 21
Camera Pairing....22
Turning a Camera On or Off....23
Setting HD Option 24
Setting the Image Quality 25
Schedule Recording 26
Motion and Mask Options....28
Detection Options....29
Event List....30
To Delete a Recording 32
To Copy a Recording....33
Setting the Date/Time 34
Setting the Language....35
Setting the Image Appearance....36
Setting the Idle Display 37
Setting the Power Savings....38
Setting the Storage....39
Formatting a Drive 40
Setting the Security Code and Internet Info....41
System Info and Upgrading 42
REMOTE ACCESS 43
Overview....43
Requirements for Remote View....43
Downloading the WDVR App....43
WDVR Android Setup Wizard 44
WDVR Apple Setup Wizard....46
Android-WDVR Main Screen and Icons 48
Android-Recording 49
Android-Event List 51
Android-Camera Pairing 54
Android-Turning a Camera On of Off 55
Android-Setting HD Option 56
Android-Setting the Image Quality....57
Android-Schedule Recording....58
Android-Motion and Motion Area Options....60
Android-Detection Options 61
Android-Setting the Date/Time....62
Android-Setting the Language 63
Android-Setting the Image Appearance 64
Android-Setting the Idle Display 65
Android-Setting the Power Savings 66
Android-Setting the Security Code and Internet Info 67
Android-Setting the Storage 68
Android-Formatting a Drive....69
Android-System Info 70
Android-Setting the Push Setting....71
Apple-WDVR Main Screen and Icons....72
Apple-Recording....73
Apple-Event List 75
Apple-Camera Pairing....78
Apple-Turning a Camera On of Off....79
Apple-Setting HD Option 80
Apple-Setting the Image Quality....81
Apple-Schedule Recording 82
Apple-Motion and Motion Area Options 84
Apple-Detection Options....85
Apple-Setting the Date/Time....86
Apple-Setting the Image Appearance 87
Apple-Setting the Idle Display 88
Apple-Setting the Power Savings....89
Apple-Setting the Push Setting 90
Apple-Setting the Storage....91
Apple-Formatting a Drive 92
Apple-Setting the Security Code and Internet Info....93
PRODUCT SPECIFICATIONS....98
WARRANTY 99
PRODUCT SAFETY: When used in the directed manner, this unit has been designed and manufactured to ensure your personal safety. Improper use of this product can result in potential electrical shock or fire hazards. Please read all safety and operating instructions carefully before installation and use, and keep these instructions handy for future reference.
CAUTION
RISK OF ELECTRIC SHOCK DO NOT OPEN


CAUTION: To reduce the risk of electric shock do not remove cover (or back). No user serviceable parts inside. Refer servicing to qualified service personnel.
DANGEROUS VOLTAGE: The lightning flash with arrowhead, within an equilateral triangle, is intended to alert the user to the presence of uninsulated dangerous voltage within the product's enclosure that may be of sufficient magnitude to constitute a risk of electric shock to persons.
ATTENTION: The exclamation point within an equilateral triangle is intended to alert the user to the presence of important operating and maintenance (servicing) instructions in the literature accompanying the appliance.
WARNING: TO PREVENT FIRE OR SHOCK HAZARD, DO NOT EXPOSE THIS UNIT TO RAIN OR MOISTURE.

Products with CE Marking comply with EMC Directive (2004/108/EC); Low Voltage Directive (73/23/EEC); R&TTE(1999/5/EC); ROHS Directive (2011/65/EU) issued by the Commission of the European Community. Compliance with these directives implies conformity to the following European Norms:
EMC: EN 301 489 LVD: EN 60950 Radio: EN 300 328

FCC Compliance Statement: This device complies with Part 15 of the FCC rules. Operation is subjected to the following two conditions: (1) this device may not cause harmful interference, and (2) this device must accept any interference received, including interference that may cause undesired operation.
FCC/CE WARNING
This equipment has been tested and found to comply with limits for a Class B digital device, pursuant to Part 15 of the FCC rules and ETSI(EN) 300328. These limits are designed to provide reasonable protection against harmful interference in residential installations. This equipment generates, uses, and can radiate radio frequency energy, and if not installed and used in accordance with the instructions, may cause harmful interference to radio communications. However, there is no guarantee that interference will not occur in a particular installation. If this equipment does cause interference to radio or television equipment reception, which can be determined by turning the equipment off and on, the user is encouraged to try to correct the interference by one or more of the following measures:
- Reorient or relocate the receiving antenna.
- Move the equipment away from the monitor.
- Plug the equipment into an outlet on a circuit different from that to which the monitor is connected.
- Consult the dealer or an experienced radio/television technician for additional suggestions.
CAUTION: Any changes or modifications to this equipment not expressly approved by the party responsible for compliance could void your authority to operate the equipment.
Recycling and Disposal Information:
- Do not dispose of electronic devices or any of their components (especially batteries and LCD displays) in your municipal trash collection.
- Consult your local waste management authority or a recycling organization like Earth911.com to find an electronics recycling facility in your area.

CAUTION: Rechargeable batteries must be recycled or disposed of properly.
Lithium-Polymer Battery Warning
- This equipment contains a rechargeable lithium-polymer battery.
- Do not charge the battery in temperatures below 32^ F (0° C) or higher than 113° F (45° C).
- Do not open or mutilate the battery.
- The rechargeable batteries contained in this equipment may explode if disposed of in a fire.
- Do not short-circuit the battery.
- Do not charge the rechargeable battery pack used in this equipment with any charger other than the one designed to charge this battery pack as specified in the owner's manual. Using another charger may damage the battery pack or cause the battery pack to explode.
WARNING:
STRANGULATION HAZARD: Infants have STRANGLED in power cords. Keep power cords more than 3 feet away from cribs, bassinets, play yards, and other safe sleep environments for infants.
IMPORTANT SERVICE SAFETY INSTRUCTIONS
Damages caused by non-compliance with this operating manual will void the warranty!
- Read and Follow Instructions - All the safety and operating instructions should be read before the product is operated. Follow all operating instructions.
- Retain Instructions - The safety and operating instructions should be retained for future reference.
- Heed Warnings - Comply with all warnings on the product and in the operating instructions.
- Power Sources - This product should be operated only from the type of power source indicated on the marking label. If you are not sure of the type of power supplied to your location, consult your video dealer or local power company. For products intended to operate from battery power, or other sources, refer to the operating instructions.
- Overloading - Do not overload wall outlets or extension cords as this can result in the risk of fire or electric shock. Overloaded AC outlets, extension cords, frayed power cords, damaged or cracked wire insulation, and broken plugs are dangerous. They may result in a shock or fire hazard. Periodically examine the cord, and if its appearance indicates damage or deteriorated insulation, have it replaced by your service technician.
- Power-Cord Protection - Power supply cords should be routed so that they are not likely to be walked on or pinched by items placed upon or against them. Pay particular attention to cords at plugs, convenience receptacles, and the point where they exit from the product.
-
Surge Protectors - It is highly recommended that the video equipment be connected to a surge protector. Doing so will protect the equipment from damage caused by power surges. Surge protectors should bear the UL listing mark or CSA certification mark.
-
Uninterruptible Power Supplies (UPS) - Because this product is designed for continuous, 24/7 operation, it is recommended that you connect the product to an uninterruptible power supply. An uninterruptible power supply has an internal battery that will keep the product running in the event of a power outage. Uninterruptible power supplies should bear the UL listing mark or CSA certification mark.
CAUTION: Maintain electrical safety. Power line operated equipment or accessories connected to this product should bear the UL listing mark or CSA certification mark on the accessory itself and should not be modified so as to defeat the safety features. This will help avoid any potential hazard from electrical shock or fire. If in doubt, contact qualified service personnel.
- Ventilation - Slots and openings in the case are provided for ventilation to ensure reliable operation of the product and to protect it from overheating. These openings must not be blocked or covered. The openings should never be blocked by placing the video equipment on a bed, sofa, rug, or other similar surface. This product should never be placed near or over a radiator or heat register. This product should not be placed in a built-in installation such as a bookcase or rack unless proper ventilation is provided and the product manufacturer's instructions have been followed.
- Attachments - Do not use attachments unless recommended by the product manufacturer as they may cause a hazard.
- Water and Moisture - Do not use receivers or video monitors near water — for example, near a bath tub, wash bowl, kitchen sink or laundry tub, in a wet basement, near a swimming pool and the like.
- Heat - The product should be situated away from heat sources such as radiators, heat registers, stoves, or other products (including amplifiers) that produce heat.
- Accessories - Do not place this video equipment on an unstable cart, stand, tripod, or table. The video equipment may fall, causing serious damage to the product. Use this product only with a cart, stand, tripod, bracket, or table recommended by the manufacturer or sold with the product. Any mounting of the product should follow the manufacturer's instructions and use a mounting accessory recommended by the manufacturer.
- Camera Extension Cables - Check the rating of your extension cable(s) to verify compliance with your local authority regulations prior to installation.
- Mounting - The cameras provided with this system should be mounted only as instructed in this guide or the instructions that came with your cameras, using the provided mounting brackets.
- Camera Installation - Cameras are not intended for submersion in water. Not all cameras can be installed outdoors. Check your camera's environmental rating to confirm if it can be installed outdoors. When installing cameras outdoors, installation in a sheltered area is recommended.
System Contents
After unpacking, you will have the following items:
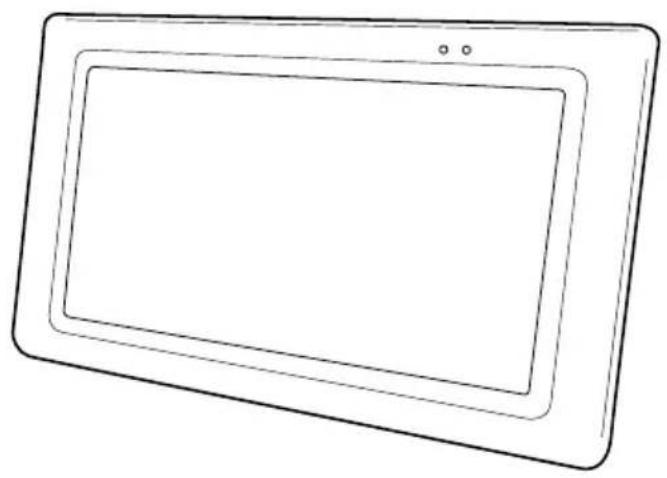
natural_image
Line drawing of a rectangular electronic device with two dots on top (no text or symbols)Monitor x 1
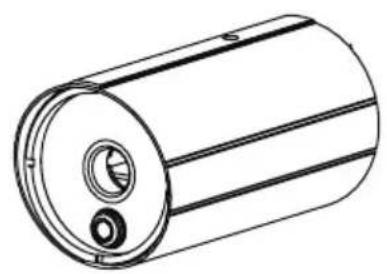
natural_image
Technical line drawing of a cylindrical mechanical component with internal features (no text or symbols)Camera x 2 (AWS3377)
Camera x 1 (AWS337)

natural_image
Line drawing of a coiled cable with connectors (no text or symbols)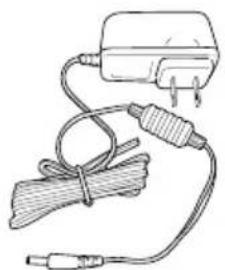
natural_image
Simple line drawing of a charging plug connected to a cable with a strap (no text or symbols)
natural_image
Line drawing of a vertical electrical insulator mounted on a base (no text or symbols)AC Adapter x 3 (x 2) Ethernet Gamma x Bracket x 2 (x 1)
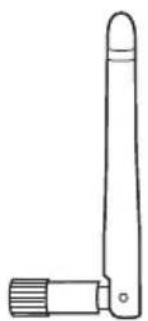
natural_image
Simple line drawing of a vertical antenna or sensor component (no text or symbols)
Antennas x 3 (x 2) Screw/Anchor Kit x2 (x 1) Quick Start Guide
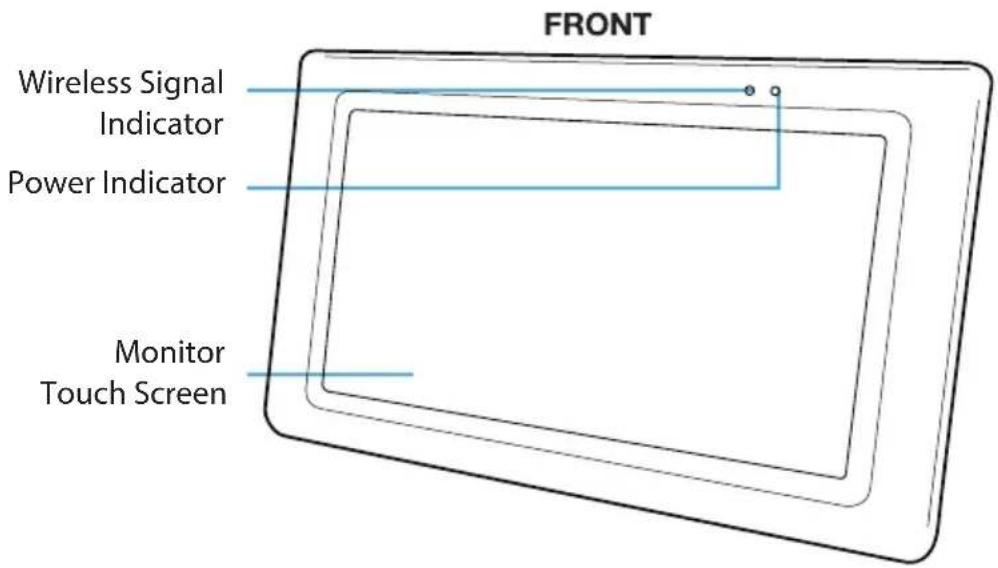
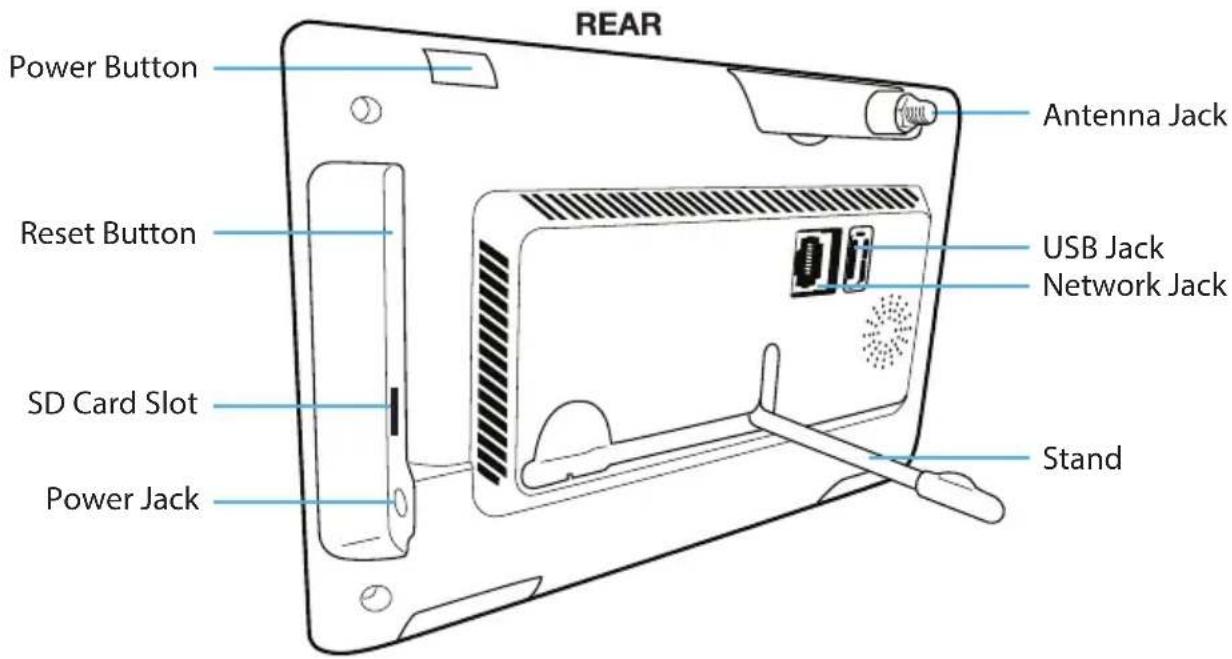
Getting to Know Your LCD Touch Screen Monitor
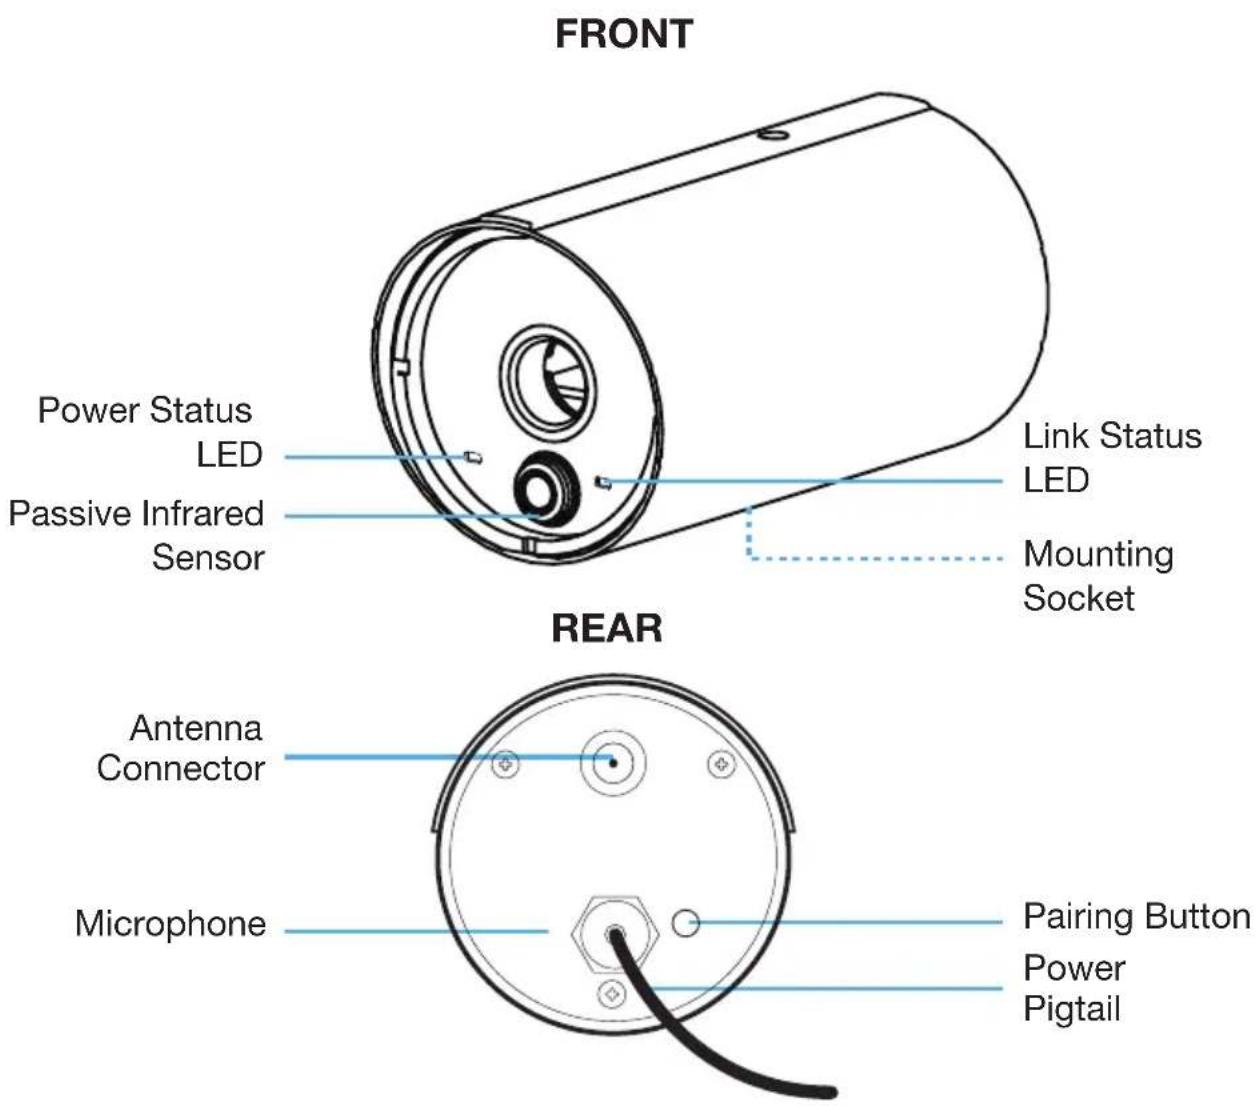
Getting to Know Your Camera
Installation Tips
WARNING:
Weatherproof, IP66 rated cameras are suitable for outdoor installation. However, if possible, it is recommended to install in a location that provides some shelter from the elements, such as beneath roof eaves.
- Before you install the camera, plan where and how it will be positioned, and where you will route the cable that connects the camera to the power adapter.
- Optimized motion detection range is 6 - 18 feet for camera. The farther away an object is, the less accurate the motion detection.
- Avoid having a direct light source in the view of the camera, including street lights, ceiling or floor lamps, spotlights in the driveway, etc.
- Rainfall, pool water ripples/reflections, tree/shrub leaves blowing in the wind – and the shadows they create – can generate motion detection false alarms.
- Before starting permanent installation, have another person check the camera image on the monitor with the camera positioned in the same place it will be permanently installed.
- It is recommended to ensure a clear line of sight between the camera and monitor and to limit the amount of obstructions, such as walls and tree branches, between the camera and monitor. Walls made of heavy building materials such as brick or concrete will significantly reduce signal range.
- If the signal will have to pass through a wall, placing the monitor or camera next to a window will improve the signal strength.
- Do not install the camera pointing out of a window. The night time picture will be unusable due to reflection from the night vision LEDs.
- The cameras are pre-paired so they work out of the box. If you have purchased additional cameras, you will need to pair them to the monitor, see “Camera Pairing” on page 24.
- As dust, grime, and cobwebs accumulate on the camera glass, they can reflect light from the infrared LED and might lower video quality. Periodically clean the lens glass with a soft cloth.
- If the camera is too close to the monitor, you may get a whistling interference sound. Simply move the camera away from the monitor to eliminate the interference sound.
Night Vision
The camera has built-in infrared LEDs to allow you to view at night for 24-hour surveillance. The LEDs will automatically activate at night and the picture viewed will turn to black and white. The night viewing range is up to 40 feet.
Setting Up the Monitor
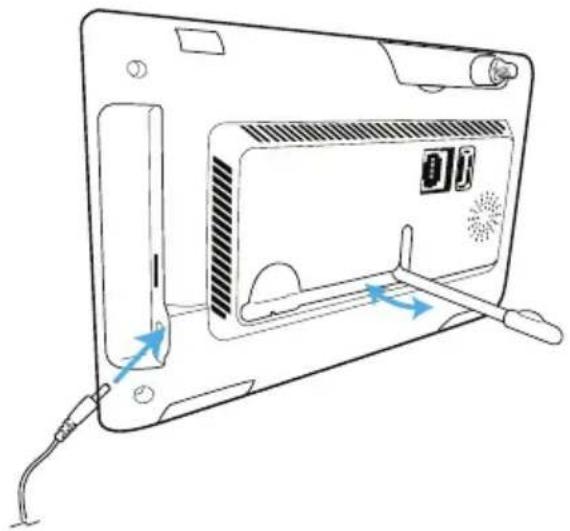
1 Flip out the stand on the back of the monitor. Connect the AC adapter to the Power Jack on the side of the monitor.
natural_image
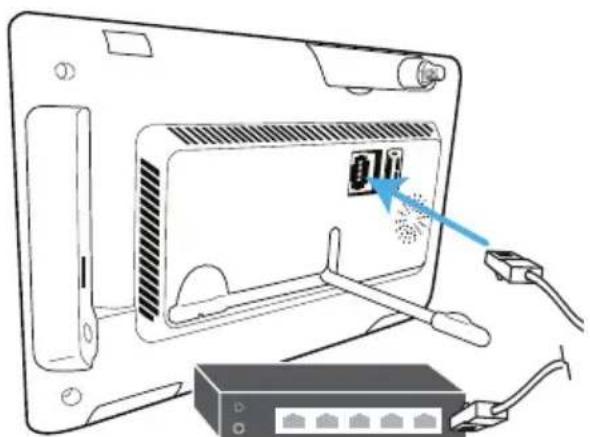
Diagram of a device rear panel with cable and indicator lights, showing internal components and directional arrows (no text or symbols)2 Connect the internet cable from the rear of the unit to your router.
natural_image
Illustration of a computer monitor with an attached network switch, showing no text or symbols on the device itself.Internet Router (not included)
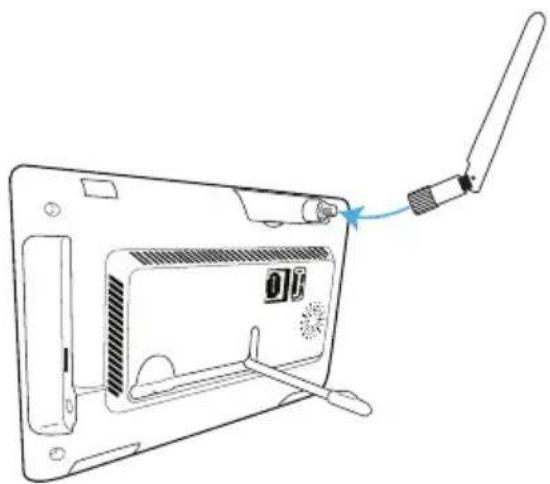
3 Screw Antenna (white antenna) clockwise into rear of camera and put into the upright position.
Rotate and pull out the stand.
TIP: You can use a USB mouse for easier navigation.
natural_image
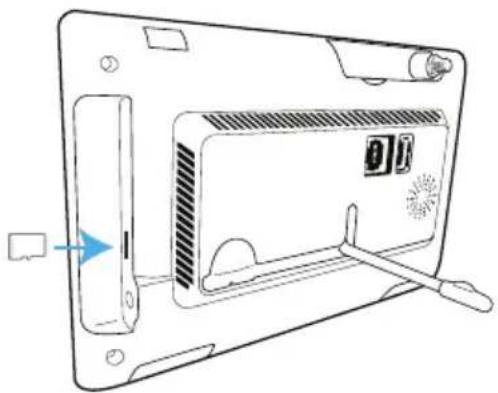
Line drawing of a device back panel with a cable inserted, showing no text or symbolsSetting Up the Monitor

Insert an SD Card (up to 128GB) into the SD Card Slot. You can also connect an HDD drive or Flash drive into the USB jack. This will allow you to record videos.
NOTES
- It is recommended to use a 2TB HDD drive for long term use.
- The max USB power for an HDD/Flash drive is 5V/1000mA. Use an external power supply for the drive if it is more.
- Format the drive/SD Card before using, see page xx.
natural_image
Line drawing of a device rear panel with a speaker and fan, showing no text or symbols
Connect the AC adapter to the Power Jack on the side of the monitor. Connect the other end of the adapter to a 120 volt AC (standard indoor) power outlet.
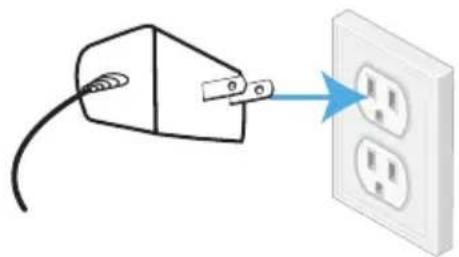
natural_image
Illustration of a plug inserted into an electrical outlet with three socket outlets (no text or symbols)
Press and hold the Power button on the top of the monitor for 3 - 4 seconds to power it up.
The monitor will display the Live view. Connect the camera(s) as shown on the next page.
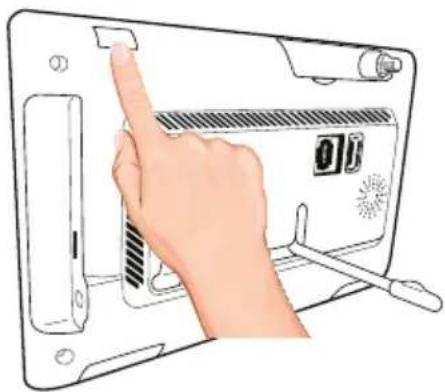
natural_image
Illustration of a hand pressing down on a device panel with a digital display (no text or symbols visible)Installing the Camera(s)
1
If not mounting, but just using on a flat surface (desk, table, etc.), skip to step 4.
2
Secure the multi-position Camera Bracket to a stable surface, ceiling or wall using the three supplied screws. If needed, three anchors are also included.
3
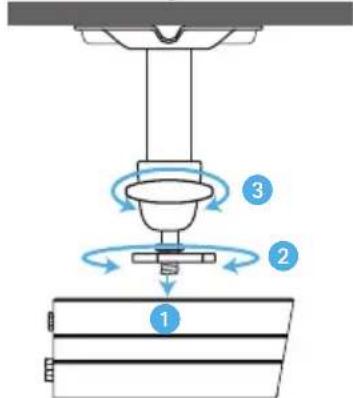
Loosen the T-Bolt on the Camera Bracket and adjust viewing angle using the Thumb Screw to rotate position.
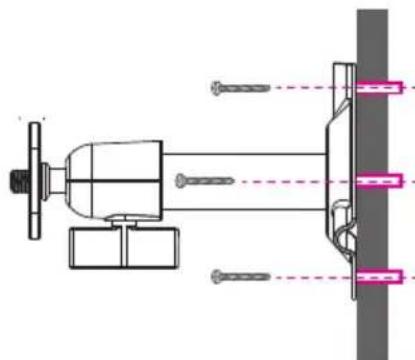
natural_image
Technical diagram of a mechanical assembly with screws and a vertical component (no text or symbols)90^

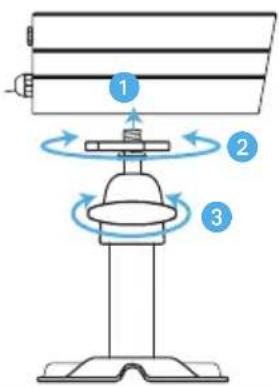
4
BOTTOM/SURFACE MOUNT:
1 Align Mounting socket on bottom of the camera with T-Bolt and screw camera onto the T-Bolt until it is in the desired position.
2 Tighten the Brace against the camera to secure it in place.
3 Set the desired camera angle and then tighten the Thumb Screw.
CEILING MOUNT:
1 Align Mounting socket on top of the camera with T-Bolt and screw camera onto it until it is in the desired position.
2 Tighten the Brace against the camera to secure it in place.
3 Set the desired camera angle and then tighten the Thumb Screw.
Surface Mount
Ceiling Mount
Installing the Camera(s)
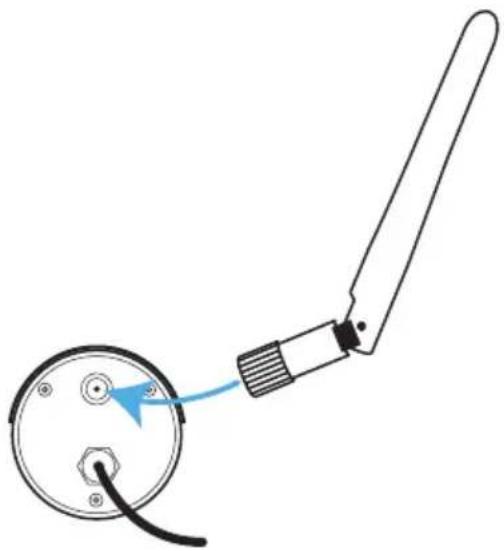
5
Screw antenna clockwise into rear of the camera.
natural_image
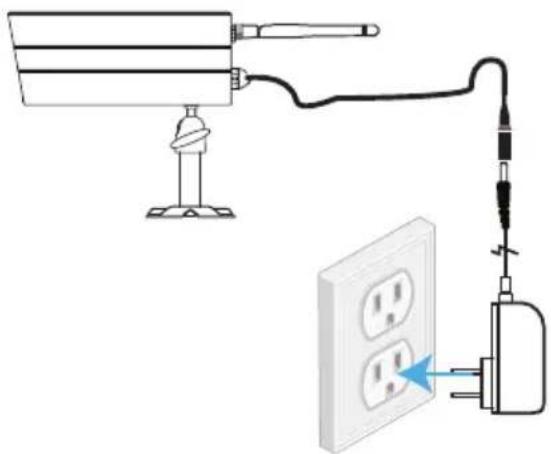
Diagram of a mechanical component with a curved arm and circular base, showing a blue arrow pointing to a component (no text or symbols present)6
Connect one end of an AC adapter to the camera's power pigtail and plug the other end of the adapter to a 120 volt AC (standard indoor) power outlet.
natural_image
Diagram showing a surveillance camera connected to an electrical outlet with a plug, no text or symbols present7
Make sure the Power status LED turns red and the Link Status LED turns green. If it doesn't, try reconnecting the AC adapter, and make sure the power outlet is not controlled by a wall switch.
You should now have video on your Live screen. If you do not have video, pair the cameras as described on page 22.
Repeat steps for additional camera(s).

TIP: Pair additional cameras as shown on page 22.
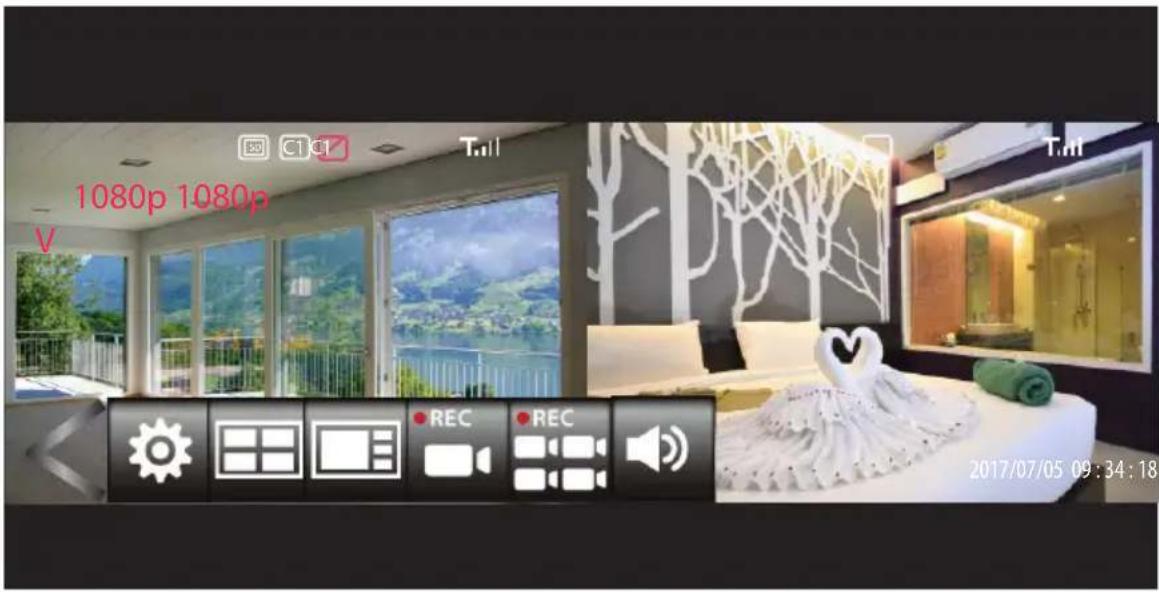
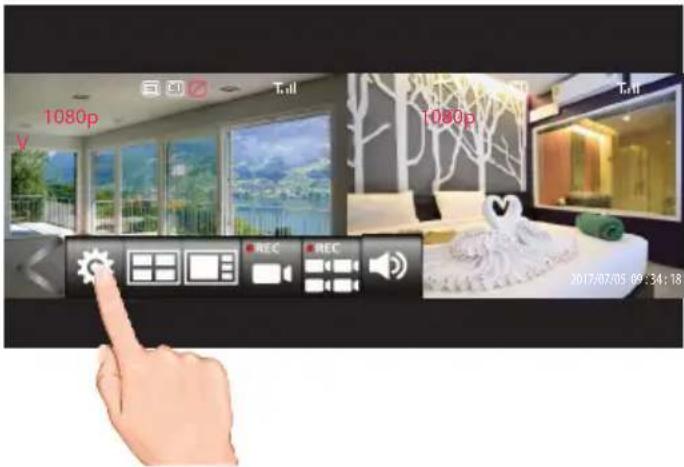
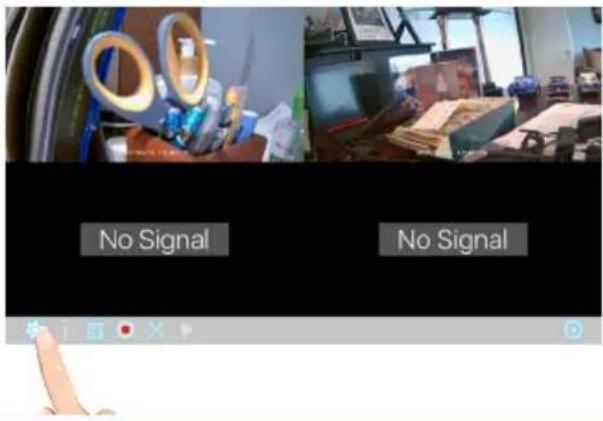
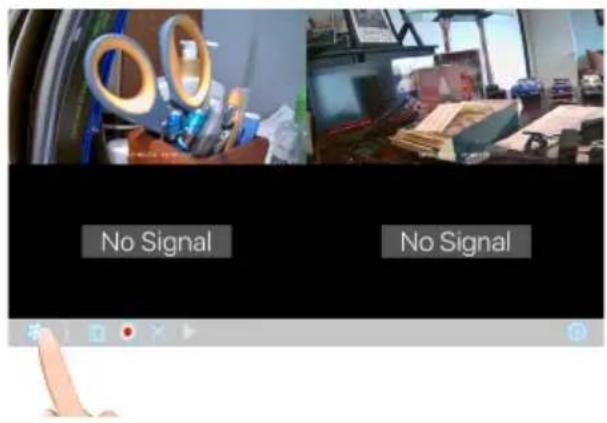
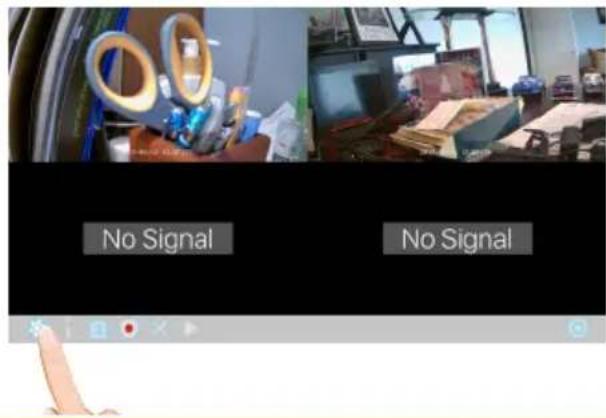
Live Screen and Menu
Your monitor's system software operates through a series of screens that let you choose groups of operations. For example, when you tap on the camera icon in the Pop-up menu, you can set how you want the main viewing screen ("Live screen") to display images from the paired cameras. You can scan between cameras, show all cameras on a single screen (Quad view or Smart Quad view), or only display a specific camera.
The Live screen lets you view the camera transmissions. It also lets you set up your screen display and make adjustments to it. Icons on the screen itself let you monitor power and camera status.
See the following page for descriptions of the Menu icons
Description of Icons
| Icon | Icon Description |
Open | Tap to open the Settings menu. |
Options | Tap to enter the Main Menu, see page 18. |
Quad Display | Tap to select Quad Display. |
Smart Quad Display | Tap to select Smart Quad Display. |
Record One Camera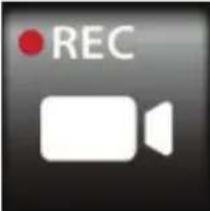 | Tap to start recording the selected camera; the Record icon will appear. Tap again to stop recording. |
Description of Icons
| Icon | |
Record All Cameras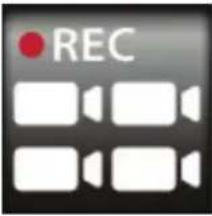 | Icon DescriptionTap to start recording from all cameras; the Record icon will appear. Tap again to stop recording. |
Volume | Tap to mute or change volume setting. |
Close | Tap to close the Settings menu. |
Live Screen Displays
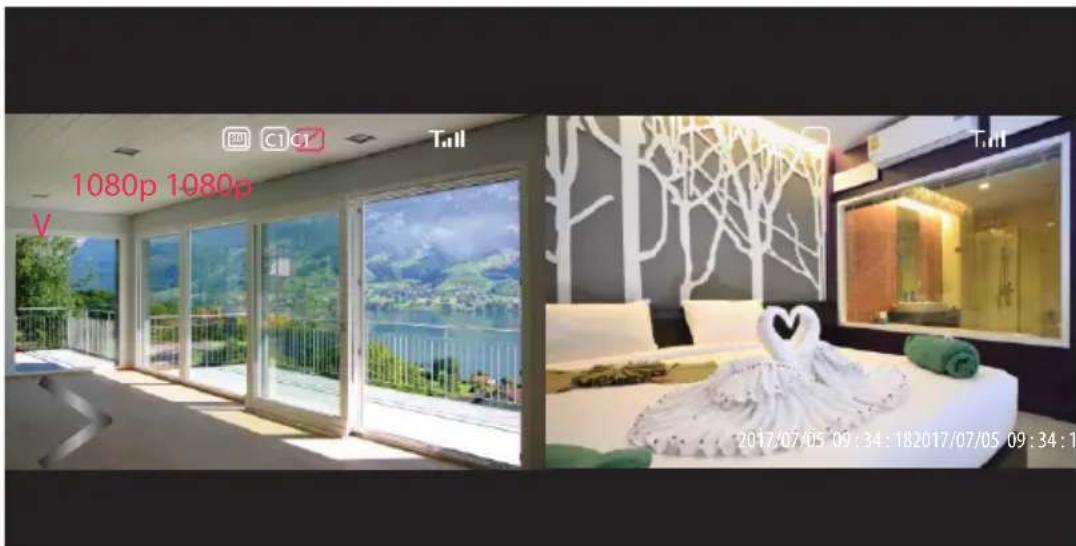
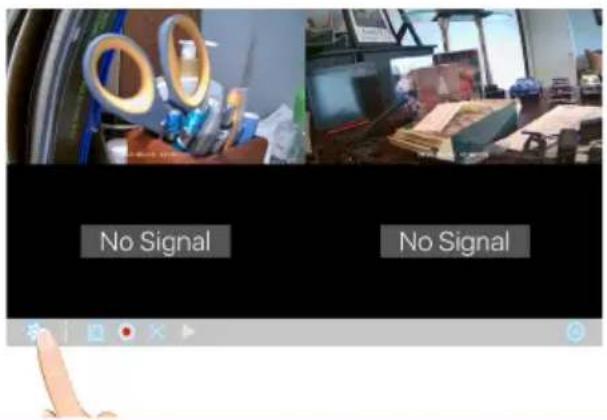
The Live screen displays in three views - Quad View, Smart Quad view or Full View. Quad View divides the screen's image area into four quadrants and displays camera video in each quadrant. If less than four cameras are connected and on, only those cameras' videos will display on the Live screen. Smart Quad will show one large camera views and up to three smaller camera views.
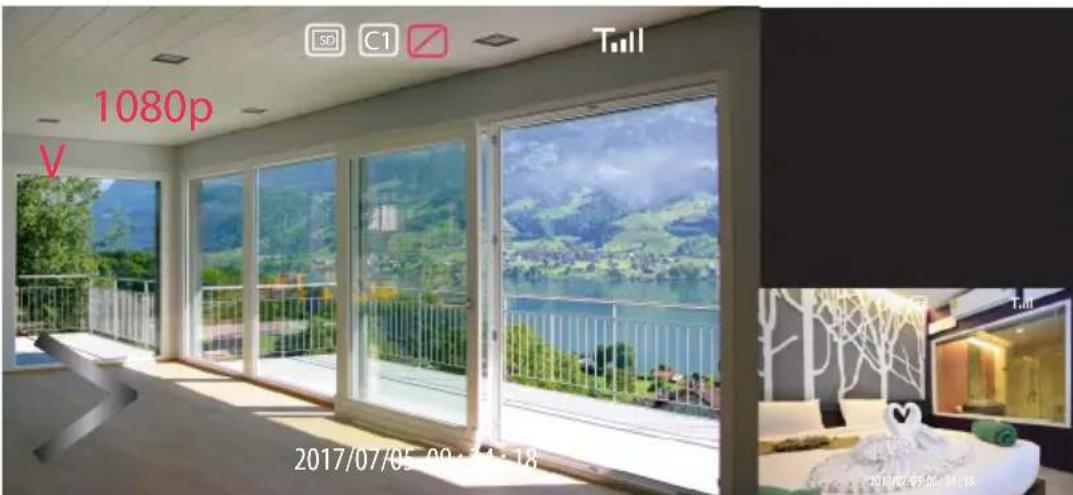
Full view displays a single camera's video on the entire screen. If you are in a Quad View, tap on the camera quadrant you want to expand to Full View. Tap on that image to return to Quad View.
Quad View
Smart Quad View
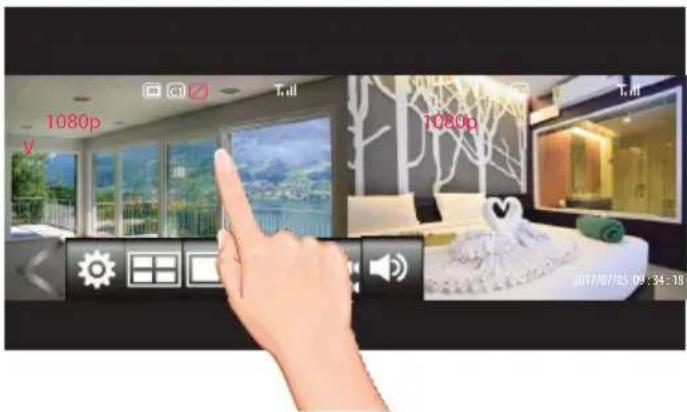
Camera Views
To change camera views, perform the following:
1
Tap on the Open/Close icon to open the Menu options.
2
Tap the Quad or Smart Quad icon.
3
The display will change to the selected Quad camera display. Tap one of the screens to view that screen only.
TIP: If the screen is not tapped within two minutes, it will revert back to the Quad display.
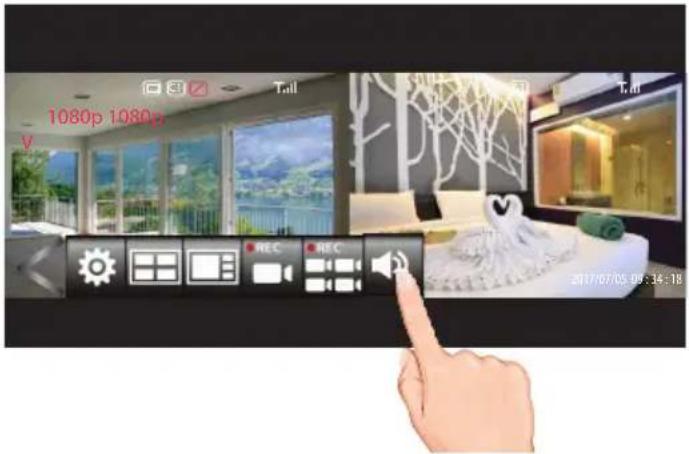
Adjusting the Volume
Adjust the camera's audio on the monitor as follows:

Tap on the Open/Close icon to open the Menu options.


Tap the Speaker icon repeatedly to set the sound from mute to one of three volume settings.
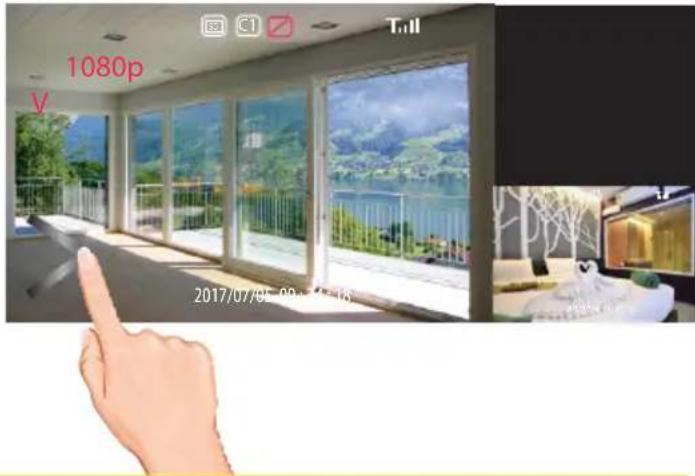
Recording Live Video
1
Make sure a Micro SD card, HDD or Flash Drive is installed, see page 11.
Tap on the Open/Close icon to open the Menu options.
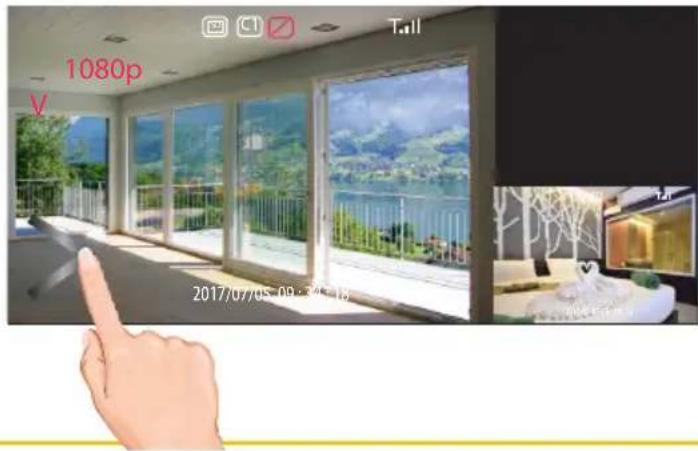
2
Tap the Record icon to start recording the selected camera/screen (REC appears on the top left side of screen) or the
Record All icon to record all cameras/screens; the Record indicator will appear at the top right of the screen.
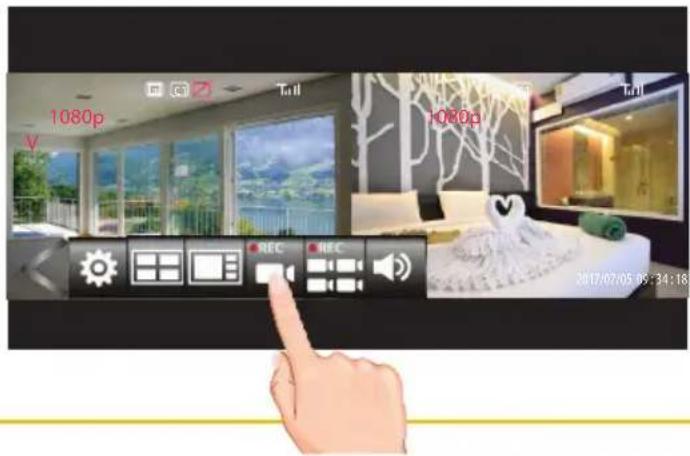
3
To stop recording, tap the respective icon again.
See the Event List section starting on page 30 to playback recorded video.
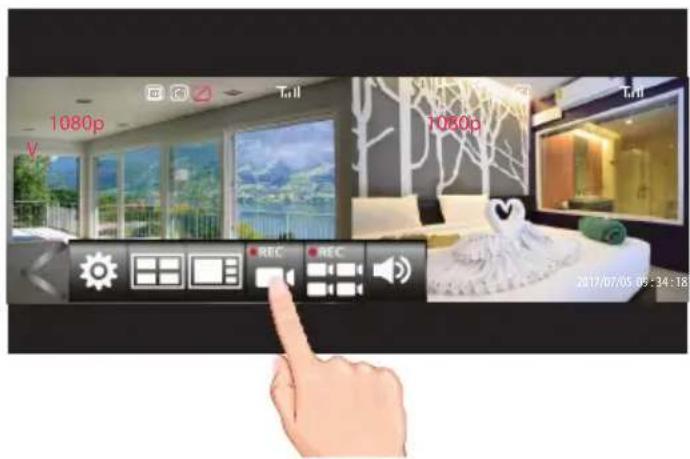
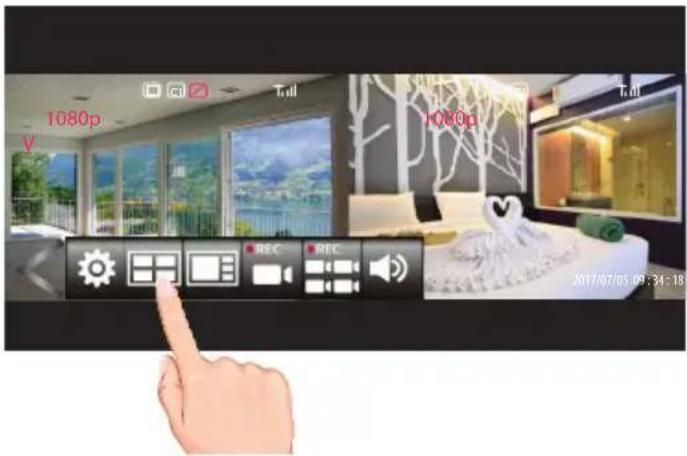
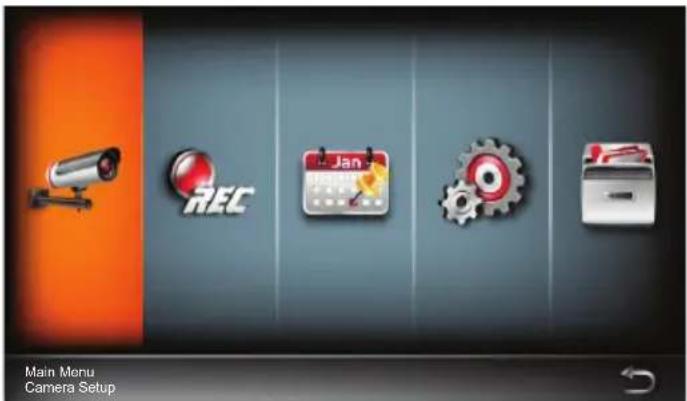
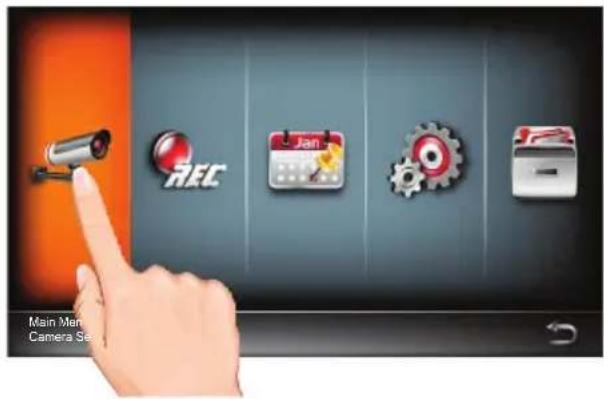
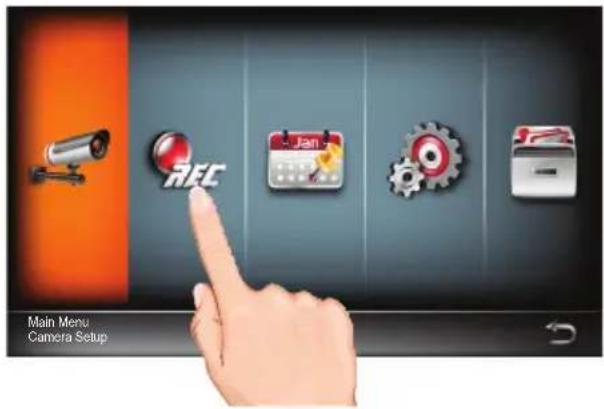
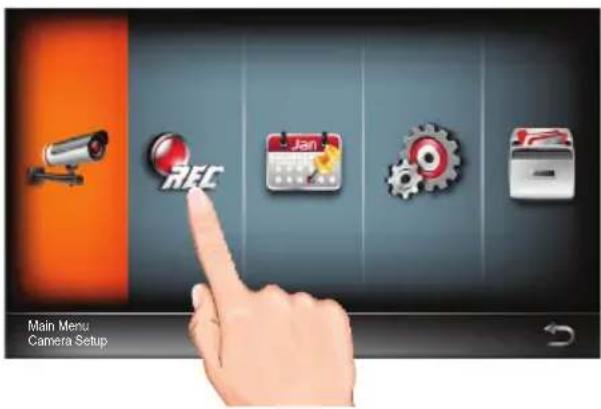
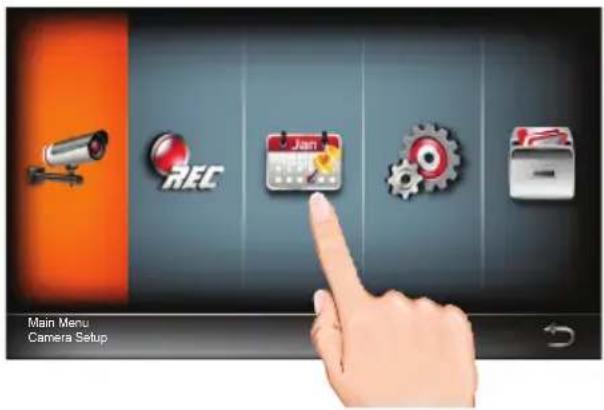
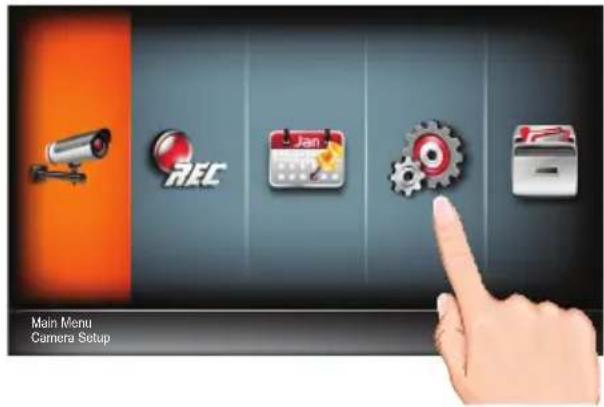
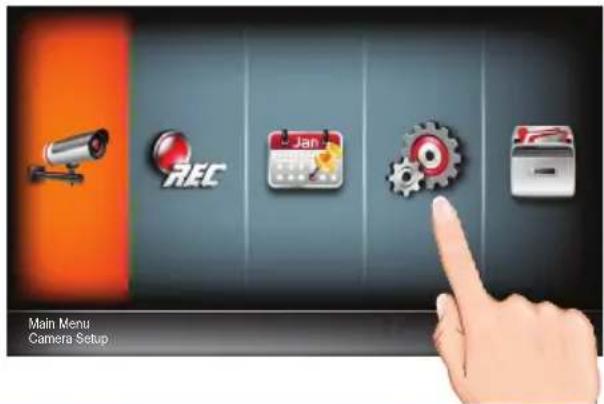
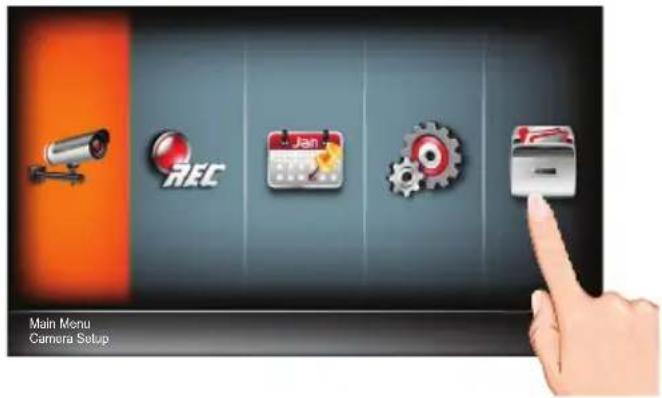
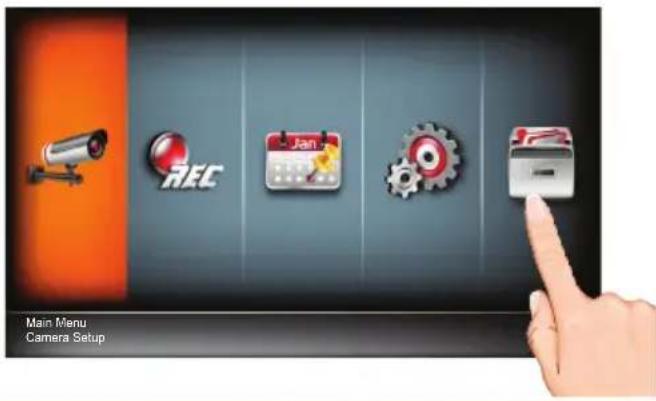
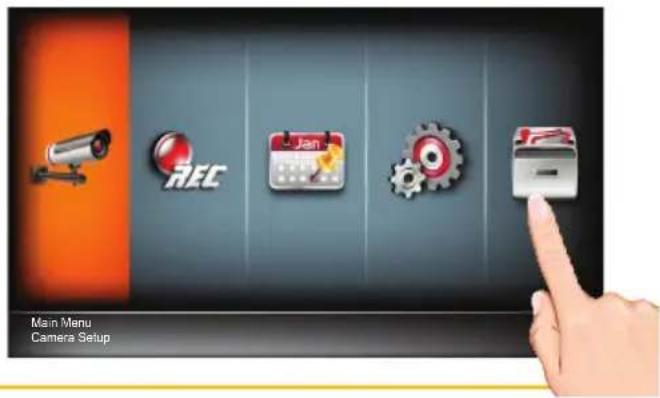
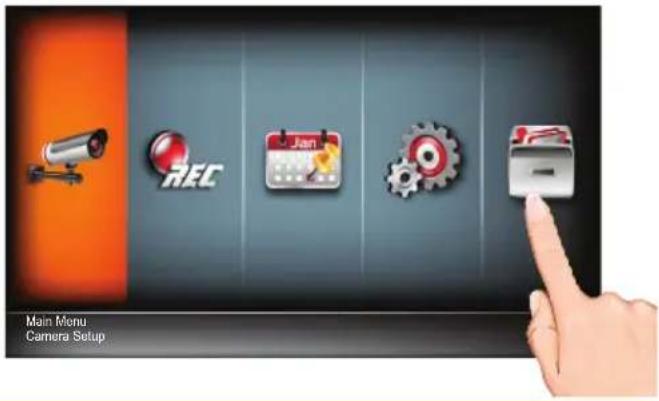
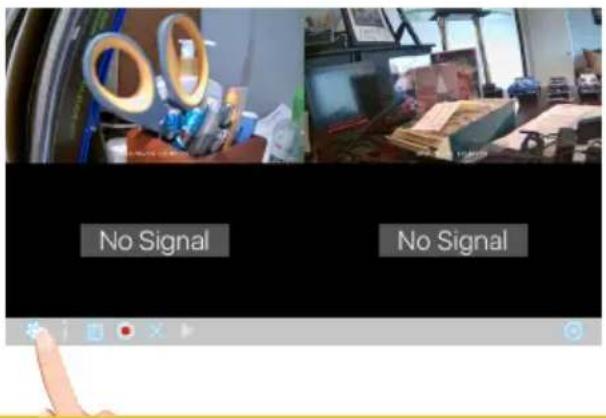
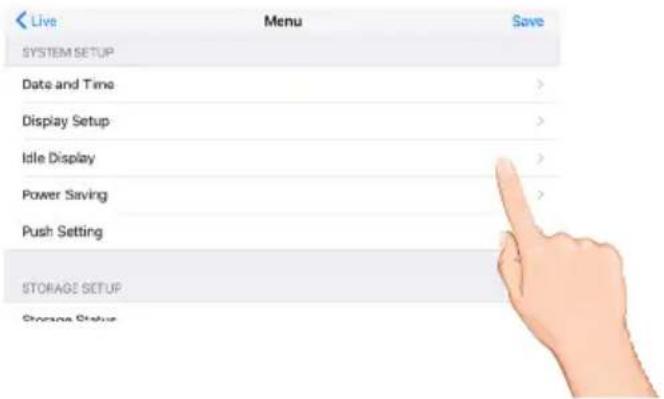
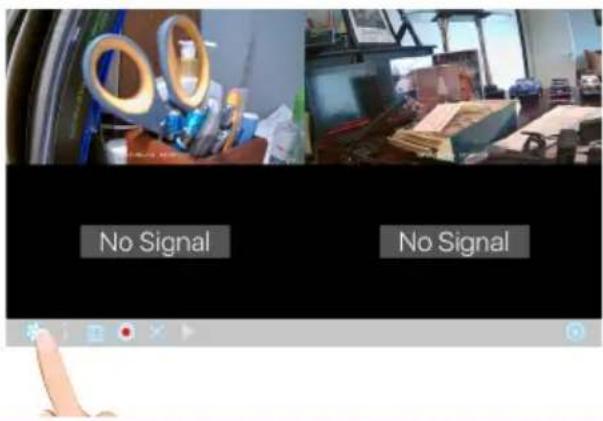
Main Menu
1
Tap on the Open/Close icon to open the Menu options.
2
Tap the Options icon to enter the Main Menu.
TIP: Entering the Main Menu while recording will stop the recording process.
3
The following screen will appear. See the following pages for the System settings.
4
When in a Setting screen, tap the return arrow to return to the previous screen.

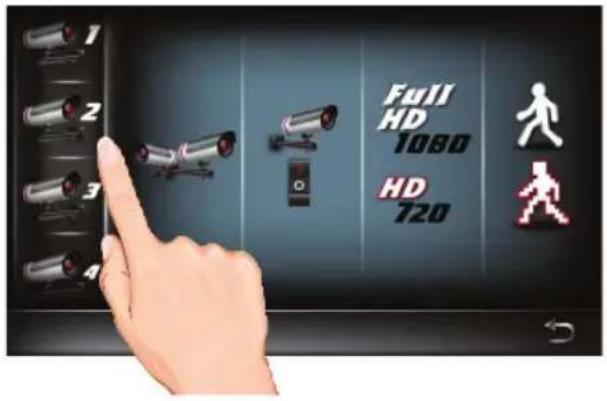
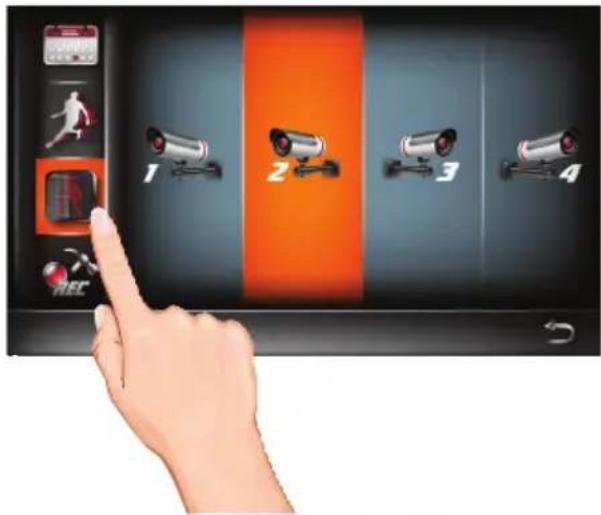
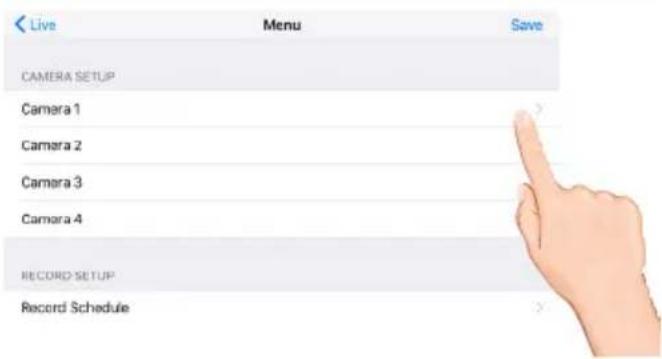
Camera Pairing
Your cameras are paired to the monitor at the factory to channels 1 and 2 (only camera 1 for AWS337). When you add a new camera to your system, you have to “introduce” the camera and monitor to each other so they can communicate.

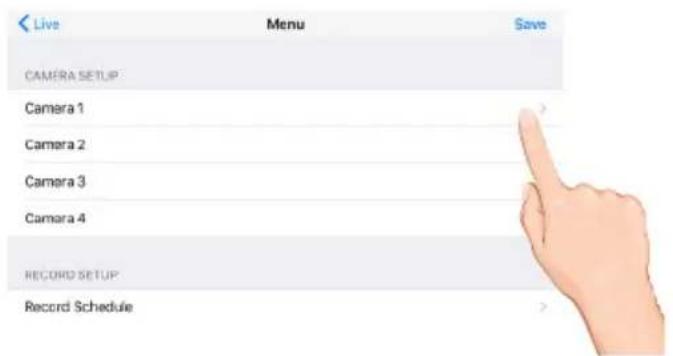
Follow steps 1 through 3 on the previous page to access the Main Menu. Tap Camera Setup icon to access the Camera Setup screen.


Tap the desired camera to pair.
TIP: You can pair up to 4 cameras.
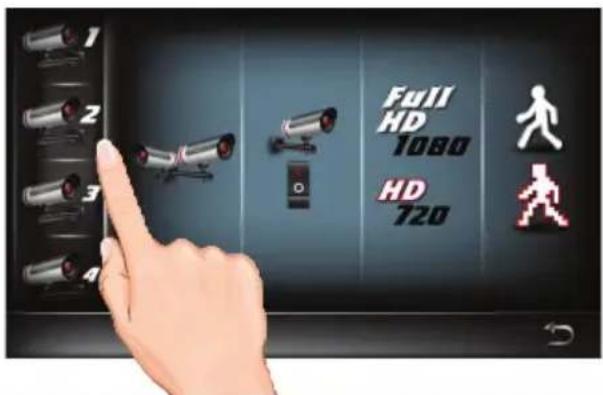

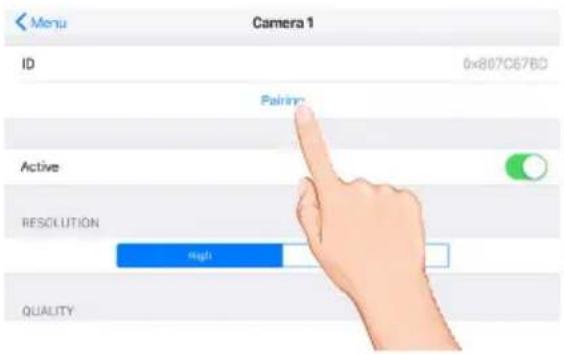
Tap the Pairing icon one to select it and once again to start pairing; "Pairing" and a countdown will appear on the screen.

Press and Hold the Pairing button on that camera for 5 seconds. If pairing is successful “pairing is successful” appears on the screen. Tap on it to remove the message. If a camera is already assigned to the selected channel, the monitor overwrites that camera link with the new one.

natural_image
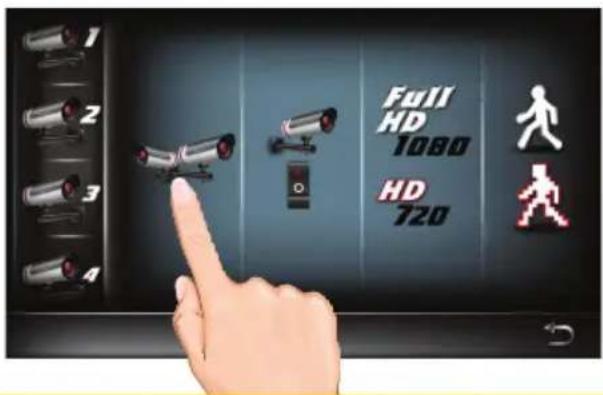
Hand inserting a cable into a circular component with a hexagonal base (no text or symbols)Turning a Camera On or Off

Follow steps 1 through 3 on page 21 to access the Main Menu. Tap Camera Setup icon to access the Camera Setup screen.


Tap the desired camera that you want to turn on or off.

Repeatedly tap the On/Off icon to cycle between On or Off.
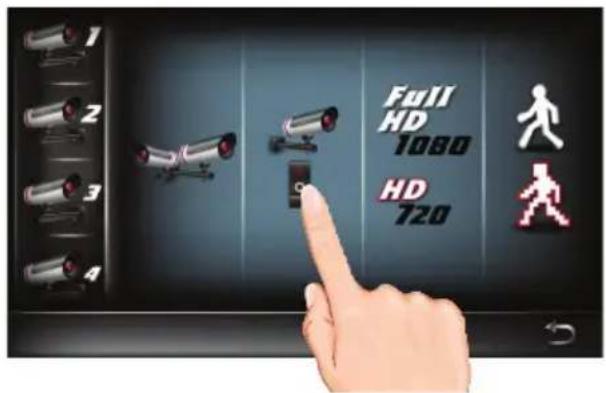
When done setting, tap the icon to return to the previous screen.

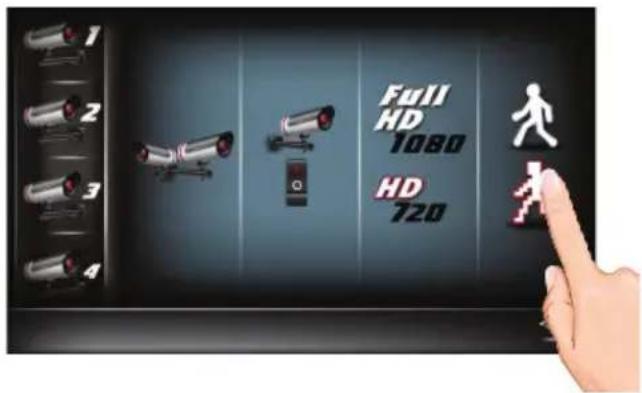
Setting HD Option

Follow steps 1 through 3 on page 21 to access the Main Menu. Tap Camera Setup icon to access the Camera Setup screen.

Tap the HD icon repeatedly to change it from 1080 to 720. 1080 will look better but 720 will provide a better frame rate which is optimal when viewing on a mobile device.
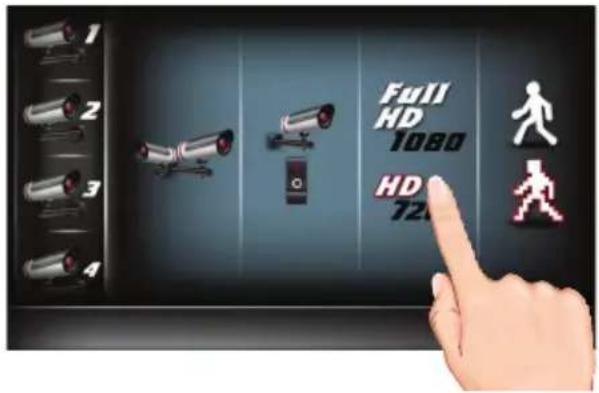
When done setting, tap the

icon to return to the previous screen.
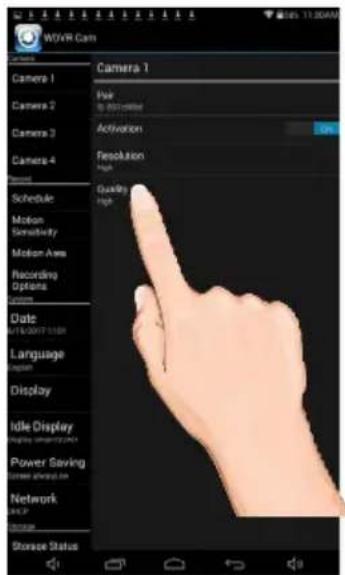
Setting the Image Quality

Follow steps 1 through 3 on page 21 to access the Main Menu. Tap Camera Setup icon to access the Camera Setup screen.


Tap the Image Quality icon repeatedly to change it from High to Low. High quality will produce a better video display quality, but the system will lower the display frame rate as compensation.
Lower quality will produce a better display frame rate, but the system will lower the quality as compensation.
When done setting, tap the

icon to return to the previous screen.
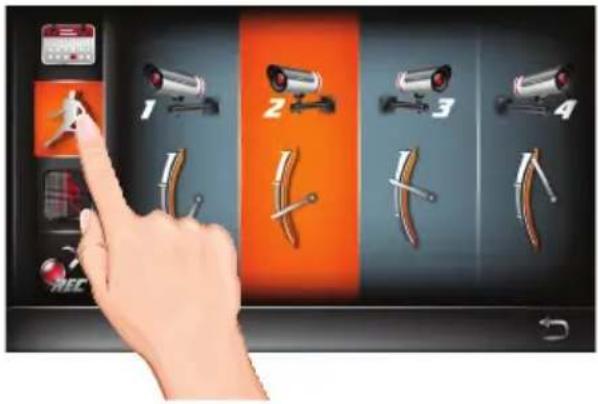
Schedule Recording
1 Follow steps 1 through 3 on page 21 to access the Main Menu. Tap Recorder Setup icon to access the Record Setup screen.
2 Tap the Record Schedule icon.
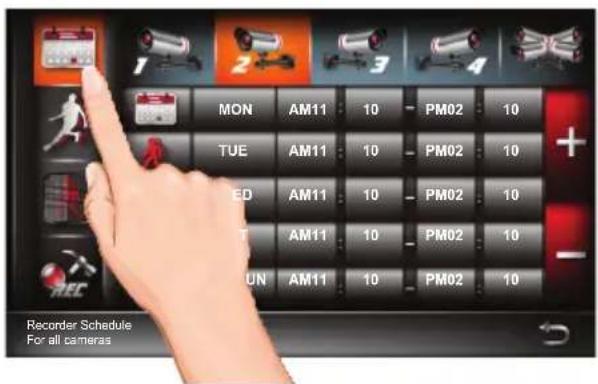
3 Tap the desired camera to set, or all cameras.
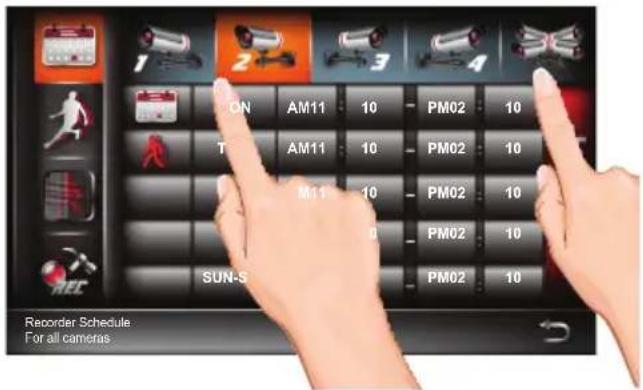
Schedule Recording

Tap the first column and then tap the + or - icon to select the following:

: Select this for continuos recorgings using a specific time and day.

: Select Motion Detection Recording to record only when motion is detected during the setup times and day(s).
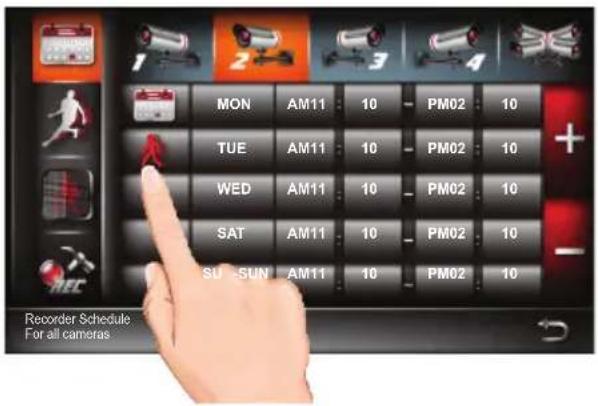

Tap the second column and then tap the + or - icon to select the weekly cycle the recording will take place. For example, EVERYDAY, MON-FRI, THURSDAY, etc.
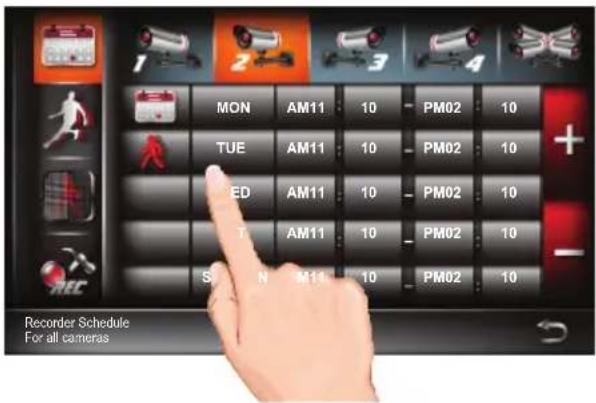

Tap the remaining columns to set the Start and End times using the + or - icon.
The unit will then record (or only record when motion is detected) at the dates and times selected.
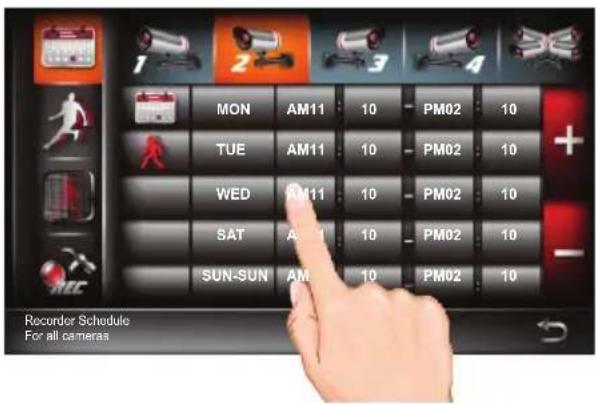
When done setting, tap the icon to return to the previous screen.
Motion and Mask Options

Follow steps 1 through 3 on page 21 to access the Main Menu. Tap Recorder Setup icon to access the Record Setup screen.


Tap the Motion icon. Tap the desired camera to select it and again to set the desired motion setting to PIR (Uses Advance Motion settings), Low, Mid or High.

This Motion Mask feature will allow you to mask areas of the screen from detecting motion and activating the motion detector recording for that area. For example, if a pet sets off the sensor, you can mask the lower areas that the pet would be visible in, or if a tree branch moving in the wind sets it off, you can mask the areas where the tree branch is in the video.
Tap the Motion Mask icon on the left menue. Tap the desired camera twice. Tap a block to mask it; "V" will disappear. To unmask a block, simply tap it again; "V" will appear.
When done setting, tap the 📋 to return to the previous screen.
Detection Options

Follow steps 1 through 3 on page 21 to access the Main Menu. Tap Recorder Setup icon to access the Record Setup screen.

Tap the Detection Setup icon.


Tap the options as follows:
Motion Record Time:
Repeatedly tap to set the time the unit will record when motion is detected (30, 60 or 120 seconds). Record time may be longer is motion continues.
Motion Detection Alarm:
Repeatedly tap to set the alarm to sound for 5 or 10 seconds when motion is detected. Tap again to turn this option off.
Video Loss Alarm:
Repeatedly tap to set the alarm to sound for 5 or 10 seconds when video is lost from one of the cameras. Tap again to turn this option off.
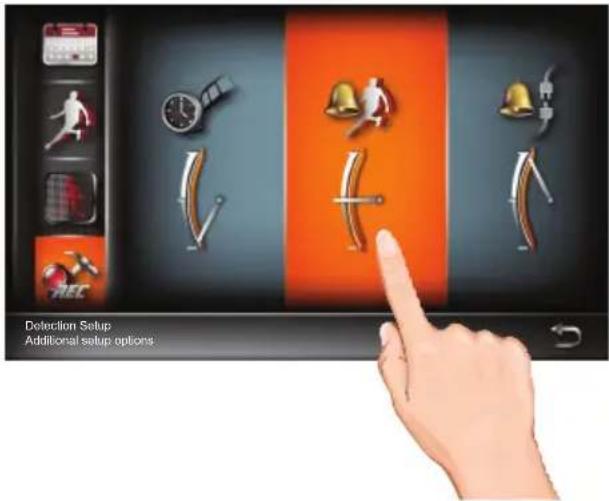
When done setting, tap the 📄n to return to the previous screen.
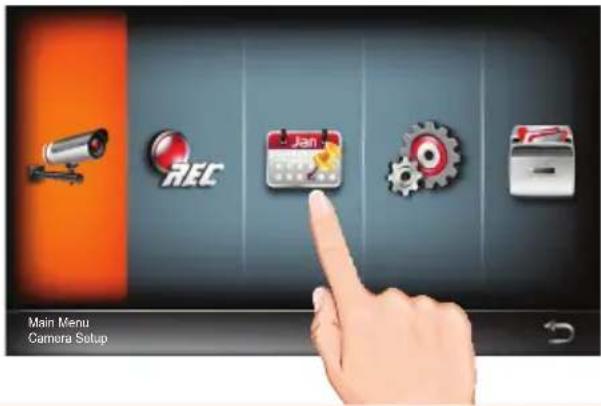
Event List

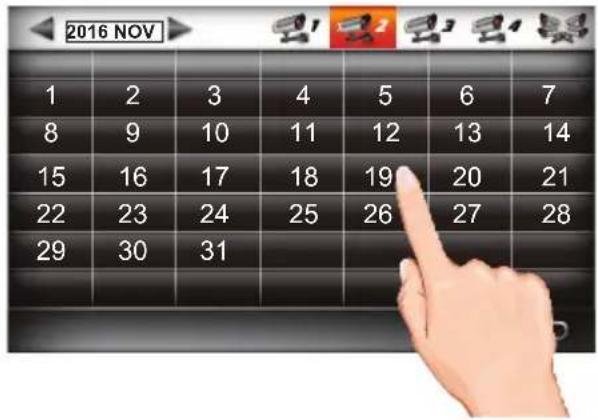
Follow steps 1 through 3 on page 21 to access the Main Menu. Tap Event List icon to access the Event List screen.

Tap on the day containing the recording you want to view or on a specific camera to view only that camera's recordings.
NOTE: An asterisk (*) will appear next to any dates with recordings. Nothing will happen if you tap a date that has no recordings.

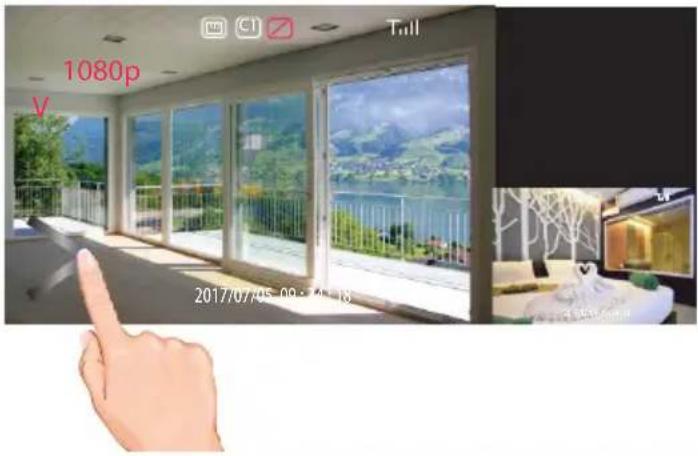
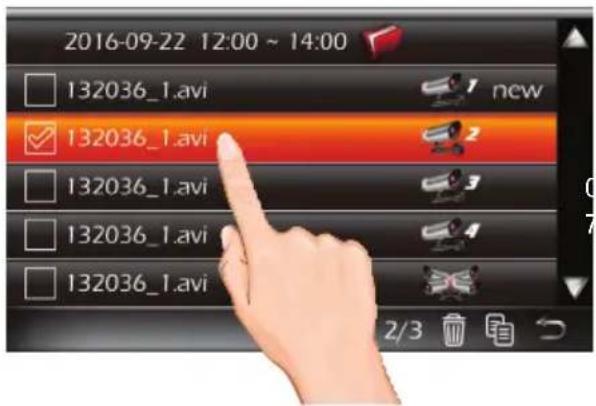
Tap the time frame folder and then tap on a recording to play it back. The video will play back and a smaller screen will appear with the live camera.
Event List

Tap on the Open/Close icon to open the playback options.
The bottom control buttons will control the following:

Tap to rapidly rewind the playback.

Tap to play back the recording.

Tap to pause the playback.

Tap to stop the playback.

Tap to advance the playback.
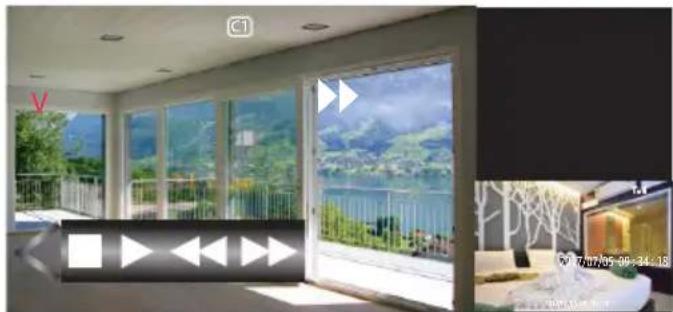
natural_image
Interior view of a modern living room with large windows overlooking a lake, featuring a play button and interior decor (no visible text or symbols)When done setting, tap the finger to return to the previous screen.
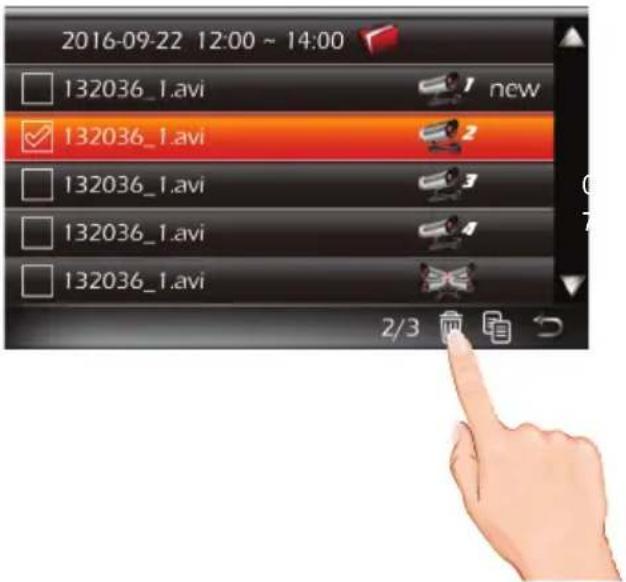
To Delete a Recording
1 Follow steps 1 through 3 on page 21 to access the Main Menu. Tap Event List icon to access the Event List screen.

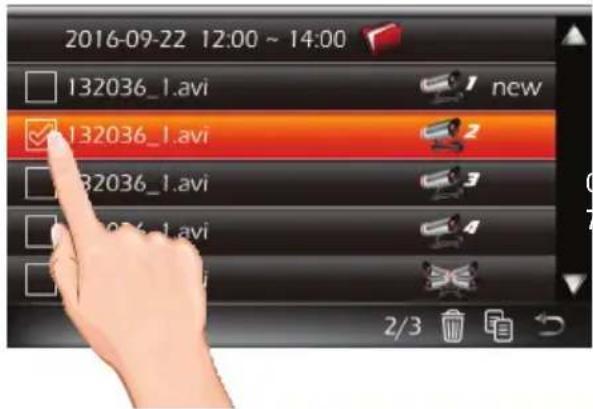
2 Tap on the day containing the recording(s) you want to delete. Tap on the box next to the recordings you want to delete, a check-mark will appear.
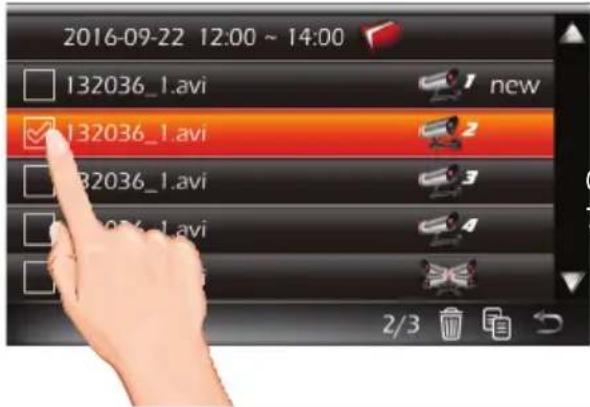
3 Tap the Delete icon to delete the folder/file.
When done setting, tap the icon to return to the previous screen.

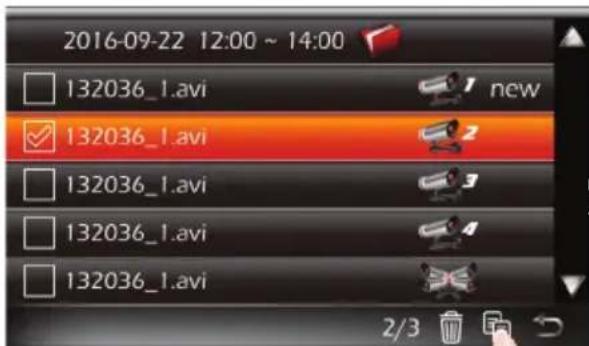
To Copy a Recording
1 Follow steps 1 through 3 on page 21 to access the Main Menu. Tap Event List icon to access the Event List screen.
2 Tap on the day containing the recording(s) you want to copy. Tap on the box next to the recordings you want to copy, a check-mark will appear.
3 Tap the Copy icon to copy the folder/file.
When done setting, tap the icon to return to the previous screen.


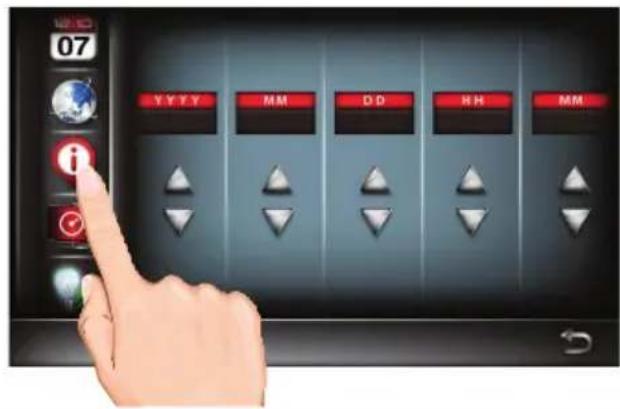
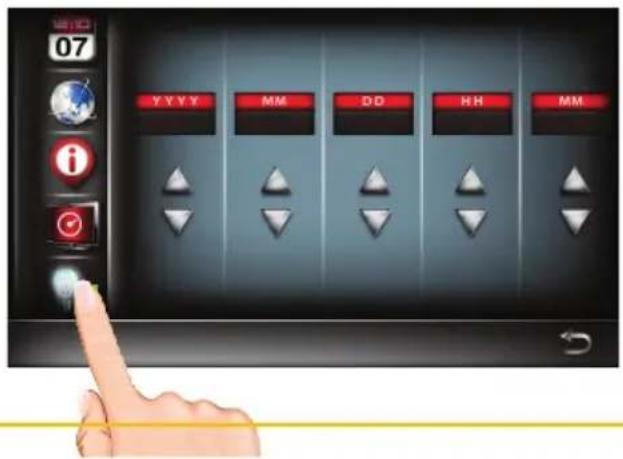
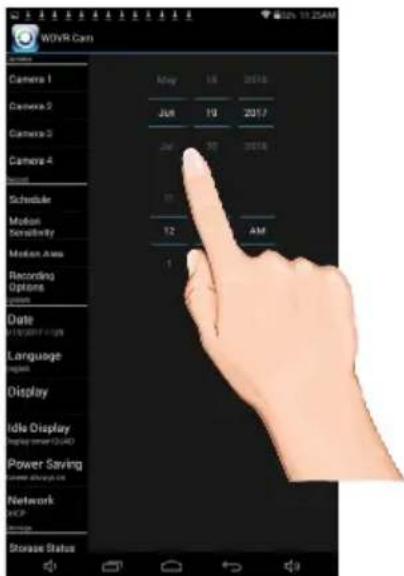
Setting the Date/Time
1
Follow steps 1 through 3 on page 21 to access the Main Menu. Tap System Setup icon to access the System screen.
2
Tap the Day and Time icon.
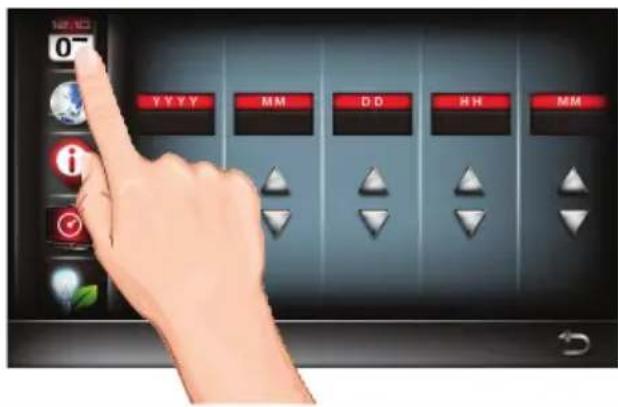
3
Tap the Up icon to increase or the Down button to decrease the Year, Month, Day, Hours and Minutes.
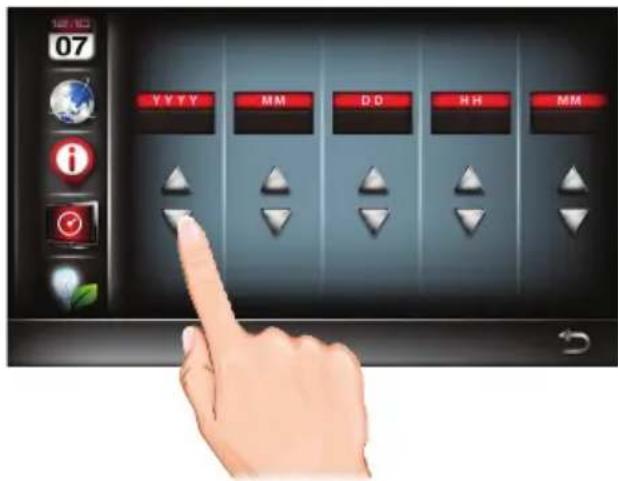
When done setting, tap the icon to return to the previous screen.

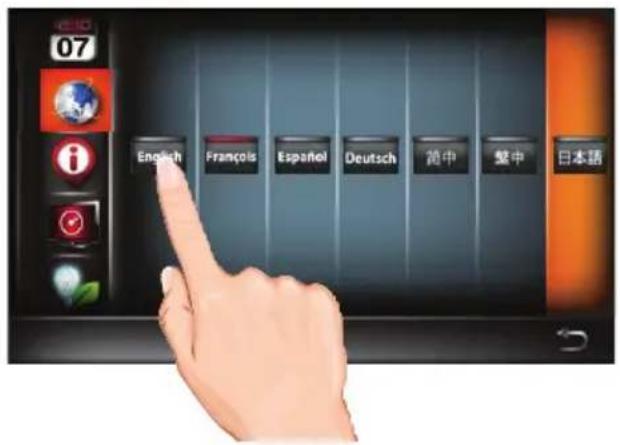
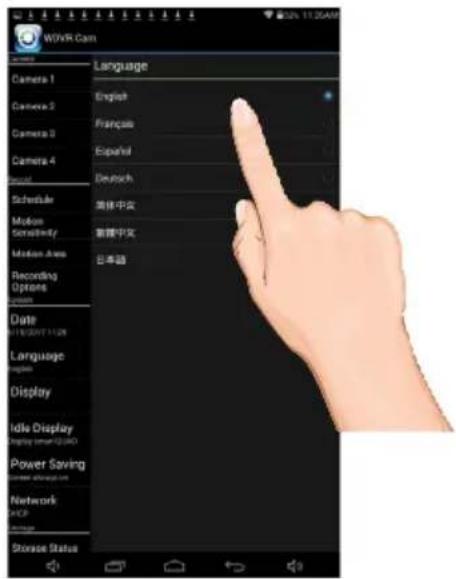
Setting the Language
1 Follow steps 1 through 3 on page 21 to access the Main Menu. Tap System Setup icon to access the System screen.

2 Tap the Language icon.

3 Tap the desired system language.
When done setting, tap the icon to return to the previous screen.

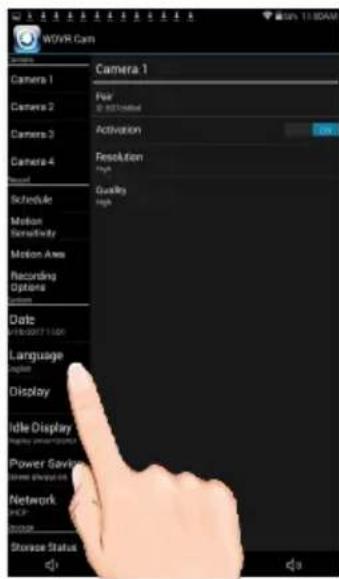
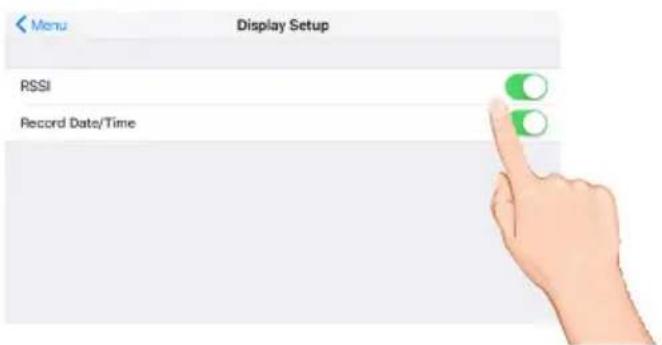
Setting the Image Appearance

Follow steps 1 through 3 on page 21 to access the Main Menu. Tap System Setup icon to access the System screen.


Tap the Display Setup icon.

Tap the Signal Strength Indicator icon once to select it and repeatedly to turn on (icon will turn red) which will show the signal strength on the videos.
Tap the Date/Time Stamp Info icon once to select it and repeatedly to turn on (icon will turn red) which will show the time and date on the videos.
When done setting, tap the icon to return to the previous screen.

Setting the Idle Display

Follow steps 1 through 3 on page 21 to access the Main Menu. Tap System Setup icon to access the System screen.

Tap the Idle Display Setup icon.


This setting allows you to decide how the cameras will display during idle (when system is not in use).
Tap to select Quad, Smart Quad, or 5 or 10 second Intervals.
When done setting, tap the icon to return to the previous screen.

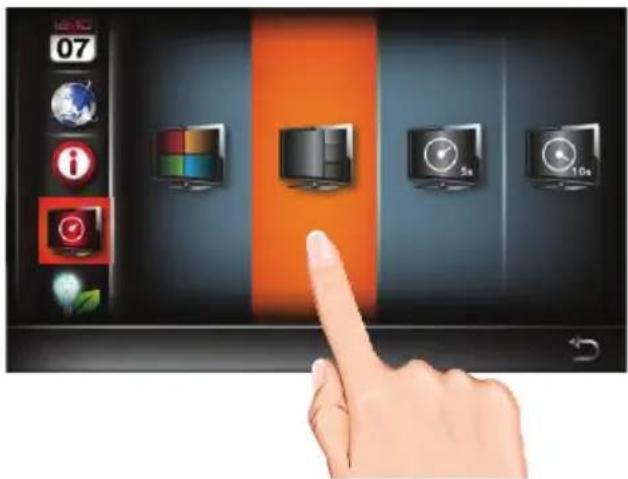
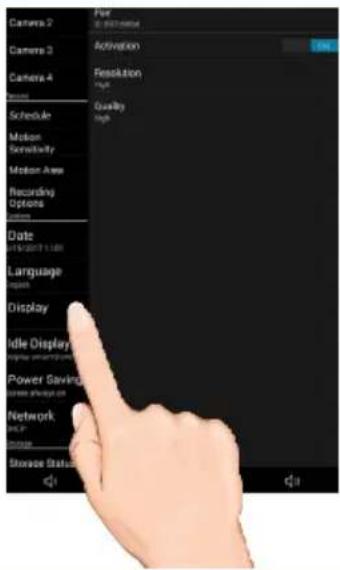
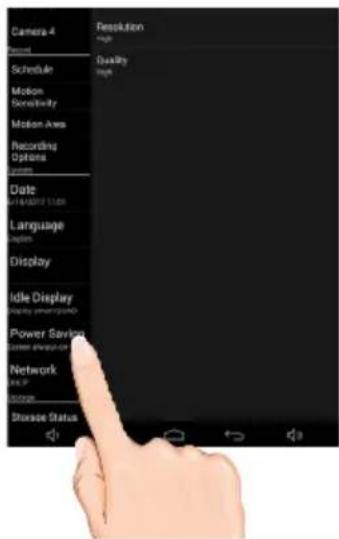
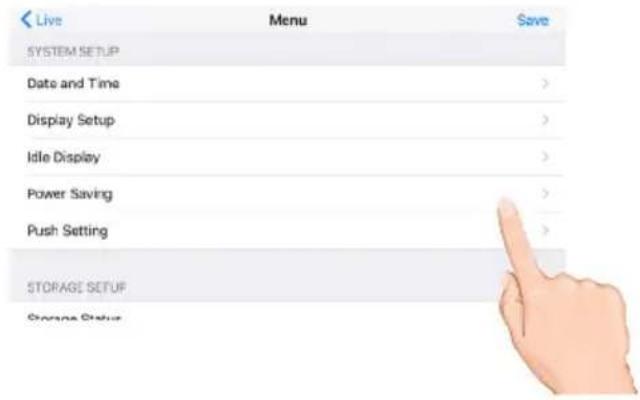
Setting the Power Savings

Follow steps 1 through 3 on page 21 to access the Main Menu. Tap System Setup icon to access the System screen.


Tap the Power Saving Setup icon.

Tap the desired time for which the display will remain on when idle, 5 minutes, 10 minutes or Always On.
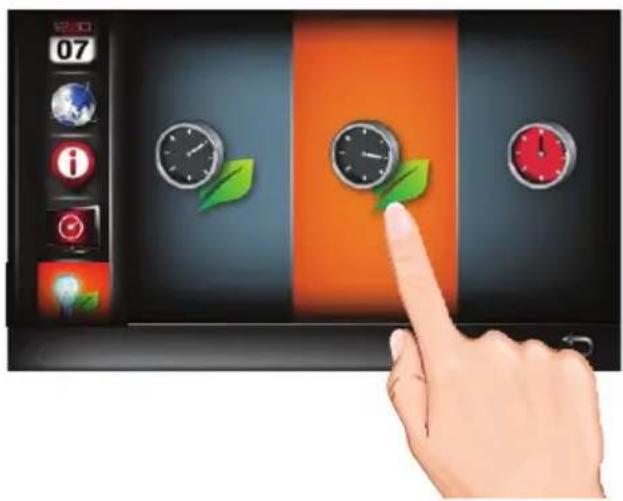
natural_image
Illustration of a hand interacting with a touchscreen device displaying three clocks and a green leaf, set against a black background with orange and red vertical bands (no text or symbols)When done setting, tap the icon to return to the previous screen.

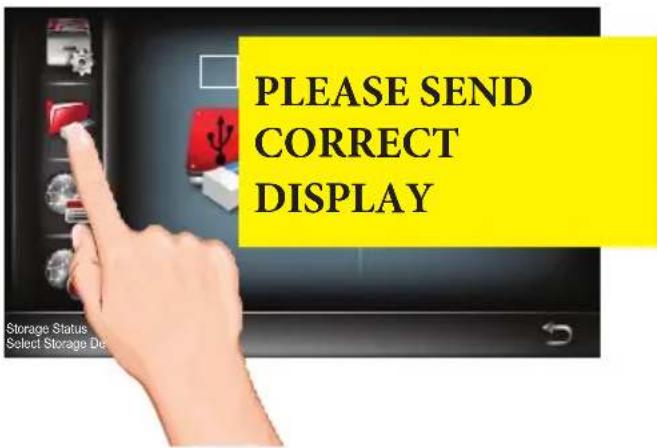
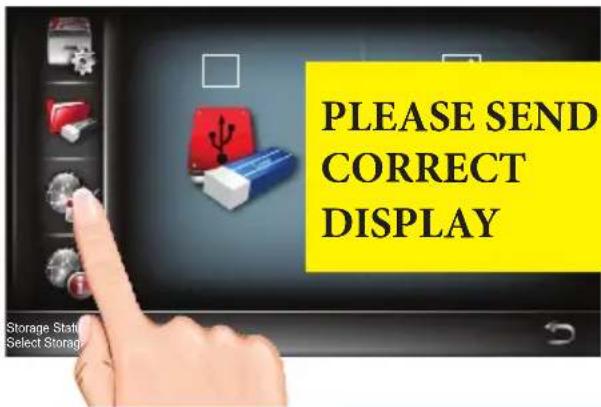
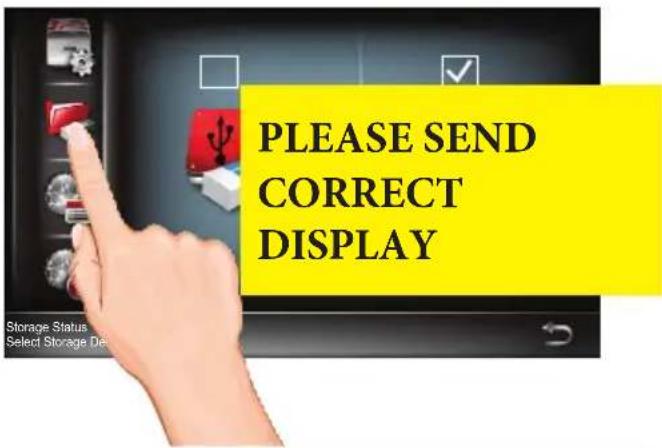
Setting the Storage
1 Follow steps 1 through 3 on page 21 to access the Main Menu. Tap Storage Setup icon.
2 Tap the Storage Setup icon.

3 Select the desired drive to record onto: microSD Card (in the microSD slot) or the drive connected to the USB jack; a check mark will appear in the box.
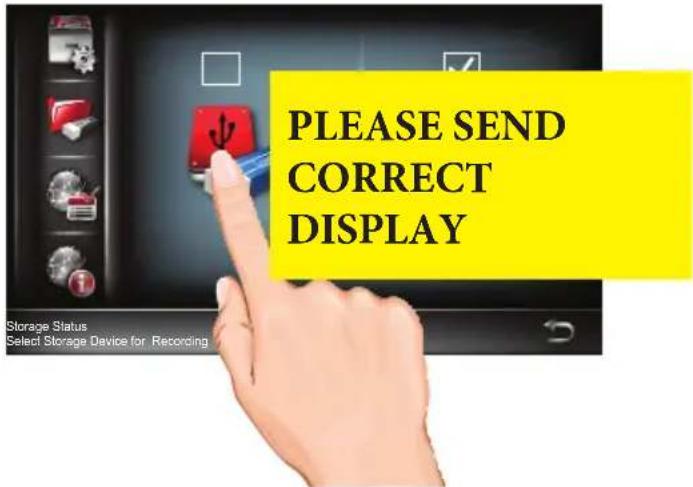
To allow the unit to record over old files, tap until “/” appears over the circle icon to deactivate the overwrite feature. Tap until the “/” disappears to activate it which will overwrite the oldest files when your memory card is full. If you turn this function off, an error message displays when you have no more room to save files.
When done setting, tap the 📄 to return to the previous screen.
Formatting a Drive
1
Follow steps 1 through 3 on page 21 to access the Main Menu. Tap Storage Setup icon.
2
Tap the Storage Format icon.
3
Tap the desired drive to format once to select it and again to reformat it which will erase the drive and format it to be used with this system.

When done setting, tap the icon to return to the previous screen.

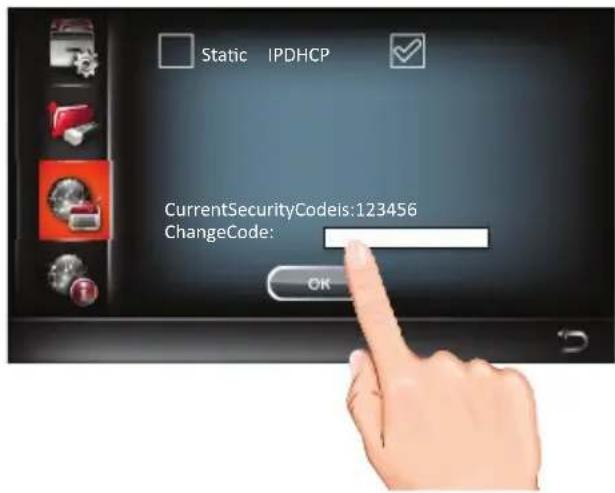
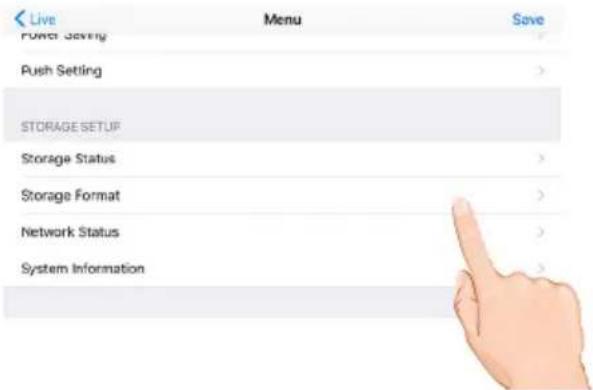
Setting the Security Code and Internet Info
1 YOU MUST CHANGE THE SECURITY CODE BEFORE SETTING UP REMOTE
ACCESS. Follow steps 1 through 3 on page 21 to access the Main Menu. Tap Storage Setup icon.
2 Tap the Security Code icon.
3 Tap the security code field, enter a new code and then tap Enter then OK.
Tap either DHCP or Static IP:
DHCP: DHCP is the most common connection. When selected, your router will automatically assign an IP address to this camera system.
Static IP: Static IP is for those that have the ability to specify an IP address for the system. If this option is selected, you will be able to input the IP Address, Subnet Mask, Default Gateway and DNS server.
When done setting, tap the 5 in to return to the previous screen.
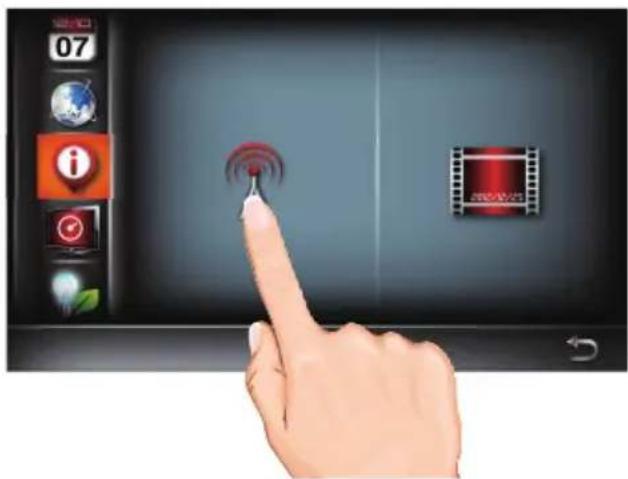
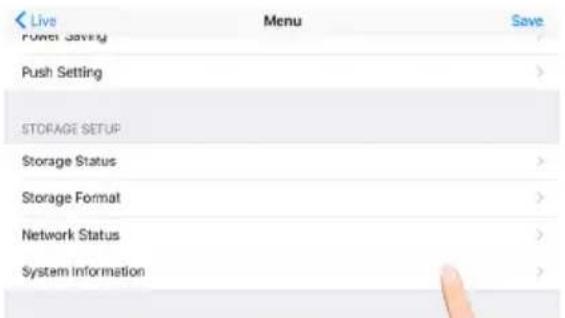
System info and Upgrading
1
Follow steps 1 through 3 on page 21 to access the Main Menu. Tap Storage Setup icon.
2
Tap the System Info icon.
3
The info on the system will appear. Tap About to view the Open Source Software Info.
Tap Upgrade to see if there is a firmware update and to upgrade the firmware. This will add features and/or fix any issues in the software.
When done setting, tap the

icon to return to the previous screen.
Overview
This camera system allows you view live video from an iPhone ^® , iPad ^® , iPod Touch ^® or Android ^™ smartphone or tablet. Free apps are available through the Apple App Store or the Android Market/Google Play.
Up to three remote users can access live video at the same time as long as they have the User ID (DID) Code and Security Code.
IMPORTANT:
The number of remote viewers is determined by the amount of “available upload bandwidth” on your home network.
Requirements for Remote View
- iPhone®, iPad®, iPod Touch® (iOS 6.0 and above)
- AndroidTM smartphone or tablet (version 2.3X or above)
IMPORTANT:
Note: Not suitable for Windows Mobile Devices or Blackberry Smartphones.
Recommended Minimum Internet Upload Speed
512Kbps upload speed (or bandwidth) to achieve up to an average of 2FPS viewing speed.
Average viewing speed will depend on other restrictions by your ISP (internet service provider).
SCREEN SHOT NOTE:
Many of the App illustrations shown in this manual are when using Android devices. The Apple device's App will look very similar and the operation will be the same, except where noted.
Downloading the WDVR App
You can use a smartphone or tablet to remotely connect to and view live camera video. First you need to download the free App as follows:
APPLE DEVICE:
From your iPhone or iPad, go to the App Store and search for WDVR. See page 46.
ANDROID DEVICE:
From your Android smartphone or tablet device, go to Google Play and search for WDVR. See the following page.


WDVR Android Setup Wizard


Launch the WDVR App and the Devices screen will appear. Tap New to start the setup.


Tap Scan QR and scan in the QR code located on the rear of the monitor. The device ID will automatically be entered.
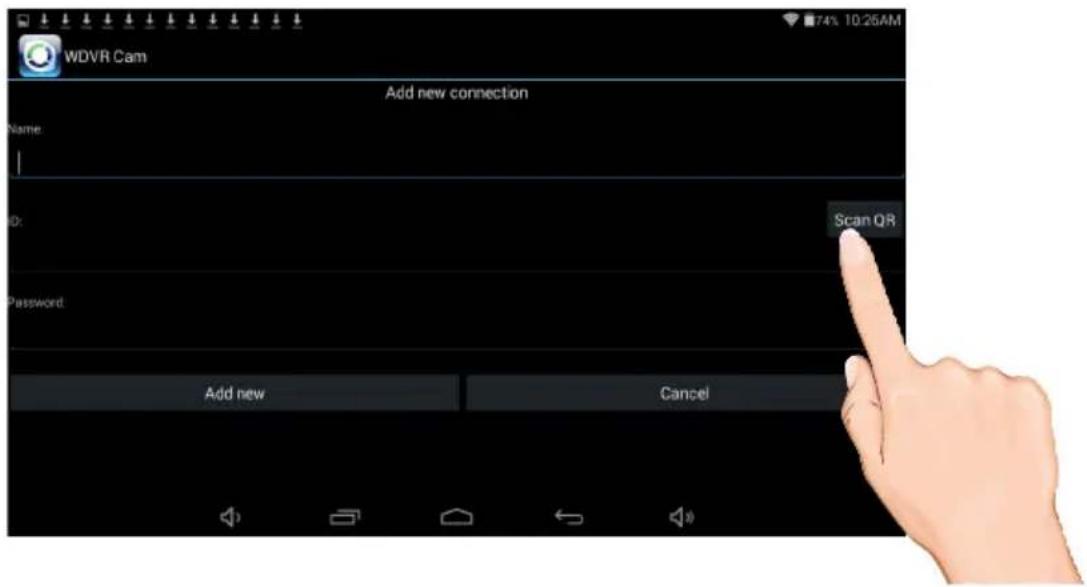
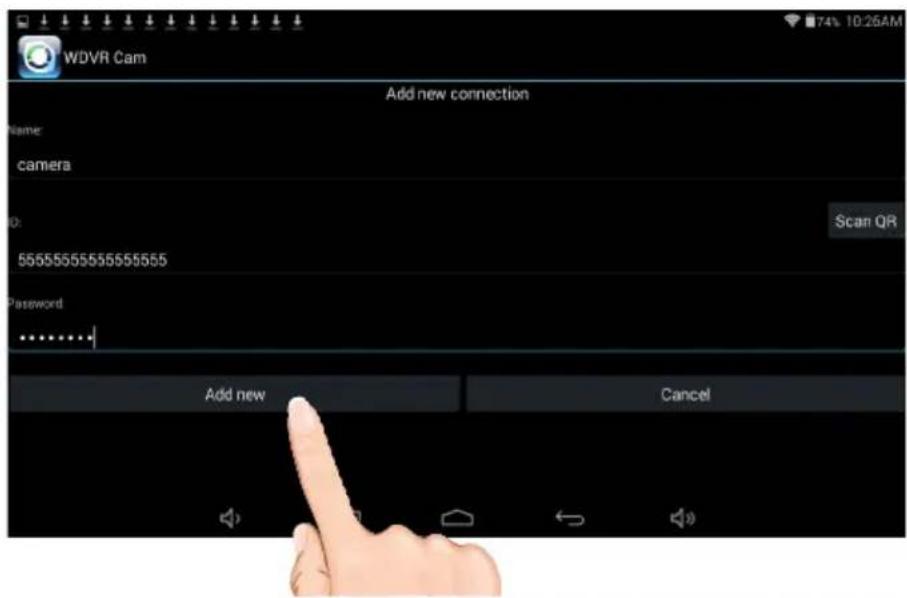
WDVR Android Setup Wizard


Enter a device name. Also enter the password, but it is VERY important that 1) the password was changed from the default 123456 on the monitor and 2) the password is entered exactly as it on the monitor.
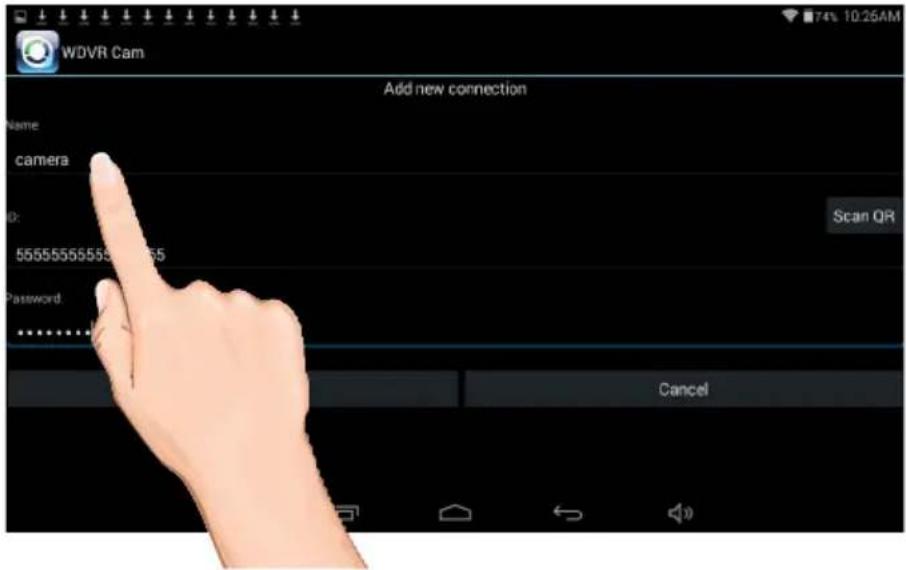

Tap Add New. Tap the camera in the Connection List followed by the ▶ button to view the camera(s).
NOTE: To delete camera from the list, press and hold on the camera name. Then tap Delete.
WDVR Apple Setup Wizard

1 Launch the WDVR App and the Devices screen will appear. Tap “+” to start the setup.
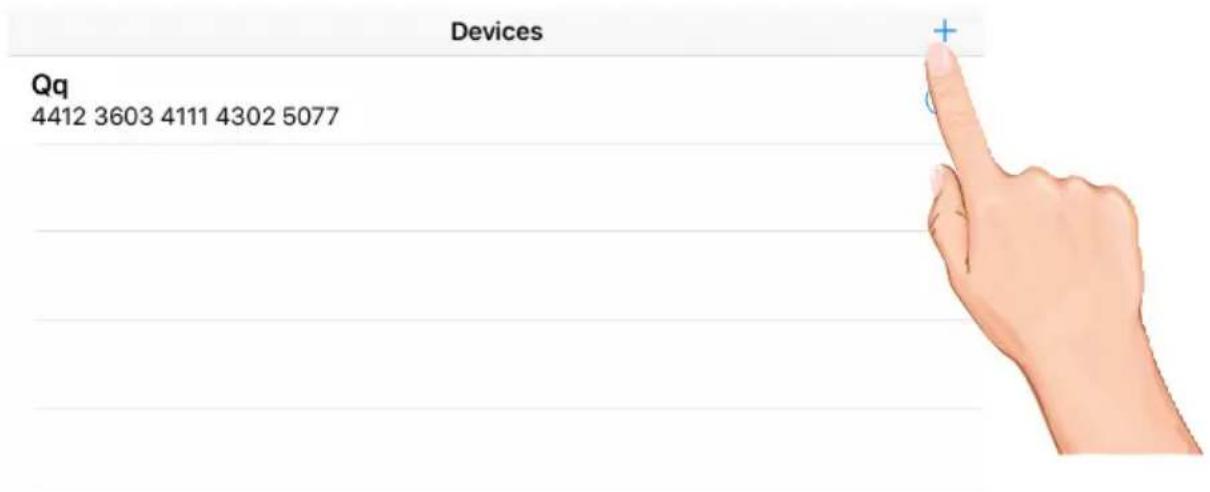
2 Tap QR code and scan in the QR code located on the rear of the monitor. The device ID will automatically be entered.
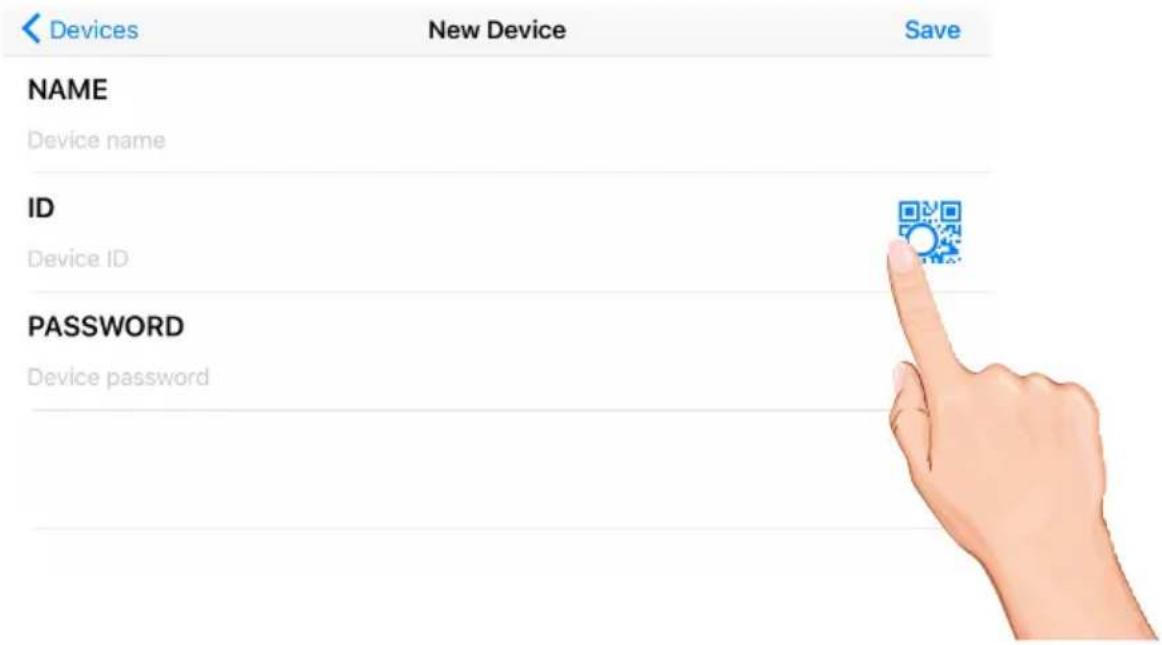
WDVR Apple Setup Wizard


Enter a device name. Also enter the password, but it is VERY important that 1) the password was changed from the default 123456 on the monitor and 2) the password is entered exactly as it is on the monitor.
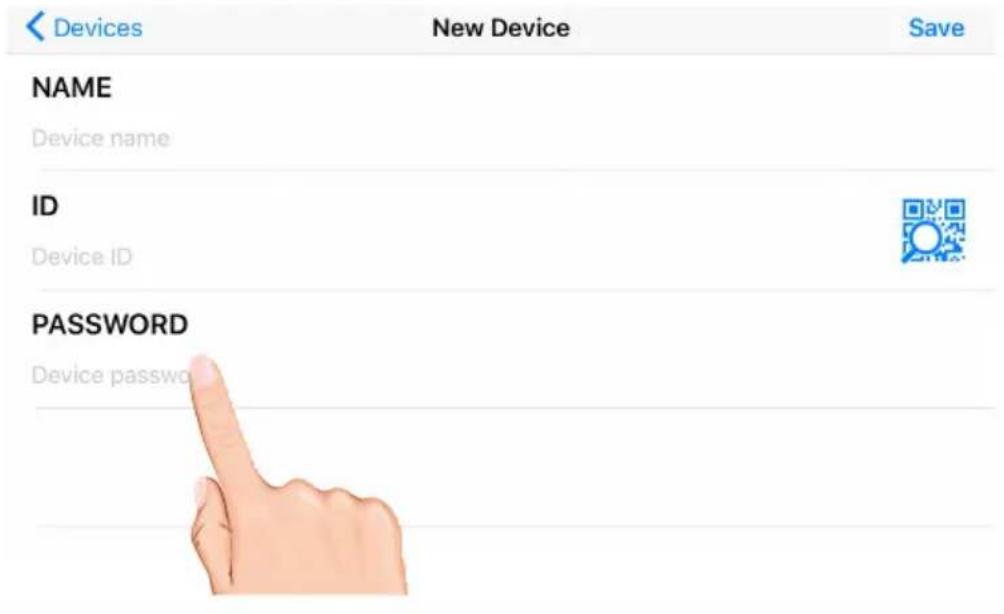

Tap Save.
Tap the camera in the Devices list followed by the ▶ button to view the camera(s).
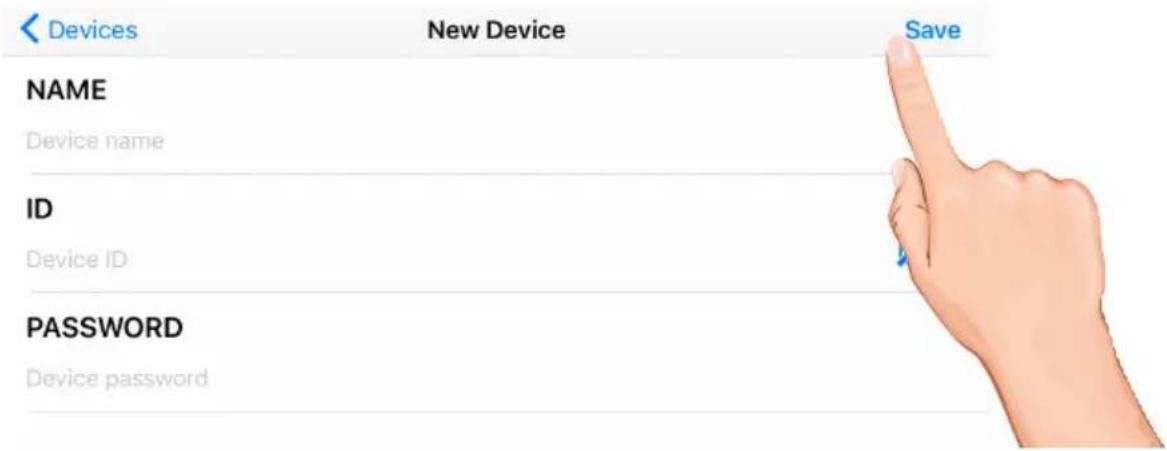
NOTE: To delete camera from the list, swipe left. Then, tap Delete.
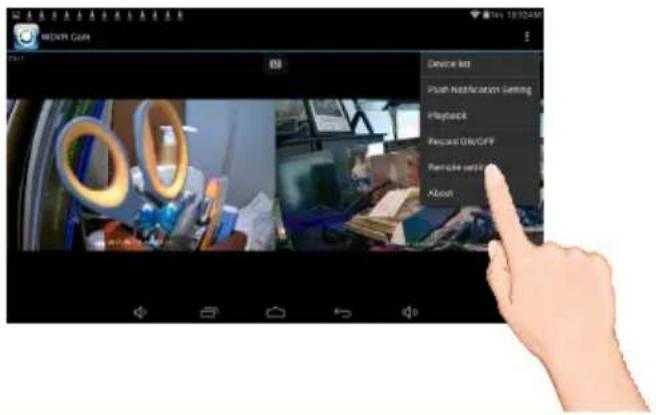
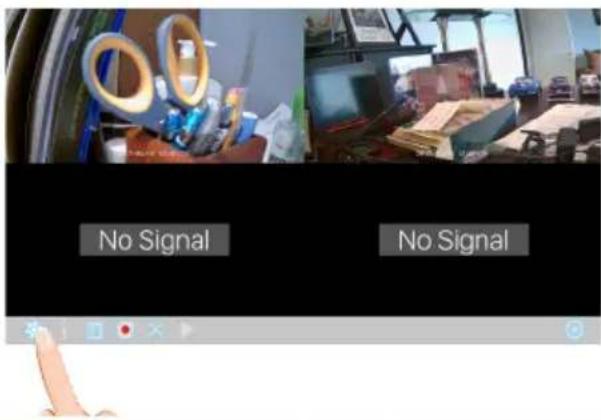
WDVR Main Screen and Icons


Tap the camera in the Devices menu followed by the ▶ button to view the camera(s). Click anywhere on the screen to bring up the App icons. See below for icon descriptions
Tap to record or stop recording, see page 49 for details
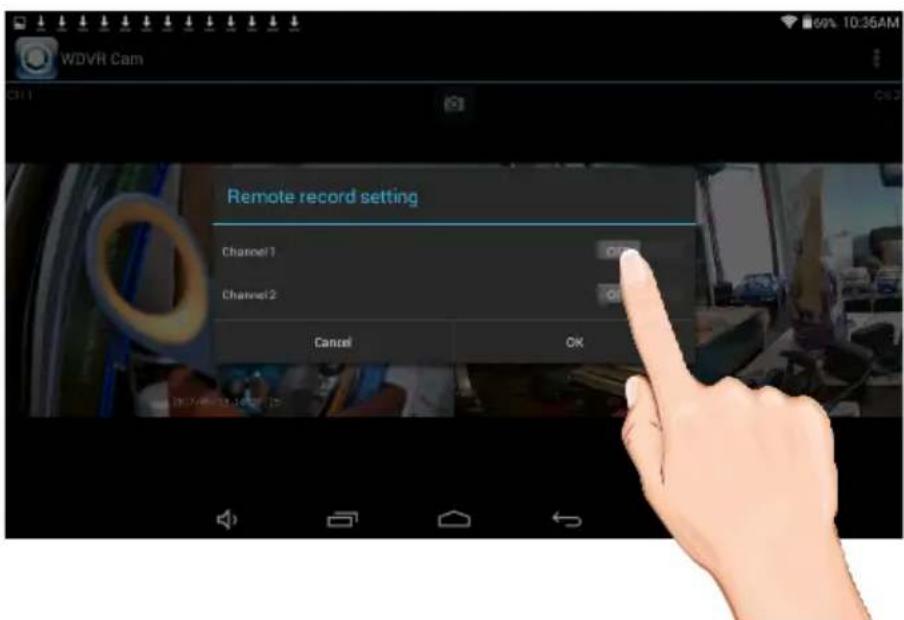
Recording

1
Tap the :icon, then tap Record ON/OFF.
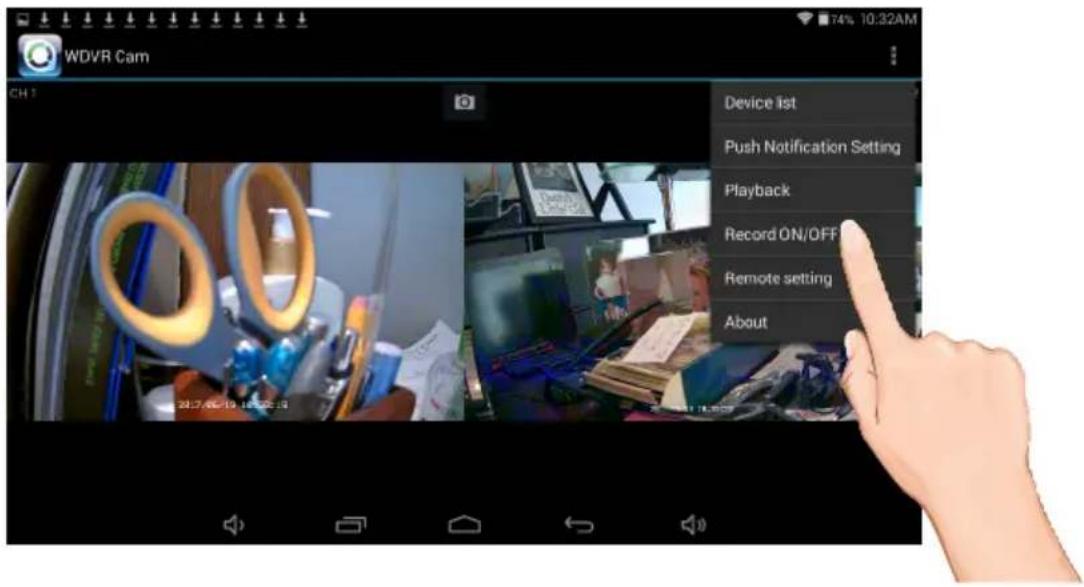
2
Tap one or more cameras/channels to record, the switches will show ON when activated.
Recording


Tap OK.
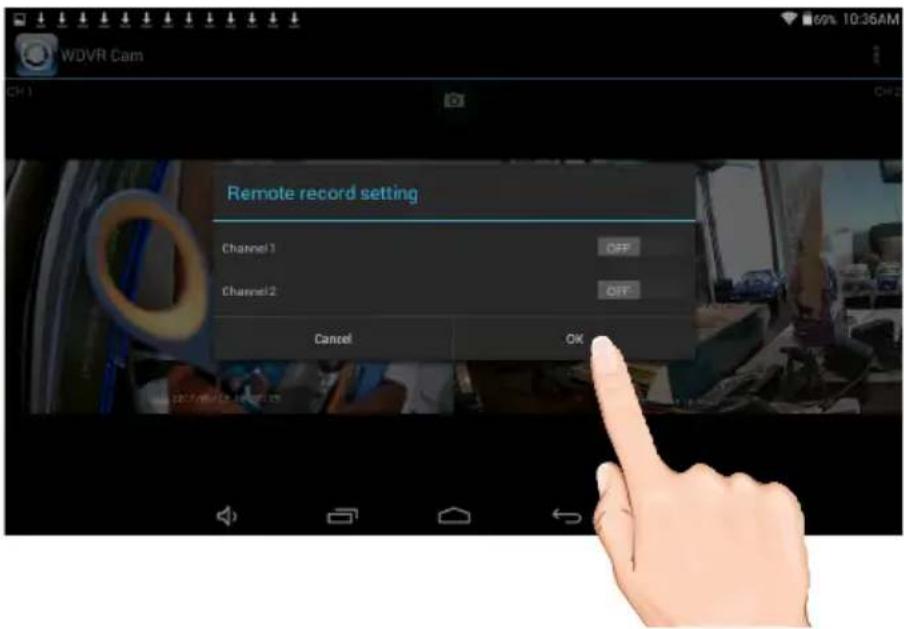

The unit will record the selected cameras/channels. To stop recording, repeat steps 1 and 2 to turn the respective switches off. Tap OK.

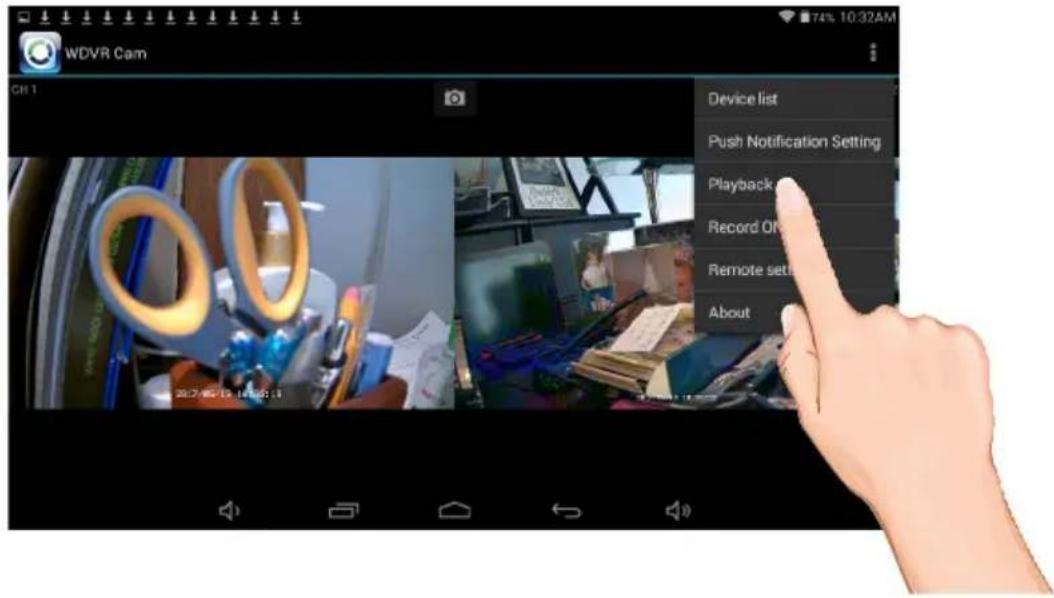
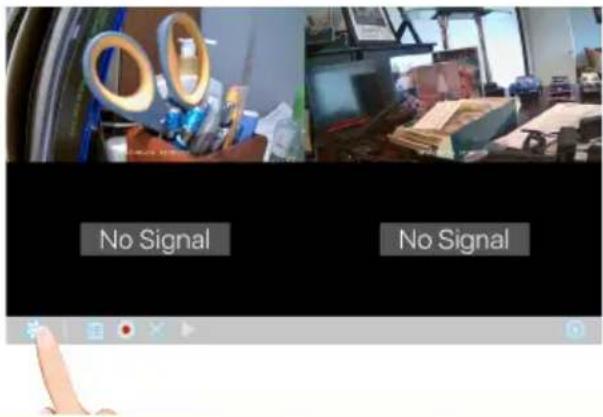
Event List

1 Tap the :icon, then tap Playback.
2 Tap Storage and then the desired drive to view, i.e. SD Card.
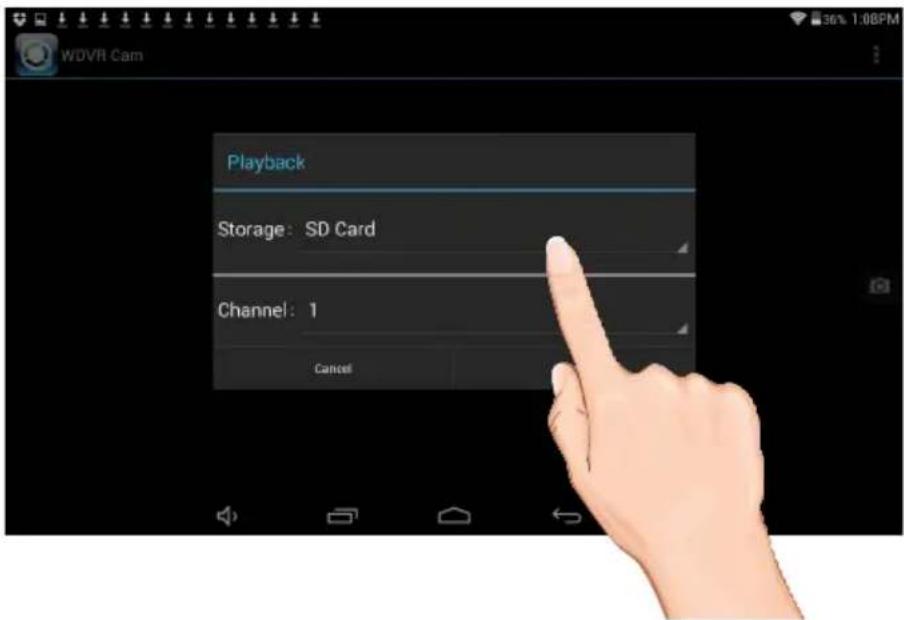
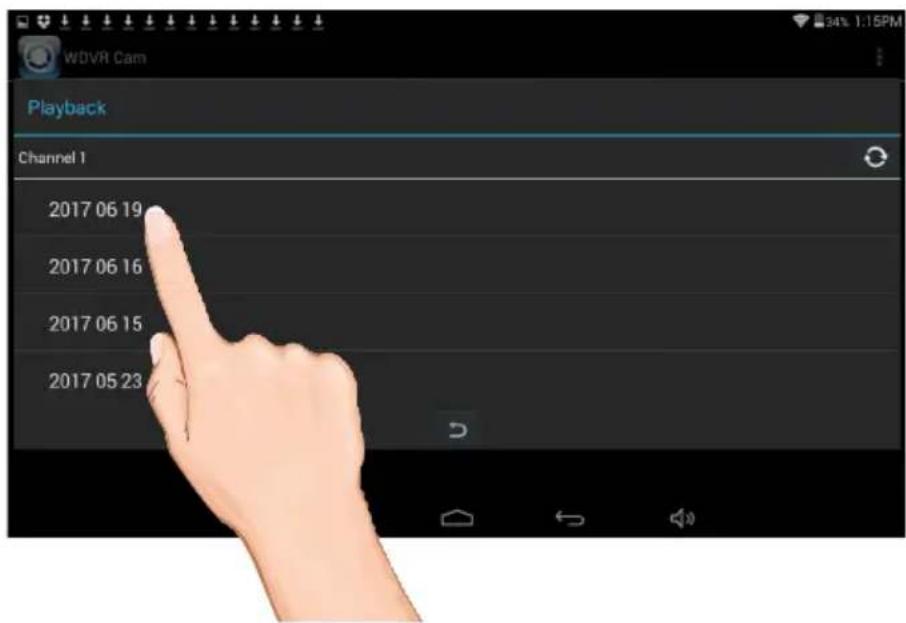
Event List


Tap Channel and then the desired camera/channels to view its recordings. Tap View.
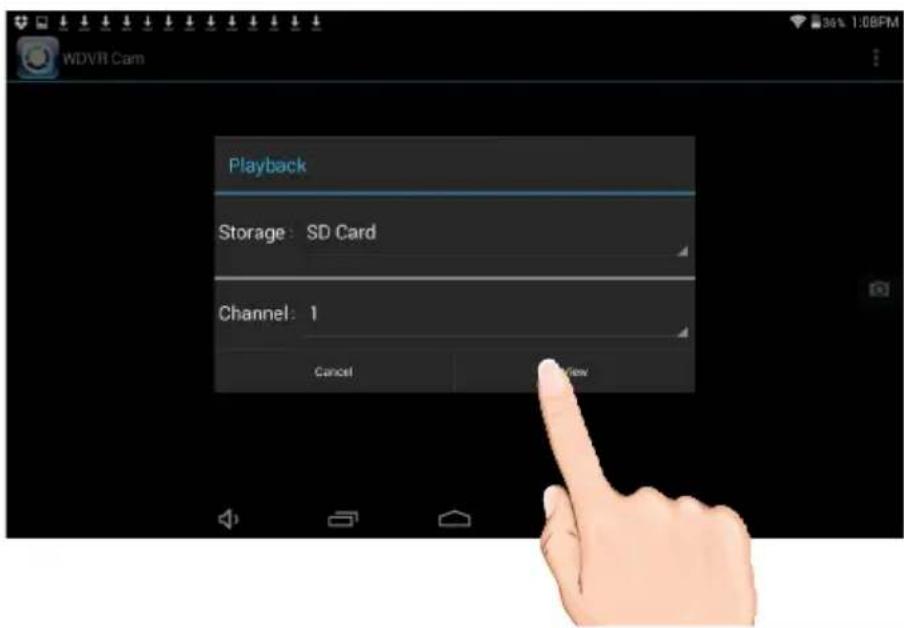

Then tap a date and then tap the time and the video will start playing back.
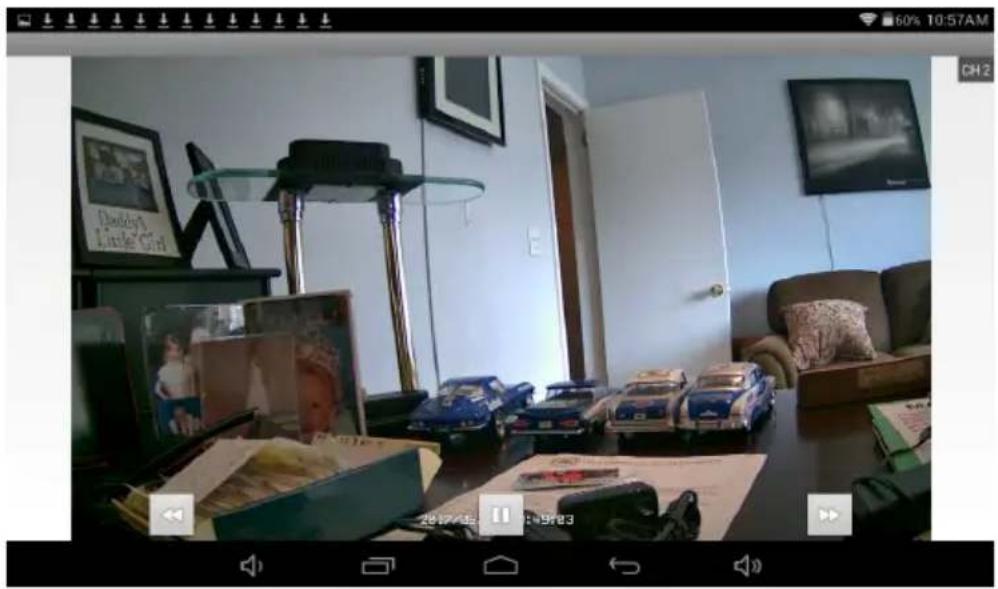
Recording


The bottom control icons will control the following:

Tap to rapidly rewind the playback.

Tap to play back the recording.

Tap to pause the playback.

Tap to rapidly advance the playback.
natural_image
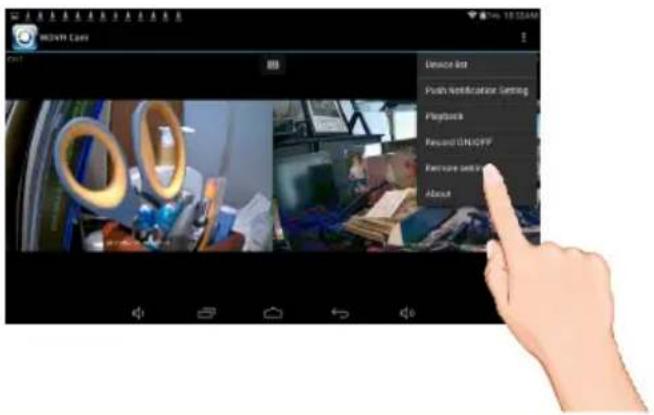
Interior of a living room with toy cars, framed pictures, and a TV wall (no visible text or symbols)Camera Pairing

Your cameras are paired to the monitor at the factory to channels 1 and 2 (only camera 1 for AWS327). When you add a new camera to your system, you have to “introduce” the camera and monitor to each other so they can communicate.

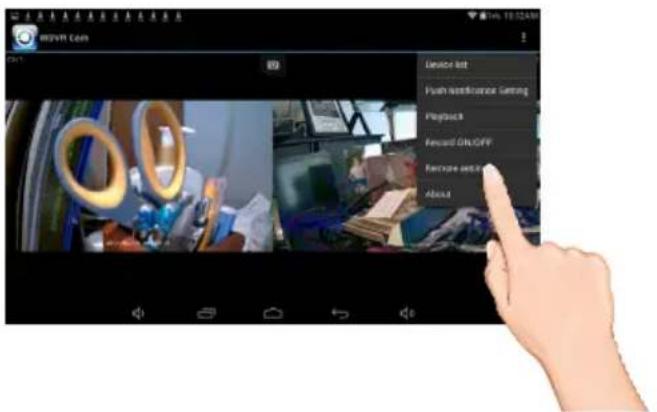
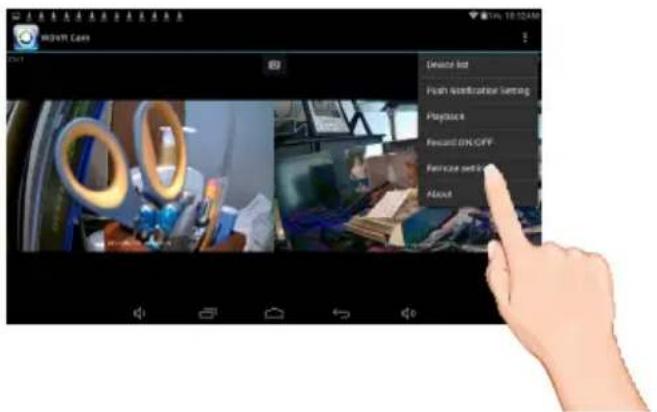
Tap the icon, then tap Remote Setting to access the System Setup screen.


Tap the desired camera to pair.


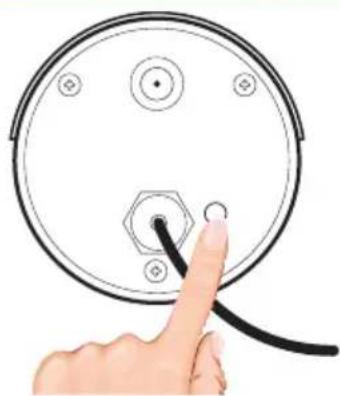
Tap Pair icon then tap OK at the pop up screen, "Pair" will appear on the screen.


Press and Hold the Pairing button on that camera for 5 seconds. If pairing is successful "pairing is successful" appears on the screen. Tap on it to remove the message. If a camera is already assigned to the selected channel, the monitor overwrites that camera link with the new one.
natural_image
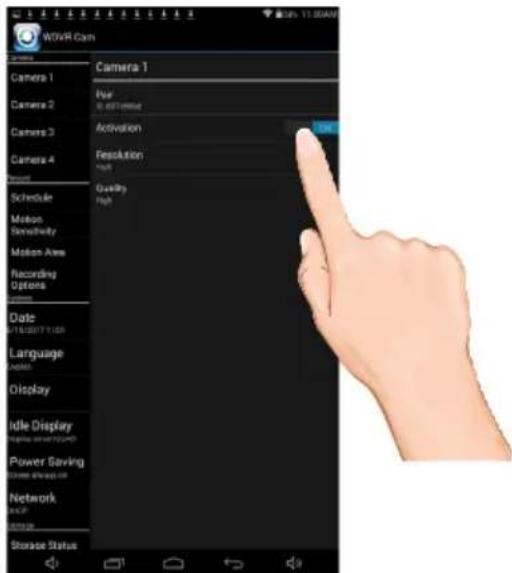
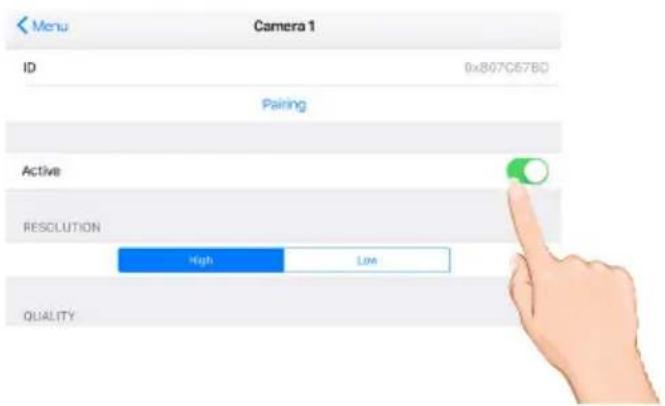
Hand inserting a cable into a circular component with a hexagonal base (no text or symbols)Turning a Camera On or Off

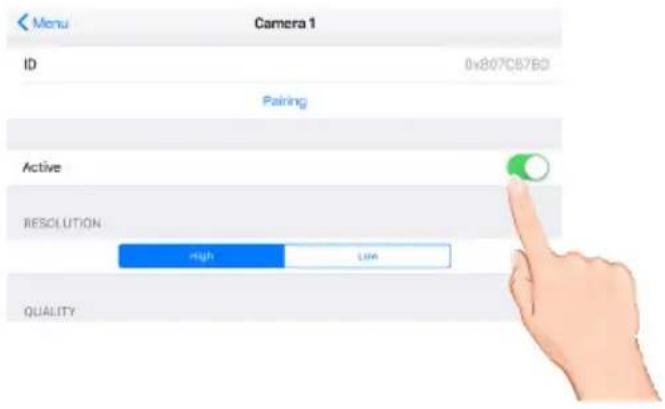
1 Tap the ! icon, then tap Remote Setting to access the System Setup screen.
2 Tap the desired camera that you want to turn on or off.
3 Tap the Activation switch to turn the selected camera on or off.
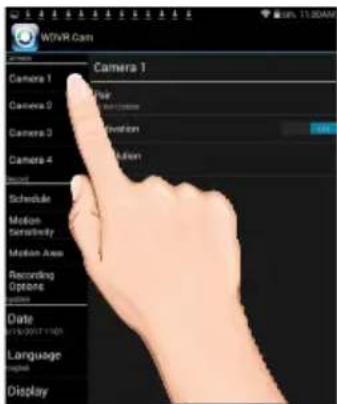
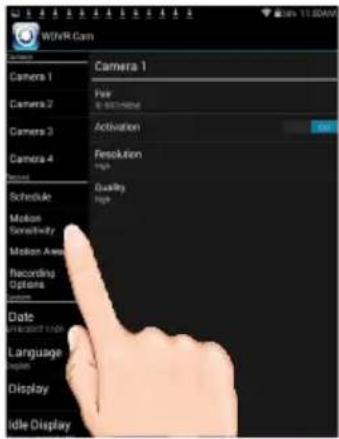
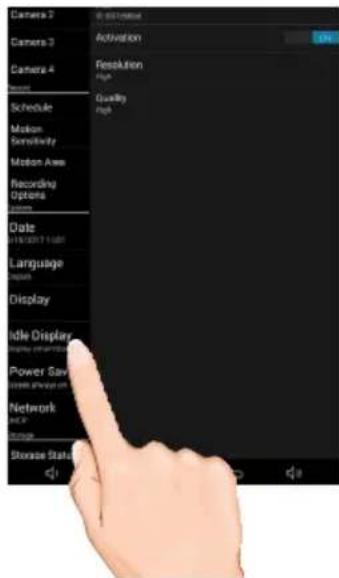
Setting HD Option

1
Tap the icon, then tap Remote Setting to access the System Setup screen.
2
Tap the desired camera that you want to set.
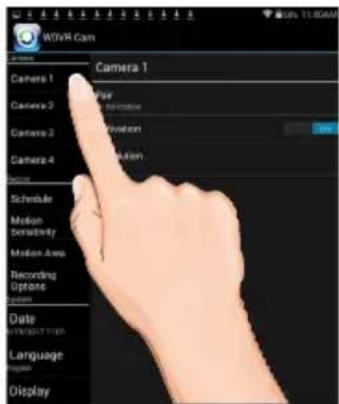
3
Tap to set the Resolution to HIGH or LOW as desired. HIGH will look better but LOW will provide a better frame rate which is optimal when viewing on a mobile device.
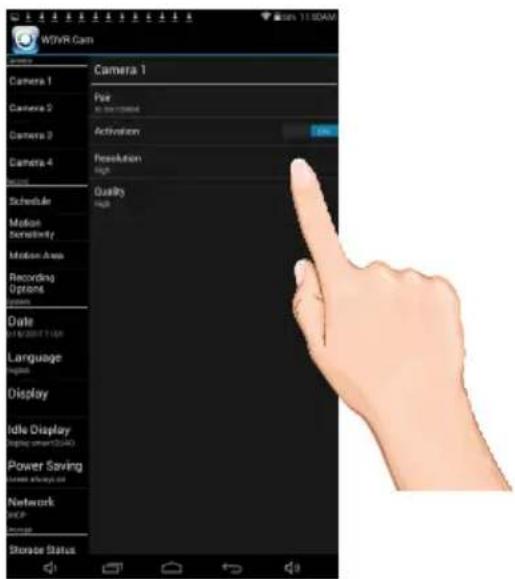
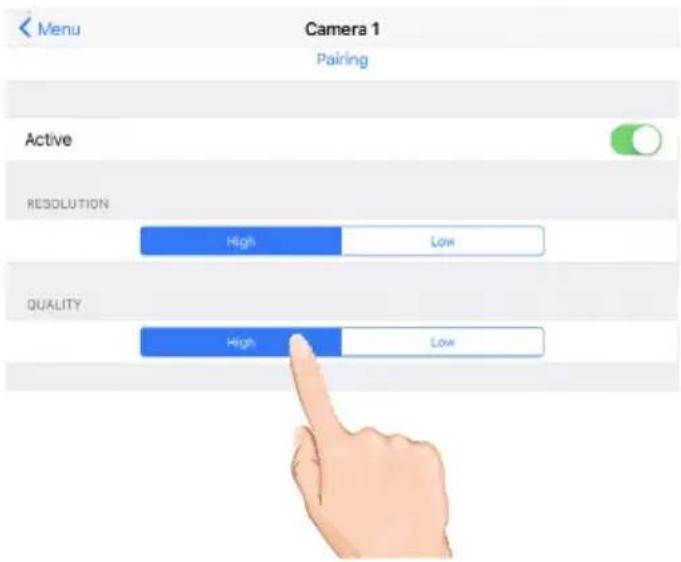
Setting the Image Quality

1
Tap the icon, then tap Remote Setting to access the System Setup screen.
2
Tap the desired camera that you want to set.
3
Tap to set the Quality to HIGH or LOW as desired. High quality will produce a better video display quality, but the system will lower the display frame rate as compensation.
Lower quality will produce a better display frame rate, but the system will lower the quality as compensation.
Schedule Recording

1 Tap the icon, then tap Remote Setting to access the System Setup screen.

2 Tap Schedule.
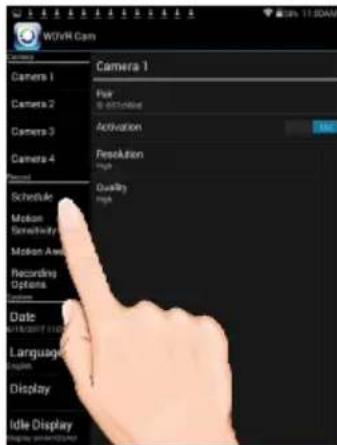
3 Tap the desired camera to set, or ALL cameras then tap on a program.
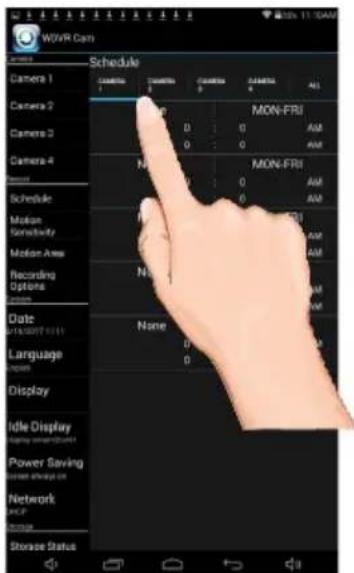
Schedule Recording


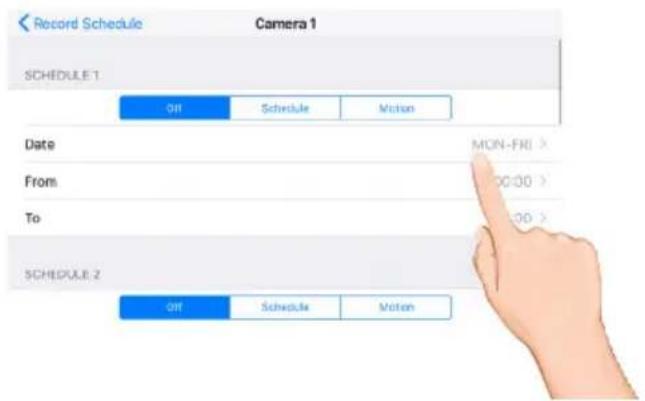
Tap Recording Mode and then: Tap None to not set a schedule. Tap Schedule to set recording times using specific days or everyday. Tap Motion to set recording times that will record when motion is detected.
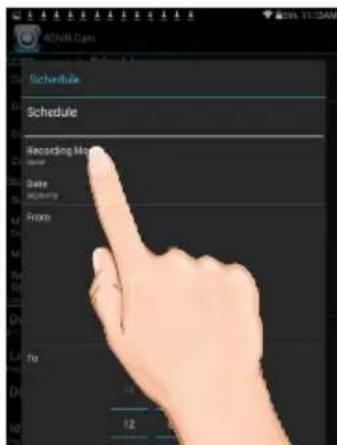

Tap Date to select the weekly cycle the recording will take place. For example, EVERYDAY, MON-FRI, THURSDAY, etc.
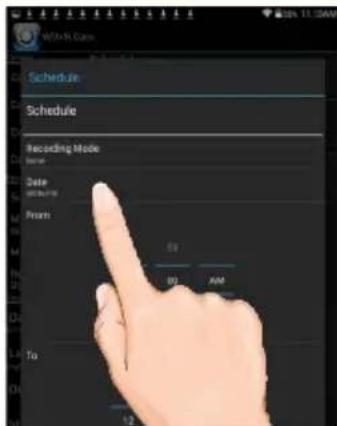

Tap From and To to set the From and To times. Tap OK when done.
The unit will then record (or only record when motion is detected) at the dates and times selected.

Repeat to set more schedules.
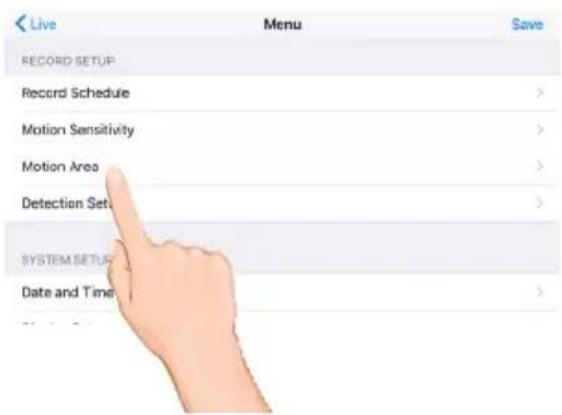
Motion and Motion Area Options


Tap the icon, then tap Remote Setting to access the System Setup screen.

Tap Motion Sensitivity. Tap the desired camera and then set the desired motion setting to PIR (Uses Advance Motion settings), PIR Low, PIR Mid or PIR High.

This Motion Mask feature will allow you to mask areas of the screen from detecting motion and activating the motion detector recording for that area. For example, if a pet sets off the sensor, you can mask the lower areas that the pet would be visible in, or if a tree branch moving in the wind sets it off, you can mask the areas where the tree branch is in the video.
Tap Motion Area then tap the desired camera. To un-mask a block, simply tap it again; a check will appear.
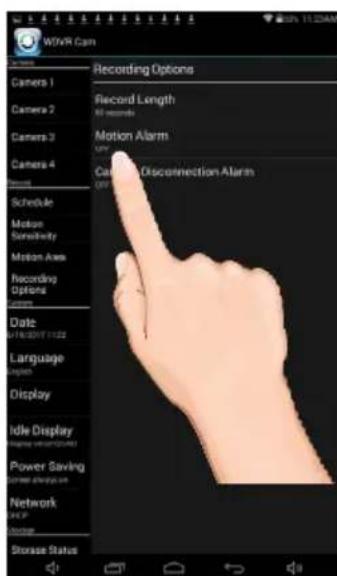
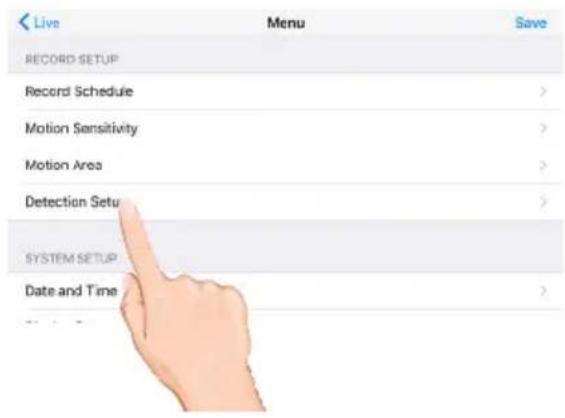
Detection Options

1 Tap the icon, then tap Remote Setting to access the System Setup screen.
2 Tap Recording Options.
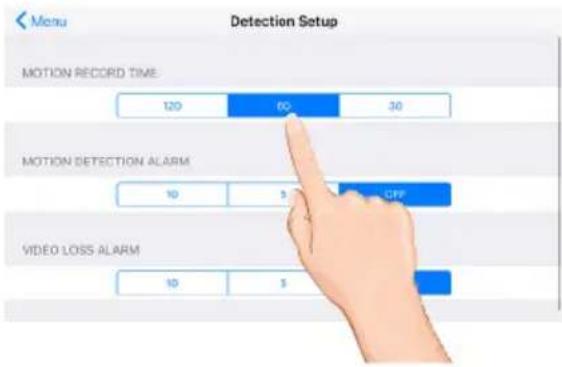
3 Tap the options as follows:
Motion Length: Set the time the unit will record when motion is detected (30, 60 or 120 seconds). Record time may be longer is motion continues.
Motion Alarm: Set the alarm to sound for 5 or 10 seconds when motion is detected, or turn off.
Camera Disconnection Alarm: Set the alarm to sound for 5 or 10 seconds when video is lost from one of the cameras, or turn off.
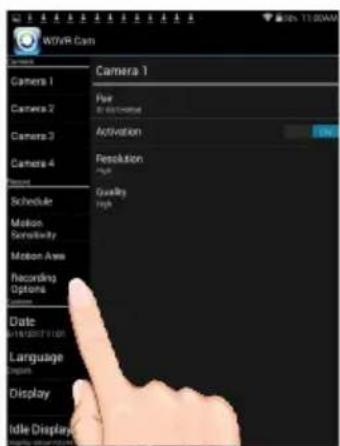
Setting the Date/Time

1 Tap the icon, then tap Remote Setting to access the System Setup screen.

2 Tap Date.
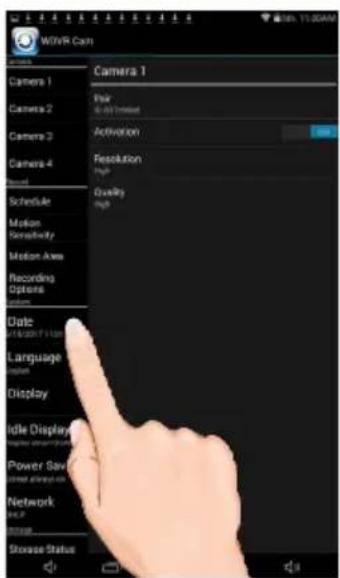
3 Set the time the date and time. Tap Update when done.
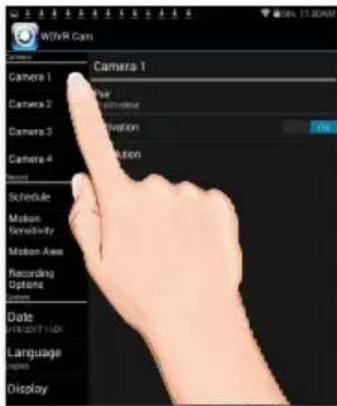
Setting the Language

1 Tap the icon, then tap Remote Setting to access the System Setup screen.

2 Tap Language.
3 Set the time the date and time. Tap the desired language.
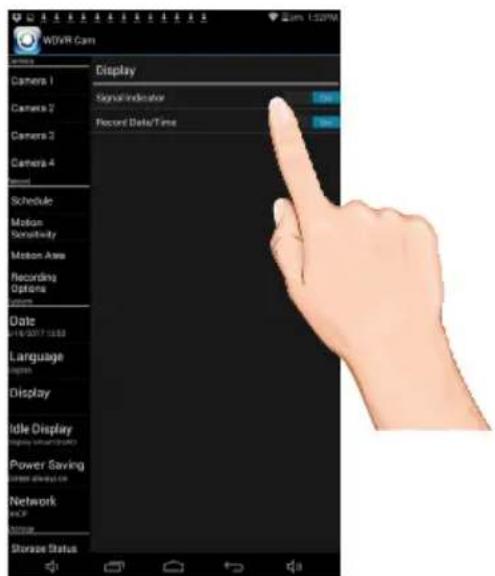
Setting the Image Appearance


Tap the icon, then tap Remote Setting to access the System Setup screen.


Tap Display.

Tap Signal Indicator to turn it on (icon will turn green) which will show the signal strength on the videos. Tap again to turn off.
Tap Record Date/Time to turn it on (icon will turn green) which will show the time and date on the videos. Tap again to turn off.
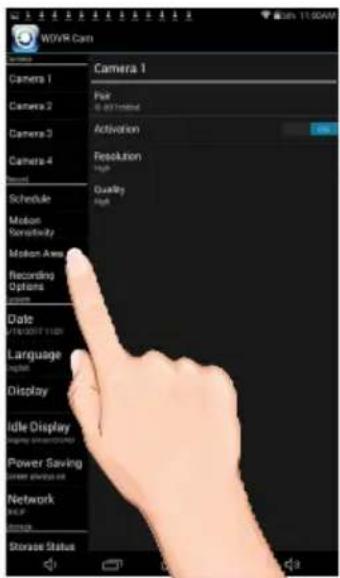
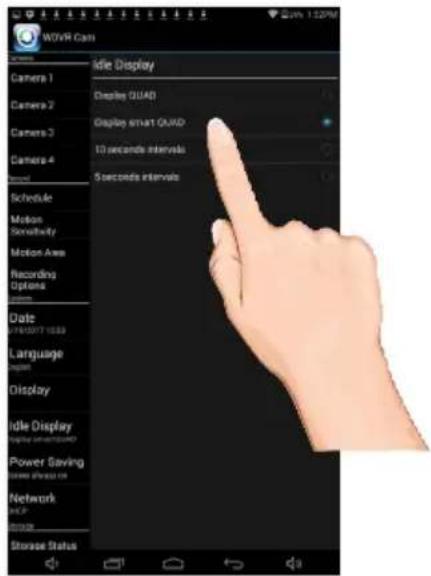
Setting the Idle Display

1 Tap the icon, then tap Remote Setting to access the System Setup screen.
2 Tap Idle Display.
3 This setting allows you to decide if the cameras will display in quad mode or if they will cycle individually in 5 or 10 second intervals. Tap to select Quad, Smart Quad, or 5 or 10 second intervals.
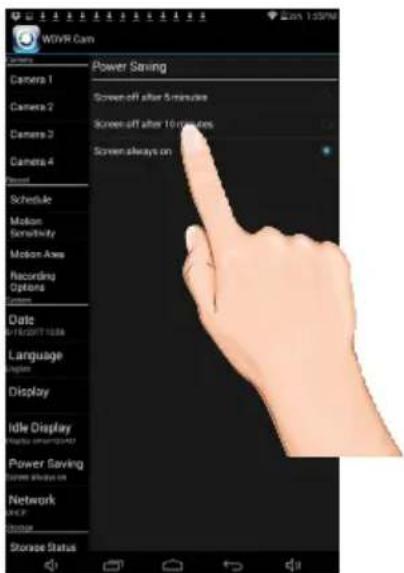
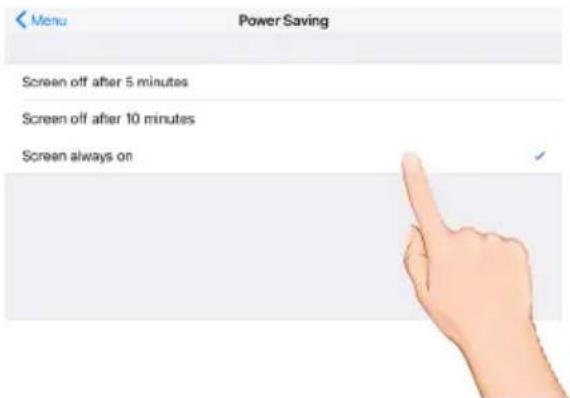
Setting the Power Savings

1 Tap the icon, then tap Remote Setting to access the System Setup screen.

2 Tap Power Saving.
3 Tap the desired time for which the display will remain on when idle, 5 minutes, 10 minutes or Always On.
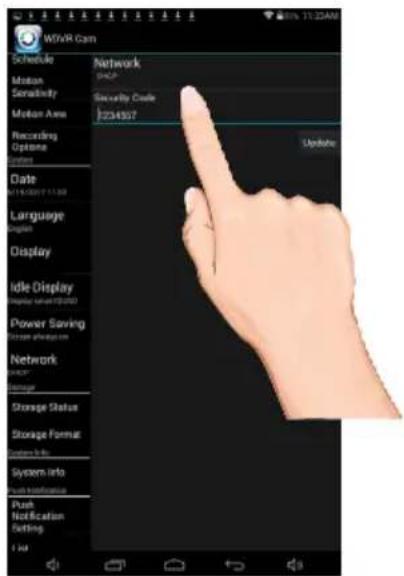
Setting the Security Code and Internet Info

1 YOU MUST CHANGE THE SECURITY CODE BEFORE SETTING UP REMOTE
ACCESS. Tap the camera in the Devices menu followed by the ▶ button to view the cam. Tap the System Menu icon to access the System Setup screen.

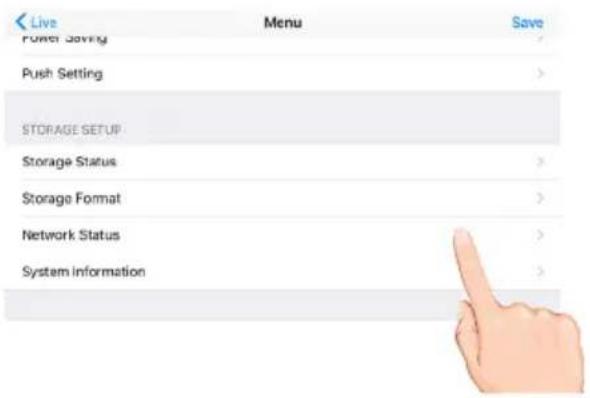
2 Tap Network Status.
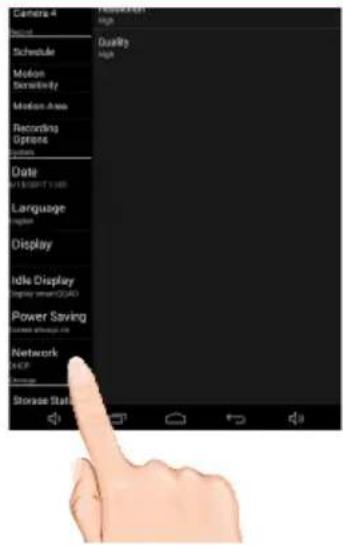
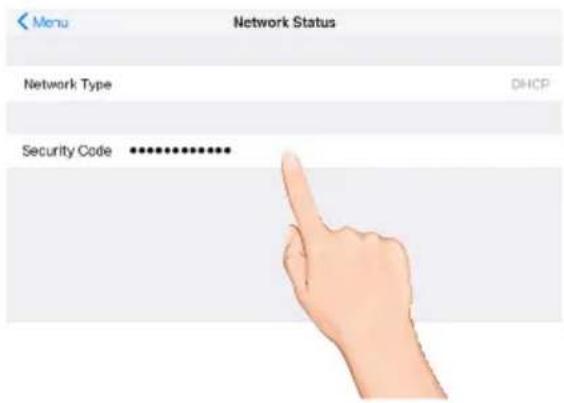
3 Tap the security code field and enter a new code.
Tap either DHCP or Static IP:
DHCP: DHCP is the most common connection. When selected, your router will automatically assign an IP address to this camera system.
Static IP: Static IP is for those that have the ability to specify an IP address for the system. If this option is selected, you will be able to input the IP Address, Subnet Mask, Default Gateway and DNS server.
TIP: The DHCP or Static IP can not be changed using your android. Use your monitor instead.
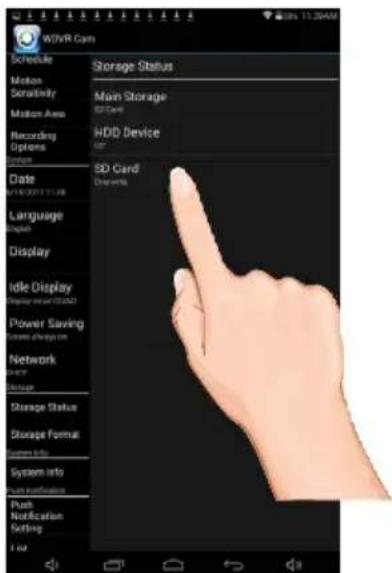
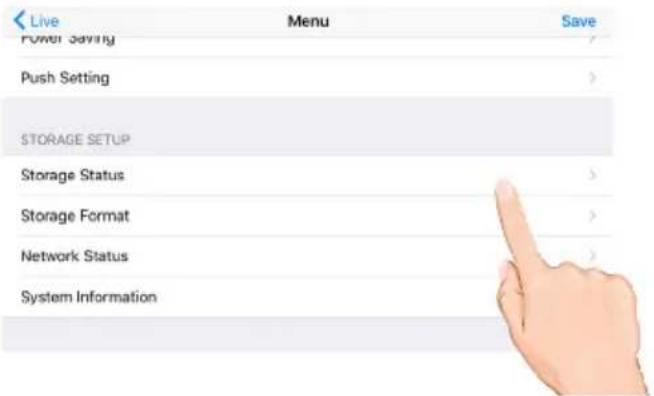
Setting the Storage

1 Tap the icon, then tap Remote Setting to access the System Setup screen.
2 Tap Storage Status.
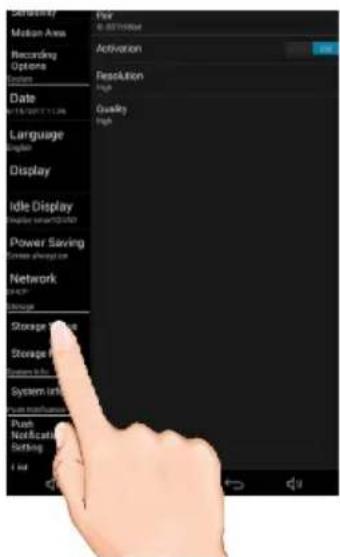
3 Select the desired MAIN drive to record onto: microSD Card (in the microSD slot) or the drive connected to the USB jack; a check mark will appear in the box.
To allow the unit to record over old files, select the device and the change to Overwrite.
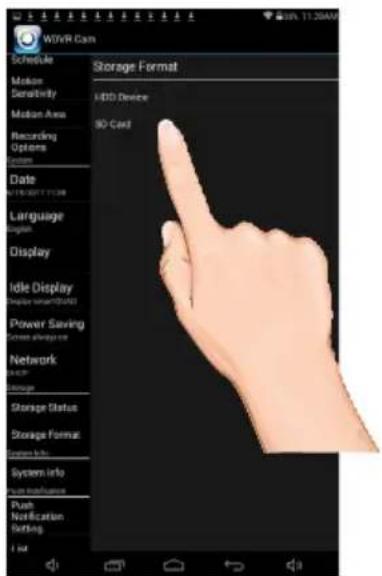
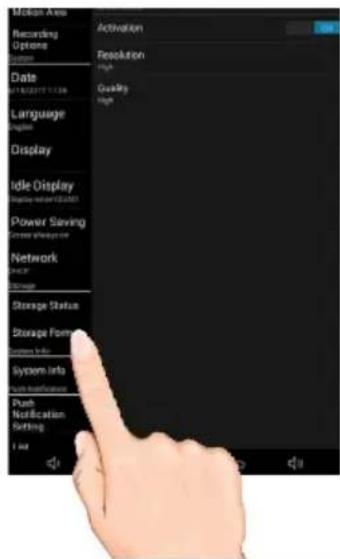
Formatting a Drive

1 Tap the icon, then tap Remote Setting to access the System Setup screen.

2 Tap Storage Format.
3 Tap the desired drive to format which will erase the drive and format it to be used with this system. Confirm by pressing the OK button.
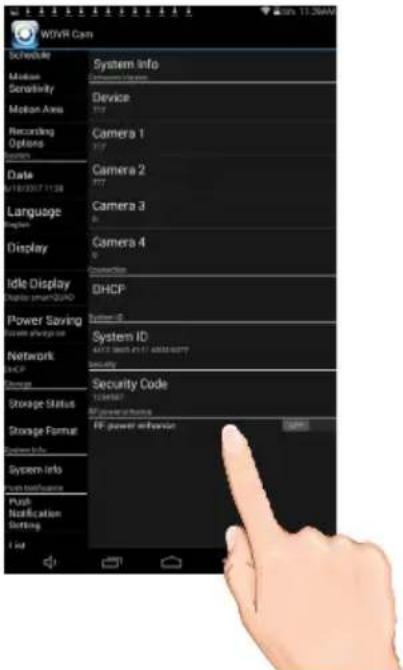
System Info

1
Tap the icon, then tap Remote Setting to access the System Setup screen.
2
Tap System Info.

3
The info on the system will appear. On this page you can also turn on the RF Power Advance option.
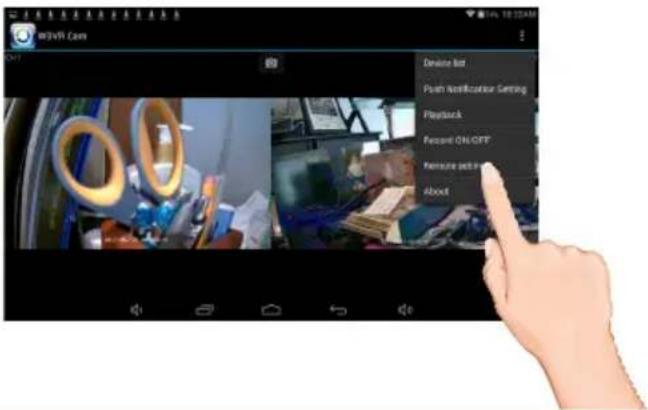
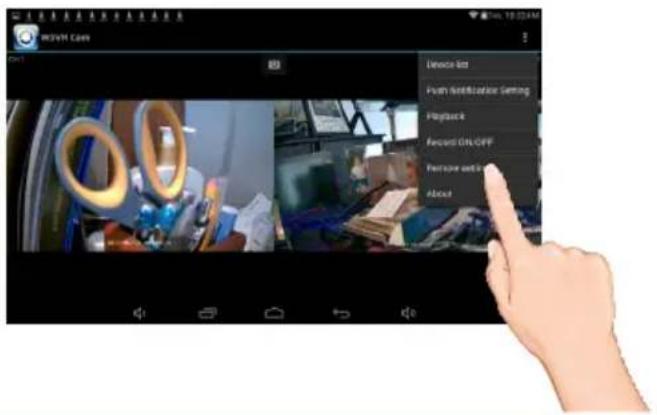
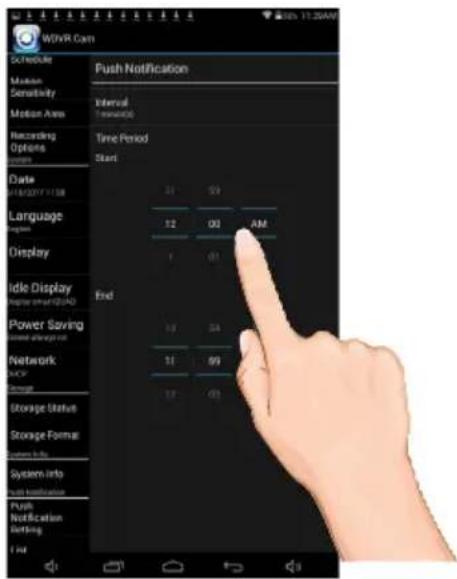
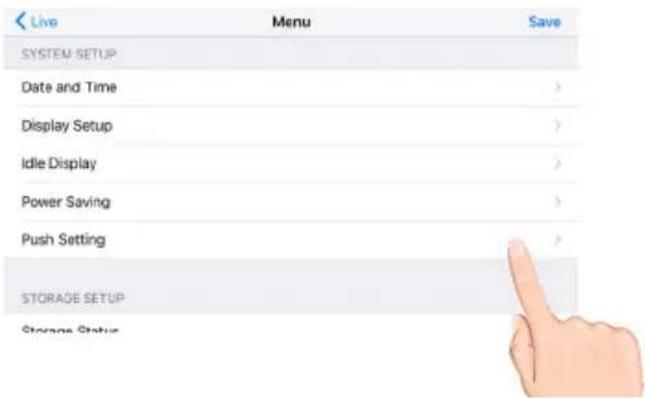
Setting the Push Setting


Tap the icon, then tap Remote Setting to access the System Setup screen.


Tap Push Notification Setting.
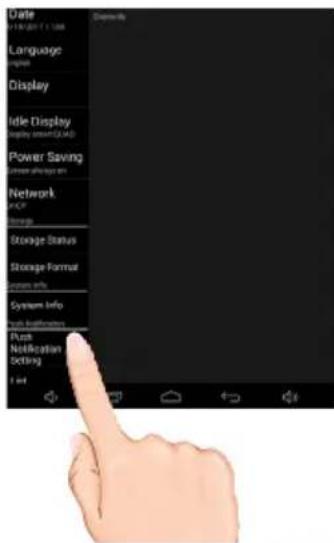

Tap the Push Interval and Push Time period. Setting the Push setting will xxxxxx?
Please advise???
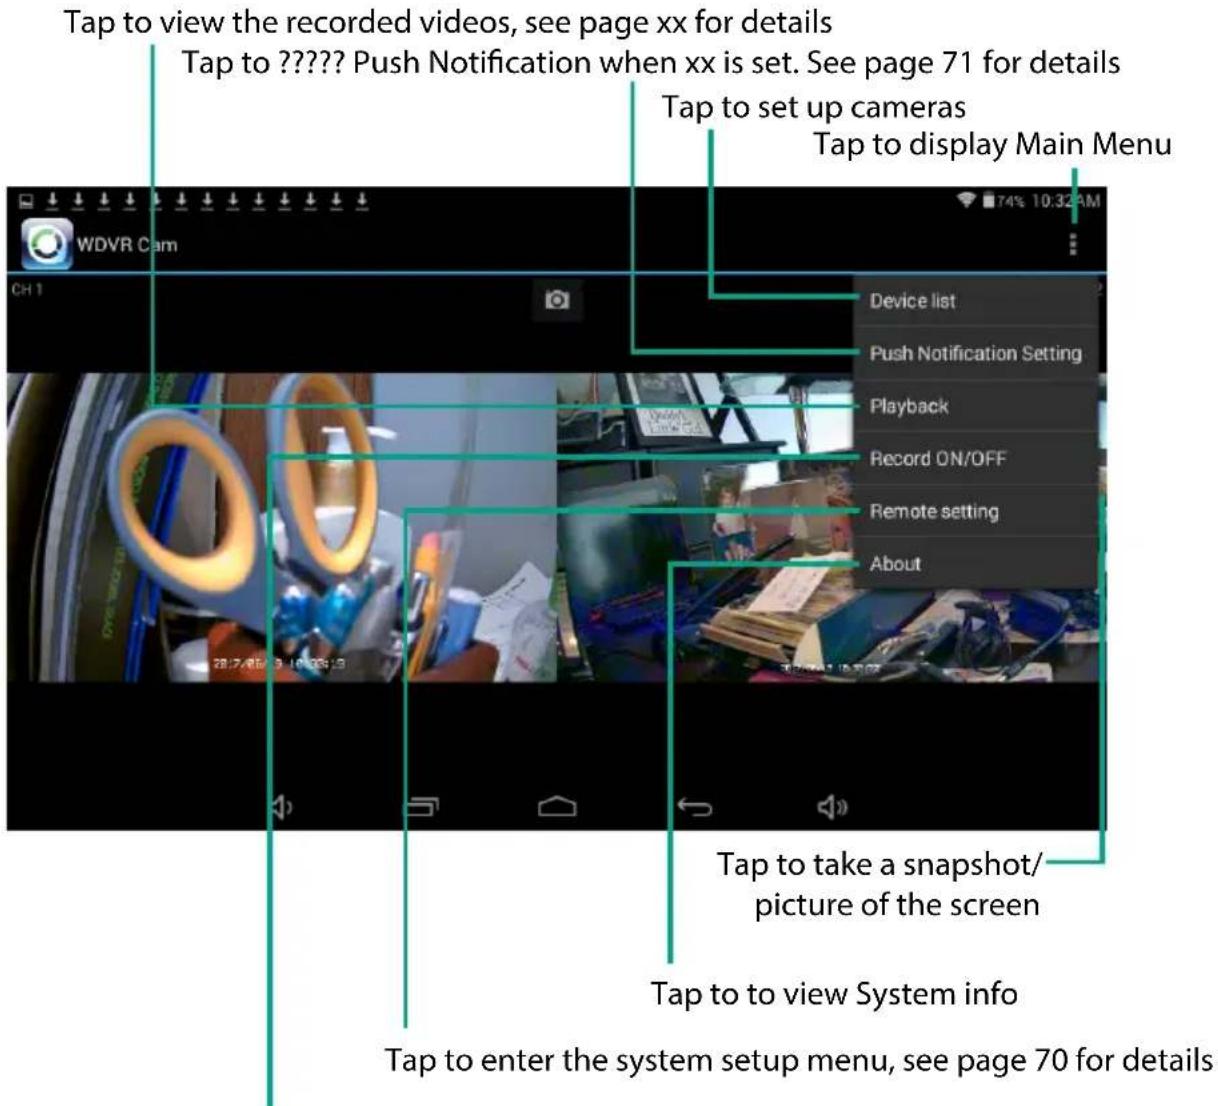
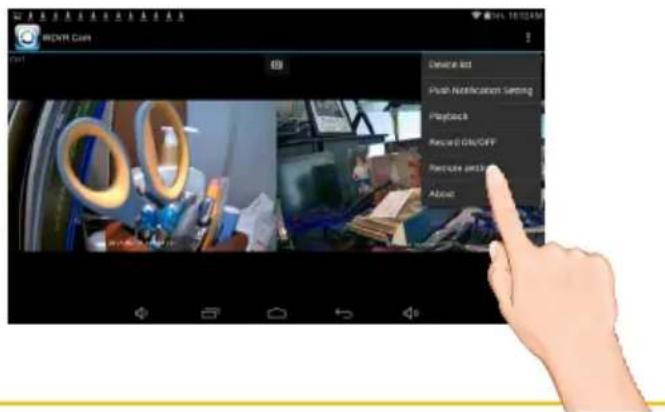
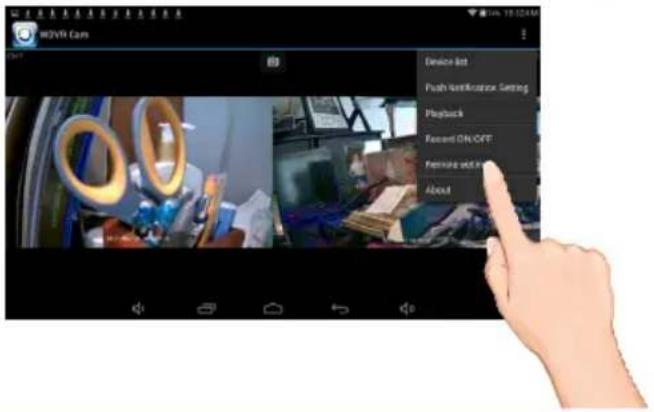
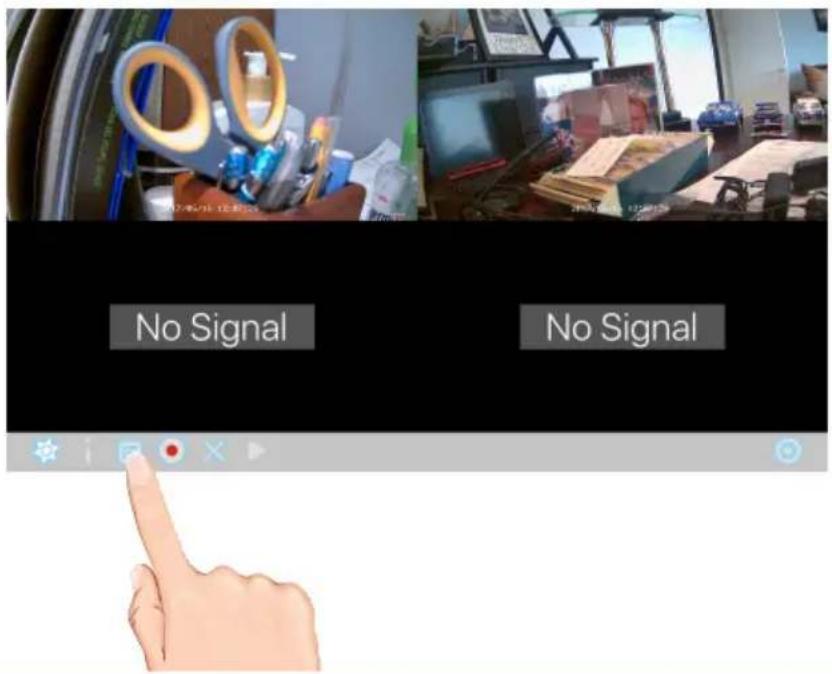
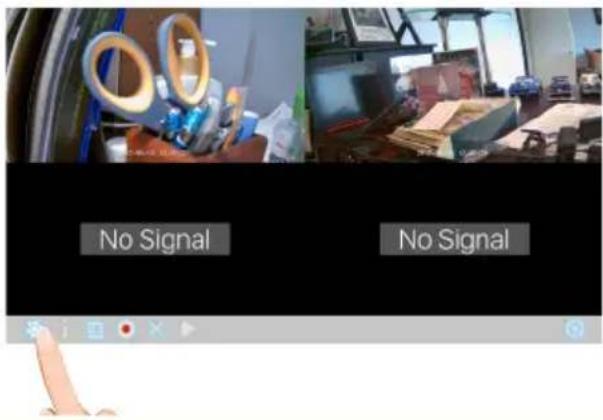
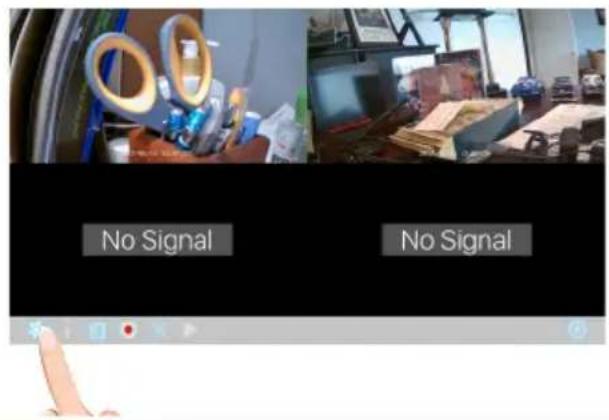
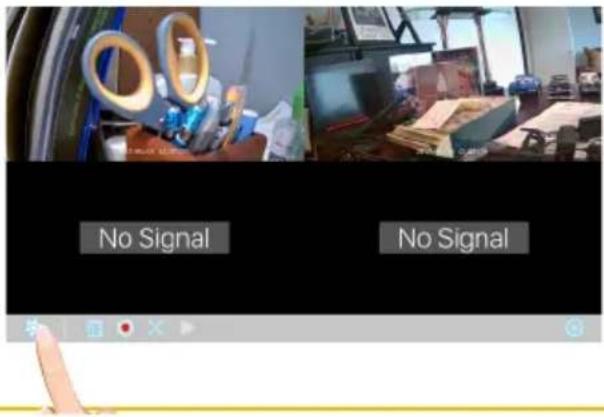
WDVR Main Screen and Icons

1 Tap the camera in the Devices menu followed by the ▶ button to view the camera(s). Click anywhere on the screen to bring up the App icons. See below for icon descriptions
Tap to take a snapshot/picture of the screen Tap to view camera(s) Tap to stop live view Tap to record or stop recording, see page 73 for details Tap to view the recorded videos, see page 75 for details Tap to ???? Push Notification when xx is set. See page 90 for details Tap to enter the system setup menu, see pages 78-94 for details
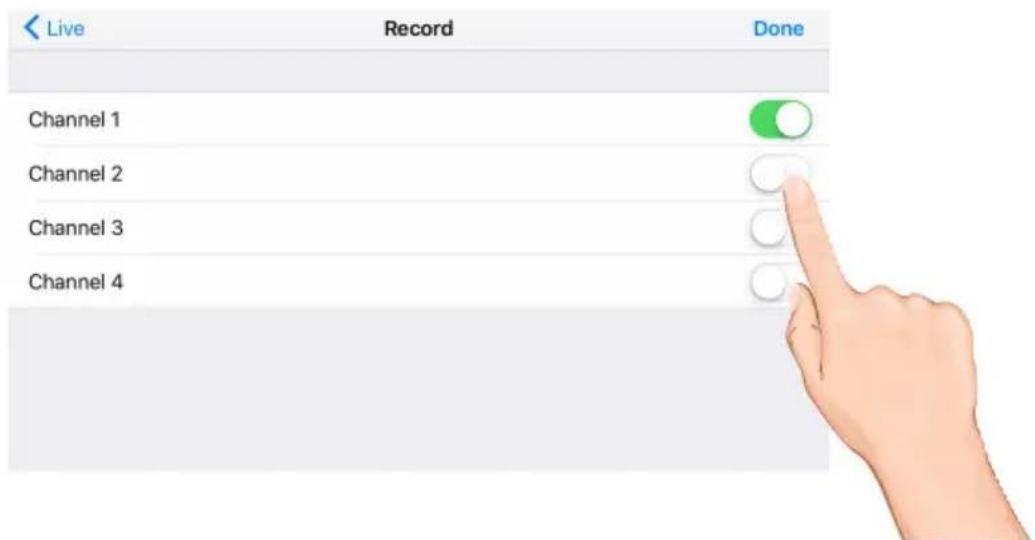
Recording

1 Tap the Record icon.
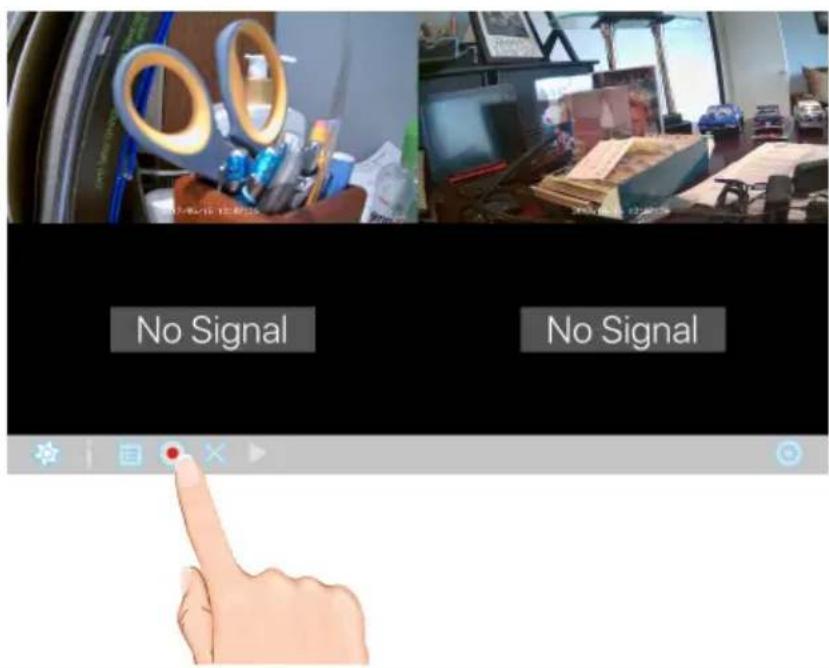
2 Tap one or more cameras/channels to record, the switches will turn green when selected.
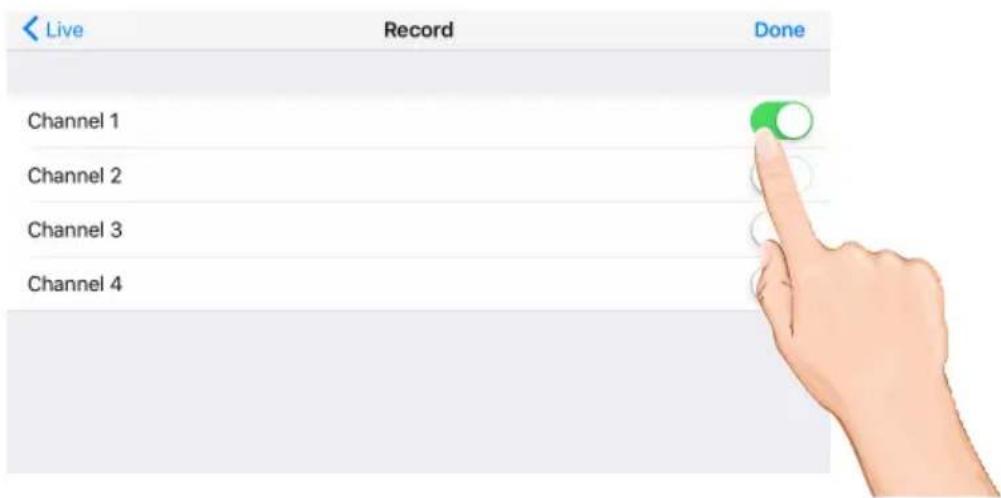
Recording


Tap Done.
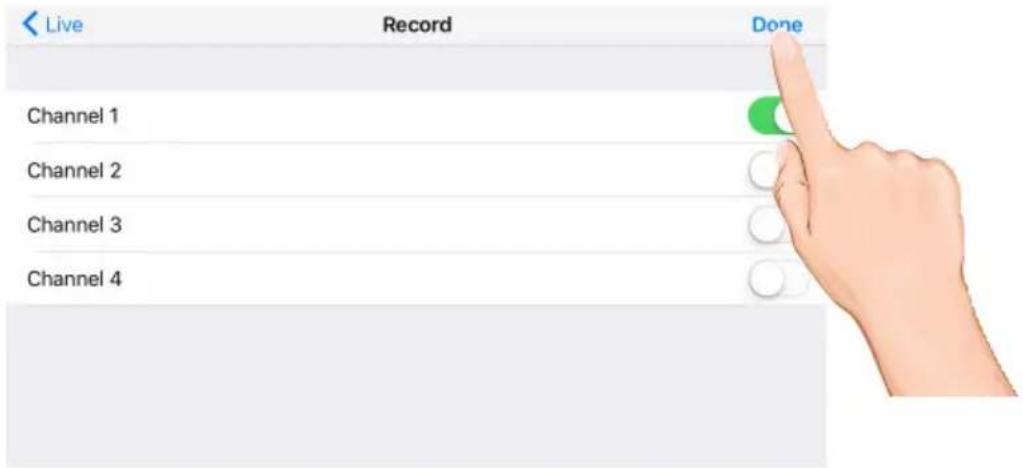

The unit will record the selected cameras/channels. To stop recording, repeat steps 1 and 2 to turn the respective switches off. Tap Done.
Event List

1 Tap the Event icon.
2 Tap the selected drive to view, i.e. SD Card.

Event List


Tap a camera/channels to view its recordings. Then, tap on the desired recording date.


Tap the desired time and the video will start playing back.

Recording


The bottom control icons will control the following:

Tap to rapidly rewind the playback.

Tap to play back the recording.

Tap to pause the playback. When paused or stopped you can tap the date in the top left corner to go to the previous screen.

Tap to rapidly advance the playback.
natural_image
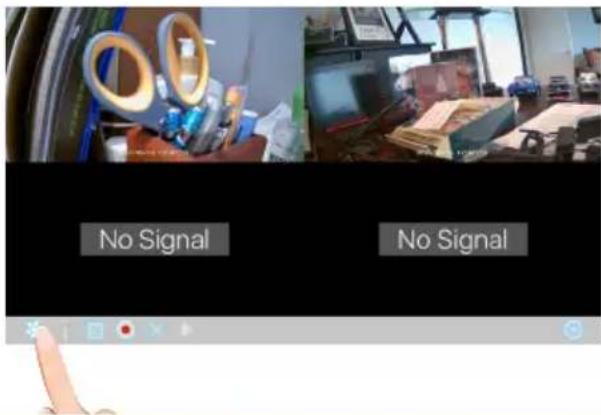
Hand holding a hand holding pens and plastic clips, with no visible text or symbols on the main subject.Camera Pairing

Your cameras are paired to the monitor at the factory to channels 1 and 2 (only camera 1 for AWS337). When you add a new camera to your system, you have to “introduce” the camera and monitor to each other so they can communicate.

Tap the camera in the Devices menu followed by the ▶ button to view the cam. Tap the System Menu icon to access the System Setup screen.

Tap the desired camera to pair.

Tap Pairing, "Pairing" and a countdown will appear on the screen.

Press and Hold the Pairing button on that camera for 5 seconds. If pairing is successful "pairing is successful" appears on the screen. Tap on it to remove the message. If a camera is already assigned to the selected channel, the monitor overwrites that camera link with the new one.

natural_image
Hand inserting a cable into a circular device with a hexagonal button (no text or symbols)Turning a Camera On or Off

1 Tap the camera in the Devices menu followed by the ▶ button to view the cam. Tap the System Menu icon to access the System Setup screen.
2 Tap the desired camera that you want to turn on or off.
3 Tap the Active switch to turn the selected camera on or off.
Setting HD Option

1
Tap the camera in the Devices menu followed by the ▶ button to view the cam. Tap the System Menu icon to access the System Setup screen.
2
Tap the desired camera that you want to set.

3
Tap to set the Resolution to HIGH or LOW as desired. HIGH will look better but LOW will provide a better frame rate which is optimal when viewing on a mobile device.
Setting the Image Quality

1 Tap the camera in the Devices menu followed by the ▶ button to view the cam. Tap the System Menu icon to access the System Setup screen.

2 Tap the desired camera that you want to set.

3 Tap to set the Quality to HIGH or LOW as desired. High quality will produce a better video display quality, but the system will lower the display frame rate as compensation.
Lower quality will produce a better display frame rate, but the system will lower the quality as compensation.
Schedule Recording

1 Tap the camera in the Devices menu followed by the ▶ button to view the cam. Tap the System Menu icon to access the System Setup screen.
2 Tap Record Schedule.
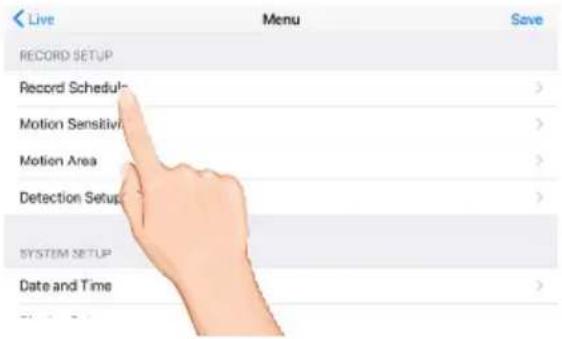
3 Tap the desired camera to set, or all cameras.

Schedule Recording


Tap Off to not set a schedule. Tap Schedule to set recording times using specific days or everyday. Tap Motion to set recording times that will record when motion is detected.
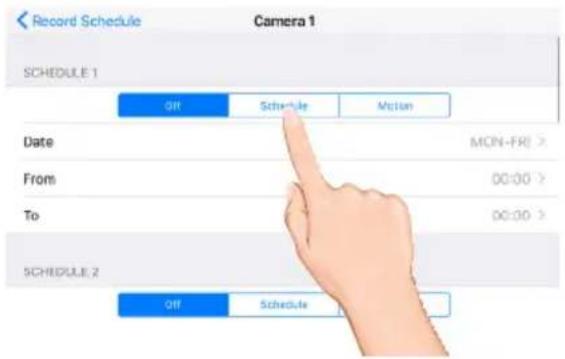

Tap Date to select the weekly cycle the recording will take place. For example, EVERYDAY, MON-FRI, THURSDAY, etc.

Tap From and To to set the From and To times.
The unit will then record (or only record when motion is detected) at the dates and times selected.
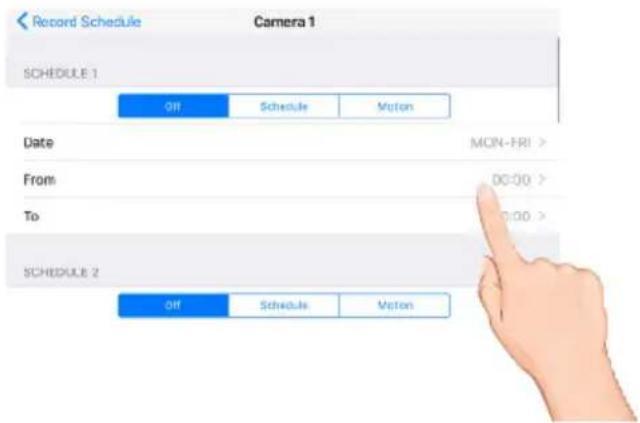
Repeat to set up tp 5 more schedules.
Motion and Motion Area Options

1 Tap the camera in the Devices menu followed by the ▶ button to view the cam. Tap the System Menu icon to access the System Setup screen.
2 Tap Motion Sensitivity. Tap the desired camera and then set the desired motion setting to PIR (Uses Advance Motion settings), PIR Low, PIR Mid or PIR High.
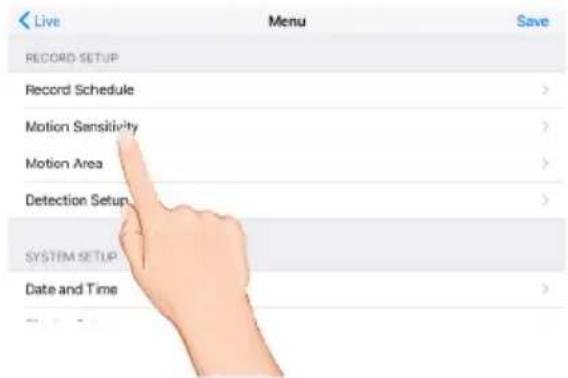
3 This Motion Mask feature will allow you to mask areas of the screen from detecting motion and activating the motion detector recording for that area. For example, if a pet sets off the sensor, you can mask the lower areas that the pet would be visible in, or if a tree branch moving in the wind sets it off, you can mask the areas where the tree branch is in the video.
Tap Motion AREA. Tap the desired camera. Tap a block to mask it; a check will disappear. To un-mask a block, simply tap it again; a check will appear.
Detection Options

1 Tap the camera in the Devices menu followed by the ▶ button to view the cam. Tap the System Menu icon to access the System Setup screen.
2 Tap Detection Setup.
3 Tap the options as follows:
Motion Record Time: Set the time the unit will record when motion is detected (30, 60 or 120 seconds). Record time may be longer is motion continues.
Motion Detection Alarm:
Set the alarm to sound for 5 or 10 seconds when motion is detected, or turn off.
Video Loss Alarm:
Set the alarm to sound for 5 or 10 seconds when video is lost from one of the cameras, or turn off.
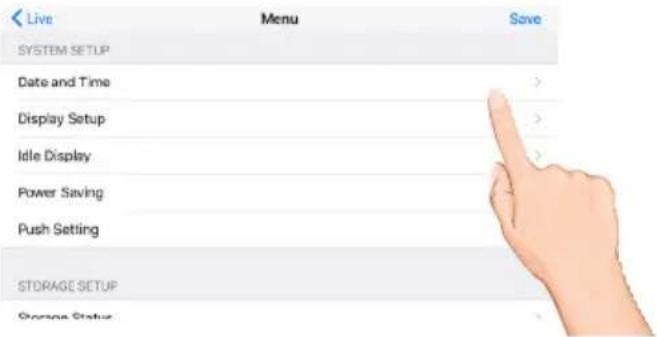
Setting the Date/Time

1
Tap the camera in the Devices menu followed by the ▶ button to view the cam. Tap the System Menu icon to access the System Setup screen.
2
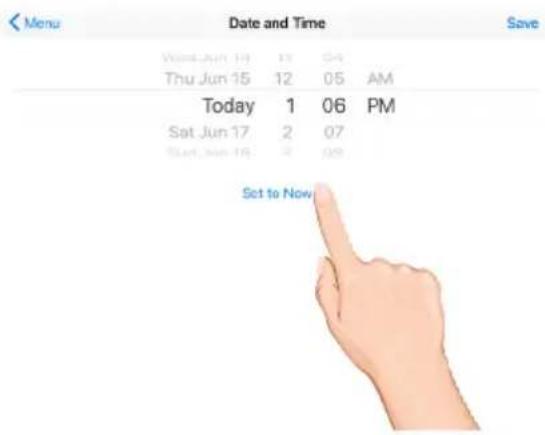
Tap Date and Time.
3
Set the time the date and time. Tap Set to Now to set the time as per the apple device.
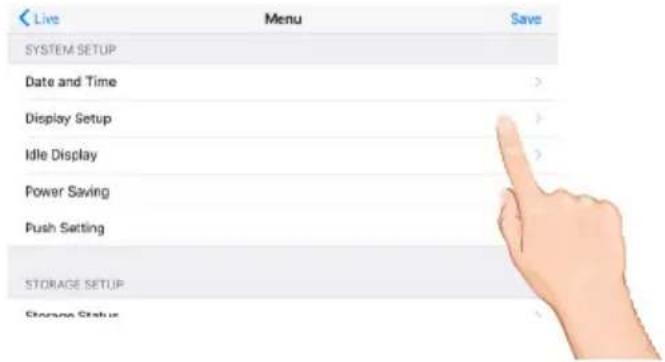
Setting the Image Appearance

1 Tap the camera in the Devices menu followed by the ▶ button to view the cam. Tap the System Menu icon to access the System Setup screen.

2 Tap Display Setup.
3 Tap RSSI to turn it on (icon will turn green) which will show the signal strength on the videos. Tap again to turn off.
Tap Record Date/Time to turn it on (icon will turn green) which will show the time and date on the videos. Tap again to turn off.
Setting the Idle Display

1 Tap the camera in the Devices menu followed by the ▶ button to view the cam. Tap the System Menu icon to access the System Setup screen.
2 Tap Idle Display.
3 This setting allows you to decide if the cameras will display in quad mode or if they will cycle individually in 5 or 10 second intervals. Tap to select Quad, Smart Quad, or 5 or 10 second intervals.

Setting the Power Savings

1 Tap the camera in the Devices menu followed by the ▶ button to view the cam. Tap the System Menu icon to access the System Setup screen.
2 Tap Power Saving.
3 Tap the desired time for which the display will remain on when idle, 5 minutes, 10 minutes or Always On.
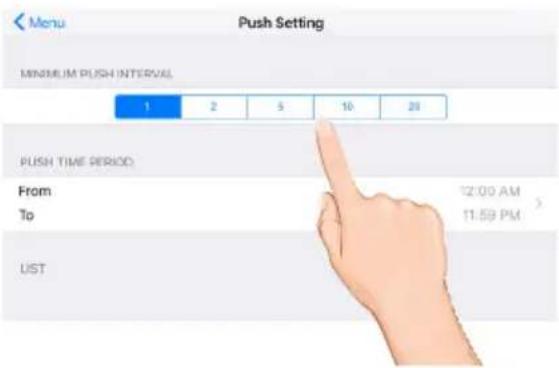
Setting the Push Setting


Tap the camera in the Devices menu followed by the ▶ button to view the cam. Tap the System Menu icon to access the System Setup screen.


Tap Push Setting.

Tap the Push Interval and Push Time period. Setting the Push setting will xxxxxx? Please advise???
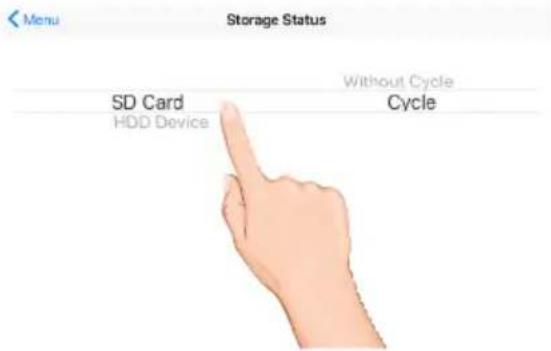
Setting the Storage

1
Tap the camera in the Devices menu followed by the ▶ button to view the cam. Tap the System Menu icon to access the System Setup screen.
2
Tap Storage Status.
3
Select the desired drive to record onto: microSD Card (in the microSD slot) or the drive connected to the USB jack.
To allow the unit to record over old files, select Cycle. Select Without Cycle to deactivate.
Formatting a Drive

1
Tap the camera in the Devices menu followed by the ▶ button to view the cam. Tap the System Menu icon to access the System Setup screen.
2
Tap Storage Format.
3
Tap the desired drive to format which will erase the drive and format it to be used with this system. Confirm the formatting by pressing the OK button.

Setting the Security Code and Internet Info

1 YOU MUST CHANGE THE SECURITY CODE BEFORE SETTING UP REMOTE
ACCESS. Tap the camera in the Devices menu followed by the ▶ button to view the cam. Tap the System Menu icon to access the System Setup screen.

2 Tap Network Status.
3 Tap the security code field and enter a new code.
Tap either DHCP or Static IP:
DHCP: DHCP is the most common connection. When selected, your router will automatically assign an IP address to this camera system.
Static IP: Static IP is for those that have the ability to specify an IP address for the system. If this option is selected, you will be able to input the IP Address, Subnet Mask, Default Gateway and DNS server.
TIP: The DHCP or Static IP can not be changed using your IOS. Use your monitor instead.
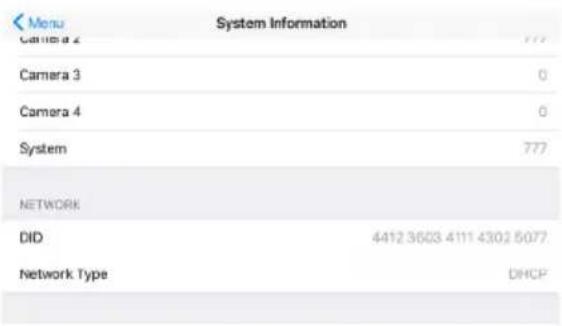
System Info


Tap the camera in the Devices menu followed by the ▶ button to view the cam. Tap the System Menu icon to access the System Setup screen.

Tap System Information.


The info on the system will appear.
Monitor
As you use your touch-screen monitor, fingerprints, etc. will appear on the screen. Keep the screen clean by wiping it with a microfiber cloth. It is not recommended to use any chemicals or harsh detergents on the touch screen.
Cameras
When dust and grime builds up on the camera lens and glass, it will affect the night vision capability. The infrared light reflects off of the dust and grime, limiting the camera's “vision.” Use a microfiber cloth to regularly clean the cameras or when night vision video is cloudy or unclear.
Upgrading the Firmware
To update to the latest firmware, go to page 42.
If you have any trouble with your system, try these simple steps which should handle most common issues.
| Problem | Possible Solution |
| No Image. | Make sure the camera's power is on. Connect it to the included adapter. Move the camera closer to the monitor; it might be out of range or flip the antenna of the monitor and/or camera to obtain best possible reception. If the monitor is connected to a PC, no image will appear. |
| Poor picture quality. | Move the camera closer to the monitor; it might be out of range or flip the antenna of the monitor and/or camera to obtain best possible reception. Clean the camera lens using a microfiber cloth. |
| The motion sensor does not respond to movement. | Ensure the camera is set to motion in the schedule section, see page 27 Increase or decrease the sensitivity of the motion sensor (for details see page 28). Part of the screen is set to mask, see page 27. |
| Standard or Scheduled recording is not working properly. | Ensure the correct Date and Time have been set, for details see page 34. Ensure the Record Schedule has been setup correctly, see page 27 for more details. Ensure the micro SD card is inserted into the monitor and formatted. |
| Unable to pair the camera to the monitor. | Make sure the camera's power is on. Press and hold the pairing button for 5 seconds. Do not press and release it; see page 22. Turn off the monitor and restart. If power button does not respond, use a pin to press the Reset button located on the side of the monitor. |
| A white image appears at night. | The camera's infrared LEDs shine invisible light that reflects off surfaces such as glass will cause white light. Place the camera on the other side of the window to improve the night vision or place it in a well-lit area (it is recommended to install a security lamp to improve lighting). |
| System has locked up. | Turn off the monitor and restart. If power button does not respond, use a pin to press the Reset button located on the side of the monitor. |
| The camera's signal status icon shows no bars. | Make sure the camera is plugged in and the red LED is on; see page 13.Make sure the camera is paired to the correct channel; see page 12.Re-pair the camera to the monitor.Move the camera closer to the monitor; it might be out of range or flip the antenna of the monitor and/or camera to obtain best possible reception. |
Camera
Transmission Distance 300 Meters in open space
Image Resolution 1920 x 1080 (Full HD)
Housing IP66 weather resistance metal
Viewing Angle ......H: 90°, V: 45°±3°
Low Light Solution 6 IR LEDs w/ IR CUT switcher
Night Visibility 8 Meters
Power Supply ....DC 5V
Operating Temperature -10°C \~ +40°C
Monitor
Transmission Power ....../<20dBm
Frequency Range 2403-2478Mhz
Compression Format.... H.264
Video Resolution High Definition 1080P
Viewing Options ......Full Screen/QUAD/Smart-QUAD
Storage Media .... External USB HDD (not included); SSD compatible (not included)
...... Memory card slot (up to 128GB; for footage backup only; memory
card not included)
Motion Detection ...... PIR On/Off setting for each camera
Record Mode ....Schedule/Motion Detection/Manual
Network Interface ...... RJ45 (LAN, Internet)
Ethernet Output 10/100Mbps
Mouse Control ....Yes
Power Supply ....DC 12V
Operating Temperature -10°C \~ +40°C
Storage Temperature -20°C \~ +50°C
One-Year Limited Warranty
Important: Evidence of original purchase is required for warranty service.
Atoms Labs LLC (“ALC”) ELEMENTS OF WARRANTY: ALC warrants, if properly installed and used thereafter in strict accordance with the use and care guidelines provided in the instructions manual, the Product shall be free from manufacturing defects in material and workmanship for one (1) year from the documented date of purchase. The purchase date must be documented with either an original sales receipt from the first retailer selling the Product or by credit card receipts or statements. The warranty is non-transferrable.
LIMITED WARRANTY: The warranty terminates one year after the date of original retail sale. The warranty is invalid if the Product is (A) damaged or not maintained as reasonable or necessary, (B) modified, altered, or used as part of any conversion kits, subassemblies, or any configurations not sold by ALC, (C) improperly installed, (D) serviced or repaired by someone other than an authorized ALC service center for a defect or malfunction covered by this warranty, (E) used in any conjunction with equipment or parts or as part of any system not manufactured by ALC, or (F) installed or programmed by anyone other than as detailed by the owner's manual for this product.
THIS WARRANTY DOES NOT COVER DATA LOSS, OR COSTS RELATED TO DATA RECOVERY. ALC MAKES NO WARRANTY THAT ANY SOFTWARE PROVIDED WITH THE PRODUCT WILL FUNCTION WITHOUT INTERRUPTION OR OTHERWISE BE FREE OF ANOMALIES, ERRORS OR VIRUSES. THIS WARRANTY DOES NOT COVER ANY COSTS RELATING TO REMOVAL, REPLACEMENT, OR INSTALLATION OF ANY PRODUCT, REGARDLESS OF WHETHER THE PRODUCT IS FOUND BY ALC TO BE DEFECTIVE, OR SOFTWARE INSTALLED ON THE USER'S COMPUTER.
ALC DOES NOT MAKE ANY CLAIMS OR WARRANTIES OF ANY KIND WHATSOEVER REGARDING THE PRODUCT'S POTENTIAL, ABILITY OR EFFECTIVENESS TO PREVENT, MINIMIZE, OR IN ANY WAY AFFECT PERSONAL OR PROPERTY DAMAGE OR INJURY. ALC IS NOT RESPONSIBLE FOR ANY DAMAGE, LOSS OR THEFT RELATED TO THE PRODUCT OR TO ITS USE FOR ANY HARM, WHETHER PHYSICAL OR MENTAL RELATED THERETO. ANY AND ALL CLAIMS OR STATEMENTS, WHETHER WRITTEN OR VERBAL, BY SALESPEOPLE, RETAILERS, DEALERS OR DISTRIBUTORS TO THE CONTRARY ARE NOT AUTHORIZED BY ALC AND DO NOT AFFECT THIS PROVISION OF THIS WARRANTY. THE LIMITED WARRANTY IS THE SOLE AND ENTIRE WARRANTY PERTAINING TO THE PRODUCT AND IS IN LIEU OF AND EXCLUDES ALL OTHER WARRANTIES OF ANY NATURE WHATSOEVER, WHETHER EXPRESS, IMPLIED OR ARISING BY OPERATION OF LAW, INCLUDING, BUT NOT LIMITED TO ANY IMPLIED WARRANTIES OF MERCHANTABILITY OR FITNESS FOR A PARTICULAR PURPOSE. THIS WARRANTY DOES NOT COVER OR PROVIDE FOR THE REIMBURSEMENT OR PAYMENT OF LOST REVENUE, PROFIT, OR DATA, OR FOR SPECIAL, INDIRECT, CONSEQUENTIAL, INCIDENTAL, OR PUNITIVE DAMAGES HOWEVER CAUSED AND REGARDLESS OF THE THEORY OF LIABILITY. Some states do not allow this exclusion or limitation of incidental or consequential damages so the above limitation or exclusion may not apply to you. Your damages will be limited to the total purchase price you paid for the Product.
Use of audio or video equipment for recording the image of a person without their knowledge and consent is prohibited in certain states or jurisdictions. The end-user assumes all liability for compliance with applicable state, local and federal laws. Atoms Labs has no responsibility or liability for how the end-user uses a product. Wireless cameras require a wired connection to AC power outlet. Network conditions and environmental factors can adversely affect wireless signal range. Actual night vision range and image clarity depends on installation location, viewing area and light reflection / absorption.
This Product may only be sold in the United States of America and Canada. There is no warranty whatsoever on the Product outside of the United States of America and Canada.
STATEMENT OF REMEDY: If the Product is under warranty, ALC will either, at its option, repair or replace the defective Product and return it to you without charge for parts, service, or any other cost. ALC, at its option, may replace the Product with a new or refurbished Product.
WARRANTY
LEGAL REMEDIES: This limited warranty gives you specific legal rights, and you may also have other rights which vary from state to state. All parties irrevocably submit themselves to the exclusive venue and personal jurisdiction of the state and federal courts in Denton County, Texas with regard to any dispute relating to this Warranty or its enforcement. The parties also hereby waive any challenge to venue and personal jurisdiction they may have to a lawsuit filed in a state or federal court in Denton County, Texas, regarding a dispute between the parties relating to this Warranty or its enforcement. You agree that Atoms Labs is entitled to its reasonable and necessary attorney's fees if it is a prevailing party in litigation against you relating to this Warranty. If any provision of this Warranty is found to be invalid, illegal, or unenforceable, the validity, legality, and enforceability of any of the remaining provisions will not in any way be affected or impaired and a valid, legal, and enforceable provision of similar intent and economic impact will be substituted therefore.
PROCEDURE FOR OBTAINING PERFORMANCE OF WARRANTY: If, after following the instructions in the owner's manual you are certain that the Product is defective, pack the Product carefully (preferably in its original packaging). The Product should include all parts & accessories originally packaged with the Product. Include evidence of original purchase & a note describing the defect that has caused you to return it. The Product should be shipped freight prepaid, by traceable means, to warrantor at:
Atoms labs LLC
2670 Firewheel Drive Suite D
Flower Mound, TX 75028
844-767-8544
9 a.m. to 6 p.m., Central Time, Monday through Friday
ALC reserves the right to make changes to its products without incurring any obligation to modify any product that has already been manufactured. This warranty does not cover any alteration or damage to any other software that may be or may become resident on the users system as a result of installing any software provided.
ALC appreciates your support and feedback! If you come across software bugs or ways we could improve our products, we would love to hear about them! Please email us at support@ALCWireless.com and you will hear back from us.
©2014 Atoms Labs LLC, All rights reserved. iPhone, iPad, iPod Touch, and App Store are registered trademarks of Apple, Inc. Chrome and Android are registered trademarks of Google, Inc. Certain other product names, brand names, and company names may be trademarks or designations of their respective owners.
Use of audio or video equipment for recording the image of a person without their knowledge and consent is prohibited in certain states or jurisdictions. The end-user assumes all liability for compliance with applicable state, local and federal laws. Wireless cameras require a wired connection to AC power outlet. Network conditions and environmental factors can adversely affect wireless signal range. Actual night vision range and image clarity depends on installation location, viewing area and light reflection / absorption. Lithium-ion battery must be recycled or disposed of properly. Photography and illustration may differ slightly from actual product.

FCC Compliance Statement: This device complies with Part 15 of the FCC rules. Operation is subjected to the following two conditions: (1) this device may not cause harmful interference, and (2) this device must accept any interference received, including interference that may cause undesired operation.

Products with CE Marking comply with EMC Directive (2004/108/EC); Low Voltage Directive (73/23/EEC); R&TTE (1999/5/EC); ROHS Directive (2011/65/EU) issued by the Commission of the European Community. Compliance with these directives implies conformity to the following European Norms: EMC: EN 301 489 LVD: EN 60950 Radio: EN 300 328

If the camera system no longer functions or can no longer be repaired, it must be disposed of according to the valid statutory regulations. Disposal of spent batteries/accumulators:
You are required by law (Battery Ordinance) to return all spent batteries and accumulators. Disposing of spent batteries/accumulators with common household waste is prohibited! Batteries/accumulators that contain hazardous substances are marked with the symbols on the side. These symbols indicate that it is prohibited to dispose of these batteries/accumulators in the household waste. The abbreviations for the respective heavy metals are: Cd=cadmium, Hg=mercury, Pb=lead. You can return spent batteries and accumulators that can no longer be charged to the designated collection points in your community, outlets or wherever batteries or accumulators are sold. Following these instructions will allow you to fulfill the legal requirements and contribute to the protection of our environment!

ALC ^TM
Wireless Made Simple. ALCWireless.com
ALC ^TM
Wireless Made Simple.