
SK-32H240S - Television WESTINGHOUSE - Free user manual and instructions
Find the device manual for free SK-32H240S WESTINGHOUSE in PDF.


| Product Type | 32-inch High Definition LCD TV |
| Model | SK-32H240S |
| Brand | Westinghouse |
| Screen Size | 32 inches (diagonal) |
| Panel Type | TFT Active Matrix WXGA LCD |
| Resolution | 1366 x 768 pixels |
| Coating | Anti-glare coating |
| Viewing Angles (H/V) | 176° / 176° |
| TV System | NTSC / ATSC (Digital) |
| HDTV Compatibility | 480i, 480p, 720p, 1080i |
| PC Resolutions Supported | 640x480, 800x600, 1024x768, 1280x720, 1360x768, 1366x768 (recommended at 60 Hz) |
| Inputs | VGA (15-pin D-sub), 2x HDMI (with HDCP), 2x Component (YPbPr), 2x Composite (AV), 2x S-Video, Antenna (RF), USB (service only) |
| Outputs | SPDIF (digital audio), Audio Out (RCA L/R) |
| Speaker Output | 10W x 2 (20W total) |
| Power Supply | 100-240 VAC, 47-63 Hz, 2.0A |
| Power Consumption (Typical) | < 150 W |
| Standby Power | < 3 W |
| Dimensions (with stand) | 31.4 in (W) x 24.3 in (H) x 8.9 in (D) |
| Weight (with stand) | 32.0 lbs |
| VESA Mount | 75mm x 75mm and 100mm x 100mm |
| Remote Control | Yes, with batteries (AAA) |
| Special Features | PIP, Closed Caption, Parental Control, Sleep Timer, AutoSource, Electronic Program Guide |
| Cleaning | Use soft dry cloth; non-ammonia, non-alcohol glass cleaner for screen |
| Regulatory Compliance | UL, C-UL, FCC Class B |
Frequently Asked Questions - SK-32H240S WESTINGHOUSE
User questions about SK-32H240S WESTINGHOUSE
0 question about this device. Answer the ones you know or ask your own.
Ask a new question about this device
Download the instructions for your Television in PDF format for free! Find your manual SK-32H240S - WESTINGHOUSE and take your electronic device back in hand. On this page are published all the documents necessary for the use of your device. SK-32H240S by WESTINGHOUSE.
USER MANUAL SK-32H240S WESTINGHOUSE
PRODUCT SAFETY INSTRUCTIONS....3
ANTENNA INSTALLATION SAFETY 4
2. A GUIDE TO DIGITAL TELEVISION
WHAT IS DIGITAL TELEVISION? 5
A GUIDE TO DIGITAL CHANNELS 6
THE ELECTRONIC PROGRAM GUIDE 7
3. INSTALLATION
PACKAGE CONTENTS 8
FRONT VIEW OF THE HIGH DEFINITION LCD TV 9
SIDE VIEW OF THE HIGH DEFINITION LCD TV....10
REMOTE CONTROL....13
INSTALLATION 14
4. OSD FUNCTION
OSD (ON SCREEN DISPLAY) FUNCTION 18
VIDEO 19
DISPLAY 21
TV....22
PC (VGA ONLY) 23
AUDIO 24
POWER MANAGEMENT 25
SETTINGS....27
MAIN CHANNEL LIST 28
PARENTAL CONTROLS (CANADIAN ENGLISH)....31
PARENTAL CONTROLS (CANADIAN FRENCH) 32
PARENTAL CONTROLS (PASSWORD EDIT) 33
INPUT MENUS....34
FAVORITE BUTTONS....35
5. APPENDIX
WALL MOUNT AND SAFETY BRACKET OPTIONS 37
WALL MOUNT AND SAFETY BRACKET OPTIONS 38
32 INCH HIGH DEFINITION LCD TV SPECIFICATIONS.... 39
42 INCH HIGH DEFINITION LCD TV SPECIFICATIONS.... 39
TROUBLESHOOTING....41
CLEANING THE HIGH DEFINITION LCD TV 43

If you have any questions or concerns, Please call our toll free number 1-866-287-5555
Owner's Record
The model and serial numbers are located on the back of the TV. Keep a record of the numbers in the spaces provided below. Refer to them whenever you call upon your Westinghouse Digital dealer regarding this product.
Model No.
Serial No.
1
PRODUCT SAFETY
Explanations of required symbols :
| SYMBOL | SYMBOL DEFINITION |
 SA 1965 SA 1965 | DANGEROUS VOLTAGE:The lightning flash with arrowhead symbol, within on equi-lateral triangle, is intended to alert the user to the presence of uninsulated "dangerous voltage" within the product's enclosure that may be of sufficient magnitude to constitute a risk of electrical shock to persons. |
 SA 1966 SA 1966 | INSTRUCTIONS:The exclamation point with on equilateral triangle is intended to alert the user to the presence of important operating and maintenance (servicing) instructions in the literature accompanying the appliance. |
1 PRODUCT SAFETY
Safety Guidelines
WARNING: This device must be operated with the original power supply, part number DPS-210 EP 2 C.
CAUTION: The power supply outlet should be located near High Definition LCD TV and should be easily accessible. Always use the appropriate AC cord that is certified for your specific country. Some examples are listed below:
USA......UL
Switzerland ..... SEV
Canada.....CSA
Britain ...... BASE/BS
Germany......VDE
Japan ...... Electric Appliance Control Act
IMPORTANT NOTICE CONCERNING POWER CORD SELECTION
The specific power cord for this High Definition LCD TV is enclosed and has been selected according to the country of destination and must be used to prevent electric shock. Use the following guidelines if it is necessary to replace the original cord set, or if the cord set is not enclosed. The female receptacle of the cord set must meet IEC-60320 requirements and should look like Figure A1 below:
Figure A1 Figure A2

For the United States and Canada
In the United States and Canada the male plug is a NEMA5-15 style (Figure A2), UL Listed, and CSA Labeled. For High Definition LCD TVs that are placed on a desk or table, type SVT or SJT cord sets may be used. For High Definition LCD TVs placed directly on the floor, only SJT type cord sets may be used. The cord set must be selected according to the current rating for the High Definition LCD TV. Please consult the table below for the selection criteria for power cords used in the United States and Canada.
| Cord Type | Size of Conductors in Cord | Maximum Current Rating of Unit |
| SJT | 18 AWG | 10 Amps |
| 16 AWG | 12 Amps | |
| 14 AWG | 12 Amps | |
| SVT | 18 AWG | 10 Amps |
| 17 AWG | 12 Amps |
FCC Compliance Statement
This equipment has been tested and complies with the limits for a Class B digital device, pursuant to part 15 of the FCC Rules. These limits are designed to provide reasonable protection against harmful interference in a residential installation. This equipment generates, uses, and can radiate radio frequency energy, and may cause harmful interference to radio communications if not installed and used in accordance with the instructions. However, there is no guarantee that interference will not occur in a particular installation. If this equipment does cause harmful interference to radio or television reception, which can be determined by turning the equipment off and on, the user is encouraged to try to correct the interference by one or more of the following measures:
• Reorient or relocate the receiving antenna.
- Increase the separation between the High Definition LCD TV and receiver.
- Connect the equipment into an outlet on a circuit different from that to which the receiver is connected.
- Consult the Westinghouse Service Center or an experienced radio/TV technician for assistance.
FCC Warning
To assure continued FCC compliance, the user must use a grounded power supply cord and the provided shielded video interface cable with bonded ferrite cores. If a BNC cable used, use only a shielded BNC (5) cable. Also, any unauthorized changes or modifications not expressly approved by Westinghouse Digital will void the user's authority to operate this device.
1
PRODUCT SAFETY
Product Safety Instructions
Follow and obey all warnings and instructions marked on the High Definition LCD TV. For your safety, please read all the safety and operating instructions before you operate the High Definition LCD TV. Keep this user's manual for future reference.
Important Safety Instructions
- Read these instructions.
- Keep these instructions.
- Heed all warnings.
- Follow all instructions.
- Do not use this apparatus near water.
- Clean only with dry cloth.
- Do not block any ventilation openings. Install in accordance with the Manufacturer's instructions.
- Do not install near any heat sources such as radiators, heat registers, stoves, or other apparatus (including amplifiers) that produce heat.
- Do not defeat the safety purpose of the polarized or grounding type plug. A polarized plug has two blades with one wider than the other. A grounding type plug has two blades and a third grounding prong. The wide blade or the third prong are provided for your safety. If the provided plug does not fit into your outlet, consult an electrician for replacement of the obsolete outlet.
- Protect the power cord from being walked on or pinched particularly at plugs, convenience receptacles, and the point where they exit from the apparatus.
- Only use attachments/accessories specified by the manufacturer.
- Use only with the cart, stand, tripod, bracket, or table specified by the manufacturer, or sold with the apparatus. When a cart is used, use caution when moving the cart/apparatus combination to a void injury from tip-over.
- Unplug this apparatus during lightning storms or when unused for long periods of time.
- Refer all servicing to qualified service personnel. Servicing is required when the apparatus has been damaged in any way, such as power-supply cord or plug is damaged, liquid has been spilled or objects have fallen into the apparatus, the apparatus has been exposed to rain or moisture, does not operate normally, or has been dropped.
Other Notices
- Avoid exposing the High Definition LCD TV to direct sunlight or high temperatures.
- Avoid exposing the High Definition LCD TV to moisture or high humidity
- Do not attempt repairs yourself. Your warranty does not cover repairs or attempted repairs by anyone not authorized by the manufacturer
- If your High Definition LCD TV will not be used for a long period of time, unplug the High Definition LCD TV and remove the batteries from the remote control
- Only use attachments/accessories specified by the manufacturer.
- Avoid touching the screen. Skin oils are difficult to remove.
- Never remove the rear cover. Your High Definition LCD TV contains high-voltage parts. You may be seriously injured if you touch them.
• Always handle your LCD display with care when moving it. - If the High Definition LCD TV emits smoke, abnormal noise, or a strange odor, immediately turn it off and contact the Westinghouse Service Center.
1
PRODUCT SAFETY
Antenna Installation Safety
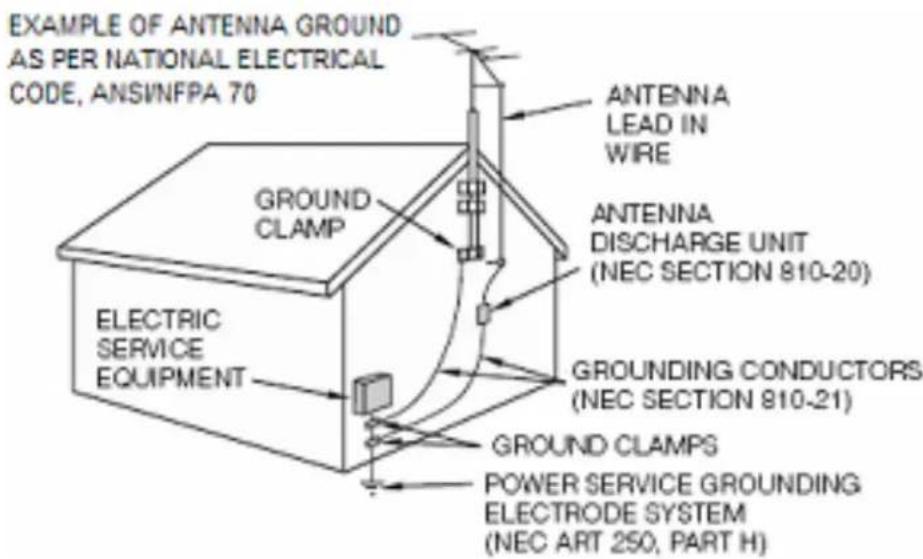
Outdoor Antenna Grounding
If an outside antenna or cable system is connected to the High Definition LCD TV, be sure the antenna or cable system is grounded to prevent voltage surges and built-up static charges. Article 810 of the National Electrical Code, ANS/NFPA 70, provides information on proper grounding of the mast and supporting structure, grounding of the lead-in wire to an antenna discharge unit, connection to grounding electrodes, and requirements for the grounding electrode.
Lightning
For added protection for the High Definition LCD TV during a lightning storm, or when it is left unattended and unused for long periods of time, unplug it from the wall outlet and disconnect the antenna or cable system. This will prevent damage to the High Definition LCD TV due to lightning and power-line surges. Do not disconnect the antenna or the power cord during a heavy storm – lightning may strike while you are holding the cable cord, causing serious injury. Turn off your High Definition LCD TV and wait for the weather to improve.
Power Lines
An outside antenna system should not be located in the vicinity of overhead power lines or other electric light or power circuits. When installing an outside antenna system, extreme care should be taken to keep from touching such power lines or circuits.
2 A GUIDE TO DIGITAL TELEVISION
What Is Digital Television?
Digital television is a new way of transmitting high quality video and audio to your TV set. Using digital television, broadcasters can transmit high definition TV (HDTV) images. This High Definition LCD TV has a built-in digital television tuner. The advantage of an integrated digital television set is that it can tune both analog and digital TV channels. All you'll need to do is to add an external antenna and you are ready to watch digital television.
Digital Television Picture
Digital television programs are transmitted in two different formats. The first is Standard Definition Television (SDTV) and the second is High Definition Television (HDTV).
SDTV program formats include 480-line interlaced (480i) and 480-line progressive (480p) video. 480i programs are essentially a digital version of our current analog TV programs, while the 480p format offers improved image detail over 480i. Some 480p programs are broadcast in widescreen and are comparable to progressive-scan DVD movies in image quality.
HDTV and standard definition television (SDTV) are the two categories of display formats for digital television transmissions. HDTV provides a higher quality display with a vertical resolution display of 720p or 1080i. The “p” stands for progressive scanning, which means that each scan shows every line for a complete picture at 1/60^th of a second. The “i” stands for interlaced scanning which first shows every odd line at one scan of the screen and then follows with every even line in the second scan for a complete picture at 1/30^th of a second. Both HDTV formats are always broadcast in widescreen, and both offer much higher picture quality than SDTV.
2 A GUIDE TO DIGITAL TELEVISION
A Guide to Digital Channels
There is a new numbering system for digital channels. Digital television virtual channels consist of a number followed by a dash and then another number. The first number is the major channel number specific to a broadcasting station. The second number is the minor channel number that allows these broadcasting stations to use the same major channel number for all analog and digital channels because digital channels can carry multiple programs simultaneously. The old analog channels are always referenced to minor channel number 0, for example 11-0.
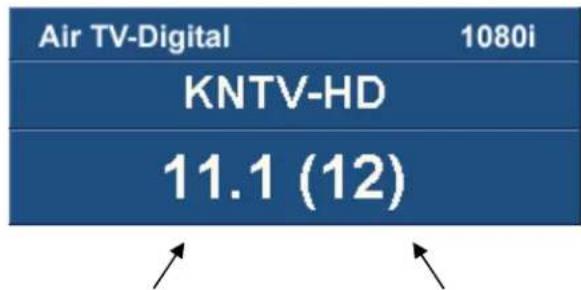
Digital Virtual Channel Number Physical Channel Number
The channel number in parentheses represents the actual physical channel number of the transmitter used to broadcast the network programming in your region. Each physical channel number is mapped to one or more digital channel numbers. In the example above, digital channel number 11.1 is mapped to physical Channel 12 and tunes into channel 12.
Some digital television stations may have only one virtual channel, others perhaps as many as six. So in the example above, the station using physical Channel 12 for digital television can have additional digital channels 11.2, 11.3, etc.
How to input digital television channels:
| User Inputs | Channel Displayed | |
| Method 1: | 11.3 | Channel 11.3 |
| Method 2: | 113 | Channel 11.3 |
For single digit channels:
| User Inputs | Channel Displayed | |
| Method 3: | 052 | Channel 5.2 |
| Method 4: | 5.2 + Ent | Channel 5.2 |
Check your local listings for available digital television channels in your area.
2
A GUIDE TO DIGITAL TELEVISION
The Electronic Program Guide
Your Westinghouse High Definition LCD TV has an Electronic Program Guide (EPG) to help you navigate through all the possible viewing options. The EPG supplies information, such as program lists, the start and end times of all available channels, and a detailed description of the program. The availability and the amount of program details will vary depending on the broadcaster. You can use the 'Guide' button on the remote control or select EPG from the TV OSD menu to display the Electronic Program Guide. The EPG begins its list with the channel that is currently active.
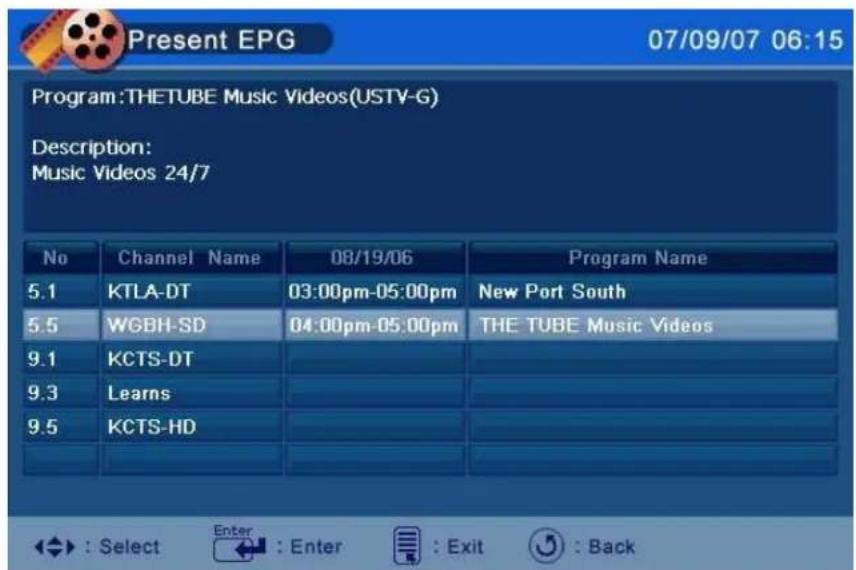
1. Channel Number
Shows the current physical channel number and all the available virtual channels.
2. Program Time
Displays the program start and end times.
3. Abstract
Displays detailed information for the selected digital program. The availability of detailed information depends on the broadcaster.
4. Current Time and Date
Shows the current time and date.
5. Event Titles
Displays the title of upcoming programs.
Help Instructions
List of available commands while in the Electronic Program Guide.
- Use the arrow keys and the Channel up/down buttons on the remote control to scroll through the Electronic Program Guide.
- Press Enter (the Enter) button on the remote to step into a sub section or press Back (the Last Channel) button on the remote to step back a section.
3 INSTALLATION
Package Contents
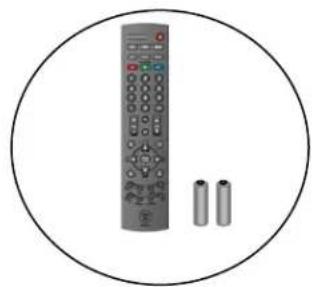
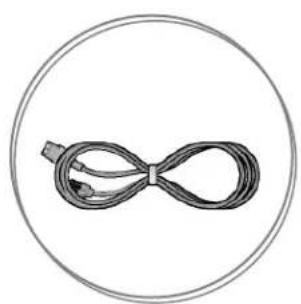
Your product package includes:
• Westinghouse High Definition LCD TV
- Remote Control (with batteries)
- Power Cord
- User's Manual
- Warranty Card
natural_image
Retro television remote with two batteries, enclosed in a circle (no text or symbols visible)User's Manual Remote Control & Batteries
natural_image
Simple line drawing of a bow-shaped cable with connectors, enclosed in a circle (no text or symbols)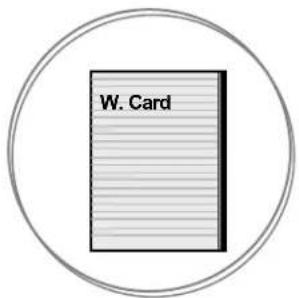
Power Cord Warranty Card
3
INSTALLATION
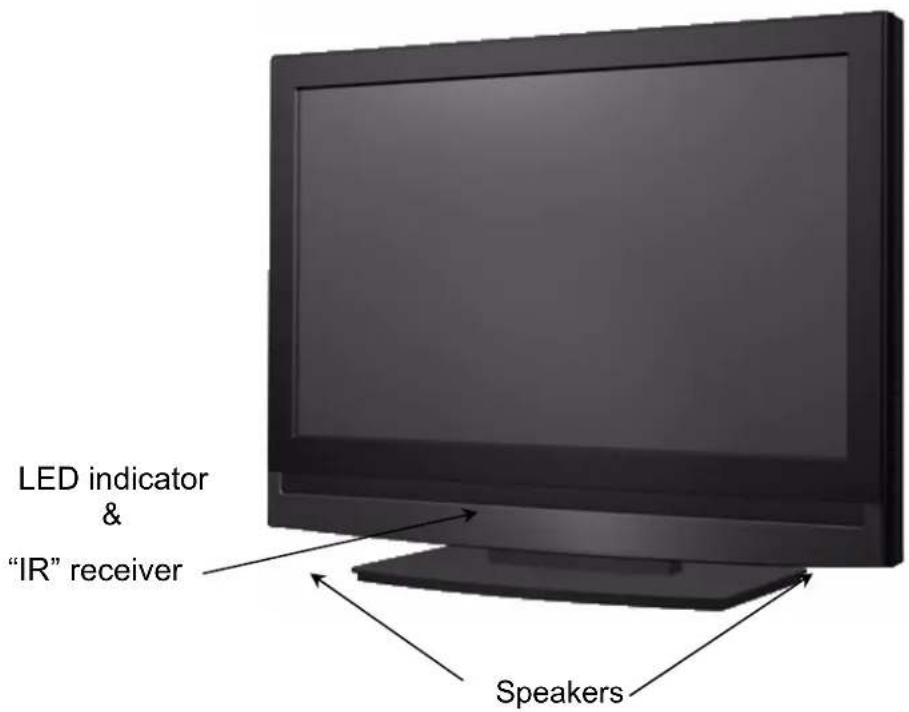
Front View of the High Definition LCD TV
Use the buttons on the right side of the High Definition LCD TV or the buttons on the remote control to display the On Screen Display (OSD) menu and adjust the High Definition LCD TV options. The OSD controls are defined in "OSD Functions" on page 18.
3
INSTALLATION
Side View of the High Definition LCD TV
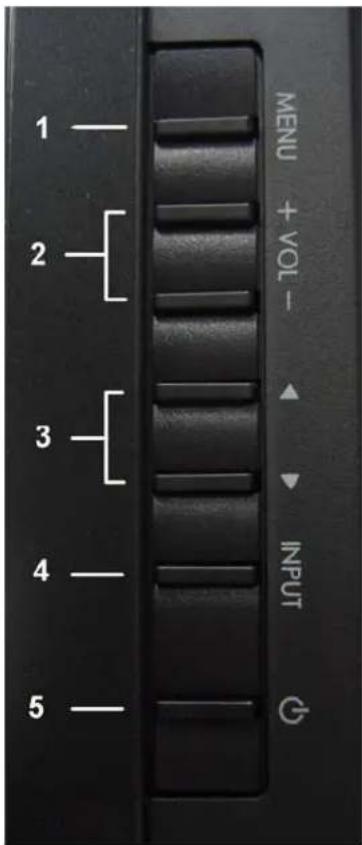
| 1. Menu Turn OSD Menu ON/OFF | |
| 2. Volume + / - | Increase/Decrease sound volume or adjust a highlighted control while in OSD Menu |
| 3. Channel ▲ / ▼ | Channel up/down when source is TV or select a control while in OSD Menu |
| 4. Input | Select Active Video source or a highlighted control while in OSD MENU |
| 5. Power Button Power ON/OFF | |
3
INSTALLATION
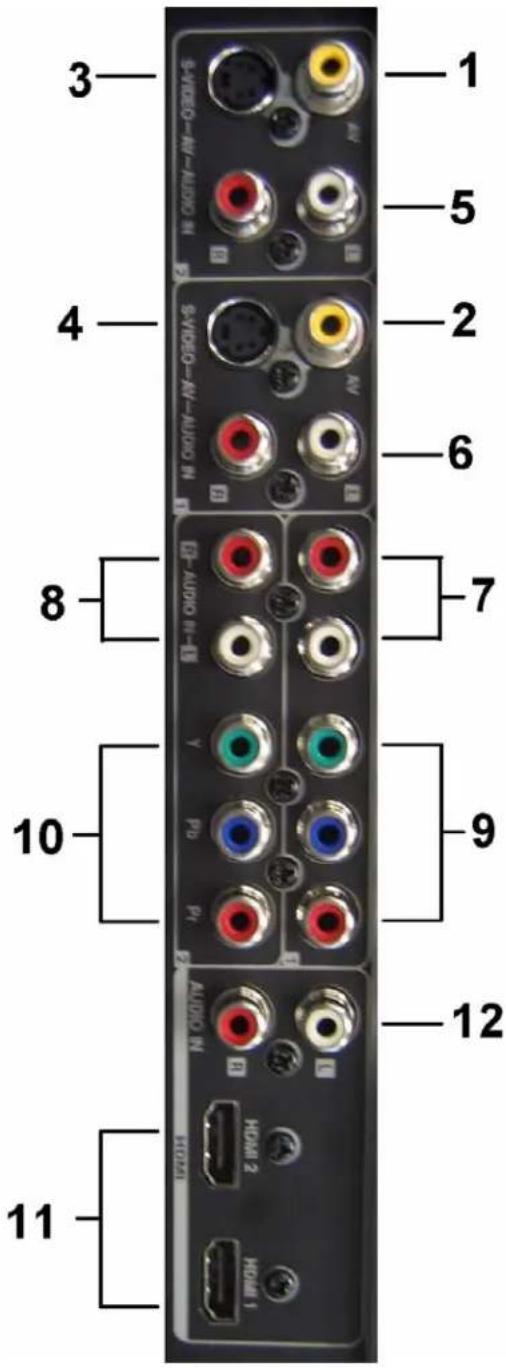
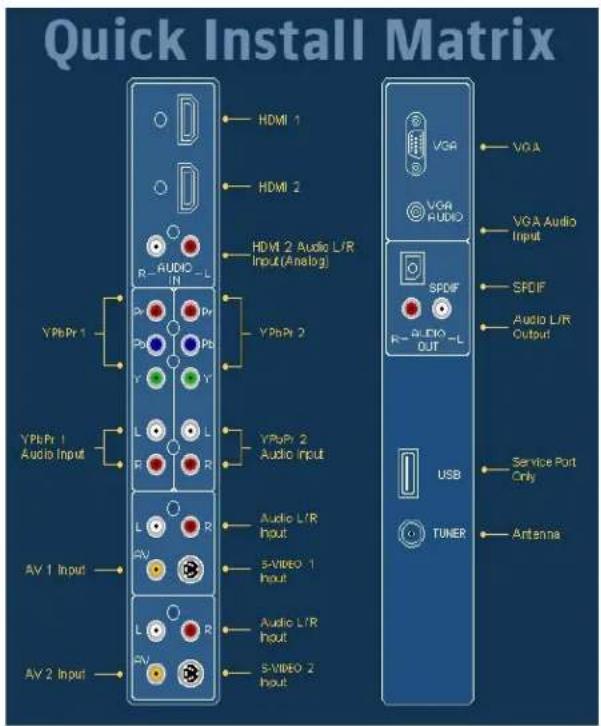
SIDE CONNECTORS
1. AV Video 1
Connect the composite video to an external video device such as a VCR.
2. AV Video 2
Connect the composite video to an external video device such as a VCR.
3. S-Video 2
Connect the S-video to an external video device such as a VCR.
4. S-Video 1
Connect the S-video to an external video device such as a VCR.
5. S-Video 2 & AV Video 2 Audio (Right / Left)
Connect the Left and Right Audio cables to the audio out of an external S-video or AV video device.
6. S-Video 1 & AV Video 1 Audio (Right / Left)
Connect the Left and Right Audio cables to the audio out of an external S-video or AV video device.
7. YPbPr 1 / Audio 1 (Right / Left)
Connect the Left and Right Audio cables to the audio out of an external device such as a DVD or gaming system.
8. YPbPr 2 / Audio 2 (Right / Left)
Connect the Left and Right Audio cables to the audio out of an external device such as a DVD or gaming system.
9. YPbPr 1
Connect the component video to an external video device such as a DVD or gaming system.
10. YPbPr 2
Connect the component video to an external video device such as a DVD or gaming system.
11. HDMI 1 / HDMI 2
Connect to an external HDMI device such as a DVD or cable/satellite receiver.
12. HDMI 2/ Audio (Right / Left)
Connect to an external HDMI audio device. Option to use analog audio for HDMI 2, open the OSD menu, and under the Audio menu, use the left/right arrow key to change Digital to Analog.
3
INSTALLATION
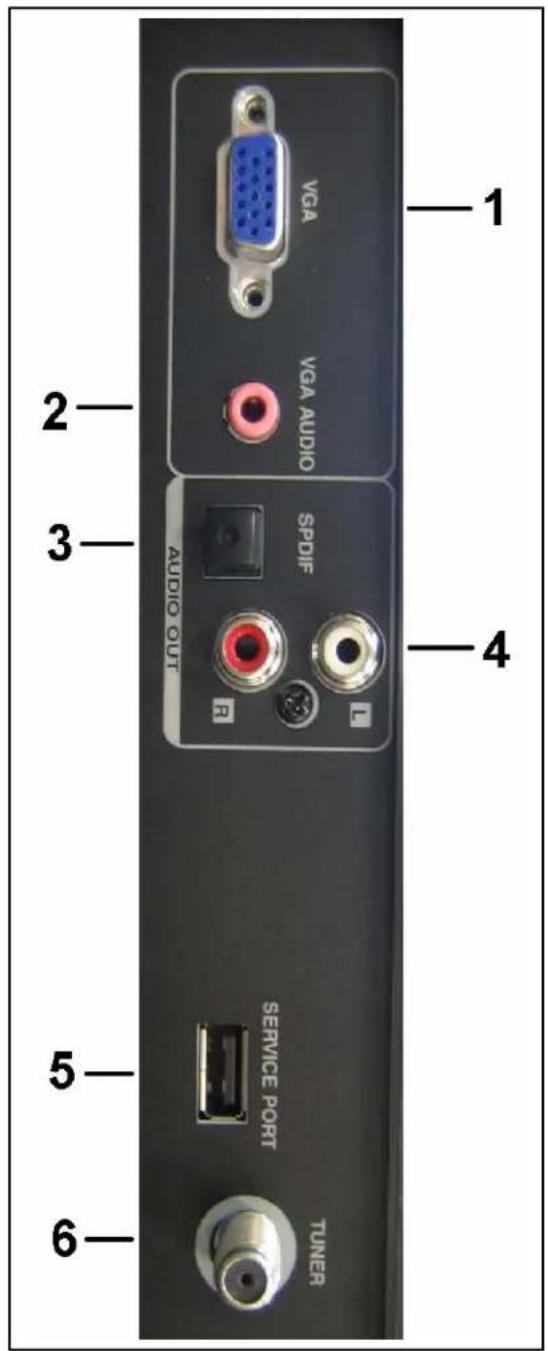
1. VGA
Using a 15-pin VGA cable, connect to a computer.
2. Audio-In (VGA)
Using a 3.5mm mini-jack cable, connect to the Audio out (Green) on a computer.
3. SPDIF
Digital Audio out connection
4. Audio Out (Right / Left)
Connect this output to an external audio amplifier.
5. USB
Connector used only for TV service.
6. ANT (RF-input)
Connect to the antenna or cable service.
3
INSTALLATION
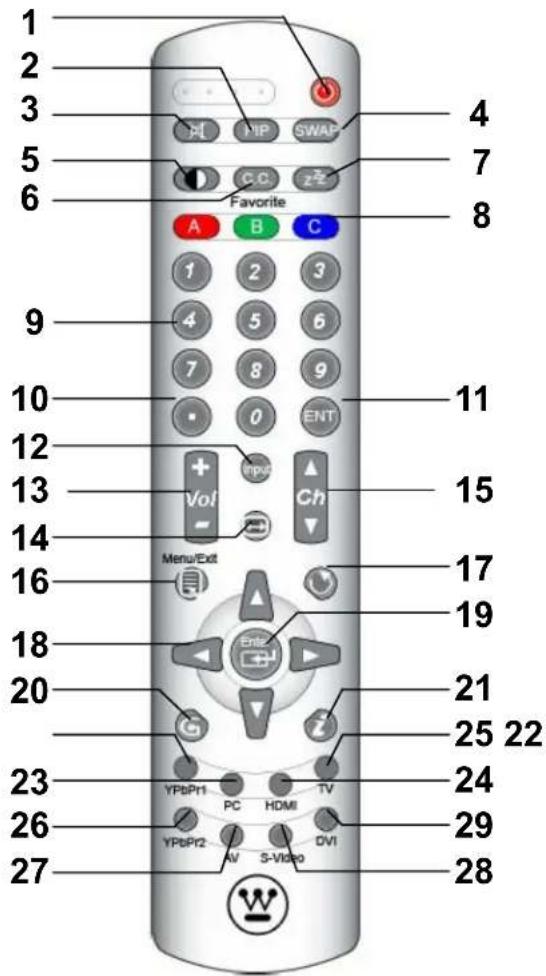
Remote Control
Use the Remote Control to adjust your Westinghouse High Definition LCD TV.
1. POWER
Switch the power On/Off
2. PIP
Display sub picture On/Off
3. MUTE
Turn the sound On/Off
4. SWAP
Switch between PIP and Main Picture
5. BACKLIGHT
Shortcut to adjust backlight adjustment
6. CC
Turn Closed Caption On/Off
7. SLEEP
Set sleep timer
8. FAVORITE CHANNEL A / B / C
Jump to favorite channels (Hold button for 3 seconds to program favorite channel).
9. CHANNEL NUMBER KEYS
Select specific channels
10.DOT
To input dot when selecting specific channels
11. ENT
Complete channel selection
12. INPUT
Display OSD input menu (see page 34)
13. VOL - / +
Volume Up/Down adjustment
14. SCALING
Set video display format to "STANDARD", "FILL" or "Overscan"
15.CH ▼ / ▲
TV Channel Up/Down adjustment
16. MENU
Turn OSD Menu On/Off
17. LAST CHANNEL
Switch to previous channel
18. ▼ / ▲ / ◀ / ▶
Navigate within OSD Menu and Volume
19. ENTER
Make a selection
20.EPG
Display Electronic Program Guide
21.INFO
Display the source and channel
22. YPbPr1
Switch to YPbPr1 source
23.PC
Switch to VGA source
24.HDMI
Switch to HDMI sources
25.TV
Switch to TV source
26. YPbPr2
Switch to YPbPr2 source
27.AV
Switch to AV sources
28.S-VIDEO
Switch to S-Video sources
29. DVI
Switch to DVI source (not available)
3
INSTALLATION
Installation
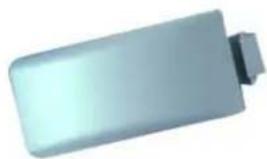
1. Insert Remote Control Batteries
1) Remove the battery cover.
2) Insert the batteries corresponding to the (+) and (−) marks on the battery compartment.
natural_image
Exterior view of a modern office building (no signage)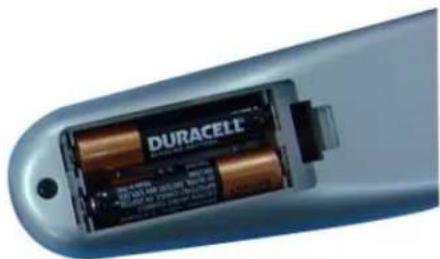
natural_image
Interior view of a DURACELC battery showing internal components and casing (no text or symbols visible)3) Re-attach the battery cover.
CAUTION:
- Only use AAA batteries.
- Do not mix new and old batteries. This may result in cracking or leakage, which may pose a fire risk or lead to personal injury.
- Insert batteries according to (+) and (−) markings. Inserting the batteries incorrectly may result in cracking or leakage, which may pose a fire risk or lead to personal injury.
- Dispose of used batteries in accordance with local laws and regulations.
- Keep batteries away from children and pets.
- When the remote control will not be used for an extended period, remove the batteries.
3 INSTALLATION
2. Connect the High Definition LCD TV to a computer
IMPORTANT:
Before you begin, make sure all devices are turned off.
VGA CONNECTION: Connect an analog VGA cable from your computer VGA OUT port to the High Definition LCD TV VGA IN port.
AUDIO CONNECTION: Connect a stereo mini cable from the computer's AUDIO OUT port to the AUDIO IN port on the High Definition LCD TV.
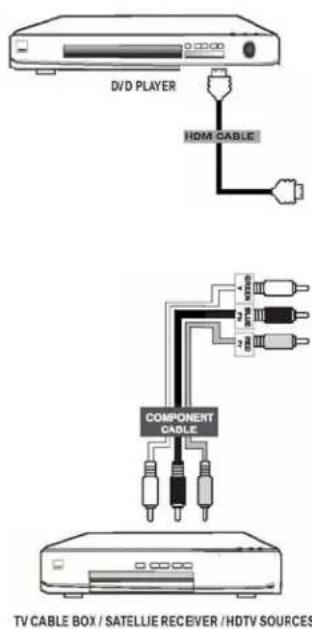
3. Connect the High Definition LCD TV to AV Devices
Connect one or all of the following compatible devices into the back of the High Definition LCD TV.
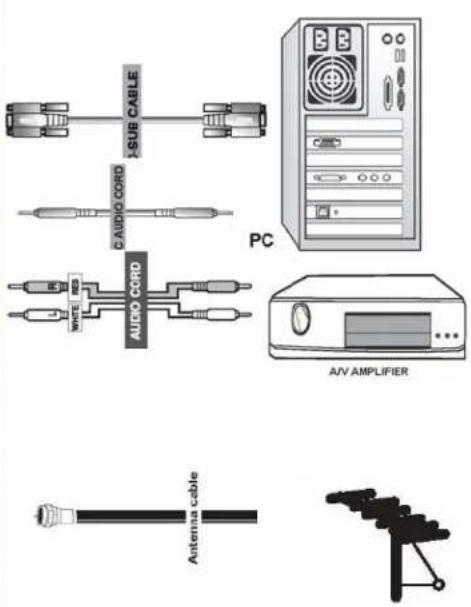
3
INSTALLATION
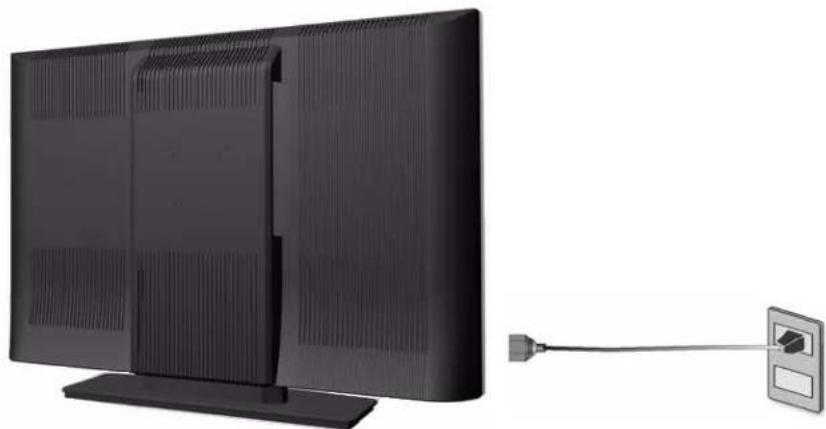
4. Connect power cable and power on the High Definition LCD TV
Connect the power cord to the High Definition LCD TV then to a properly grounded AC outlet and press power to turn on the High Definition LCD TV.
NOTE: The High Definition LCD TV will take a few seconds to power up.
natural_image
Exterior view of a modern flat-screen TV with a cable and connector attached (no text or symbols visible)5. Turn on your computer
The High Definition LCD TV will auto adjust to the resolution of the computer.
6. Turn on the cable box or satellite receiver
If using DVI or HDMI connection, the cable box or satellite receiver will need to be restarted to complete HDCP authentication to view the picture.
7. Select an input source for the High Definition LCD TV using the OSD menu or remote control
8. If connecting to an Antenna, Cable or other RF source, run Autoscan to receive all available channels:
- Press the 'Menu' key on the remote or side panel and use the left/right arrow keys to select the TV menu.
- Use the up/down arrow keys to select "Tuner Source".
- Use the arrow keys to select your signal source "Air/Cable/IRC/HRC".
- After selecting your signal source, use the up/down arrow keys to select "Auto Scan". Press "Enter" to start scanning for channels.
- This will take a few minutes to identify analog and digital channels.
9. If connecting to a computer:
For the best picture quality, set PC timing mode to 1366x768 at 60Hz. Refer to your computer's graphic card user guide for questions on how to set this timing mode.
3 INSTALLATION
Many computers show VESA* 1360x768 as an alternative resolution.
* VESA is a trademark of Video Electronics Standards Association. All other trademarks are the property of their respective owners.
4
OSD FUNCTION
OSD (On Screen Display) Function
Main Menu
To select a sub-menu, press ▲/▼ on the right side of the High Definition LCD TV or the
▲/▼ key on the remote control.
OSD Main Menu
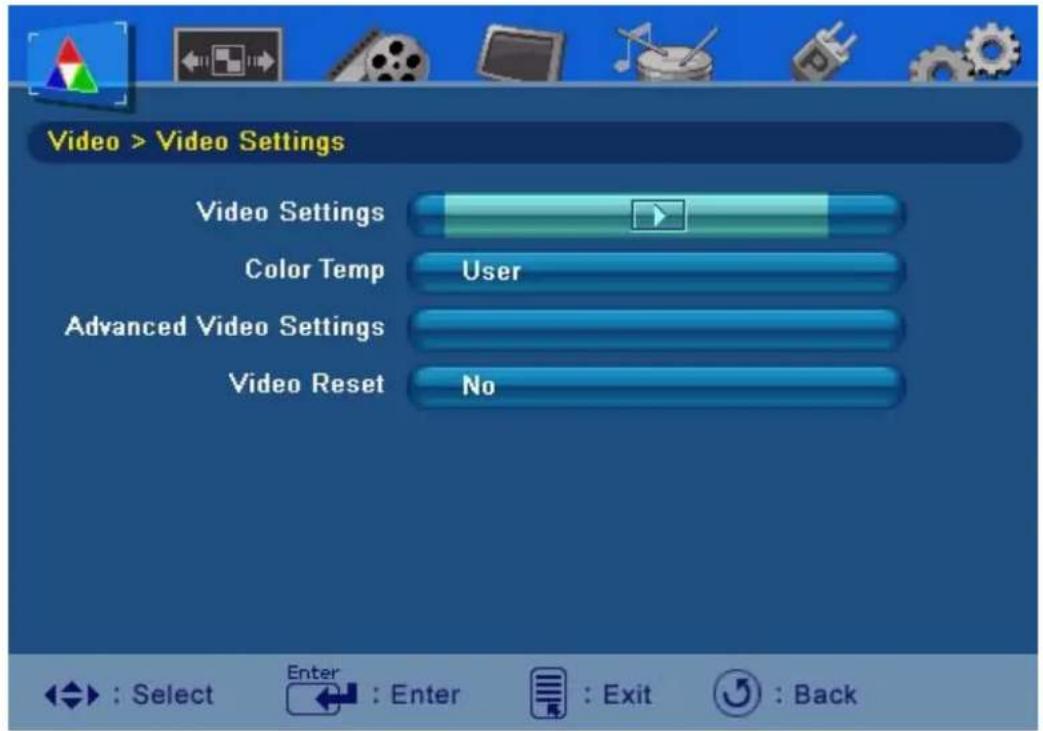
Navigation Menu
Provides functions needed to navigate through the OSD
To display the OSD main menu, press the Menu button on the right side of the High Definition LCD TV or the MENU key on the remote control. Use the ◀ / ▶ arrow keys to highlight the desired OSD Main Menu.
4
OSD FUNCTION
Video
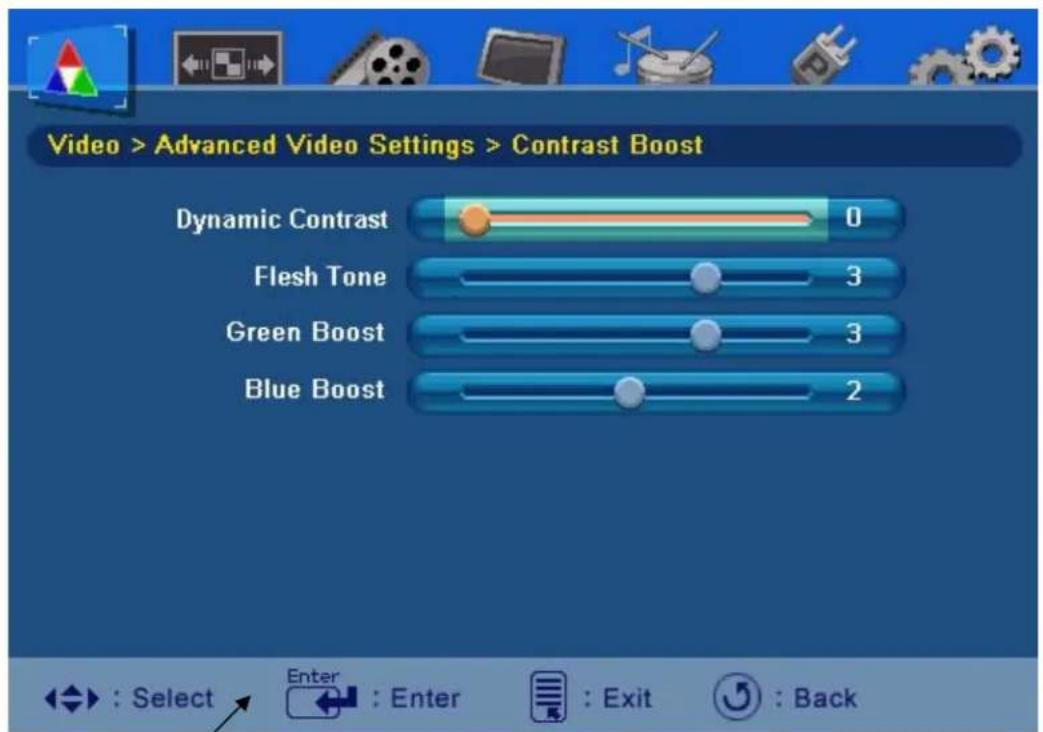
Sub-Menu
List of functions under main menu.
| Function Name Function | |
| Dynamic Contrast Automatically adjusts the black level of the image | |
| Flesh Tone Automatically adjusts the skin color level of the image | |
| Green Boost Automatically increases the Green color of the image. | |
| Blue Boost Automatically increases the Blue color of the image. |
4
OSD FUNCTION
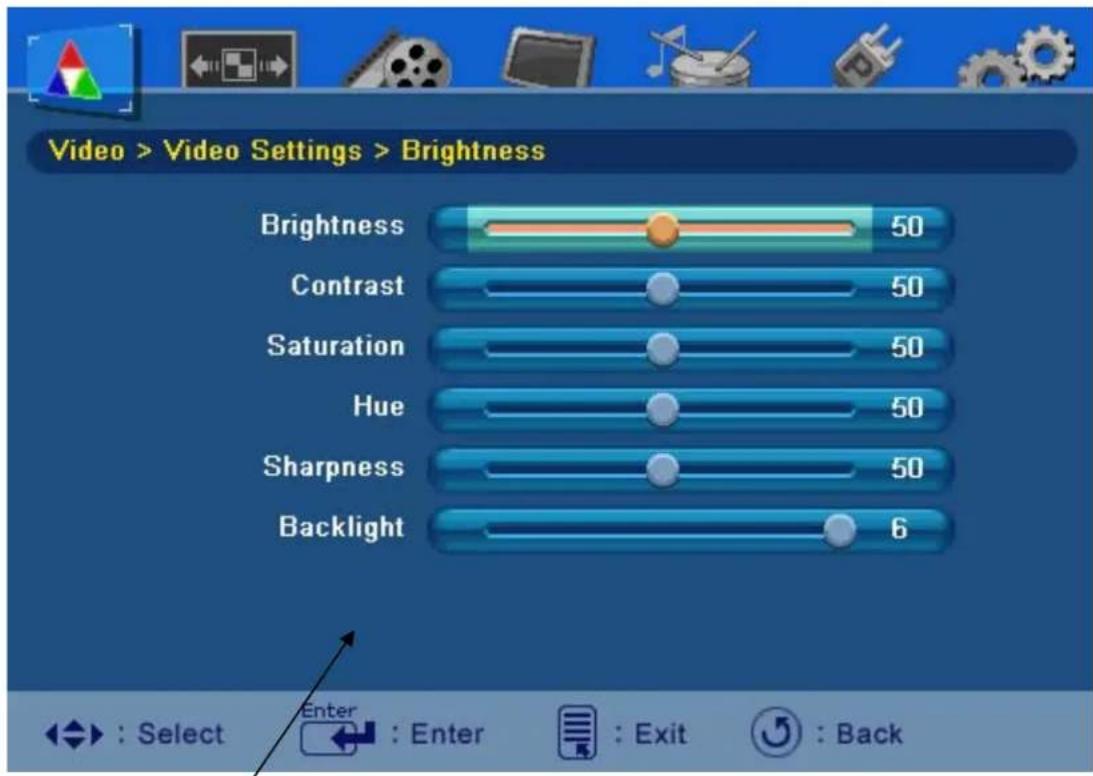
Sub-Menu
List of functions under main menu.
| Function Name Function | ||
| Brightness | Adjust the black level of the display. | |
| Contrast | Adjust the white level of the display. | |
| Color Adjust the intensity of the colors. | ||
| Hue Adjust the color towards either red or green. | ||
| Sharpness | Adjust the clarity of the picture. | |
| Backlight | Adjust the intensity of the lamp that illuminates the High Definition LCD TV. | |
| Video Reset Reset the video settings to the factory default. | ||
4
OSD FUNCTION
Display
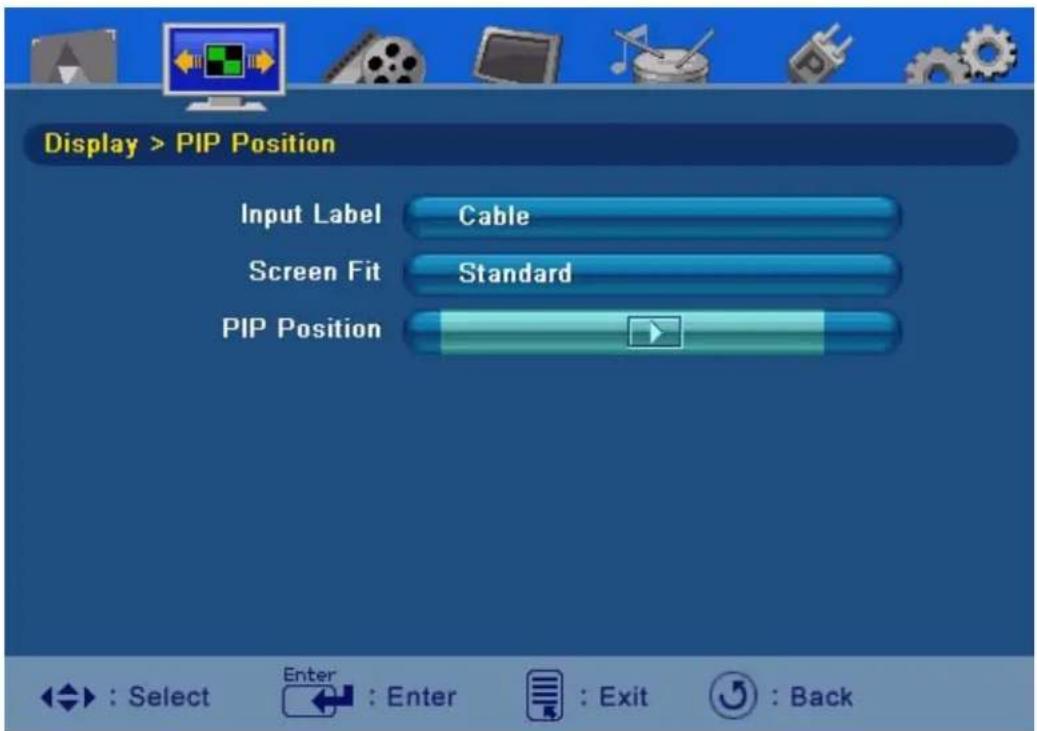
| Function Name Function | |
| Input Label | Change the input name of the current source to one of the labels in the input label list. If the input label is already used by another source, the label of the other source will be reset to the default label. |
| Screen Fit | Adjusts the ratio between the width of the picture and the height of the picture. 16:9 pictures will be displayed at its original format.Standard – conventional format used for viewing programs in their normal format.Fill – format that horizontally stretches pictures to the edge of the screen (some programs will be broadcasted with black or gray bars on the top and bottom or sides of the picture).Overscan – format that horizontally stretches pictures slightly over the edge of the screen |
| PIP Displays the picture in | picture input source menu. |
4
OSD FUNCTION
TV
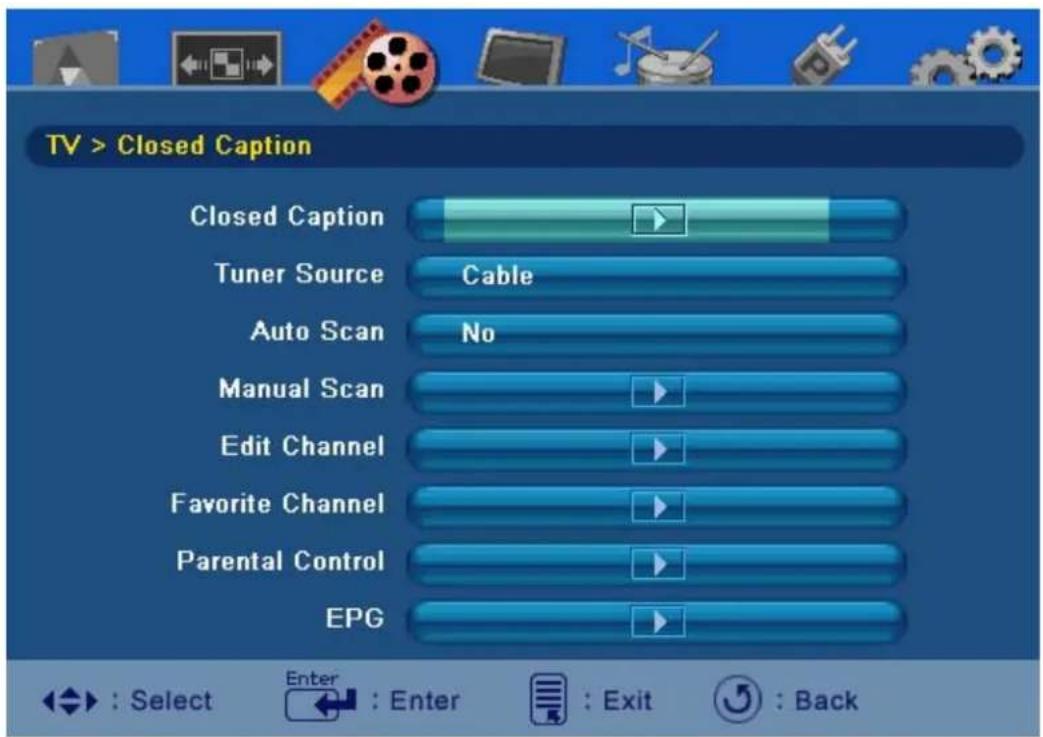
| Function Name | Function |
| Closed Caption | Enable / Disable closed captioning. Closed caption is used to visually communicate audio via text. |
| Tuner Source | Choose the type of RF input.Air - Normal over-the-air frequencyStd (Cable) – Standard frequency used for cable TVIRC (Cable) – Incrementally Related CarrierHRC (Cable) – Harmonically Related Carrier |
| Auto Scan | Automatically scans the tuner's range of frequencies for all viewable channels. |
| Manual Scan | Manually input physical channel number(s) and search for signal reception within that range. |
| Edit Channel | Displays the Main Channel List so that you can add / delete a channel from the current list of viewable channels. |
| Favorite Channel | Displays the Main Favorite Channel List so that you can add / delete a channel from the current list of viewable channels. |
| Parental Control | Displays the parental control menu, from which the user can adjust what content can and cannot be seen on this TV. See page 25 for more detail. |
| EPG | The electronic programming guide displays the list of available channels and the corresponding channel information (start time, end time, program title, program description) |
4
OSD FUNCTION
PC (VGA Only)
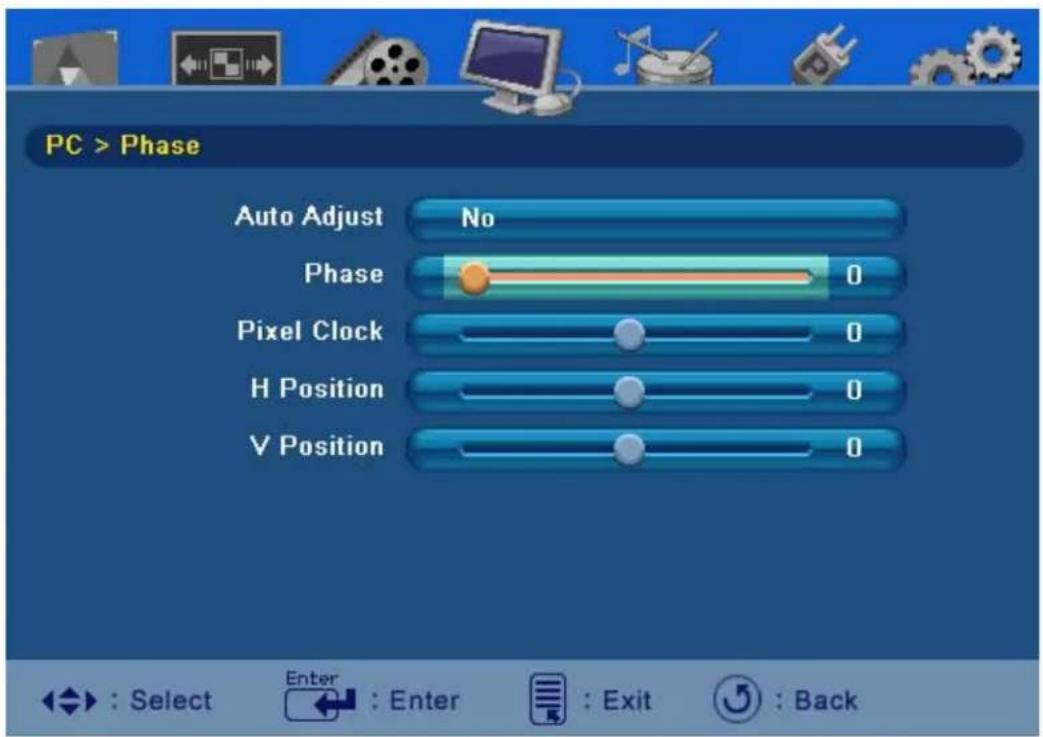
| Function Name Function | |
| Auto Adjustment | Automatically re-centers the image to the middle of the screen by synchronizing both vertical and horizontal refresh rate and resolution. |
| Phase | Manually adjust the Phase control to eliminate horizontal streaking. |
| Pixel Clock Manually adjust | the Horizontal pixel picture width. |
| H Position Manually adjust | the horizontal image on the screen. |
| V Position Manually adjust | the vertical image on the screen. |
4
OSD FUNCTION
Audio
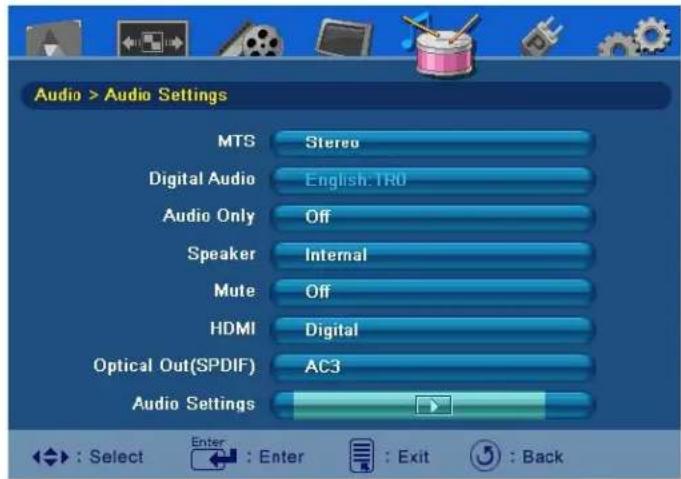
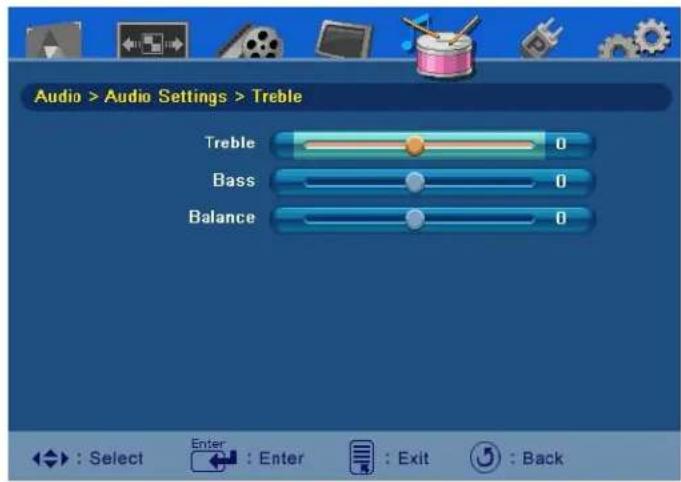
| Function Name | Function |
| MTS | Multi-Channel Television Sound consists of three different settings. Select one of the following:MonoStereoSAPS |
| Digital Audio Enable | language selection for digital channels. |
| Mute Turn audio on/off. | |
| Speaker Enable / Disable internal /external/both speakers. | |
| HDMI | Switches the HDMI audio input source to one of the following:Analog – RCA audio inputDigital – HDMI cable integrated audio input |
| Treble | Adjust the amount of Treble in the audio of Bass in the a |
| Bass | Adjust the amount |
| Balance Adjust the left and right audio balance. | |
4
OSD FUNCTION
Power Management
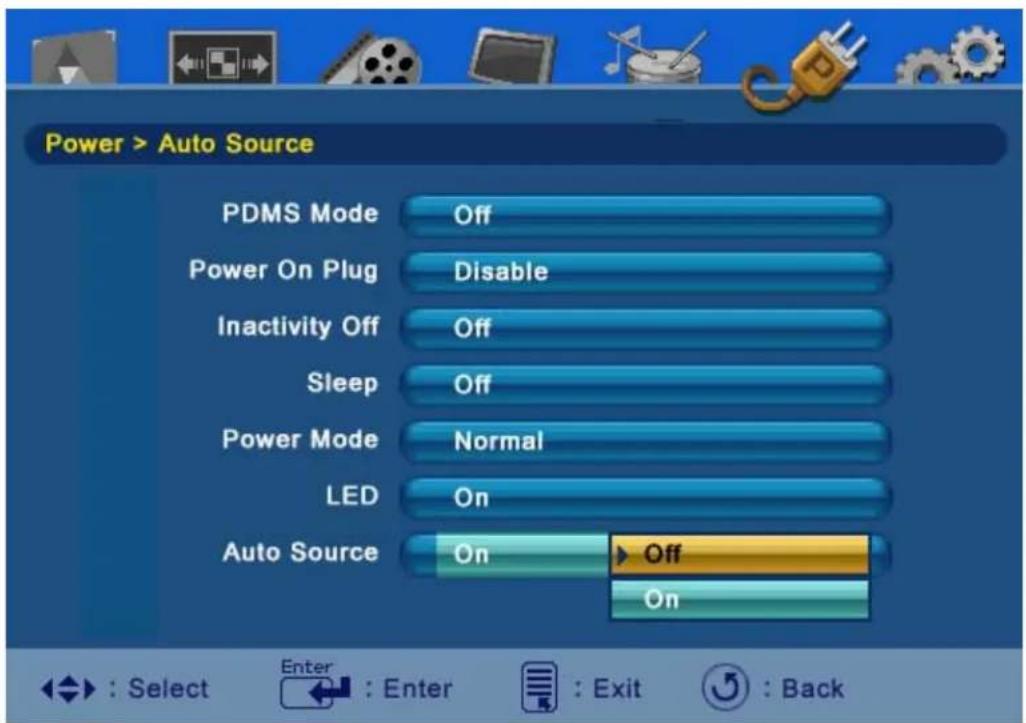
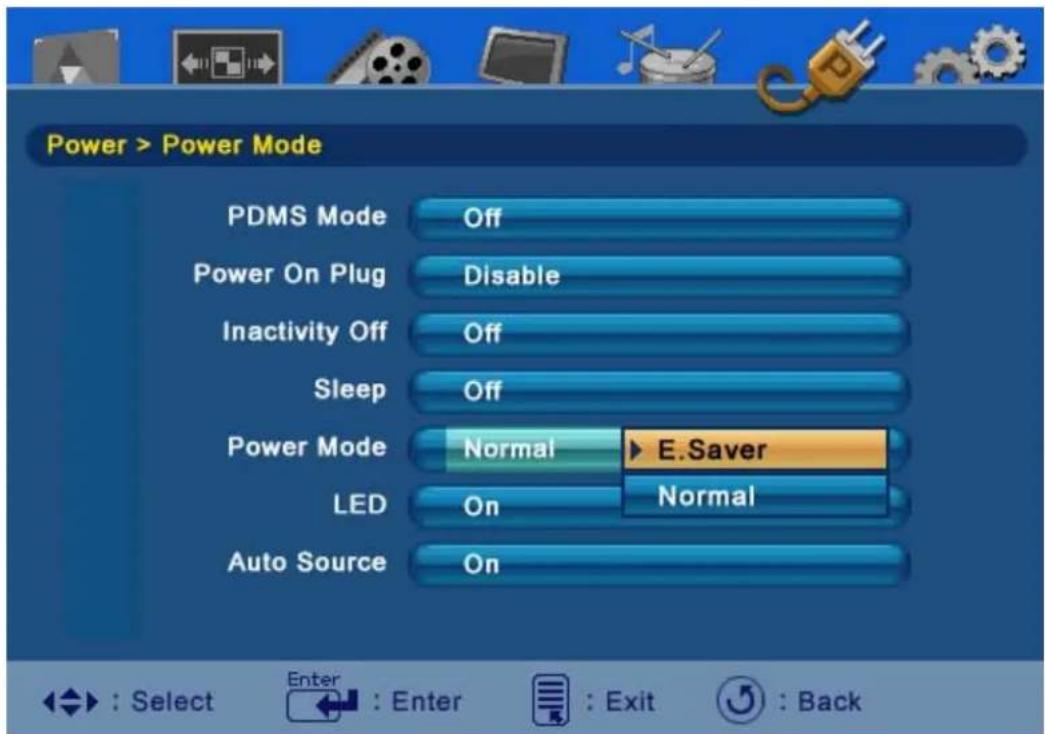
4
OSD FUNCTION
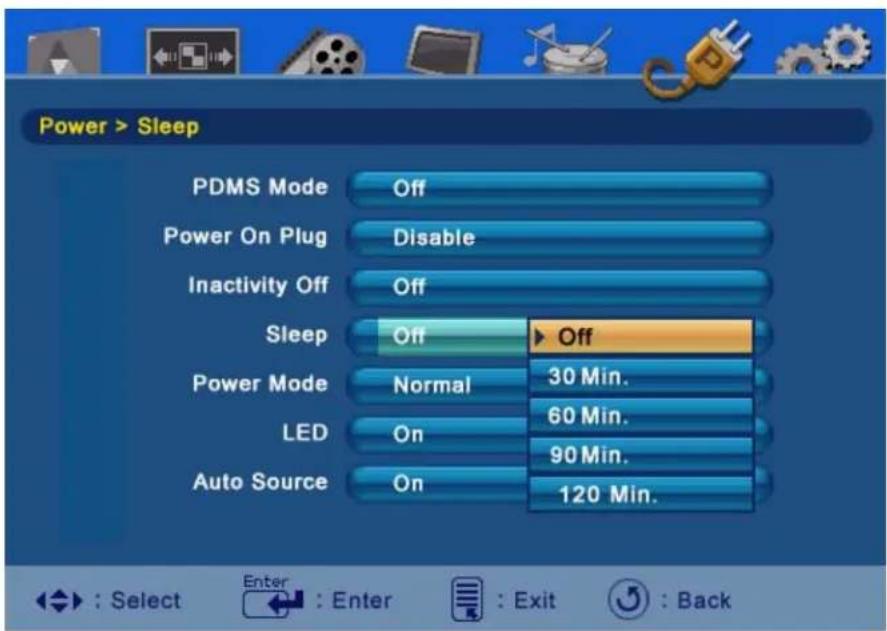
| Function Name Function | |
| DPMS Mode | Enable / Disable the Display Power Management Signaling which allows the display to go into Standby mode when there is no signal coming in from the selected input. |
| Power On Plug | Enable High Definition LCD TV to automatically turn on when power is restored. |
| Inactivity Off | Sets the High Definition LCD TV to turn off after a specified time of no remote or panel button presses. Four options available:Off1 hour3 hours6 hours |
| Sleep | Sets the High Definition LCD TV to turn off after a specified amount of time:Off30 minutes60 minutes90 minutes120 minutesNOTE: The High Definition LCD TV will take a few seconds to come back from sleep mode. |
| Power Mode | Sets the power boot up mode:E. Saver – takes longer to come back from Standby but requires less powerNormal – takes faster to come back from Standby but requires more power |
| LED Turns the LED on the TV on and off | |
| AutosourceTM | AutosourceTMwill detect a new incoming signal and automatically switch the input source to the connection of the new source’s device. |
4
OSD FUNCTION
Settings
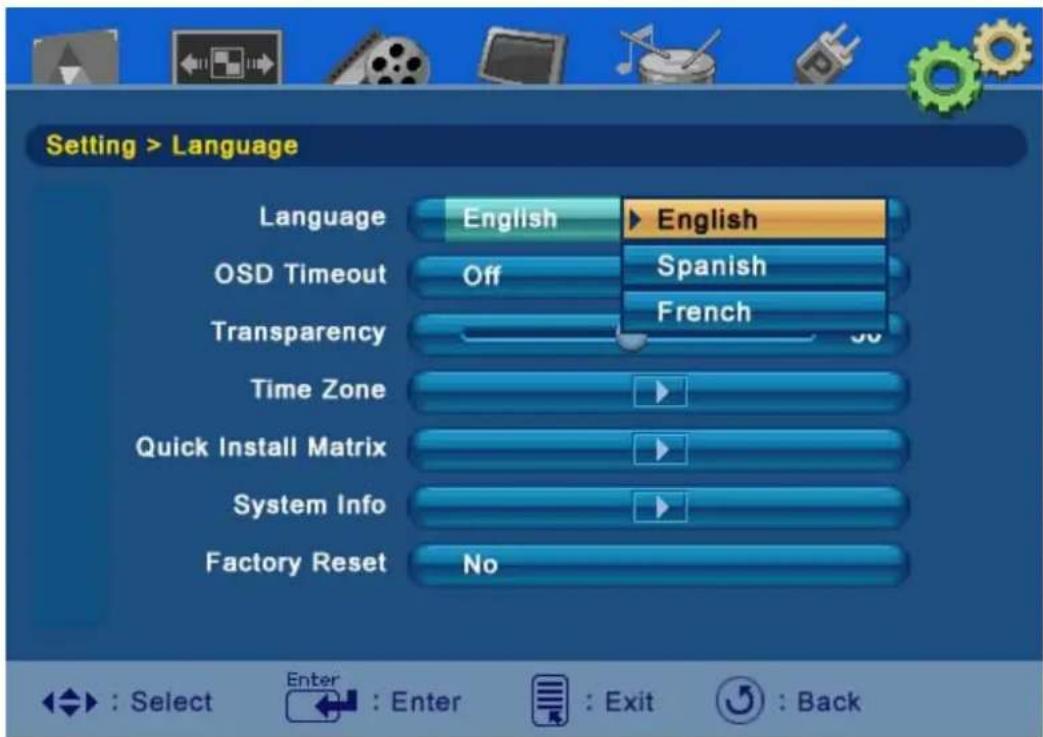
| Function Name | Function |
| Language | Switches the language of the OSD to one of the following:EnglishSpanishFrench |
| OSD Timeout | Sets the amount of time of inactivity before the OSD disappears.OFF5 seconds10 seconds30 seconds |
| Transparency Adjust | the level of transparency of the OSD. |
| Time Zone Set the High Definition LCD TV to the local time zone. | |
| Quick Install Matrix | Displays the Quick Install Matrix. |
| System Info Displays the system information. | |
| Factory Reset | Resets all OSD menu settings (except parental controls) of the High Definition LCD TV back to the factory defaults. |
4
OSD FUNCTION
Main Channel List
Use the OSD to access the Main Channel List.
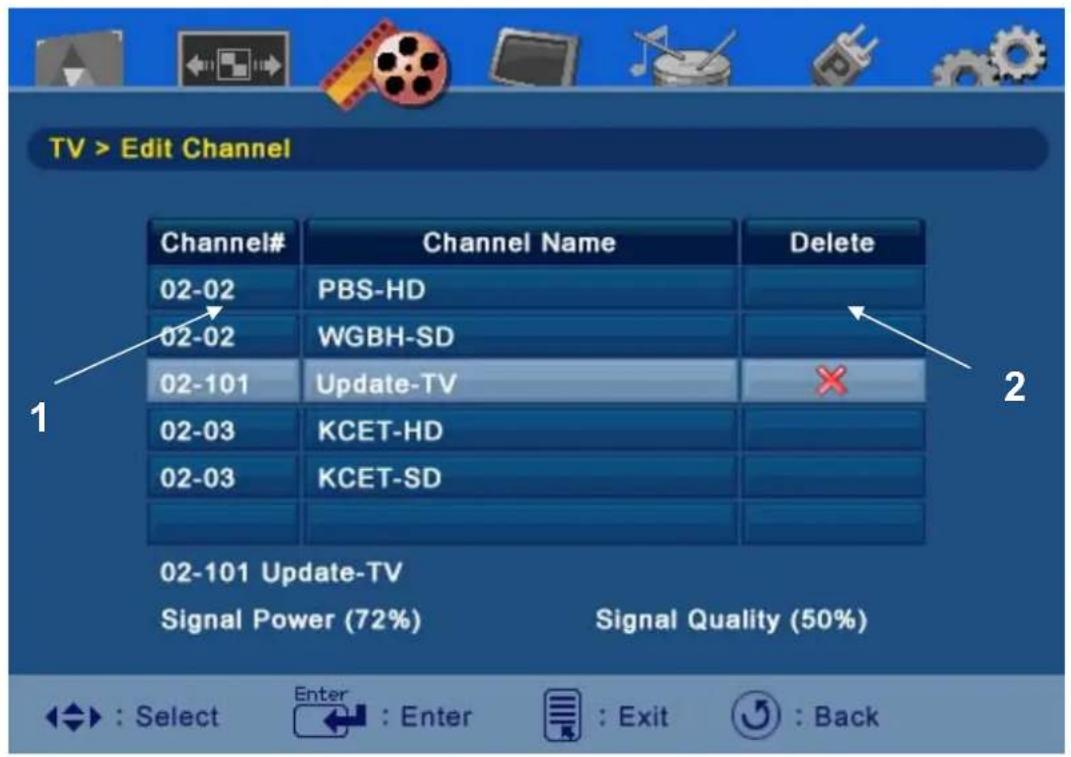
1. Channel Number
- Scroll to highlight a channel number from the list of available channels and press Enter to tune to that channel.
2. Channel Enable / Disable
- Enable or disable channel in list of channels.
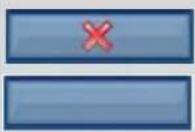
○ Channel will not be displayed when scrolling through channels.
○ Channel is included in the channel list.
4
OSD FUNCTION
Parental Controls
The Parental Control feature allows you to block TV programs based on their ratings and to lock out the keys on the right side of the High Definition LCD TV and can only be changed by entering the correct 4-digit password. When entering the parental control menu for the first time, you will be taken to the password submenu to setup a password. In order for the parental control feature to be activated, you must setup a password.
| Rating Type | Description | |
| MPAA | 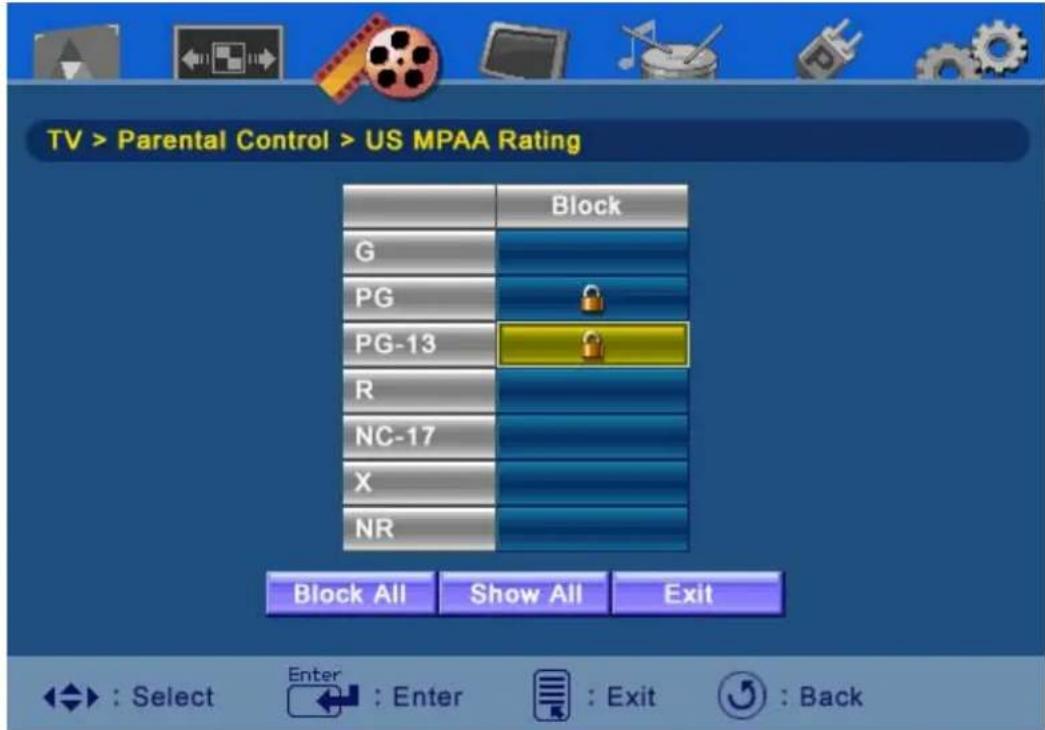 | |
| Rating Definitions | ||
| NR | Not available | |
| G | General audience | |
| PG | Parental guidance suggested | |
| PG-13 | Parents strongly cautioned | |
| R | Restricted | |
| NC 17 | No one 17 and under admitted | |
| X | Adult audience only | |
4
OSD FUNCTION
Parental Controls
| Rating Type | Description | |
| TV PG Rating | 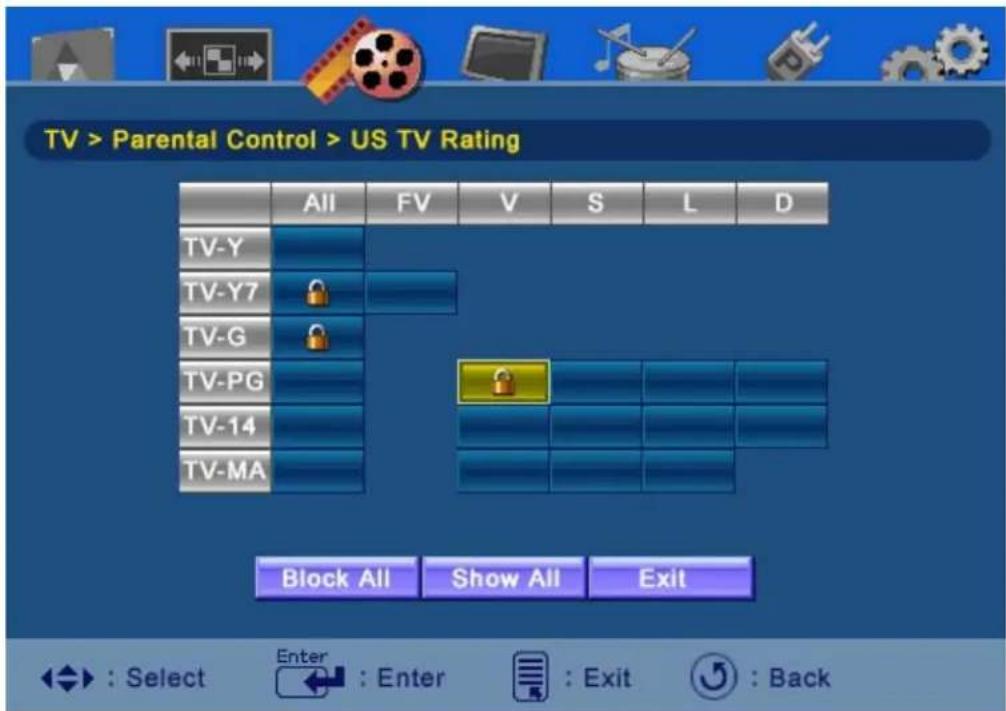 | |
| Rating Definitions | ||
| TV Y | All children | |
| TV Y7 | Directed to older children | |
| TV G | General audience | |
| TV PG | Parental guidance suggested | |
| TV 14 | Parents strongly cautioned | |
| TV MA | Mature audience only | |
| Content Definitions | ||
| All | All Content | |
| FV | Fantasy Violence | |
| D | Sexually Suggestive Dialog | |
| L | Adult Language | |
| S | Sexual Situation | |
| V | Violence | |
4
OSD FUNCTION
Parental Controls (Canadian English)
| Rating Type | Description | |
| Canadian English | 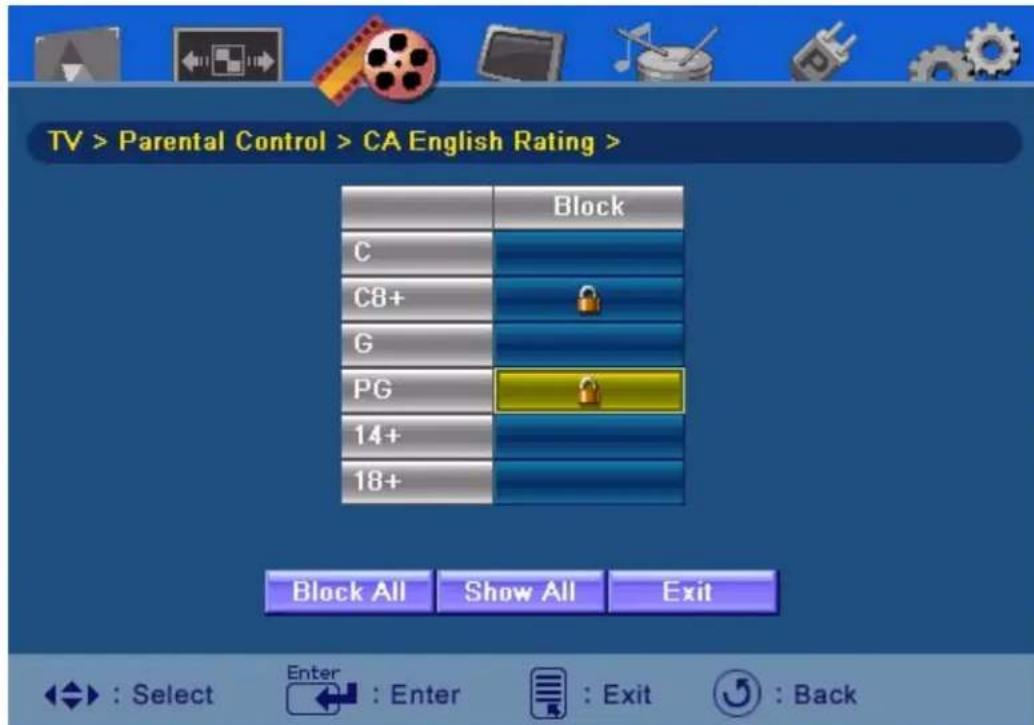 | |
| Rating Definitions | ||
| C | Children | |
| C8 | Children over 8 years | |
| G | General | |
| PG | Parental Guidance | |
| 14 | Over 14 years | |
| 18 | Adults | |
4
OSD FUNCTION
Parental Controls (Canadian French)
| Rating Type | Description | |
| Canadian French | 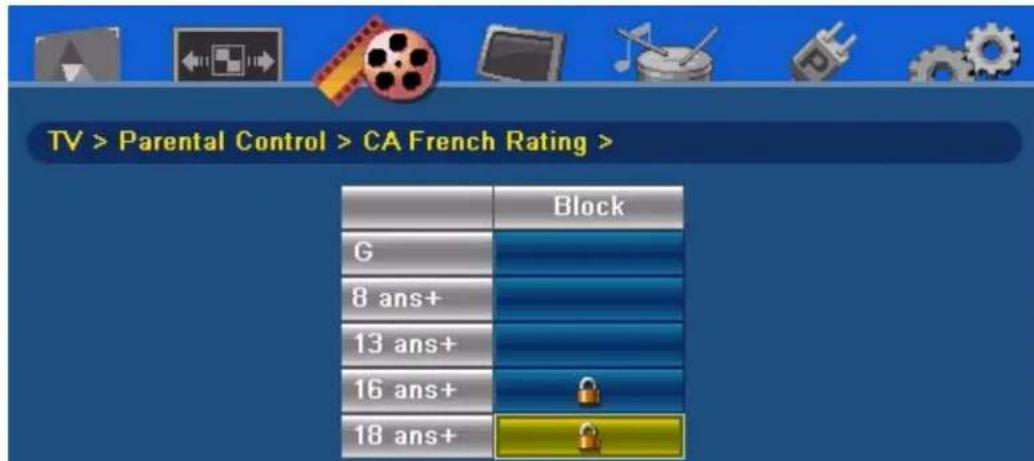 | |
 | ||
 : Select : Select  : Enter : Enter  : Exit : Exit  : Back : Back | ||
| Rating Definitions | ||
| G | General | |
| 8ans | General but inadvisable for young children | |
| 13ans | Over 13 years | |
| 16ans | Over 16 years | |
| 18ans | Over 18 years | |
4
OSD FUNCTION
Parental Controls (Password Edit)
| Password Edit | 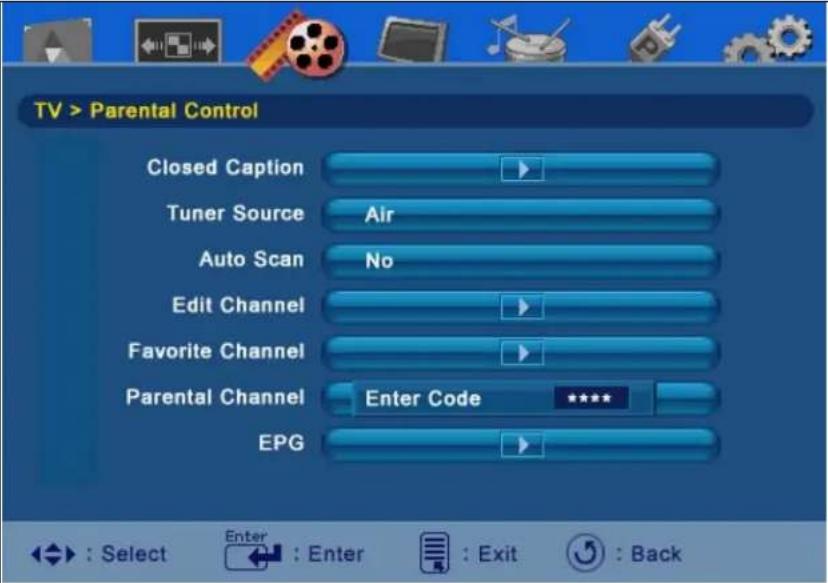 |
| 1. Enter new 4 digit parental control password. | |
| TV > Parental Control > Change PasswordLock ChannelUS MPAA RatingUS TV RatingCA English RatingCA French RatingChange PasswordEnter New Code****Re-Enter Code****2. Confirm code by typing password again. | |
| 3. In the case that the password is forgotten, enter “0000” to enter the parental control menu and reset the password. |
4
OSD FUNCTION
Input Menus
Input Menu
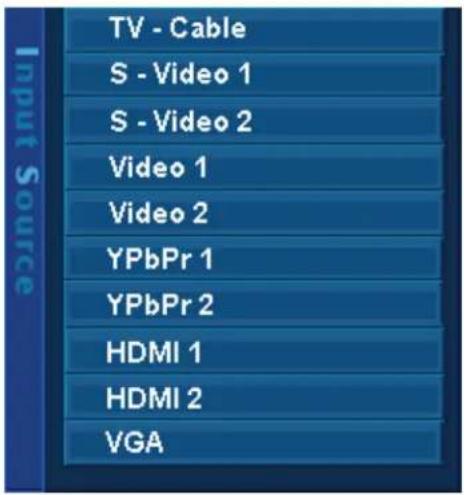
PIP Input Menu
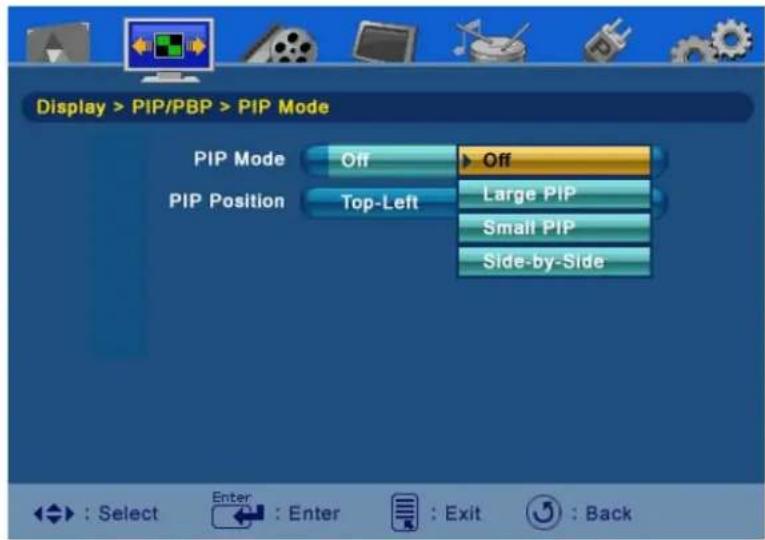
To change the input source, press the Input button on the remote to display the Input Source menu. When the input menu is open, press the Input button again to switch to the next input or use the up/down arrows to scroll through the inputs and the press enter to switch to the highlighted input. The input menu will timeout after 5 seconds and switch to the input that is currently highlighted.
To change the PIP source, press the PIP button on the remote to display the PIP input menu. Use the up/down arrows to scroll through the inputs and the press enter to switch to the highlighted input. The input menu will timeout after 5 seconds and switch to the input that is currently highlighted.
4
OSD FUNCTION
Favorite Buttons
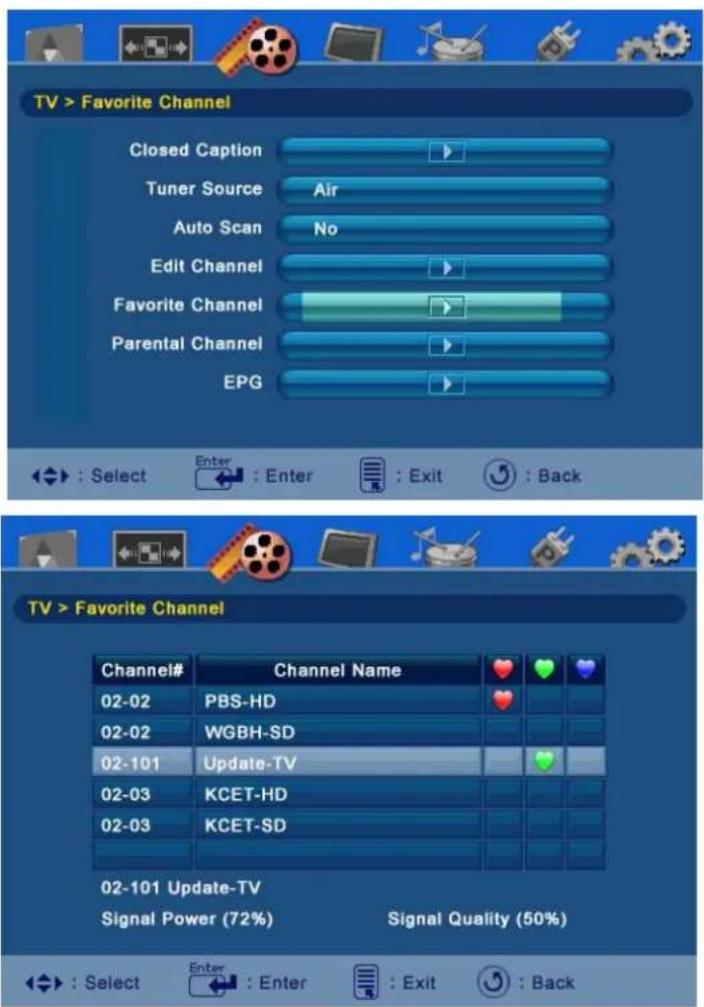
Favorite channels are stored in one of the three memory tables.
Storing Channels
- Enter the main menu and open the TV sub-menu.
- Scroll down and select "Favorite Channel".
- In this menu, a list of all available channels are shown.
- Use the Red(A), Green(B), and Blue(C) buttons on the remote to add/remove channels.
Selecting Channels
| Remote Control | Function |
| A | Scroll down and press “Enter” to select channel. |
| B | Scroll down and press “Enter” to select channel. |
| C | Scroll down and press “Enter” to select channel. |
| 4 | OSD FUNCTION |
- - PIP and Swap Operates
| INPUT/ PIP SOURCE CHART | ||||||||
| PIP Main | TV | AV | S Video | YPbPr1 | YPbPr2 | VGA | DVI | HDMI |
| TV | ● | |||||||
| AV | ● | |||||||
| S Video | ● | |||||||
| YPbPr1 | ● | |||||||
| YPbPr2 | ● | |||||||
| VGA | ● | ● | ● | ● | ● | |||
| DVI | ||||||||
| HDMI | ||||||||
5
APPENDIX
Wall mount and Safety bracket Options
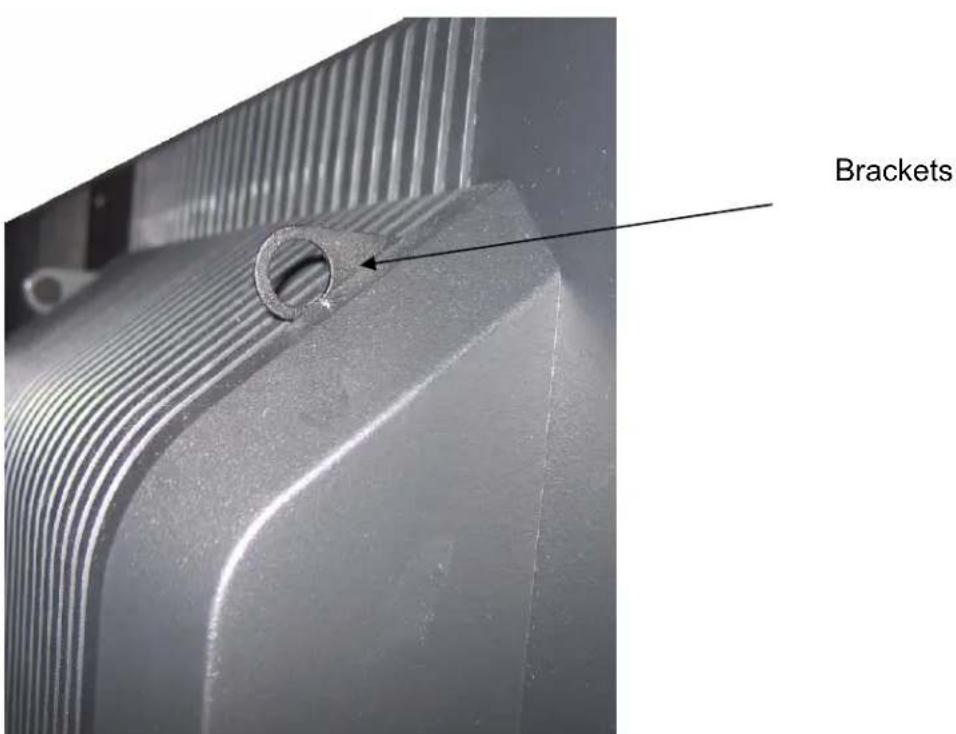
Anti-tip over option:
This TV has two small metal brackets on the back side of the TV. These two brackets have a circular cut out in the center. The brackets are to serve as an "anti-tip over" option and/or theft deterrent.
If used as an “anti-tip over” aid, it is the responsibility of the user to securely anchor the brackets to a surface that can support the weight of the TV.
(Note: at no time do we advocate using these brackets to support the entire weight of the TV.) These brackets must be used in conjunction with TV's provided base. The brackets are to be used as an additional safety precaution option.
Theft deterrent option:
If used as a theft deterrent, much like the “anti-tip over” application, the brackets can aid in anchoring the TV.
5
APPENDIX
Wall mount and Safety bracket Options
natural_image
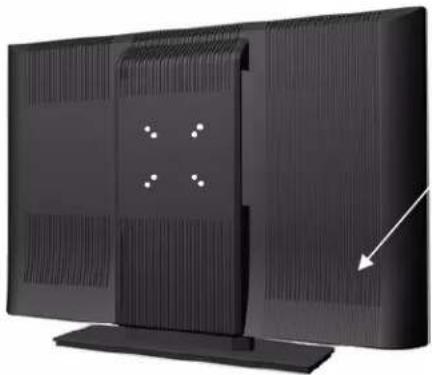
Exterior view of a black rectangular TV with ventilation grilles and a central display unit (no text or symbols visible)VESA mounting holes
The TV has been fitted with two sets of VESA mounting holes. The holes are spaced 75 mm and 100 mm equally apart... These mounting location are provided strictly as an option to the user for wall mounting.
It is the responsibility of the user to use a UL Listed Wall Mount Unit rated to support the weight of this TV. Please consult authorized service personnel for the installation of this Unit. Incomplete or inadequate mounting of the unit to the wall may cause it to fall down, resulting in potentially serious injury.
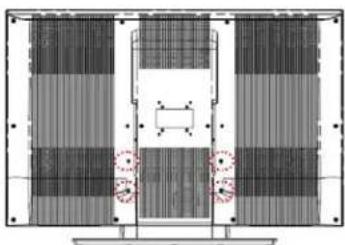
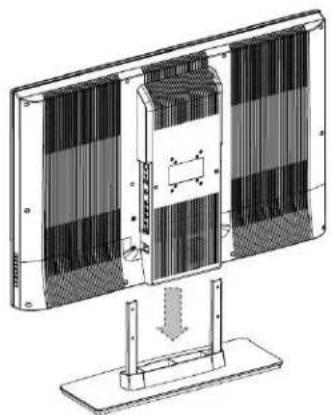
- Lay the LCDTV with front bezel down on a soft and clear area. Please make sure that there is no any foreign objects on the surface to avoid any scratch or damage of the LCD panel
natural_image
Architectural floor plan showing two vertical panels with horizontal grating and a central rectangular structure, no text or symbols present.The base is fixed with 4 points of screw mounting
natural_image
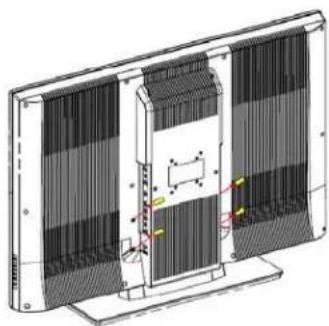
Technical line drawing of a device with internal components and mounting brackets (no text or symbols)Unload the 4 screws
natural_image
Technical line drawing of a dual-panel electronic device with a central panel and base mount (no text or symbols)Pull down the base
- Remove the four screws as shown in Step -2
- Remove the base from LCD TV as shown in Step-3
5
APPENDIX
42 Inch High Definition LCD TV Specifications
| Model Name | SK-42H240S / SK-42H360S | ||
| Panel | Type | 42" TFT (Thin Film Transistor), Active Matrix WXGA LCD, 1366 x 768 vertical stripe | |
| Coating | Anti-glare | coating | |
| Viewing Angles | 176° (H) / 176° (V) | ||
| Input Signal | Video/Audio | RGB Analog * 1 (75 ohms, 0.7 Vp-p)/Mini-Stereo *1 | |
| - H/V separated (TTL) for PC | |||
| HDMI-HDCP * 1 / RCA (L/R) * 1 | |||
| HDMI-HDCP * 1 | |||
| - fh: 30-80 kHz, fv: 50-75 Hz NTSC | |||
| TV system NTSC / HDTV * 1 | |||
| Output Signal | RCA (L/R), SPDIF (Stereo Digital) | ||
| HDTV Compatibility | 480i, 480P, 720P, 1080i | ||
| PC Compatible | Recommended 1366 x 768 @ 60Hz | ||
| Supported 1024 x 768 @ 75 Hz 800 x 600 @ 60, 75 Hz | |||
| 1024 x 768 @ 60Hz | 640 x 480 @ 60, 75 Hz | ||
| 1280 x 720 @ 60, 75 Hz 1360 x 768 @ 60Hz | |||
| Speaker Output | 10W | (x2) | Channels) |
| Power | Voltage 100-240 VAC, 47/63 Hz, 2.0A, universal. | ||
| Temperature | Operating 0 to + 35°C (Hum < 75%) | ||
| Storage -20 to +60 °C (Hum < 35%) | |||
| Humidity (Relative) | Operating 20 to 90% non-condensing | ||
| Storage 10 to 90% non-condensing. | |||
| Altitude | Operating 0 to 2,000 m | ||
| Storage 0 to 12,000m | |||
| Dimensions | Physical 41.9 in. (W) x 29.2 in. (H) x 8.9 in. (D) | ||
| Weight | W/ stand | 63.0 lbs | |
| Regulations | UL/C-UL, FCC-B | ||
| Power saving | On | <150W Typical (Blue LED) | |
| Modes | Active Off | <3W (Amber LED) | |
| Warning: Do not set the graphics card in your computer to exceed these refresh rates; doing so may result in permanent damage to the High Definition LCD TV. | |||
| Note: Product Specifications are subject to change without notice. | |||
32 Inch High Definition LCD TV Specifications
| Model Name | SK-32H240S / SK-32H520S | ||
| Panel | Type | 32" TFT (Thin Film Transistor), Active Matrix WXGA LCD, 1366 x 768 vertical stripe | |
| Coating | Anti-glare | coating | |
| Viewing Angles | 176° (H) / 176° (V) | ||
| Input Signal | Video/Audio RGB Analog * 1 (75 ohms, 0.7 Vp-p)/Mini-Stereo *1- H/V separated (TTL) for PCHDMI-HDCP * 1 / RCA (L/R) * 1HDMI-HDCP * 1- fh: 30-80 kHz, fv: 50-75 Hz NTSC | ||
| TV system NTSC / HDTV * 1Component Video * 2 / RCA (L/R) Stereo * 2Composite * 2 / S–Video * 2 / RCA (L/R) stereo * 2 | |||
| Output Signal | RCA (L/R), SPDIF (Stereo Digital) | ||
| HDTV Compatibility | 480i, 480P, 720P, 1080i | ||
| PC Compatible | Recommended 1366 x 768 @ 60HzSupported 1024 x 768 @ 75 Hz 800 x 600 @ 60, 75 Hz1024 x 768 @ 60Hz 640 x 480 @ 60, 75 Hz1280 x 720 @ 60, 75 Hz 1360 x 768 @ 60Hz | ||
| Speaker Output | 10W | (x2) | Channels) |
| Power | Voltage 100-240 VAC, 47/63 Hz, 2.0A, universal. | ||
| Temperature | Operating 0 to +35°C (Hum < 75%) | ||
| Storage -20 to +60 °C (Hum < 35%) | |||
| Humidity (Relative) | Operating 20 to 90% non-condensing | ||
| Storage 10 to 90% non-condensing. | |||
| Altitude | Operating 0 to 2,000 m | ||
| Storage 0 to 12,000m | |||
| Dimensions | Physical 31.4 in. (W) x 24.3 in. (H) x 8.9 in. (D) | ||
| Weight | W/ stand | 32.0 lbs | |
| Regulations | UL/C-UL, FCC-B | ||
| Power saving | On | <150W Typical (Blue LED) | |
| Modes | Active Off | <3W (Amber LED) | |
| Warning: Do not set the graphics card in your computer to exceed these refresh rates; doing so may result in permanent damage to the High Definition LCD TV. | |||
| Note: Product Specifications are subject to change without notice. | |||
5
APPENDIX
Troubleshooting
No Power
- Make sure power cord is securely connected to the AC In jack on the back of the High Definition LCD TV.
• Make sure AC power cord is securely connected to the AC socket. - Plug another electrical device (such as a radio) to the power outlet to verify that the outlet is supplying the proper voltage.
- When set to E. Saver, the TV will take longer to turn on. Change the Power menu setting to Normal to improve power on time.
Power is suddenly turned off
- Check if Sleep Timer is set. If so, turn it off.
- Check if Inactivity Off is set. If so, turn it off.
Remote Control Does Not Work
- Press only one button at a time.
- Make sure batteries are inserted correctly.
- Replace batteries with new ones if necessary.
Remote Control Code Not Found in a "Universal" Remote
- Purchase a separate "learning" remote control.
- Go to www.westinghousedigital.com for a list of remote codes.
Image Quality Issues
- For the best TV image quality, “Standard Definition” TV content should be viewed in 4:3 format.
No Picture
- Check the video connection.
- Make sure the video cable connected to the High Definition LCD TV is tightly secured to the video output port on the back of the computer. If the other end of the video cable is not attached permanently to the High Definition LCD TV, secure it tightly.
- Adjust brightness and contrast.
- If you are using a Macintosh computer older than G3, you need a Macintosh adapter.
- Make sure that the input source you are connected to corresponds to the source on the High Definition LCD TV.
- Verify that the antenna is properly connected.
No Picture when I connect VGA cable or "No Input Signal"
- Check VGA cable connection.
- Lower the video resolution on the computer and try plugging in the cable again.
5
APPENDIX
Troubleshooting
Picture is cut off/with sidebar screen.
- Use Auto Adjust.
- Make sure the aspect ratio is set correctly.
Blocky images appear in TV mode.
- Check your antenna connection. If necessary, rotate the antenna and wait up to 10 seconds for signal.
- Reduce signal splitters and excessively long cables.
- Replace poor antenna cables and/or connectors to improve signal quality.
Wrong or Abnormal Colors
- If any colors (red, green, or blue) are missing, check the video cable to make sure it is connected securely. Loose or broken pins in the cable connector could cause an improper connection.
- Connect the High Definition LCD TV to another computer.
Snow Appears on Screen
- Check your antenna connection. If necessary, rotate the antenna and wait up to 10 seconds for signal.
- Check the TV / CATV selection.
- Make sure the external device is HDCP compliant.
AUDIO Interconnection Issues
- Remember that S-Video and Composite AV1 share the same audio source.
Autosource Interconnection Issues
- With HDMI, there are a few cable boxes and other devices that continue to keep a link active, thus this may cause impaired autosource operation.
No Sound
- Check the audio connection.
- Press MUTE on the remote control, so that MUTE disappears from the screen.
- Check the audio settings. The High Definition LCD TV audio may be set to SAP or minimum.
- Press the Volume + (Up) key on the remote control.
Parental Control Password is "LOST"
- In the unlikely occurrence, select "PASSWORD EDIT" and enter "0000" to reset the password.
How Can I Find More Help?
5 APPENDIX
• Log on to: www.westinghousedigital.com
- Contact Westinghouse Customer Service at (866) 287-5555 or write us at service@westinghousedigital.com
Cleaning the High Definition LCD TV
• MAKE SURE THE HIGH DEFINITION LCD TV IS TURNED OFF
• NEVER SPRAY OR POUR ANY LIQUID DIRECTLY ONTO THE SCREEN OR CASE
To clean the screen:
- Wipe the screen with a clean, soft, lint-free cloth. This removes dust and other particles.
- If still not clean, apply a small amount of non-ammonia, non-alcohol based glass cleaner onto a clean, soft, lint-free cloth, and wipe the screen.
To clean the case:
- Use a soft, dry cloth.
- If still not clean, apply a small amount of non-ammonia, non-alcohol based, mild non-abrasive detergent onto a clean, soft, lint-free cloth, then wipe the surface.
Disclaimer
Westinghouse Digital does not recommend the use of any ammonia or alcohol-based cleaners on the High Definition LCD TV screen or case. Some chemical cleaners have been reported to damage the screen and or High Definition LCD TV case. Westinghouse Digital will not be liable for damage resulting from use of any ammonia or alcohol-based cleaners.

www.wde.com
- A GUIDE TO DIGITAL TELEVISION
- INSTALLATION
- OSD FUNCTION
- APPENDIX
- If you have any questions or concerns, Please call our toll free number 1-866-287-5555
- Owner's Record
- PRODUCT SAFETY
- PRODUCT SAFETY
- Safety Guidelines
- IMPORTANT NOTICE CONCERNING POWER CORD SELECTION
- For the United States and Canada
- FCC Compliance Statement
- FCC Warning
- 1
- Product Safety Instructions
- Important Safety Instructions
- Other Notices
- Antenna Installation Safety
- Outdoor Antenna Grounding
- Lightning
- Power Lines
- A GUIDE TO DIGITAL TELEVISION
- What Is Digital Television?
- Digital Television Picture
- A Guide to Digital Channels
- 2
- A GUIDE TO DIGITAL TELEVISION
- The Electronic Program Guide
- Channel Number
- Program Time
- Abstract
- Current Time and Date
- Event Titles
- Help Instructions
- INSTALLATION
- Package Contents
- Your product package includes:
- 3
- INSTALLATION
- Front View of the High Definition LCD TV
- Side View of the High Definition LCD TV
- SIDE CONNECTORS
- AV Video 1
- AV Video 2
- S-Video 2
- S-Video 1
- S-Video 2 & AV Video 2 Audio (Right / Left)
- S-Video 1 & AV Video 1 Audio (Right / Left)
- YPbPr 1 / Audio 1 (Right / Left)
- YPbPr 2 / Audio 2 (Right / Left)
- YPbPr 1
- YPbPr 2
- HDMI 1 / HDMI 2
- HDMI 2/ Audio (Right / Left)
- VGA
- Audio-In (VGA)
- SPDIF
- Audio Out (Right / Left)
- USB
- ANT (RF-input)
- Remote Control
- POWER
- PIP
- MUTE
- SWAP
- BACKLIGHT
- CC
- SLEEP
- FAVORITE CHANNEL A / B / C
- CHANNEL NUMBER KEYS
- 10.DOT
- ENT
- INPUT
- VOL - / +
- SCALING
- 15.CH ▼ / ▲
- MENU
- LAST CHANNEL
- ▼ / ▲ / ◀ / ▶
- ENTER
- 20.EPG
- 21.INFO
- YPbPr1
- 23.PC
- 24.HDMI
- 25.TV
- YPbPr2
- 27.AV
- 28.S-VIDEO
- DVI
- Insert Remote Control Batteries
- CAUTION:
- Connect the High Definition LCD TV to a computer
- Connect the High Definition LCD TV to AV Devices
- Connect power cable and power on the High Definition LCD TV
- Turn on your computer
- Turn on the cable box or satellite receiver
- Select an input source for the High Definition LCD TV using the OSD menu or remote control
- If connecting to an Antenna, Cable or other RF source, run Autoscan to receive all available channels:
- If connecting to a computer:
- 4
- OSD FUNCTION
- OSD (On Screen Display) Function
- Main Menu
- OSD Main Menu
- Navigation Menu
- Video
- Sub-Menu
- Display
- TV
- PC (VGA Only)
- Audio
- Power Management
- Settings
- Main Channel List
- Channel Enable / Disable
- Parental Controls
- Parental Controls (Canadian English)
- Parental Controls (Canadian French)
- Parental Controls (Password Edit)
- Input Menus
- Input Menu
- PIP Input Menu
- Favorite Buttons
- Storing Channels
- 5
- APPENDIX
- Wall mount and Safety bracket Options
- Troubleshooting
- No Power
- Power is suddenly turned off
- Remote Control Does Not Work
- Remote Control Code Not Found in a "Universal" Remote
- Image Quality Issues
- No Picture
- No Picture when I connect VGA cable or "No Input Signal"
- Picture is cut off/with sidebar screen.
- Blocky images appear in TV mode.
- Wrong or Abnormal Colors
- Snow Appears on Screen
- AUDIO Interconnection Issues
- Autosource Interconnection Issues
- No Sound
- Parental Control Password is "LOST"
- How Can I Find More Help?
- APPENDIX
- Cleaning the High Definition LCD TV
- To clean the screen:
- To clean the case:
- Disclaimer
Brand : WESTINGHOUSE
Model : SK-32H240S
Category : Television