
SLTC EM 107 G 900 - Range hood SIRIUS - Free user manual and instructions
Find the device manual for free SLTC EM 107 G 900 SIRIUS in PDF.


| Product type | Range hood |
| Brand | Sirius |
| Model | SLTC EM 107 G 900 |
| Width | 90 cm (900 mm) |
| Installation type | Built-in / Under cabinet |
| Extraction mode | Ducted (external) or recirculating (with charcoal filter) |
| Number of motors | 1 |
| Fan speeds | 3 speeds |
| Maximum extraction rate | Approx. 650 m³/h |
| Noise level (max speed) | Approx. 65 dB(A) |
| Lighting type | LED (2 x 3 W) |
| Control type | Push buttons |
| Grease filter type | Aluminum mesh, washable |
| Charcoal filter | Optional, replaceable |
| Power supply | 220-240 V, 50 Hz |
| Power consumption (motor) | Approx. 150 W |
| Energy class | A+ (typical) |
| Dimensions (W x D x H) | 90 x 50 x 15 cm (approx.) |
| Weight | Approx. 16 kg |
| Safety features | Thermal cut-out, motor overload protection |
| Spare parts available | Grease filters, charcoal filters, LED bulbs |
| Maintenance | Clean grease filters monthly; replace charcoal filters every 3-6 months |
Frequently Asked Questions - SLTC EM 107 G 900 SIRIUS
User questions about SLTC EM 107 G 900 SIRIUS
0 question about this device. Answer the ones you know or ask your own.
Ask a new question about this device
Download the instructions for your Range hood in PDF format for free! Find your manual SLTC EM 107 G 900 - SIRIUS and take your electronic device back in hand. On this page are published all the documents necessary for the use of your device. SLTC EM 107 G 900 by SIRIUS.
USER MANUAL SLTC EM 107 G 900 SIRIUS
Congratulations on your purchase! Thank you for choosing a Sirius product.
CANOPY RANGEHOOD
OFFBOARD INSTALLATION INSTRUCTIONS
SLTC EM 107 G900 EAN# 9351116001766
SLEM 107 S900 EAN# 9351116001759
SLEM 107 S1200 EAN# 9351116001773
SLTC EM 92 G900 EAN# 9351116000721
SLTC EM 92 G900 WH EAN# 9351116000752
SLEM 2 900 EAN# 9351116000639
SLTC EM 97 900 EAN# 9351116001605
TABLE OF CONTENTS
BEFORE YOU INSTALL - DUCTING INFORMATION 4
CANOPY RANGEHOOD INSTALLATION 6
USING THE RANGEHOOD 8
MAINTENANCE 9
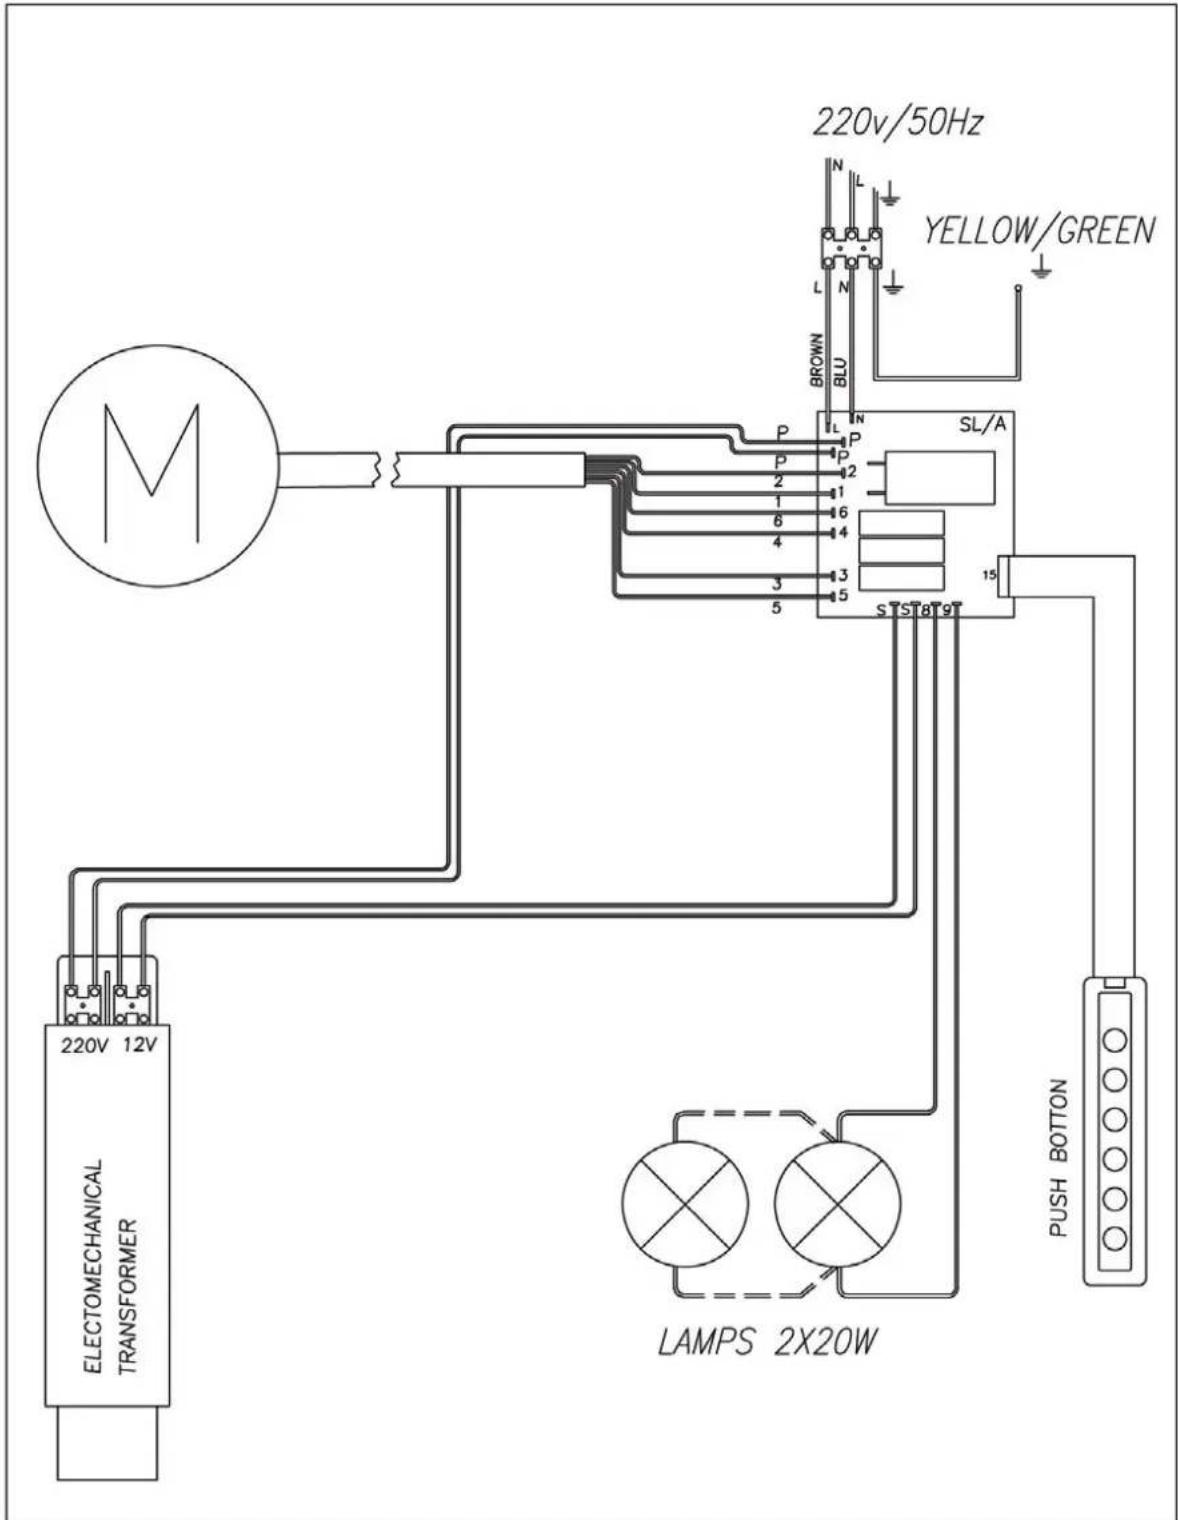
SLEM 107 S900 / SLEM 107 S1200 WIRING DIAGRAM 10
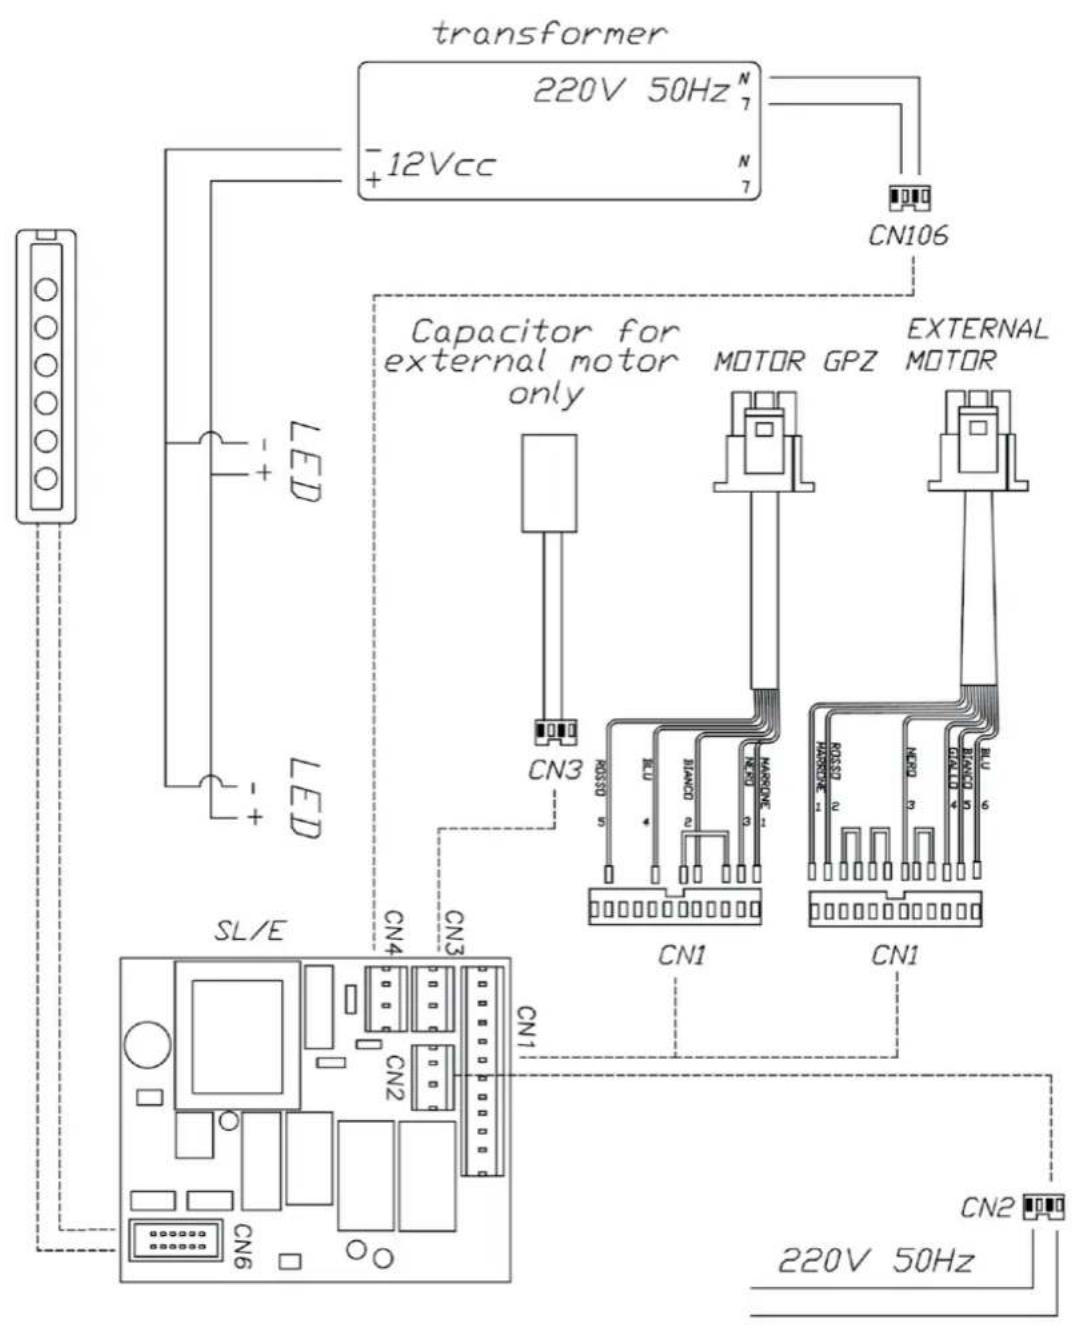
SLTCEM 107 G900 WIRING DIAGRAM 11
SLTCEM 92 G900/WH WIRING DIAGRAM 12
SLEM 2 900 WIRING DIAGRAM 13
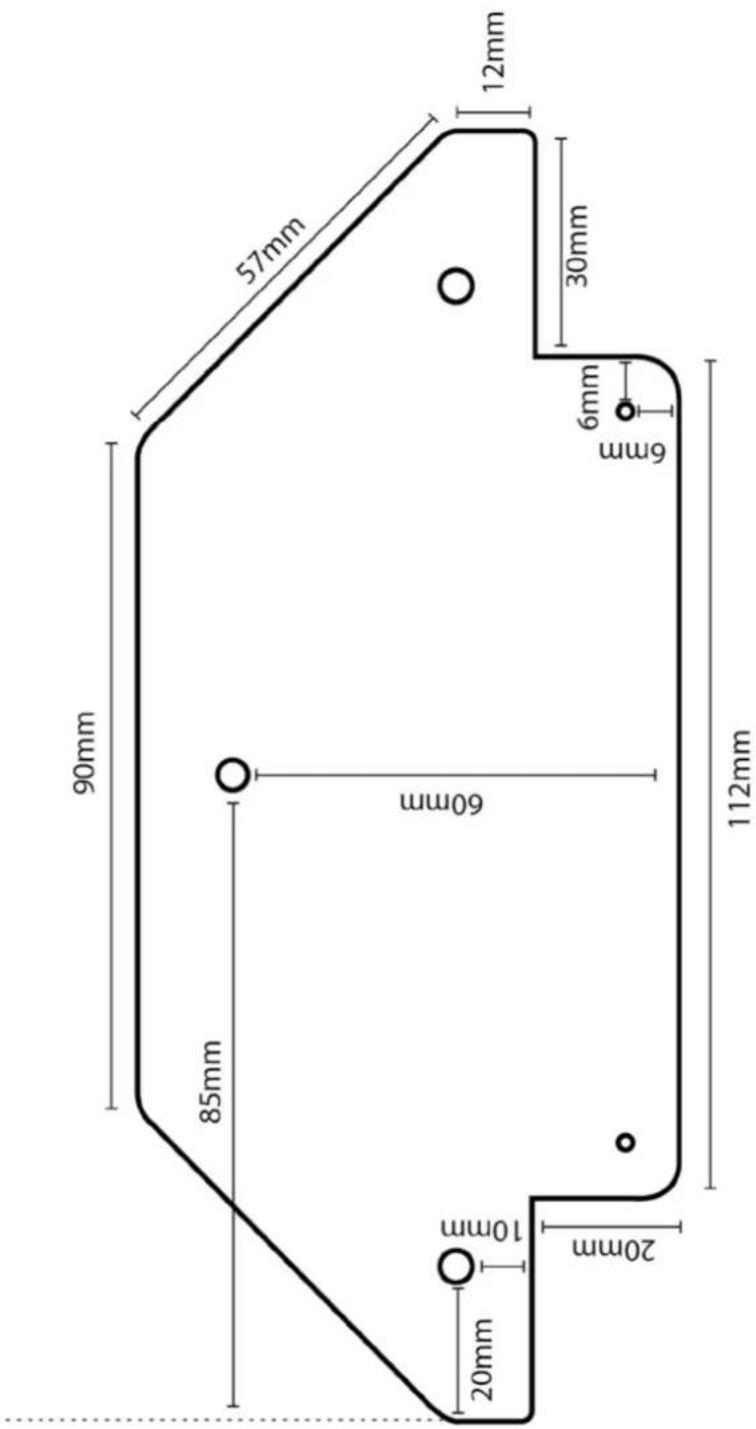
BRACKET 14
WARRANTY INFORMATION 15
BEFORE YOU INSTALL - DUCTING INFORMATION
Sirius warranty covers only Sirius product. If you choose to install a non-Sirius branded accessory such as flexible ducting, Sirius will only warrant the rangehood and motor. If installation is found to be the cause of failure or issue then charges will apply for service and parts.
Flexible ducting is not permitted under any circumstances. Flexible ducting has been found to increase noise levels, increase vibration and reduce airflow. Sirius Semi-rigid or solid ducting can be used in lieu. There is a range available to suit any application.

WARNING

The appliance must be installed and connected to the power supply only by a qualified technician.
- There should be adequate ventilation of the room when the rangehood is used at the same time as appliances burning gas or other fuels (not applicable to appliances that only discharge the air back into the room)
- The details concerning the method and frequency of cleaning
- There is a fire risk if cleaning is not carried out in accordance with the instructions;
- Do not flambé under the range hood;
- CAUTION: Accessible parts may become hot when used with cooking appliances.
Ducting available at www.siriusbrand.com
6 Year Warranty when Sirius Ducting is used. Full replacement warranty on parts and labour.
See website for terms & conditions.
A reduction in the duct diameter from stated ducting size will void warranty.
If you are in doubt about the ducting, please contact Sirius on 1300 762 219 prior to installation
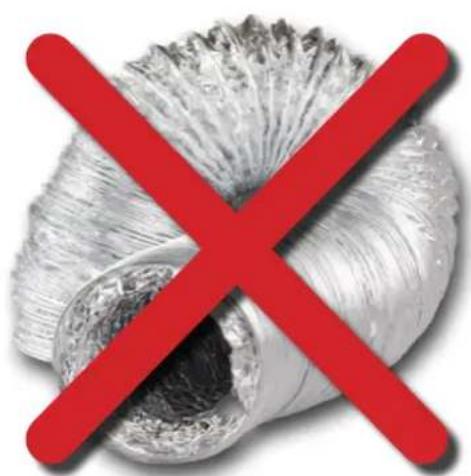
natural_image
Cross-shaped red prohibition symbol over a composite image of rolled paper or plastic (no text or symbols)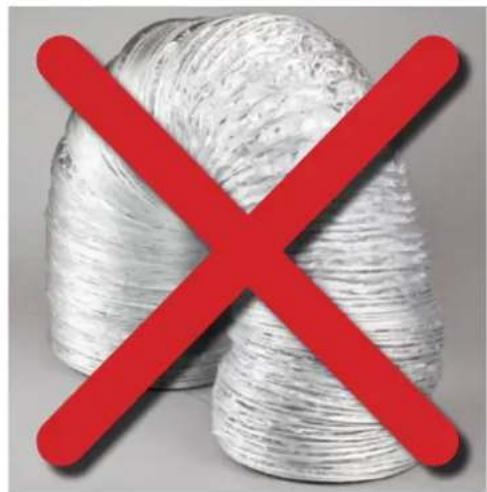
natural_image
Red X symbol crossed over a bundle of white yarn spools, no text or symbols present
natural_image
Symbol of a trash bin crossed with a horizontal line, no text or numbers presentThe symbol on the product or on its packaging indicates that this product may not be treated as house-hold waste. Instead it shall be handed over to the applicable collection point for the recycling of electrical and electronic equipment. By ensuring this product is disposed of correctly, you will help prevent potential negative consequences for the environment and human health, which could otherwise be caused by inappropriate waste handling of this product. For more detailed information about recycling of this product, please contact your local city office, your household waste disposal service or the shop where you purchased the product. This appliance is marked according to the European directive 2002/96/EC on waste electrical and electronic equipment (WEEE).

Min. 600mm - Max. 700mm for electric cooktops.
Min. 650mm - Max. 750mm gas cooktops.
If the rangehood is positioned above the max height recommended, warranty may be compromised as performance of the rangehood will be affected. Measurement is taken from the top of the trivets to the underside of the hood. (Fig.1)
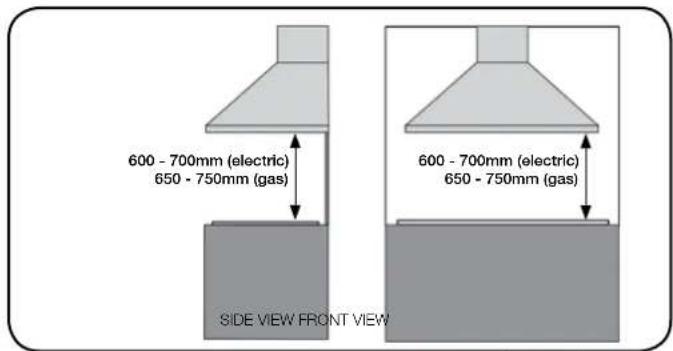
(Fig. 1)
- The air being drawn can't be conveyed through or into a duct used to let out fumes from appliances fed by energy other than electric power (eg. centralized heating, radiators, water heaters, etc.).
- Attention: remove any possible PVC film from the stainless steel, including the filters.
- To externally vent, please comply with the pertaining rules given by competent authorities.
- Provide the room with an adequate ventilation when a rangehood and appliances fed by energy other than electric power (gas, oil, or coal stoves, etc.) are used simultaneously. The rangehood, when evacuating the air, could generate a negative pressure in the room which can't exceed the limit of 0.04 mbar, in order to avoid the suck of exhausts deriving from the heat source. Therefore the room should be provided with air intakes to allow a constant flow of fresh air.
If the rating label in the rangehood shows the symbol ☐, the appliance is built in class II° and it does not need any earth connection.
If the rating label in the rangehood does not show the symbol ☐, the appliance is built in class I° and it needs the earth connection.
When performing the electrical connections on the appliance, please make sure that the current-tap is provided with earth connection and that voltage values correspond to those indicated on the label placed inside the appliance itself.
Before carrying out any cleaning or maintaining operations, the appliance needs to be switched off. If the appliance is not provided with a non-separable flexible cable and plug, or with another device
ensuring omnipolar disconnections from the grid, with an opening distance between the contacts of at least 3mm, then such disconnecting devices must be supplied within the fixed installation. If the fixed appliance is endowed with a supply cord and a plug, the appliance has to be put in a place where the plug can be reached easily.
The use of materials which can burst into flames should be avoided in close proximity of the appliance. When frying, please pay particular attention to fire risk due to oil grease. Being highly flammable, fried oil is especially dangerous. Do not use uncovered electric grills. In order to avoid possible fire risk, all instructions for grease-filter cleaning and for removing eventual grease deposits should be strictly followed.
When ducting rangehood, options are as follows:
- NOTE: For SEM 1 & SEM 8 only: From motor to exit point, additional lengths of duct will be required from the rangehood to the SEM 1 or SEM 8 motor.
Roof vent - EASYROOF 150T/M EASYROOF 200T/M
*Kit includes roof flashing
Download installation guide
Eave vent - EASYEAVE 150/200
Download installation guide
Wall vent - EASYWALL 150/200
Download installation guide
MOTOR INSTALLATION GUIDES
SEM 1, 2, 7, 8 MOTOR
Download installation guide
SEM 5 MOTOR
Download installation guide

Rangehood and SEM motor cannot be installed back-to-back. There must be a minimum of 2 metres between rangehood and motor for noise reduction reasons.
WARNING: Failure to install the screws or fixing device in accordance with these instructions may result in electrical hazards.
CANOPY RANGEHOOD INSTALLATION - OFFBOARD MOTOR

NOTE

Before installing the appliance, make sure that none of the parts are damaged in any way. In case of damaged parts, contact your retailer and do not proceed with installation. Read all of the following instructions with care before installing the appliance.
- Use ducting within the min/max specifications
- Limit the number of ducting bends.
- Do not make any changes in ducting diameter (recommended constant diameter: ∅ 150 mm / ∅ 200 mm or equal surface area).
Before installing the appliance - in order not to damage the appliance itself - the metal grease filter should be removed. These filters could be removed by pushing the handles towards the back side of the rangehood and pulling it downwards to unfasten it from its slot. (Fig.3).
To install the appliance please follow these instructions:
- The appliance must be installed by qualified technicians, or where possible use a Sirius recommended installer. See siriusbrand.com. In order to avoid damage to the electronic parts of the appliance, please do not use additional screws.
- Prepare the power supply - 240 volts.
- Prepare a hole for the exhaust - 160mm diameter for SEM 1/2/5 & 210mm for for SEM 7/8 motor versions.
- Maximum length of ducting should not exceed 7 metres to motor. Minimum length of 2 metres between hood and motor.
- (SEM 1 or SEM 8) Additional 5 metres from motor to atmosphere.
- Do not use screws to fix the ducting to the rangehoods as they will prevent the movement of non-return valves.
- SEM motor
- Limit the number of elbows in the ducting, since each elbow reduces the duct efficiency by 1 metre. (i.e. if you use two 90^ elbows, the length of ducting must not exceed 5 metres.)
- Avoid abrupt direction changes.
- Use 150mm constant diameter ducting for the whole length for the SEM 1/2/5 motors, 200mm ducting for the SEM 7/8 motor model.
- The use of Sirius ducting will increase the warranty of the unit to 6 years.

WARNING

- The rangehood is quite heavy, so two people will be needed for installation.

CAUTION

- Before connecting any ducting to the motor, make sure the non-return valves - which are on the air outlet of the motor - can swing open.
- Using the supplied bracket template (pg. 7), mark the location of the holes that need to be drilled in the wall, being careful to make sure that the wall behind is clear of electrical wiring, plumbing, pipes etc. Note: Be sure to set the height of the rangehood between the minimum and maximum height requirements as per diagram Fig. 1(Pg. 3). This can be done by measuring from the lowest point of the rangehood to the horizontal support bar. (Fig. 4)
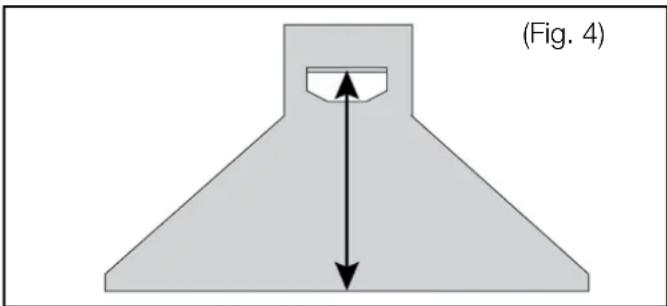
natural_image
Diagram of a conical funnel with an internal slot and directional arrows, labeled (Fig. 4), no text or symbols present.NOTE: Model measurements will vary. Please check specific model specs.
- Using an 8mm drill bit, pre-drill the holes that will hold the bracket to the wall. (Using bracket template)
- Insert the supplied plastic dowels to the pre-drilled holes and fix bracket to the wall with the supplied screws. (Note: Please use a spirit level to make sure the bracket is perfectly level.)
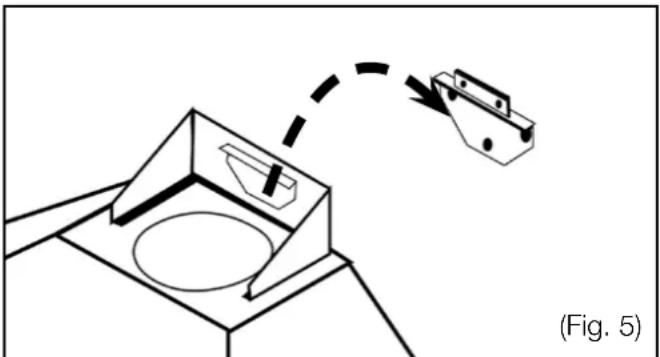
- Once the bracket is secure, using two people, lift the hood and drop the horizontal support bar onto the fixed bracket (Fig. 5).
natural_image
Technical diagram showing a mechanical assembly with a dashed arrow indicating motion or transformation (no text or symbols present)(Note: There are additional holes on the inside of the hood to secure the rangehood flush to the wall and completely stable. (Hole locations will vary per model.)
-
Connect your Sirius ducting (see www.siriusbrand.com for approved ducting) to the outlet collar on the rangehood and secure in place with a ring clamp if you are using semi rigid ducting. If you are using solid/rigid ducting and external duct connector is required. (Note: do not fix the ducting in place with screws as they will prevent the movement of the non-return valves). Complete all of the duct work to the motor location before fixing the flue covers in place to ensure the ducting has not come free. (See www.siriusbrand.com for motor installation guides.)
-
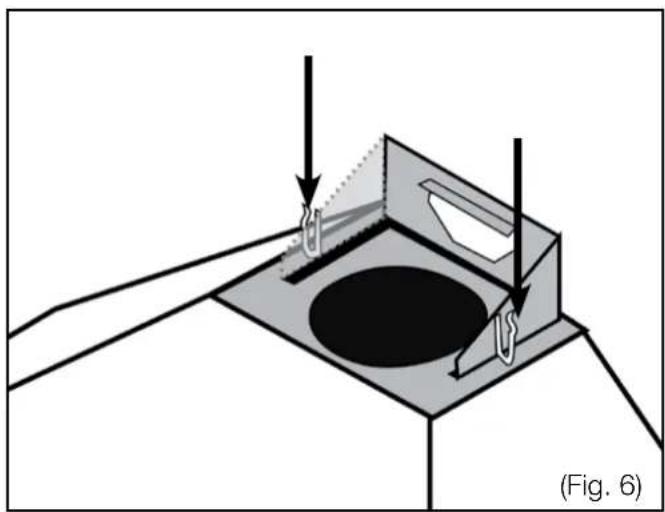
Insert the upper flue cover into the cover into the lower flue cover and mount into the channel on the top of the rangehood. There are two spring loaded clips that need to be on the inside of the lower flue cover to secure in place. (Fig 6.)
natural_image
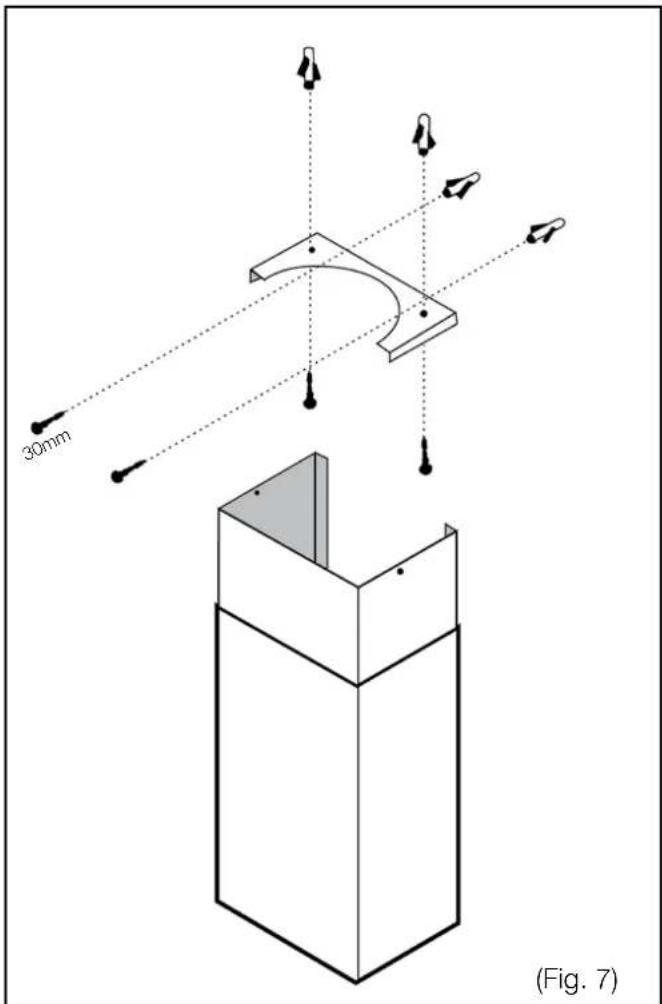
Diagram of a mechanical assembly with arrows indicating force or movement, no text or symbols present- Telescope the upper flue cover to the ceiling and mark with a pencil the outer line of the cover, this will give you the exact location of where the top fixing bracket needs to be fitter to the ceiling.
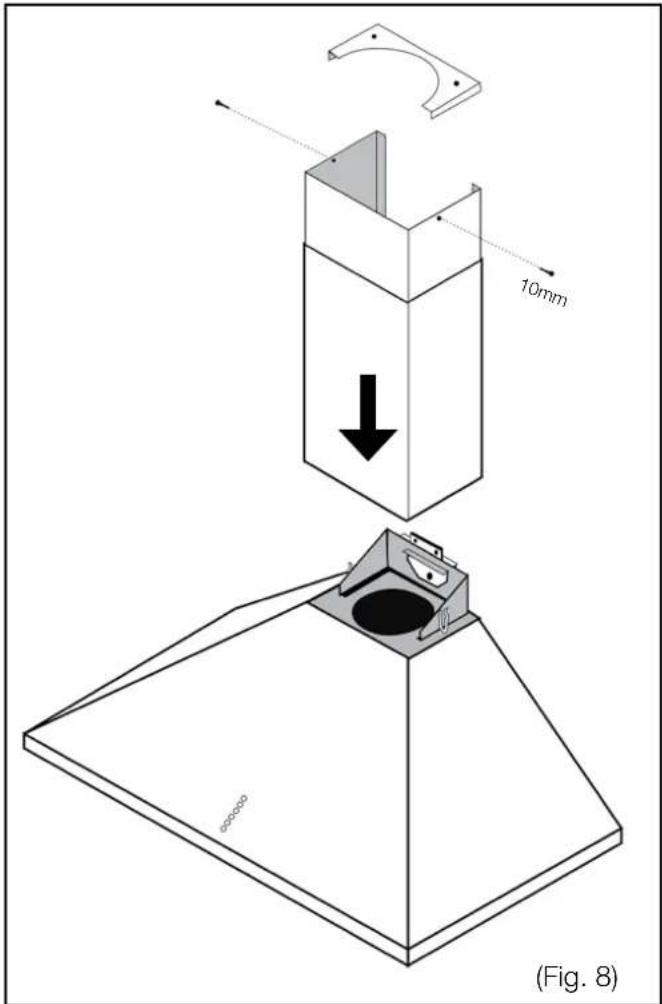
- Fix the top fixing bracket into place using the supplied 30mm screws (Fig.7) and telescope the upper flue cover over the bracket and secure in place with the very small 10mm supplied screws. (Fig 8.)

NOTE

Please do not fix shroud permanently. Must be removable for servicing purposes.
USING THE RANGEHOOD
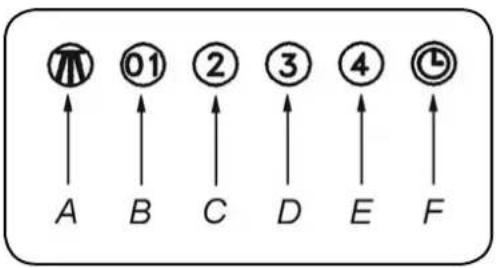
Manual control buttons:
SLTC 107 S900, SLEM 107 S1200, SLEM 2 900
A: Light switch on/off
B: Motor switch on speed 1/off - (low/simmer)
C: Motor switch on speed 2 - (general cooking)
D: Motor switch on speed 3 - (high power)
E: Motor switch on speed 4 - (booster)
F: 10 minute shut-off timer
flowchart
graph TD
    A["A"] --> 1["1"]
    B["B"] --> 2["01"]
    C["C"] --> 2["01"]
    D["D"] --> 3["2"]
    E["E"] --> 4["3"]
    F["F"] --> 5["4"]
    1 --> 2
    2 --> 3
    3 --> 4
    4 --> 5
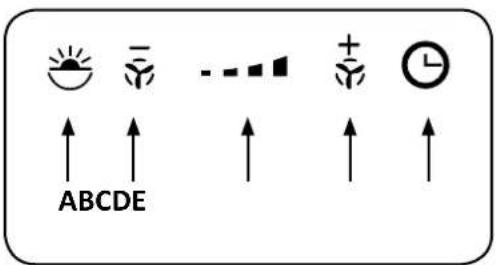
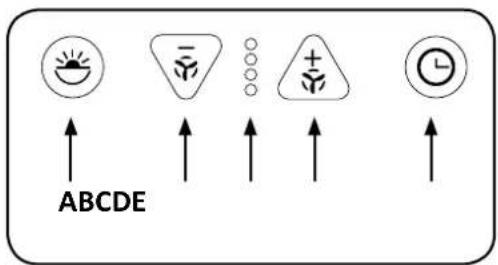
Electronic touch control
SLTC EM 107 G900, SLTC EM 92 G900, SLTC EM 92 G900 WH, SLTC EM 97 900
A: Light switch on/off
B: Motor speed decrease / motor off
C: Motor speed indicator
D: Motor speed increase
E: 10 minute shut-off timer
MAINTENANCE
- Accurate maintenance guarantees good functioning and long-lasting performance.
• Particular care is due to the grease filter panel. - It can be removed by pushing its handle toward the back side of the rangehood and pulling the filter downwards so to unfasten it from its slot (Fig.2).
To insert the filter just perform the opposite operation.
- After 30 hours of operation, the buttons on the control panel will flash, signaling the filters are due for cleaning. Press the timer button ⏻ to reset.
The grease filter needs cleaning by regular handwashing or in dishwashers every two months at least, depending on its use.
Filters may require cleaning sooner if frequent heavy frying is done.
- To clean the appliance itself, water and detergent are recommended, while abrasive products should be avoided. For steel appliances specialized detergents are recommended (please follow the instructions indicated on the product itself to obtain the desired results).

WARNING

If the supply cord is damaged, it must be replaced by the manufacturer or its service agent or a similarly qualified person in order to avoid a hazard.
WIRING DIAGRAM SL-EM107 S 900
WIRING DIAGRAM SL-EM107 S 1200
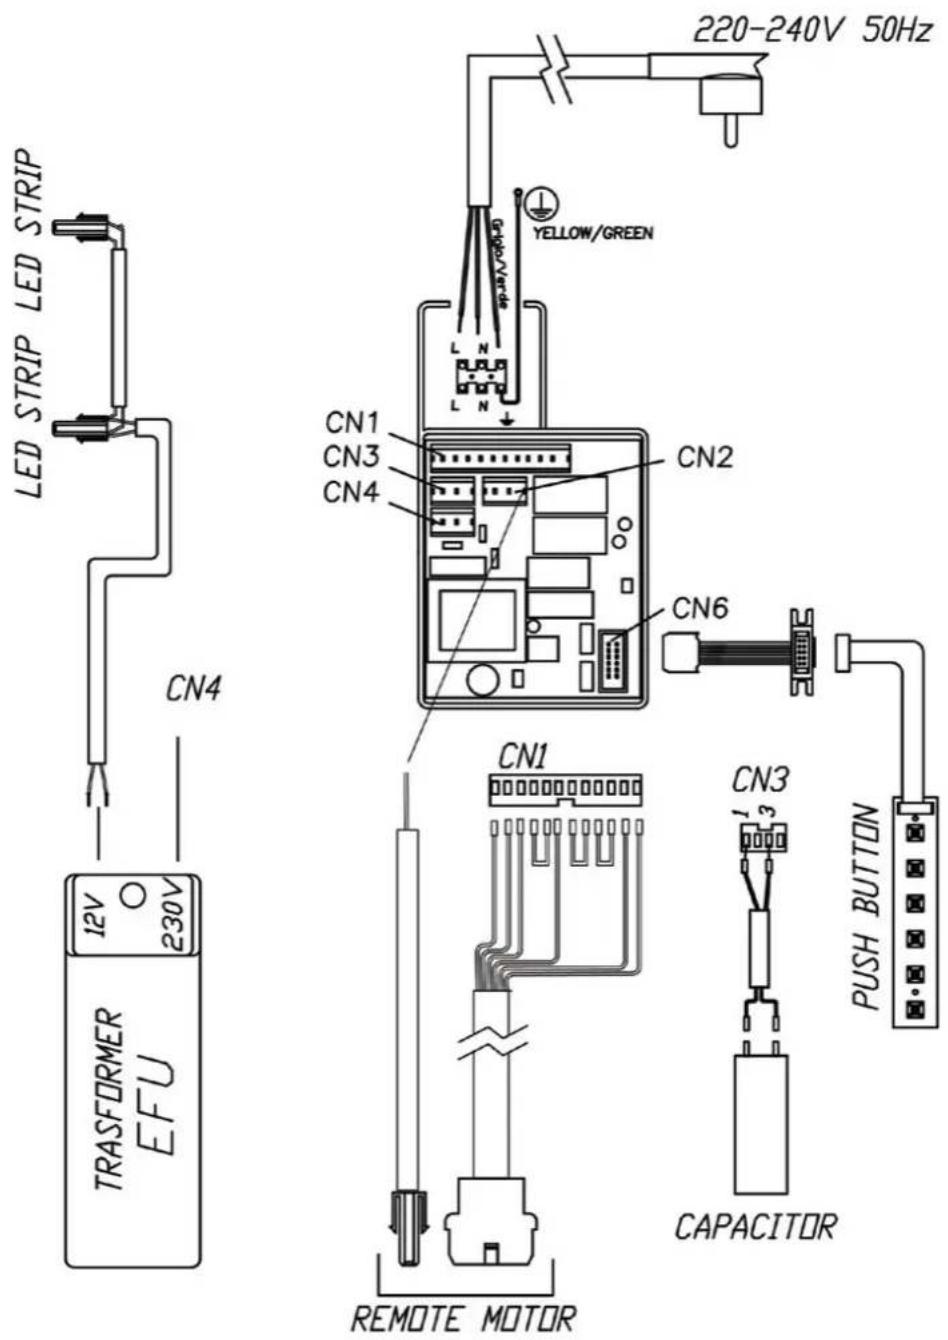
WIRING DIAGRAM SLTC EM 107 S900
SL EM92 S 900 - SLTC EM92 G 900
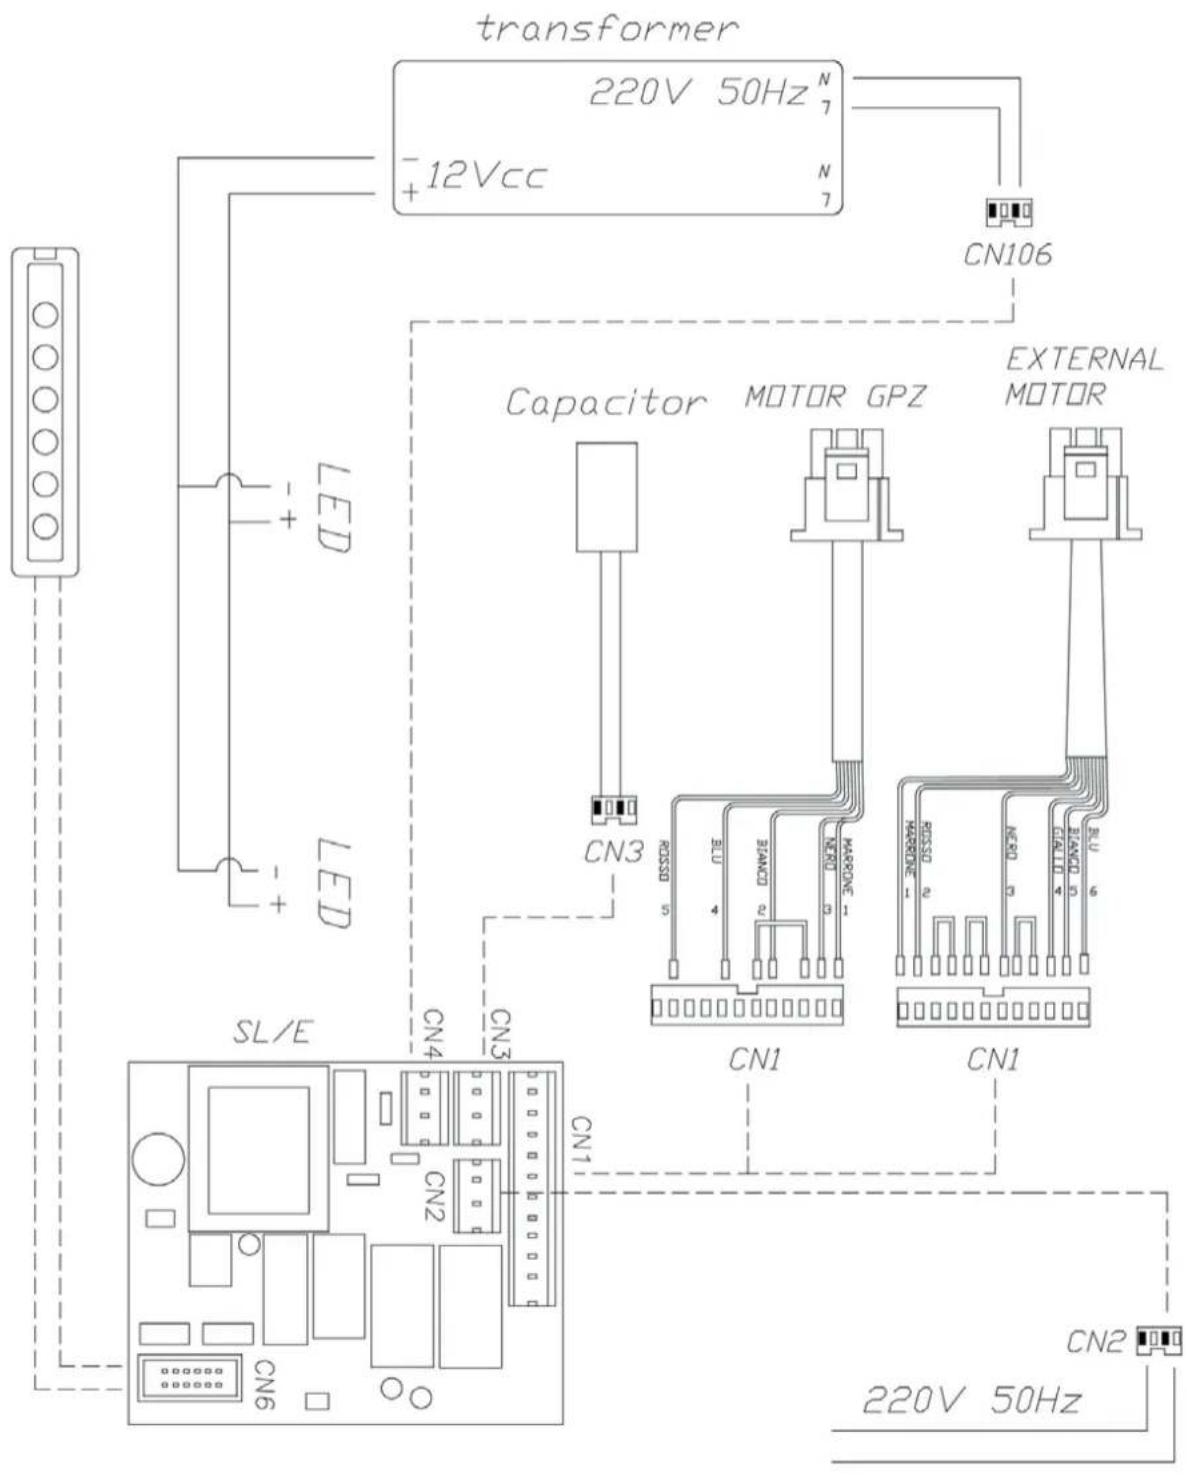
WIRING DIAGRAM SLEM 2 900
other
| Dimension | Value | | --------- | ------- | | Width | 90mm | | Height | 85mm | | Base | 60mm | | Top Margin| 57mm | | Bottom Margin| 12mm | | Total Width| 12mm | | Total Height| 112mm | | Base Width | 6mm | | Top Width | 6mm | | Bottom Width| 20mm |Dear Customer,
Thank you for choosing this Sirius Rangehood.
We are sure that it will provide you with many years of excellent service. At Arisit Pty Limited we are dedicated to ensuring that our customers receive the best possible after-sales care.
The Sirius ‘Protection Plan’ has been devised to give you added peace of mind. Should you encounter any problems with your appliance, our nationwide team of specially trained technicians will deal with your call swiftly and efficiently.
PRIORITY SERVICE, ACCESSORIES & SPARE PARTS
AUSTRALIA
ARISIT PTY LIMITED
40-50 Mark Anthony Drive, Dandenong South,
VIC 3175, Australia
Phone: 1300 762 219
Email: consumer.care@arisit.com
NEW ZEALAND
ARISIT PTY LIMITED
1A Howe Street, Newton,
Auckland 1145, New Zealand
Phone: (09) 306 1020
Email: sales@aristonappliances.co.nz
Warranty
By registering your ownership NOW, you qualify for Sirius's Total Peace of Mind Protection Plan.
Australian & New Zealand 3 / 6 Year Protection Plan*
This guarantees your appliance for a full 3 years parts and labour & 10 years for the off-board motors (covering manufacturing defects only) from the date of purchase, subject to the Terms and Conditions overleaf.
*3 Year warranty is extended to a 6 year period only when Sirius ducting is installed.
Your Warranty
Register now to qualify.
Terms & Conditions
These Terms and Conditions apply only to Sirius products distributed in Australia and New Zealand by Arisit Pty Limited.
- This warranty applies for a period of 3 years on all products.
a) Warranty is extended to a 6 year period when Sirius ducting is installed.
b) All off-board motors are covered under warranty for a 10 year period for manufacturing defects only. - Warranty applies for parts and labour in Australia and New Zealand, commencing from date of purchase.
- This warranty applies only to the original purchaser/hire purchaser of this appliance and cannot be assigned or transferred. Failure to produce documentary proof of the date of original acquisition by the original purchaser will result in a charge being levied for work done, labour and parts supplied.
- This warranty does not apply to:
a) Consumable items such as filters, fuses, and light bulbs.
b) Damage to body work, paint work, glass, and plastic items (such as, but not limited to windows, covers, baskets, trays, worktops, door handles, control and kick panels.)
c) Corrosion & rust damage.
A fee may be charged following warranty claims where no fault is found with the appliance.
-
This warranty will not apply where:
a) The fault is caused by accident, misuse, an infestation of insect and or vermin, fire, flood or the use of products not approved by Arisit Pty Limited.
b) There has been a failure to comply with the manufacturer's operating and installation instructions.
c) Service, modification or repair has been carried out by anybody other than an approved Arisit Service Technician.
d) The appliance has been used/installed anywhere other than a private dwelling, or where it has been used other than for domestic use.
e) The appliance is subject to a rental agreement. -
Any defective part that has been replaced becomes the property of Arisit Pty. Limited.
-
This warranty applies only to Sirius appliances purchased and installed in Australia and New Zealand.
-
Loss of use of the appliance or consequential loss of any nature is not covered.
-
A charge may be levied at the discretion of Arisit Pty Limited if the call is deemed unnecessary or if the cause of failure is traced to external sourced such as, but not limited to: blown fused, power failure, faulty installation, customer misuse or negligence, etc
-
Where the appliance, the subject of a warranty claim or repair, is used or installed more than TWENTY (20) kilometres from the nearest Arisit Service Division or Authorised Service Agent, the cost of delivery to the nearest Service
Division or travel costs for a technician or Authorised Service Agent shall be for the account of the Purchaser. Where a built-in appliance is located or installed outside the Arisit Authorised Service Agent's normal service area, additional travel and labour costs shall be the account of the Purchaser.
-
Service is offered during normal business hours only, also appliances to have a clear access in a serviceable area
-
Arisit Pty Limited shall not under any circumstances be responsible in terms of this warranty for the replacement or repair of any part of the equipment which may have been damaged in transit, during and after installation or imperfections after installation.
-
Losses caused by act of God, failure to obtain spare parts, strikes or lockouts are not covered.
-
External off board motors must be installed a minimum of 2 metres and maximum of 7 metres away from the rangehood. This is for optimum sound and performance.
-
All motors must be accessible for servicing purposes and if installed above 2 metres from ground height additional cost will be incurred due to OH&S standards for service agents. Prior to install please check minimum & maximum installation details on the Sirius website, FAQ under support tab.
We reserve the right to amend any of the above without prior notice.
- This warranty does not affect your statutory rights.
To register for your warranty, please visit:
www.arisitwarranties.com.au/Customer-Registration.aspx or scan the QR code.

ARISIT PTY LIMITED (Australia)
ABN 23 091 616 294
40-50 Mark Anthony Drive
Dandenong South VIC 3175
P: Sales & Service: 1300 762 219
F: Sales & Service: (03) 9768 0838
E: arisit@arisit.com
ARISIT PTY LIMITED (New Zealand)
1A Howe Street Newton, Auckland 1145
PO Box 68-140 Newton, Auckland 1145
P: (09) 306 1020 - Fax: (09) 302 0077
E: sales2@aristonappliances.co.nz
www.arisit.com
www.siriusbrand.com

Year Warranty
when Sirius ducting is used.
Full replacement warranty on parts and labour. Check website for T&Cs.
Sirius Hocos and ducting products are only available from our select group of Sirius Professional Stock's nationwide. For the latest list of Sirius Stockists near you, please refer to www.siriusbrand.com
All efforts have been made to ensure that the information provided in this brochure is correct at the time of printing. Due to continuous product improvement and ongoing development, Sirus
reserves the right to make changes to the products and technical data without prior notice. Some products appearing in this brochure may be for illustrative purposes only. Diagrams are indicative measures only. Prior to commencing
cabinetry outputs the operating/installation instructions accompanying the product must be referred to at www.sir.usprand.com
10 year warranty on SEM motors.
- Congratulations on your purchase! Thank you for choosing a Sirius product.
- CANOPY RANGEHOOD
- OFFBOARD INSTALLATION INSTRUCTIONS
- TABLE OF CONTENTS
- MAINTENANCE 9
- BRACKET 14
- BEFORE YOU INSTALL - DUCTING INFORMATION
- WARNING
- The appliance must be installed and connected to the power supply only by a qualified technician.
- Ducting available at www.siriusbrand.com
- Year Warranty when Sirius Ducting is used. Full replacement warranty on parts and labour.
- See website for terms & conditions.
- A reduction in the duct diameter from stated ducting size will void warranty.
- Roof vent - EASYROOF 150T/M EASYROOF 200T/M
- MOTOR INSTALLATION GUIDES
- CANOPY RANGEHOOD INSTALLATION - OFFBOARD MOTOR
- NOTE
- CAUTION
- USING THE RANGEHOOD
- Manual control buttons:
- Electronic touch control
- MAINTENANCE
- PRIORITY SERVICE, ACCESSORIES & SPARE PARTS
- AUSTRALIA
- NEW ZEALAND
- Warranty
- Your Warranty
- Register now to qualify.
- Terms & Conditions
Brand : SIRIUS
Model : SLTC EM 107 G 900
Category : Range hood