WorkSmart 3121 - Chair Space - Free user manual and instructions
Find the device manual for free WorkSmart 3121 Space in PDF.

User questions about WorkSmart 3121 Space
0 question about this device. Answer the ones you know or ask your own.
Ask a new question about this device
Download the instructions for your Chair in PDF format for free! Find your manual WorkSmart 3121 - Space and take your electronic device back in hand. On this page are published all the documents necessary for the use of your device. WorkSmart 3121 by Space.
USER MANUAL WorkSmart 3121 Space
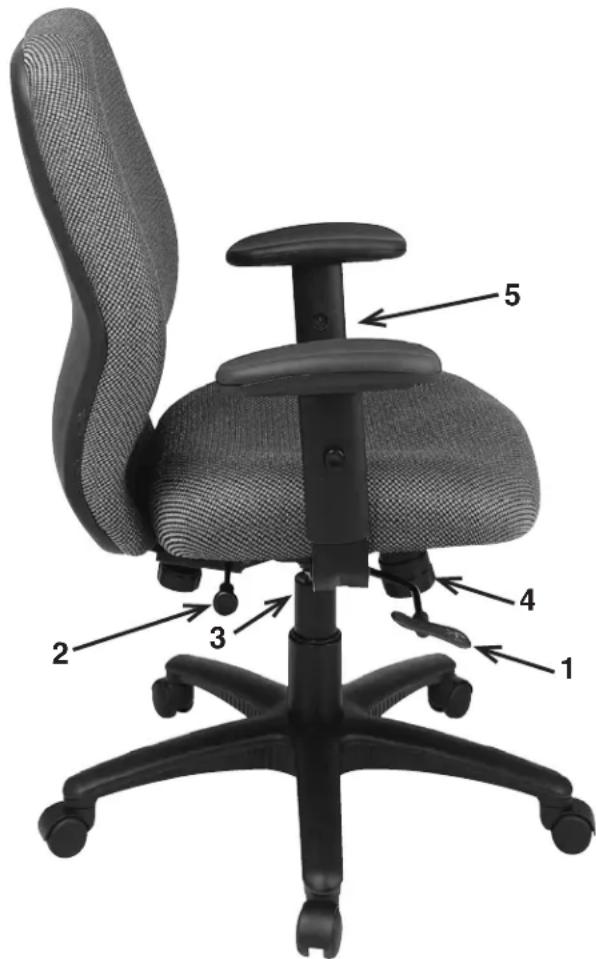
3121 SYNCHRO TILT MANAGERS CHAIR
OPERATING INSTRUCTIONS
FEATURE
- PNEUMATIC SEAT HEIGHT ADJUSTMENT
To raise seat remove pressure from seat and lift lever (1). To lower seat height sit on chair and lift lever (1).
• SYNCHRO TILT
To recline backrest pull lever (2) out, to lock return backrest to upright position and push lever (2) in.
• TILT TENSION ADJUSTMENT
For individual comfort, this chair has been equipped with an adjustment that will allow the user to change the tension of the tilting feature. Turn knob (4) clockwise to increase tension and counter-clockwise to decrease or ease the tension.
NOTE: Be careful not to loosen back tilt adjustment knob completely.
• ARM HEIGHT & WIDTH ADJUSTMENT
To adjust arm height, push button (5) in to allow the arms to move up or down freely. Release the button (5) once the desired height is reached. To adjust width loosen Arm Width Adjustment Knob (3) under seat, slide arm to desired position then tighten knob.
WARNING
- Use this product only one person at a time.
- Do not use this chair unless all bolts screws and knobs are securely tightened.
- Check that all bolts screws and knobs are tight every three months or as needed.
- Do not overturn back tilt knob when decreasing tension.
- Dispose of packing material properly. Do not use plastic cover as head covering. It may cause suffocation.
- Do not use chair as a stepladder.
- Use this chair for its intended purpose only.
- Use mild detergent only for cleaning.
WARRANTY
Office Star chairs are warranted from the date of purchase against failure due to material and workmanship as follows:
• 15 Years on all non-moving metal parts.
- 2 Years on component parts including Control mechanisms, pneumatic cylinders, wood, plastic parts, base and casters.
- 3 Year on upholstery fabric and foam against wear and deterioration.
To make a warranty claim, contact Parts Department. Provide model number and description of the problem and obtain return authorization. At its option Office Star Products will:
(a) Supply compatible components of current manufacture.
(b) Repair the customer's component. The customer must prepay freight on any components returned to the factory. Return freight on components still in warranty will be paid by Office Star Products.
*All warranties are limited to the original purchaser for normal Residential usage by persons weighing 250 lbs. or less. This warranty will not cover labor, freight or damage from misuse, abuse, negligence, alteration, accident, vandalism, rusting, acts of nature or any other event beyond the control of Office Star Products. The warranty does not cover cosmetic damage that may result from normal use. Liability for incidental or consequential damages is excluded. The user assumes all risk of injury resulting from use of this product.
This warranty gives you specific legal rights, and you may also have other rights which vary from state to state.
Our quality standards are among the highest in the industry. Sometimes, no matter how hard we try, there are times when parts are damaged or missing. Our Parts Department will do everything possible to promptly remedy the problem. Contact us via e-mail parts@officestar.net, by Fax 1-909-930-5629, or toll free parts number 1-800-950-7262, Monday through Friday 8:00 a.m. - 5:00 p.m. Pacific Time.
3121 SYNCHRO TILT MANAGERS CHAIR
ASSEMBLY INSTRUCTIONS

DETAIL A

PART QTY
- Base ..... 1
- Casters 5
- Pneumatic Cylinder ..... 1
- Bellows ..... 1
- Seat Plate ..... 1
- Seat Cushion....1
- Back Cushion ..... 1
- 1" Screws ..... 4
- Arms Left (9L) Right (9R) .... 2
- Arm Width Adjustment Knobs 2
- Backrest Plate (pre-installed) 1
- Back Rest Knob.....1
- Small Flat Washer....2
- Small Star Washer.....2
- Large Flat Washer....1
- Larger Star Washer....1
- Allen Wrench (Not Shown) .. 1
Remove all parts from carton, separate by part numbers indicated on parts list, and verify part quantities.
STEP 1. Insert five Casters (2) into Base (1), push hard until you feel or hear the Caster (1) snap into place. Insert Pneumatic Cylinder (3) into Base (1) and slip Bellows (4) over Pneumatic Cylinder (3).
STEP 2. Attach adjustable Seat Plate (5) to Seat Cushion (6) with the arrow towards the front of the chair, using four 1" Screws (8). TIGHTEN ALL FOUR SCREWS COMPLETELY.
STEP 3. Attach Arms (9L & 9R) into Arm Bracket using Arm Width Adjustment Knob (10), Small Star Washer (14), and Small Flat Washer (13). TIGHTEN BOTH ADJUSTMENT KNOBS.
STEP 4. Place the assembled seat on top of Pneumatic Cylinder (3) and apply downward pressure.
STEP 5. Insert the Backrest Plate (11) to Seat Plate (5). TIGHTEN THE BACKREST KNOB (12) COMPLETELY (SEE DETAIL A).
ATTENTION: MAKE SURE ALL SCREWS ARE FULLY TIGHTENED BEFORE USING CHAIR.