MX500i - Earphones PLANTRONICS - Free user manual and instructions
Find the device manual for free MX500i PLANTRONICS in PDF.

| Type | In-ear earphones |
| Connectivity | Wired, 3.5mm audio jack |
| Microphone | Built-in omnidirectional microphone |
| Controls | In-line remote with answer/end button |
| Compatibility | Smartphones, tablets, laptops with 3.5mm jack |
| Cable Length | 1.2 meters |
| Driver Unit | 9 mm dynamic driver |
| Frequency Response | 20 Hz - 20 kHz |
| Impedance | 32 ohms |
| Sensitivity | 110 dB SPL/mW |
| Weight | 15 g (including cable) |
| Color | Black |
| Warranty | 1 year limited warranty |
| Package Contents | Earphones, silicon ear tips (3 sizes), user manual |
| Cleaning | Wipe with a dry cloth; keep ear tips clean |
| Storage | Store in a cool, dry place |
Frequently Asked Questions - MX500i PLANTRONICS
User questions about MX500i PLANTRONICS
0 question about this device. Answer the ones you know or ask your own.
Ask a new question about this device
Download the instructions for your Earphones in PDF format for free! Find your manual MX500i - PLANTRONICS and take your electronic device back in hand. On this page are published all the documents necessary for the use of your device. MX500i by PLANTRONICS.
USER MANUAL MX500i PLANTRONICS
The following manual describes ways to optimize your sound experience or simply provide troubleshooting tips.
Setting Up Your USB Adapter....2
Headset Settings....3
Headset Settings for MX500i: 4
Headset Settings for M214i: 5
Internet Calling Services Settings....6
Settings for Skype:....7
Settings for Yahoo! Messenger with Voice: 8
Settings for Google Talk:....10
Windows XP Settings.... 11
Microphone Level Settings for Windows XP: 12
Side Tone Adjustments for Windows XP: 13
Setting Up Your USB Adapter:
To set-up your USB adapter:
1) Plug the 2.5mm jack of your Plantronics Internet Headset into the 2.5mm plug of the USB adapter.
2) Plug the USB connector into the correct port on your computer.
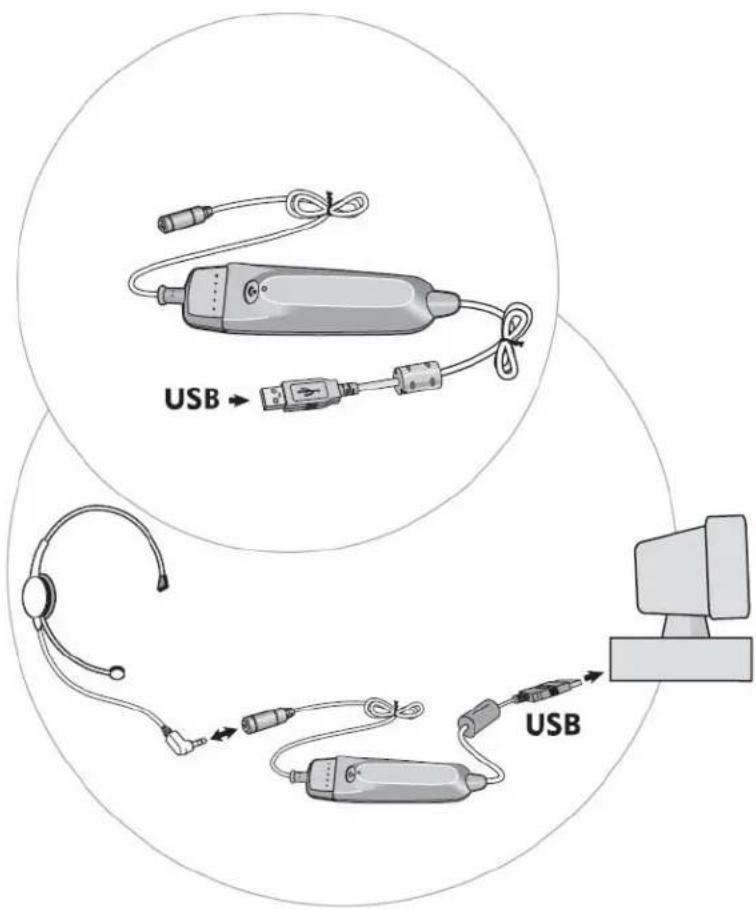
text_image
USB → USBMethod 1: Headset Settings
Headset Settings for MX500i:
For the best sound experience, please check that:
1) Your talking volume is optimized
2) Your mute button is not on
3) Your listening volume is optimized
- To adjust the volume that you hear the other person at, adjust the rolling knob on the side of the pod. Make sure it is on the higher volume setting if you are having trouble hearing the other person.
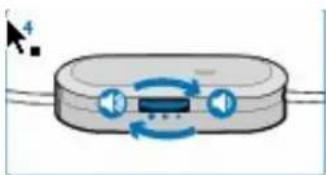
natural_image
Diagram of a device with bidirectional arrows indicating rotation or signal flow (no text or symbols)- If the person on the other end can not hear you, check that the pod is NOT on mute. Make sure that you see GREEN to ensure the mute button is off.
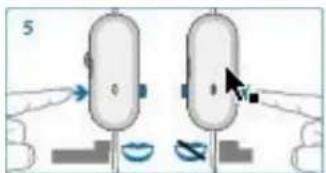
natural_image
Diagram showing two identical mechanical components with arrows indicating motion, no text or symbols present- If the person on the other end can not hear you well, try adjusting you microphone adjustment switch. This switch is on the side and adjusts your outgoing volume. You may need a paperclip or pen to adjust it.
text_image
6Headset Settings for M214i:
For the best sound experience from your M214i, please check that:
1) Your talking volume is optimized
2) Your mute button is not on
3) Your listening volume is optimized
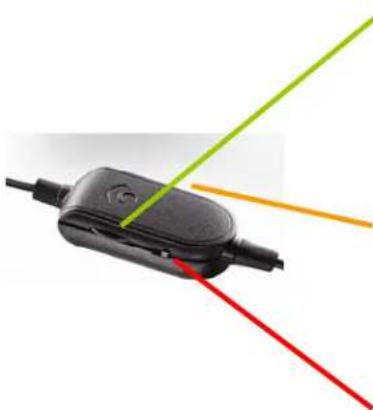
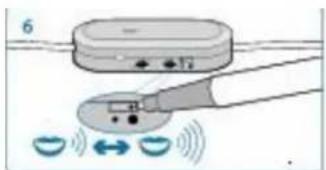
natural_image
Close-up of a black electronic device with three colored lines (red, green, yellow) extending from its side, against a white background (no text or symbols visible)-
To adjust the volume that you hear the other person at, adjust the rolling knob on the side of the pod. Make sure it is on a higher volume setting if you are having trouble hearing the other person.
-
If the person on the other end can not hear you, check that the pod is NOT on mute. The mute switch is on the side of the pod.
-
If the person on the other end can not hear you well, try adjusting you microphone adjust switch. This switch is on the side and adjusts your outgoing volume. You may need a paperclip or pen to adjust it.
Method 2: Internet Calling Services Settings
This should be done regardless of which service provider you use.
Settings for Skype:
(Ver 2.5.0.141)
The following adjustments are to make sure that Skype recognizes your internet headset:
Step 1: Open up Skype
Step 2: Click ‘tools’ > ‘Options’ (from the top navigation, Figure 1)
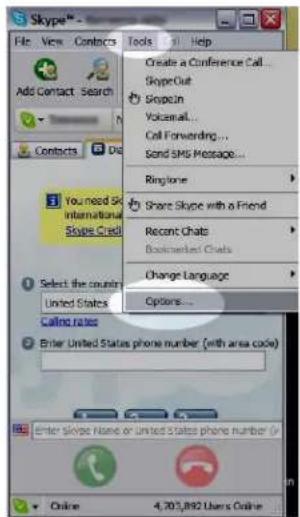
text_image
Skype File View Contacts Tools Help Create a Conference Call... SkypeOut Stopout Vocemail... Call Forwarding... Send SMS Message... Ringtone > Share Skype with a Friend Recent Chats Bookmaster Chats Change Language Options... You need Sk International Skype Credit Select the country United States Calling rates Enter United States phone number (with area code) Enter Skype Name or United States phone number (x 4,703,892 Users OnlineStep 3: Select 'Sound Devices' (from the left hand column)
Step 4: In ALL 3 drop down menus (Audio In, Audio Out, and Ringing) select ‘USB Audio Device’ (Figure 2)
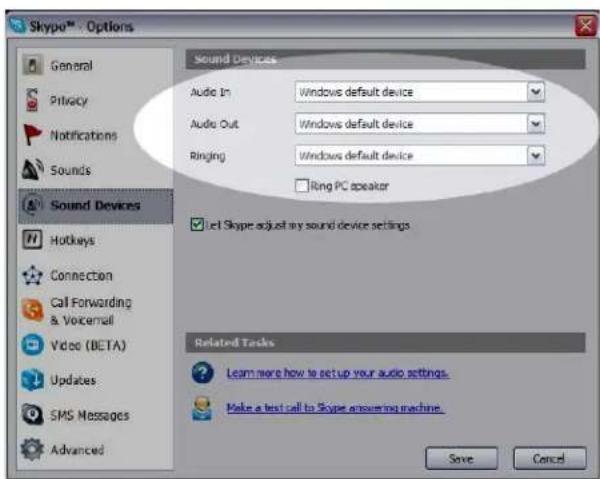
text_image
Skype™ - Options General Privacy Notifications Sounds Sound Devices Hotkeys Connection Call Forwarding & Voicemail Video (BETA) Updates SMS Messages Advanced Sound Devices Audio In Windows default device Audio Out Windows default device Ringing Windows default device Ring PC speaker Let Skype adjust my sound device settings Related Tasks Learn more how to set up your audio settings. Make a test call to Skype answering machine. Save CancelStep 5: Press SAVE. This button is located in the bottom right corner.
Settings for Yahoo! Messenger with Voice:
(Ver 8.0.0.716)
The purpose of the following adjustments, are to make sure that Yahoo! Messenger recognizes your Internet headset.
Step 1: Open Yahoo Messenger
Step 2: Choose 'Actions' > 'Call setup':

text_image
AT&T Yahoo! Messenger with ... Messenger Contacts Actions Help Send an Instant Message... Ctrl+M Call Computer... Ctrl+L Call a Phone Number... Ctrl+K Call Setup... Send an SMS Message... Ctrl+T Send an Email... Ctrl+Y Send My Contact Details... Ctrl+Shift+C Send My Messenger List... Ctrl+Shift+M Send a File... Share Photos... Play a Game... Choose a Plugin... View Webcam... Invite to View My Webcam Invite to Conference... (MÈME LES PLUS SECRÉTES) DÉCOUVREZ-LESStep 3: Click 'Next' on the wizard:

text_image
Yahoo! Call Setup Assistant Set Up Your Computer to Make Voice Calls In just two steps, you can set up your computer's microphone and speakers for a high-quality voice experience within Yahoo! Messenger. Note: You can always excess the Call Setup Assistant from the Actions menu. Click Next to continue.Step 4: Speak into your headset and see if the bars light up. If not, select 'USB Audio Device' from the drop down menu. Click next:

PLANTRONICS
SOUND INNOVATION
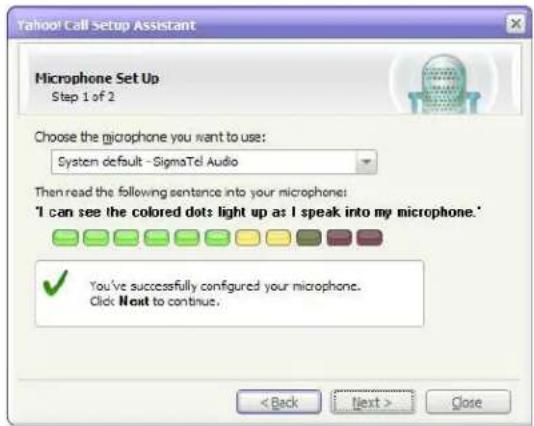
text_image
Yahoo! Call Setup Assistant Microphone Set Up Step 1 of 2 Choose the microphone you want to use: System default - SigmaTel Audio Then read the following sentence into your microphone: 'I can see the colored dots light up as I speak into my microphone.' ✓ You've successfully configured your microphone. Click Next to continue. < Back Next > CloseStep 5: Listen for music. If you can not hear music, select 'USB Audio Device' from the drop down menu. Click next:
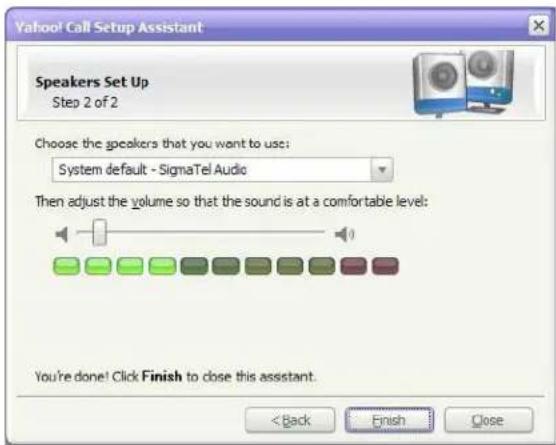
text_image
Yahoo! Call Setup Assistant Speakers Set Up Step 2 of 2 Choose the speakers that you want to use: System default - SigmaTel Audio Then adjust the volume so that the sound is at a comfortable level: You're done! Click Finish to close this assistant. < Back Finish CloseStep 6: Click Finish
Settings for Google Talk:
The purpose of the following adjustments, are to make sure that Google Talk recognizes your Internet headset.
Step 1: Open Google Talk:
Step 2: Click 'settings' in the top right of the Google talk window:
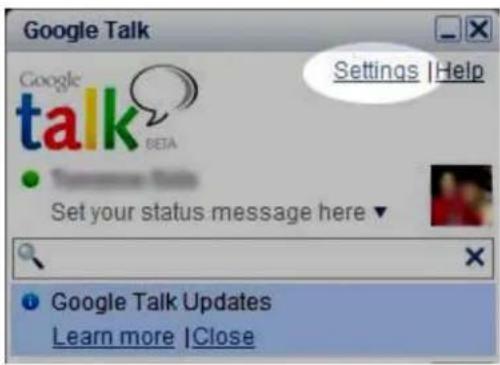
text_image
Google Talk Settings | Help Google talk BETA Set your status message here ▼ Google Talk Updates Learn more | CloseStep 3: Click 'audio' in the left navigation of the settings window

text_image
Settings General Chat Blocked Notifications Connection Audio Appearance Audio Input - microphone or headset: Default Device ✓ Automatically adjust microphone sensitivity Output - speakers or headset Notifications - rings and dings All Devices Calls Default Device ✓ Unmute speaker for ringing ✓ Unmute speaker and microphone when on a call Share music listening history with Google Music Trends Enabling this will share your music listening history with Google Music Trends and will turn on Personalized Search. Learn more Help OK CancelStep 4: Select ‘USB Audio Device’ in ALL 3 of the drop down menus in the audio screen. See picture above.
Step 5: Click OK.
Method 3: Windows XP Settings
You may not find this necessary to do.
Microphone Level Settings for Windows XP:
Skype and Google automatically adjust these volume levels for you during your conversation. If you are using Skype or Google you DO NOT have to manually adjust your computer microphone level.
For other internet calling services, you may need to adjust your computer microphone level in order for the person on the other end to hear you perfectly. Below is a description of how to adjust your computer microphone for Windows XP systems. However, this setting adjustment should also be available in other versions of Windows.
Make sure your USB adapter is connecting your headset to your computer.
Start >
Control Panel >
Choose Sound and Audio Devices >
Click the 'Audio' tab >
Under 'Sound Recording' click the 'volume' button>
If a 'Microphone' option is available adjust it how you see fit.
If a ‘Microphone’ option is NOT available (likely):
Choose Options >
Properties >
Check Microphone>
Adjust accordingly
Side Tone Adjustments for Windows XP:
You may not find it necessary to make this adjustment. Most phones have some built-in sidetone that lets you hear your own voice as you talk. It is barely noticeable but for some users, the absence of sidetone might affect the overall sound experience.
Make sure your USB adapter is connecting your headset to your computer.
Start >
Control Panel>
Sound and Audio Devices >
Click the 'volume tab' >
Click the 'Advanced' button>
If a 'Microphone' option is available adjust it how you see fit.
If a 'Microphone' option is NOT available (likely):
Choose Options >
Properties >
Check Microphone>
Adjust accordingly.
The degree to which you will notice the adjustments, depends on the level your ‘speaker volume’ is set, within that same panel. A higher overall speaker volume will allow a higher level of side tone.