
CW40T2RW - Television WESTINGHOUSE - Free user manual and instructions
Find the device manual for free CW40T2RW WESTINGHOUSE in PDF.


| Product Type | Television |
| Brand | Westinghouse |
| Model | CW40T2RW |
| Screen Size | 40 inches |
| Display Resolution | 1920 x 1080 (Full HD) |
| Display Technology | LED |
| Refresh Rate | 60 Hz |
| Dimensions (with stand) | Approximately 900 x 550 x 200 mm |
| Weight (with stand) | Approximately 8 kg |
| Power Consumption | 70 W (typical) |
| Standby Power | < 0.5 W |
| Inputs | HDMI, USB, Composite, VGA, RF |
| Outputs | Headphone jack, Optical audio |
| Built-in Speakers | 2 x 8 W |
| Smart TV | No |
| VESA Mount | 200 x 200 mm |
| Remote Control | Included |
| Power Supply | AC 100-240 V, 50/60 Hz |
| Operating Temperature | 0°C to 40°C |
| Cleaning | Use a soft, dry cloth. Do not use liquid cleaners. |
| Safety | Place on a stable surface. Do not block ventilation. |
Frequently Asked Questions - CW40T2RW WESTINGHOUSE
User questions about CW40T2RW WESTINGHOUSE
0 question about this device. Answer the ones you know or ask your own.
Ask a new question about this device
Download the instructions for your Television in PDF format for free! Find your manual CW40T2RW - WESTINGHOUSE and take your electronic device back in hand. On this page are published all the documents necessary for the use of your device. CW40T2RW by WESTINGHOUSE.
USER MANUAL CW40T2RW WESTINGHOUSE
The lightning flash with arrowhead symbol, within an equilateral triangle, is intended to alert the user to the presence of un-insulated dangerous voltage within the products enclosure that may be of sufficient magnitude to constitute a risk of electric to persons.

The exclamation point within an equilateral triangle is intended to alert the user to the presence of important operating and maintenance (servicing) instruction the literature accompanying the appliance.
CAUTION: USE OF ANY CONTROLS, ADJUSTMENTS, OR PROCEDURES OTHER THAN THOSE SPECIFIED HEREIN MAY RESULT IN HAZARDOUS RADIATION EXPOSURE.
CAUTION: These servicing instructions are for use by qualified service personnel only. To reduce the risk of electric shock, do not perform any servicing other than that contained in the operating instructions unless you are qualified to do so.
Refer to service manual for servicing instructions.
Important Safety Instructions
Note:
- Read these instructions.
- Keep these instructions.
3.Heed all warnings.
4.Follow all instructions.
5.Do not use near water.
6.Clean only with dry cloth. - Do not block any ventilation openings. Install in accordance with the manufacturer's instructions.
- Do not install near any heat sources such as radiators, heat registers, stoves, or other apparatus (including amplifiers) that produce heat.
-
Do not defeat the safety purpose of the polarized or grounding-type plug. A polarized plug has two blades with one wider than the other. A grounding type plug has two blades and a third grounding prong. The wide blade or the third prong are provided for your safety. If the provided plug does not fit into your outlet, consult an electrician for replacement of the obsolete outlet.
-
Protect the power cord from being walked on or pinched particularly at plugs, convenience receptacles, and the point where they exit from the apparatus.
- Only use attachments / accessories specified by the manufacturer.
- Use only with the cart, stand, tripod, bracket, or table specified by the manufacturer, or sold with the apparatus. When a cart is used, use caution when moving the cart / apparatus combination to avoid injury from lip-over.
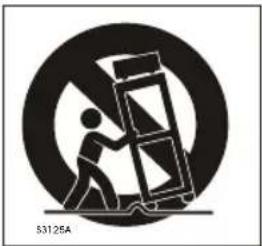
natural_image
Silhouette of a person climbing a ladder inside a circle, symbolizing work or progress (no text or symbols)- Unplug this apparatus during lightning storms or when unused for long periods of time.
- Refer all servicing to qualified service personnel. Servicing is required when the apparatus has been damaged in any way, such as power-supply cord or plug is damaged, liquid has been spilled or objects have fallen into the apparatus, the apparatus has been exposed to rain or moisture, does not operate normally, or has been dropped.
- Apparatus shall not be exposed to dripping or splashing and that no objects filled with liquids, such as vases, shall be placed on the apparatus.
- WARNING: To reduce the risk of fire or electric shock, do not expose this apparatus to rain or moisture.
- Mains plug or appliance coupler is used as the disconnect device, shall be readily operable.
- The apparatus shall be connected to a MAINS socket outlet with a protective earthing connection.
- WARNING: The batteries shall not be exposed to excessive heat such as sunshine, fire or the like.
- The ON-MODE Power under Home Mode should be less than 75.0W.
- The Sleep Mode power should be less than 1.0W.
- This equipment is a Class II or double insulated electrical appliance. It has been designed in such a way that it does not require a safety connection to electrical earth.
- Lamp(s) inside this product contain mercury and must be recycled or disposed of according to local, state or federal laws.
This Westinghouse product has earned the Energy Star ^® for meeting U.S. Federal energy efficiency guidelines as set by the Department of Energy and Environmental Protection agency. The Energy Star ^® program exists to provide energy saving guidelines and help promote energy efficient products and practices. Changes to certain features, settings and functions of this TV can change and/or increase its power consumption. Depending on how settings are changed, power consumption may exceed the limits required for Energy Star ^® qualification. This Westinghouse TV will operate at optimal energy efficiency in “Home” mode.
How to install the stand!
Follow instructions below to install the base of the TV, reverse the instructions to remove the base.
- Fix the base cover to the fixed-ring base as image 1;
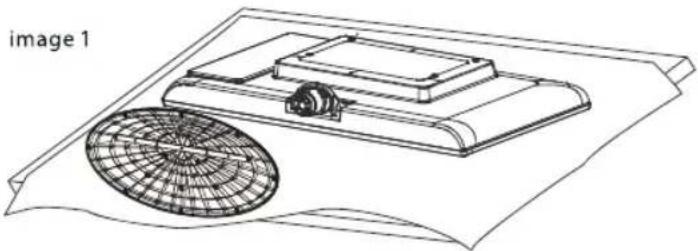
natural_image
Technical line drawing of a device with a circular base and grid pattern, labeled 'image 1' (no text or symbols on the diagram itself)- Fix the base cover to fixed-ring base with the screws.
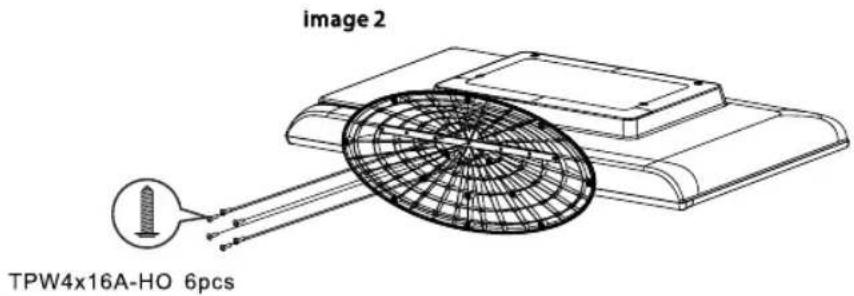
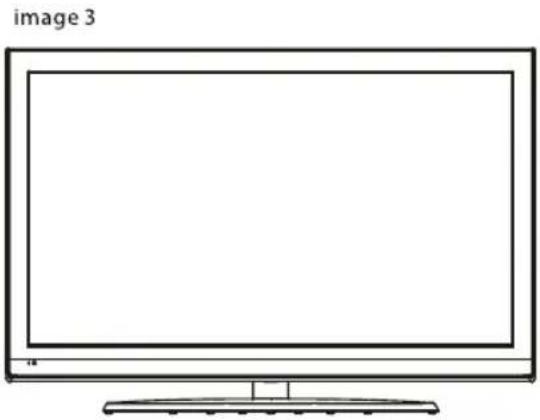
natural_image
Line drawing of a flat-screen monitor with a blank screen and stand (no text or symbols)3. PREFACE
Thank you for buying this TV! Please read this manual thoroughly before operating the TV. Make sure the TV was not damaged in transit. Should the TV be damaged, do not install it and contact your dealer. Check that you have all the accessories according to the model.
4. SAFETY PRECAUTIONS

Put the TV on a stable surface.

Do not place any material on the TV.
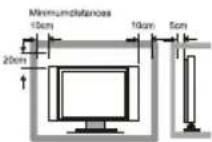
Do not use the TV with fixtures other than those provided or suggested by the manufacturer.
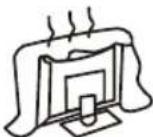
Do not block or cover the ventilation openings on the TV. If you have a wall mount, check that it is steady.
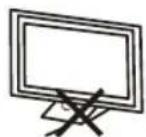
Power cord and cables must be properly routed and protected to prevent people from stepping on them and causing the TV to fall.

natural_image
Illustration of a computer monitor with broken-out fragments and lightning bolts (no text or symbols)Keep the TV dry and away from humidity.
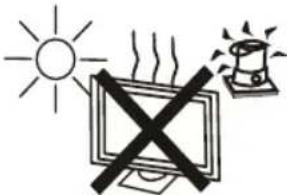
Keep the TV away from heat sources.
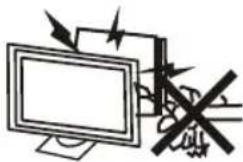
Unplug the TV before cleaning it. Do not use solvent or liquid to clean the TV.
Only clean the TV with a soft and dry cloth.

In case of troubleshooting, do not use spare parts other than those suggested by the manufacturer. Using inadequate spare parts can lead to electric shocks, short-circuits, fire or other incidents.
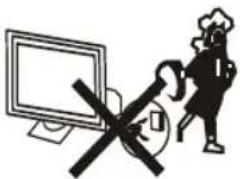
Unplug the TV during lightning storms or when unused for long periods of time.
5. CONTENTS
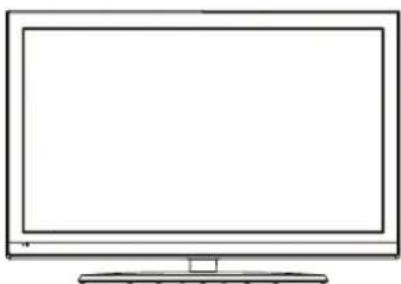
natural_image
Line drawing of a flat-screen monitor with blank screen (no text or symbols)LCD TV SET
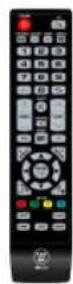
Remote Control
USER'S MANUAL
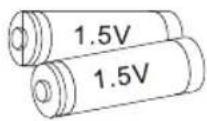
AAA Batteries
Warranty Card
Quick Connect Guide
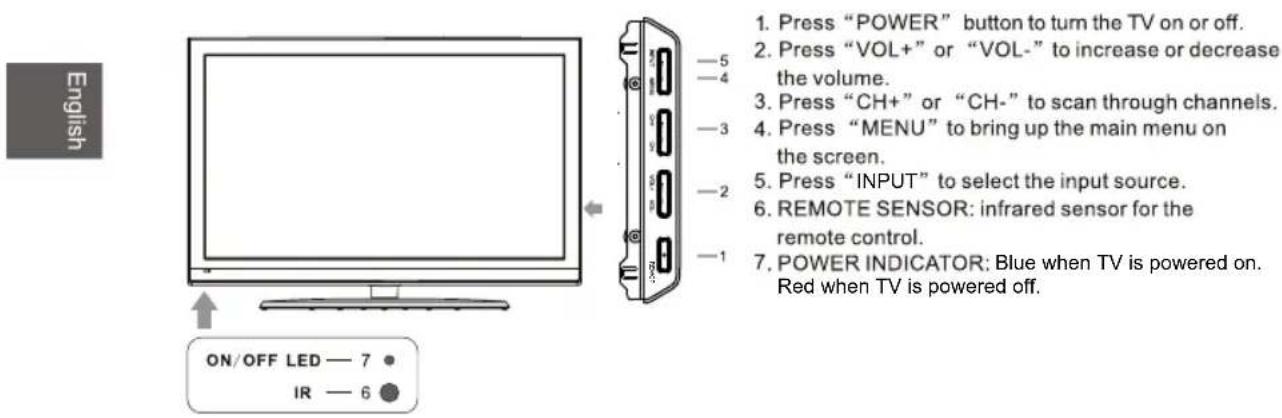
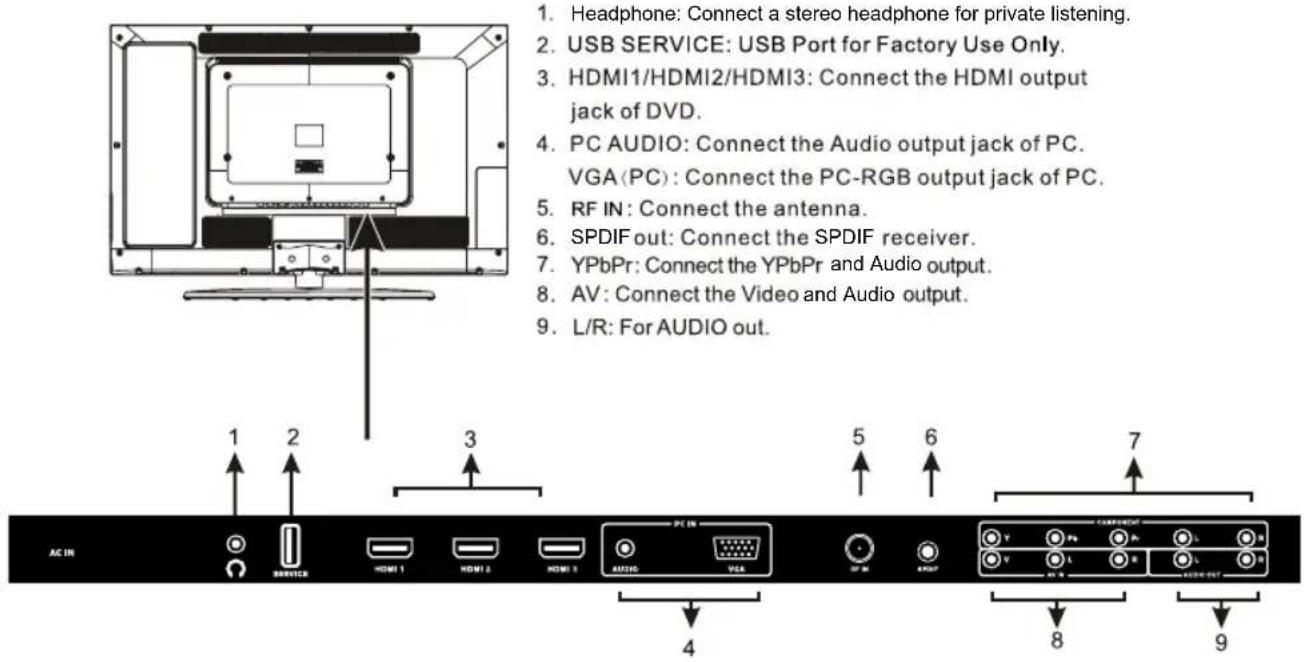
6. FRONT/BACK CONNECTIONS OF LCD TV
Front View
Back View and Control Connections
7. TV INSTALLATION
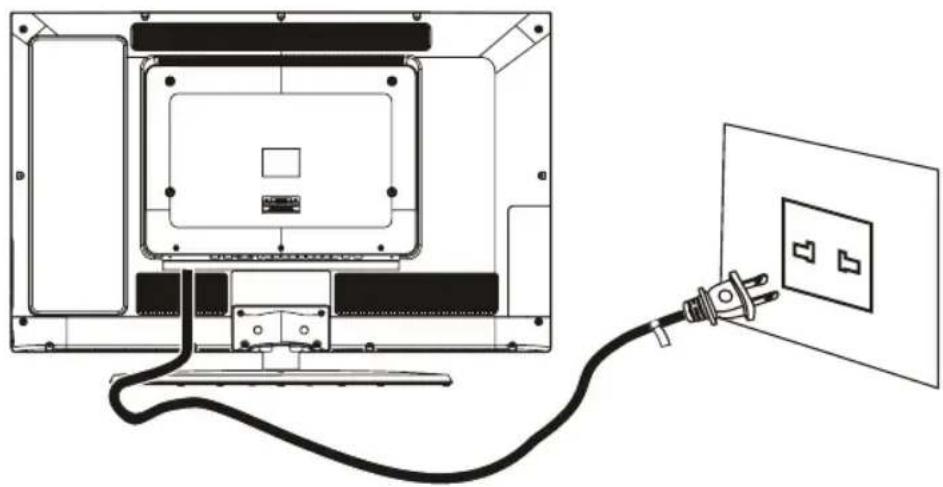
Power Cord Connection
- Connect the power cord correctly as shown.
natural_image
Diagram of an electrical outlet connected to a wall-mounted power plug, showing internal components and wiring (no text or symbols)Antenna Connection
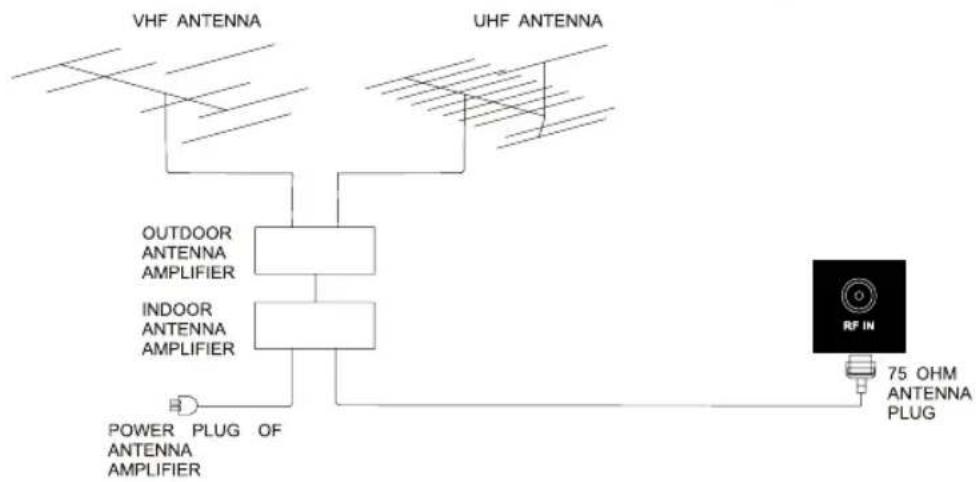
To ensure good picture and sound, TV antenna system needs to be installed. The antenna system as shown can be sourced from TV equipment shops, which will provide service for correct installation and connection. After installation, insert the 75-ohm antenna plug into the antenna jack as shown.
flowchart
graph TD
    A["VHF ANTENNA"] --> B["OUTDOOR ANTENNA AMPLIFIER"]
    C["UHF ANTENNA"] --> D["INDOOR ANTENNA AMPLIFIER"]
    B --> E["POWER PLUG OF ANTENNA AMPLIFIER"]
    D --> E
    E --> F["75 OHM ANTENNA PLUG"]
    G["RF IN"] --> F
AV Connection
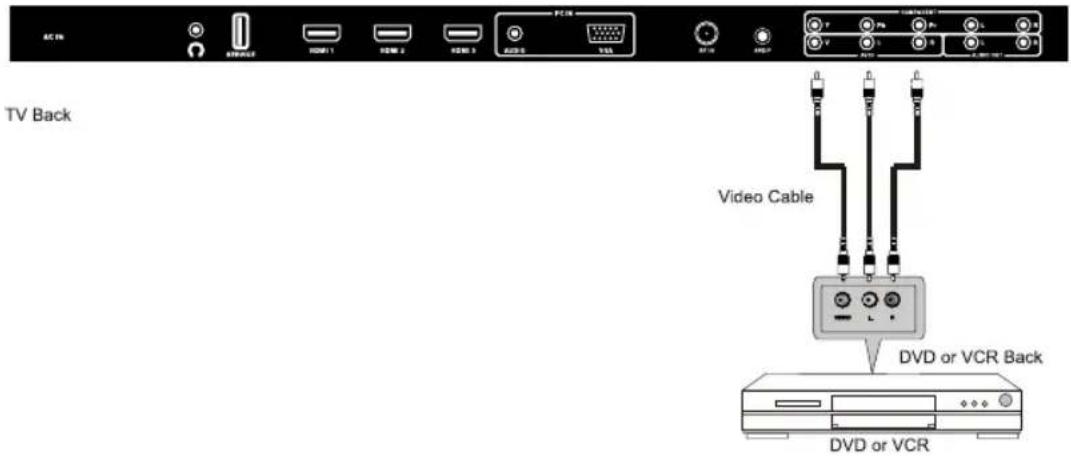
Connect the VIDEO and AUDIO output jack of the DVD or VCR to the VIDEO jacks on the set using the RCA cable. Match the jack colors: Video is yellow, Audio left is white, and Audio right is red. Select the AV input source using the SOURCE button on the remote control.
YPbPr (Component) Connection
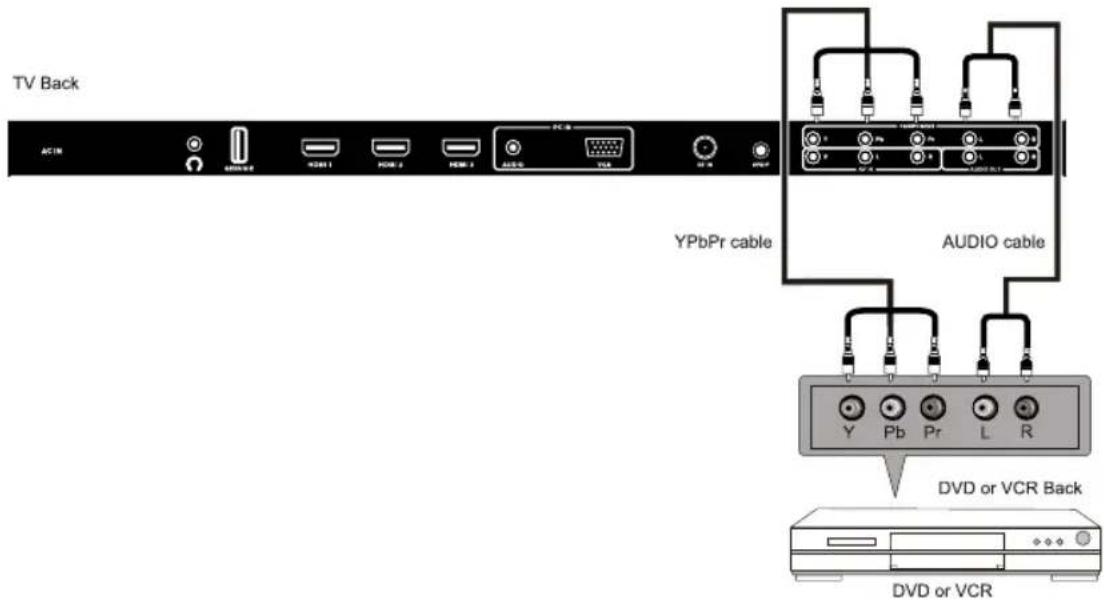
Connect the YPbPr output of the DVD or VCR to the YPbPr input on the set. The picture quality is improved; compared to connecting a regular VCR to the video input. Connect the Audio output of the DVD or VCR to the Audio input jacks on the set using the RCA cable.
Match the jacks colors :Y is green,Pb is blue,Pr is red,Audio left is white and Audio right is red. Select component input source using the SOURCE button on the remote control.
VGA(PC) Connection
Connect the RGB output of the PC to the VGA(PC) jack on the set. Connect the AUDIO output of The PC to the PC AUDIO jack on the set. Select the VGA input source with using SOURCE button on the remote control.

Service Port Function
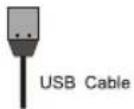
Service port: (For factory uses only.)

TV Back
HDMI Connection
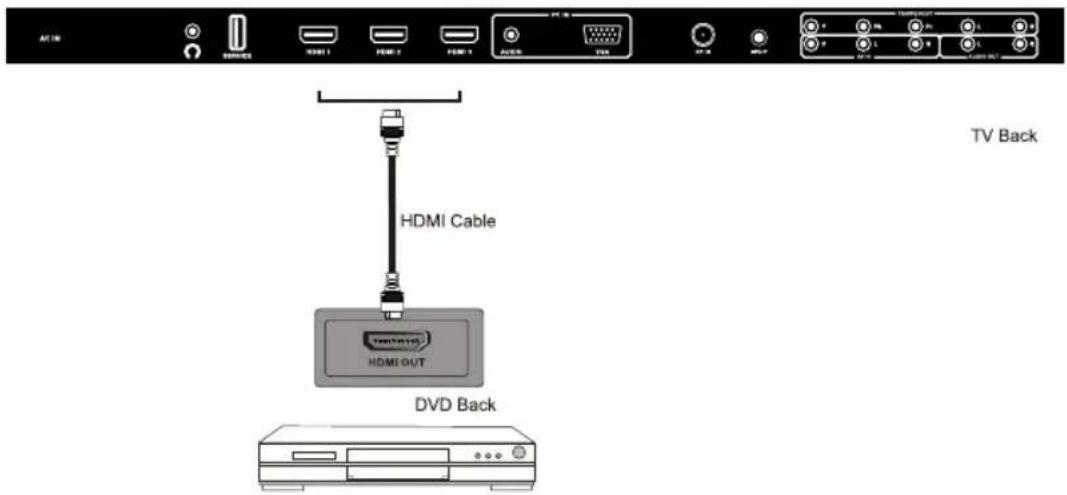
HDMI plug which replaces the HDMI connection allows transfer of all audio/video control signals through one cable only. These signals are transferred in digital.
8. REMOTE CONTROL
Remote control instructions in TV mode
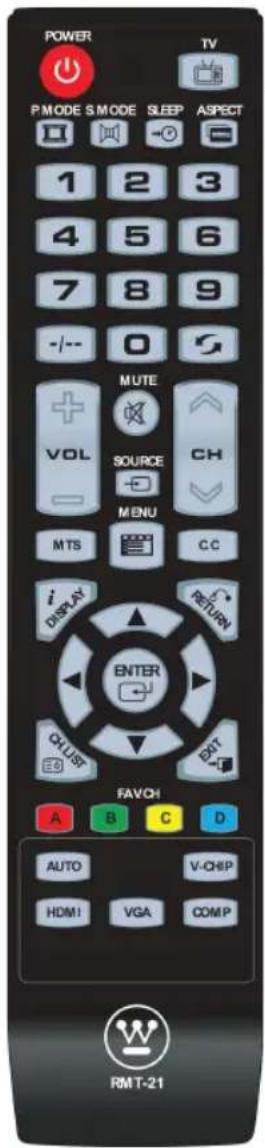
POWER Turn the LCD TV on of off.
TV Select to the TV mode directly.
P.MODE Select the picture mode.
S.MODE Select the sound mode.
SLEEP Set the Sleep Timer.
ASPECT Press to select Aspect Ratio.
NUMBER BUTTONS Press 0-9 to directly change the TV channel.
-/- Press this button to enter a program number for multiple program channel such as 2-1, etc.
5 Return to the previous channel viewed.
VOL+/VOL- Press to increase / decrease the sound level.
CH^/CH▼ Press to scan through channels.
MUTE Press once to disable the audio and press again to enable the audio.
SOURCE Press SOURCE to display the OSD input source, press ▲▼ to select an input source, and then press ENTER to confirm.
MENU Displays the main TV menu.
MTS Press to adjust between available audio channel.
CC Press to set the closed caption.
DISPLAY Displays the source and channel information.
RETURN Return to the previous menu.
THUMBSTICK(▲/▼/◄/►/ENTER)
Allows you to navigate the on-screen menus and adjust the system settings to your preference.
CH.LIST Press to display the TV program list.
EXIT Exit the main TV menu.
FAV.CH A
Single push >switch to FAV channel A;
Push and hold >store current channel in A
FAV.CH B
Single push >switch to FAV channel B;
Push and hold >store current channel in B.
FAV.CH C
Single push >switch to FAV channel C;
Push and hold >store current channel in C.
FAV.CH D
Single push >switch to FAV channel D;
Push and hold >store current channel in D
V-CHIP Setting up parental control.
AUTO Press to adjust the picture automatically in VGA source.
HDMI Select to the HDMI mode directly.
VGA Select to the VGA mode directly
COMP Select to the COMP mode directly.
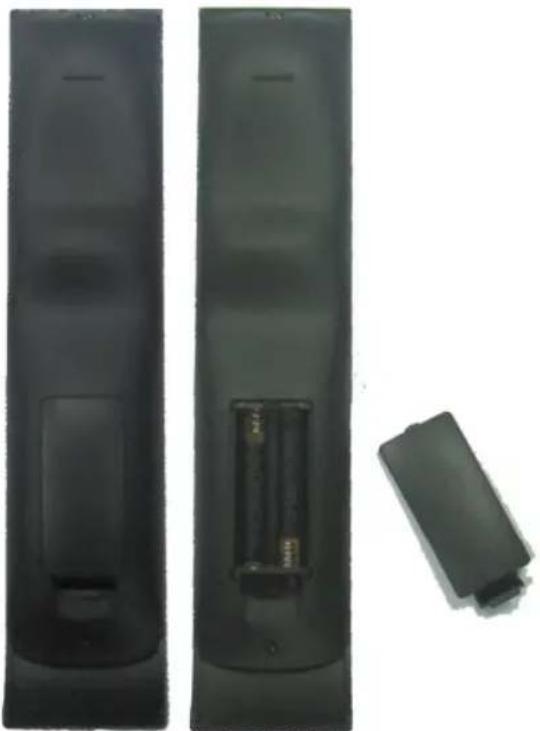
Remote control setup
- Open the cover.
- Uses AAA size batteries. When inserting the batteries, make sure correct polarities "+" and "-" marks on the batteries line up correctly with compartment markings.
- Replace the battery cover.
To prevent battery leakage which may result in bodily injury or damage to the remote:
- Install all batteries correctly, and as marked on the remote control.
- Do not mix batteries:(OLD and NEW or CARBON and ALKALINE, etc) Remove batteries when the remote is not used for a long period of time
natural_image
Two black remote control panels with visible battery modules and one separate plastic case (no text or symbols)9.Menu Operation
SETUP WIZARD
Select Language
Select Language
Welcome to the Westinghouse HDTV Setup Wizard.
Follow this guide to help setup your
HDTV for Scanning channels or
accessing your external devices for cable satellite Buy on DVD and
CABLO, BACUMCO, CHA-TAY, D.V.D., AM
Use the Up and Down arrows on your
remote control to select the language
to use for menus and message screens
02:Select
English
Français
Español
EnterNext
Time Zone
Time Zone
Use The Up and Down arrows
on your remote control to select your local time zone.
Go Back
0000 Select
Iowa(UTC-10)
A18045(1C-8)
Pacific(UTC-4)
MountainVTC-7
Control(WTC-4)
Eastern(UTC-fi)
Enter:Next
Power on Mode
Power on Mode
Use the Up and Down arrows on your
remote control to select power on mode.
Home optimizes the video setting for
Energy Star qualification.
Home
Retail
Go Back
@00@:Select
Enter:Next
Power on Mode
Use the Up and Down arrows on your
remote control to select power on mode.
Showroom optimizes the video
setting for use on a retail showroom
floor or demo environment
Home picture mode is the mode in which
the product qualifies for ENERGY STAR
Go Back
0836:Select
Home
Retail
Enter Next
Setup Wizard
Let's Get Connected...
Click Here To Connect A Cable Box or Satellite Box
Click here to connect a Game, Blu-Ray DVD, or other player
Click here to scan channels from the Antenna or coastal cable input
Go Back
@00:Select
Enter:Next

Cable or Satellite Source input
Use the Left/Right arrows on your remote control to select the
type of connection are you using to connect the set top box?
For optimal vide quality, we recommend HDMI or Component
(refer to Quick Connect Guide or User Manual to help you
determine what connection you are using)
HDMI
Component
Other
Antenna
Go Back
0984:Select
Enter Next
Let's Get Connected...
Click Here To Connect A Cable Box or Satellite Box
Click here to connect a Game Blu-Ray, DVD, or other player.
Click here to scan channels from the Antenna of classer cable input
Go Back
8000:Select
Enter Next

INPUT SOURCE
TV
AV
Component
HDMI
HDMI2
HDMI
VGA
flowchart
graph TD
    A["Channel Scan"] --> B["Let's Get Connected..."]
    B --> C["Scan Channels from the Antenna or coaxial cable input"]
    C --> D["Scanning channels"]
    D --> E["No Channels Found"]
    E --> F["If channels can not be found, this frame will be displayed automatically"]

    G["Antenna[ATSC"] Channel Access] --> H["Antenna users need a Channel Access Code in order to perform a channel scan and receive broadcast signals. Contact: Westinghouse's Channel Access Service by: Web: www.westinghousedigital.com/support; select Channel Access and enter Access Info. Text Message: Text Tuner to 95495 Phone:1-800-701-0680 follow instructions Select Next to obtain the Access code. Go Back Next"]
    H --> I["Antenna[ATSC"] Channel Access Information]
    I --> J["Enter Channel Access Code"]

    K["Error"] --> L["Scanning channels"]
    L --> M["ERROR: Access Code Incorrect"]

    style A fill:#f9f,stroke:#333
    style G fill:#ccf,stroke:#333
    style K fill:#cfc,stroke:#333
Operating the Menu
- Press the POWER button to turn the LCD TV on.
- Press the MENU button on the remote control, the on-screen menu will appear on the screen.
- Use the LEFT and RIGHT buttons to select your main menu option.
PICTURE MENU:
Allows you to make adjustments to your picture settings. (select TV source for example)
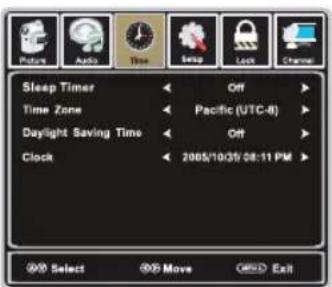
TIME MENU:
Allows you to set up a variety of timer options. (Select TV source for example)
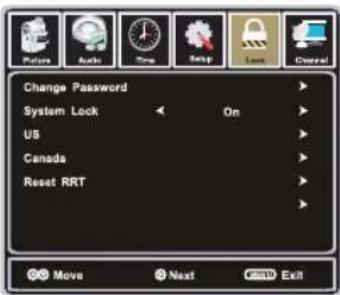
LOCK MENU:
Allows you to set up a variety of lock options. (Select TV source for example)
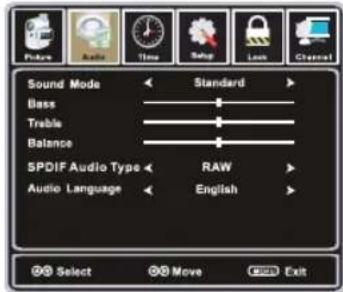
AUDIO MENU:
Allows you to customize the audio options and effects. (select TV source for example)
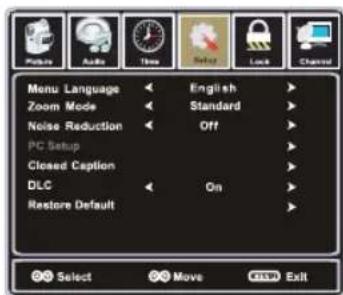
SETUP MENU:
Allows you to set up a variety of setup options. (Select TV source for example)
CHANNEL MENU:
Allows you to search channels and set up a variety of channel options. (Select TV source for example)
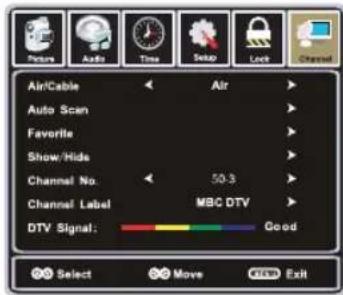
- Use the UP/DOWN buttons to select an option of the sub-menu, and press the RIGHT button.
While in adjustment mode, use the LEFT/RIGHT button to change the value of the item. - Press the MENU button to exit the menu.
Note:
Only when you input the suitable signal, the relevant items can be activated.
- Press the POWER button to turn the LCD TV on.
- Press the MENU button on the remote control, the on-screen menu will appear on the screen.
- Use the LEFT and RIGHT buttons to select your main menu option.
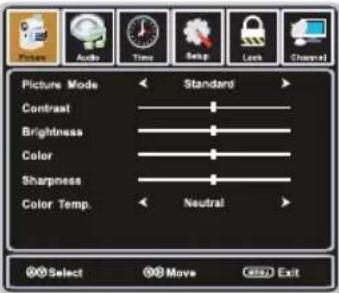
PICTURE Menu
Select TV source for example.
- Press the MENU button on the remote control to display the Main menu, and use the LEFT and RIGHT buttons to select the PICTURE.
- Use the UP and DOWN buttons to highlight an individual PICTURE option, use the LEFT and RIGHT buttons to change the setting, and press the MENU to exit the menu.
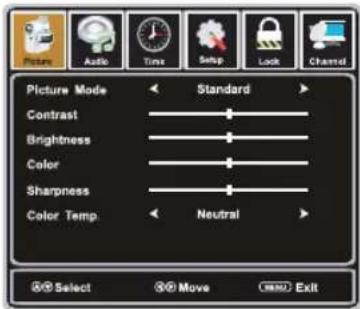
The PICTURE menu includes the following options :
Picture Mode
Cycles among picture display modes: Standard, Dynamic, Movie, User.
Contrast
Controls the difference between the brightest and darkest regions of the picture.
Brightness
Controls the overall brightness of the picture
Color
Control the color.
Sharpness
Increase this setting to see crisp edges in the picture; decrease it for soft edges.
Color Temp.
Cycles among color temp: Neutral, Warm, Cool.
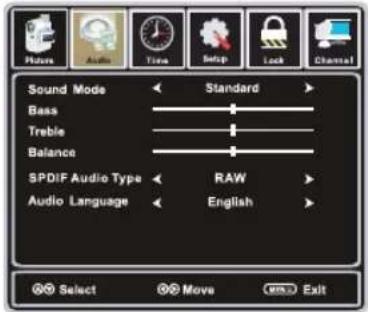
AUDIO Menu
Select TV source for example.
- Press the MENU button on the remote control to display the Main menu, and use the LEFT and RIGHT buttons to select the AUDIO.
- Use the UP and DOWN buttons to highlight an individual AUDIO option, use the LEFT and RIGHT buttons to change the setting, and press the MENU to exit the menu.
The AUDIO menu includes the following options :
Sound Mode
Allows you to select among: User, Standard, Music, Movie.
Bass
Controls the relative intensity of lower pitched sounds.
Treble
Controls the relative intensity of higher pitched sounds
Balance
To adjust the balance of the left and right sound track, or turn off the volume of the left and right sound track.
SPDIF Audio Type
Allows you to select between: PCM and RAW.
Audio Language
Allows you to select audio languages among: English, Français and Español.
TIME Menu
Select TV source for example.
- Press the MENU button on the remote control to display the Main menu, and use the UP and DOWN buttons to select the TIME.
- Use the UP and DOWN buttons to highlight an individual TIME option, use the LEFT and RIGHT buttons to change the setting, and press the MENU button to exit.
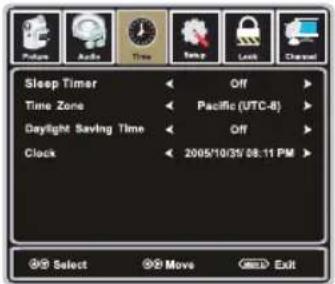
The TIME menu includes the following options :
Sleep Timer
Allows you to set up the sleep timer among: 5Min, 10Min, 15Min, 30Min, 45Min, 60Min, 90Min, 120Min, 180Min, 240Min and Off.
Time Zone
Allows you to set up the time zone : Pacific, Alaska, Hawaii, Eastern, Central and Mountain.
Daylight Saving Time
Allows you to set up the daylight saving between On or Off.
SETUP Menu
Select TV source for example.
- Press the MENU button on the remote control to display the Main menu, and use the LEFT or RIGHT button to select the SETUP.
- Use the UP and DOWN buttons to highlight an individual SETUP option, use the LEFT and RIGHT buttons to change the setting, and press the MENU button to exit.
The SETUP menu includes the following options:
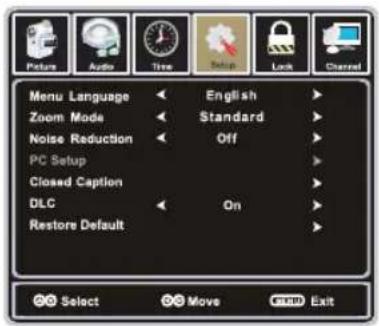
Menu Language
Allows you to select menu language among: English, Français and Español.
Zoom Mode
Allows you to select the zoom mode among: Standard, Fill, Overscan.
Noise Reduction
Allows you to select the noise reduction mode among: Strong, Off, Weak, Medium.
PC Setup (In VGA Mode only)
Input PC signal first, then press SOURCE button to select VGA mode, press RIGHT button to confirm.
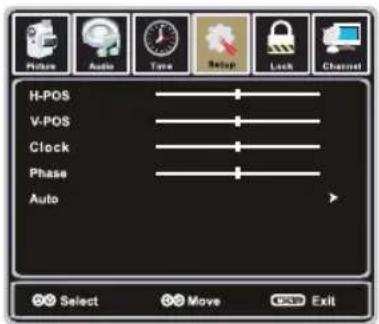
H-Position Allow you to use LEFT and RIGHT button to adjust the H Position.
V-Position Allow you to use LEFT and RIGHT button to adjust the V Position.
Clock Allow you to prolong the image.
Phase Allow you to adjust the definition.
Auto Select "Auto" and press RIGHT, the unit will automatically adjust all items to achieve a best effect.
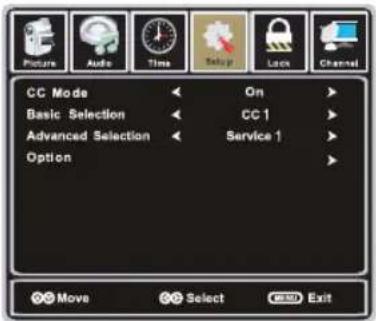
Closed Caption
Use Down button to highlight the Closed Caption item, then press RIGHT button to enter into the following menu.
CC Mode
Allows you to select the CC Mode among: On, Off and CC on Mute.
Basic Selection
Allows you to select the basic selection among: CC1, CC2, CC3, CC4, Text1, Text2, Text3 and Text4.
Advanced Selection
Allows you to select the advanced selection among:
Service1, Service2, Service3, Service4, Service 5 and Service 6.
Option
Use Down button to highlight the "Option" item, then press RIGHT button to enter into the following menu.
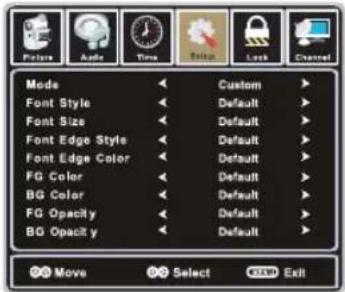
Use UP and DOWN buttons to highlight the desired item, and use LEFT and RIGHT buttons to select.
DLC
Dynamic luminance control On or Off.
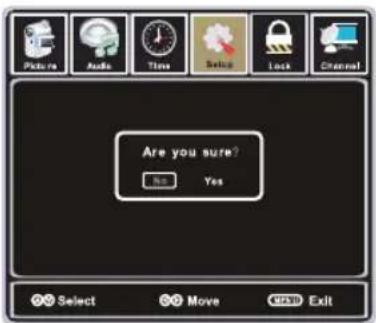
Restore Default
Restores all settings to factory settings.
LOCK Menu
Select TV source for example.
- Press the MENU button on the remote control to display the Main menu, and use the LEFT and RIGHT buttons to select the LOCK
- Use the DOWN button to highlight the "Enter Password" item, use the numeric keys to input 4-digital password, then the screen will display the junior menu. After settings, press menu button to exit.
NOTE: The factory password is 0000.
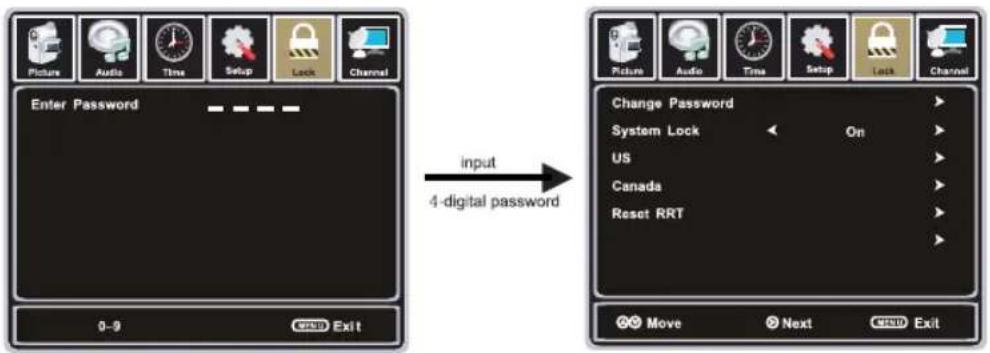
The LOCK menu includes the following options :
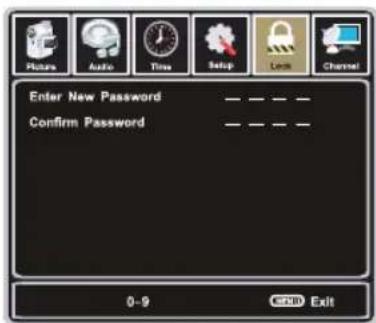
Change Password
Use DOWN button to select the "Change Password" item, then press RIGHT button to enter into the following menu. Input the new 4-digital password and input it again to confirm.
System Lock
Allows you to turn on or off the system lock. If you turn off the system lock, then the following items (US, Canada and Reset RRT) will unable to use.
US
Use Down button to highlight the "US" item, then press RIGHT button to enter into the following menu.
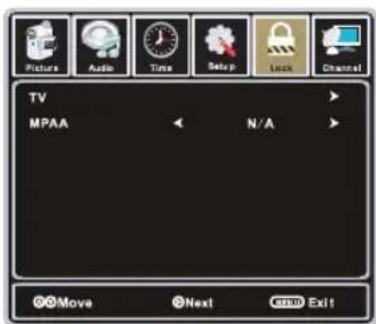
TV
Use Down button to highlight the "TV" item, then press RIGHT button to enter into the following menu.
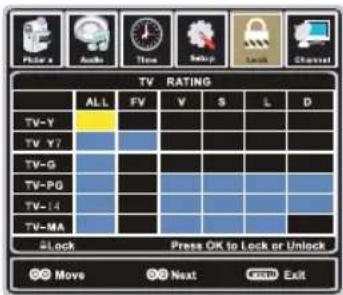
Use UP and DOWN buttons to select the desired rating and press OK button to block or unblock rating.
MPAA
The Movie rating (MPAA) is used for original movies rated by the Motion Picture Association of America
(MPAA) as broadcasted on cable TV and not edited for television.
Use RIGHT and LEFT button to select N/A, G, PG, PG-13, R, NC-17 or X.
RATING DESCRIPTION
G General Audiences. Movie is appropriate for all ages.
PG Parental Guidance Suggested. May contain material not suited for younger viewers.
PG-13 Contains content that may not be appropriate for viewers under the age of 13.
R Restricted. Contains adult content, no one under 17 admitted without parent.
NC-17 No one 17 and under admitted.
X Adults only.
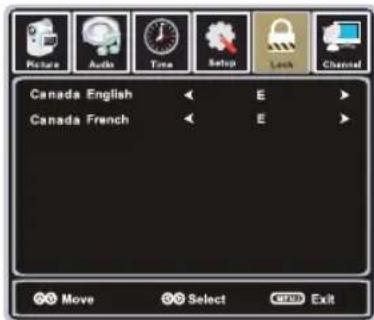
Canada
Use Down button to highlight the "Canada" item, then press RIGHT button to enter into the following menu.
Canada English
Use LEFT and RIGHT buttons to select among: E, C, C8+, G, PG, 14+ and 18+
Canada French
Use LEFT and RIGHT buttons to select among: E, G, 8ans+, 13ans+, 16ans+ and 18ans+
Reset RRT
Allows you to reset the RRT setting.
CHANNEL Menu
Select TV source.
- Press the MENU button on the remote control to display the Main menu, and use the LEFT and RIGHT buttons to select the CHANNEL.
- Use the UP and DOWN buttons to highlight an individual CHANNEL option, use the LEFT and RIGHT buttons to change the setting, and press the MENU button to exit.
The CHANNEL menu includes the following options :
Air/Cable/QAM
Allows you to select antenna between Air、Cable and QAM.
Use Down button to highlight the "Auto Scan" item, then press RIGHT button to enter into the following menu.
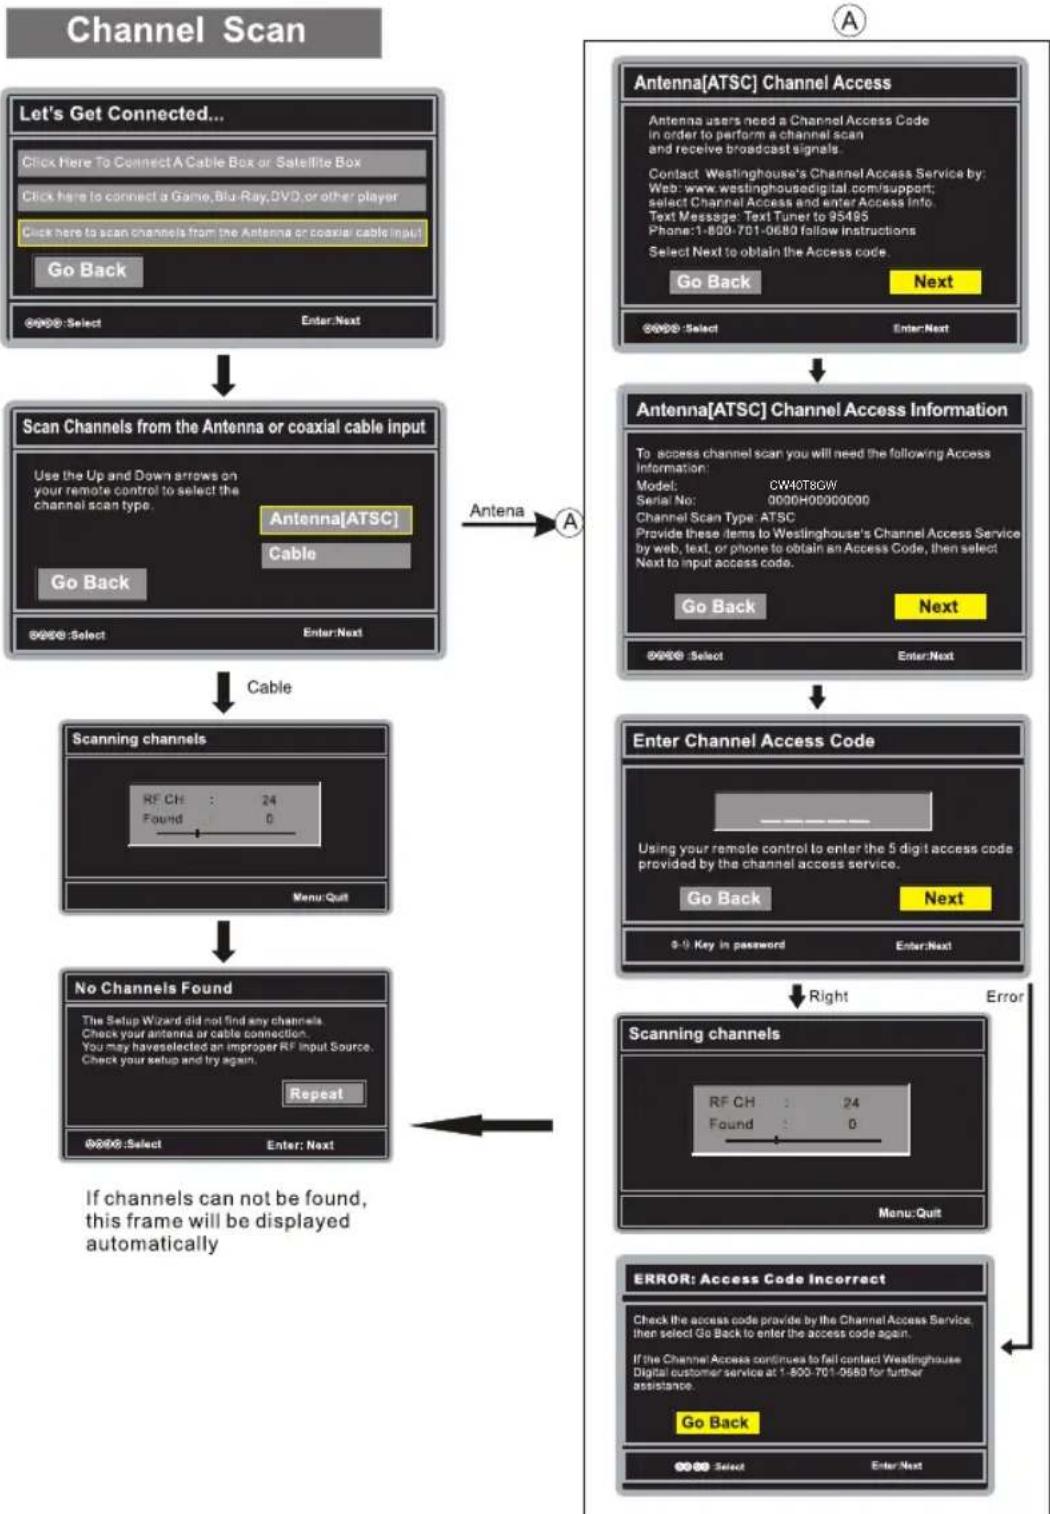
If you select "Air" as input signal in Antenna item, you can press RIGHT button to search the channels automatically.
The receivable channels will be stored automatically. When searching channels, press MENU to stop.
If you select "Cable" as input signal in Antenna item, allows you to select Cable System among: AUTO, STD, IRC and HRC. Use DOWN button to highlight the "Start to Scan", then press RIGHT button to search the channels automatically. The receivable channels will be stored automatically. When searching channels, press MENU to stop.
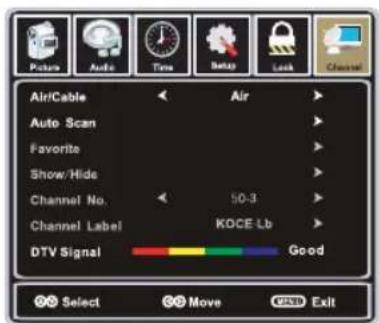
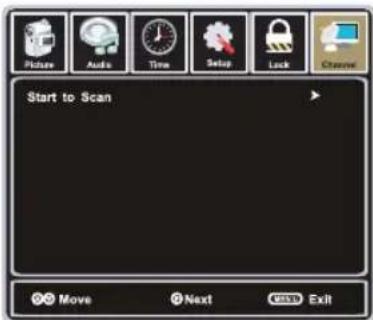
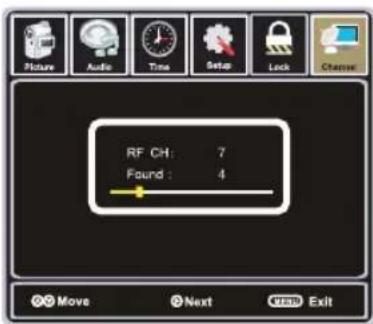
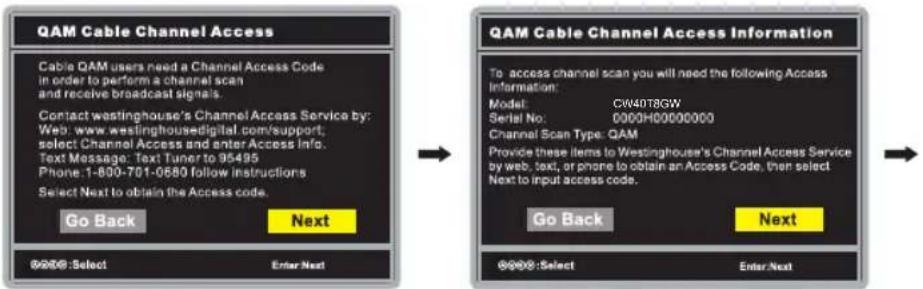
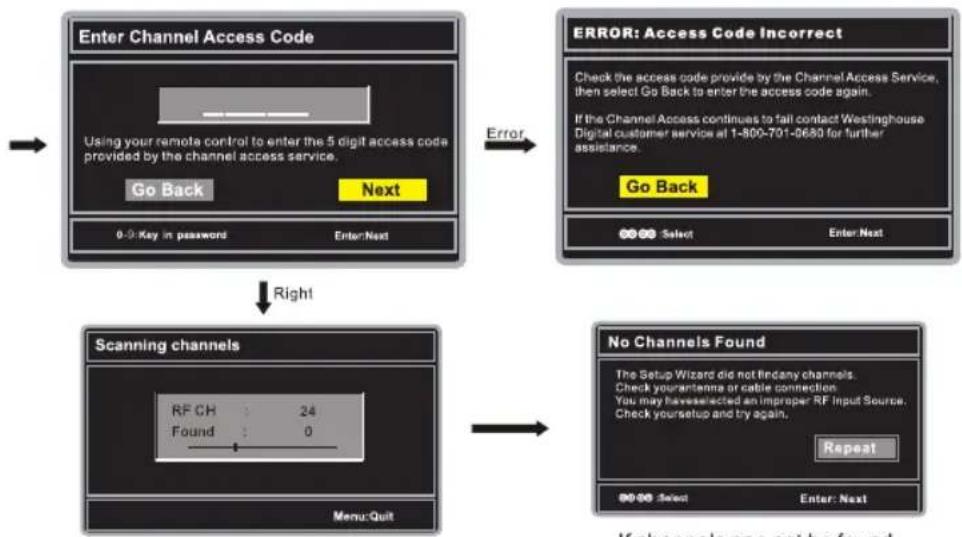
If you select "QAM" as input signal in Antenna, these frames will be displayed automatically (but these frames will be displayed only in the first scan).
flowchart
graph TD
    A["Enter Channel Access Code"] --> B{Using your remote control to enter the 5 digit access code provided by the channel access service.}
    B --> C["Go Back"]
    B --> D["Next"]
    C --> E["0:0 Key in password Enter:Next"]
    D --> F["Error"]
    F --> G{Check the access code provide by the Channel Access Service, then select Go Back to enter the access code again.}
    G --> H["If the Channel Access continues to fail contact Westinghouse Digital customer service at 1-800-701-0680 for further assistance."]
    H --> I["Go Back"]
    I --> J{Select Enter:Next}
    J --> K["Error"]
    K --> L["Scanning channels"]
    L --> M{RF CH : 24
Found : 0}
    M --> N["Menu:Quit"]
    N --> O{No Channels Found}
    O --> P{The Setup Wizard did not find any channels.
Check your antenna or cable connection
You may have selected an improper RF Input Source.
Check your setup and try again.}
    P --> Q["Repeat"]
    Q --> R["0:00 Select Enter:Next"]

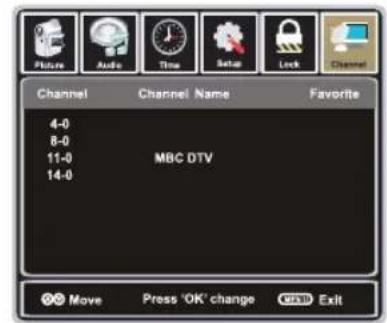
Favorite
Allows you to add these channels which you desired as the favorite channels.
Use UP or DOWN button to highlight the "Favorite" item, then press RIGHT button to enter into the following menu.
Use UP and DOWN button to highlight the desired item, then press OK button to add or remove the highlighted channel as favorite.
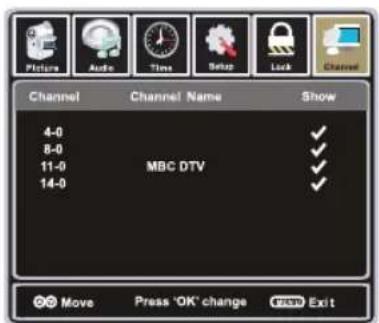
Show / Hide
Allows you to show or hide the channels.
Use UP or DOWN button to highlight the "Show / Hide" item, then press RIGHT button to enter into the following menu.
Use UP and DOWN button to highlight the desired item, then press OK button to show or hide the highlighted channel.
Channel No.
Display the number of current channel.
Channel Label
Display the lable of current channel.
DTV Signal
Display the quality of current DTV Signal.
10. Troubleshooting
Please check if you can solve problems by troubleshooting yourself.
| Troubleshooting | Control |
| No signal | Please check that all cables are correctly plugged in. |
| No color shades | Adjust the contrast, the color and the brightness. |
| Stain on the screen | May be the result from a lighting signal from car, motor, neon light and other electrical devices or appliances. |
| Double or multiple display image | May be the result of an electrical wave disturb from other TV, Computer and Game machine or Radio. |
| Snow on the screen | The cables of the antenna are not correctly plugged in. |
| The remote control does not work | Please check the batteries order and alignment. Check that the IR of the remote control is not hidden by something. |
| "Zip" made noise on TV cover | Even if the display image is correct, the noise may come from an unsteady fixation of the panel. |
| No sound | Make sure that you have not press the MUTE button of the remote control. |
11. SPECIFICATIONS
This manual is only for your reference, any change to the design and specification will not be advised.
| Screen Size | 40 Inch | |
| Display Type | TFT LCD | |
| Resolution(Pixel) | 1920 X 1080 | |
| Aspect Ratio | 16:9 | |
| Power Supply | AC100-240V 50/60Hz | |
| Power Consumption | 160W | |
| TV System | ATSC/NTSC | |
| Video Input Format | PAL/NTSC | |
| Audio Output Power | L/R 2X8W | |
| SUPPORT | ANTENNA | YES |
| AV-IN | YES | |
| YPbPr - IN | YES | |
| HDMI - IN | YES | |
| VGA(PC) - IN | YES | |
| VGA(PC) AUDIO - IN | YES | |
| SCART - IN | -- | |
| SCART - OUT | -- | |
| HEADPHONE - OUT | YES | |
| S-VIDEO - IN | -- | |
| COAXIAL - OUT | YES | |
| COMMON INTERFACE | -- | |
| USB | Service Port Only | |
| IPOD | -- | |
| DVD | Disc Physical Format | -- |
| DVDVideoOutputFormat | -- | |
| Dimensions | Inc Stand (LxWxHmm) | 992x289x674mm |
| Exc Sand (LxWxHmm) | 992x118x623mm | |
| Weight | Net (Kgs) | 14.6 |
| Gross (Kgs) | 19 | |

www.westinghousedigital.com
S/N:
- Important Safety Instructions
- Note:
- How to install the stand!
- PREFACE
- SAFETY PRECAUTIONS
- CONTENTS
- FRONT/BACK CONNECTIONS OF LCD TV
- TV INSTALLATION
- Power Cord Connection
- Antenna Connection
- AV Connection
- YPbPr (Component) Connection
- VGA(PC) Connection
- Service Port Function
- HDMI Connection
- REMOTE CONTROL
- Remote control instructions in TV mode
- Remote control setup
- 9.Menu Operation
- SETUP WIZARD
- Select Language
- Time Zone
- Power on Mode
- Let's Get Connected...
- Cable or Satellite Source input
- INPUT SOURCE
- Operating the Menu
- PICTURE MENU:
- TIME MENU:
- LOCK MENU:
- AUDIO MENU:
- SETUP MENU:
- CHANNEL MENU:
- PICTURE Menu
- Picture Mode
- Contrast
- Brightness
- Color
- Sharpness
- Color Temp.
- AUDIO Menu
- Sound Mode
- Bass
- Treble
- Balance
- SPDIF Audio Type
- Audio Language
- TIME Menu
- Sleep Timer
- Daylight Saving Time
- SETUP Menu
- Menu Language
- Zoom Mode
- Noise Reduction
- PC Setup (In VGA Mode only)
- Closed Caption
- CC Mode
- Basic Selection
- Advanced Selection
- Option
- DLC
- Restore Default
- LOCK Menu
- Change Password
- System Lock
- US
- TV
- MPAA
- Canada
- Canada English
- Canada French
- Reset RRT
- CHANNEL Menu
- Favorite
- Show / Hide
- Channel No.
- Channel Label
- DTV Signal
- Troubleshooting
- SPECIFICATIONS
Brand : WESTINGHOUSE
Model : CW40T2RW
Category : Television