Stylistic Q335 - Graphic tablet FUJITSU - Free user manual and instructions
Find the device manual for free Stylistic Q335 FUJITSU in PDF.

User questions about Stylistic Q335 FUJITSU
0 question about this device. Answer the ones you know or ask your own.
Ask a new question about this device
Download the instructions for your Graphic tablet in PDF format for free! Find your manual Stylistic Q335 - FUJITSU and take your electronic device back in hand. On this page are published all the documents necessary for the use of your device. Stylistic Q335 by FUJITSU.
USER MANUAL Stylistic Q335 FUJITSU
ContactaddressinNorthAmerica
FUJITSUAM ERICAINC.
1250EastArquesAvenue, Sunnyvale,
CA94085-3470,U.S.A.
Telephone:8008313183or4087466000
"http://solutions.us.fujitsu.com"
"http://solutions.us.fujitsu.com/contact"
Haveaqu estion?Emailusat:" AskFujitsu@us.fujitsu.com"
Copyright
© 2015 F ujitsu America Inc.. All rights reserved
B5FK-4951-02ENZ0-00
FUJITSUTabletSTYLISTICQ335
OperatingManual
Declarationofconformity7
FujitsuContactInformation8
Notationalconventions9
Portsandcontrols10
Importantnotes12
First-timesetupofyourdevice17
Working with the Tablet PC
Securityfunctions 38
Connectingexternaldevices 43
SettingsinBIOSSetupUtility 46
Troubleshootingandtips 48
Technical data 55
Manufacturer'snotes 58
Declarationsofconformity 61
FCCandIC Regulatory Information 62
Appendix 66
Index 81
CopyrightandTrademarkInformation
FujitsuAmerica, Incorporated has made every effort to ensure the accuracy and completeness of this document; however, as ongoing development efforts are continually improving the capabilities of four products, we cannot guarantee the accuracy of the content of this document. Wedisclaim liability for errors, omissions, or future changes.
Fujitsu, the Fujitsulogo and STYLISTIC are registered trademark of Fujitsu Limited or its subsidiaries in the United States and other countries.
IntelandIntelCorearetrademarksorregisteredtrademarksofIntelCorporationor itssubsidiariesintheUnitedStatesandothercountries.
Microsoft and Windows are either registered trademarks or trademarks of Microsoft Corporation in the United States and/or other countries.
The ExpressCard word mark and logo are owned by the Personal Computer MemoryCardInternationalAssociation(PCMCIA)andanyuseofsuchmarksby FujitsuAmerica,Incorporatedisunderlicense.
GoogleisattrademarkorregisteredtrademarkofGoogleIncorporated.
BluetoothisattrademarkofBluetoothSIG, Inc., USA.
OmniPassisattrademarkofSoftex, Inc.
RoxioisatrademarkofRoxio,adivisionofSonicSolutions.
PowerDirector, PowerDVD, YouCam, and Make Discaretrademarksof CyberLink Corp.
Adobe, Acrobat, and Adobe Reader are either registered trademarks sort trademark of Adobe Systems Incorporated in the United States and/or other countries.
Contents
Declaration of conformity 7
FujitsuContactInformatio n 8
Notationalconventions 9
Ports and controls 10
Importantnotes 12
Safetyinstructions 12
Additional safety notes for devices with wireless components 13
Protectingthedisplayscreen 13
Energysaving 13
Energy saving under Windows 13
TravelingwithyourTabletPC 13
Beforeyoutravel 14
TransportingtheTabletPC 15
StoringtheTabletPC 15
CleaningtheTabletPC 16
FurtherinformationoncleaningtheTabletPC 1
Cleaningwithdisinfectantwipes 1
First-timesetup of your device 17
Unpacking and checking the device 17
Choosealocation 18
Connectingth eACadapter.... 19
Switchingon the device for the first time 20
Working with the Tablet PC 21
Batterychargingindicator 21
SwitchingtheTabletPCon 22
ProgrammingtheON/OFFbutton 22
Switching the Tablet PC off 23
Handwriting recognition 23
Touchscreen 24
Selectdisplayorientation(portraitorlandscapeformat) ....
Touch commands 26
Actions with one finger (Windows 8.1 Modern) 26
Actions with one finger (Windows 8.1 Desktop) 29
Actions with two fingers (Windows 8.1 Desktop) 30
Tablet buttons 32
Webcam 33
Rechargeablebattery 33
Chargingandmaintainingthebattery 3:
Usingtheenergysavingfunctions.... 34
Memorycards 35
Supported format 35
Insertingthememorycard 35
Removingthememorycard 36
WirelessLAN/Bluetoothcomponents 3
Switching the wireless components on and off 36
Configuring WLAN access 36
FurtherinformationonWLANandBluetooth 3
Securityfunctions 38
Configuring password protection in BIOS Setup Utility 38
Protecting BIOS Setup Utility (supervisor password and user password) 38
Passwordprotectionforbootingtheoperatingsystem.... 39
Passwordprotectionfortheharddisk 40
Trusted Platform Module - TPM (device dependent) 42
EnablingTPM 42
DisablingTPM 42
Connecting externaldevices 43
ConnectinganexternalmonitortothemicroHDMIport.... 43
ConnectingUSBdevices....44
HowtoremoveUSBdevicescorrectly 44
Headphonesport....45
Settings in BIOS Setup Utility 46
StartingtheBIOSSetupUtility 46
BIOSSetupUtilityoperation.... 46
ExitingBIOSSetupUtility 47
Exit Saving Changes - save changes and exit BIOS Setup Utility 47
ExitDiscardingChanges-RejectchangesandexitBIOSSetupUtility....47
LoadSetupDefaults—loaddefaultvalues 4
Discard Changes - Discard Changes without exiting BIOS Setup Utility 47
SaveChanges-savechangeswithoutexitingtheBIOSSetupUtility.... 47
Save changes and power off 47
Troubleshooting and tips 48
UsingtheResetbutton 48
Helpifproblemsoccur 49
RecoveringyourFactoryImage 49
The TabletPC'sdateortimeisincorrect 49
Batteryindicatordoesnotilluminate 49
TheTabletPC'stouchscreenremainsdark 49
The display on the Tablet PC's touchscreen is difficult to read. 50
The external monitor remains blank 50
The external monitor is blank for the image is unstable ....
The Tablet PC does not start after switch on 51
TheTabletPCstopsworking 51
The printer does not print 51
The wireless connection to a network does not work 52
Thebatterydischargestooquickly 52
Acousticwarning 52
Errormessagesonthescreen.... 52
Technical data 55
Tablet PC 55
WLAN specifications 56
Rechargeablebattery.... 57
10WMicroUSBACadapter.... 57
Manufacturer'snotes 58
Disposalandrecycling 58
Recyclingyourbattery 58
DOC(IndustryCANADA)Notices 58
ULNotice 59
ENERGYSTARCompliance 60
Declarationsof conformity 61
FCC and IC Regulatory Information 6
RegulatoryNotesandStatements.... 62
WirelessLAN,HealthandAuthorizationforuse ......
RegulatoryInformation/Disclaimers....62
FederalCommunicationsCommissionandIndustryCanadastatement:......
Exportrestrictions 64
Restrictionsconcernantl'exportation ....
Canadian Notice 64
Before Using the Optional Wireless LAN 66
WirelessLANDevicesCoveredbythisDocument ....
CharacteristicsoftheWLANDevice 66
WirelessLANModesUsingthisDevice 66
Deactivating/Disconnecting the WLAN Device 69
Configuring the Wireless LAN 69
Connectiontothenetwork. 69
TroubleshootingtheWLAN 69
UsingtheBluetoothDevice 72
CreatingaBackupofEssentialAccessSoftware ....
RECOVERYOURSYSTEMWHENTHEHARDDRIVEISSTILLACCESSIBLE ......
UsingtheRecoveryandUtilityTools 73
RestoretheRecoveryImagefromHiddenPartition.... 75
RECOVERYOURSYSTEMWHENTHEHARDDRIVEISNOTBOOTABLE
RestoretheRecoveryImageforFullHardDrive ....
Recovering Your Recovery Image Using Recovery and Utility (for new hard drive or non-bootable hard drive) 77
InstallingtheSoftwareaftertheRecoveryImageisRestored ....
Index 81
Declarationofconformity

DECLARATION OF CONFORMITY
according to FCC Part 15
Responsible Party Name:
Address: 1250 E.
Fujitsu America, Inc.
Arques Avenue
Sunnyvale, CA 94085
Telephone: (408) 746-6000
Declares that product:
Base Model Configuration: STYLISTIC Q335 Tablet PC
Complies with Part 15 of the FCC Rules.
This device complies with Part 15 of the FCC rules. Operations are subject to the following two conditions: (1) This device may not cause harmful interference. (2) This device must accept any interference received, including interference that may cause undesired operation.
FujitsuContactInformation
ServiceandSupport
YoucancontactFujitsuServiceandSupportinthefollowingways:
•Tollfreephone:1-800-8Fujitsu(1-800-838-5487)
-Website:" http://solutions.us.fujitsu.com/www/content/support/contact/index.php"

Beforeyouplacethecall,havethefollowinginformationreadysothatthecustomer supportrepresentativecanprovideyouwiththefastestpossiblesolution:
- Productname
•Productconfigurationnumber
•Productserialnumber
•Purchasedate - Conditionsunderwhichtheproblemoccurred
• Anyerrormessagesthathaveoccurred - Typeofdeviceconnected,ifany
FujitsuShoppingOnline
Pleasegoto" http://www.shopfujitsu.com/store/".
MaintainingLatestConfiguration
To ensure that you always have the most current driver updates related to your system, occasionally accesstheFujitsuSoftwareDownloadManager(FSDM)utility.TheFSDMutilityisavailablefrom the Fujitsu Support site. FSDM will allow you to view a list of the most current drivers, utilities and applications to determine whether you have the latest versions. If you have a Windows 7 ororWindows8/8.1operatingsystem,youwillneedtogototheSupportSitetodownloadtheFSDMUtility:" http://support.fujitsupc.com/CS/Portal/support.do?srch=DOWNLOADS".
LimitedWarranty
Your STYLISTIC Tablet PC is backed by a Fujitsu International Limited Warranty. Check the service kitthatcamewithyourTabletPCfortheLimitedWarrantyperiodandtermsandconditions.
Notationalconventions
 | Payparticularattentiontotextmarkedwiththissymbol.Failuretoobserve thiswarningwillendangeryourlife,willdamagethedeviceorleadtoloss ofdata.Thewarrantywillbeinvalidatedifthedevicebecomesdefective throughfailuretoobservethesewarnings. |
 | Indicatesimportantinformationwhichisrequiredtousethedeviceproperly. |
| ▶ | indicatesanactivitythatmustbeperformed |
| ↳ | indicatesaresult |
| Thisstyle | indicatesdataenteredusingthekeyboardinaprogramdialogueorat thecommandline,e.g.yourpassword(Name123) or a com m and u s e t to startaprogram(start.exe) |
| Thisstyle | indicatesinformationthatisdisplayonthescreenbyaprogram,e.g.: Installationiscomplete. |
| Thisstyle | indicates• terms and texts used in a software interface, e.g.: Click on Save.•namesofprogram s or files, e.g. Windows or setup.exe. |
| "Thisstyle"indicates | •Cross-refere ncestoanothersection,e.g."Safetyinformation"•cross-referencestoanexternalsource,e.g.awebaddress:Formore information,goto" http://solutions.us.fujitsu.com/"•namesofCDs ,DVDsandtitlesordesignationsofothermaterials,e.g.: "CD/DVDDri vers&Utilities"or"Safety/Regulations"manual |
| Key | indicates akeyonthekeyboard,e.g: F10 |
| Thisstyle e | indicatestermsandtextthatareemphasizedorhighlighted,e.g.:Donot switchof fthedevice |
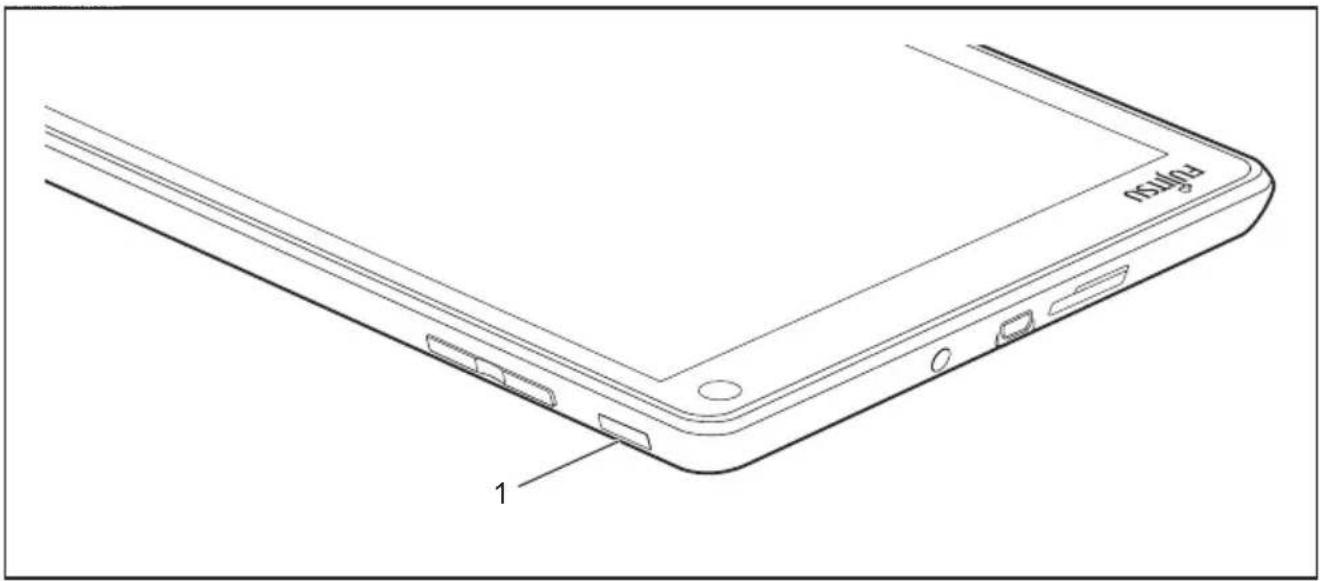
Portsandcontrols
Thischapterpresentstheindividualhardwarecomponentsofyourdevice.Itgivesan overviewoftheindicatorsandconnectionsofthedevice.Pleasefamiliarizeyourself withtheseitemsbeforeyoustarttoworkwiththedevice.

text_image
1 2 3 41=Frontwebcam
2=Windowsbutton
3=MicroUSBport(powersupply, data communication, USB2.0)
4=Batterychargingindicator
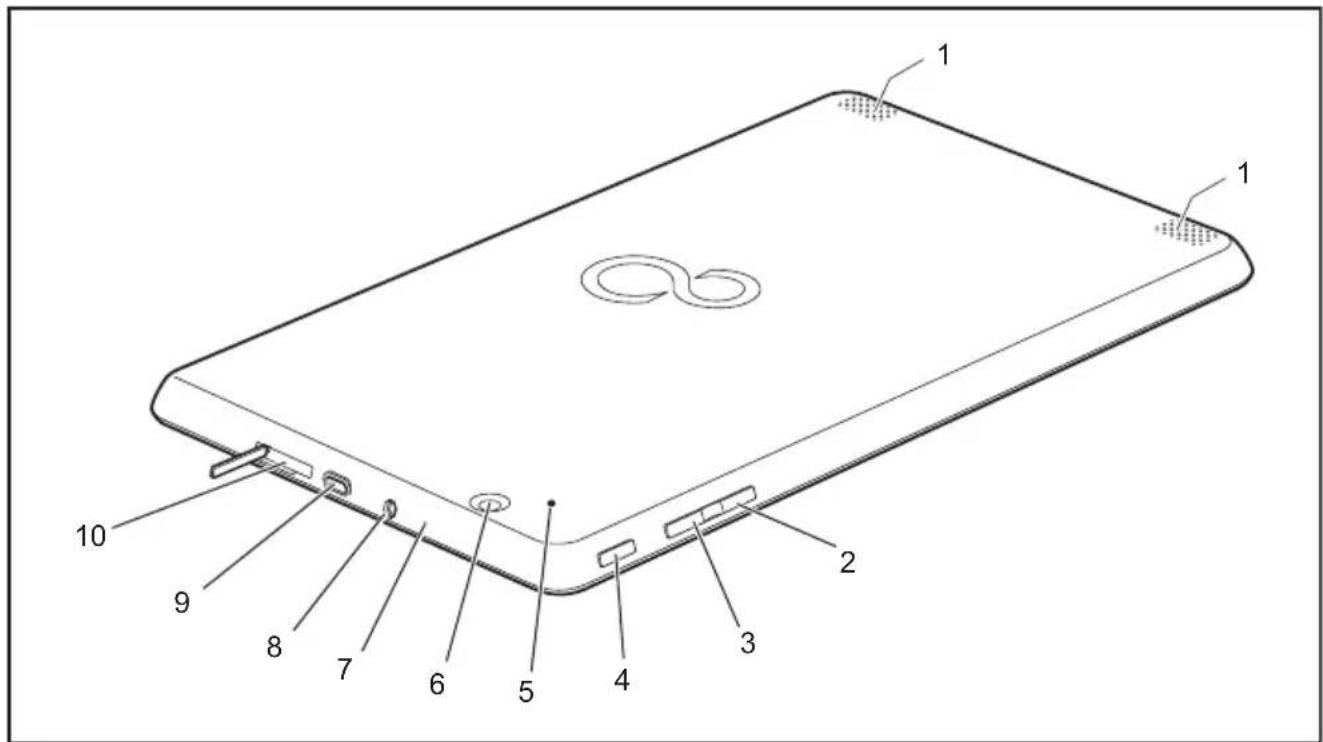
text_image
Technical diagram of a device with numbered parts labeled for identification1=Speaker
2=Decreasevolumebutton
3=Increasevolumebutton
4=ON/OFFbutton
5=Resetbutton
6=Rearwebcam
7=Microphone
8=Headphonesport
9=MicroHDMIport
10=Memorycardslot(MicroSecure Digital(SD ^TM Card))
Importantnotes

Thischaptercontainsessential safety information which must be followed when working with your TabletPC. The other notes provide useful information about your TabletPC.
Safetyinstructions

Please follow the safety notes provided in the "Safety/Regulations" manual as well as the safety notes given below.
Pleasepayspecialattentiontothesectionsinthemanualmarked withthesymbolontheleft.
When connecting and disconnecting cables, observetherelevant notes in this operating manual.
Readtheinformationontheambientconditionsinthe" Technicaldata",Page55chapter andtheinformationinthe" First-timesetupofyourdevice",Page17chapterbefore preparing your Tablet PC for use and switching it on for the first time.
Whencleaningthedevice,pleaseobservetherelevantnotesinthe section" CleaningtheTabletPC",Page16.
Payattentiontotheadditionalsafetynotesfordeviceswithwirelesscomponents providedinthe"Safety/Regulations"manual.
When handling this device, you come into contact with lead, a chemical which in Californiaisheldtobeapossiblecauseofbirthdefectsandotherdamagetofertility.
Washyourhandsafterusingthedevice.
ThisTabletP Ccomplieswiththerelevantsafetyregulationsfordataprocessingequipment. If youhaveques tionsastowhetheryoucansetuptheTabletPCintheintendedenvironment, pleaseconta ctyoursalesoutletorourhotline/servicedesk.
Additionalsafetynotesfordeviceswith wirelesscomponents
Ifaradiocomponent(WirelessLAN,Bluetooth)isintegratedinyourTabletPC,youmustbe suretoobservethefollowingsafetyprecautionsconcerningyourTabletPC:
- Switchoffthewirelesscomponentswhenyouareinanaircraftordrivinginacar.
- Switchoffthewirelesscomponentswhenyouareinahospital,anoperating roomornearamedicalelectronicssystem. Thetransmittedradiowaves canimpairtheoperationofmedicaldevices.
- Switchoffthewirelesscomponents,whenyouletthedevicegetnearflammable gasesorintohazardousenvironments(e.g.gasstation,paintstores),asthe transmittedradiowavescancauseanexplosionorafire.

For further information on how to switch the wireless component on and off, refer to section" Switching the wireless component on and off", Page 36.
Protectingthedisplayscreen

Inthisevent, don otpourliquidsontothedevice and donotwashitwithawetcloth. Donotplaceanyo bjectsonthescreen, so that it will not bedamaged.
Thewarrantydo esnotcoverascratchedscreen.
Energy saving
If you will not be using your Tablet PC, switch it off. Switch off any connected external devices when they are not in use. If you use the energy-saving functions, the Tablet PC uses less power. If you do this, you will be able to work longer with the Tablet PC before having to recharge the battery.

The energy efficiency is increased and environmental pollution is reduced. Yousavemoneyandhelpprotecttheenvironment.
Energy saving under Windows
▶ Make use of the available energy-saving functions as described in chapter "Usingtheenergysavingfunctions", Page34.
TravelingwithyourTabletPC
Please follow the instructions below when traveling with your Tablet PC.
Beforeyoutravel
▶ Switch off the radio component for data security reasons. With data traffic via a wireless connection, it is also possible for unauthorized third partiestoreceived data.

Informationonactivatingdataencryptionisprovidedinthedocumentation foryourradiocomponent.
▶ If you want to use your Tablet PC during a flight, ask the flight attendants to see if it is safe to use it.
Whentravelinginothercountries
▶ If you are traveling abroad, check that the AC adapter can be operated with the local AC voltage. If this is not the case, obtain the appropriate AC adapter for your Tablet PC. Donot use any other converter!
▶ Check whether the local AC voltage and the AC cable are compatible. If this is not the case, buy an AC cable that suits the local conditions.
▶ Enquire with the appropriate government office of the country you will be travelling in as to whether you may operate a theradiocomponent integrated in your TabletPC there.
▶ Take the necessary travel adapters with you when traveling abroad. Check in the following table for which travel adapters you will need, or ask your travel organizer.
| PowerconnectionTraveldestination | |
 | UnitedStates,Canada,Mexico,partsofLatinAmerica,Japan,Korea,Philippines,Taiwan |
 | |
 | RussiaandtheCommonwealthofIndependentStates(CIS),muchofEurope,partsofLatinAmerica,theMiddleEast,partsofAfrica,HongKong,India,muchofsouth-eastAsia |
 | UnitedKin gdom,Ireland,Malaya,Singapore,partsofA frica |
 | China,A ustralia,NewZealand |
TransportingtheTabletPC

Protect the Tablet PC from severeshocks and extreme temperatures (e.g. direct sunlight in acar).
- DonottransportyourTabletPCwhileitisturnedon.
- CarryyourTabletPCwithyouwhiletraveling.Donotcheckitinasbaggage.
- NeverputyourTabletPCthroughametaldetector.Haveithand-inspectedby securitypersonnel.YoucanhoweverputyourTabletPCthroughaproperly tunedX-raymachine.Toavoidproblems,placeitclosetotheentranceof themachineandremoveitassoonaspossibleorhaveithand-inspectedby security personnel. Security officials may require you to turn your Tablet PC on.Somakesureyouhaveachargedbatteryonhandforthis.
▶ SwitchtheTabletPCoff
▶ Unplug the AC plug of the AC adapter and all external devices from the power outlets.
▶ DisconnecttheACad aptercableandthedatacablesforallexternaldevices.
Toprotectagainstdamagingjoltsandbumps,useasuitableTabletPC carryingcasetotransportyourTabletPC.
StoringtheTabletPC
- IfstoringyourTa blet PC for a month or longer, turn it off, fully charge the battery, then removeandstor ealltheLithiumPolymerbatteriesinasuitablelocation.
- Store your tablet PC in a cool dry location. Temperatures should remain between 13°F/-25°C and 140°F/60°C.
- StoreyourTab letPCandbatteriesseparately.IfyoustoreyourTabletPCwith abatteryinst alled,thebatterywilldischarge,andbatterylifewillbereduced.In addition,af aultybatterymightdamageyourTabletPC.

- Alwayspower offtheTabletPCbeforetransportingand/orpackagingit. Aftershutt ingdowntheTabletPC, waituntilthestatusLEDpanel indicates thepower-offcondition(i.e.,nolightsareilluminated).
- It is possible that the Tablet PC may not automatically go to power-off or hibernate mode when you close the lid. This situation may occur due to pre-operating system boot password security settings or some other application running on the Tablet PC.
- Attempti ngtotransporttheTabletPCwhilepowerisonmaydamage theTable tPCduetoshockoroverheating.
CleaningtheTabletPC

- UseofincorrectcleanerscanresultinopticalimpairmentoftheLCDand/or damagetothecomputer.Alwaysrefertothecleanermanufacturer'sguidelinesand materialsafetydatasheetsforproperhandlinganduseoftheproducts.
- Neveruseammonia, acidic, or alkaline cleanersor organic chemicals such as paint thinner, acetoneorkerosene. It may damage surface finishes and the coating of the LCD screen.
- Neverusecompressedairforcleaningyourcomputer.
- Makesurethatnoliquidcanenterthedevicebecausethiscan causedamagetotheTabletPC.
FurtherinformationoncleaningtheTabletPC
TheTabletPCdoesnotfloat.

If the Tablet PC is exposed to water or other liquids with its connections open, liquid can penetrate the Tablet PC and cause amalfunction. Donot continuetousethe Tablet PC. Switchitoff and contact our hotline/ourservicedesk (see enclosed list of service desks visit our website at: http://solutions.us.fujitsu.com/www/content/support/).
Cleaningwithdisinfectantwipes
There are many ways of disinfecting surfaces. The following disinfectant wipes have been tested successfully with the TabletPC:
•MGChemicalsMultipurposeAlcoholWipes(alcohol-based)
•PROSAT®Sterile™PS-911EB/EtOHLifeSciencesWipes(alcohol-based)

Makesurethatnodisinfectingliquidcanenterthebuttonsorportsbecause thiscancausedamagetotheTabletPC.Takeextraprecautionsaround thesecomponentswhencleaningthedevice.

For proper use of disinfectant wipes, please read the manufacturer's instructions.
Beforecleaning, please test the disinfectant wipeonasmallarea of the Tablet PC. Somemedical disinfectant wipes may leaveresidue on the Tablet PC which is difficult to remove again, or they may dry out quickly. Therefore dispose of the wipes afteronesingle use and donotreusethem.
First-timesetupofyourdevic e

Please read the chapter "Important notes", Page 12.
If your device is equipped with a Windows operating system, then necessary hardwaredrivers and supplied software are already pre-installed.
Before switching it on for the first time, connect the device to the AC voltage using theACadapter,see" ConnectingtheACadapter",Page19.TheACadaptermust remainconnectedduringthewholeoftheinstallationprocess.
A system test is performed when your device is first switched on. Various messages can appear. The display may remain dark for a short time or may flicker.
Pleasefollowtheinstructionsonthescreen.
NEVERswitchoffyourdeviceduringthefirst-timesetupprocess.
The battery must be charged if you want to operate your device using the battery.
When used on the move, the built-in battery provides the device with the necessary power. You can increase the operating time by using the available energy-saving functions.
Forinstructionsonhowtoconnectexternaldevices(e.g.mouse, printer) to your Tablet PC, pleaserefertotheoperatingmanualforyourdevice.
Unpackingandc heckingthedevice

If you find that damage has occurred during transport, please notify yourlocalsalesoutletimmediately!
▶ Unpackalltheindividualparts.
▶ Checkyourd eviceforanyvisibledamagewhichmayhaveoccurredduringtransportation.

Youmaynee dtoreusethepackaginginthefuture,forexampleif youneedt oshipyourdevice.
Choosealocation

Choose suitable location forth the device before setting it up. Indoing so, please follow these instructions:
- NeverplacethedeviceortheACadapteronaheat-sensitivesurface. Thesurfacecouldbedamagedasaresult.
- Neverplacethedeviceonasoftsurface(e.g.carpeting,upholsteredfurniture, bed).Thiscanresultindamagecausedbyoverheating.
•Thebackofthedeviceheatsupduringnormaloperation.Prolongedcontact withskincanbecomeunpleasantorevenresultinburns. - Place the device on a stable, flat, non-slippery surface. Please note that the rubberfeetofthedevicemaymarkcertaintypesofdelicatesurfaces.
- Keepotherobjectsatleast100mm/4inchesawayfromthedevice anditsACadaptertoensureadequateventilation.
- Donotexposethedevicetoextremeenvironmentalconditions.Protect thedeviceagainstdust,humidityandheat.
ConnectingtheACadapter

Observethesafetynotesintheenclosed"Safety/Regulations"manual.
ThesuppliedACcableconformstotherequirementsofthecountryinwhich youpurchasedyourdevice.MakesurethattheACcableisapprovedfor useinthecountryinwhichyouintendtouseit.
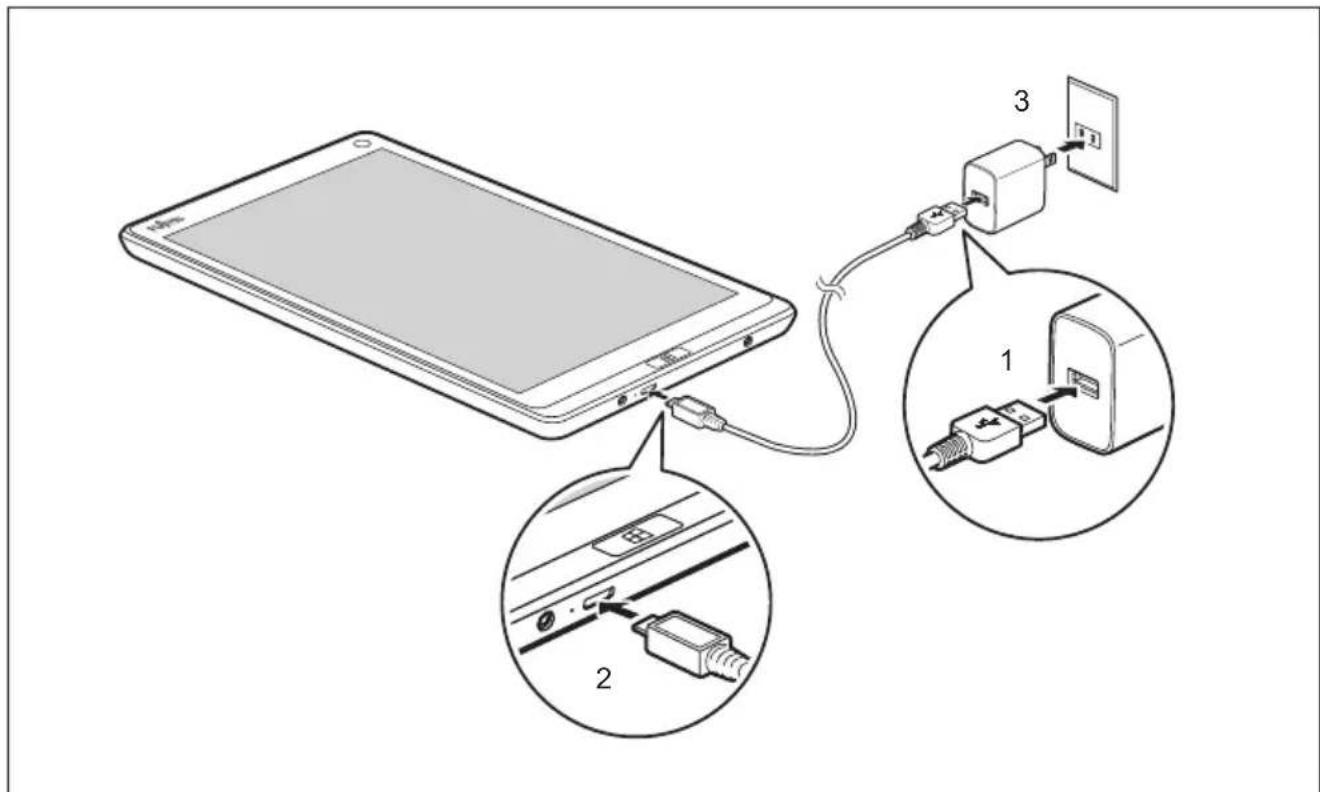
text_image
Diagram showing connection between a tablet and a power adapter, with labeled components and cable connections▶ ConnecttheUSBpowercable(1)totheACadapter.
▶ Connect the USB power cable (2) to the micro USB port on the device.
▶ ConnecttheACadapter(3)toanelectricaloutlet.
Switchingonthedeviceforthefirsttime
To make it easier to use your device for the first time, the operating system is pre-installed on the hard disk.
text_image
pflg 1▶ PresstheON/OFFbutton(1)foraboutonesecondtoswitchthedeviceon.
▶ Duringtheinstallationprocess,followtheon-screeninstructions.

You can find information and help on the Windows operating system functions ontheInternetat" http://windows.microsoft.com".
IfaWindows8.1operatingsystemisinstalledonyourTabletPC,atutorialis automatically started when a new user logs on for the first time, which shows youhowtousethenewfunctionsofWindows8.1.
WorkingwiththeTabletPC
This chapter describes the basics for operating your Tablet PC. You can find instructions on how to connect external devices (e.g. mouse, flash storage) to the Tablet PC in thechapter" Connectingexternaldevices",Page43.

Please refer to the notes in the chapter "Important notes", Page 12.
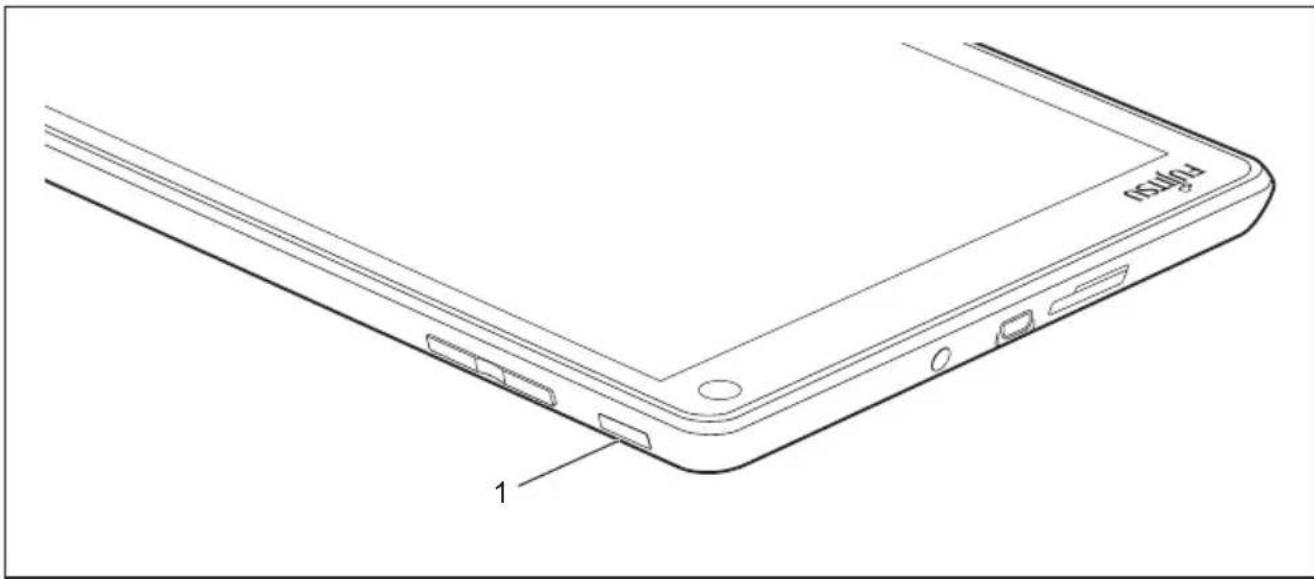
Batterychargingindicator
Thebatterychargingindicator(1)givesinformationaboutthestatusofthepowersupply.
natural_image
Line drawing of a smartphone rear panel with labeled component '1' (no text or symbols beyond label)| Status/colorDescription | |
| On(yellow-orange) | Thebatteryisbeingcharged. |
| Off | TheTable tPCisswitchedofforinSave-to-Diskmode. |
SwitchingtheTabletPCon
text_image
p50 1▶ PresstheON/OFFbutton(1)foraboutonesecondtoswitchthedeviceon.
ProgrammingtheON/OFFbutton
YoucanprogramtheON/OFFbutton:
| Operatingsyst em | Menu |
| Windows8.1 | Windows8.1De sktop-ControlPanel-Hardware andSound-Po werOptions |

If you have assigned a password, you must enter this when requested to do so, in order to start the operating system. Detailed information can be found in the chapter "Security functions", Page 38.
SwitchingtheTabletPCoff

Backupyourdataandcloseallapplicationsbeforeyouswitchoffyour device. Otherwisedatamightbelost.
▶ Shutdowntheoperatingsystemcorrectly.
or
▶ PresstheON/OFFbuttonfor<2secondstoswitchintoconnectedstandbymode.
or
▶ PresstheON/OFFbutton for>2secondsto<10secondstodisplaythe "Sweepdownwardstosw itchoff" popup.
or
▶ If the Tablet PC is not switched off automatically, press the ON/OFF button for about 10 seconds (forced shutdown).
Handwritingrecognition
For detailed information on handwriting recognition, see the documentation for your operating system.
UnderWindows8.1youcansettherequiredlanguageunderControlPanel-Time,LanguageandRegion-Language.
Touchscreen
Backgroundlighting
LCDscreensareoperatedwithbackgroundlighting. Theluminosityofthebackground lightingcandecreaseovertheperiodofuseoftheTabletPC. However, you cansetthebrightnessofyourscreenyourself.
Ambientlightsensor
If your Tablet PC was shipped with the Windows operating system, the screen brightness is regulated by means of the ambient light sensor and depending on the respective light conditions. This results in optimum readability and longer battery life at the same time.
If your Tablet PC was shipped with Windows 8.1, the adaptive brightness setting is deactivated. To change the ambient light sensor settings, select Control Panel - System and Security - Power Options - Change plan settings - Change advanced power settings - Display - Activate adaptive brightness setting..
Select On to activate the adaptive brightness setting with the help of the ambient light sensor.
Synchronizingthedisplayonthetouchscreenandanexternalmonitor
In Windows 8.1 wipe your finger over the screen from the right-hand edge. The setting Charms-Devices-Secondmonitoropens.Selectthedesiredoutputtype.
You can also use the Fujitsu Display Manager in the Windows Mobility Center to set the output type.
Selectdisplayorientation(portraitor landscapeformat)
Youcanchoosetouseeitherportraitorlandscapeformatforthedisplay.

Windows8.1
You can change these settings under Windows 8.1 Desktop - Control Panel - HardwareandSound-WindowsMobilityCenter/Rotatescreen.
To switch off the automatic changing between portrait and landscape format, select Control Panel - Appearance and Personalization - Display - Screen Resolution.

In the Fujitsu Tablet Controls settings, profiles are saved for operation with different screen orientations. These profiles have preset standard configurations that can be modified as desired.
ThesesettingsdonotjustaffectthemonitorsettingsontheTabletPC, butalsoonexternalmonitorsthatareconnected.
Touchcommands
You can execute certain commands by using your finger tip on the touchscreen of your device.
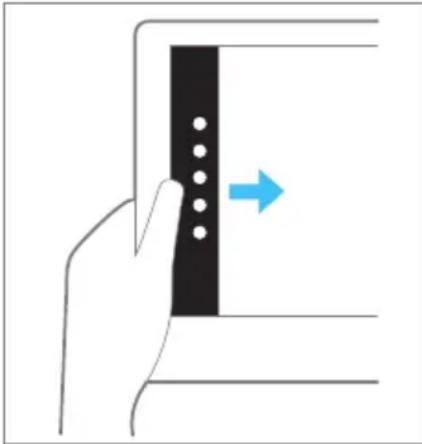
Actionswithonefinger(Windows8.1Modern)
| ActionDescription | |
| Wipeyourfingeroverthescreenfromthe right-handedge. | ► OpenCharmswithsystemcommands (equivalenttopressingtheWindowsbutton+ C button).► Workingwiththemouse:Positionthemouse pointeratthebottomright-handedgeofthe screen. |
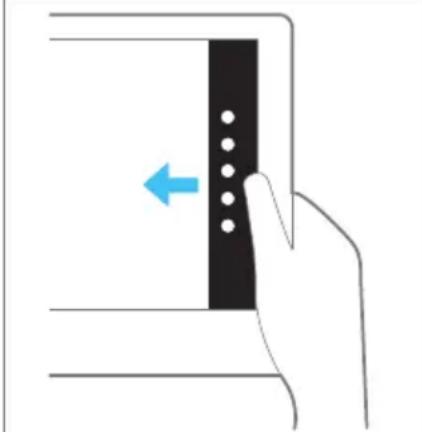 | |
| Wipeyourfingeroverthescreenfromthe left-handedge. | ► Switchbetweenthemostrecentlyused applications(equivalenttopressingthe Windowsbutton+ Ctrl + Space).► Workingwiththemouse:Positionthemouse pointeratthebottomleft-handedgeofthe screen. |
 | |
| Wipeyourfingeroverthescreenfromthetoporbottomedge. | ► OpentheAppcommands(equivalenttopressingtheWindowsbutton+ Z button). WipefromthetoptothebottomofthescreentodockorclosethecurrentApp.► Workingwiththemouse:Right-clickontheApptodisplaytheAppcommands. |
 | |
| Pressandhold | ► Keep your finger pressed on an object on the screentodisplayamenuwithfurtheroptions.► Workingwiththemouse:Movethemousepointerovertheobjecttodisplayamenuwithfurtheroptions. |
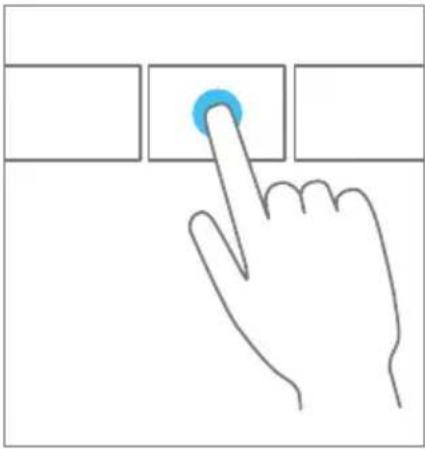 T a p o n a n o b j e c t T a p o n a n o b j e c t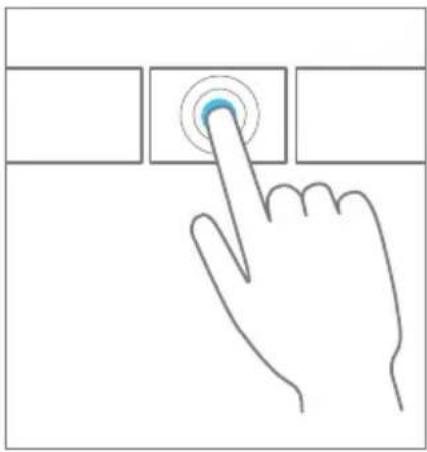 | |
| ► Tap your finger on an object on the screen toopenanApporalinkortoexecutea command.► Workingwiththemouse:Left-clickonthe object. | |
Scroll/Moveobject /Swivelobject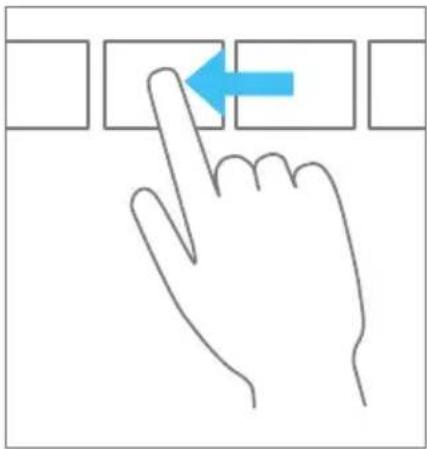 | ► Usethisfunctionto scrollthroughlistsor websitesortoswiv elormoveanobject.► Workingwiththemouse:Left-clickonthe object,keepthemousebuttonpressedand move/swiveltheobjectorscroll. |
Actionswithonefinger(Windows8.1Desktop)
| ActionDescription | |
| Selectingobjects(clickwiththeleftmouse button) | ► Tap once briefly with the finger on the object. |
| Startingprograms(double-clickwiththeleft mousebutton) | ► Useonefingertotaptwiceinquick successionontheprogramsymbol. |
| Movingobjects/windows(whileholdingtheleft mousebuttonpressed,drag&drop) | 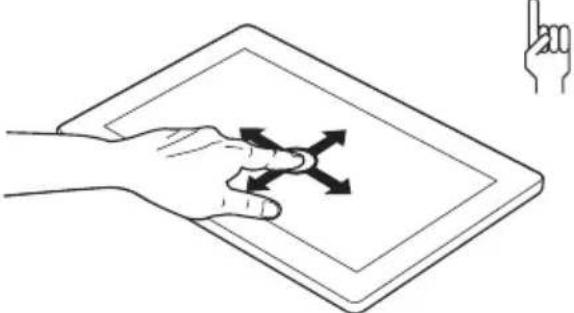 ► Place your finger on the object/window, keepyourfingertippressedagainst thetouchscreenandmovethedesired object/window. ► Place your finger on the object/window, keepyourfingertippressedagainst thetouchscreenandmovethedesired object/window. |
| Openingacontextmenu(clickwiththeright mousebutton) | ► Tap your finger on the desired item. Keepyourfingertippressedagainst the touchscreen.Thecontextme nuappears. |
| Movingthecur sor | ► Position one finger on the touchscreen and moveyourfingersinthedesireddirection. |
Actionswithtwofingers(Windows8.1Desktop)
| ActionDescription | |
| Scrolling | 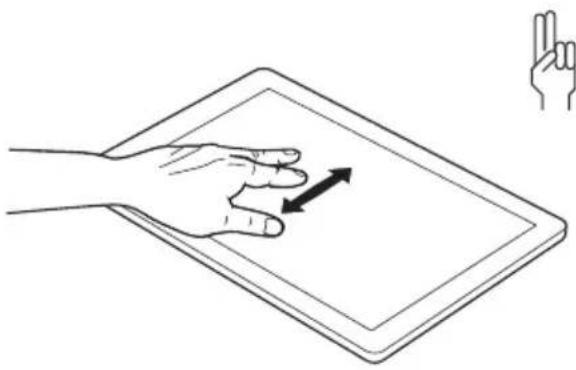 ► Place two fingers on the touchscreen.► Move the fingers up to scrollup.or► Move the fingers down to scroll down. ► Place two fingers on the touchscreen.► Move the fingers up to scrollup.or► Move the fingers down to scroll down. |
| RotatingIncreaseordecreasezoom | 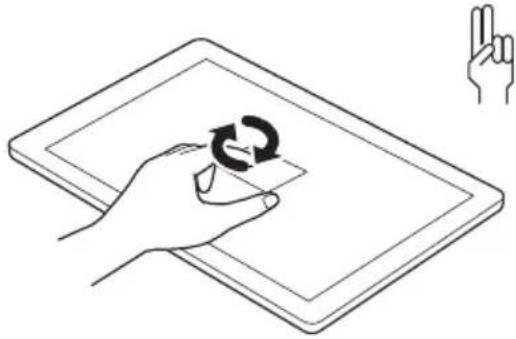 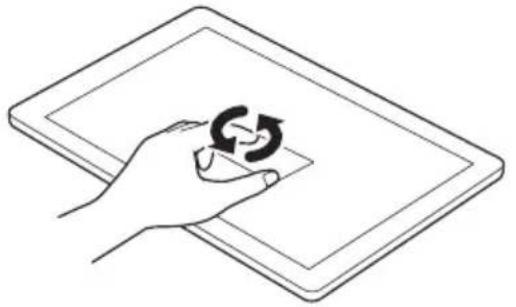 ► Positionyourthumbonthetouchscreenand rotatetheimageclockwiseoranticlockwise usingyourindexfinger. ► Positionyourthumbonthetouchscreenand rotatetheimageclockwiseoranticlockwise usingyourindexfinger.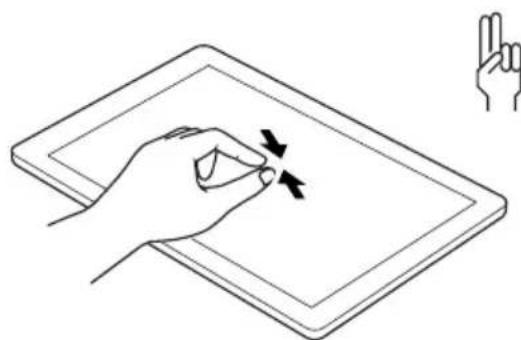 |
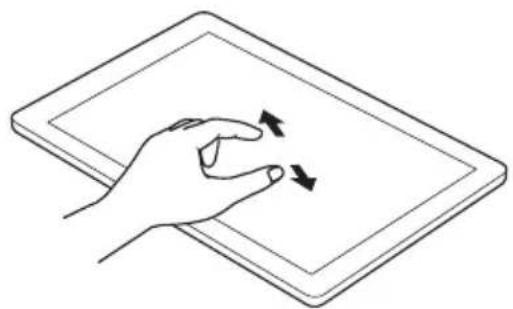 | |
| ► Put two fingers on the touchscreen and movethemaparttoincreasethesizeofthe zoom. or ► Put two fingers on the touchscreen and movethemtogethertodecreasethesize ofthezoom/view. | |
| Lockcontext-sensitivemenus | ► Use two fingers to tap twice in quick successiononthetouchscreen. |
Tabletbuttons
Your Tablet PC is fitted with three tablet buttons.

text_image
1 2 3| Symbol | Descriptio n | Functions |
| 1 Vol | u me - b u tton | Decreasev olume |
| 2 | V o utton l u | Increase volume + b |
| 3Windowsb | utton | Switch between Start screen and the last application used |
Webcam

Yourdevicehastwowebcams:oneonthefrontofthedeviceandoneontherear.
Dependingonthesoftwareu sed,youcanuseyourwebcamtotakepictures, recordvideoclipsortakep artinwebchats.
•Thepicturequalitydepen dsonthelightingconditionsandthesoftwarebeingused.
- Youcanonlyoperatethewebcamwithaparticularapplication(e.g.anInternettelephonyprogramoravideoconferencingprogramwhichsupportsawebcam).
- Whenusingthewebcamthe supportoftheTabletPCmustnotwobble.
- The webcam automatically adjusts itself to the current light level. For this reason, the touchscreen may flicker while the light level is adjusted.

Furtherinformationonuseofthewebcamandadditionalsettingsforyourwebcam canbefoundinthehelpfunctionoftheprogramusingthewebcam.
Rechargeablebattery
The built-in battery provides the Tablet PC with the necessary power for use on them. You can increase the service life of the battery by caring for the battery properly. The average battery service life is around 500 charge/discharge cycles.
You can extend the battery service life by taking advantage of the available energy-saving functions.
Chargingandmaintainingthebattery
TheTabletPC batterycanonlybechargedwhentheambienttemperatureis between5°C/ 41°Fandmax. 35°C/95°F.
Youcanchar gethebatterybyconnectingtheTabletPCtotheACadapter (see" ConnectingtheACadapter", Page19).
Ifthebatt eryisrunninglowyouwillhearawarningalarm.IfyoudonotconnecttheACadapter withinfive minutesofhearingthewarningalarm,yourTabletPCwillswitchoffautomatically.
Monitoringthebatterystateofcharge
Abattery symbolformonitoringthebatterycapacityisdisplayedinthesystembar/statusi ndicator.Thebatterysymbolshowsyouthebatterycharge.
Usingtheenergysavingfunctions
TheTabletPCuseslesspowerwhenthepowermanagementfeaturesareenabled.Youwill then be able to work longer when using the battery before having to recharge it.

The energy efficiency is increased and environmental pollution is reduced. By choosing the best power options, you can make significant savings and atthesametimehelpprotecttheenvironment.
Werecommendthefollowingsettings:
| FunctionOperatingonACpower | Operatingonbatterypower | |
| TurnoffdisplayAfter10minutesAfter5minutes | ||
| Turnoffharddisk(s)After15minutesAfter10minutes | ||
| Energysaving | After20minutesAfter15minutes | |
▶ SettheenergysavingfunctionsinyourControlPanel.
▶ SetthescreensaverinyourControlPanel.
or
▶ Keep a finger pressed on the desktop to display the context menu. Configure the screen saverunderChangescreensaver.

If you need further information about an option, you can get help with most settings by pressing the ? symbol in the upper right of the screen to open the Microsoft Help.
When the Tablet PC is in an energy saving mode, you must remember the following:

When the Tablet PC is in energy saving mode, opendata is held in main memory or in aswap file on the hard disk.
Never switch off the Tablet PC while it is in an energy saving mode. If the built-in battery is nearly drained, close all open files and do not go into energy saving mode.
If you donotintendtouseyourTabletPCforalongperiodoftime:
▶ Exit the energy saving mode if necessary via touching the screen or by switching on the TabletPC.
▶ Close all opened programs and completely shut down the Tablet PC.
Memorycards
YourTabletPCisequippedwithanintegratedstoragecardreader.Usestorage cardstoenlargethestorageofyourTabletPC.

Followthemanufacturer'sinstructionswhenhandlingthememorycards.
Supportedformat
The following format is supported:
•MicroSecureDigital(SD TM Card)
Insertingthememorycard
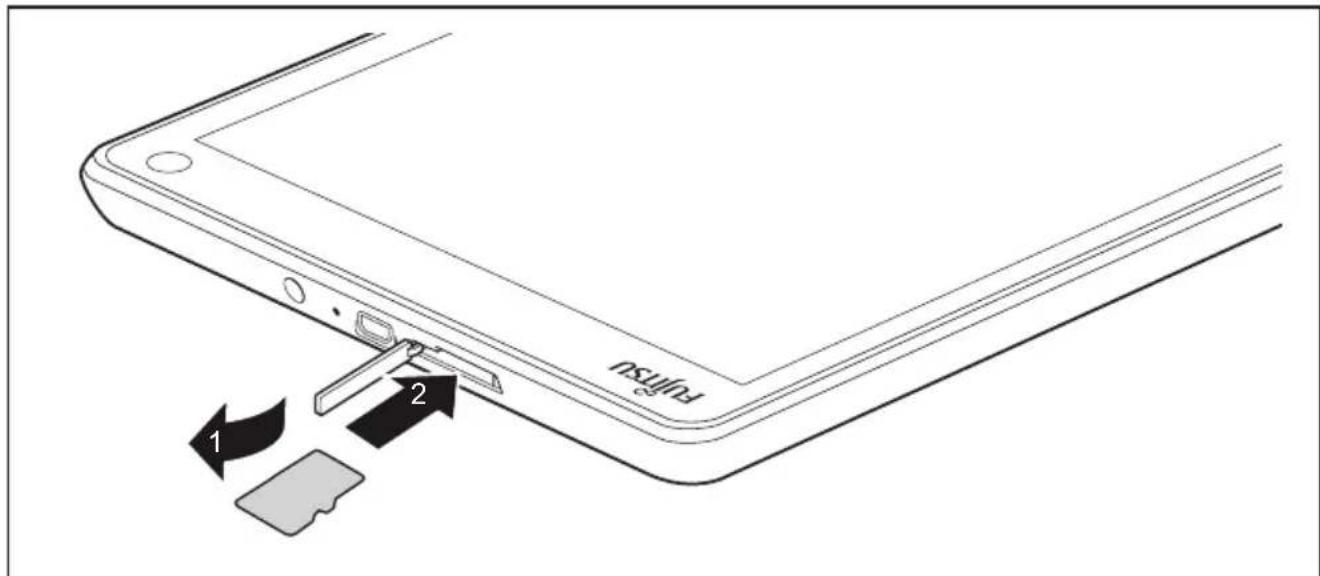
text_image
Fujitsu 1 2▶ Opentheslotcover(1).

Checktoensuretheproperendofthecardisfacingforwardtowards thetabletpcandisrightsideup.
Carefully slidethestorage card into the slot(2). Donot apply any force, otherwise the delicate contacts surfaces could be damaged.

Thecardwillstayintheinsertedposition.Ifitdoesnotstayinplaceitisnotproperly inserted.Checkagaintoensuretheproperendofthecardisfacingforwardandit isnotupsidedown.Carefullyreinsertthecarduntil"locks"intoplace.
Closetheslotcover.
Removingthememorycard

To avoid any loss of data, always follow the correct procedure for removing the card (seethedocumentation for your operating system).
▶ Opentheslotcover.
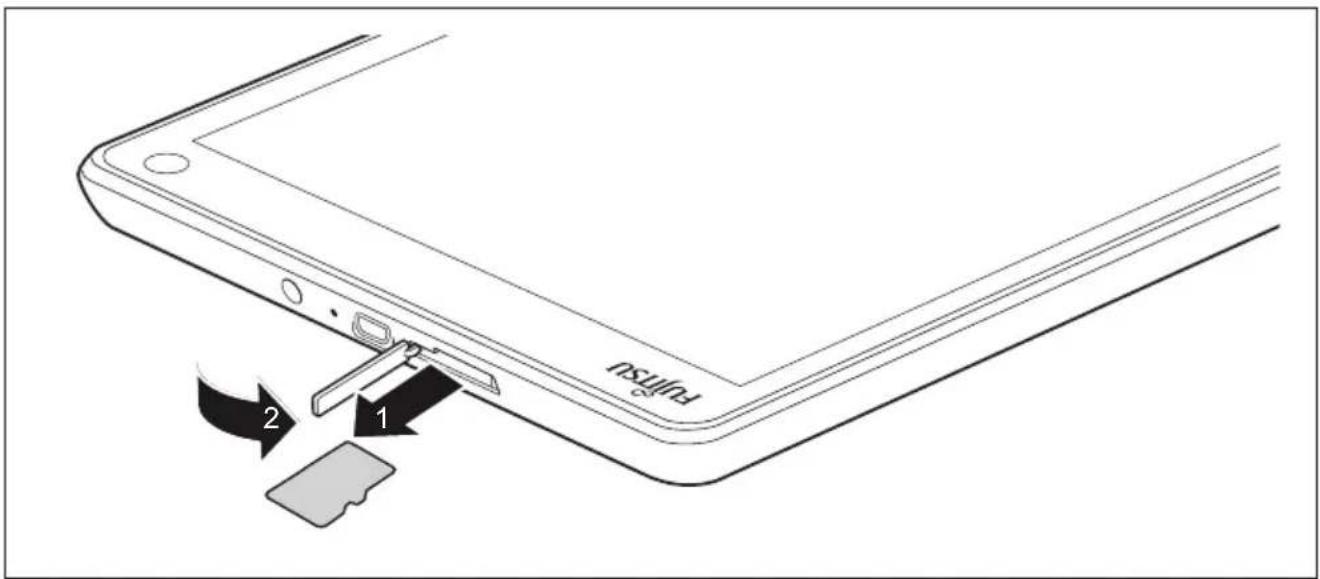
text_image
Fulfsu 1 2▶ Pull the storage card out of the slot (1).
▶ Closetheslotcover(2).
WirelessLAN /Bluetoothcomponents

The installation of wireless components not approved by Fujitsu will invalidate the certifications issued for this device.
Switchingthewirelesscomponentsonandoff
The radio components are switched on and off using the appropriate functions of the operating system.
To switch wireless components on and off individually, select Settings - Change PCsettings-Wireless-WirelessCommunication-Off.
ConfiguringWLANaccess
- Requirement: A WLAN is available and you have the necessary access data to hand.

Information on configuring WLAN access can be found in the documentation for your operating system.
FurtherinformationonWLANandBluetooth
For further information about WLAN or Bluetooth, pleasereferto the appendix of this Operating Manual.
For WLAN specifications, see chapter "WLANspecifications", Page56.
Securityfunctions
YourTabletPChasseveralsecurityfeaturesthatyoucanusetosecureyoursystem andyourpersonaldatafromunauthorizedaccess.
This chapter explains how to use these functions, and what the benefits are.

Pleaserememberthatinsomecases,forexample,forgettingyourpassword,youmaybelockedoutofthesystemandunabletoaccessyourdata.
Therefore, pleasenotethefollowinginformation:
- Backupyourdataonexternaldataacarriersatregularintervals.
- Some security function is needy out of choose passwords. Make an note of the passwords and key epitheminasafe place.
If you forget your passwords you will need to contact our Service Desk.
Deletionorresettingofpasswordsarenotcoveredbyyourwarranty andachargewillbemadeforassistance.
ConfiguringpasswordprotectioninBIOSSetupUtility

Before using the various options for password protection in the BIOS Setup Utility, please proceed as follow to increased database security:
Makeanoteofthepasswordsandkeeptheminasafeplace.Ifyouforgetyour supervisorpasswordyouwillnotbeabletoaccessyourTabletPC.Passwordsare notcoveredbyyourwarrantyandachargewillbemadeforassistance.

Yourpasswordcanbeuptoeightcharacterslongandcancontainlettersand numbers.Nodistinctionismadebetweenuppercaseandlowercase.
ProtectingBIOSSetupUtility(supervisorpassword anduserpassword)

If you have opened these operating instructions on the screen, were recommend that you print them out. You cannot call up the instructions on the screen while you are setting up the password.
Thesupervisor password and the user password both prevent unauthorized use of the BIOS SetupU tility. The supervisor password allows you to access all of the functions of the BIOS Setup Utility, while the user password will only give you access to some of the functions. You can onlyse tupauserpasswordifasupervisorpasswordhasalreadybeenassigned.

Calling and using the BIOS Setup Utility is described in the chapter "SettingsinBIOSSetupUtility", Page46.
Assigningthesupervisoranduserpasswords
▶ Start the BIOS Setup Utility and go to the Security menu.
▶ Select the Set Supervisor Password field and press the Enter key.
WithEnternewPassword:youareaskedtoenterapassword.
▶ EnterthepasswordandpresstheEnterkey.
→ Confirm new Password requires you to confirm the password.
▶ EnterthepasswordagainandpresstheEnterkey.
→ Changes have been saved is displayed as a confirmation that the new password has been saved.
▶ To set the user password, select Set User Password and proceed exactly as whenconfiguringthesupervisorpassword.
If you do not want to change any other settings, you can exit BIOS Setup Utility.
▶ In the Exit menu, select the option Save Changes & Exit.
▶ Select Yes and press the Enter key.
TheTabletPCisrebootedandthenewpasswordiseffective.Itwillnowbenecessaryto first enter your supervisor or user password in order to open the BIOS Setup Utility. Please notethatheuserpasswordonlyprovidesaccesstoafewoftheBIOSsettings.
Changing the supervisor password or user password
Youcanonlychangethesupervisorpasswordwhenyouhavelloggedintothe BIOSSetupUtilitywiththesupervisorpassword.
▶ Start the BIOS Setup Utility and go to the Security menu.
▶ When changing the password, proceed exactly as when assigning a password.
Removing passwords
Toremoveapassword(withoutsettinganewpassword)performthefollowingsteps:
▶ Start the BIOS Setup Utility and go to the Security menu.
▶ Highlight the Set Supervisor Password or Set User Password field and press the Enter key.
→ You will be requested to enter the current password by the Enter Current Password prompt. Enter New Password will appear and you will be requested to enter a new password.
▶ PresstheEnterkeytwiceatthisrequest.
▶ In the Exit menu, select the option Save Changes & Exit.
▶ Select Yes and press the Enter key.
→ TheTabletPCisrebootedandthepassworddisremoved. Removingthesupervisorpasswordsimultaneouslydeactivatestheuserpassword.
Passwordprotectionforbooting theoperatingsystem

With the supervisor password you have set in the BIOS Setup Utility (see section" Assigning the supervisor and user passwords", Page 39), you can also prevent booting of the operating system.
Activatingsystemprotection
▶ Start the BIOS Setup Utility and go to the Security menu.
▶ Select the Password on Boot option and press the Enter key.
▶ Select the option you require (Disabled, First Boot or Every Boot) and press the enter key
▶ Select the Save Changes & Exit option under Exit.
→ TheTabletPCreboots.Youwillbepromptedtoenteryourpassword(thesupervisorpassword).
Deactivatingsystemprotection
▶ Start the BIOS Setup Utility and go to the Security menu.
▶ Select the Password on Boot option and press the Enter key.
▶ Select the Disabled option and press the Enter key.
→ If you do not want to change any other settings, you can exit BIOS Setup Utility.
▶ Select the Save Changes & Exit option under Exit.
→ TheTabletPCreboots.Thesystemisnolongerpassword-protected.
Passwordprotecti onfortheharddisk

Theharddiskpasswordpreventsunauthorizedaccesstotheharddiskdrives andischeckedinternallyeachtimethesystemisbooted. Theconditionforthis isthatyouhaveassignedatleastthesupervisorHDDpassword.
Activatingharddiskprotection
▶ CalluptheBIO S Setup andselecttheSecuritymenu.
If you have not assigned BIOS passwords yet, define the supervisor and the user passwordnow, if desired (see" Security functions", Page 38).
MarktheHard DiskSecurityfieldandpresstheEnterkey.
▶ In the area Drive0, mark the field Set Master Password and press the Enter key.
→ EnternewPa ssword then appears and you are asked to enter a password.
▶ EnterthepasswordandpresstheEnterkey.
→ Confirmnew Password requires you to confirm the password.
▶ EnterthepasswordagainandpresstheEnterkey.
WithSetu p Notice: Changes have been saved you receive confirmation that thenewpa sswordhasbeensaved.
▶ If you wish to enter a password for a second hard disk (Drive1), in the area Drive1 mark the field Set Master Password and proceed in exactly the same way as for the set up of the first hard disk (Drive0).
→ Thefiel d Password Entry on Boot is set to Enabled by default. You can exit the BIOS Setup once you have finished changing the settings.
▶ From the Exit menu, choose the option Exit Saving Changes.
▶ Press the Enter key and select Yes.
→ TheTabletPCrebootsandyourharddiskisnowprotectedwithapassword. The passwordpromptisenabledassoonastheTabletPChasrebooted.
Deactivatingharddiskprotection
Tocancelapassword(withoutsettinganewpassword)proceedasfollows:
▶ Call up the BIOS Setup and select the Security menu.
▶ Mark the Hard Disk Security field and press the Enter key.
▶ In the area Drive0, mark the field Set Master Password and press the Enter key.
With the prompt Enter current Password you are first asked to enter the old password again. With Enter new Password you are then prompted to enter a new password.
▶ Aftertherequest, presstheEnterkeythreetimes.
▶ From the Exit menu, choose the option Exit Saving Changes.
▶ Press the Enter key and select Yes.
→ TheTabletPCrebootsandthereisnolongeranypasswordprotectionforthisharddisk.
▶ If you wish to remove a password for a second hard disk (Drive1), in the area Drive1 mark the field Set Master Password and proceed in exactly the same way as for the removal of the first hard disk (Drive0).
TrustedPlatformModule-TPM(devicedependent)
To use the TPM, you must enable the TPM in the BIOS Setup before the software is installed. Therequirementforthisisthatyouhaveassignedatleastthesupervisor HDDpassword(see" Securityfunctions",Page38).
EnablingTPM
- Requirement: You have assigned a supervisor password (see "Security functions", Page 38).
▶ CallBIOSSetupandsele cttheSecuritymenu.
▶ Mark the TPM Security Chip Setting field and press the Enter key.
▶ SelecttheentryEnabl edtoenabletheTPM
Once you have enabled the TPM the Clear Security Chip menu item appears.
Youcanclearthehold er in the TPM using Clear Security Chip. With Enabled, allsecretkeys(e.g .SRK-StorageRootKeys,AIK-AttestationIdentityKeys etc.) generated by applicationsaredeleted.
Takenotethatyouc anthennolongeraccessthedatayouhave encryptedontheh older-basedkeys!
▶ SelecttheExitSa vingChangesoptionintheExitmenu.
▶ Press the Enter key and select Yes.
→ TheTabletPCres tartsandtheTPMisenabledafterthereboot.
DisablingTPM
- Requirement: You have assigned a supervisor password (see "Security functions", Page 38).
▶ Call BIOS Setup and select the Security menu.
▶ Mark the TPM Security Chip Setting field and press the Enter key.
▶ Select the entry Disabled to disable the TPM.
▶ From the Exit menu, choose the option Exit Saving Changes.
▶ Press the Enter key and select Yes.
→ TheTabletPCisrebootedandtheTPMisdisabled.
Connectingexternaldevices

Underallcircumstances, pleaseobservethesafetynotesprovidedinthe "Important notes", Page 12 chapter before connecting or disconnecting anydevicestoorfromyourTabletPC.
Alwaysreadthedocumentationsuppliedwiththedeviceyouwishtoconnect.
Neverconnectordisconnectcablesduringathunderstorm.
Neverpullatacablewhendisconnectingit.Alwaysgrasptheplug.

Withsomedevices, suchasUSBdevices, itisnotnecessarytoswitchoff theTabletPCandthedevicebeforeconnecting/disconnecting. Formore information about whether or not devices need to be switched off, pleaserefer tothedocumentations supplied with you external device.
Someoftheexternaldevicesrequirespecialdrivers(seetheoperating systemandexternaldevicedocumentation).
Connectinganexternalmonitortothe microHDMIport
The micro HDMI port can be used to connect an external amplification or plasma TV with an HDMI connection.
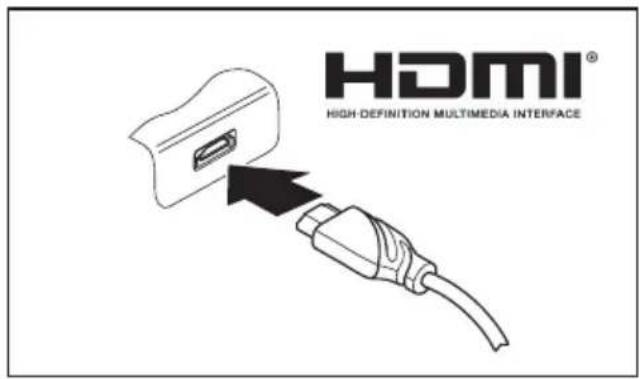
text_image
HDMI® HIGH DEFINITION MULTIMEDIA INTERFACE▶ Connectthedatacabletothe externaldevice.
Connectthedatacabletothemicro HDMIport.

SomeLCDtelevisionshaveonlytwospeakers/speakerportsandtherefore cannotreproduceDolbyDigitalorDTS. ToplaybackHDMIsound, you mustchangetheHDMIsoundsettingsaccordingly.
You can find the settings under Control Panel - Hardware and Sound. Deactivate the settingsforDTSAudioandDolbyDigitaltoenableplaybackofHDMIsound.
ConnectingUSBdevices
YourTabletPChasamicroUSBport.UsingtheUSBcablesupplied,youcanconnectyourTabletPCtoanotebookordesktopPCfordatacommunication.WithacommerciallyavailableUSB-OTG adapter,youcanconnectinputdevicessuchasakeyboardandmouseaswellasmassmemories suchasFlashmemorysticks.Checkthemanualtoseeifyourdeviceissupported.

USB devices are hot-pluggable. This means you can connect and disconnect the cables of USB devices while the operating system is running.
USB2.0hasadatatransferrateofupto480Mbps.
Additional information can be found in the documentation for the USB devices.
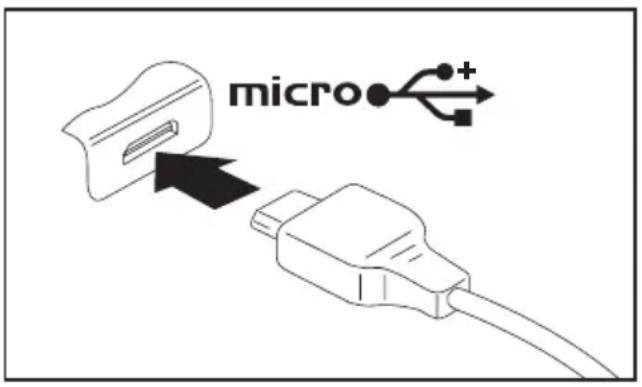
text_image
micro••+▶ Connectthedatacabletothe externaldevice.
Connectthedatacabletothemicro USBportontheTabletPC.

Devidedrivers
USBdeviceswillbeautomaticallyrecognizedandinstalledbyyouoperatingsystem.
HowtoremoveU SBdevicescorrectly

Alwayscorrectlyremovethedeviceaccordingtotherulesdescribedbelow, toensurethatnoneofyourdataislost.
▶ Taphesym bolforsaferemovalofthehardware.
▶ Select the device you wish to shut down and remove.
▶ TapOK.
→ Waitforthedialogboxwhichtellsyouthatitisnowsafetoremovethedevice.
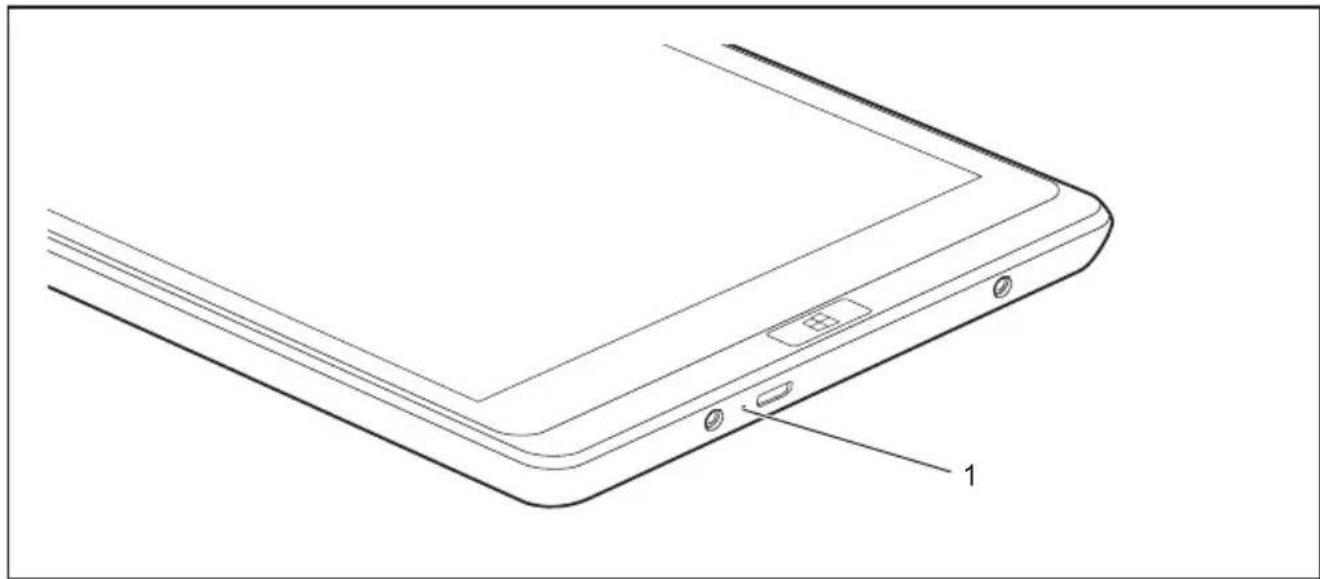
Headphonesport
YoucanconnecteitherheadphonesorexternalspeakerstoyourTabletPCviatheheadphoneport.
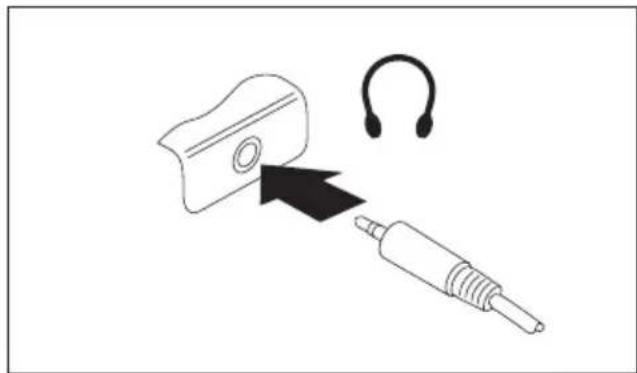
natural_image
Diagram showing a mechanical device with an ear and plug, no text or symbols present▶ Connecttheaudiocabletothe externaldevice.
Connecttheaudiocabletotheheadphone portoftheTabletPC.
→ Theinternalspeakersaredisabled.

If you buy a capable from a retailer, please note the following information:
TheheadphoneportonyourTabletPCisa"3.5mmjacksocket".
Ifyouwanttoconnectheadphonesorspeakersyouwillneeda"3.5mmjackplug".
SettingsinBIOSSetupUtility
The BIOS Setup Utility allows you to set the system functions and the hardware configuration for the TabletPC.
When the Tablet PC is delivered, the default settings are effective. You can change these settings in the menus of the BIOS Setup Utility. Any changes you make take effect as soon as you save and exit the BIOS Setup Utility.
The BIOS Setup Utility program contains the following menus:
| About | DisplaysinformationrelatingtotheBIOS,processorandTabletPC |
| System | Advancedsystemsettings |
| Advanced | Configuration of various hardware components, such as mouse, keyboard, processor |
| Security | Password settingsand securityfunctions |
| Boot | Configuration of the start-up sequence |
| Exit | Exits the BIOS Setup Utility |
Starting the BIOS Setup Utility
- Keep the "Lock screen orientation" tablet button pressed and switch the Tablet PC on.
▶ If a password has been assigned, enter the password and press the Enter key.

If you have forgotten the password, contact your system administrator or contact our customers service centre.
TheBIOSSetupUtilitystarts.
BIOS Setup Utility operation

Press the F1 key to display help about operation of the BIOS Setup Utility. The description of the individual settings is shown in the right-hand window of the BIOS Setup Utility. With the F9 key you can load the default settings of the BIOS Setup Utility.
▶ Usethecursorkeys ← or → toselectthemenu youwishtoaccess tomakechanges.
→ Themenuisdisplayedonthescreen.
▶ Select the option you want to change with the cursor keys or .
▶ Pressthe"Enter"key.
▶ Pressthe ESC keytoexittheselectedmenu.
For future reference, make a note of the changes you have made (for example, in this manual).
ExitingBIOSSetupUtility
You need to select the desired option in the Exit menu and activate it by pressing the Enter key:
ExitSavingChanges-savech angesandexitBIOSSetupUtility
▶ To save the current menu settings and exit the BIOS Setup Utility, select Exit Saving Changes and Yes.
→ TheTabletPCisrebooted and thenewsettingscomeintoeffect.
ExitDiscardingChanges-Rejectchangesand exitBIOSSetupUtility
▶ To discard the changes, select Exit Discarding Changes and Yes.
The settings which were valid when BIOS Setup Utility was called remain effective. The BIOS Setup Utility ends and the Tablet PC is rebooted.
Load Setup Defaults – load defaultvalues
▶ To copy the standard entries for all menus of the BIOS Setup Utility, choose Load Setup Defaults and Yes.
DiscardChanges-DiscardChangeswithout exitingBIOSSetupUtility
▶ To discard the changes you have made, select Discard Changes and Yes.
→ The settings in place when BIOS Setup Utility was called remain effective. YoucannowmakeadditionalsettingsintheBIOSSetupUtility.
▶ If you want to exit the BIOS Setup Utility with these settings, select Exit Saving Changes and Yes.
SaveChan ges-savechangeswithoutexiting theBIOSSetupUtility
▶ To save the changes, select Save Changes and Yes.
→ Thechangesaresaved.YoucannowmakeadditionalsettingsintheBIOSSetupUtility.
▶ If you want to exit BIOS Setup Utility with these settings, choose Exit Saving Changes and Yes.
Savechangesandpoweroff
▶ To save the changes and switch off your device, select Save Changes and Power Off and Yes.
→ The changes are saved. Your device is shut down.
Troubleshootingandtips
Ifafaultoccurs,trytocorrectitasdescribed.Ifyoufailtocorrecttheproblem,proceedasfollows:
▶ Makeanoteofthestepsandthecircumstancesthatledtothefault.Also makeanoteofanyerrormessagesdisplayed.
▶ SwitchtheTabletPCoff.
▶ PleasecontacttheHotline/ServiceDesk.

YoucancontactFujitsuServiceandSupportinthefollowingways:
• Tollfreephone:1-800-8Fujitsu(1-800-838-5487)
Website:" http://solutions.us.fujitsu.com/www/content/support/contact/index.php"
Beforeyouplacethecall,havethefollowinginformationreadysothatthecustomer supportrepresentativecanprovideyouwiththefastestpossiblesolution:
- ThemodelnameandserialnumberoftheTabletPC. Theserialnumber islocatedonastickerontheundersideoftheTabletPC.
- Noteswiththemess agesthatappearedonthescreenand information on acousticsignals.
• All changes you have made to the hardware or software after receiving the Tablet PC.
• All changesyouha ve made to the BIOS Setup settings after receiving the Tablet PC. - Your system configuration and all peripheral devices connected to your system.
- Yoursalescont ract.

OurTabletPCshavebeendesignedprimarilywithmobileapplicationsinmind. Thismeansthatconsiderableefforthasbeenmadetooptimizecomponentsand equipmentintermsofweight,spaceandenergyrequirements.Dependingonthe particular configuration you have purchased, it is possible that functionality may be slightly reduced compared to a desktop PC if you are running processor-intensive gamingsoftware,e.g.gameswithintensive3Dgraphics.Updatingyourhardwarewith driverswhichhavenotbeenapprovedbyFujitsumayresultinperformancelosses, datalossesormalfunctionoftheequipment.Alistofapproveddriversandcurrent BIOSversionscanbedownloadedfrom:" http://solutions.us.fujitsu.com"
Using the Resetbutton
If the device no longer responds and does not react to the ON/OFF button, use the Reset button to switchchoff the device.
▶ DisconnectthedevicefromtheACadapter.
▶ Press a pen or a piece of wire (e.g. a paperclip) firmly into the opening of the Reset button to switch off the system.
▶ ReconnecttheACadaptertothedevice.
▶ Switchthedeviceonagain.
Helpifproblemsoccur
Shouldyouencounteraproblemwithyourcomputerthatyoucannotresolveyourself:
▶ NotethelDnumberofyourdevice. TheIDnumberisfoundonthetyperating plateonthebackorundersideofthecasing.
For further clarification of the problem, contact the Fujitsu Service Desk. When you do this, please havereadytheIDnumberandserialnumberofyoursystem.
RecoveringyourFactoryImage
In the event you need to restore your original Factory Image, please refer to the appendix of this Operating Manual.
TheTabletPC'sdateortimeisincorrect
| CauseTroubleshooting | |
| Time and date are incorrect. | ► With the BIOS-Setup-Utility, you can set the date and time in the Main menu. |
| Dateandtimearestillsetincorrectlyafter switching on the Tablet PC. | ► Pleasecontactyoursalesoutletorour hotline/servicedesk. |
Battery indicator does not illuminate
| Cause | Troubleshooting |
| Thebatteryi sdischarged. | ▶ Chargethebattery.or▶ Connect the Tablet PC to a power outlet using the ACadapter. |
The Tablet PC's touchscreen remains dark
| CauseTroubleshooting | |
| Touchscreen is switched off. | ▸ Press a key (external keyboard) or tap on thetouchscreen. |
| External monitor or television set connected. | ▸ Check whether the graphics driver settings are correctorwhether anexternalmonitor has been detected in "Intel Graphics Media AcceleratorDriverformobile". |
ThedisplayontheTabletPC'stouchscreen isdifficulttoread.
| CauseTroubleshooting | |
| Reflected glare | ► Move the Tablet PC into a different position. ► Increasethebrightnessofthescreen. |
Theexternalmonitorremainsblank
| CauseTroubleshooting | |
| Monitorisswitchedoff. | ► Switchtheexternalmon itoron. |
| Powersavinghasbeenactivated(monitoris blank). | ► Pressakey(externalkeyboard)ortapon thetouchscreen. |
| Brightnessissettodark. | ► Adjustthebrightnessofthemonitor. |
| Screenoutputisse ttotheTabletPC touchscreen. | ► Checkwhethertheg raphicsdriversettings arecorrectorwhet heranexternalmonitor hasbeendetected in"IntelGraphicsMedia AcceleratorDriv erformobile". |
| Theexternalmonitor'sACcableordatacableis notconnectedproperly. | ► SwitchofftheTabletPCandtheexternal monitor.► Check whether the AC cable is plugged properlyintotheexternalmonitorandinto thepoweroutlet.► Check that the data cable is properly connectedtotheTabletPCandtheexternal monitor(ifitispluggedinwithaconnector).► Switch on the external monitor and the TabletPC. |
The external monitor is blank or the image is unstable
| CauseTroubleshooting | |
| Thewrongexternalmonitorhasbeenselected orthewrongscreenresolutionhasbeensetfor theapplicationprogram. | ► Terminate the application program in Windows. If the error persists after terminating the program, use the key combinationforswitchingthescreenoutput inordertoswitchtothetouchscreenofthe TabletPC.Changethefollowingsetting:► Setthescreenresolution: Setthescreen resolution as described in the documentation for your operating system.► Selectmonitor:Selectmonitor1or2as describedinthedocumentationforyour operatingsystem. |
TheTabletPCdoesnotstartafterswitchon
| CauseTroubleshooting | |
| Thebatteryisdead. | ▶ Chargethebattery.or▶ ConnecttheACadaptertotheTabletPC. |
| The AC adapter is not connected properly. | ▶ Check whether the AC adapter is properly connectedtotheTabletPC.▶ SwitchtheTabletPCon. |
TheTabletPCstopswor king
| CauseTroubleshooting | |
| TheTabletPCisinenergysavingmode. | ► Endenergysavingmo de. |
| Anapplicationprogramhascausedthe malfunction. | ► Closetheapplicationprogramorrestart theTabletPC(byrestartingtheoperating systemorswitchingthedeviceoffandback onagain). |
| Thebatteryisdead. | ► Chargethebatte ry.or► ConnecttheACadaptertotheTablet PC. |
Theprinterdoesnotprint
| CauseTroubleshooting | |
| The printer is not switched on. | ► Make sure that the printer is switched onandreadyfor operation(refer tothe documentationsuppliedwiththeprinter). |
| Theprinterisnotconnectedcorrectly. | ► Check that the data cable between the Tablet PCandtheprinterisproperlyconnected. |
| The printer driver is faulty or not correctly installed,oritisthewrongprinterdriver. | ► Check that the data cable between the Tablet PCandtheprinterisproperlyconnected.► Checkwhetherthecorrectprinterdriveris loaded(refertotheprinterdocumentation). |
Thewirelessconnectiontoanet workdoesnotwork
| CauseTroubleshooting | |
| The wireless component is switched off. | ► Switch the wireless component on (see "Switchingthewirelesscomponentsonand off",Page36). |
| Thewirelesscomponentisswitchedon.Despite this,thewirelessconnectiontoanetworkdoes notwork. | ► Checkwhetherthewirelessconnectionis enabledbythesoftware.► Furtherinformationonusingthewireless componentcanbefoundinthehelpfiles. |
Thebatterydischarges tooquickly
| Cause | Troubleshooting |
| Thebatteryiseither toohotortoocold.Inthis casethebatteryindi catorflashes. | ► BringtheTabletPCup/downtoanormal operatingtemperatureagain.► Iftheoperatingtimeofthebatterylifeis extremelyshort,thebatteryisprobablytoo old.Replaceethebatteryifnecessary. |
| Youmayhaveanapplicationrunningthatconsumesagreatdealofpowerduetofrequent accessingoftheharddiskoropticaldrive. | ► UsetheACadapterwheneverpossible. |
| Themaximumbrightnessmayhavebeenset forthescreen. | ► Reducethebrightnessofthescreento lowerenergyconsumption:Youwillfindthe settingunderControlPanel-Hardwareand Sounds-WindowsMobilityCenter. |
Acousticwar ning
| Cause | Troubleshooting |
| Abeepsoundseveryfewseconds.Thebatteryisalmostdead. | ▶ Chargethebattery. |
Errormessagesonthescreen
ThissectiondescribestheerrormessagesgeneratedbytheBIOSSetup.Errormessagesdisplayed by the operating system or programs are described in the documentation for these programs.

If the errormessage appears repeatedly despite troubleshooting measures, contact the place of purchase or our customers service center.
| Errormessage/causeTroubleshooting | |
| CMOSBatteryBadIftheerrormessageoccursrepeatedly,the bufferbatteryintheTabletPCisflat. | ▸ Contactyoursalesoutletorour customer servicecenter. |
| SystemCMOSchecksumbad-Defaultconfiguration usedThe system configuration information is incorrect. | ▸ SwitchtheTabletPCoff.▸ SwitchtheTabletPCon.▸ Keepthevolumebuttonand theshortcut buttonpressedandswitc htheTabletPC on.Ifyoukeepthevolume buttonpressed duringthebootprocess, youcanswitchinto theBIOSSetup-▸ In the BIOS Setup, select the Exit menu.▸ SelecttheentryLoadS etupDefaults.▸ Select OK and press the Enter key. |
| Extended memory failed at offset: xxxx Failing Bits: zzzzzzzzWhentestingtheextendedmemory.anerror hasresultedattheaddressxxxx. | ▸ Contactyoursalesoutletorourcustomer servicecenter. |
| FailureFixedDisknThesettingsoftheharddiskdriveareincorrect. | ▸ Start the BIOS Setup (Primary Master submenu)andselectthecorrectsettings. |
| Keyboardcontrollererror | ▸ SwitchyourTabletPCoffwiththeON/OFF button.▸ Wait3-5secondsandswitchtheTabletPC onagain. |
| Keyboarderror | Ifyouuseanexternalkeyboard:▸ ChecktheconnectionandreboottheTablet PC. |
| nnStuckkey | ▸ Makesurethatnokeyispressed. |
| Operatingsystemnotfound | ▸ Checkin theBIOSSetupwhetheryourhard diskhas beensetcorrectly.▸ Makesurethattheoperatingsystemis installedonthecorrespondingdrive. |
| Press(toresume,toSETUPThiserrormessageappearsifanerroroccurs duringtheself-testbeforestartingtheoperating system. | ▸ Pressthe Alt tabletbuttontobootthe operatingsystem |
| Realtimeclockerror | ▸ Contactyoursalesoutletorourcustomer servicecenter. |
| nnnnKShadowRAMfailedatoffset:xxxxFailing Bits:zzzz | ▸ Contactyoursalesoutletorourcustomer servicecenter. |
| Systembatteryisdead-ReplaceandrunSETUP | ▸ Contactyoursalesoutletorourcustomer servicecenter. |
| Systemcacheerror-Cachedisabled | ▸ Contactyoursalesoutletorour customer servicecenter. |
| Systemtimererror | ▸ Contactyoursalesoutletorourcustomer servicecenter. |
Technicaldata
TabletPC
| General | |
| Processor | IntelBayTrail-TCRZ3735F1.33GHz(IntelBurstTechnology:Maximum 1.83GHz) |
| Mainmemory | 2GBDDR3L-RS(1333MHz)onboard |
| Electricaldata | |
| SafetyregulationscompliedwithCE | |
| ProtectionclassII | |
| Maximumpowerconsumption(TabletPC switchedonandthebatteryfullycharged): | 10 W |
| Touchscreen | |
| Size8"WXGAWideAngle | |
| Screenresolution800x1280pixels/16millioncolors | |
| PixelclassII | |
| Brightnesscontrol | 12levels |
| Cameras | • Front:1.26megapixels• Back:5megapixels |
| Graphicsc ard | |
| Chip | Intel(R)HDGraphics |
| Maximumresolutionofexternaldisplay: | 1920x1080 |
| Dimensions | |
| WidthxDepthxHeight | 126mmx 215mmx9.9mm(4.96inx8.46in x 0.389 in) |
| Weight depending on configuration | Under 400 g (0.88 lbs) |
| Inputdevices | |
| Tabletbuttons | 3buttons: Increasevolumebutton,decrease volumebutton,Windowsbutton |
| Slots | |
| Storagecardslot | 1 x micro SD Card |
| Ports | |
| Headphonesport | 3.5mmstereominijack |
| MicroHDMIport | 1 x |
| USB(UniversalSerialBus) | 1xMicroUSB2.0 |
| Ambientconditions | |
| EnvironmentclassDINIEC721 | 7K1 |
| MechanismclassDINIEC721 | 7M2 |
| Operatingtemperature 5^ .... 35^/41^ .... 95^ | |
| Transporttemperature(2K2)– 15^ .... 60^/5^ .... 140^ | |
WLANspecifications
| TypeofnetworkAzureWaveAW-NB177NFSingleBand1x1 | BGNWLAN/BTcombo,integratedSingle-BandwirelessdeviceconformstolEEE802.11b/g,and802.11n,Wi-Fibased.* |
| Transferrate•IEEE802.11b:11Mbpsmax.(Automaticswitching)•IEEE802.11g:54Mbpsmax.(Automaticswitching)•IEEE802.11n:150Mbpsmax.(Automaticswitching) | |
| Activefrequency•IEEE802.11b/g:2400–2497MHz | •IEEE802.11n:2.4G Hz |
| Recommendmaximumdistance**•IEEE802.11b/g:30m•IEEE802.11n:50m | |
| Numberofchannels | •IEEE802.11b:1–14ch•IEEE802.11g:1–13ch•IEEE802.11n:1–13ch |
| Security•WEP(WEIPkey:64/128bit) | •WPA-Personal(TKIP/AES)•WPA2-Personal(TKIP/AES)•WPA-Enterprise(TKIP/AES)•WPA2-Enterprise(TKIP/AES)•IEEE802.11x(TLS/PEAP) |
| * “Wi-Fi based” indicates that the interconnectivity test of the organization which guarantees theinterconnectivityofwirelessLANs(Wi-FiAlliance)waspassed.** There commend maximum distances given above increase or decrease depending on factorssuch as the number of walls, reflecting material or interference by external RF sources.*** Network key encryption (WEP) occurs with the number of bits given above, after deduction ofthefixed length of 24 bits the user may however also set 40 or 104 bits. | |
Rechargeablebattery

Forinformationonthebatteriesusedinyourdevice,pleasesee "http://solutions.us.fujitsu.com/www/content/support/".
| Ratedvoltage5V | |
| Ratedcapacity20Wh |
10 W MicroUSBACadapter
| Ratedvoltage5V | |
| Max.ratedcurrent2A |
AnadditionalACadapterorACcablecanbeorderedatanytime.
Manufacturer'snotes
Disposalandrecycling
You can find information on this subject on your Tablet PC or on our website ("http://solutions.us.fujitsu.com/www/content/products/trade-in_program/").
Recyclingyourbattery
Overtime,thebatteriesthatrunyourmobilecomputerwillbegintoholdachargefora shorteramountoftime;thisisanaturaloccurrenceforallbatteries.Whenthisoccurs, youmaywanttoreplacethebatterywithafreshone*.Ifyoureplaceit,itisimportant thatyoudisposeoftheoldbatteryproperlybecausebatteriescontainmaterialsthat couldcauseenvironmentaldamageifdisposedofimproperly.
Fujitsuisveryconcernedwithenvironmentalprotection,andhasenlistedtheservicesofthe Rechargeable Battery Recycling Corporation (RBRC)**, a nonprofit public service organization dedicatedtoprotectingourenvironmentbyrecyclingoldbatteriesatnocosttoyou.
RBRC has drop-off points at tens of thousands of locations throughout the United States and Canada. To find the location nearest you, go to "www.RBRC.org" or call 1-800-822-8837.
If there are no convenient RBRC locations near you, you can also go to the EIAC consumer Education Initiative website" http://EIAE.org/" and search for a convenient dispos allocation.

Remember—protectingtheenvironmentisacooperativeeffort, and wemust make every effort to protect it for current and future generations.
*ToorderanewbatteryforyourFujitsumobilecomputer, gototheFujitsushoppingsite at" www.shopfujitsu.com" in the US or "www.fujitsu.ca/products/notebooks" in Canada.
**RBRCisanindependentthirdpartytowhichFujitsuprovidesfundingfor batteryrecycling; RBRCisinnowayaffiliatedwithFujitsu.
DOC(IndustryCANADA)Notices
RadiosandTelevision
This Class B digital apparatus meets all requirements of Canadian Interference-Causing Equipment Regulations.
IMPORTANT SAFETY INSTRUCTIONS
ThisunitrequiresanACadaptertooperate.OnlyuseULListedI.T.E.adapterswithanoutputrating of 5 VDC, with a minimum current of 2.0A (10W). The correct output rating is indicated on the AC adapterlabel.RefertotheillustrationbelowforthecorrectACAdapteroutputpolarity:

flowchart
graph LR
    A[" "] --> B["●"]
    B --> C["+"]
When using your Tablet PC equipment, basics safety precaution should always be followed to reduce the risk of fire, electric shock and injury to persons, including the following:
- Donotusethisproductnearwaterforexample, nearabathtub, washbowl, kitchen sinkorlaundrytub, inawetbasementornearaswimmingpool.
- Use only the power cord and batteries indicated in this manual. Do not dispose of batteries in a fire. They may explode. Check with local codes for possible special disposal instructions.
SAVETHESEINSTRUCTIONS
For Authorized Repair Technicians Only

CAUTION:
For continued protection against risk of fire, replace only with the sametypeandratingfuse.

WARNING:
DangerofexplosionifLithium(CMOS)batteryisincorrectlyreplaced.Replaceonly withthesameorequivalenttyperecommendedbythemanufacturer.
Disposeofusedbatteriesaccordingtothemanufacturer'sinstruction.
ENERGYSTARCompliance

text_image
energy ENERGY STARYour Fujitsu system is an ENERGY STAR qualified mobile PC. By choosing a computer with the latest energy-saving technology, you're helping top reserve our environment for future generations. ENERGY STAR is a joint program of the U.S. Environmental Protection Agency, U.S. Department of Energy, Natural Resources Canada, and other governments around the world helping us money while protecting the environment through energy efficient products and practices. With energy costs and global warming top-of-mind for consumers, Fujitsu committed to offerings solution that help consumers conserve energy and improve the quality of our environment.
Displaysleepmode:
Youwillnoticethatyourcomputerisinitiallysetsothatthedisplayturnsoffafter4minutesof userinactivity.To"wake"thedisplayfromsleepmode,presstheWindowsButton.
Energysavingbenefits:
Fujitsu ENERGY STAR qualified mobile PCs use about half as much electricity as standard equipment – saving half in utility costs. But more than that, ENERGY STAR also makes a difference fortheenvironment. Did you know that the average house can be responsible for twicethe greenhouse gas emissions as the average car? That's because every time you flip on a light switch, run your dish washer, or turn on your PC, you use energy, which means more greenhouse gas emissions from power plants. So the more energy we can save through energy efficiency, them more we help to reduce greenhouse gases and other risks of global warming.
TolearnmoreabouttheimportantENERGYSTARprogram,visit:" www.energystar.gov".
ToreadabouthowFujitsuissupportingSustainableManagementalongwith several other environmental activities, visit the Fujitsu Corporate Citizenship page at: "http://www.computers.us.fujitsu.com/www/content/aboutus/environmental/environment.php".
Declarationsofconformity
This device complies with Part15 of the FCC Rules. Operations are subject to the following two conditions: (1) This device may not cause harmful interference, (2) this device must accept any interferencereceived, including interference that may cause undesired operation.
FCCandICRegulatoryInformation

PleasenotethefollowingregulatoryinformationrelatedtothewirelessLAN device.
RegulatoryNotesandStat ements
WirelessLAN, HealthandAuthorizationforuse
Radio frequency electromagnetic energy is emitted from Wireless LAN devices. The energy levels of these emissions, however, are far much less than the electromagnetic energy emissions from wireless devices such as mobile phones. Wireless LAN devices are safe for use by consumers because they operate within the guidelines found in radiofrequency safety standards and recommendations. The use of Wireless LAN devices may be restricted in some situations or environments, such as:
- Onboardanairplane,or
•Inanexplosiveenvironment,or - Insituationswheretheinterferencerisktootherdevicesorservicesis perceivedoridentifiedasharmful.
In cases in which the policy regarding use of Wireless LAN devices in specific environments is not clear (e.g., airports, hospitals, chemical/oil/gas industrial plants, private buildings), obtain authorizationousethesedevicespriortooperatingtheequipment.
RegulatoryIn formation/Disclaimers
Installation and use of this Wireless LAN device must be in strict accordance with the instructions included in the user documentation provided with the product. Any changes or modifications made to this device that are not expressly approved by the manufacturer may void the user's authority to operate the equipment. The manufacturer is not responsible for any radio or television interference caused by unauthorized modification of this device, or the substitution or attachment of connecting cables and equipment other than those specified by the manufacturer. It is the responsibility of the user to correct any interference caused by such unauthorized modification, substitution or attachment. The manufacturer and its authorized resellers or distributors will assume no liability for any damage or violation of government regulations arising from failure to comply with these guidelines.
This device must not be co-located or operated in conjunction with any other antenna or transmitter.
ForIEEE802.11aWirelessLAN: Foroperationwithin5.15\~5.25GHzfrequencyrange, itis restricted to indoor environments, and the antenna of this device must be integral.
FederalCommunicationsCommissionandIndustry Canadastatement:
This device complies with Part 15 of FCC Rules and Industry Canada license exempt RSS standard(s).
Operationissubjecttothefollowingtwoconditions:(1)Thisdevicemaynotcause interference,and,(2)Thisdevicemustacceptanyinterference,includinginterference thatmaycauseundesiredoperationofthisdevice.
This equipment has been ested and found to comply with the limits for a Class B digital device, pursuant to Part 15 of the FCC Rules. These limits are designed to provide reasonable protection against that mful interference in a residential installation. This equipment generates, uses, and can radiatera dio frequency energy. If not installed and used in accordance with the instructions, it may cause harmful interferencet or radiocommunications. However, there is no guarantee that interference will not occur in particular installation.
If this equipment do escause harmful interferencetoradioortelevisionreception, which can be determined by turning the equipment off and on, the user is encouraged to try and correct the interference by one or more of the following measures:
- Reorientorreloca tethereceivingantenna.
- Increase thedistance between the equipment and thereceiver.
- Connecttheequip menttoanoutletonacircuitdifferentfromtheonethereceiverisconnectedto.
- Consultthedealeroranexperiencedradio/TVtechnicianforhelp.
FCCRadioFrequencyExposurestatement
The available scientific evidence does not show that any health problems are associated with usinglowpowerwirelessdevices.Thereisnoproof,however,thattheselowpowerwireless devicesareabsolutelysafe.Lowpowerwirelessdevicesemitlowlevelsofradiofrequency energy(RF)inthemicrowaverangewhilebeingused.WhereashighlevelsofRFcanproduce health effects (by heating tissue), exposure to low-level RF that does not produce heating effectscausesnoknownadversehealtheffects.Manystudiesoflow-levelRFexposurehave notfoundanybiologicaleffects.Somestudieshavesuggestedthatsomebiologicaleffects might occur, but such findings have not been confirmed by additional research.
ThewirelessLANradiodevicehasbeentestedandfoundtocomplywithFCCradiation exposurelimitssetforthforanuncontrolledequipmentandmeetstheFCCradiofrequency (RF)ExposureGuidelinesinSupplementCtoOET65.
The exposure standard for wireless devices employs a unit of measurement known as the Specific Absorption Rate, or SAR. The SAR limit set by the FCC is 1.6W/kg, and 1.6W/kg by Industry Canada.
This device is compliant with SAR for general population/uncontrolled exposure limits in ANSI/IEEE C95.1-1992 and Canada RSS 102, and had been tested in accordance with the measurement methods and procedures specified in OET Bulletin 65 Supplement C, and Canada RSS 102. This device has been tested, and meets the FCC, ICRF exposure guidelines when tested with the device operating conditions.
This product or software contains encryption code which may not be exported or transferred from the US or Canada without an approved US Department of Commerce export license. This device complies with Part 15 of FCC Rules., as well as ICES 003B/NMB 003B.
Operationissubjecttothefollowingtwoconditions:(1)thisdevicemaynotcauseharmful interference, and (2) this device must accept any interference received, including interference that may cause undesirable operation. Modifications not expressly authorized by Fujitsu America, Inc.mayinvalidatetheuser'srighttooperatethisequipment.
Restrictionsconcernantl'exportation
Inaddition, users are cautioned to take notethathigh power radars are allocated as primary users (meaning they have priority) of 5250-5350 MHz and 5650-5850 MHz and these radars could cause interference and ordamage to LE-LAN devices.
AvispourleCanada
This manual describes the procedures required to properly set up and configure the optional integrated Wireless LAN Mini-PCI device (referred to as "WLAN device" in the rest of the manual). Before using the WLAN device, read this manual carefully to ensure its correct operation. Keep this manual in as safe place for future reference.
WirelessLANDevicesCoveredbythisDocument
Thisdocumentisapplicabletosystemscontainingthefollowingdevice:
- AzureWaveAW-NB177NFSingleBand1x1BGNWLAN/BTcombo
CharacteristicsoftheWLANDevice
• The WLAN devices are PCI Express Mini cards attached to the main board of the mobile computer.
•TheWLANdevicesoperateinlicense-freeRFbands,eliminatingtheneedtoprocure an FCC operating license. The WLAN operates in the 2.4GHz Industrial, Scientific, andMedical(ISM)RFbandandthelower,middle,andupperbandsofthe5GHz UnlicensedNationalInformationInfrastructure(UNII)bands.
- The WLAN devices are capable of four operating modes, IEEE802.11a, IEEE802.11b, IEEE802.11g, and IEEE802.11n.
- The WLAN device is Wi-Fi certified and operates (as applicable) at a the maximum data rate of 450 Mbps in IEEE802.11n mode (300 Mbps in this configuration); 54 Mbps inIEEE802.11gmode;and11MbpsinIEEE802.11bmode.
- TheWLANdevicessupportthefollowingencryptionmethods-WEP, TKIP, CKIP, and AESencryption.
- The Wireless LAN devices are compliant with the following standards: WPA, WPA2, CCX1.0, CCX2.0, CCX3.0, and CCX4.0.
Wireless LANModesUsingthisDevice
AdHocMode
"Ad Hoc Mode" refers to a wireless network architecture where wireless network connectivity between multiple computers is established without a central wireless network device, typically known as Access Point(s). Connectivity is accomplished using only client devices in a peer-to-peer fashion. That is why AdHoc networks are also known as peer-to-peer networks. AdHoc networks are an easy and inexpensive method for establishing network connectivity between multiple computers. Ad Hoc mode requires that the SSID, network authentication, and encryption key settings are identically configured on all computers in the Ad Hoc network.
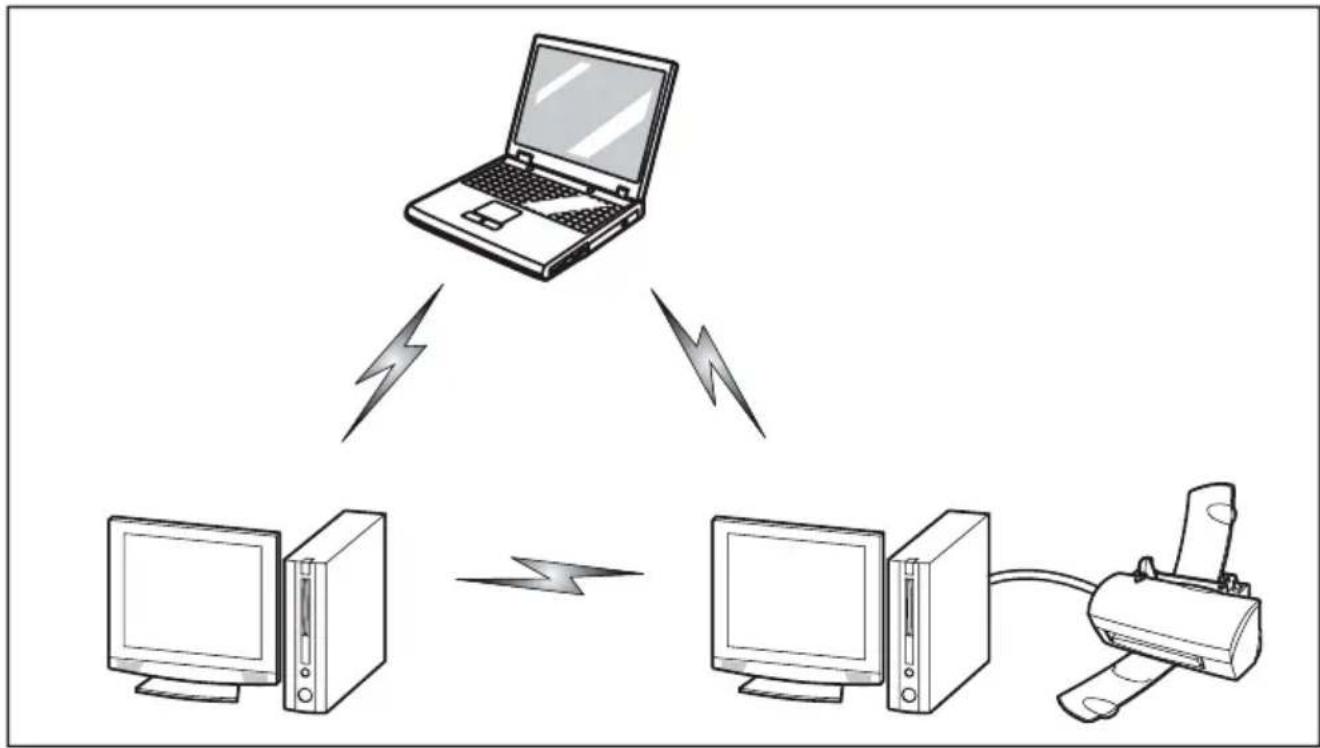
flowchart
graph TD
    A["Laptop"] -->|Wireless Link| B["Desktop Computer"]
    A -->|Wireless Link| C["Desktop Computer"]
    A -->|Wireless Link| D["Desktop Computer"]
    B <--> C
AccessPoint(Inf rastructure)Mode
Infrastructure modereferstoawirelessnetworkarchitectureinwhichdevicescommunicatewith wirelessorwir ednetworkdevicesbycommunicatingthroughanAccessPoint.Ininfrastructure mode,wireless devicescancommunicate witheachotherorwithawirednetwork.Corporate wirelessnetwo rks operate in infrastructure mode because they require access to the WLAN in ordertoacces s services, devices, and computers (e.g., file servers, printers, databases).
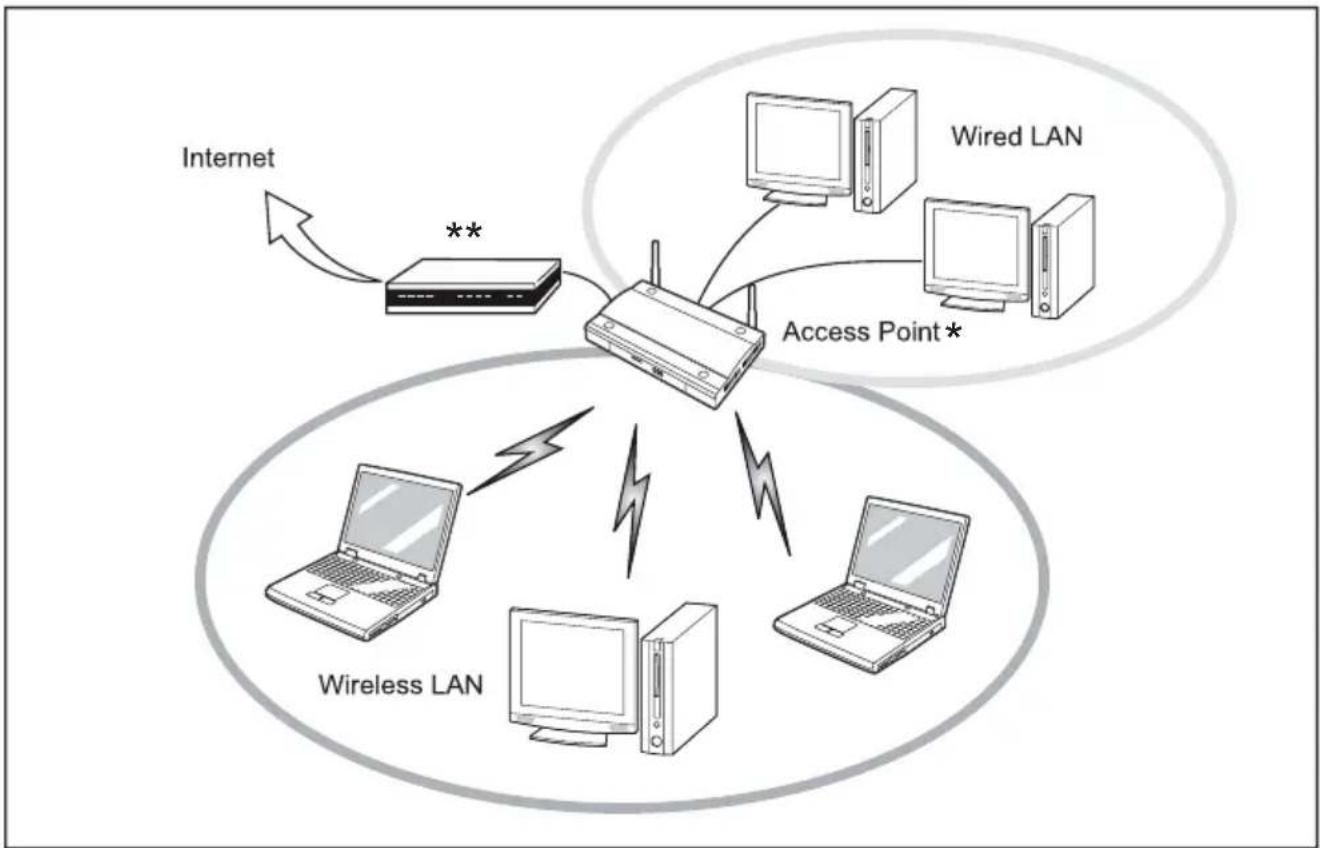
flowchart
graph TD
    A["Internet"] -->|**| B["Router"]
    B --> C["Wired LAN"]
    B --> D["Access Point*"]
    B --> E["Wireless LAN"]
    E --> F["Computer"]
    E --> G["Computer"]
    E --> H["Computer"]
^* =AnoptionalhubforawiredLANmay berequireddependinguponthetype ofaccesspointused.
**=ADSLmodem,cablemodem,orsimilar
HowtoHandleThisDevice
The WLAN device is an optional device that may come pre-installed in your mobile computer. Under normal circumstances, it should not be necessary for you to remove or install it. The Operating System that your mobile computer comes with has been pre-configured to support the WLAN device.
- IntegratedIntelCentrinowirelessLANdevicessupportIEEE802.11a, IEEE802.11b, IEEE802.11g, and IEEE802.11n.
•TheWLANdeviceoperatesinthe2.4GHzISMbandandthe5GHz lower,middle,andupperUNIIbands. - MicrowaveovensmayinterferewiththeoperationofWLANdevicessincetheyoperateinthesame2.4GHzfrequencyrangeasIEEE802.11b/g/ndevices.Interferencebymicrowavesdoes not occur with IEEE802.11a radio which operates in the 5 GHz RF band.
- Wirelessdevicesthattransmitinthe2.4GHzrangemayinterferewithoperationofWLAN devices in IEEE802.11b/g/n modes. Symptoms of interference include reduced throughput, intermittentdisconnects,andmanyframeerrors.ItisHIGHLYrecommendedthatthese interferingdevicesbepoweredofftoensureproperoperationoftheWLANdevice.
Deactivating/DisconnectingtheWLANDevice
Disconnecting the WLAN device may be desired in certain circumstances (to extend battery life) or where certain environments require it (i.e. hospitals, clinics, airplanes, etc.). The WLAN device can be disconnected in Windows using the WLAN icon in the system tray (Note that disconnecting via the icon in the system tray does not turn off the radio; it continues to transmit and receive event though it's not connected.)
The radio components are switched on and off using the appropriate functions of the operating system.
▶ To switch radio components on and off individually, select Settings – Change PCsettings–Wireless–Wirelessdevices–Off.
ConfiguringtheWirelessLAN
TheoptionalWLANdevicecanbeconfiguredtoestablishwirelessnetworkconnectivity usingthesoftwarethatisbuiltintoWindows.Supportformostindustrystandard securitysolutionsiscontainedinthissoftware.
Pre-defined parameters will be required for this procedure. Please consult with your network administrator for these parameters:
Connectiontothe network
After you have configured your computer, you can connect to an active network by performing the following steps:
- Click on the WLAN icon in the system tray.
- SelectConnec ttoanetwork.
- Select a network from the list that appears, and click the Connect button.
TroubleshootingtheWLAN
Causesandcountermeasuresfortroublesyoumayencounterwhileusingyour wirelessLANaredescribedinthefollowingtable.
| ProblemPossibleCausePossibleSolution | |
| Unavailablenetworkconnection | Incorrectnetworkname(SSID)ornetworkkey |
| Adhocconnection:verifythat thenetworknames(SSID's) andnetworkkeys(WEP)of allcomputerstobeconnected havebeenconfiguredcorrectly. SSID'sandWEPkeyvalues mustbeidenticaloneach machine.AccessPoint(Infrastruc ture) connection:setthenetw ork name(SSID)andnetworkk ey tothesamevaluesasthos e of theaccesspoint.SettheNetworkAuthent ication valueidenticallyto thatofthe AccessPoint.Please consult yournetworkadmini stratorfor thisvalue,ifneces sary. | |
| Weakreceivedsign alstrength and/orlinkqualit y | |
| Adhocconnection:Retry connectionafters hortening t h e d i s t a n c destination computerorremov ingany obstaclesforbe ttersight.AccessPoint(I nfrrastructure) connection:Re tryconnection aftershorteni ngthedistanceto theaccesspoi ntorremoving anyobstacles forbettersight. |
| ProblemPossibleCausePossibleSolution | ||
| Unavailablenetworkconnection(continued) | TheWLANdevicewas deactivatedorisdisabled | CheckifthewirelessswitchisturnedOn.GotoStart>ControlPanel,anddoubleclic k onWindowsMobilityCenter. If thewirelessnetworkisoff,c lick theTurnwirelessonbutton. |
| Thecomputertobeconnect ed isturnedoff | Checkifthecomputertobe connectedisturnedON. | |
| Incorrectlyconfigurednetwork settings | Rechecktheconfigurationof yournetworksettings. | |
| RFinterferencefromAc cess Pointsorotherwireles s networks | Theuseofidenticalor overlappingRFchannel s can causeinterferencewi ththe operationoftheWLANd evice. Changethechannelo fyour AccessPointtoacha nnel thatdoesnotoverla p w ith t he interferingdevic e. | |
| Wirelessnetwork authentication hasfailed | Re-checkyourNet work Authentication, Encryption, andSecuritysett ings. Incorrectlycon figured securitysetti ngssuchas anincorrectly typedWEP key,amis-con figuredLEAP username,ora nincorrectly chosenauthen ticationmethod willcauseth e LAN device to associatebu tnotauthenticate tothewirele ssnetwork. | |
| Incorrectl Paddress configuration | Thisonlyap pliestonetworks usingstat icIPaddresses. Pleasecon tactyournetwork administratorforthecorrect settings. | |
UsingtheBluetoothDevice
BluetoothisintegratedintotheWirelessLANmodule.TheBluetoothcapabilitiesareBluetooth Basic,EDRandBluetoothLowEnergy(BTv4.0)operationalmodes.
WhatisBluetooth?
Bluetoothtechnologyisdesignedasashort-rangewirelesslinkbetweenmobiledevices,such as laptop computers, phones, printers, and cameras. Bluetooth technology is used to create PersonalAreaNetworks(PANs)betweendevicesinshort-rangeofeachother.

ToenableordisableeitherthewirelessLANorBluetoothdevices individually, performthefollowingsteps:
- Go to the Modern Start screen and select Charms > Settings > ChangePCSettings> Wireless.
- Under Wireless > Wireless Devices click on the Bluetooth switch to turn it on.
WheretoFindInformationAboutBluetooth
For additional information about Bluetooth Technology, visit the Bluetooth Website www.blu'etooth.com".
FCCRadiationExposureStatement
This equipment complies with FCC radiation exposure limits set forth for an uncontrolled environment. The Bluetooth antenna is located on the top edge of the LCD screen and is exempt from minimum distance criteria and due to its slow power.
The transmitters in this device must not become located or operated in conjunction with any other antenna or transmitter.
CanadianNotice
To prevent radio interference to the licensed service, this device is intended to be operatedindoorsandawayfromwindowstoprovidemaximumshielding.Equipment(or itstransmitantenna)thatisinstalledoutdoorsissubjecttolicensing.
Warranty
Users are not authorized to modify this product. Any modifications invalidate the warranty.
This equipment may not be modified, altered, or changed in any way without signed written permission from Fujitsu. Unauthorized modification will void the equipment authorizationfromtheFCCandIndustryCanadaandthewarranty.
CreatingaBackupofEssentialAccessSoftware
When you purchased your news system, a "Fujitsu Software Extractor" shortcut was loaded to "C:\Fujitsu\Drivers\AutoInstaller". This shortcut allows you to save the software driver packages along with the extracted Auto Installer software package to a selected location. It is recommended that you save these packages to writable media or an external drive. This ensures that in the event of system failure you will be able to re-install the essential access software.
-
OpentheC:\Fujitsu\Drivers\AutoInstaller\folder
-
Run "FujitsuSoftwareExtractor" as an Administrator
a.Right-clickonFujitsuSoftwareExtractor.
b. Select the "Run as Administrator" option from the menu that is displayed.
- The default save location is C:\Fujitsu\ AutoInstaller\ Drivers. You can change the location by clicking on the Browse button and selecting your preferred location.
Note: It is recommended that you change the default location and save the software packages to the external writable media or drive.
-
ClickontheSavePackagesbutton.
-
Fujitsu Software Extractor copies the zipped software packages and Readme files, and extract the AutoInstaller fold to these selected location.

Note: The extracted AutoInstaller will later be used to install the software automatically on the system in the event of generic imager restoration when the software is not pre-installed in the image.
RECOVERYOURSYSTEMWHENTHEHARD DRIVEISSTILLACCESSIBLE
UsingtheRecoveryandUtilityTools
The Recovery and Utility tools consist of a variety of tools that will help you recovery your recovery image and system images, and delet the data from your hard disk.
Methodsforaccessingtheutilities
RecoveryandUtilityToolsarepreinstalledinahiddenpartitionbythefactory,or theycanbeaccessedbyusingthebootabledisk.

Note: The Recovery and Utility tools may be deleted from your hard disk drive if you modify the partitions. If that occurs, you will not be able to use the hidden partition for booting to Recovery and Utility Tools, but you will still be able to boot from the Bootable Disk.
DeterminingwhetherRecoveryandUtilityispre-loaded
- Turnonorrebootyoursystem. Whenthe Fujitsulogoappears, pressthe
F12 key. - Usethe Tab keytogettotheApplicationMenu.
- Check whether the Recovery and Utility option is present. If it is not present, it means that the utility must be used from the Bootable Disk. Proceed to "Running Recovery and Utility from the Bootable Disk" if Recovery and Utility is unavailable.
RunningRecoveryandUtilityfromharddisk
- Turnonorrebootoursystem. WhentheFujitsulogoappears, pressthe
F12 key. - Usethe Tab keytogettotheApplicationMenu.
- Cursor down to Recovery and Utility and press the Enter key.
- Choose your language, if necessary. Select Recovery and Utility to proceed.
- Three tool options appear: Diagnostics, Recovery, and Utility (refer to the Recovery and Utilitytoolssectionbelowforinstructionsonhowtousethesetools).
- If this was successful, please skip then next step and goto "Recovery and Utility tools."
- If this was NOT successful, please goto then next step.
RunningRecoveryandUtilityfromtheBootabledisk
Toverify/changetheboot-uppriority(ratherthanbooting-upfromtheharddriveoranexternalmediadrive),performthefollowingsteps:
F12 key.
-
Poweronyoursystem. WhentheFujitsulogoappearsonthescreen, pressthe
-
ConnectanexternalDVDdrive.
-
Insertthebootablediskintothedrivetray.
-
HighlighttheCD/DVDoptionfromtheBootmenu, thenpress
Enter.
5.ClickOK.
- SelectCD/DVDbootmode: UEFIMode, if applicable, and then press Enter . While the files are being loaded from the disk, the Fujitsu logo screen will appear followed by a progress bar at the bottom of the screen.
RecoveryandUtilitytools

Note: Recovery and Utility tools may not be available on your system depending on the region from which the system was shipped.
Diagnosticstool: The Diagnosticstool is designed for use by IT professionals. It is not likely you will need to set this stool. If you should need to set this stool, perform the following steps:
- Press the Diagnostics Tool button to start the Diagnostics tool.
- Readthenote, and thenclick OK.
- Choose one or more of the following options for diagnostics on the Fujitsu Hardware Diagnostics Toolwindow:CPU,Memory,Display,HardDisk,CD/DVD/BD,FloppyDisk,Keyboard,andMouse.
- Click the Option button in the Tool menu to specify how many times the tool shouldrundiagnosticsoneachselectedcomponent.
- Press Execute to start the Diagnostics tool.
- After the execution is completed, these selected components are circled in red to indicate that they have been diagnosed and the result dialog window opens. Click Close to close the window.
- Click End to close the Diagnostics tool, and then click Yes to confirm the end of diagnostics session. Recoverytool:TheRecoverytoolcontainstwooptions:
- RestoreCDrive:Restorerecoveryimage(onlyC:drive)
- RestoreFullHardDrive:Restorerecoveryimage(fullharddrive).
YoucanusethesetoolstorestoretheRecoveryImagefromthehiddenpartition,andperformafull hard drive recovery. Please refer to instructions above for details on how to create a Recovery Image.
RestoretheRe coveryImagefromHiddenPartition
- Click[RestoreC:drive] from Recovery and Utility tools
- The progress bar is followed by "Restore Recovery image (only C: drive)" screen confirming that the Image will be restored to the C: drive. Click Next.
- Read the instruction screen and select Agree, then click Next.
- ClickOKto acknowledge the warning message restore recovery image to the C: drive.
- Whentheprogressbarappears, waitfortheprocesstocomplete.
6.ClickFin ishwhentheprocesscompletes;thecomputerwillrestarttoWindows. - Followthestepslisted in the "AutoInstallationsupportforsoftwarepackages fromhiddenpartition" section.
- Downloa dFSDM(FujitsuSoftwareDownloadManager)fromthesupportsiteanddownload allthe softwareapplicabletothemodelandOSusingFSDM.
- Followthestepslisted in "AutoInstallationsupportforsoftwarepackages downloadedfromsupportwebsite" section.
RECOVERYOURSYSTEMWHENTHEHARD DRIVEISNOTBOOTABLE
RestoretheRecoveryImageforFullHardDrive
Followthestepsinthe"RecoveringyourRecoveryImageusingRecoveryandUtility (fornewharddriveornon-bootableharddrive)"section.
Utilitytool:Ifapplicableforyourregion,theUtilitytoolcontainstwooptions:HardDiskDataDeleteandPartitionCreation.
TheHardDiskDataDeleteutilityisusedtodeletealldataontheharddisk andpreventthedatafrombeingreused.

NOTE: DonotusetheHardDiskDataDeleteutilityunlessyouareabsolutelycertain thatyouwanttoeraseyourentireharddisk,includingallpartitions.
TheHardDataDiskDeletefunction(HDDD)needstheACpowersupplyconnected.Whenrunning HDDDfromthehiddenpartition,youshouldconnecttheACcable.WhenrunningHDDDfroma BootableDisk,aUSBDVDdriveneedstobeconnected.BesureandswitchfromtheUSBdevice cabletotheACcable,whenHDDDdisplaystheguidanceremindingyouoftheACconnection.
Todeleteharddiskdata:
- Click the Hard Disk Data Delete button. The progress bar appears, followed by the EULA screen.
- AgreetotheEULAandclickNext.
- Choose the hard disk from which the data should be deleted in the list of hard disks and click Next. ThePartitionCreationutilityisusedtochangetheC:andD:drivepartitionsizes.
Torunthisutility:(ThisisnotanoptionwhenusingWindows7.)
- ClickthePartitionCreationbutton.
- Aprogressbarappears, followed by the EULAscreen. AgreetotheEULA.
- On the Recovery Tool - Partition Creation screen, move the slider to set disk size, and then click OK.
- Click Yes in the Partition Creation confirmation dialog.

WARNING: It is highly recommended that you send your product to Fujitsu Servicetoreplace aharddrive. Amistake could possibly destroy your computer, your new hard drive or both.
RecoveringYourRecoveryImageUsingRecoveryandUtility (fornewharddriveornon-boot ableharddrive)
If your hard drive is not bootable, perform the following steps.

Note: You will need the Bootable disk and Recovery Imaged disk set forth this recovery.
YouwillneedanexternalUSB-DVDdrive.Beforeyoupowerupyour computer,connectitviaUSBcabletomicroUSBport.EnsuretheTabletPC batteryisfullychargedbeforerecoveringtheimage.
Enter key.
- Poweronyoursystem. WhentheFujitsulogoappearsonthescreen, pressthe
- InsertthebootablediskinyourDVDdrive, thenclickOK.
- HighlighttheCD/DVDoptionfromtheBootMenuandpress
Enter - SelectCD/DVDbootmode: SelectUEFIMode, if applicable and press Enter. While the files are being loaded from the disk, the Fujitsu logo screen appears followed by a progressbaratthebottomofthescreen.
- Choose your language, if necessary.
- Three tool options appear: Diagnostics, Recovery and Utility. Select Recovery.
- ForWindows8.1:SelectRestorefullharddrive
- ForWindows7:SelectRestoringtheFactoryImage(fullharddriverecovery)
- Click Next to confirm full hard drive restoration. All data on HDD will be deleted.
- Agree to EULA by selecting Agree option and clicking Next.
- Click Next on the Recovery Disk Check screen to verify that the bootable diskhasbeeninsertedintotheopticaldrive.
- The Checking for Recovery Disk screen appears followed by the prompt to insert the first disk. Click OK to continue. Repeat this step for all disks. After all recovery disks have been checked and the check has been completed, clickNext.
- Follow the prompt to reinsert the first recovery disk and click Next.
- Click OK when you receive the final warning informing you that all data on drive Cwillbelost. Thisstartstherecoveryprocess.
- Follow the prompts to insert the next recovery disks and click OK.
- After the copying of the imagetoftheHDDcompletestherestoreprocessis complete, click Finish to restart the system. The computer will restart automatically and thengothroughthefirstbootprocess.
- Follow the steps listed in “Auto Installation support for essential access software from backup location” section.
- DownloadFSDM(FujitsuSoftwareDownloadManager) from supportsite and download all the software applicable to themodelandOSusingFSDM.
- Follow the steps listed in "Auto Installation support for essential access software downloaded from support website.
InstallingtheSoftwareaftertheRecoveryImageisRestored
Auto-installationsupportforessentialaccesssoftware fromhiddenpartition
The below listed steps are applicable only in cases in which there recovery imagerestore and hidden partition contents haven not been wiped out.
- After the recovery image is restored, launch the desktop icon "Fujitsu Software Auto Installer".
- Double-clickon "FujitsuSoftwareAutoInstaller" desktopicon.
- Click Yes on User Account Control Dialog box. This will take some time to processthesoftwarepackages.Amessagewillbedisplayedduringthistime, "Pleaseawaitwhilethecontentisbeingprocessed".
- If EULA is displayed for Fujitsu Software Auto Installer, accept the EULA, otherwise continue.
- Then Fujitsu Software Auto Installer user interface will be launched providing ability to auto-install the essential access software on the system.
- It is recommended that you install all the software in the listed order. You can SelectAll, to install the software in the order listed.
- ClickInstalltostarttheinstallation.
- After installing all the selected drivers, Installation Results window will be displayed. Click OK.
- "Youmustrestartthesystemforthesettingstotakeeffect.Doyouwishtorebootnow?"messageappears.SelectYes.
- Thesystemwillnowreboot.
- YoucannowconnecttotheinternetanddownloadFSDM(FujitsuSoftwareDownload Manager)fromthesupportsiteanddownloadallthesoftwareapplicabletothe modelandOSusingFSDMiftheyarenotdownloadedyet.
Auto-installationsupportforessentialaccesssoftware frombackuplocation
The belowlisted steps are applicable in cases in which a backup copy was created as mentioned in these section "CreatingaBackupofessentialaccesssoftware".
- It is important to have the extracted Autoinstallersoftware package folder and Readme file in the same location as other software folders. Otherwise auto-installation of the software will not be supported.
- Inside the Auto Installer software package, launch FjAutoinstall.exe as an Administrator.
- Click Yes on the User Account Control dialog box. This will take some time to process the software packages. A message will be displayed during this time stating, "Please wait while the content is being processed".
- If EULA is displayed for Fujitsu Software Auto Installer, accept the EULA, otherwise continue.
- The Fujitsu Software Auto Installer user interface will be launched providing ability to auto install the essential access software on the system.
- It is recommended that you install all the software in the listed order. You can "SelectAll", to install the software in the order listed.
- ClicktheInstallbuttontostarttheinstallation.
- After installing all the selected drivers, Installation Results window is be displayed. Click OK.
- "Youmustrestartthesystemforthesettingstotakeeffect.Doyouwishtorebootnow?"messageappears.SelectYes.
- Thesystemwillnowreboot.
AutoInstallationsupportforthesoftwaredownloadedfromsupportwebsite
- Download FSDM (Fujitsu Software Download Manager) from the support site and download all the drivers applicable to the model and OS using FSDM if they are not downloaded yet.
- Whenthesoftwarepackagesaredownloadedfromweb,itisimportanttodownload the Auto Installer Software package and the model/language-specific Readme fileifyouprefertoautoinstallthesoftware.
- It is important to have the extracted AutoInstallersoftware package folder and Readme file in the same location as other software folders. Otherwise auto-installation of the software will not be supported.
- InsidetheAutoInstallersoftwarepackage, launchFjAutoinstall.exeasadministrator.
- Click Yes on the User Account Control dialog box. This will take some time to processthesoftwarepackages.Amessagewillbedisplayedduringthistimestating "Pleaseawaitwhilethecontentisbeingprocessed".
- If EULA is displayed for Fujitsu Software Auto Installer, accept the EULA, otherwise continue.
- The Fujitsu Software Auto Installer user interface will be launched providing the ability to auto install the software downloaded from supportsite.
- It is recommended that you install all the software in the listed order. You can SelectAll, to install the software in the order listed.
- ClicktheInstallbuttontostarttheinstallation.
- After installing all the selected drivers, the Installation Results window is displayed. Click OK.
- "Youmustrestartthesystemforthesettingstotakeeffect.Doyouwishtorebootnow?"messageappears.SelectYes.
- Thesystemwillnowreboot.
DownloadingDriverUpdates
Toensurethatyoualwayshavethemostcurrentdriverupdatesrelatedtoyoursystem, youshouldoccasionallyaccesstheFujitsuSoftwareDownloadManager(FSDM)utility. TheFSDMutilityisavailablefromtheFujitsuSupportsite.FSDMwillallowyoutoview anddownloadalistofthemostcurrentdrivers,utilities,andapplicationstodetermine whether youhavethelatestversions.TodownloadtheFSDMUtility,gototheSupportSite: "http://support.fujitsupc.com/CS/Portal/support.do?srch=DOWNLOADS".
If you are planning on downgrading, upgrading or changing version of your operating system during this process please see the User's Guide for more information at "http://solutions.us.fujitsu.com".
Index
A
ACadapter
connecting19
Setup18
Acousticwarnings52
Audioconnections45
B
Battery33
batterycharge34
Caringforandmaintaining33
chargelevel33
Charging33
Dischargestooquickly52
seeRechargeablebattery33
Servicelife33
batterychargemeter33
BIOSSetupUtility
,protectingwithpassword38
calling46
exiting47
operation46
Settings46
Bluetooth, Safetynotes13
C
Chargingback-upbattery49
Choosealocation18
Configuration,BIOSSetupUtility46
Configuringhardware46
Configuringsystem46
Connectingaudiodevices45
Connectingheadphones45
D
darktouchscreen49
Datenotcorrect49
Declarationsofconformity61
Displayorientation select25
DOC(INDUSTRYCANADA)NOTICES58
E
Ending
energysavingmode51
Energy
Energyconsumption34
Energysaving13
Energysavingfunctions34
Errormessagesonthescreen52
Errors
Acousticwarnings52
Screenmessages52
F
Fault
Elimination48
First-timesetup17
G
Gettingstarted17
H
HDMIport43
|
Importantnotes12
Incorrecttime49
Information,
safety12
L
Landscapeformat display25
M
Makingreadytouse19
Memorycard
handling35
inserting35
removing36
Mobileoperation13
Monitor
noimage50
remainsblank50
unstableimage50
N
Notebook
switchingoff23
Notes12
disposal/recycling58
Energysaving13
touchscreen24
Transport13
0
Operating system activating system protection 40 cancel system protection 40 Protecting with password 39
P
Packaging17
Password changing39 entering39 removing39
Passwordprotection38 harddisk40
Portraitformat display25
Powersaving13
Power-onPower-onindicator22
Printerdoesnotprint51
Problemsolving48
R
Rechargeablebattery seebattery33
s
Safetyinformation12
Securityfunctions38
Servicelife, battery33
Setup Device18
Setup seeBIOSSetupUtility46
Slot Memorycards35
Statusindicators21
Summertime49
Supervisorpassword change39 entering39 removing39
Suspend/Resumebutton22
Switchingonforthefirstttime20
Symbols Indicators21
Systemsettings, BIOSSetupUtility46
T
Tablet operating21
TabletPC cannotbestarted51 doesn'twork51 transporting13
Tablet,operation21
Tablet: Switchingon22
Technicaldata ACadapter57
Thewirelessconnectiontoanetwork doesnotwork52
Timenotcorrect49
Tips48
Touchscreen difficulttoread50 notes24 reflectedglare50 remainsdark49
TPM42
Transport Damageduringtransportation17
Transportation13
Troubleshooting48
TrustedPlatformModule42
U
USBports44
Userpassword change39 entering39 removing39
W
Webcam33
Wintertime49
Wirelesscomponents Safetynotes13
WirelessLAN Safetynotes13
Wrongdate/time49