
Foris 850 - Gps Rand McNally - Free user manual and instructions
Find the device manual for free Foris 850 Rand McNally in PDF.


| Product Type | Truck GPS Navigator |
| Display Size | 8.0 inches |
| Display Resolution | 800 x 480 pixels |
| Weight | Approx. 420 g |
| Dimensions | 210 x 130 x 20 mm |
| Power Source | 12V/24V vehicle adapter |
| Battery Life | Up to 2 hours (internal battery) |
| Memory Storage | 4 GB internal, microSD expandable |
| Maps | Preloaded North America truck maps |
| Navigation Features | Truck-specific routing, low bridge warnings, weight restrictions |
| Connectivity | USB 2.0, Bluetooth (optional) |
| Mount | Suction cup windshield mount with EZ-Adjust arm |
| Operating System | Proprietary Rand McNally OS |
| Maintenance | Clean screen with microfiber cloth; avoid liquids |
| Safety Precautions | Do not mount in airbag deployment zone; secure device |
| Spare Parts | Replacement mounts and chargers available from Rand McNally |
| Repairability | Contact Rand McNally support for service |
| General Information | Water-resistant (IPX1), operating temp -10°C to 60°C |
Frequently Asked Questions - Foris 850 Rand McNally
User questions about Foris 850 Rand McNally
0 question about this device. Answer the ones you know or ask your own.
Ask a new question about this device
Download the instructions for your Gps in PDF format for free! Find your manual Foris 850 - Rand McNally and take your electronic device back in hand. On this page are published all the documents necessary for the use of your device. Foris 850 by Rand McNally.
USER MANUAL Foris 850 Rand McNally
User Manual



Legal information
Rand McNally
9855 Woods Drive
Skokie, IL 60077
Rand McNally follows a continuous review process and reserves the right to provide changes and enhancements that may not be reflected in the pictures and specifications in this document.
All trademarks mentioned in this manual belong exclusively to the respective owners and may therefore not be used for commercial or other purposes.
© 2013 RM Acquisition, LLC, d/b/a Rand McNally.
All rights reserved.
Contents
Safety instructions....4
FCC compliance statement....4
Device description....5
Device 5
Opening and closing the housing cover 6
Inserting the batteries 6
Inserting a micro SD card....6
Bike mount 7
-
Navigation view....9
-
Main menu 11
-
Destination entry....11
3.1 Address....11
3.2 Home 11
3.3 Points of interest 12
3.4 Previous destinations....13
3.5 Position on map....13
3.6 Waypoints 13
3.7 Coordinates....13
3.8 Geocaches 14
3.9 Tracks....14
3.10 Trips....14
3.11 Arrange menu....14
3.12 Calculated route....14
-
Trip computer....15
-
Trip Manager....15
5.1 Create trip....15
5.2 Loop Me!....16
5.3 Select saved trip 16
- Settings....17
6.1 Navigation settings....17
6.1.1 Route options....17
6.1.2 Set routing 17
6.1.3 Speed profile....18
6.1.4 Ask about route options....18
6.2 Map display....18
6.2.1 Map perspective 18
6.2.2 Map oriented....18
6.2.3 Position on street....18
6.2.4 City names on map 18
6.2.5 Auto zoom....18
6.2.6 Points of interest on map 18
6.2.7 Track recording....18
6.2.8 Arrange menu 18
6.3 System / General 19
6.3.1 Battery type....19
6.3.2 GPS Info 19
6.3.3 Brightness....19
6.3.4 Volume....19
6.3.5 Calibrate compass....19
6.3.6 Calibrate barometer....19
6.3.7 Set position format....20
6.3.8 Screen auto-off 20
6.3.9 Set home 20
6.3.10 Quick access menu....20
6.3.11 Quick access button assignment 20
6.3.12 Miles / kilometers 20
6.3.13 Delete history 20
6.3.14 Default settings 20
6.3.15 Time 20
6.3.16 Voice 20
6.3.17 Screen....20
6.3.18 Info 21
6.3.19 Arrange menu 21
7. Active route....21
8. Remember position....21
9. Geocaching....21
9.1 Transfer files to your device....21
9.2 Search for geocaches....22
9.2.1 Cache list....22
9.2.2 Filter....22
9.2.3 Detailed view 22
9.2.4 Options 23
9.2.5 Arrival at the geocache....23
9.2.6 Delete geocache....23
9.2.7 Logging 23
9.3 Pocket query....24
9.4 Found geocaches 24
9.5 Geocache icons....24
- Waypoint manager....25
10.1 Choose waypoint....25
10.2 Create waypoint 25
10.3 Delete created waypoints....25
- Track manager....25
11.1 Record track....25
11.2 Detailed view of a track....26
11.3 Modify track....26
11.4 Start track....26
11.4.1 TrackNav....26
11.4.2 Start track directly 26
- Extras....27
12.3 GPX manager....27
12.4 Map errors....27
12.4.1 Create map error....27
12.4.2 Create POI error....27
12.4.3 Edit map and POI errors ......27
12.5 Help....28
- Arrange menu 28
- Trailhead....28
14.1 Introduction to Trailhead....28
14.2 Import of GPX files 28
14.3 Transfer of content 30
14.4 Import of POIs 30
14.5 Software 32
- Tips and tricks....32
- Troubleshooting ....33
- Technical data....34
- Service & support....34
- Glossary....34
- License terms and conditions....36
Safety instructions
For optimal results, do not store or operate the device in extreme temperatures below 15° F or above 140° F. Avoid exposing the device to sudden fluctuations in temperature, which could cause condensation to collect. If condensation forms, wait it has dried before operating the device.
The device is waterproof in accordance with the IPX7 standard and is protected against being temporarily submerged. CAUTION: To protect the device against the ingress of water, make sure the battery housing and USB cover are completely closed. Note that the device must not be submerged for longer than 30 minutes in a water depth of 3 feet.
Do not place, store or leave the device in or next to heat sources, at places which have high temperatures, or a high level of solar radiation, in a microwave oven or pressurized container. Use only Rand McNally original accessories or Rand McNally-approved adapters. The use of other components may result in malfunctions and/or serious damage.
Make sure you observe the following safety instructions in order to prevent accidents or serious injuries:
- This navigation device for outdoor use is merely an orientation and navigation aid that cannot be a substitute for making a sensible assessment of the situation you are in. Please note the particular characteristics of the terrain and the routes you are using. Do not follow any routes or suggested routes which would entail a dangerous or illegal form of hiking or riding or would place you in a dangerous situation.
- Road traffic regulations must be complied with at all times, for example when cycling, and have priority over the routes of the navigation device.
- Never operate the navigation device while riding and do not allow yourself to be distracted by the device while riding.
- The map data which is used may include inaccurate or incomplete data. You should therefore check the calculated route to see if it makes sense and choose your own alternative route if necessary.
CAUTION: The navigation device is intended for hiking, biking, and other outdoor recreational uses and, as such, is not suitable for use as a vehicle navigation system.
FCC Compliance Statement
This device complies with part 15 of the FCC rules. Operation is subject to the following two conditions: (1) this device may not cause harmful interference, and (2) this device must accept any interference received, including interference that may cause undesired operation. This equipment has been tested and found to comply with the limits for a Class B digital device, pursuant to part 15 of the FCC rules. These limits are designed to provide reasonable protection against harmful interference in a residential installation. This equipment generates, uses, and can radiate radio frequency energy and may cause harmful interference to radio communications if not installed and used in accordance with the instructions. However, there is no guarantee that interference will not occur in a particular installation. If this equipment does cause harmful interference to radio or television reception, which can be determined by turning the equipment off and on, the user is encouraged to try to correct the interference by one of the following measures:
- Reorient or relocate the receiving antenna.
- Increase the separation between the equipment and the receiver.
- Connect the equipment into an outlet that is on a different circuit from the GPS unit.
- Consult the dealer or an experienced radio/TV technician for help.
Device description
Device

Power: Hold to turn the device on/off. Quick press to access the following options:
Touchscreen lock: Freezes at the current screen. To deactivate, quick press the power button and tap "Touchscreen lock" again.
Screen off: Switches the screen off. Ongoing navigations or track recordings remain active. Tap the screen to return. Use this setting to save power.
Stand-by: Switches to stand-by mode. Quick press the power button to return.
Switch off: Switches the device off completely.
Cancel takes you back to the application.
Volume & Brightness: Adjust volume and brightness.
Quick Access: In the default setting, this button starts or pauses the track recording. To change the function of this button, see "Settings > System / General > Quick Access Button."
Note: If the device is not responding, press the power button for approximately 3 seconds to restart. Or simply remove and reinstall the batteries.
Touchscreen: Displays the map and the menu.
USB port: Connects the device to a PC via the USB cable. The port is located beneath a rubberized cover to protect it from water. This cover should be completely closed when using the device.
Speaker: The speaker is located on the back of the device.

Battery cover
To open the battery cover, lift the silver fastener, turn it 90° counterclockwise and pull it up so that the cover of the battery compartment is removed. Insert the batteries as indicated in the battery compartment.

natural_image
Two stacked batteries with one fully filled and two partially filled, no text or symbols visiblePlace the battery cover back on and close it by turning the silver fastener clockwise. Make sure that the housing cover fits correctly and locks flush in place.
Batteries
The device works with AA alkaline (included), lithium or rechargeable NiMH batteries. Please note that batteries cannot be recharged while in the device.
Note: To maximize battery life, select the correct battery type under "Settings > System/General > Battery type".
Additional tips for maximizing battery life
- Reduce the brightness of the display. (Display dims automatically when batteries are low.)
- Reduce the volume. (Volume decreases automatically when batteries are low.)
- Set navigation to beep output in "Settings > Navigation Settings > Set guidance preference."
- Set to "screen off" while in use. (See page 5.)
- Keep the device out of the cold. Batteries are very sensitive to temperature. In cold conditions, the run time of the batteries is greatly curtailed. Optimum results are achieved at around 70°F.
- When using rechargeable batteries, follow the manufacturer's instructions for maximum run time.
Do not use any sharp objects to remove the batteries. Do not attempt to open the batteries. Note the regulations governing the disposal of the batteries.
Inserting a micro SD card (optional)
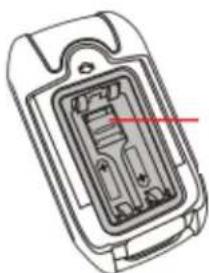
First open the housing cover. Remove the batteries if necessary. Then slide the metallic retaining plate for the micro-SD card upwards and flip it up from underneath. Insert the micro-SD card.
natural_image
Cross-sectional diagram of a mobile phone casing showing internal circuitry (no text or labels)Retaining Plate
Make sure the contacts on the card are pointing downwards. Flip the retaining plate back down towards the device and lock it in place by sliding it downwards.
Bike Mount

natural_image
Close-up of hands holding a black handheld device with a green indicator light (no visible text or symbols)- Push up on the lever at the top of the mount to release the lock.

natural_image
Close-up of hands installing a black cable connector with a green mesh spring (no text or symbols visible)- Wrap the strap around the handlebar and reinsert the locking lever.
natural_image
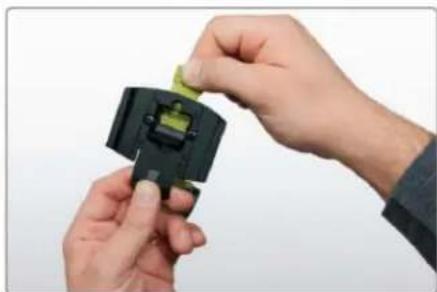
Close-up of hands assembling a small electronic component with a green clip (no text or symbols visible)- Adjust to fit as necessary by releasing the tab in the middle of the bracket and pulling the strap.

natural_image
Close-up of a mechanical clamp or bracket assembly with a black handle and yellow-green clamps (no visible text or symbols)- Once in place, the mount holds securely to the handlebar. (Note: To mount to the stem, remove the screws, rotate the bracket 90 degrees, and replace the screws.)
natural_image
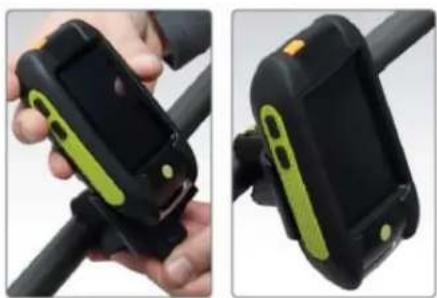
Close-up of a black and green handheld device with a handle, shown from side by side (no text or symbols visible)- Slide the device onto the bracket until it clicks into place.
natural_image
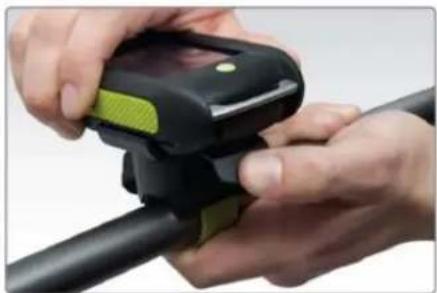
Close-up of hands holding a black handheld device with green and yellow buttons, partially connected to a black cable (no visible text or symbols)- To remove the device, press down on the tab at the bottom of the bracket and slide off.
1. Navigation view
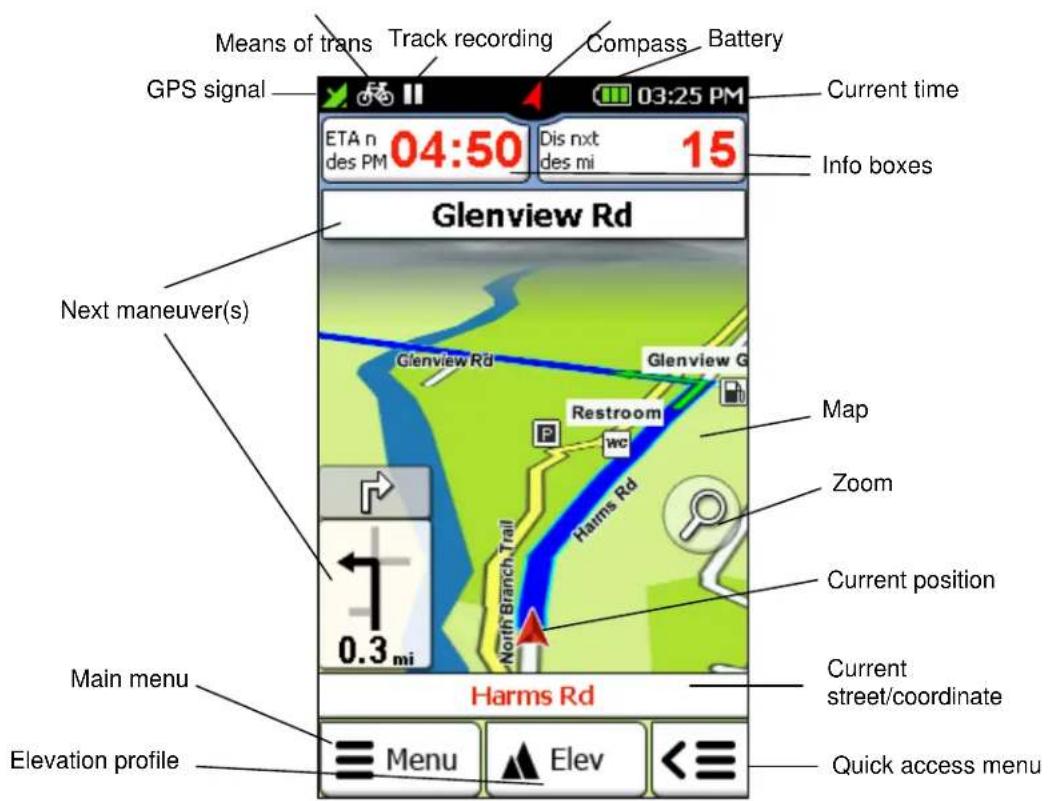
Info Boxes: Show information about the calculated route. Tap on the box to select which information to display. (Note: If no value displays for "north bearing," calibrate the compass (see Chapter 6.3.5).)
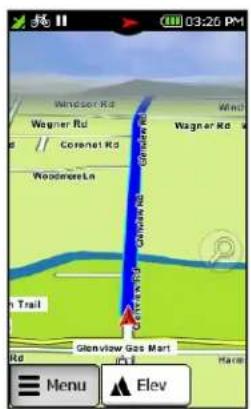
Map: Shows the current position. Touch the screen to drag the map to another location. The Here button, which appears at the bottom, returns the map to the current position.
Next Maneuver:

The arrow indicates the direction of the next turn. Tap to repeat. Also displays other intersecting roads and the distance to your next maneuver. The top field displays the second maneuver. Upcoming intersections may also display and count down here.

Goes to the main menu. Hold to hide the navigation information and show a "cleaner" view of the map. Tap again to return to the main menu.

Displays and hides the elevation profile on the map. Tap the profile itself for a more detailed view.
| t | ss to three functions of your choice. Hold unctions: |
| t | e the recording; hold to stop recording. Note: It is recommended, before you start er manually (see Chapter 6.3.6).) |
| ap to calibrate. | |
| tion, or coordinates for off-road terrain. | |
| Z | then on the plus or minus symbol to adjust |
| t | to zoom out and see the entire route. |
| ption. | |
| llow positioning. Signals are being |
received from fewer than 3 satellites.
Adequate: GPS signal is sufficiently strong to allow positioning. Signals are being received from 3 satellites.
Strong: A high-quality GPS signal is being received that allows your elevation to be determined. Signals are being received from at least 4 satellites.
correspond to biking and hiking mode.
C action. Red indicates the compass needs to be al > Calibrate compass".
B
Device connected to power source
Tip: Wherever you are in the menu, you can easily switch back to the map view at any time by holding down Cancel or Back.
Tap on the map
Tap on a point on the map to mark the point with a pin and display the address or position. Tap on "Actions" to route to the location, save it as a waypoint, or search nearby.
POIs on the map
Tap on any point of interest to view more information. Tap the title to show Info, Map and Options tabs, or tap "Actions" to route to the location, save it as a waypoint, or search nearby.
2. Main menu


Use the < and > arrows to scroll through menu screens. As you navigate through menus, the red dots at the top indicate which screen you're viewing. To return to the map view, tap
Map. To cancel an active route, tap ✗ Route
The functions in the main menu are described in the following chapters.
3. Destination entry

3.1 Address

- To enter an address, select Destination Entry > Address.
-
Use the keypad to enter the city. (Invalid letters will disappear as you type to prevent errant keystrokes.)
-
To narrow the search, search within a state by tapping the flag at the top of the screen. Select the state and tap "OK."
- To view the location on the map, tap "Show Map."
-
Tap "List" to select the city from a list.
-
Once you have entered the city, tap "Next."
-
Enter the street.
-
Tap "List" to select the city from a list.
-
Tap "Center" to route to the center of the city.
-
Once you have entered the street, tap "Next."
-
Enter the address number.
- Tap "Center" to route to a midpoint on the street.
- Tap "OK."
- Enter route preferences. (See Chapter 6.1.1.)
3.2 Home

Easily navigate back home at any time. When you first start the device, you will be asked to

enter your home address. After you have entered your address once, it is saved and you can navigate there by tapping on "Home" once. You can change the saved address in "Settings > System/General > Set home."

3.3 Points of interest
Your Rand McNally Foris contains millions of points of interest such as parks, landmarks, campgrounds, restaurants, and more.
Select individual categories with check marks by tapping on them or select all categories at once by tapping on "All" (top right). Tap "ABC" to search for the name of a category.
Specify a search center: a waypoint, your current location, the current destination, along the route, a city, an address, a position on the map, or coordinates. The POIs will be displayed according to their distance from this point.
The results are displayed in a list.
Sort – Sort results by distance, alphabetically, or by those that include extra information.
Map – Display the selected POI on the map OK – Start the route calculation to the selected POI
Double tap – Open the detailed view for a POI
ABC – Search for a POI by entering text

Detail view
Tap on a POI to see more information in the detail view. Switch between the Info, Map, and Options screens by tapping on the tabs.
Info shows the address, the distance, and descriptive text.
Map shows the POI on the map view.
In Options, choose from the following:
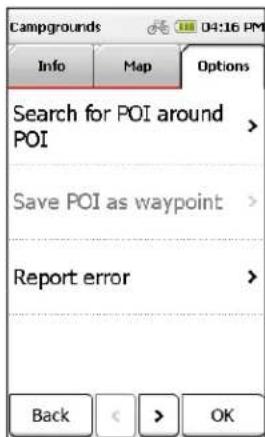
Search for POI around POI - Searches for another POI around the current one
Save POI as waypoint - Adds the POI to the list of saved waypoints

Report error – Opens a map error about this POI (see Chapter 12.4)
Use the two arrows at the bottom to scroll to the next or previous POI from the list.
OK starts the route calculation to this POI. Back switches back to the list of POIs.
3.4 Previous destination

Route to a destination previously entered. The last forty destinations are automatically saved.
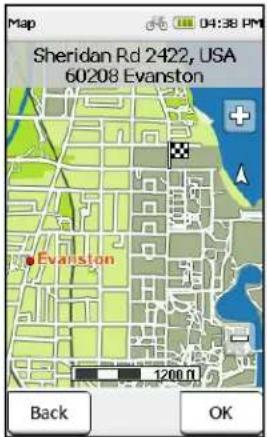
3.5 Position on map

Route to a point on the map by dragging the screen. Use the zoom functions to move the map more quickly. The address or geocoordinates of the point are displayed.
3.6 Waypoints
A waypoint is a saved position or address. Create or import waypoints to navigate to at a later date. (See Chapter 10.)
Choose to show all waypoints in alphabetical order or specify a search center: your current location, the current destination, along the route, a city, an address, a position on the map, or coordinates. The waypoints will be displayed according to their relative distance.

The results are displayed in a list.
Sort - Sort results by distance or alphabetically
Map - Display the selected waypoint on the map
OK - Start the route calculation to the selected waypoint
Double tap – Open the detailed view for a waypoint
ABC – Search for a waypoint by entering text
3.7 Coordinates

You can also enter your destination via coordinates—particularly helpful for reaching a precise location in open terrain where it is not possible to specify an address. Also used for geocaching.
Note: The entry format is important, as there are different formats for coordinates. The default format is based on the pattern of degrees/decimal minutes (dd°mm.mmmm'). To set a different format, tap on "Format" on the right. A list containing possible formats will then be displayed. You can change the format again at any time in "Settings > System/General > Set position format."
In the default degrees/decimal format, enter the degree of latitude first. Tap "N" for the northern hemisphere. Then enter the
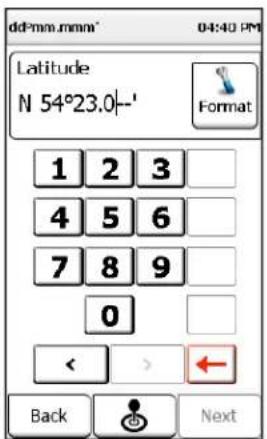
coordinates. Tap "Next" and enter the degree of longitude. Tap "W" for the western hemisphere.
Tap "Next" and the coordinates display, with the closest address (if possible). Tap "Map" to show the point on the map or tap "OK" to route to the location. Tap "Reset" to return to the coordinate entry screen.
3.8 Geocaches

Geocaching is a free outdoor real-world treasure hunt. Players use a GPS device to located hidden containers known as geocaches. (See Chapter 9.)
To start navigation to a geocache, select "Geocaches". Select a desired search center or click on "All geocaches not found". The caches are sorted according to their distance from the search center. Select your desired geocache by tapping "OK."
3.9 Tracks

A track is a specific route defined by coordinates that are connected to form a line. You can record your own tracks using TrackNav or import tracks via Trailhead. (See Chapters 11 & 14.)
To route on a track, select the track from the list. Tap "OK" to view the track; tap "OK" again to start the route.
3.10 Trips

(See Chapter 5.) To find a saved trip, search around your location or an address. Trips are displayed according to their relative distance. Or, tap "Show all trips." Select the trip from the list. Tap "OK" to view the trip; tap "OK" again to start the route.
3.11 Arrange menu

Use "Arrange menu" to change the order of the menu functions within the destination entry screen. Select a function and move it with the aid of the arrows on the right. No functions will be deleted. To restore to the default order, tap "Reset."
3.12 Calculated route

Calculate two alternative routes (See below)

Display the elevation profile for the calculated route(s)

Change the route options
i Display details about the route as well as the turn-by-turn directions list. Tap any maneuver and tap "Map" to view it on the map. (Note: The route description is only available in navigation, not in bearing (straight line) mode.)
Tap "OK" to start the route.

Alternative routes and elevation profiles
Alternative routes are shown in different colors on the map. Select a route from the boxes at the bottom of the screen to view information about that route.
The elevation profiles are color-coded to the routes. Use the < and > arrows to switch between them. Each is plotted by distance on the X axis and elevation on the Y axis. Use the plus and minus buttons to adjust the scale.
Tip: Zoom in closer to identify more details in the altitude profile. Tap on the graph to view more detail about that point on the route. Tap the info boxes above to select different information to display.


line
| Time (min) | Elevation gain (ft) | | ---------- | ------------------- | | 0 | 650 | | 10 | 750 | | 20 | 850 | | 24 | 900 |
4. Trip computer
The trip computer displays data about the current trip. The default view displays six different statistics. Tap any field to select different information to display. The red box at the bottom shows the destination.
Tap "Stats" for further information about the current trip. Tap 📄o reset all values.

5. Trip manager
Enter destinations in the trip manager to:
- Enter a starting point that is different from your current GPS location
- Use the Loop Me! feature (see below)
- Enter a multi-stop trip
- Run a demo of the route (not available for Loop Me! or multi-stop trips)
- Save trips
5.1 Create new trip
Tap "Trip Manager" and "Plan trip."
The default starting point is your current location. To enter a different starting point, tap "Start" and choose an address or other location.
Tap "Destination" and follow the steps to select. Then tap "OK." (See Chapter 3 for more information on destinations.)
Tap "OK" to begin the route calculation.

Or, to create a multi-stop trip, tap "Add further destinations." Tap "Add stopover" to add more destinations. Tap "OK" and enter a name to save the route. Tap "OK" again to begin the route. (See below.)
Once the route has been calculated, you can simulate the route by tapping "Demo." (Not available with Loop Me! or multi-stop trips.)
5.2 Loop Me!
Loop Me! calculates a route with the same starting and ending point. The default starting point is your current GPS location. Tap "Start/Dest." to begin the loop at another point.
Specify a distance or duration for the trip as well as your average speed to begin the route calculation.
5.3 Select saved trip
Search for a saved multi-stop trip around your location, an address, or choose to display all trips. Select the trip and tap "OK" or tap "ABC" to search for a trip by name.
Tap any of the three tabs to view route "Info," see destinations on the "Map," or list "Stopovers."
The "Stopovers" list shows each destination on the trip. Use the arrows to scroll through. Tap any stop to deselect. The icon changes to a red X.
✗ Indicates this stop will be skipped
☑ Indicates this stop is on the route
√ Indicates this stop has already been visited (on the current trip)
Tap "OK" to start the trip or "Modify" to make additional changes.


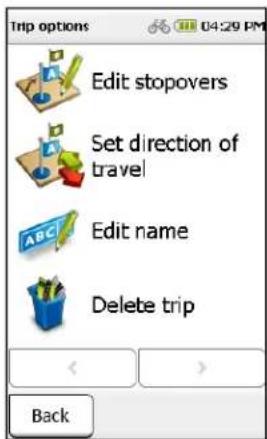
Edit stopovers

View each stop. Tap for more information on POIs. Select any stop and use the arrow keys at the right to reorder. Tap to delete a stop.
Set direction of travel

Reverse the trip, starting at the last destination and working back to the first.
Edit name

Edit the name of the trip.
Delete trip

Delete the trip.
6. Settings

6.1 Navigation settings

6.1.1 Route options
These settings appear before each route calculation. (Unless set not to ask—see below.) To bypass the route options, tap "OK" when the first window appears. Or tap "Next" to select each of the following.
Select activity:
Bicycle or pedestrian
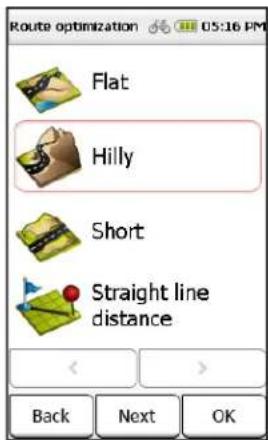
Route optimization:
Flat favors flat sections.
Hilly favors hilly sections.
Short calculates the shortest route to the destination, regardless of inclines.
Straight line distance plots a straight line from your current location to the destination (bearing navigation).
Note: The selected route optimization impacts the length of the route. For example, choosing "Flat" will avoid the steepest sections, which may result in a longer route.
Route preferences:
A red "x" indicates this type of route will be avoided in most cases. (Individual routes may disregard some preferences, as necessary for route calculation.) A heart symbol indicates this type of route is preferred.

Bike paths uses or avoids cycling paths (only in bicycle mode).
Hiking trails uses or avoids hiking trails. (Hiking trails can be preferred in pedestrian mode)
Steep downhills uses or avoids gradients of over 8% (only in bicycle mode).
Road travel uses or avoids roads (only in bicycle mode).
Ferries uses or avoids routes involving ferry connections.
Tunnels uses or avoids routing through tunnels.
6.1.2 Set routing
Set audio guidance during navigation by voice or with a beep. The voice issues spoken turn-by-turn directions with indications of distance. The beep warns you with a beeping noise when you approach a turn, or when you deviate from the calculated route. (Tip: Switch to beep to save battery power.)
6.1.3 Speed profile
Set your average speed to calculate the arrival time and total travel time more exactly. Set separately for bicycle/pedestrian. Use the plus and minus buttons and tap "OK" to save.
6.1.4 Ask about route options
If this function is activated, the device verifies the route options above before each route calculation. Disable this verification if the route options change infrequently.

6.2 Map Display

6.2.1 Map perspective: 2D/3D
Choose a two-dimensional (like a printed map) or three-dimensional (like a video camera) representation of the map.
6.2.2 Map oriented: Direction up / North up
Select whether to orient the map in the direction of movement, so that the positional arrow always points upward, or to the north, so that the positional arrow stays in the middle of the screen and rotates according to direction.
6.2.3 Position on street: On / Off
Specify whether your current position should be shown on the nearest road or trail. (Note: It is important to turn this setting off for geocaching or navigation in open terrain.)
6.2.4 City names on map On / Off
Controls labels on the map.
6.2.5 Auto zoom: On / Off
Auto zoom adjusts the map view automatically based on position and speed—the map zooms out at higher speeds. Switch off to set the scale yourself.
6.2.6 POIs on map
Choose which points of interest to display as small icons on the map. Check off categories to display those icons.
6.2.7 Track recording on map: On / Off
Specify whether to show the current track being recorded on the map. See Chapter 11 for more information on track recording.
6.2.8 Arrange menu
Use "Arrange menu" to change the order of the menu functions within the map display settings. Select a function and move it with the aid of the arrows on the right. No functions will be deleted. To restore to the default order, tap "Reset."
6.3 System / General
6.3.1 Battery type
Set the battery type and check the remaining battery capacity. (Note: For maximum battery life, make sure this setting is accurate. See "Device description" for more information about batteries.)
6.3.2 GPS Info
Indicates GPS signal quality by color.
Red: GPS signal is not sufficiently strong to allow positioning. Signals are being received from fewer than 3 satellites.
Yellow: GPS signal is sufficiently strong to allow positioning. Signals are being received from 3 satellites.
Green: A high-quality GPS signal is being received that allows your elevation to be determined. Signals are being received from at least 4 satellites.
Also indicates number of satellites, current latitude/longitude, height, and speed.
6.3.3 Brightness
Adjust the screen brightness. (Note: Keep low to save battery.) You can also select whether the screen should automatically dim when the battery is weak in order to save power.
6.3.4 Volume
Adjust the volume, or turn the sound on or off. Tap no adjust volume separately for the speaker and keytones. (Note: Volume is automatically reduced when battery is low.)
6.3.5 Calibrate compass
To guarantee precise orientation of the compass, you should recalibrate the compass at regular intervals. Tap "Calibrate compass" and follow the instructions on the device. Visit the support section of Rand McNally website to see a short video. (Note: Conduct compass calibration outdoors. Make sure that no metallic objects are located in the vicinity of the device and that no magnetic or electromagnetic sources of disturbance (e.g. high-voltage power lines, antennae) are present.)
6.3.6 Calibrate barometer
For the most accurate height measurements, calibrate the barometer at regular intervals.
There are three methods of calibration. Select one and tap "Next."
Automatic: Calibrate the barometer every 15 minutes.
Manual by specifying height: If you know the height of your current position, enter this and place the device down to rest on a flat surface for a short time.
Standard atmospheric pressure: Use the standard atmospheric pressure at sea level to determine the height.
(Note: The barometer should be calibrated after each change of battery, and after changes in elevation or weather.)

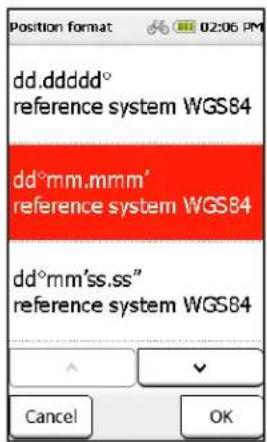
6.3.7 Set position format
Select the format for specifying coordinates.
dd.ddddd° (decimal degrees) dd°mm.mmmm` (decimal degrees and minutes) dd°mm`ss.ss" (decimal degrees, minutes, seconds) UTM (zone, easting, northing: from some printed maps)
6.3.8 Screen auto-off
Set whether and after what period of time the screen automatically switches off: never, 30 seconds, 1 minute or 2 minutes. You can also select whether to lock the touchscreen at the same time to avoid accidental entries. (See "Device description" for more information about screen lock.)
6.3.9 Set home
When you turn on the device, you'll be prompted to enter a home address. You can change that address here.
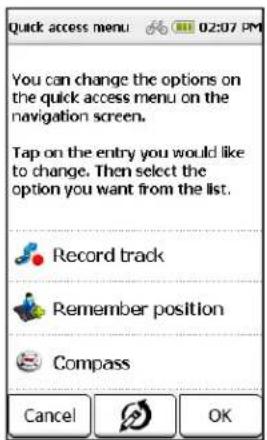
6.3.10 Quick access menu
Select which functions to display on the navigation screen. (See Chapter 1.)
6.3.11 Quick access button
Located on the left side of the device. To specify what this button does, select one of the functions from the list and tap "OK."
6.3.12 Miles / Kilometers
Set units of measurement.
6.3.13 Delete history
Delete all user data. You will see which data will be deleted in the confirmation prompt.
6.3.14 Default settings
Reset to default factory settings. The device will automatically restart.
6.3.15 Time
Set the time zone and the time format. The current date and the current time are received with the GPS signal and are thus always set to the nearest second. To set the time zone in which you are located, tap on the left or right arrow in the top section of the screen. Daylight Savings Time is automatically set, but can be turned on or off manually.
6.3.16 Voice
Select the menu and speaker voice.
6.3.17 Screen
If you encounter a number of errors while typing, the screen may need to be recalibrated. Tap "OK" and follow the on-screen

instructions, tapping on the crosshairs. Tap on the screen again to return to the menu.
6.3.18 Info
View display system information, including software and map versions. Tap ☐ for a list of available software functions. Tap Ⓐ to display copyright information.
6.3.19 Arrange menu
Use "Arrange menu" to change the order of the menu functions within the system/general settings. Select a function and move it with the aid of the arrows on the right. No functions will be deleted. To restore to the default order, tap "Reset."
7. Active route
If you have calculated a route and are in navigation mode, the following options are available:
- Calculate alternatives: Calculates two alternative routes
- Enter stopover: Enter a stopover point between the current position and the destination
■ Next destination: (For multi-stop trips) Navigate to the next destination - Current trip profile: (For multi-stop trips) View the entire tour profile (see Chapter 5.3)
8. Remember position

Saves the current position as a waypoint. Use the date and time, or tap to delete and enter another name. To save a point other than your current location, see waypoint manager (Chapter 10).
9. Geocaching

Geocaching is a kind of outdoor treasure hunt in which you as the treasure hunter can find concealed containers, known as geocaches. Transfer geocaches from the Internet to your Foris via Trailhead (see Chapter 14). For more information on geocaching, visit geocaching.com.
Note: When navigating to a geocache, disable the "Position on street" setting in "Settings >Map display."
9.1 Transfer files to your device
Transfer by Trailhead
You can download geocaches to your device via GPX Manager in Trailhead. (See Chapter 14.2.)
Transfer by plugin
For geocaching.com premium members: On geocaching.com, click "send to my GPS device" and click the Rand McNally tab. Follow the instructions to install the plugin and transfer geocaches.
9.2 Search for geocaches
Tap "Geocaching > Search for geocache" and specify the desired search center. The geocaches are then sorted according to their distance from this point.
Once you have selected a geocache from the list, you can display the geocache on the map by clicking on the map, navigate to it directly by tapping "OK" or call up the detailed view by tapping it again.
9.2.1 Cache list
In the list view, all geocaches in the area surrounding your search center are displayed, sorted by distance. You can also search for cache names or cache codes by tapping "ABC" and entering the desired name or code. You can also filter the geocaches according to specific criteria.

9.2.2 Filter
Filter geocache search results according to specific criteria.
Status - Search for geocaches that are either unattempted, not found, or where repair is needed.
Cache type – Look specifically for one cache type or for several cache types.
Cache size – Choose a particular size of cache.
Difficulty – Choose a particular level of difficulty.
Terrain – Choose a particular difficulty of terrain.

(Note: The Rand McNally Foris does not support Wherigo caches.)
9.2.3 Detailed view
Display more information about the geocache and make edits and comments.
Info - Shows the cache description, distance and relevant details. Use the arrows at the bottom to scroll.
Map - Shows the cache and if applicable the waypoints on the map. You can zoom in and out of the map and move it around.
Waypoints - If the geocache has several specified waypoints, you can display them in a list. These waypoints serve as starting points, stages, or parking and are stored as additional information.
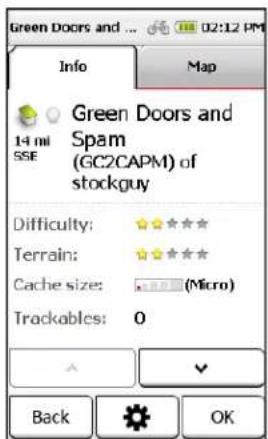

Options to edit the cache.
OK- Starts the route calculation to this cache.
Back - Goes back to the list of caches.
9.2.4 Options
Edit status - Log caches and leave comments. Comments can be edited at any time.
Show logs - View comments left by other geocachers who have already searched for this cache. (See Chapter 9.2.7).
Show hints – View available hints to help find the cache.
Create waypoint – For multicaches, use the clues to determine the next point. Tap the plus sign to add a waypoint by coordinates, projection from your current location or projection from a chosen waypoint.
For projections, enter the bearing and distance and tap "Next." Tap "Reset" to change the entry, "Map" to show the calculated waypoint on the map, and "OK" to confirm. Save the waypoint by entering a name. Delete waypoints by tapping 📋

Change description – Edit the description. Tap "Reset" to restore the original information.
9.2.5 Arrival at the geocache
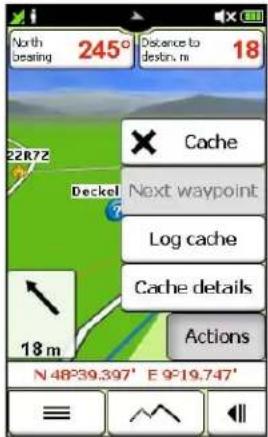
The following options display on the navigation screen when routing to a geocache:
X Cache- End the search
Next waypoint – Start navigating to the next stop in a multicache Log cache – Once you've found the cache, log your find and leave comments
Cache details – View cache description and details
(Note: You can view the details about the geocache at any time on the main menu under "Active route > Active geocache.")
9.2.6 Delete geocache
Geocaches can be removed via the device or via Trailhead. To delete a geocache directly on the device, you must delete the corresponding file for the geocache in the GPX manager (see Chapter 12.3). Or delete the geocache via the GPX import on Trailhead (see Chapter 14.2).
9.2.7 Logging in the community
Connect your device to Trailhead to log your finds with geocaching.com. On the device, log data, status and comments are saved in the file "geocache_visit.txt."
9.3 Pocket query
A pocket query is a compiled file which consists of several filtered geocaches that can be downloaded to the device via Trailhead. To learn more about pocket queries, visit geocaching.com.
Note: Pocket queries are limited to 1,000 geocaches with a max file size of 5 MB. The first
time you turn the unit on after loading a pocket query to your Foris, the geocaches will need to be indexed. This can take several minutes, but is only done once. The larger the file, the longer the conversion process. Transfer one pocket query to the device at a time and then start the device in order to carry out the conversion. Following successful conversion, another pocket query can be transferred.
9.4 Found geocaches
Geocaches you have already marked as found are stored under "Found geocaches." Here you can find, view and edit all caches that have already been found.
9.5 Geocache icons
Read more about geocache types at geocaching.com.


10. Waypoint manager
Saved locations are stored as waypoints.
10.1 Choose waypoint
To route to a waypoint, tap "Choose waypoint" and select a search center. Waypoints display, sorted by distance from the search center. Or choose "Show all waypoints."
Double tap the waypoint to view more information. Tap "Map" to display on the map, or tap "OK" to route to the waypoint.

10.2 Create waypoint
Create a waypoint the same way you would enter a destination (see Chapter 3). Enter a name for the waypoint, or use the address or geocoordinates. Tap "OK" to save.
10.3 Delete created waypoints
To delete a waypoint, tap "Delete created waypoints." Select from the list and tap "OK" to confirm. (Note: Imported waypoints can be deleted by deleting the corresponding GPX file in the GPX manager (see Chapter 12.3).)
11. Track manager

Use the track manager to record a new track, start an existing track, or delete or edit tracks.
11.1 Record track
Record the route that you are riding or walking along. This track recording will allow you to retrace the route you have ridden or walked precisely at a later date. After the recording, you can choose to display the track on the map and view the altitude profile. You can also display additional information such as the starting and end position, distance and the height gain or loss.
Start the track recording by:
- Tapping in the quick access menu,
- Pressing the quick access button on the left side of the device, or
- Tapping the "Record" button in the Track Manager.
Note: It is recommended that you calibrate the barometer manually before starting track recording (see Chapter 6.3.6).
Pause the recording by tapping the pause button, or again using the quick access menu of the quick access button.
To end the recording and to save the track, tap the "Stop button" or in the rapid access menu hold down. Enter a name for the track—initially the date and time are displayed as the default name. Tap "OK" to save. The detailed track view displays.
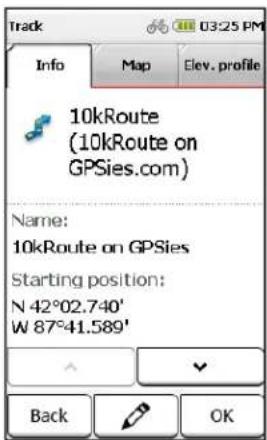
11.2 Detailed view of a track
To select an existing track, tap it the list and then tap "OK."
Info - Displays all the information about the track.
Map - Displays the track on the map. You can zoom in and out and move the map. Tap "Position" to show or hide your current position on the map.
Altitude profile - Displays the altitude profile for the track.
OK - Starts the track navigation.
Modify – Makes changes to the track.
11.3 Modify track
Invert track – Reverses the direction of travel of the track—useful when trying to find your way back to your starting point.
Edit name – Changes the name of the track.
Delete track – Deletes the track.
11.4 Start track
Choose to start the track directly or convert it into a route in order to obtain turn-by-turn directions.
11.4.1 TrackNav (Convert track to route)
The Convert track to route function calculates a route as similar as possible to the original track. The route includes turn-by-turn directions and displays the arrival time and the real distance.
Both the original track and the calculated route display on the map. Choose "Route" to obtain turn-by-turn directions. Choose "Track" to start guidance without turn-by-turn directions.
Choose whether to be guided to the starting point of the track or to the nearest point along the track.
Note: If road segments do not exist in the map material or sections of road are avoided by the route options, the alternative route will make an appropriate detour. The calculated alternative route will be compared with the original track so that you can choose which version of the route you prefer.

11.4.2 Start track directly
"Start track guidance directly" starts the track without any changes. Directional instructions are given on the map view, but no spoken instructions relating to turns or distances.
Choose whether to be guided to the starting point of the track or to the nearest point along the track.

12. Extras

12.3 GPX manger

The GPX manager contains all of the GPX files that are located on your device—either tracks you have recorded or imported GPX files.
Use the buttons at the right to edit or delete files from the device.
Note: The imported files may contain tracks, trips, and waypoints. They are also displayed in each case in the track manager and waypoint manager.
Caution: When you delete a GPX file, all of the elements contained (tracks, trips and/or waypoints) are deleted. If you want to delete a GPX file, but would like to keep a waypoint from it, simply save the waypoint under a different name before you delete the GPX file.
12.4 Map errors

The Rand McNally Foris allows you to report map errors and thus help to improve the quality and relevance of the maps and the points of interest. You can then transfer the map errors to Rand McNally via Trailhead. You can create map errors on the menu or record them directly while you are travelling and then edit them at a later date.
Create new map errors as well as view map errors or POI errors that have been saved previously.
12.4.1 Create map error
Tap "Create map error" to record a new map error. You can also enter an address or mark a position on the map. Tap "OK" to confirm.
In the second step, select the type of error. You can also add a comment about the map error recorded in order to describe the error in greater detail or to record additional information.
12.4.2 Create POI error
To create a POI error, tap "Report error" in the "Options" tab for the POI. (See Chapter 3.3.)

12.4.3 Edit map and POI errors
To change a map or POI error that you have created, tap "Saved map errors" or " Saved POI errors." On the map view you will then see all of the map and POI errors that have been created. Use the arrows at the bottom to switch back and forth between the errors. Select the error and tap "Modify."
Choose from the following options:
Correct position on map – Change the position of the error if it was not entered correctly.
Correct error type – Change the type of error.
Delete – Delete errors that have been entered.
Change comment – Change a comment about the recorded error or enter a comment at a later date.
POI details – View information about the POI for which you have created an error.
12.5 Help

Show help instructions for the device. Help is also available on any screen with the symbol. Tap to view detailed help tips about that particular screen.

13. Arrange menu

Use "Arrange menu" to change the order of the main menu functions. Select a function and move it with the aid of the arrows on the right. No functions will be deleted. To restore to the default order, tap "Reset."
14. Rand McNally Trailhead
With Rand McNally Trailhead, you can transfer maps, voices, POIs and GPX files to your device or from the device to your PC. You can also move data between the device and onto a micro-SD card to allow for more data.
14.1 Introduction to Rand McNally Trailhead
You must first install Rand McNally Trailhead on your PC. This is a free software program available on www.randmcnally.com. It is available in the Support section under Outdoor GPS. Download the file to a location you will remember on your computer, then double-click on it to install it. Once it is installed, plug in your GPS device and wait for it to be recognized by your computer. Then start Trailhead. If your device is connected to your PC, it will appear as connected in the lower left corner of the Trailhead screen.
When you first start Trailhead, you will be given an option to watch a brief overview video of how to use Trailhead. If you wish to watch it at a later time, it is also available from the Help menu at the top. You will also be given the opportunity to register your device. If it is connected, the serial number will automatically be pre-entered. If it does not appear, then disconnect and reconnect your USB cable to your device and wait for it to show as connected.
14.2 Import of GPX files
GPX is the most common industry file format for tracks, geocaches and waypoints. There are numerous websites and providers on the internet that offer tracks to download, or you can use GPX files from friends or other devices. To transfer GPX files from a web site or other source to your device, you must first save them on your PC. Then choose "GPX Manager" at the top in Rand McNally Trailhead. You can watch a brief video on how this is done from the Help menu.
When Trailhead starts, it searches your computer and any connected Rand McNally GPS device for GPX files and shows them in a list. You can control what directories are searched under the Options menu at the top. The Storage Location column shows whether the file was found on your PC, or on your GPS device.
To view the GPX files on a map, simply select an item in the list. If it is a track, tap the "+" to see the detail. You can then select any detail item to not only see the location of the track, but the speed and altitude along any portion. Simple tap on any portion of the track on the map, and see the corresponding speed or altitude on the tabs below the map.
You can also copy or delete the GPX files by highlighting the selected item next to the “+”, rather than the detail underneath. Select the detail under the “+” to see speed and altitude, but select the “+” summary to see the possible options shown by the orange circle icons on the right.
GPX files on the map view
In the GPX manager, you can display waypoints, tracks and geocaches that you have created yourself. The map can be moved using the arrows and the hand icon. The zoom level of the map can be changed with "+" and "-". Viewing options such as satellite and map are located at the top right-hand edge of the map view screen.
In the bottom section of the GPX manager, you can display the altitude and speed profiles, length, time and description of tracks and waypoints. If no information exists in relation to this, the detailed view remains empty. If no actually required time exists, the anticipated required time is calculated based on the average speeds for cyclists and pedestrians which exist in the navigation device

Transfer GPX files from your PC to the navigation device
To import downloaded GPX files to your navigation device:
- Select the button "Import".
- Search for the file you want on your PC, select it and use the button "Open".
- The file has now been imported to the GPX manager and can now be saved on the GPS device.
- Mark the file you want and choose "Copy from PC to device memory" on the right.
Delete GPX files from the navigation device
To delete GPX files from your navigation device, simply select the file you want and use the "Delete from device memory" button in the function bar on the right.
Edit GPX files
To edit the name or the description of tracks or waypoints:
- Select the item you want and use the button "Edit".
- A window will open up in which you can change the name and description.
14.3 Transfer of content
All of the available data is summarised in various categories. Along the top, the categories Country maps, POIs, My favorite lists, Voices, and Software are presented in tabs. When you click on the tab, a list appears. Row headings and icons, show where the data is located, per the icons below.
☐ in the internal memory of the navigation device,
on the SD card,
on the PC,
on CD/DVD or
on an Internet server.
Important: An active internet connection must exist to enable downloading from the internet.
Copying or deleting is done using the icons along the right side. If an icon is orange, it is an available action for the selected item in the list.
Please note that the memory capacity of the internal memory is limited. The capacity utilisation of the internal memory is displayed on the bar at the bottom of the screen.
14.4 Import of POIs
On Google Earth other websites a large number of points of interest (POIs) are available for you to download. If these POIs exist in a KML or KMZ format, you can transfer them to your navigation device via the KML import plugin of Trailhead. For a short video on how to import KML POI data, select it from the Help menu.
KMZ/KML files from Google Earth
The following section describes how you can incorporate several POIs as a new POI category.
Note: Rand McNally has no influence over functions of Google Earth which are described in the instructions. There may therefore be changes to the sequence which is described.
- Start Google Earth.
- Enter a city and a subject theme in the search box at the top left (e.g. "Chicago" and "Museums").
- Selecting the folder icon below the resulting list to copy to My Places
- The selected POIs are displayed under "My Places".
- Click on the "My Places" item with the right mouse button and select the menu item "Save As". The file can now be saved on the PC as a KMZ file.
KML/KMZ import in Rand McNally Trailhead
On the Trailhead menu bar, select menu select item "Plugins". In this wizard, you can select the KML or KMZ (compressed KML) file on your PC which you would like to transfer to your navigation device. Once you have selected a file, a list of the POIs in it appears beneath it. Press the Next button.
In the next window, you can assign an individual category name for your POI category. You also have the option here of providing more details about the particular POI category. Once you have provided the POI category with a name and the information you want, confirm your entries again with the Next button.
In the next step, you have the option of selecting an icon to be displayed on the map with the respective POIs. A small selection of icons are suggested for you. However, you can also select your own icon from your PC. This icon should have a resolution of 72 dpi and the image size 16x16 pixels.

Finally, confirm your entry again with the "Next" button. If you do not specify your own icon, the default icon shown will be used for displaying the POI on the map. The final window once again summarises the information for the POI category which is to be imported. When
you press the Complete button, the KML or KMZ file will be converted to Rand McNally format.
The converted POI category appears automatically after a few seconds under the "My favorites" tab. To transfer the POI category to the navigation device, select it and click on the right-hand side of the window on the button Copy from PC to device memory or Copy from PC to SD card. Following successful transfer, your own POI category is available on the navigation device for nearby searches or navigation destinations.
14.5 Software
Each time Trailhead starts, it automatically checks Rand McNally servers for any available updates. If one is available, it will appear under the Software tab. You can then select it and copy to your device. Make sure you have done a backup to your PC first, selecting the "Backup Data on your Device" button on the lower right.
15. Tips and tricks
List, ABC – These buttons allow you to switch between the input view and the list view. In the list view, you will see all of the entries that match your previous input, to help you find what you're looking for more quickly.
Back to map – Wherever you are on the menu, you can easily switch back to the map view at any time. To do this, hold down on "Back" or "Cancel."
Help – On any screen on which you see the symbol, tap it and you will be guided directly to the related Help chapter. The arrows below allow you to scroll within a chapter, or change chapters.
Scrolling and browsing – In list views, you can move the continuous text up and down directly with your finger. In menus with several pages, you can scroll to the next page by swiping your finger sideways. (Note: The dots at the top of the Menu screens indicate which page of the menu you are on.)
Hide all – On the map view screen, you can hide most of the buttons and maximize the map view by holding down the menu button. Holding it down again menu will restore the normal view.
Route options – With the route option "Easy" the route may be longer as grades of over 4% are avoided. The avoidance of certain types of routes (tunnels, hiking trails etc.) also has an influence on the route which is calculated. After the route has been calculated, you can
change the route options again by tapping

Map zooming – To move the map a greater distance, first zoom out to access other portions of the map more quickly. Zoom in on the map (e.g., in the view of the calculated route) to identify more details.
Set Quick View – You can change the quick access menu on the bottom of the map screen in "Settings > System / General > Quick Access Menu."
Save power – You can save power and thus increase the operating life by switching to stand-by mode when the device is not in use. In addition, you can set the brightness of the screen and the volume to a lower level to save power. See "Device description" for more tips on saving battery power.
16. Troubleshooting
| Problem | Possible cause | Solution |
| Navigation device does not start up | Battery too low | Connect the device to a suitable power source or replace the batteries.If the device is not being used for a prolonged period, switch it off entirely. Press the power button and tap on "Switch off". |
| No GPS reception / GPS reception is interrupted | GPS reception may be interfered with in forests, when you are surrounded by tall buildings, where there is heavy cloud cover etc. | Reposition the navigation device if necessary. At least 4 satellites are required for navigation. This information can be viewed on the device under "Settings" > "System / General" > "GPS Info". |
| Device no longer responds | Occasionally, responding reset may be required. | Carry out a hard reset by holding down the power button for around 3 seconds. The device then switches off entirely. |
| Compass does not align itself correctly | The compass should be regularly calibrated | Recalibrate the compass. |
| There may be magnetic interference nearby. | Make sure that there are no sources of interference such as magnets, large metal objects such as vehicles or running engines, or high-voltage power lines close by. | |
| Altitude values are not correct | The barometer should be regularly calibrated | When there are breaks in the weather or you experience great gains or losses of altitude, you should calibrate the barometer several times a day. |
| The track includes jumps in altitude | The barometer was not calibrated prior to the start of the track recording. | It is recommended that you calibrate the barometer manually, by entering an altitude, in particular before recording a track. |
17. Technical data
| Screen | Display | 7.6 cm diagonal (3"), transflective, LED backlight |
| Resolution 240 × 400 pixels | ||
| Internal memory | Flash memory 8 GB | |
| RAM memory 128 MB | ||
| Memory card slot | Micro SD card slot up to 32 GB (SDHC) | |
| Input / output | Input Screen interface, on-screen keypad | |
| Input / outputBattery | Speaker Built in, 1 W | |
| USB USB 2.0 (Mini USB) | ||
| 2 x | ||
| Environmental conditions | Waterproof ratingOperating temperatureStorageAtmospheric humidity | IPX 7-10~+60°C-20~+70°C0~90% atmospheric humidity |
18. Service & support
Rand McNally Customer Service 800.333.0136
7:00 AM to 5:00 PM Central Time, Monday–Friday
19. Glossary
Barometer: A barometer is a measuring device used to measure atmospheric pressure. The barometer is used to calculate the current height and is shown on the trip computer.
Quick access button: The quick access button is the lower button on the left-hand side of the device. This button stops or pauses track recording. However, you can also select another function which for this button in Settings.
Geocache: Is a container in which you will find objects to swap or a logbook. The ultimate goal is to find and log the treasure or cache.
Geocaching: Is a kind of electronic treasure hunt or scavenger hunt in which you can find small caches of treasure using published coordinates and waypoints. The Rand McNally Foris is compatible with direct download of Geocaches from Geocacaching.com
Geocoin: Geocoins perform the same role as Travel Bugs. They are tracked online and can travel around the world. Geocoins are often individually designed by geocachers and are also used as collectors' items.
GPS: The Global Positioning System is a satellite-based system for global positioning. Your location can be pinpointed using the conventional GPS satellite system to within about 50 feet at any time – provided that a GPS signal is being received. Location accuracy will vary based on available satellites, interference from trees, clouds and other factors. GPS
satellites are not stationary and are in constant movement, so accuracy can vary at the same location at different times.
GPX file: The most common file format for saving tracks or waypoints is the GPX format. The files are saved in the GPX manager. However, the tracks or waypoints they contain are also displayed in the track manager or waypoint manager. (Note: To delete imported waypoints, the corresponding GPX file must be deleted.)
Compass: A compass is a measuring instrument for determining the cardinal direction. The compass icon on the navigation view screen shows you the north bearing. If you display the compass in a large-scale view via the rapid access menu, the entire map is orientated in the direction you are looking.
Log: By logging geocaches, you can document the success or failure of your treasure hunt online at Geocaching.com. This allows other people and primarily the geocache owner to follow and track what is happening around the cache.
microSD card: You can increase the memory capacity of your device if you use a microSD card. microSD cards with a memory of up to 32 GB can be used. To insert the card into the device, see page 7. Data can be transferred to the SD card using Trailhead (see Chapter 14).
Loop Me!: Loop Me allows you to create a trip based on the time or distance of your choosing, and other parameters such as hilly or flat. You can then show 3 choices of loops on the map screen given this same criteria.
Point of interest: A point of interest (POI) is an address or position of special interest such as restaurants, interesting sights, museums and many more. The points of interest on your device are divided up into various categories to make it easier to search for specific destinations. Additional points of interest can be transferred to the device via Trailhead (see Chapter 14).
Coordinates: Positions can be determined precisely with the aid of coordinates. This makes sense particularly on open terrain away from roads. Coordinates are normally specified with degrees of latitude and longitude.
Track: A track is a route which is precisely defined (with the aid of coordinates placed close to one another which are connected to form a line). This can be displayed on the map so that you can travel along it. Tracks can also be recorded with the device. In track navigation, no turn-by-turn directions are displayed or spoken announcements issued; however, you can convert a track into a route to allow spoken guidance using the Track Manager menu item
Trackable: The best-known trackables include the Travel Bugs. These are transported from one cache to the next and their journey is documented on a special website. In addition, they have a unique numerical combination for identification.
Trip computer: The trip computer is the information and statistics hub in your Rand McNally Foris. Data relating to the current route can be called up. (Note: Save your current track before you change batteries to save your statistics.)
Waypoint: A waypoint is a geoposition saved as a pair of coordinates (geographical latitude and longitude) in open terrain. A waypoint can be any point in the countryside—e.g. a branch on a path, a hut, or any desired POI. Each waypoint can be selected as a destination.
20. Warnings, End-User License Agreement, and Warranty
Pay attention to road conditions and street signs, and obey all traffic and safety laws. Traffic laws and current traffic conditions must always be observed and take precedence over the instructions issued by the Rand McNally navigation system. The User should be aware of situations where current traffic conditions and the instructions from the navigation system may be in conflict. Always use your best judgment and exercise common sense when making off-road navigational decisions. For safety, be attentive to trail and weather conditions and defer to posted signs. It is the User's responsibility to ensure compliance with all laws and regulations. The use of the navigation system does not relieve the User of his/her responsibilities. The User should be aware of the surroundings at all times.
If after reading these statements the User decides not to accept these terms, the User should not use the navigation system.
Rand McNally hereby grants you ("User") a single-user non-exclusive, non-transferable license to use the Rand McNally Foris™ navigation product (hereinafter referred to as the "Product" (including software and associated data)) for User's own internal business or personal use and not for resale, sublicense or commercial use.
This Product and the software incorporated in it and related documentation are furnished under license and may be used only in accordance with this license. Except as permitted by such license, the contents of this Product and software may not be disclosed to third parties, copied or duplicated in any form, in whole or in part, without the prior written permission of Rand McNally. This Product and software contain proprietary and confidential information of Rand McNally and its licensors. Rand McNally grants User a limited license for use of this Product and the software incorporated in the Product for its normal operation. By using the Product, User acknowledges that the content of this document and the Product are the property of Rand McNally and its licensors and are protected by U.S. copyright, trademark and patent laws and international treaties.
THE USER MAY NOT:
- Use the Product on a network or file server, time-sharing or to process data for other persons.
- Use the Product to create any routing tables, files, databases or other compendiums.
- Copy, loan or otherwise transfer or sublicense the Product, its software or content.
- Modify, or adapt the Product in any way, or decompile, disassemble, reverse engineer or reduce to human readable form the Product and software incorporated therein.
- Alter, remove or obscure any copyright notice, trademark notice, or proprietary legend from the Product, its software or content.
This license will terminate automatically if User fails to comply with any of the terms of this license and User agrees to stop using the Product. Rand McNally may revise or update the Product and is not obligated to furnish any revisions or updates to User.
Warranty: Please retain your original sales receipt for warranty service. Rand McNally warrants that the Product, and the component parts thereof, will be free of defects in workmanship and materials for a period of one (1) year from the date of first consumer purchase.
This warranty may be enforced by the first consumer purchaser, provided that the product is utilized within the U.S.A.
Rand McNally will, without charge, repair or replace (with a new or newly reconditioned unit), at its option, defective Products or component parts. For repair or replacement of defective
Products, User must contact Rand McNally at 1-800-333-0136 for return authorization and instructions. User will be required to provide proof of the date of first consumer purchase, such as a duplicated copy of a sales receipt. The consumer must pay any initial shipping charges required to ship the product for warranty service, but the return charges will be at Rand McNally's expense, if the Product is repaired or replaced under warranty.
Repairs or replacements have a 90-day warranty. If the unit sent in is still under its original warranty, then the new warranty is 90 days or to the end of the original one (1) year warranty, depending on which is longer.
This warranty gives the consumer specific rights, and he or she may also have other rights which vary from state to state.
Exclusions: This limited warranty does not apply: 1) to any product damaged by accident; 2) in the event of misuse or abuse of the product or as a result of unauthorized alterations or repairs; 3) if the serial number has been altered, defaced or removed; or 4) if the owner of the product resides outside of the U.S.A.
Caution: Rand McNally makes no warranty as to the accuracy or completeness of the information in the Product and disclaims any and all express, implied or statutory warranties, including any implied warranty of merchantability or fitness for a particular purpose. It is the user's responsibility to use this product prudently. This product is intended to be used only as a travel aid and must not be used for any purpose requiring precise measurement of direction, distance, location or topography.
RAND MCNALLY AND ITS LICENSORS DO NOT MAKE ANY OTHER WARRANTY OR REPRESENTATION, EITHER EXPRESS OR IMPLIED, WITH RESPECT TO THE PRODUCT, INCLUDING ANY WARRANTY AS TO QUALITY, PERFORMANCE, TITLE OR NON-INFRINGEMENT.
IN NO EVENT WILL RAND MCNALLY OR ITS LICENSORS BE LIABLE FOR ANY INDIRECT, SPECIAL, INCIDENTAL, OR CONSEQUENTIAL DAMAGES ARISING OUT OF THE USE OR INABILITY TO USE THE PRODUCT, EVEN IF ADVISED OF THE POSSIBILITY OF SUCH DAMAGES.
Some states do not allow limitations on how long an implied warranty lasts and/or do not allow the exclusion or limitation of incidental or consequential damages, so the above limitations may not apply to some consumers.
The User agrees to allow User-provided information to Rand McNally to be used for internal business evaluation purposes, including, but not limited to, evaluating the effectiveness of the services provided, methods to simplify or improve User experiences. Such information will not be used by third parties or in any way that discloses the identity of the User.
Rand McNally may make use of third party software in the Product. Notwithstanding the terms and conditions of this license, use of some third party materials included in the Product may be subject to other terms and conditions. The official third party copyright notices are provided at the end of this License.
The User agrees to indemnify, defend and hold Rand McNally and its licensors (including their respective licensors, suppliers, assignees, subsidiaries, affiliated companies, and the respective officers, directors, employees, shareholders, agents and representatives of each of them) free and harmless from and against any liability, loss, injury (including injuries resulting in death), demand, action, cost, expense or claim of any kind or character, including but not limited to attorney's fees, arising out of or in connection with any use or possession by the User of this Product.
These terms and conditions constitute the entire agreement between Rand McNally (and its licensors and suppliers) and the User pertaining to the subject matter hereof, and supersedes in their entirety any and all written or oral agreements previously existing between us with respect to such subject matter.
The above terms and conditions shall be governed by the laws of the Illinois, without giving effect to (i) its conflict of laws provisions, or (ii) the United Nations Convention for Contracts for the International Sale of Goods, which is explicitly excluded. The User agrees to submit to the jurisdiction of Illinois for any and all disputes, claims and actions arising from or in connection with the Data provided to the User hereunder.
User shall not export the Product in violation of any U.S. or foreign laws. Rand McNally's licensors shall be third party beneficiaries of Rand McNally's rights under this license, but are not parties hereto and have no obligations hereunder.
By using this product you agree to be bound both by the foregoing and to the terms of use found at www.randmcnally.com/outdoorgps.
Restricted Rights Legend. For governmental agencies: Use, reproduction or disclosure is subject to restrictions set forth in subparagraph (c) (1) (iii) of the Right in Technical Data and Computer Software clause at DFARS 52.227-7013, as amended.
Rand McNally, the Rand McNally logo, and the globe design mark are registered trademarks and Foris is a trademark of RM Acquisition, LLC, d/b/a Rand McNally.
- Contents
- System / General 19
- Active route....21
- Remember position....21
- Geocaching....21
- Transfer files to your device....21
- Search for geocaches....22
- Safety instructions
- FCC Compliance Statement
- Device description
- Device
- Battery cover
- Batteries
- Additional tips for maximizing battery life
- Inserting a micro SD card (optional)
- Bike Mount
- Navigation view
- Next Maneuver:
- Tap on the map
- POIs on the map
- Main menu
- Destination entry
- Address
- Home
- Points of interest
- Detail view
- Previous destination
- Position on map
- Waypoints
- Coordinates
- Geocaches
- Tracks
- Trips
- Arrange menu
- Calculated route
- Alternative routes and elevation profiles
- Trip computer
- Trip manager
- Create new trip
- Loop Me!
- Select saved trip
- Edit stopovers
- Set direction of travel
- Edit name
- Delete trip
- Settings
- Navigation settings
- Route options
- Select activity:
- Route optimization:
- Route preferences:
- Set routing
- Speed profile
- Ask about route options
- Map Display
- Map perspective: 2D/3D
- Map oriented: Direction up / North up
- Position on street: On / Off
- City names on map On / Off
- Auto zoom: On / Off
- POIs on map
- Track recording on map: On / Off
- Arrange menu
- System / General
- Battery type
- GPS Info
- Brightness
- Volume
- Calibrate compass
- Calibrate barometer
- Set position format
- Screen auto-off
- Set home
- Quick access menu
- Quick access button
- Miles / Kilometers
- Delete history
- Default settings
- Time
- Voice
- Screen
- Info
- Arrange menu
- Active route
- Remember position
- Geocaching
- Transfer files to your device
- Transfer by Trailhead
- Transfer by plugin
- Search for geocaches
- Cache list
- Filter
- Detailed view
- Options
- Arrival at the geocache
- Delete geocache
- Logging in the community
- Pocket query
- Found geocaches
- Geocache icons
- Waypoint manager
- Choose waypoint
- Create waypoint
- Delete created waypoints
- Track manager
- Record track
- Detailed view of a track
- Modify track
- Start track
- TrackNav (Convert track to route)
- Start track directly
- Extras
- GPX manger
- Map errors
- Create map error
- Create POI error
- Edit map and POI errors
- Help
- Arrange menu
- Rand McNally Trailhead
- Introduction to Rand McNally Trailhead
- Import of GPX files
- GPX files on the map view
- Transfer GPX files from your PC to the navigation device
- Delete GPX files from the navigation device
- Edit GPX files
- Transfer of content
- Import of POIs
- KMZ/KML files from Google Earth
- KML/KMZ import in Rand McNally Trailhead
- Software
- Tips and tricks
- Troubleshooting
- Technical data
- Service & support
- Glossary
- Warnings, End-User License Agreement, and Warranty
- THE USER MAY NOT:
Brand : Rand McNally
Model : Foris 850
Category : Gps