
4420 - Gps NAVMAN - Free user manual and instructions
Find the device manual for free 4420 NAVMAN in PDF.


| Product Type | Portable GPS Navigator |
| Brand | Navman |
| Model | 4420 |
| Dimensions | Approx. 12 x 8 x 2 cm |
| Weight | Approx. 200 g |
| Display | Color touchscreen, 4.3 inch |
| Power Supply | Rechargeable lithium-ion battery, 12V car charger |
| Battery Life | Up to 3 hours |
| Memory | Internal flash, SD card slot |
| Navigation Features | Turn-by-turn directions, voice guidance, points of interest, route planning |
| Map Coverage | Preloaded maps of North America (or region) |
| Connectivity | USB for data transfer |
| Mounting | Windshield suction cup mount, dashboard disk |
| Cleaning | Wipe with a soft, dry cloth |
| Safety Precautions | Mount securely, do not obstruct view, use audible directions |
| Repairability | No user-serviceable parts; contact Navman support |
Frequently Asked Questions - 4420 NAVMAN
User questions about 4420 NAVMAN
0 question about this device. Answer the ones you know or ask your own.
Ask a new question about this device
Download the instructions for your Gps in PDF format for free! Find your manual 4420 - NAVMAN and take your electronic device back in hand. On this page are published all the documents necessary for the use of your device. 4420 by NAVMAN.
USER MANUAL 4420 NAVMAN
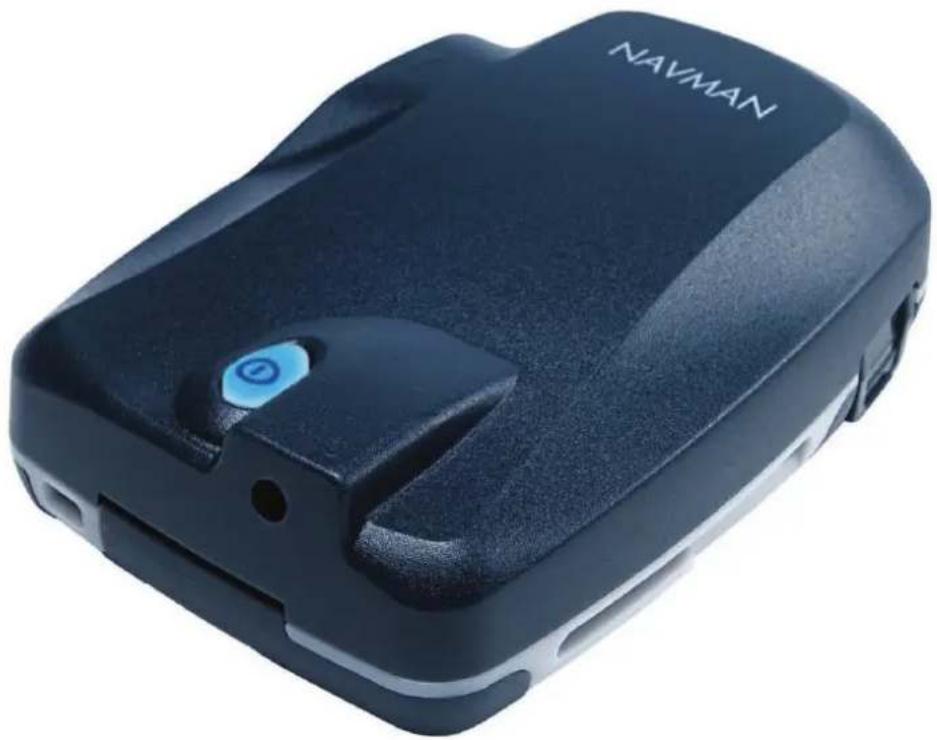
Bluetooth™ GPS Receiver
4100 / 4420 / 4470
User Manual
natural_image
Black NAVMAN device with blue circular button and 'NAVMAN' branding on top (no other text or symbols visible)Contents
- Introduction ...... 3
- Bluetooth GPS Receiver Features ....4
- Connecting the Bluetooth GPS Receiver to your PDA ...... 6
- Positioning the Bluetooth GPS Receiver in a Vehicle 7
5 Batteries 10
6 Optional Accessorie s 11 - Support Information 13
1. Introduction
Whether you travel in your own country, or overseas, the Bluetooth™ GPS Receiver will provide you with a Global Positioning System (GPS) based location accurate to within 5 m (15 ft) for 95% of the time.
The Bluetooth GPS Receiver contains:
- A GPS antenna to receive signals from the GPS satellites,
- An internal microcomputer to calculate the position of the receiver on Earth, and
- A Bluetooth link to send the GPS position to your PDA within a radius of less than 10 m (33.ft)
When using in a vehicle, the Bluetooth GPS Receiver can be mounted on your dash or back window in a position where it has a clear view of the sky and can receive GPS signals easily.
GPS and GPS Signals
The Global Positioning System (GPS) is a network of satellites that transmit accurate time and position information worldwide. GPS receivers receive signals from these satellites, and use the information to determine their exact location.
GPS satellites orbit the Earth at around 12,000 miles. While a GPS receiver can detect signals from up to 12 satellites at any time, only three are needed to provide a two-dimensional position or "fix" (latitude and longitude) required for vehicle navigation systems. GPS data is available free of charge for any user.
The Bluetooth GPS Receiver will send the GPS position information to your PDA which may then be used by your third-party software to plot your position on a map and direct you to your destination.
Safety Notice
In a vehicle, it is your sole responsibility to place, secure and use the Bluetooth GPS Receiver in a manner that will not cause accidents, personal injury or property damage. It is your sole responsibility to observe safe driving practices and to ensure that the vehicle mount installation instructions are read carefully, understood and used consistently with the laws of operation for each country in which the device is used.
It is your sole responsibility to adhere to the following safety instructions at all times:
- Do not operate the Bluetooth GPS Receiver while driving or place the receiver in a position that obstructs the driver's view.
- Do not mount in a way that interferes with airbags or other safety equipment
- Do not leave in view while your vehicle is unattended, especially in strong sunlight
- Do not use or handle the Bluetooth GPS Receiver when it is hot, leave it to cool out of direct sunlight.
Navman disclaim all liability for use of this product in a way that may cause accidents, damage or that may violate law.
2. Bluetooth GPS Receiver Features
It is recommended that you familiarise yourself with the basic operations of your Bluetooth GPS Receiver:
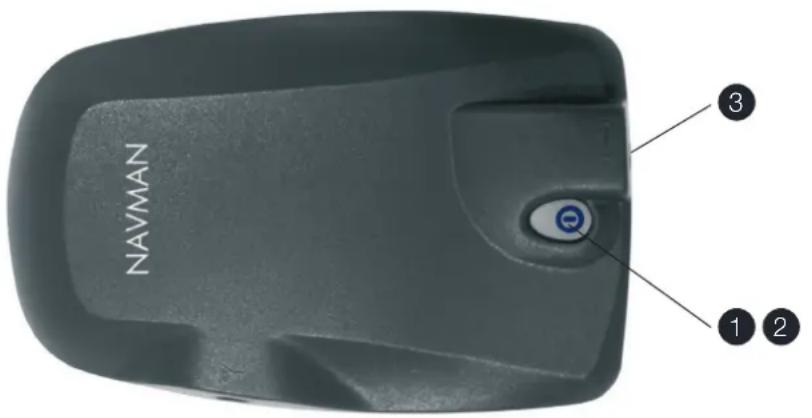
Top Components
| Component Description | ||
| 1 | On/Off Button | To turn on:Press for two seconds and release.To turn off:Press for two seconds and release.The Bluetooth GPS receiver will automatically turn off three minutes after the Bluetooth connection is closed or lost. |
| 2 | Indicator Light | The indicator light is built into the On/Off button.Off:The Bluetooth GPS Receiver power is off.Single flash every 1.5 seconds:The Bluetooth GPS Receiver is connected to the PDA via Bluetooth.Double flash every 1.5 seconds:The Bluetooth GPS Receiver is not connected to the PDA via Bluetooth.Light is blue:Battery voltage is good.Light is red:Battery voltage is low. Change the batteries. |
| 3 | External Power Adapter Socket | If the vehicle power adapter is plugged in, the Bluetooth GPS Receiver will use the external power supply instead of the internal batteries.Note:The external power adapter does not charge the internal batteries. |
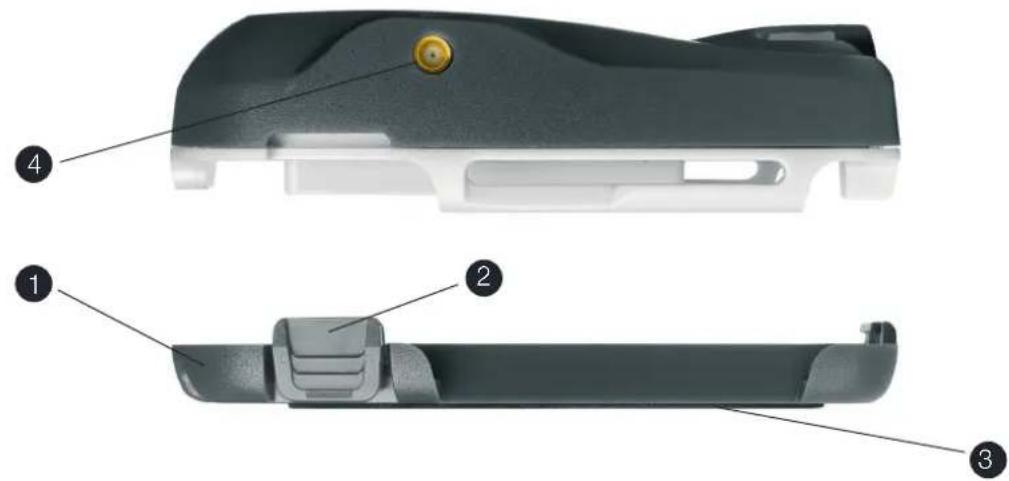
Side Components
| Component Description | ||
| 1 | Battery Cover | Forms the base of the Bluetooth GPS Receiver and protects the internal batteries.Remove by squeezing the two side-clips while pulling the cover away from the main unit. |
| 2 | Side Clip Holds the battery cover in place. | |
| 3 | Non-Slip Pad Prevents the receiver from slipping when it is not in the receiver cradle. | |
| 4 | External GPS Antenna MCX Socket | If an external GPS antenna is plugged in, the Bluetooth GPS Receiver will use the external antenna instead of the internal antenna. |
Specifications
| Property/Item Description | |
| Size 95 x 62 x 26 mm (3.7 x 2.4 x 1 in) | |
| Weight 223 g (7.9 oz) without batteries | |
| Case UV stable plastic | |
| Internal Batteries 3 x AAA alkaline supplied | |
| External Power Supply (optional) 5 V DC, centre pin is positive | |
| Operating Temperature -10 to +60°C (14 to 140°F) | |
| Interface | BluetoothTM Class 3Version 1.1 SPP (Serial Port Profile)Within 10 m (33 ft) range with no obstructionNMEA 0183 v.2.20, GPGGA, GPGSA, GPRMC and GPGSVBaud rate 57600 |
| GPS Antenna 25 x 25 x 4 mm (1 x 1 x 0.2 in) ceramic patch | |
| GPS Receiver | SiRF low power chipset12 channel parallel, automatic selection |
| Time to First GPS Fix | Hot Start - 8 seconds typicalWarm Start - 38 seconds typicalCold Start - 45 seconds typical |
3. Connecting the Bluetooth GPS Receiver to your PDA
To establish a Bluetooth connection between your PDA and the Bluetooth GPS Receiver, complete the following steps:
-
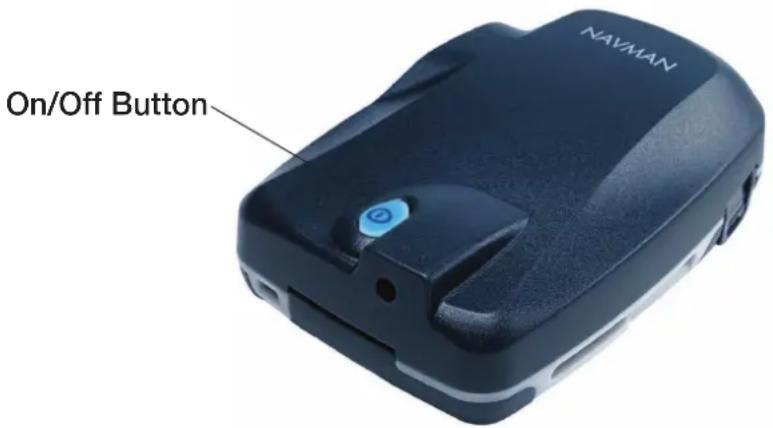
Turn on the Bluetooth GPS Receiver.
-
Press the On/Off button for two seconds.
- The On/Off button will flash blue twice every 1.5 seconds to indicate it is not connected to another Bluetooth device.
- Turn on your PDA.
-
Turn on Bluetooth on your PDA and connect to the Bluetooth GPS Receiver.
-
Ensure that the light on the Bluetooth GPS Receiver is still flashing. The receiver will turn off after three minutes if a Bluetooth connection is not established.
- Turn on Bluetooth on your PDA and establish a connection with the Bluetooth GPS Receiver by following the documentation supplied with your PDA or Bluetooth card.
- If you are prompted for a Passkey or Device PIN, use the appropriate Passkey / Device PIN as follows:
| Device Name Passkey / Device PIN | |
| NAVMAN GPS ONE NAVMAN | |
| NAVMAN BT GPS 1234 |
- When a connection has been established between your PDA and Bluetooth GPS Receiver, the light on the receiver will change to flash once every 1.5 seconds.
-
Pocket PC Only — Determine the Bluetooth COM Port.
-
Identify the outbound COM port used to create a serial port connection between your PDA and the Bluetooth GPS receiver by following the documentation supplied with your PDA or Bluetooth card.
- Specify the outbound COM port in your third-party software to receive GPS data from the Bluetooth GPS Receiver. Note: If using Navman™ SmartST™, the COM Port is specified on the GPS Status screen. See the SmartST User Manual for more information.
You are now ready to obtain a GPS fix.
Getting a GPS Fix
The term "GPS fix" is used to describe when your Bluetooth GPS Receiver has enough information from three or more GPS satellites to calculate your position. You can monitor the strength of the GPS signal using your third-party software. Note: If using Navman SmartST, the GPS status can be monitored on the GPS Status screen. See the SmartST User Manual for more information.
When you turn on your Bluetooth GPS Receiver, it may take several minutes to get the first GPS fix. You can minimise the amount of time this takes by:
- Positioning the Bluetooth GPS Receiver according to the guidelines in Chapter 4.
- Remaining stationary until the Bluetooth GPS Receiver has a GPS fix.
4. Positioning the Bluetooth GPS Receiver in a Vehicle
Use the following guides to choose a suitable position for the Bluetooth GPS Receiver:
- The receiver must have a good view of the sky and horizon.
- The receiver must not obstruct your view, or interfere with the operation of the vehicle or the vehicle safety equipment.
- The receiver must be accessible so that you can operate the On/Off button and replace the batteries.
- Avoid placing the receiver near sources of electrical interference or noise.
- Avoid locations subjected to excessive shock or vibration.
- The receiver must be within 10 m (33 ft) of your PDA.
- The receiver is not waterproof — mount it where it will not get wet (including condensation).
Note: If your vehicle is fitted with an athermic (heat reflecting) or a heated windscreen, you may need to purchase a Navman external antenna to allow your Bluetooth GPS Receiver to receive GPS signals inside the vehicle. See page 11.
The Bluetooth GPS Receiver and your PDA are mounted separately in your vehicle. Follow these instructions carefully to ensure proper installation. For security purposes and to avoid overheating, do not leave the Bluetooth GPS Receiver or your PDA on the dash or attached to the windscreen while your vehicle is unattended, especially in strong sunlight.
Positioning your Receiver
Option One: Windscreen Suction Mount
You can position the Bluetooth GPS Receiver on the inside of your vehicle windscreen or back window using the receiver windscreen suction mount and receiver cradle:
- Insert the tab on the receiver windscreen suction mount into the receiver cradle slot.
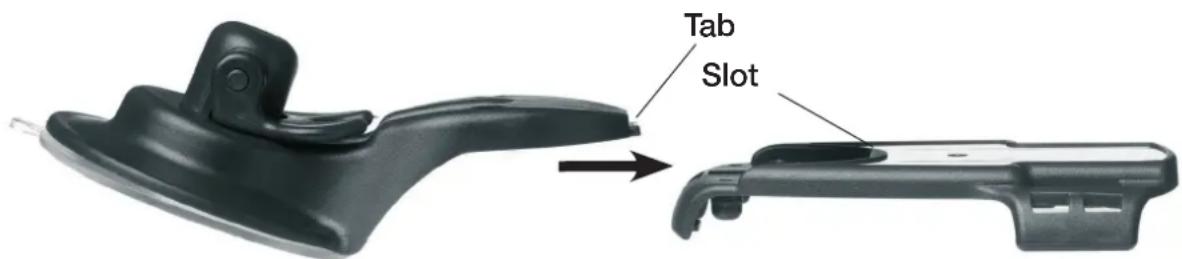
- Fasten the receiver cradle to the receiver windscreen suction mount by using the two screws provided.
- Find a suitable position in your vehicle for the Bluetooth GPS Receiver to be mounted.
- Use the alcohol swab to thoroughly clean the window area that the suction cup will be mounted to. Do not touch the area after it is cleaned.
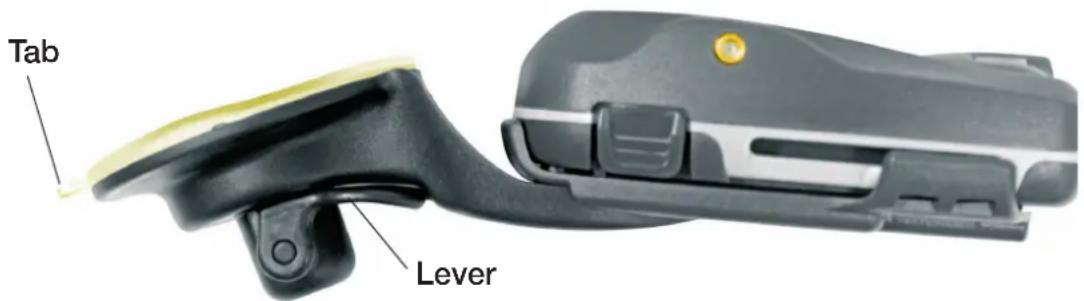
- Do not touch the bare suction cup surface. Press the suction cup firmly to the window, then pull the lever down and away from the window.
- Slide the Bluetooth GPS Receiver into the receiver cradle.
To remove the receiver windscreen suction mount from the windscreen or back window, press the lever down and toward the window and gently lift the tab on the rim of the suction cup.
Option Two: Mounting Pad on Dashboard (Permanent)
You can attach the Bluetooth GPS Receiver to the dashboard using the receiver cradle and mounting pad:
Warning: This is a permanent solution – the mounting pad cannot be removed once fixed and will mark the dashboard if forcibly removed.
- Remove one of the backing layers from the receiver mounting pad.
- Attach the sticky side of the mounting pad to the under-side of the receiver cradle.
- Find a suitable position in your vehicle for the Bluetooth GPS Receiver to be mounted.
- Use the alcohol swab to thoroughly clean the area of the dashboard that the cradle will be mounted to. Do not touch the area after it is cleaned.
- Remove the second backing layer from the mounting pad.
- Press the cradle firmly to the dashboard for 30 seconds.
- Slide the Bluetooth GPS Receiver into the receiver cradle.
Positioning your PDA
Option One: Windscreen Suction Mount
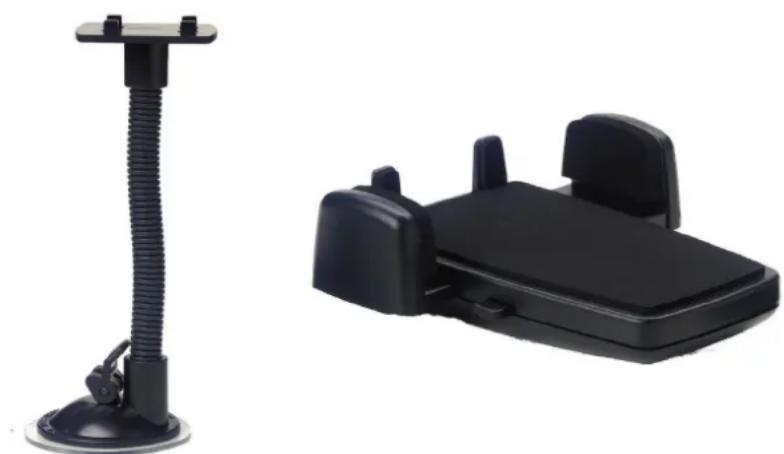
You can position your PDA on the inside of your vehicle windscreen using the PDA windscreen suction mount (see figure one) and PDA cradle (see figure two):
- Attach the PDA cradle to the PDA windscreen suction mount by inserting the four tabs at the end of the suction mount arm into the four slots on the cradle. Ensure that the Close arrow on the suction mount is pointed toward the top end of the cradle.
- Find a suitable position on your windscreen where the PDA will be clearly visible by the driver.
Warning: Do not mount your PDA in a way that interferes with airbags or other safety equipment. - Use the alcohol swab to thoroughly clean the window area that the suction cup will be mounted to. Do not touch the area after it is cleaned.
- Do not touch the bare suction cup surface. Press the suction cup firmly to the window, then push the lever toward the window.
- Place your PDA in the PDA cradle.
- Squeeze the side arms of the cradle firmly until they are securely holding your PDA.
- Bend the arm of the suction mount so that the PDA will be clearly visible by the driver.
To remove the PDA windscreen suction mount from the windscreen, pull the lever away from the window and gently lift the tab on the rim of the suction cup.
natural_image
Two black automotive seat covers, one with a flexible neck and the other a flat seat (no text or symbols visible)Figure One Figure Two
Option Two: Mounting Disc on Dashboard (Permanent)
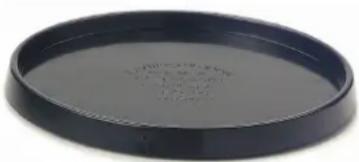
You can position your PDA on the dashboard using the PDA windscreen suction mount (see figure one), PDA cradle (see figure two) and PDA mounting disc (see figure three).
Warning: This is a permanent solution – the mounting disc cannot be removed once fixed and will mark the dashboard if forcibly removed.
- Attach the PDA cradle to the PDA windscreen suction mount by inserting the four tabs at the end of the suction mount arm in the four slots on the cradle. Ensure that the Close arrow on the suction mount is pointed toward the top end of the cradle.
- Find a suitable position on your dashboard where the PDA will be clearly visible by the driver.
Warning: Do not mount your PDA in a way that interferes with airbags or other safety equipment.
- Use the alcohol swab to thoroughly clean the area of the dashboard that the disc will be mounted to. Do not touch the area after it is cleaned.
- Remove the backing from the mounting disc.
- Press the mounting disc firmly to the dashboard for 30 seconds.
- Insert the suction cup in the mounting disc, then push the lever down.
- Place your PDA in the PDA cradle.
- Squeeze the side arms of the cradle firmly until they are securely holding your PDA.
- Bend the arm of the suction mount so that the PDA will be clearly visible by the driver.
To remove the PDA windscreen suction mount from the mounting disc, pull the lever up and gently lift the tab on the rim of the suction cup.
natural_image
Circular black object with a textured surface, possibly a petri dish or container (no visible text or symbols)Figure Three
Powering the Bluetooth GPS Receiver with the Vehicle Power Adapter
You can use the vehicle power adapter to power the Bluetooth GPS Receiver when in a vehicle. If the vehicle power adapter is plugged in, the receiver will use the external power supply instead of the internal batteries.
- Plug the smaller end of the vehicle power adapter in to the external power adapter socket on the Bluetooth GPS Receiver.
- Remove the cigarette lighter from your cigarette lighter socket.
- Plug the larger end of the vehicle power adapter in your cigarette lighter socket.
5. Batteries
When using the vehicle power-adapter, you need not remove the batteries. For minimum time to obtain a GPS fix, ensure that the three AAA batteries are always in the Bluetooth GPS Receiver.
Battery life is up to 30 hours of active use; however, results vary with battery type.
Replacing the Batteries
When the light in the On/Off button turns red, replace the batteries in the Bluetooth GPS Receiver.
To replace the batteries:
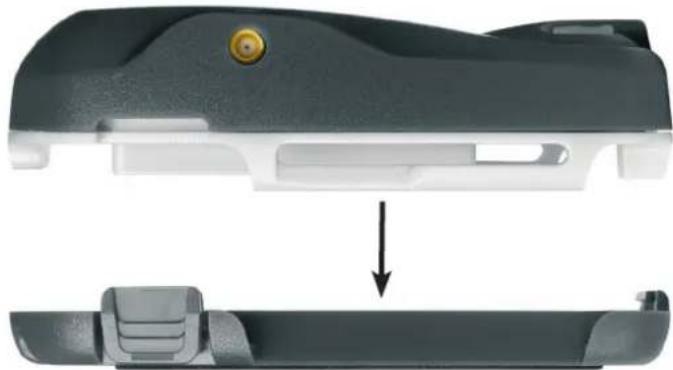
- Remove the battery cover by squeezing the two side-clips while pulling the cover away from the main unit.
natural_image
Close-up of a mechanical component with a highlighted section showing a downward arrow (no text or symbols visible)-
Remove the old batteries and insert three new AAA dry-cell, rechargeable, or alkaline batteries.
-
Replace the battery cover by inserting the clip in to the bottom slot on the main unit and pressing the side-clips back in the side slots.
6. Optional Accessories
External Antenna
If your vehicle is fitted with an athermic (heat reflecting) or a heated windscreen, GPS signals to the Bluetooth GPS Receiver are greatly reduced or blocked.
An external antenna is available to ensure that sufficient GPS signal is available. The antenna is attached by a magnet to the outside of your vehicle, usually on the roof. The antenna cable is plugged in to the External GPS Antenna MCX Socket. The cable may be threaded through the door opening.
The external antenna is available from your Navman retailer.
Warranty Agreement
IMPORTANT: The following terms and conditions may vary from country to country. Please check with Your Navman dealer from where You purchased the product.
Hardware Product: Navman warrants its products to be free from defects in materials or workmanship under normal use for one year from the date of purchase (the Warranty Period) to the original owner (You). To claim under this warranty, You must return the product to the place of purchase, or a service centre approved by Navman (Service Centre). You must produce an original sales receipt as proof of purchase. You will be solely responsible for all shipping charges, freight, insurance and proper packaging to prevent breakage in transit. Navman will, at its discretion, repair or replace any defective product or its components at no cost to You for parts and labour. The replacement product or component takes on the warranty status of the original product or component. This is Your exclusive remedy for defective products.
Limitations: This warranty does not apply to products that have been damaged or rendered defective: (a) as a result of incorrect installation, misuse, mishandling, misapplication, accident, abuse, breakage or other external causes; (b) by operation outside the usage specifications stated in the product documentation; (c) by modification or service other than by Navman or its approved Service Centres.
Limitation of Liability: To the fullest extent permitted by law, Navman will not be liable in any event, whether in tort (including negligence), contract or otherwise for any damage including loss of profits, any consequential, indirect or special damage, loss or injury of any kind suffered by You or any other person. Except as expressly set out in this warranty, Navman makes no other warranties, express or implied, including any implied warranties of merchantability and fitness for a particular purpose. If any limitation or exclusion or liability contained in this warranty is held to be invalid for any reason and Navman becomes liable for loss or damage that would otherwise have been excluded, such liability will be limited to the total amount actually paid by You for the product.
FCC Statement
This equipment has been tested and found to comply with the limits for a Class B digital device, pursuant to Part 15 of the FCC Rules. These limits are designed to provide reasonable protection against harmful interference in a normal installation. This equipment generates, uses and can radiate radio frequency energy and, if not installed and used in accordance with the instructions, may cause harmful interference to radio communications. However, there is no guarantee that interference will not occur in a particular installation. If this equipment does cause harmful interference to radio or television reception, which can be determined by turning the equipment off and on, the user is encouraged to try to correct the interference by one or more of the following measures:
- Reorient or relocate the receiving antenna.
- Increase the separation between the equipment and receiver.
- Connect the equipment into an output on a circuit different from that to which the receiver is connected.
- Consult the dealer or an experienced technician for help.
- A shielded cable must be used when connecting a peripheral to the serial ports.
CAUTION: Changes or modifications not expressly approved by the party responsible for compliance could void the user's authority to operate the equipment.
Support Compliance
Operation is subject to the following two conditions: (1) this device may not cause interference, and (2) this device must accept any interference, including interference that may cause undesired operation of the device.
EMC compliance
• CE (Europe): EN301489, 300328-2
• E-mark (Europe): Annex VII and VIII 95/54/EC
• FCC (USA): Part 15 Class B, 15.247, 15.35, 15.209
• C-tick (Australia): AS/NZS 3548
• MIC (Korea): R-LARN-03-0450
Safety compliance
• UL60950, EN60950.
• EN50371 SAR requirements
• FCC SAR guideline
NMEA compliance
• NMEA 0183 Version 2.20
• Communicate at 57,600 Baud
Environmental compliance
- Not waterproof
Support Information
Support for New Zealand:
Navman NZ Ltd
13-17 Kawana Street
Northcote
Auckland
New Zealand
Phone: 0800 GONAVMAN
pcnsupport.nz@navman.com
www.navman.com
Support for Europe:
Navman Europe Limited
4G Gatwick House
Peeks Brook Lane
Horley, Surrey RH6 9ST
United Kingdom
support@navman-europe.com
www.navman-europe.com
Support for US and Canada:
Navman USA Limited
27142 Burbank
Foothill Ranch, CA 92610
United States of America
Phone: 866-9-NAVMAN
support@navmanusa.com
www.navmanusa.com
Support for Australia:
Navman Australia Pty. Ltd
PO Box 479
Gladesville
New South Wales 2111
Australia
Phone: (02) 9879 9000
pcnsupport.aus@navman.com
www.navman.com
NAVMAN DISCLAIM ALL LIABILITY FOR ANY USE OF THIS PRODUCT IN A WAY THAT MAY CAUSE ACCIDENTS, DAMAGE OR VIOLATE THE LAW.
Copyright
© 2004 Navman NZ Limited. Navman is a registered trademark of Navman NZ Limited. All rights reserved.
Microsoft® Windows® 98, ME, 2000 or XP, Microsoft Internet Explorer are registered trademarks of Microsoft Corporation.
SmartST is a trademark of Navman NZ Limited. All rights reserved.
Bluetooth is a trademark of the Bluetooth SIG, Inc. The Bluetooth trademarks are owned by Bluetooth SIG, Inc. USA.
Acrobat Reader® is a registered trademark of Adobe Systems Incorporated. All rights reserved.
All other trademarks and registrations are the property of their respective owners.
Published in New Zealand
MN000385A
- Bluetooth™ GPS Receiver
- Contents
- Introduction
- GPS and GPS Signals
- Safety Notice
- Bluetooth GPS Receiver Features
- Connecting the Bluetooth GPS Receiver to your PDA
- Getting a GPS Fix
- Positioning the Bluetooth GPS Receiver in a Vehicle
- Positioning your Receiver
- Option One: Windscreen Suction Mount
- Option Two: Mounting Pad on Dashboard (Permanent)
- Positioning your PDA
- Option Two: Mounting Disc on Dashboard (Permanent)
- Powering the Bluetooth GPS Receiver with the Vehicle Power Adapter
- Batteries
- Replacing the Batteries
- Optional Accessories
- External Antenna
- Warranty Agreement
- FCC Statement
- Support Compliance
- EMC compliance
- Safety compliance
- NMEA compliance
- Environmental compliance
- Support Information
- Support for New Zealand:
- Support for Europe:
- Support for US and Canada:
- Support for Australia:
- Copyright
Brand : NAVMAN
Model : 4420
Category : Gps