
SPX 5400 - Gps COBRA - Free user manual and instructions
Find the device manual for free SPX 5400 COBRA in PDF.


| Product Type | GPS Navigation System |
| Brand | Cobra |
| Model | SPX 5400 |
| Display Size | 4.3 inches diagonal |
| Dimensions (W x H x D) | 4.5 x 3.0 x 1.0 inches |
| Weight | 6.0 oz (170 g) |
| Power Source | Rechargeable lithium-ion battery; 12V vehicle adapter |
| Battery Life | Up to 4 hours continuous use |
| Memory | 4 GB internal; microSD card slot expandable up to 32 GB |
| Maps | Preloaded with North America maps; lifetime map updates available |
| GPS Receiver | High-sensitivity SiRFstar III |
| Voice Guidance | Text-to-speech with street name announcement |
| Traffic Updates | Live traffic via optional cable or smartphone tethering |
| Bluetooth | Hands-free calling and audio streaming |
| Mounting | Windshield suction cup mount included |
| Operating Temperature | 32°F to 140°F (0°C to 60°C) |
| Languages | English, French, Spanish |
| Maintenance | Clean with soft dry cloth; avoid liquids |
| Safety Features | Driver alerts for speed cameras, red light cameras, and school zones |
| Spare Parts / Repairability | Replacement mounts, chargers, and batteries available from Cobra |
| Warranty | 1-year limited warranty |
Frequently Asked Questions - SPX 5400 COBRA
User questions about SPX 5400 COBRA
0 question about this device. Answer the ones you know or ask your own.
Ask a new question about this device
Download the instructions for your Gps in PDF format for free! Find your manual SPX 5400 - COBRA and take your electronic device back in hand. On this page are published all the documents necessary for the use of your device. SPX 5400 by COBRA.
USER MANUAL SPX 5400 COBRA
The Cobra line of quality products includes:
CB Radios
microTALK® Radios
Radar/Laser Detectors
Safety Alert® Traffic Warning Systems
Truck-Specific Navigation Systems
HighGear® Accessories
CobraMarine VHF Radios
Power Inverters
LED Lights
Jumpstarters
Accessories
For more information or to
please visit our website:
www.cobra.com
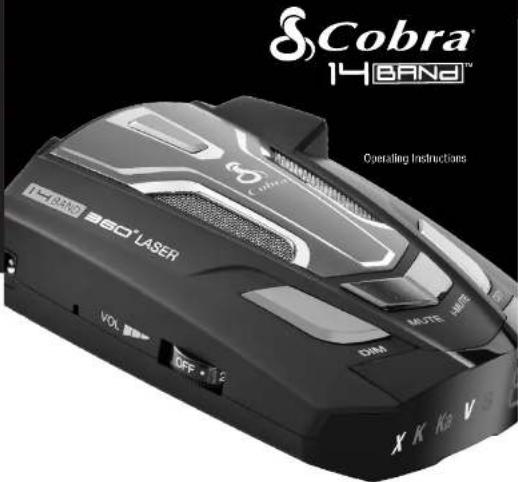
14 BAND
ULTRA-HIGH PERFORMANCE
DIGITAL RADAR/LASER DETECTOR
SPX 5400
S###
Nothing Comes Close to a Cobra ^®
English
Nothing Comes Close to a Cobra
English
Introduction
Important Information and Customer Assistance
Important Information
Federal Laws Governing the Use of Radar Detectors
It is not against federal law to receive radar transmissions with your Cobra radar/laser detector. The Communications Act of 1924 guarantees your right to receive radio transmissions on any frequency. Local laws that contravene this Act, while illegal, may be enforced by your local law enforcement officials until and unless they are prohibited from doing so by federal court action.
Safety Alert
Use of this product is not intended to, and does not, ensure that motonists or passengers will not be involved in traffic accidents. It is only intended to alert the motorist that an emergency vehicle equipped with a Cobra Safety Alert transmitter is within range as defined by that product. Please call local fire and police departments to learn if coverage exists in your area.
Safe Driving
Motorisms, as well as operators of emergency or service vehicles, are expected to exercise all due caution while using this product, and to obey all applicable traffic laws.
Security of Your Vehicle
Before leaving your vehicle, always remember to conceal your radar detector in order to reduce the possibility of break-in and theft.

Customer Assistance
Should you encounter any problems with this product, or not understand its many features, please refer to this owner's manual. If you require further assistance after reading this manual, Cobra Electronics offers the following customer assistance services:
For Assistance in the U.S.A.
Automated Help Desk English only. 24 hours a day, 7 days a week 773-889-3087 (phone). Customer Assistance Operators English and Spanish. 8:00 a.m. to 5:30 p.m. Central Time Mon. through Fri. (except holidays) 773-889-3087 (phone).
Questions English and Spanish. Faxes can be received at 773-822-2269 (tax).
Technical Assistance English only. www.cobra.com (on-line: Frequently Asked Questions). English and Spanish. productinfo@cobra.com (e-mail).
For Assistance Outside the U.S.A.
Contact Your Local Dealer
Ovio Green Electronics Corporation
(2163)8, 0028.01017 U.S.
www.60018.com
A1 English


Controls, Indicators and Connections
Controls, Indicators and Connections
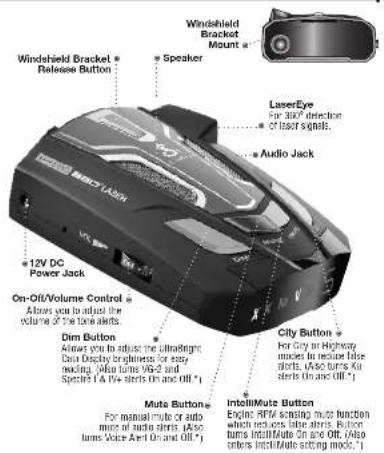
* Press and hold for four seconds to access these functions.

WARNING
NOTIFICATION OF PARTS COCONOMO FOR APPROVED
BY Canadian Broadcasting Corporation may believe
FCC Rules and vote your authority to secure the legal environment.

English

Display and Product Features
Display
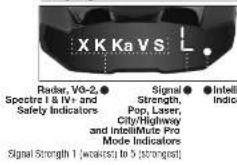

NOTE: In This Manual
When steady.
the display will
be shown:
When drinking
The following
the display will be taken.
20.010M
X & X will here
simultanecusty
when indicating


[Non-Text]
[Non-Text]
[Non-Text]
[Non-Text]
[Non-Text]
[Non-Text]
[Non-Text]
[Non-Text]
[Non-Text]
[Non-Text]
[Non-Text]
[Non-Text]
[Non-Text]
[Non-Text]
[Non-Text]
[Non-Text]
[Non-Text]


Introduction
Important Information ...... A1
Customer Assistance A1
Controls, Indicators and Connections.... A2
Display A3
Product Features.... A3

Your Detector
Installation 2
Getting Started.... 5
Auxiliary Audio Jack 5
Settings.... 6
Highway/City Mode 6
UltraBright Data Display Brightness 7
Muting an Alert 8
Auto Mute Mode 8
IntelliMute 9
IntelliMute Pro 12
Voice/Tone Setting 13
VG-2 and Spectre I & IV+ Alert Settings 13
Radar Alert and Pop Alert Settings....14
Detection.... 15
Signals Detected.... 15
Audio Alerts.... 15
Visual Display 15
Instant-On Detection.... 18
Responding to Alerts 18
Understanding Radar and Laser 19
Maintenance....20
Specifications.... 21

Warranty
Limited 1-Year Warranty....22

Customer Assistance
Product Service 23
Optional Accessories 24
Accessories Order Info 25
Trademark Acknowledgement.... 25

Installation
Installation
Where to Mount Your Unit
You will get optimum performance from your detector if you Mount it at a point approximately in the center of the vehicle, as low as possible on the front windshield without obstructing the unit's view of the road either to the front or rear. Make sure the unit is level with the road. You can also mount it directly on the dashboard.
Windshield Mounting Dashboard Mounting
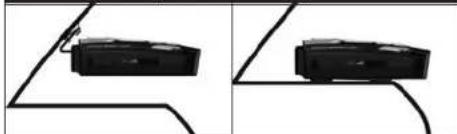
natural_image
Two identical black rectangular objects placed on curved and straight lines, no text or symbols visible.The unit's lens must not be blocked and the LaserEye should have a clear view out the back window to allow 360° detection.
Radar and laser signals pass through glass but not through other materials and objects. Objects that can block or
weaken incoming signals include:
■ Windshield wiper blades
■ Mirrored sun screens
■ Dark tinting at the top of the windshield
■ Heated windshields currently available on some vehicles (Instaclear for Ford, Electriclear for GM.) Consult your dealer to see if you have this option.

English

Installation
Windshield Mounting
| 1. Attach the rubber cups to the bracket. |  |
| 2. Make sure the rubber cups and your windshield are clean. | |
| 3. Push the bracket firmly onto the windshield. | 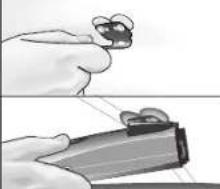 |
| 4. Attach the detector to the bracket. Check the angle of the unit. | |
| 5. To adjust the angle if necessary, gently push or pull on the bracket to bend it. DO NOT use the detector to bend the bracket. | 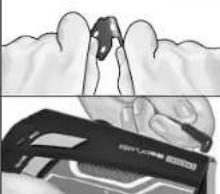 |
| 6. Plug the power cord into the detector. | |
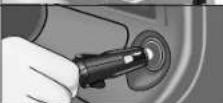
| 7. Plug the cigarette lighter adapter on the power cord into your vehicle's cigarette lighter. | 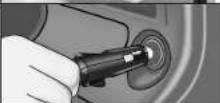 |
| 8. You can temporarily remove the detector whenever you wish by pressing the bracket release button and sliding it off the bracket. | |
Nothing Comes Close to a Cobra


Installation
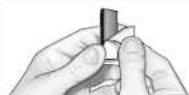
Dashboard Mounting
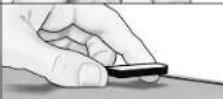
- Place the detector on the dashboard to find a location where the unit has a clear, level view of the road. The angle can NOT be adjusted after mounting.
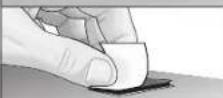
- Remove the paper backing from one side of the hook-and-loop fastener.
- Attach the pad to the dashboard at your chosen location and remove the other paper backing.
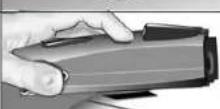
- Attach the detector to the hook-and-loop fastener. You can remove and reattach the unit as often as you like.
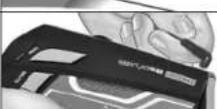
- Plug the power cord into the detector.
- Plug the cigarette lighter adapter on the power cord into your vehicle's cigarette lighter.

Getting Started
Getting Started
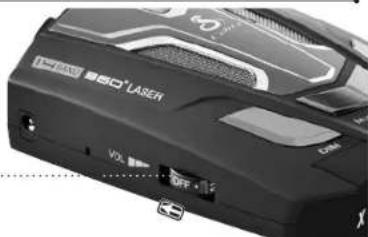
Power On

On-Off/
Volume Control Rotate clockwise (away from you)
natural_image
Close-up of a black LARE device with visible control buttons and ventilation slots (no readable text or symbols)To Turn On the Unit and Adjust the Audio Volume
| Rotate the On-Off/Volume control clockwise (away from you). | Tone Voice | Visual Display | |
| Three beeps Testing, | then three beepsSystem Ready, thenVoice Alert | H appears in the display indicating that the power is On | |

NOTE
In some vehicles, power is supplied to the cigarette lighter even while the ignition is Off. If this is the case with your vehicle, you should turn Off or unplug your detector when parking for lengthy periods.
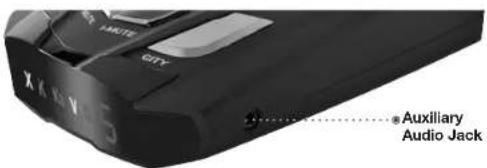
Auxiliary Audio Jack
The Auxiliary Audio Jack can be used to connect external speakers in environments with high ambient noise levels. The internal speaker will be disconnected. (This uses a mini stereo audio connector.)

Settings
Settings
When changing the Settings on your detector, please keep in mind:
■ Buttons can have multiple functions.
■ Depending on your choice of Voice Alert or Tone Alert mode, you will hear either voice messages or tones confirming changes in settings.
■ All settings will be stored in memory when the power is turned Off and recalled when the power is turned back On.
Highway/City Mode
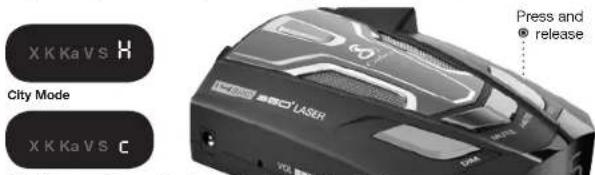
Setting your detector to City mode delays all X band audio alerts until the signal strength reaches Level 3. (A single beep will sound when the signal is first detected.) This will reduce false alerts while you are driving in, or near, urban areas where there are many sources for conflicting X band signals such as microwave towers and automatic door openers.
To change settings, follow the procedure listed below, which indicates what you will see and hear (either in Voice Alert or Tone Alert mode) as you complete each step. The factory setting is Highway mode.
To Change From Highway Mode to City Mode
| Press and release the City button. | Tone Voice | Visual Display | |
| One beep City | C appears in the display | ||
To Change From City Mode Back to Highway Mode
| Press and release the City button again. | Tone Voice | Visual Display | |
| Two beeps Highway | H appears in the display | ||

English

Settings
UltraBright Data Display Brightness
You can choose from three settings for Brightness of the display. You can cycle through the settings by repeatedly pushing the Dim button. The factory setting is Bright.
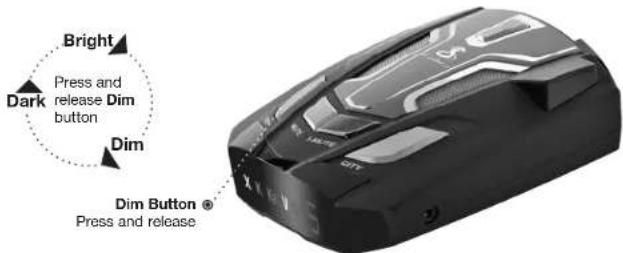
To Change the Brightness to Dim
| Press and release the Dim button once. | Tone Voice | Visual Display | |
| One beep Dim Display | dims | ||
To Change the Brightness to Dark
| Press and release the Dim button again. | Tone Voice | Visual Display | |
| One beep Dark Display remains | dim (no visual alerts will be seen) | ||
To Change the Brightness to Bright
| Press and release the Dim button a third time. | Tone Voice | Visual Display | |
| Two beeps Bright Display returns | to full brightness | ||


Settings
Muting an Alert
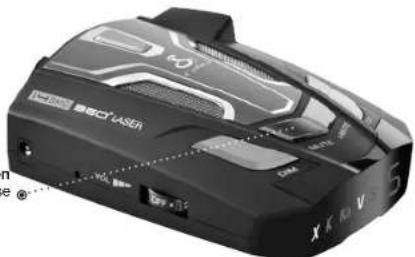
Your detector allows you to quickly turn Off an audio Alert by momentarily pressing the Mute button. If you press the Mute button a second time during the Alert, the audio Alert will be turned back On.
Auto Mute Mode
Auto Mute will automatically reduce the audio volume of all alerts after four seconds for as long as the signal is detected. The factory setting for Auto Mute is On.
natural_image
Close-up of a black and white BEO Vaser branded device with visible branding and control buttons (no readable text or symbols)To Turn Auto Mute On
| Press and release theMutebutton again while no alert is occurring. | Tone Voice | Visual Display | |
| Two beepsAuto Mute | On None | ||
To Turn Auto Mute Off
| Press and release theMutebutton while no alert is occurring. | Tone Voice | Visual Display | |
| One beep Auto Mute | Off None | ||

English

Settings
IntelliMute
IntelliMute is a unique feature that allows you to avoid alerts you don't need to hear because you are stopped or moving slowly. By sensing the "revs" (RPMs) of your engine, IntelliMute knows when you are at low speed and automatically mutes audio radar alerts.
Before IntelliMute will work, you must set an activation point for your engine's revs (see page 10). Whenever the revs are below that point, IntelliMute will begin muting. The activation point will be stored in memory and recalled each time the power is turned On. The factory setting is IntelliMute Off.

NOTE
IntelliMute may not work with some vehicles because it cannot sense the engine's revs. In such cases, you can reduce unwanted audio alerts by using Auto Mute and City mode when appropriate.
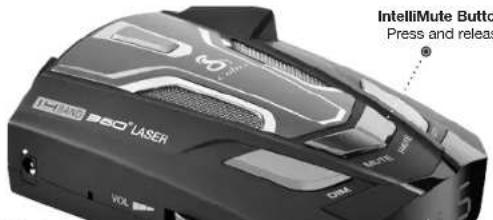
To Turn IntelliMute On
| Press and release the IntelliMute button. | Tone Voice | Visual Display | |
| Two beeps IntelliMute | On Dot appears next | to the large character on the right | |
To Turn IntelliMute Off
| Press and release the IntelliMute button again. | Tone Voice | Visual Display | |
| One beep IntelliMute | Off Dot disappears | ||


Settings
What to Remember While Using IntelliMute
IntelliMute works with both City and Auto Mute modes.
Whenever your engine revs are below the activation point, the dot next to the large character on the right side of the display will remain lit. Above the activation point, the dot will blink twice every two seconds.
Below Activation Point
Above Activation Point

XKKaVS [
If, for any reason, the unit stops sensing your engine's revs, IntelliMute will indicate an error and automatically turn Off.
The rev point you set will be stored in the unit's memory when power is turned Off and recalled each time the power is turned On.

NOTE
The rev point must be reset if you use your detector in a different vehicle.

NOTE
When initially choosing your IntelliMute activation point, a setting of approximately 300 to 600 RPMs above idle is recommended. You can reset the activation point at any time to fit your individual preferences and driving style.
Setting the IntelliMute Activation Point
Your detector must be installed in your vehicle.

CAUTION
Do not attempt to set the rev point while driving. Your vehicle should be parked and idling.
IntelliMute must be turned On before setting the activation point. Depending on whether the unit is in Tone Alert or Voice Alert mode, you will hear a series of beeps or voice messages as you follow the steps on the next page.

English
Settings
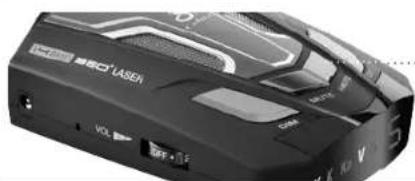
natural_image
Close-up of a black and white LASER motorcycle with visible branding and control buttons (no readable text or symbols)IntelliMute Button Press and release
To Set the IntelliMute Activation Point
| Press and hold the IntelliMute button for two seconds. | Tone | Voice | Visual Display |
| Two beeps Set Engine | Revs None | ||
| Rev your engine to the level you wish to set (recommend slightly above idle) and hold revs steady for two seconds. | None None Three bars will | flash in succession1232-- -- -- | |
| At the desired rev level, press and release the IntelliMute button. | Three beeps | IntelliMute Set | All three bars flash three times1232-- -- -- |

NOTE
If the unit is unable to sense usable pulses within three seconds or if you do not set a rev point within 20 seconds of beginning these steps, IntelliMute will indicate an error and automatically turn Off.
| Tone | Voice | Visual Display |
| Four beeps IntelliMute Error,followed by IntelliMute Off | E appearsX K Ka V S E | |
Nothing Comes Close to a Cobra ^3


Settings
IntelliMute Pro
IntelliMute Pro prevents detection by radar detector detectors (RDDs) such as VG-2, Spectre I and Spectre IV+ when traveling at slower speeds. It is intended for use by experienced users only.
When IntelliMute Pro is turned On, and engine RPMs are below the IntelliMute activation point, your detector's radar detection circuits are turned Off to prevent detection by RDDs.
Before IntelliMute Pro can be turned On, you must have turned On and Set the IntelliMute activation point. (See pages 9 through 11.)

CAUTION
When IntelliMute Pro is On, NO radar signals will be detected and NO alerts will be given at RPMs below the IntelliMute activation point.
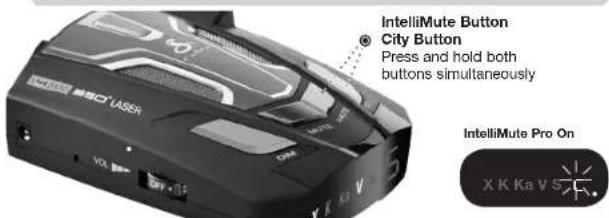
To Turn IntelliMute Pro On
| While no signal is being detected, press and hold both the IntelliMute and City buttons for four seconds. | Tone Voice | Visual Display | |
| Two beeps | IntelliMute Pro On | c or h will blink | |
To Turn IntelliMute Pro Off
| Press and hold both the IntelliMute and City buttons for four seconds. | Tone Voice | Visual Display | |
| One beep | IntelliMute Pro Off | c or h will show steady | |

English

Settings
Voice/Tone Setting
You can set your detector to sound alerts with either a Voice or a Tone. You can change settings by using the Mute button. In Voice Alert mode, you will first hear several tones, then a voice message announcing the type of signal detected, followed by more tones. In Tone Alert mode, you will hear the tones only. The factory setting
To Change From Voice Alert to Tone Alert
| While no signal is being detected, press and hold theMutebutton for two seconds. | Tone Voice | Visual Display | |
| One beepTone Alert | None | ||
To Change From Tone Alert Back to Voice Alert
| While no signal is being detected, press and hold theMute button for two seconds again. | Tone Voice | Visual Display | |
| None Voice Alert None | |||
VG-2 and Spectre I & IV+ Alert Settings
Police use radar detector detectors (RDDs) to spot users of radar detectors. Your detector is able to identify signals from VG-2, Spectre I and Spectre IV+ RDDs and can provide alerts when any of these or similar devices are in use near your vehicle.
Your detector can be spotted by Spectre IV+ RDDs, but is invisible to VG-2 and Spectre I RDDs. You can choose whether you want to be alerted to VG-2 and Spectre I & IV+ RDD signals. The factory setting for VG-2 and Spectre I & IV+ alerts is Off.
To Turn VG-2 and Spectre I & IV+ Alerts On and Off
| While no signal is being detected, press and hold the Dim button for four seconds. | Tone Voice | Visual Display | |
| On = Two Beeps Spectre | VG-2 On | V will blink twice in the display | |
| Off = One Beep | Spectre VG-2 Off | V will blink once in the display | |
Nothing Comes Close to a Cobra ^4


Settings
Radar Alert Settings
The detector allows you to choose whether it will show alerts on the X, K and Ku bands. The factory settings are: X Band and K Band On; Ku Band Off.
To Turn X Band On and Off
| While no signal is being detected, press and hold both the Dim and Mute buttons for four seconds. | Tone Voice | Visual Display | |
| X On = Two beeps | X On | X will blink twice in the display | |
| X Off = One beep | X Off | X will blink once in the display | |
To Turn K Band On and Off
| While no signal is being detected, press and hold both the Mute and City buttons for four seconds. | Tone Voice | Visual Display | |
| K On = Two beeps | K On | K will blink twice in the display | |
| K Off = One beep | K Off | K will blink once in the display | |
To Turn Ku Band* On and Off
| While no signal is being detected, press and hold the City button for four seconds. | Tone Voice | Visual Display | |
| Ku On = Two beeps Ku | On | X and K will blink twice in the display | |
| Ku Off = One beep | Ku Off | X and K will blink once in the display | |
Pop Alert
The Pop Mode Radar Gun is a single-pulse Doppler radar that is a feature of a K and Ka (Bee III Ka radar gun) band Instant-On radar gun. It uses a single, short-time pulse to measure the target vehicle's speed.
The Pop mode receiver senses Pop singles beyond the effective range of Pop radar guns. As the Pop mode receiver is so sensitive, you should limit the use of Pop Detect mode to highway and rural driving.
Pop Alert will alert you to Pop radar signals. During the alert, the unit continues to detect other signals. The factory setting is Pop Detect Off.

English
Settings and Detection
Pop Alert (continued)
| To Turn Pop Alert On and Off | |||
| While no signal is being detected, press and hold both the Dim and City buttons for four seconds. | Tone Voice | Visual Display | |
| Pop On = Two beeps | Pop On | P will blink twice in the display | |
| Pop Off = One beep | Pop Off | P will blink once in the display | |
Detection
The tables on the following pages show you the types of Signals your detector will detect, as well as the voice and visual alerts it provides for each of them.
In Voice Alert mode you will first hear several tones, then a voice message announcing the type of signal detected, followed by more tones. In Tone Alert mode, you will hear the tones only.
In both Voice Alert and Tone Alert modes, a distinctly different alert tone is used for each type of signal detected (including separate tones for each laser signal). For X, K, Ka and Ku band radar signals, the tones will repeat faster as you approach the signal source. The repeat rate of the tones gives you useful information about the signal detected. (See responding to alerts on page 18.)
An indication of the type of signal detected will appear in the UltraBright data Display. During X, K, Ka and Ku alerts, a number will also appear, indicating the strength of the signal detected. (1 = weakest, 5 = strongest)
X Signal Detected

K Signal Detected Ka Signal Detected


Ku Signal Detected



Detection
During pop alerts, the letter P will appear; and during laser alerts, the letter L will appear, instead of the signal strength indication.
POP Signal Detected
X K Ka V S
Laser Signal Detected
X K Ka V S L
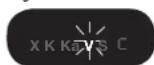
During VG-2 or Spectre I or IV+ alerts, the letter V will appear. It will be steady during VG-2 and blink during Spectre I or IV+.
VG-2 Alert Signal Detected
X K Ka V S C
Spectre I or IV+ Alert Signal Detected
X K Ka V S C
During Safety Alert, the letter S will appear.
Safety Alert Signal Detected
X K Ka V S C
Radar Signals, Voice and Visual Displays
| Type of Signal Voice | Visual Display | |
| X Band Radar | X Alert | X and Signal Strength |
| K Band Radar | K Alert | K and Signal Strength |
| Ka Band Radar | Ka Alert | Ka and Signal Strength |
| Ku Band Radar | Ku Alert | X K and Signal Strength |
| Pop Radar Mode | Pop Alert | P is Steady |
X Signal Detected
K Signal Detected
Ka Signal Detected
Ku Signal Detected




POP Alert Signal Detected


English

Detection
Laser Signals, Voice and Visual Displays
| Type of Signal | Voice | Visual Display |
| LTI 20-20* | Laser | L is Steady |
| LTI Laser* | Laser | L is Steady |
| Kustom Signals Laser 340* | Laser | L is Steady |
| Kustom Signals Laser* | Laser | L is Steady |
| Stalker LIDAR* | Laser | L is Steady |
| Laser Atlanta SpeedLaser/Kustom Signals-ProLaser II* | Laser | L is Steady |
* Your detector provides 360° detection of these signals.
Laser Signal Detected


NOTE
Beep rate changes with different laser alerts.
Safety Alert Signals, Voice and Visual Displays
| Type of Signal Voice Visual Display | ||
| Emergency Vehicles | Emergency Vehicle Approaching | S is Steady |
| Road Hazards | Road Hazard Ahead | S is Steady |
| Trains Train Approaching S is Steady | ||
Safety Alert Signal Detected


NOTE
There are different tones for each Safety Alert.
VG-2 and Spectre I or IV+ Alert Signals, Voice and Visual Displays
| Type of Signal Voice Visual Display | ||
| Interceptor VG-2 | VG-2 Alert | V is Steady |
| Spectre I or IV+ | Spectre Alert | V Blinks |
VG-2 Alert Signal Detected

Spectre I or IV+ Alert Signal Detected

NOTE
There are different tones for each alert
Nothing Comes Close to a Cobra ^3


Detection
Instant-On Detection
Your detector is designed to detect Instant-On speed monitoring signals, which can suddenly appear at full strength.

NOTE
You should take appropriate action immediately whenever an instant-on alert is given.
| Description Interpretation | Recommended Response | |
| Tone repeats slowly at first, then speeds up rapidly. | Probably police radar. FULL | ALERT |
| Tone sounds one time only. | Probably a false alarm, but possibly pulsed radar, VG-2, or Spectre I or IV+ nearby. | Exercise caution |
| Tone instantly begins repeating rapidly. | Radar, VG-2 or Spectre I or IV+ nearby has been activated suddenly. | FULL ALERT |
| Tone repeats slowly as you approach a hill or bridge, then speeds up sharply as you reach it. | Probably police radar beyond the hill or bridge. | FULL ALERT |
| Tone repeats slowly for a short period. | Probably a false alarm. Exercise | caution |
| Any type of laser alert. Laser alerts are never false alarms. | FULL ALERT | |
| Any Safety Alert. | You are nearing an emergency vehicle, railroad crossing, or road hazard (construction, accident, etc.). | Exercise caution |

English
Understanding Radar and Laser
Understanding Radar and Laser
Radar Speed Monitoring Systems
Three band frequencies have been approved by the Federal Communications Commission (FCC) for use by speed monitoring radar equipment:
X band 10.525 GHz
K band 24.150 GHz
Ka band 33.400 – 36.00 GHz
Your detector detects signals in all three radar bands, plus Ku band (13.435 GHz), which is an approved frequency used in parts of Europe and Asia.
VG-2 and Spectre I & IV+
VG-2 and Spectre I & IV+ are radar detector detectors (RDDs) that work by detecting low-level signals emitted by most radar detectors. Your detector does not emit signals that can be spotted by VG-2 and Spectre I RDDs. However, your detector can be spotted by Spectre IV+ RDDs. Your unit detects signals from these or similar devices and will alert you when such a device is in use near your vehicle.
Safety Alert Traffic Warning System

FCC-approved Safety Alert transmitters emit microwave radar signals that indicate the presence of a safety-related concern. Depending on the frequency of the signal emitted, it can indicate a speeding emergency vehicle or train, or a stationary road hazard.
Because these microwave signals are within the K band frequency, most conventional radar detectors will detect Safety Alert signals as standard K band radar. Your detector, however, is designed to differentiate between standard K band and Safety Alert signals, and give separate alerts for each.
Safety Alert technology is relatively new. Safety Alert transmitters can be found in limited numbers in all 50 states, but the number is growing. Depending on your location, you may not receive these alerts regularly and may often encounter emergency vehicles, trains and road hazards without being alerted. As the number of transmitters increases, these alerts will become more common.
When you receive such an alert, please watch for emergency vehicles ahead of you, on cross streets and behind you. If you see an emergency vehicle approaching, please pull over to the right side of the road and allow it to pass.
Nothing Comes Close to a Cobra ^1


Understanding Radar and Laser and Maintenance
LIDAR (Laser)
The correct name for the technology that most people refer to as laser is actually LIDAR, which stands for Light Detection and Ranging. LIDAR operates much like radar. Its signal spreads out like a radar signal, though not as widely. Unlike radar, LIDAR must have a clear line of sight to its target vehicle throughout the entire measurement interval. Obstructions such as sign posts, utility poles, tree branches, etc., will prevent valid speed measurement.
Some common questions about LIDAR include:
■ Does weather have any affect on LIDAR?
Yes. Rain, snow, smoke, fog or airborne dust particles will reduce the effective range of LIDAR and can, if dense enough, prevent its operation.
■ Can LIDAR operate through glass?
Yes. Newer LIDAR guns can obtain readings through most types of glass. However, the laser pulse also can be received through glass to trigger an alarm by your detector.
■ Can LIDAR operate while in motion?
No. Because LIDAR operates by line of sight, the person using it cannot drive the vehicle, aim and operate the gun all at the same time.
■ Is LIDAR legal to use?
Yes. It is legal in all 50 states.
Maintenance
Maintenance of Your Radar Detector
Your detector is designed and built to give you years of trouble-free performance without the need for service. No routine Maintenance is required. If your unit does not appear to be operating properly, please follow these troubleshooting steps:
■ Make sure the power cord is properly connected.
■ Make sure the socket of your vehicle's cigarette lighter is clean and free of corrosion.
■ Make sure the power cord's cigarette lighter adapter is firmly seated in your cigarette lighter.
- Check the power cord fuse. (Unscrew the ribbed end cap of the cigarette lighter adapter and examine the fuse. If required, replace it with a 2-amp fuse only.)

English
Your DetectorYour D
Specifications
Band and Frequencies
| PS | |
| X Band 10.525 ± 0.050 GHz | |
| K Band 24.125 ± 0.125 GHz | |
| Ka Band 34.700 ± 1.300 GHz | |
| Ku Band 13.435 ± 0.035 GHz | |
| VG-2 11.500 ± 0.250 GHz | |
| Laser 910 ± 50nm 100 PPS | |
| 910 ± 50nm 125 PPS | |
| 910 ± 50nm 130 PPS | |
| 910 ± 50nm 200 PPS | |
| 910 ± 50nm 238 PPS | |
| 910 ± 50nm 340 PPS | |
| Spectre I 13.300 ± 0.200 GHz | |
| Spectre IV/IV+ Not Disclosed | |
| Safety Alert 24.070 ± 0.010 GHz | |
| Traffic Warning | 24.110 ± 0.010 GHz |
| System | 24.190 ± 0.010 GHz |
| 24.230 ± 0.010 GHz | |
This radar detector is covered by one or more of the following U.S. patents: 5,497,148; 5,594,432; 5,612,685; 6,078,279; 6,094,148. Additional patents may be listed inside the product or pending.


Warranty
Warranty
Limited 1-Year Warranty
For Products Purchased in the U.S.A.
Cobra Electronics Corporation warrants that its Cobra Radar/Laser Detectors, and the component parts thereof, will be free of defects in workmanship and materials for a period of one year from the date of first consumer purchase. This warranty may be enforced by the first consumer purchaser, provided that the product is utilized within the U.S.A.
Cobra will, without charge, repair or replace, at its option, de fec tive Radar/Laser Detectors, products or component parts upon delivery to the Cobra Factory Service Department, accompanied by proof of the date of first consumer purchase, such as a duplicated copy of a sales receipt.
You must pay any initial shipping charges required to ship the product for warranty service, but the return charges will be at Cobra's expense, if the product is repaired or replaced under warranty.
This warranty gives you specific rights, and you may also have other rights which vary from state to state.
Exclusions: This limited warranty does not apply:
- To any product damaged by accident.
- In the event of misuse or abuse of the product or as a result of un au tho rized alterations or repairs.
- If the serial number has been altered, defaced or removed.
- If the owner of the product resides outside the U.S.A.
All implied warranties, including warranties of merchantability and fitness for a particular purpose are limited in duration to the length of this warranty.
Cobra shall not be liable for any incidental, consequential or other damages; including, without limitation, damages resulting from loss of use or cost of in stal la tion.
Some states do not allow limitations on how long an implied warranty lasts and/or do not allow the exclusion or limitation of incidental or consequential damages, so the above limitations may not apply to you.

Product Service
Product Service
For any questions about operating or installing this new Cobra product, or if parts are missing...PLEASE CALL COBRA FIRST...do not return this product to the store. See customer assistance on page A1.
If this product should require factory service, please call Cobra first at 773-889-3087 BEFORE sending the product. This will ensure the fastest turnaround time on any repair.
If Cobra asks that the product be sent to its factory, the following must be furnished to have the product serviced and returned:
- Send the complete unit, including power cord. (It is not necessary to include the mounting bracket.)
- For warranty repair, enclose some form of proof-of-purchase, such as a photocopy or carbon copy of a sales receipt. If you send the original receipt, it cannot be returned.
- Enclose a typed or clearly written description of the problem you are having with your unit, plus the name and address where you want the unit returned.
- Pack the unit securely to prevent damage during transit. If possible, use the original packing materials.
- Ship prepaid and insured using a traceable carrier such as United Parcel Service (UPS), Federal Express or Insured Priority mail with delivery confirmation. Ship to: Cobra Factory Service, Cobra Electronics Corporation, 6500 West Cortland Street, Chicago, IL 60707 U.S.A.
- Please allow three to four weeks before contacting us about the status of your service. Call 773-889-3087 for assistance. If your unit is under warranty, it will either be repaired or replaced upon receipt, depending on the model. If your unit is out of warranty, you will receive a letter informing you of the repair or replacement charge.

English

Optional Accessories
You can find quality Cobra products and accessories at your local Cobra dealer, or in the U.S.A., you can order directly from Cobra. See ordering info on page 25.
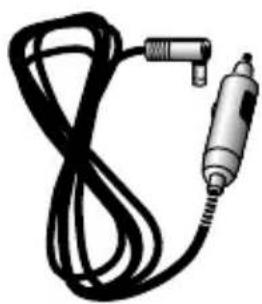
natural_image
Illustration of a handheld electric shaver with coiled cable and connector (no text or symbols)Straight 12V DC Power Cord
Includes plug and fuse
Item # 420-030-N-001

natural_image
Cartoon character with a smiling face and hat, no text or symbols presentWindshield Mounting Bracket
Includes suction cups
Item # 545-159-N-001
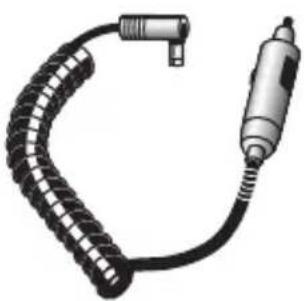
natural_image
Illustration of a coiled cable with a handheld probe (no text or symbols)Coiled 12V DC Power Cord
Includes plug and fuse
Item # 420-026-N-001
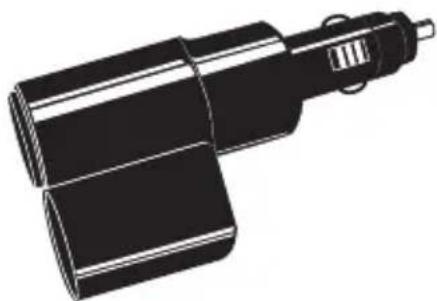
natural_image
Illustration of a mechanical component with no visible text or symbolsDual Port Power Adapter
Includes adjustable plug
(up to 90°) and fuse
Item # CLP-2B
- Important Information and Customer Assistance
- Important Information
- Customer Assistance
- Controls, Indicators and Connections
- Display and Product Features
- Introduction
- Your Detector
- Warranty
- Installation
- Where to Mount Your Unit
- Dashboard Mounting
- Getting Started
- NOTE
- Auxiliary Audio Jack
- Settings
- Highway/City Mode
- UltraBright Data Display Brightness
- Muting an Alert
- Auto Mute Mode
- IntelliMute
- What to Remember While Using IntelliMute
- Setting the IntelliMute Activation Point
- CAUTION
- IntelliMute Pro
- Voice/Tone Setting
- VG-2 and Spectre I & IV+ Alert Settings
- Radar Alert Settings
- Pop Alert
- Settings and Detection
- Detection
- Instant-On Detection
- Understanding Radar and Laser
- Radar Speed Monitoring Systems
- VG-2 and Spectre I & IV+
- Safety Alert Traffic Warning System
- Understanding Radar and Laser and Maintenance
- LIDAR (Laser)
- Some common questions about LIDAR include:
- Maintenance
- Maintenance of Your Radar Detector
- Specifications
- Limited 1-Year Warranty
- For Products Purchased in the U.S.A.
- Exclusions: This limited warranty does not apply:
- Product Service
- Optional Accessories
Brand : COBRA
Model : SPX 5400
Category : Gps